1、准备环境
ip 角色 系统 主机名 cpu mem
192.168.40.129 master centos7.9 k8smaster 4 8
192.168.40.130 node1 centos7.9 k8snode1 4 8
192.168.40.131 node2 centos7.9 k8snode2 4 8
192.168.40.132 node3 centos7.9 k8snode3 4 8
重要:首先将各主机ip配置为静态、主机名修改、时间同步 等
curl -o /etc/yum.repos.d/CentOS-Base.repo https://mirrors.aliyun.com/repo/Centos-7.repo
yum install -y conntrack ntpdate ntp ipvsadm ipset jq iptables curl sysstat libseccomp wget vim net-tools git
systemctl stop firewalld && systemctl disable firewalld
yum -y install iptables-services && systemctl start iptables && systemctl enable iptables && iptables -F && iptables-save > /etc/sysconfig/iptables
swapoff -a && sed -ri 's/.*swap.*/#&/' /etc/fstab
setenforce 0 && sed -i 's/enforcing/disabled/' /etc/selinux/config
127.0.0.1 localhost localhost.localdomain localhost4 localhost4.localdomain4
::1 localhost localhost.localdomain localhost6 localhost6.localdomain6
timedatectl set-timezone Asia/Shanghai
timedatectl set-local-rtc 0
systemctl restart rsyslog
systemctl stop postfix && systemctl disable postfix
docker (所有节点)参考:《【CentOS7】Linux安装Docker教程(保姆篇)_linux centos7 安装docker-CSDN博客 》
cat > /etc/docker/daemon.json <<EOF
"exec-opts": ["native.cgroupdriver=systemd"],
"registry-mirrors": ["https://exsnkv91.mirror.aliyuncs.com"],
"insecure-registries":["192.168.40.129:5000"]
配置cri-docker使kubernetes 以docker作为运行时 自 1.24 版起,Dockershim 已从 Kubernetes 项目中移除。因为历史问题docker却不支持kubernetes主推的CRI(容器运行时接口)标准,所以docker不能再作为kubernetes的容器运行时了,即从kubernetesv1.24开始不再使用docker了。 但是如果想继续使用docker的话,可以在kubelet和docker之间加上一个中间层cri-docker。cri-docker是一个支持CRI标准的shim(垫片)。一头通过CRI跟kubelet交互,另一头跟docker api交互,从而间接的实现了kubernetes以docker作为容器运行时。
到下面的链接下载最新版cri-docker
https://github.com/Mirantis/cri-dockerd/tags
tar zxf cri-dockerd-0.2.1.amd64.tgz
cp cri-dockerd/cri-dockerd /usr/bin/
解压后,将文件复制到每个节点对应的目录
scp /usr/bin/cri-dockerd 192.168.40.130:/usr/bin/
scp /usr/bin/cri-dockerd 192.168.40.131:/usr/bin/
scp /usr/bin/cri-dockerd 192.168.40.132:/usr/bin/
创建cri-docker启动文件 启动文件从下面链接找到。
https://github.com/Mirantis/cri-dockerd/tree/master/packaging/systemd
这里/usr/bin/cri-dockerd一定要加上参数 ,如下
vi /usr/lib/systemd/system/cri-docker.service
Description=CRI Interface for Docker Application Container Engine
Documentation=https://docs.mirantis.com
After=network-online.target firewalld.service docker.service
Wants=network-online.target
Requires=cri-docker.socket
ExecStart=/usr/bin/cri-dockerd --network-plugin=cni --pod-infra-container-image=registry.aliyuncs.com/google_containers/pause:3.9
ExecReload=/bin/kill -s HUP $MAINPID
WantedBy=multi-user.target
创建启动文件 文件内容
/usr/lib/systemd/system/cri-docker.socket
vi /usr/lib/systemd/system/cri-docker.socket
Description=CRI Docker Socket for the API
PartOf=cri-docker.service
ListenStream=%t/cri-dockerd.sock
同步到每个节点
scp /usr/lib/systemd/system/cri-docker.service /usr/lib/systemd/system/cri-docker.socket root@192.168.40.130:/usr/lib/systemd/system/
scp /usr/lib/systemd/system/cri-docker.service /usr/lib/systemd/system/cri-docker.socket root@192.168.40.131:/usr/lib/systemd/system/
scp /usr/lib/systemd/system/cri-docker.service /usr/lib/systemd/system/cri-docker.socket root@192.168.40.132:/usr/lib/systemd/system/
scp /usr/lib/systemd/system/cri-docker.socket/usr/lib/systemd/system/cri-docker.socket root@192.168.40.130:/usr/lib/systemd/system/
scp /usr/lib/systemd/system/cri-docker.socket/usr/lib/systemd/system/cri-docker.socket root@192.168.40.131:/usr/lib/systemd/system/
scp /usr/lib/systemd/system/cri-docker.socket/usr/lib/systemd/system/cri-docker.socket root@192.168.40.132:/usr/lib/systemd/system/
启动cri-docker并设置开机自动启动
systemctl daemon-reload ; systemctl enable cri-docker --now
systemctl is-active cri-docker
cat <<EOF > /etc/yum.repos.d/kubernetes.repo
baseurl=https://mirrors.aliyun.com/kubernetes/yum/repos/kubernetes-el7-x86_64/
gpgkey=https://mirrors.aliyun.com/kubernetes/yum/doc/yum-key.gpg https://mirrors.aliyun.com/kubernetes/yum/doc/rpm-package-key.gpg
yum list kubeadm --showduplicates | sort -r
yum install -y kubelet-1.28.2-0 kubeadm-1.28.2-0 kubectl-1.28.2-0
systemctl enable --now kubelet.servicekubeadm init --image-repository registry.aliyuncs.com/google_containers --apiserver-advertise-address=192.168.40.129 --kubernetes-version=v1.28.2 --service-cidr=10.96.0.0/12 --pod-network-cidr=10.244.0.0/16 --upload-certs --cri-socket /var/run/cri-dockerd.sock注意:其中 --apiserver-advertise-address=192.168.40.129 是根据你自己的master节点定。
按照提示创建kubeconfig文件
cp -i /etc/kubernetes/admin.conf $HOME /.kube/config
chown $(id -u):$(id -g) $HOME /.kube/config
下载flannel的yml文件并创建,这里flannel.yml文件里镜像拉取地址为外网地址,构建pod时会拉取超时,这里单独下载了镜像上传到了阿里云ACR上,需要修改yml文件里的image 地址。
wget https://github.com/flannel-io/flannel/releases/download/v0.24.3/kube-flannel.yml
sed -i '/ image:/s#docker.io/flannel#registry.cn-hangzhou.aliyuncs.com/luoyuxin#' kube-flannel.yml
构建flannel
kubectl create -f kube-flannel.yml
kubectl get pod -n kube-flannel
可根据提示加入其他node,在node节点上执行下面语句,注意后面加上 --cri-socket /var/run/cri-dockerd.sock 参数
kubeadm join 192.168.40.129:6443 --cri-socket /var/run/cri-dockerd.sock --token pr06h4.9uqcgg6aoej4uq4k \
--discovery-token-ca-cert-hash sha256:2b4b622220812a7230b96c600ba595640eee991f47e64c5c11e20e71fe195f6e
检查子节点是否已加入
kubectl get nodes
这种是命令刚执行,节点加入还在执行中,等30秒钟再看
kubectl get nodes -o wide
K8s安装部署(v1.28)--超详细(cri-docker作为运行时)_安装cri-docker-CSDN博客
1、Kubernetes 网络模型和CNI插件
在Kubernetes中设计了一种网络模型 ,要求无论容器运行在集群中的哪个节点,所有容器都能通过一个扁平的网络平面进行通信,即在同一IP网络中。需要注意的是:在K8S集群中,IP地址分配是以Pod对象为单位,而非容器,同一Pod内的所有容器共享同一网络名称空间。
了解Docker 的友友们都应该清楚,Docker容器的原生网络模型主要有4种:Host(主机)、Container 、Bridge(桥接)、none。
host模式:容器和宿主机共享Network namespace。
container模式:容器和另外一个容器共享Network namespace。 kubernetes中的pod就是多个容器共享一个Network namespace。
none模式:容器有独立的Network namespace,但并没有对其进行任何网络设置,如分配veth pair 和网桥连接,配置IP等。
bridge模式:(默认为该模式)
[root@localhost ~ ]# docker run -it --network=模式名 镜像名
例:使用nginx镜像启动一个容器,网络模型为host
[root@localhost ~ ]# docker run -it --network=host nginx
host模式
如果启动容器的时候使用host模式,那么这个容器将不会获得一个独立的Network Namespace,而是和宿主机共用一个Network Namespace。容器将不会虚拟出自己的网卡,配置自己的IP等,而是使用宿主机的IP和端口。但是,容器的其他方面,如文件系统、进程列表等还是和宿主机隔离的。
使用host模式的容器可以直接使用宿主机的IP地址与外界通信,容器内部的服务端口也可以使用宿主机的端口,不需要进行NAT,host最大的优势就是网络性能 比较好,但是docker host上已经使用的端口就不能再用了,网络的隔离性不好。
Host模式如下图所示:
container模式
这个模式指定新创建的容器和已经存在的一个容器共享一个 Network Namespace,而不是和宿主机共享。新创建的容器不会创建自己的网卡,配置自己的 IP,而是和一个指定的容器共享 IP、端口范围等。同样,两个容器除了网络方面,其他的如文件系统、进程列表等还是隔离的。两个容器的进程可以通过 lo 网卡设备通信。
Container模式示意图:
none模式
使用none模式,Docker容器拥有自己的Network Namespace,但是,并不为Docker容器进行任何网络配置。也就是说,这个Docker容器没有网卡、IP、路由等信息。需要我们自己为Docker容器添加网卡、配置IP等。
这种网络模式下容器只有lo回环网络,没有其他网卡。none模式可以在容器创建时通过--network=none来指定。这种类型的网络没有办法联网,封闭的网络能很好的保证容器的安全性。
None模式示意图:
bridge模式
当Docker进程启动时,会在主机上创建一个名为docker0的虚拟网桥,此主机上启动的Docker容器会连接到这个虚拟网桥上。虚拟网桥的工作方式和物理交换机类似,这样主机上的所有容器就通过交换机连在了一个二层网络中。
从docker0子网中分配一个IP给容器使用,并设置docker0的IP地址为容器的默认网关。在主机上创建一对虚拟网卡veth pair设备,Docker将veth pair设备的一端放在新创建的容器中,并命名为eth0(容器的网卡),另一端放在主机中,以vethxxx这样类似的名字命名,并将这个网络设备加入到docker0网桥中。可以通过brctl show命令查看。
bridge模式是docker的默认网络模式,不写--net参数,就是bridge模式。使用docker run -p时,docker实际是在iptables做了DNAT规则,实现端口转发功能。可以使用iptables -t nat -vnL查看。
bridge模式如下图所示:
我们知道的是,在K8S上的网络通信包含以下几类:
容器间的通信:同一个Pod内的多个容器间的通信,它们之间通过lo网卡进行通信
Pod之间的通信:通过Pod IP地址进行通信
Pod和Service之间的通信:Pod IP地址和Service IP进行通信,两者并不属于同一网络,实现方式是通过IPVS或iptables规则转发
Service和集群外部客户端的通信,实现方式:Ingress、NodePort、Loadbalance
k8s网络实现不是集群内部自己实现,而是依赖于第三方网络插件---(CNI:Container Network Interface)。
flannel、calico、canel等是目前比较流行的第三方网络插件。这三种的网络插件需要实现Pod网络方案的方式通常有以下几种:虚拟网桥、多路复用(MacVLAN)、硬件交换(SR-IOV)
无论是上面的哪种方式在容器当中实现,都需要大量的操作步骤,而K8S支持CNI插件进行编排网络,以实现Pod和集群网络管理功能的自动化。每次Pod被初始化或删除,kubelet都会调用默认的CNI插件去创建一个虚拟设备接口附加到相关的底层网络,为Pod去配置IP地址、路由信息并映射到Pod对象的网络名称空间。
CNI的主要核心是:在创建容器时,先创建好网络名称空间(netns),然后调用CNI插件为这个netns配置网络,最后在启动容器内的进程。
Flannel是一种基于overlay网络的跨主机容器网络解决方案,也就是将TCP 数据包封装在另一种网络包里面进行路由转发和通信。
工作原理
Flannel会为k8s集群中每个node 端的host分配一个网段,Pod从这个网段中分配IP,这些IP可以在host间路由,Pod间无需使用nat和端口映射即可实现跨主机通信。如host1被分配的网段为172.17.1.0/16,host2被分配的网段为172.17.2.0/16。已分配 的subnet、host的IP等网络配置会被存放在ETCD中。
Flannel数据包在主机间转发是由backend实现的,目前已经支持UDP、VxLAN、host-gw等多种backend。
VxLAN:使用内核中的VxLAN模块进行封装报文。也是flannel推荐的方式
host-gw:即Host GateWay,通过在节点上创建目标容器地址的路由直接完成报文转发,要求各节点必须在同一个2层网络,对报文转发性能要求较高的场景使用
UDP:使用普通的UDP报文封装完成隧道转发
VxLAN(Virtual extensible Local Area Network)虚拟可扩展局域网,采用MAC in UDP封装方式,具体的实现方式为:
1、将虚拟网络的数据帧添加到VxLAN首部,封装在物理网络的UDP报文中
2、以传统网络的通信方式传送该UDP报文
3、到达目的主机后,去掉物理网络报文的头部信息以及VxLAN首部,并交付给目的终端
跨节点的Pod之间的通信就是以上的一个过程,整个过程中通信双方对物理网络是没有感知的。如下网络图:
VxLAN模式配置:
[root@master ~] # etcdctl set /atomic.io/network/config '{"Network" : "172.17.0.0/16" , "SubnetLen" : 24 , "SubnetMin" : "172.17.1.0" ,"SubnetMax" : "172.17.20.0" , "Backend" : {"Type" : "vxlan" }}'
#SubnetLen:用于指定分配给单个宿主机的docker0的ip段的子网掩码的长度
#SubnetMin:用于指定最小能够分配的ip段
#SudbnetMax:用于指定最大能够分配的ip段,在上面的示例中,表示每个宿主机可以分配一个24位掩码长度的子网,可以分配的子网从10.0.1.0/24到10.0.20.0/24,也就意味着在这个网段中,最多只能有20台宿主机
#Backend:用于指定数据包以什么方式转发,默认为udp模式,host-gw模式性能最好,但不能跨宿主机网络
由于VXLAN由于额外的封包解包,导致其性能较差,所以Flannel就有了host-gw模式,即把宿主机当作网关,除了本地路由之外没有额外开销,性能和calico差不多,由于没有叠加来实现报文转发,这样会导致路由表庞大。因为一个节点对应一个网络,也就对应一条路由条目。
host-gw虽然VXLAN网络性能要强很多。,但是种方式有个缺陷:要求各物理节点必须在同一个二层网络中。物理节点必须在同一网段中。这样会使得一个网段中的主机量会非常多,万一发一个广播报文就会产生干扰。在私有云场景下,宿主机不在同一网段是很常见的状态,所以就不能使用host-gw了。
VXLAN还有另外一种功能,VXLAN也支持类似host-gw的玩法,如果两个节点在同一网段时使用host-gw通信,如果不在同一网段中,即 当前pod所在节点与目标pod所在节点中间有路由器,就使用VXLAN这种方式,使用叠加网络。 结合了Host-gw和VXLAN,这就是VXLAN的Direct routing模式
Direct routing模式配置
[root@master ~ ] # etcdctl set / atomic.io/ network/ config '{"Network" : "172.17.0.0/16" , "SubnetLen" : 24 , "SubnetMin" : "172.17.1.0" ,"SubnetMax" : "172.17.20.0" , "Backend" : {"Type" : "vxlan" ,"Directrouting" :true }}'
Flannel除了上面2种数据传输的方式以外,还有一种是host-gw的方式,host-gw后端是通过添加必要的路由信息使用节点的二层网络直接发送Pod的通信报文。它的工作方式类似于Directrouting的功能,但是其并不具备VxLan的隧道转发能力。
工作模式流程图如下:
Host-gw模式配置
[root@master ~ ] # etcdctl set / atomic.io/ network/ config '{"Network" : "172.17.0.0/16" , "SubnetLen" : 24 , "SubnetMin" : "172.17.1.0" ,"SubnetMax" : "172.17.20.0" , "Backend" : {"Type" : "host-gw" }}'
网络策略(Network Policy )是 Kubernetes 的一种资源。Network Policy 通过 Label 选择 Pod,并指定其他 Pod 或外界如何与这些 Pod 通信。
Pod的网络流量包含流入(Ingress)和流出(Egress)两种方向。默认情况下,所有 Pod 是非隔离的,即任何来源的网络流量都能够访问 Pod,没有任何限制。当为 Pod 定义了 Network Policy,只有 Policy 允许的流量才能访问 Pod。
Kubernetes的网络策略功能也是由第三方的网络插件实现的,因此,只有支持网络策略功能的网络插件才能进行配置网络策略,比如Calico、Canal、kube-router 等等。
PS:Kubernetes自1.8版本才支持Egress网络策略,在该版本之前仅支持Ingress网络策略。
Calico可以独立地为Kubernetes提供网络解决方案和网络策略,也可以和flannel相结合,由flannel提供网络解决方案,Calico仅用于提供网络策略,此时将Calico称为Canal。结合flannel工作时,Calico提供的默认配置清单式以flannel默认使用的10.244.0.0/16为Pod网络,因此在集群中kube-controller-manager启动时就需要通过--cluster-cidr选项进行设置使用该网络地址,并且---allocate-node-cidrs的值应设置为true。
[root@master ~]# kubectl apply -f https:/ / docs.projectcalico.org/ v3.2 / getting-started/ kubernetes/ installation/ hosted/ canal/ rbac.yaml
[root@master ~]# kubectl apply -f https:/ / docs.projectcalico.org/ v3.2 / getting-started/ kubernetes/ installation/ hosted/ canal/ canal.yaml
[root@k8 s-master ~]# kubectl get ds canal -n kube-system
NAME DESIRED CURRENT READY UP-TO-DATE AVAILABLE NODE SELECTOR AGE
canal 3 3 0 3 0 beta.kubernetes.io/ os= linux 2 m
部署canal需要的镜像,建议先拉取镜像,避免耗死资源:
quay.io/ calico/ node:v3.2.6
quay.io/ calico/ cni:v3.2.6
quay.io/ coreos/ flannel:v0.9.1
[root@master ~]# kubectl get pods -n kube-system -o wide |grep canal
canal-2 hqwt 3 / 3 Running 0 1 h 192.168.56.11 k8 s-master
canal-c5 pxr 3 / 3 Running 0 1 h 192.168.56.13 k8 s-node02
canal-kr662 3 / 3 Running 6 1 h 192.168.56.12 k8 s-node01
** ** ** ** ** ** ** ** ** ** ** ** ** ** ** ** ** ** ** ** ** ** ** ** ** ** ** ** ** ** ** ** ** ** ** ** ** ** ** ** ** ** ** ** ** ** ** ** ** ** *
Canal作为DaemonSet部署到每个节点,属于kube-system这个名称空间。
需要注意的是,Canal只是直接使用了Calico和flannel项目,代码本身没有修改,Canal只是一种部署的模式,用于安装和配置项目。
** ** ** ** ** ** ** ** ** ** ** ** ** ** ** ** ** ** ** ** ** ** ** ** ** ** ** ** ** ** ** ** ** ** ** ** ** ** ** ** ** ** ** ** ** ** ** ** ** ** *
在Kubernetes系统中,报文的流入和流出的核心组件 是Pod资源,它们也是网络策略功能的主要应用对象。NetworkPolicy对象通过podSelector选择 一组Pod资源作为控制对象。NetworkPolicy是定义在一组Pod资源之上用于管理入站流量,或出站流量的一组规则,有可以是出入站规则一起生效,规则的生效模式通常由spec.policyTypes进行 定义。如下图:
默认情况下,Pod对象的流量控制是为空的,报文可以自由出入。在附加网络策略之后,Pod对象会因为NetworkPolicy而被隔离,一旦名称空间中有任何NetworkPolicy对象匹配了某特定的Pod对象,则该Pod将拒绝NetworkPolicy规则中不允许的所有连接请求,但是那些未被匹配到的Pod对象依旧可以接受所有流量。
就特定的Pod集合来说,入站和出站流量默认是放行状态,除非有规则可以进行匹配。还有一点需要注意的是,在spec.policyTypes中指定了生效的规则类型,但是在networkpolicy.spec字段中嵌套定义了没有任何规则的Ingress或Egress时,则表示拒绝入站或出站的一切流量。定义网络策略的基本格式如下:
apiVersion: networking.k8 s.io/ v1 #定义API版本
kind: NetworkPolicy #定义资源类型
name: allow-myapp-ingress #定义NetwokPolicy的名字
podSelector: #匹配拥有标签app:myapp的Pod资源
policyTypes ["Ingress" ] #NetworkPolicy类型,可以是Ingress,Egress,或者两者共存
- podSelector: #选定当前default 名称空间,标签为app:myapp可以入站
** ** ** ** ** ** ** ** ** ** ** ** ** ** ** ** ** ** ** ** ** ** ** ** ** ** ** ** ** ** ** ** ** ** ** ** ** ** ** ** ** ** ** ** ** ** ** ** ** ** *
该网络策略就是将default 名称空间中拥有标签"app=myapp" 的Pod资源开放80 / TCP端口给10.244.0.0 / 16 网段,
并排除10.244.3.0 / 24 网段的访问,并且也开放给标签为app= myapp的所有Pod资源进行访问。
** ** ** ** ** ** ** ** ** ** ** ** ** ** ** ** ** ** ** ** ** ** ** ** ** ** ** ** ** ** ** ** ** ** ** ** ** ** ** ** ** ** ** ** ** ** ** ** ** ** **
为了看出Network Policy的效果,先部署一个httpd的应用。配置清单文件如下:
[root@master ~]# mkdir network-policy-demo
[root@master ~]# cd network-policy-demo/
[root@master network-policy-demo]# vim httpd.yaml
imagePullPolicy: IfNotPresent
创建三个副本,通过NodePort类型的Service对外方服务,部署应用:
[root@master network-policy-demo]# kubectl apply -f httpd.yaml
deployment.apps/ httpd unchanged
service/ httpd-svc created
[root@master network-policy-demo]# kubectl get pods -o wide |grep httpd
httpd-75 f655479 d-882 hz 1 / 1 Running 0 4 m 10.244.0.2 k8 s-master
httpd-75 f655479 d-h7 lrr 1 / 1 Running 0 4 m 10.244.2.2 k8 s-node02
httpd-75 f655479 d-kzr5 g 1 / 1 Running 0 4 m 10.244.1.2 k8 s-node01
[root@master network-policy-demo]# kubectl get svc httpd-svc
NAME TYPE CLUSTER-IP EXTERNAL-IP PORT(S) AGE
httpd-svc NodePort 10.99.222.179 < none> 8080 :30000 / TCP 4 m
当前没有定义任何Network Policy,验证应用的访问:
#启动一个busybox Pod,可以访问Service,也可以ping副本的Pod
[root@master ~]# kubectl run busybox --rm -it --image=busybox /bin/sh
If you don't see a command prompt, try pressing enter.
Connecting to httpd-svc:8080 (10.99.222.179:8080)
index.html 100% |**** **** **** **** **** **** **** **** **** **** **** **** **** **** **** **** **** **** **** **** **** **** **** *| 45 0:00:00 ETA
PING 10.244.1.2 (10.244.1.2): 56 data bytes
64 bytes from 10.244.1.2: seq=0 ttl=63 time=0.507 ms
64 bytes from 10.244.1.2: seq=1 ttl=63 time=0.228 ms
--- 10.244.1.2 ping statistics ---
2 packets transmitted, 2 packets received, 0% packet loss
round-trip min/avg/max = 0.228/0.367/0.507 ms
#集群节点也可以访问Sevice和ping通副本Pod
[root@node01 ~]# curl 10.99.222.179:8080
<html > <body > <h1 > </h1 > </body > </html >
[root@k8s-node01 ~]# ping -c 2 10.244.2.2
PING 10.244.2.2 (10.244.2.2) 56(84) bytes of data.
64 bytes from 10.244.2.2: icmp_seq=1 ttl=63 time=0.931 ms
64 bytes from 10.244.2.2: icmp_seq=2 ttl=63 time=0.812 ms
--- 10.244.2.2 ping statistics ---
2 packets transmitted, 2 received, 0% packet loss, time 1001ms
rtt min/avg/max/mdev = 0.812/0.871/0.931/0.066 ms
#集群外部访问192.168.56.11:30000也是通的
[root@localhost ~]# curl 192.168.56.11:30000
<html > <body > <h1 > </h1 > </body > </html >
那么下面再去设置不同的Network Policy来管控Pod的访问。
NetworkPolicy资源属于名称空间级别,它的作用范围为其所属的名称空间。
用户可以创建一个NetworkPolicy来为名称空间设置一个默认的隔离策略,该策略选择所有的Pod对象,然后允许或拒绝任何到达这些Pod的入站流量,如下:
[root@master network-policy-demo]# vim policy-demo.yaml
apiVersion: networking.k8 s.io/ v1
#指明了Ingress生效规则,但不定义任何Ingress字段,因此不能匹配任何源端点,从而拒绝所有的入站流量
[root@master network-policy-demo]# kubectl apply -f policy-demo.yaml
networkpolicy.networking.k8 s.io/ deny-all-ingress created
[root@k8 s-master network-policy-demo]# kubectl get networkpolicy
deny-all-ingress < none> 11 s
[root@master ~]# kubectl run busybox --rm -it --image= busybox / bin/ sh
If you don't see a command prompt, try pressing enter.
Connecting to httpd-svc:8080 (10.99.222.179:8080)
wget: can' t connect to remote host (10.99.222.179 ): Connection timed out
如果要将默认策略设置为允许所有入站流量,只需要定义Ingress字段,并将这个字段设置为空,以匹配所有源端点,但本身不设定网络策略,就已经是默认允许所有入站流量访问的,下面给出一个定义的格式:
apiVersion: networking.k8 s.io/ v1
实践中,通常将默认的网络策略设置为拒绝所有入站流量,然后再放行允许的源端点的入站流量。
[root@master network-policy-demo]# vim policy-demo.yaml
apiVersion: networking.k8 s.io/ v1
[root@master network-policy-demo]# kubectl apply -f policy-demo.yaml
networkpolicy.networking.k8 s.io/ access-httpd created
[root@master network-policy-demo]# kubectl get networkpolicy
access-httpd run = httpd 6 s
验证NetworkPolicy的有效性:
#创建带有标签的busybox pod访问,是可以正常访问的,但是因为仅开放了TCP协议,所以PING是无法ping通的
[root@master ~]# kubectl run busybox --rm -it --labels="access=true" --image=busybox /bin/sh
If you don't see a command prompt, try pressing enter.
Connecting to httpd-svc:8080 (10.99.222.179:8080)
index.html 100% |**** **** **** **** **** **** **** **** **** **** **** **** **** **** **** **** **** **** **** **** **** **** **** *| 45 0:00:00 ETA
PING 10.244.0.2 (10.244.0.2): 56 data bytes
--- 10.244.0.2 ping statistics ---
3 packets transmitted, 0 packets received, 100% packet loss
通常,出站的流量默认策略应该是允许通过的,但是当有精细化需求,仅放行那些有对外请求需要的Pod对象的出站流量,也可以先为名称空间设置“禁止所有”的默认策略,再细化制定准许的策略。networkpolicy.spec中嵌套的Egress字段用来定义出站流量规则。
和Igress一样,只需要通过policyTypes字段指明生效的Egress类型规则,然后不去定义Egress字段,就不会去匹配到任何目标端点,从而拒绝所有的出站流量。
apiVersion: networking.k8 s.io/ v1
实践中,需要进行严格隔离的环境通常将默认的策略设置为拒绝所有出站流量,再去细化配置允许到达的目标端点的出站流量。
下面举个例子定义一个Egress规则,对标签run=httpd的Pod对象,到达标签为access=true的Pod对象的80端口的流量进行放行。
[root@master network-policy-demo]# vim egress-policy.yaml
apiVersion: networking.k8 s.io/ v1
#NetworkPolicy检测,一个带有access = true 标签,一个不带
[root@master ~]# kubectl run busybox --rm -it --labels= "access=true" --image= busybox / bin/ sh
If you don't see a command prompt, try pressing enter.
Connecting to httpd-svc:8080 (10.99.222.179:8080)
index.html 100% |*********************************************************************************************| 45 0:00:00 ETA
Session ended, resume using ' kubectl attach busybox-686 cb649 b6 -6 j4 qx -c busybox -i -t' command when the pod is running
deployment.apps "busybox" deleted
[root@master ~]# kubectl run busybox2 --rm -it --image=busybox /bin/sh
If you don' t see a command prompt, try pressing enter.
Connecting to httpd-svc:8080 (10.99.222.179 :8080 )
wget: can't connect to remote host (10.99.222.179): Connection timed out
从上面的检测结果可以看到,带有标签access=true的Pod才能访问到httpd-svc,说明上面配置的Network Policy已经生效。
实践中,通常需要彼此隔离所有的名称空间,但是又需要允许它们可以和kube-system名称空间中的Pod资源进行流量交换,以实现监控和名称解析等各种管理功能。下面的配置清单示例在default名称空间定义相关规则,在出站和入站都默认均为拒绝的情况下,它用于放行名称空间内部的各Pod对象之间的通信,以及和kube-system名称空间内各Pod间的通信。
apiVersion: networking.k8 s.io/ v1
policyTypes: ["Ingress" ,"Egress" ]
apiVersion: networking.k8 s.io/ v1
policyTypes: ["Ingress" ,"Egress" ]
values : ["default" ,"kube-system" ]
values : ["default" ,"kube-system" ]
需要注意的是,有一些额外的系统附件可能会单独部署到独有的名称空间中,比如将prometheus监控系统部署到prom名称空间等,这类具有管理功能的附件所在的名称空间和每一个特定的名称空间的出入流量也是需要被放行的。
参考文章:
https://www.cnblogs.com/linuxk/p/10517055.html
https://www.jianshu.com/p/22a7032bb7bd
K8s的网络模型和网络策略_kubernetes的网络模式-CSDN博客
curl -O https://docs.tigera.io/archive/v3.25/manifests/calico.yaml
kubectl create -f calico.yaml
这是由于node节点上没有admin.conf。出现这个问题的原因是kubectl命令需要使用kubernetes -admin的身份来运行,在“kubeadm int”启动集群的步骤中就生成了/etc/kubernetes/admin.conf,而node节点上是没有这个文件的,也就是系统认为工作节点时不能具有管理节点的权限,所以可以把master节点上的admin.conf拷贝到其他node节点上,这样就能通过认证,也能顺利的使用kubectl命令行工具 了
scp /etc/kubernetes/admin.conf root@k8s-node1:/etc/kubernetes/
scp /etc/kubernetes/admin.conf root@k8s-node2:/etc/kubernetes/
echo "export KUBECONFIG=/etc/kubernetes/admin.conf" >> ~/.bash_profile
完整的离线文件下载脚本:
#!/bin/bash

ENV_CFG=./env.cfg
if [ -f ${ENV_CFG} ] ; then
	chmod 777 ${ENV_CFG}
	source ${ENV_CFG}
fi

# Internet URLs
kernel_url="http://mirrors.tuna.tsinghua.edu.cn/elrepo/kernel/el7/x86_64/RPMS/${kernel_name}"

cni_plugins_url="https://github.com/containernetworking/plugins/releases/download/${cni_plugins_version}/${cni_plugins_name}"
cri_containerd_cni_url="https://github.com/containerd/containerd/releases/download/v${cri_containerd_cni_version}/${cri_containerd_cni_name}"
crictl_url="https://github.com/kubernetes-sigs/cri-tools/releases/download/${crictl_version}/${crictl_name}"
runc_url="https://github.com/opencontainers/runc/releases/download/v${runc_version}/${runc_name}"

etcd_url="https://github.com/etcd-io/etcd/releases/download/${etcd_version}/${etcd_name}"
kubernetes_server_url="https://storage.googleapis.com/kubernetes-release/release/${KUBERNETES_VERSION}/${kubernetes_server_name}"
nginx_url="http://nginx.org/download/${nginx_name}"

# Download packages
packages=(
  $kernel_url
  $runc_url
  $cni_plugins_url
  $cri_containerd_cni_url
  $crictl_url
  $cri_dockerd_url
  $etcd_url
  $kubernetes_server_url
)

for package_url in "${packages[@]}"; do
  filename=$(basename "$package_url")
  if curl -k -L -C - -o "$filename" "$package_url"; then
    echo "Downloaded $filename"
  else
    echo "Failed to download $filename"
    exit 1
  fi
done
以上镜像文件可以从: registry.cn-hangzhou.aliyuncs.com/google_containers下载
calico/node
calico/kube-controllers
calico/node
calico/typha
calico/node-driver-registrar
calico/csi
calico/cni
calico/ctl
calico/pod2daemon-flexvol
calico/apiserver
以上可以直接从docker.io下载即可
注意: 以上所有的镜像文件务必准备到位。本文脚本中的几个版本便令注意修改到位:
#!/bin/bash

ENV_CFG=./env.cfg
if [ -f ${ENV_CFG} ] ; then
	chmod 777 ${ENV_CFG}
	source ${ENV_CFG}
fi
image_list="${IMAGE_DOMAIN}/${IMAGE_NAMESPACE}/kube-apiserver:${KUBERNETES_VERSION}
${IMAGE_DOMAIN}/${IMAGE_NAMESPACE}/kube-controller-manager:${KUBERNETES_VERSION}
${IMAGE_DOMAIN}/${IMAGE_NAMESPACE}/kube-scheduler:${KUBERNETES_VERSION}
${IMAGE_DOMAIN}/${IMAGE_NAMESPACE}/kube-proxy:${KUBERNETES_VERSION}
${IMAGE_DOMAIN}/${IMAGE_NAMESPACE}/coredns:${COREDNS_VERSION}
${IMAGE_DOMAIN}/${IMAGE_NAMESPACE}/pause:${PAUSE_VERSION}
${IMAGE_DOMAIN}/${IMAGE_NAMESPACE}/etcd:${ETCD_VERSION}
calico/node:${CALICO_VERSION}
calico/kube-controllers:${CALICO_VERSION}
calico/node:${CALICO_VERSION}
calico/typha:${CALICO_VERSION}
calico/node-driver-registrar:${CALICO_VERSION}
calico/csi:${CALICO_VERSION}
calico/cni:${CALICO_VERSION}
calico/ctl:${CALICO_VERSION}
calico/pod2daemon-flexvol:${CALICO_VERSION}
calico/apiserver:${CALICO_VERSION}
"
#${IMAGE_DOMAIN}/${IMAGE_NAMESPACE}/registry:${REGISTRY_VERSION}

newimage_list=()
for image in ${image_list}; do
    docker pull "${image}"
    newimage=$(echo $image | sed -e "s/calico/${LOCAL_IMAGE_DOMAIN}\/calico/")
    newimage=$(echo $newimage | sed -e "s/${IMAGE_DOMAIN}\/${IMAGE_NAMESPACE}/${LOCAL_IMAGE_DOMAIN}\/${LOCAL_IMAGE_NAMESPACE}/")
    newimage_list+="${newimage} "
    docker tag $image $newimage
    docker push $newimage
done

docker save -o qinghub-kube-"${VERSION}".tar ${newimage_list}
轻云官方下载
https:/qingplus.cn/pkg/kubernetes/v1.29.4/qinghub-kube-v1.29.4.tar
关闭防火墙
关闭 swap partition permanently
配置检查时间同步
配置安装时间同步组件
配置检查 nfs-utils kubeadmin方式安装不需要检查
配置检查内核版本
配置检查资源情况
配置检查SSH
配置检查系统配置
配置检查转发 IPv4
配置检查Docker用户并添加ssh免密认证<authoirzed_keys> (建议手动执行)
配置检查Docker (容器运行时为Containerd时,不需要检查)
配置检查Docker用户权限 (容器运行时为Containerd时,不需要检查)
配置检查网络
#!/bin/bash

###############################################
# QingHub K8S Install 版本: $VERSION
# 架构: $ARCH_TYPE 目前版本主要支持amd64,其他待敬请期待
# 操作系统: $os_type
# QingHub Studio官网: https://qinghub.net
# 如过您安装遇到问题,请到官网查找官方联系方式或加支持群:
#                                https://qinghub.net
###############################################

ENV_CFG=./env.cfg
if [ -f ${ENV_CFG} ] ; then
	chmod 777 ${ENV_CFG}
	source ${ENV_CFG}
fi

export CONSOLE=${CONSOLE:-false}
os_type=$(cat /etc/os-release | grep "^ID=" | awk -F= '{print $2}' | tr -d [:punct:])
os_version_id=$(cat /etc/os-release | grep "VERSION_ID=" | awk -F= '{print $2}' | tr -d [:punct:])

if [ "$EUID" -ne 0 ]; then
    if [ "$LANG" == "zh_CN.UTF-8" ]; then
        echo -e "${RED}[ERROR] 当前用户不是 root 用户,请切换到 root 用户执行该脚本.${NC}"
        exit 1
    else
        echo -e "${RED}[ERROR] Current user is not root user, please switch to root user to execute the script.${NC}"
        exit 1
    fi
fi

if [ -z "$SSH_RSA" ]; then
    if [ "$LANG" == "zh_CN.UTF-8" ]; then
        echo -e "${RED}[ERROR] 请设置环境变量 SSH_RSA, 该变量为 SSH 公钥.${NC}"
        exit 1
    else
        echo -e "${RED}[ERROR] Please set the environment variable SSH_RSA, the variable is SSH public key.${NC}"
        exit 1
    fi
fi

###############################################
# 新增ubuntu 用户
# QingHub Studio官网: https://qinghub.net
# 如过您安装遇到问题,请到官网查找官方联系方式或加支持群:
#                                https://qinghub.net
###############################################
function add_user_in_ubuntu() {
    useradd --create-home -s /bin/bash -g root "$1"
    echo "$1":"$2" | chpasswd
    if [ "$LANG" == "zh_CN.UTF-8" ]; then
        echo -e "${GREEN}[INFO] 用户 $1 已经创建.${NC}"
    else
        echo -e "${GREEN}[INFO] User $1 has been created.${NC}"
    fi
}

###############################################
# 新增redhat 用户
# QingHub Studio官网: https://qinghub.net
# 如过您安装遇到问题,请到官网查找官方联系方式或加支持群:
#                                https://qinghub.net
###############################################
function add_user_in_redhat() {
    adduser -g root "$1"
    echo "$1":"$2" | chpasswd
    if [ "$LANG" == "zh_CN.UTF-8" ]; then
        echo -e "${GREEN}[INFO] 用户 $1 已经创建.${NC}"
    else
        echo -e "${GREEN}[INFO] User $1 has been created.${NC}"
    fi
}

###############################################
# 描述: 检查并新增用户, 有些版本可以不用检查,请使用时根据
# 情况自行注释掉
# QingHub Studio官网: https://qinghub.net
# 如过您安装遇到问题,请到官网查找官方联系方式或加支持群:
#                                https://qinghub.net
###############################################
function check_user() {
    if ! grep -q docker /etc/group; then
        groupadd --force docker
    fi

    if id -u "${DOCKER_USER}" >/dev/null 2>&1; then
        if ! id -nG "${DOCKER_USER}" | grep -qw "docker"; then
            gpasswd -a "${DOCKER_USER}" docker
        fi

        if [ "$LANG" == "zh_CN.UTF-8" ]; then
            echo -e "${GREEN}[INFO] 用户 ${DOCKER_USER} 已经存在.${NC}"
        else
            echo -e "${GREEN}[INFO] User ${DOCKER_USER} already exists.${NC}"
        fi
    else
        case $os_type in
        centos|redhat|euleros|fusionos|anolis|kylin|rhel|rocky|fedora|openEuler)
            add_user_in_redhat "${DOCKER_USER}" "${DOCKER_PASS}"
        ;;
        ubuntu|debian)
            add_user_in_ubuntu "${DOCKER_USER}" "${DOCKER_PASS}"
        ;;
        *)
            if [ "$LANG" == "zh_CN.UTF-8" ]; then
                echo -e "${RED}[ERROR] 暂不支持 $os_type 操作系统.${NC}"
                exit 1
            else
                echo -e "${RED}[ERROR] The $os_type operating system is temporarily not supported.${NC}"
                exit 1
            fi
        ;;
        esac
    fi
    $CONSOLE
    $CONSOLE || add_ssh_rsa "${DOCKER_USER}"
}

function add_ssh_rsa() {

    if id -u "$user" >/dev/null 2>&1; then
        if [ ! -d "/home/$1/.ssh" ]; then
            if [ "$LANG" == "zh_CN.UTF-8" ]; then
                echo -e "${GREEN}[INFO] 创建 /home/$1/.ssh 目录.${NC}"
            else
                echo -e "${GREEN}[INFO] Create /home/$1/.ssh directory.${NC}"
            fi
            mkdir -p /home/"$1"/.ssh
        fi
        if [ -f "/home/$1/.ssh/authorized_keys" ]; then
            if [ "$LANG" == "zh_CN.UTF-8" ]; then
                echo -e "${GREEN}[INFO] /home/$1/.ssh/authorized_keys 已经存在.${NC}"
            else
                echo -e "${GREEN}[INFO] /home/$1/.ssh/authorized_keys already exists.${NC}"
            fi
            chmod 777 /home/"$1"/.ssh/authorized_keys
            if ! < /home/"$1"/.ssh/authorized_keys grep -q "$SSH_RSA"; then
                echo "$SSH_RSA" >> /home/"$1"/.ssh/authorized_keys
            fi
        else
            if [ "$LANG" == "zh_CN.UTF-8" ]; then
                echo -e "${GREEN}[INFO] 创建 /home/$1/.ssh/authorized_keys.${NC}"
            else
                echo -e "${GREEN}[INFO] Create /home/$1/.ssh/authorized_keys.${NC}"
            fi
            touch /home/"$1"/.ssh/authorized_keys
            chmod 777 /home/"$1"/.ssh/authorized_keys
            echo "$SSH_RSA" > /home/"$1"/.ssh/authorized_keys
        fi

        if < /home/"$1"/.ssh/authorized_keys grep -q "$SSH_RSA"; then
            if [ "$LANG" == "zh_CN.UTF-8" ]; then
                echo -e "${GREEN}[INFO] 成功将 SSH 公钥添加到 /home/$1/.ssh/authorized_keys.${NC}"
            else
                echo -e "${GREEN}[INFO] Successfully added ssh public key to /home/$1/.ssh/authorized_keys.${NC}"
            fi
        else
            if [ "$LANG" == "zh_CN.UTF-8" ]; then
                echo -e "${RED}[ERROR] 将 SSH 公钥添加到 /home/$1/.ssh/authorized_keys 失败.${NC}"
                exit 1
            else
                echo -e "${RED}[ERROR] Add ssh public key to /home/$1/.ssh/authorized_keys failed.${NC}"
                exit 1
            fi
        fi
        chmod 600 /home/"$1"/.ssh/authorized_keys
        chown -R "$1":"$1"  /home/"$1"/.ssh
    fi
}

function check_user_permission(){
    if su ${DOCKER_USER} -c "docker ps" >/dev/null 2>&1; then
        if [ "$LANG" == "zh_CN.UTF-8" ]; then
            echo -e "${GREEN}[INFO] Docker 用户有权限执行 docker 命令.${NC}"
        else
            echo -e "${GREEN}[INFO] Docker users have the permission to execute docker commands.${NC}"
        fi
    else
        if [ "$LANG" == "zh_CN.UTF-8" ]; then
            echo -e "${RED}[ERROR] Docker 用户无权限执行 docker 命令, 请尝试重启docker 'systemctl restart docker'. 重启 docker 后, 再次执行该脚本.${NC}"
            exit 1
        else
            echo -e "${RED}[ERROR] Docker users have no permission to execute docker commands, Please try to restart docker 'systemctl restart docker'. After restarting docker, execute the script again.${NC}"
            exit 1
        fi
    fi
}

###############################################
# 描述: 关闭防火墙
# QingHub Studio官网: https://qinghub.net
# 如过您安装遇到问题,请到官网查找官方联系方式或加支持群:
#                                https://qinghub.net
###############################################
function disable_firewalld() {
    if systemctl status firewalld | grep Active | grep -q running >/dev/null 2>&1; then
        systemctl stop firewalld >/dev/null 2>&1
        systemctl disable firewalld >/dev/null 2>&1
        if [ "$LANG" == "zh_CN.UTF-8" ]; then
            echo -e "${GREEN}[INFO] 检测到 Firewalld 服务已启动,正在将 Firewalld 服务关闭并禁用.${NC}"
        else
            echo -e "${GREEN}[INFO] The Firewalld service has been started, Firewalld service is being turned off and disabled.${NC}"
        fi
    else
        if [ "$LANG" == "zh_CN.UTF-8" ]; then
            echo -e "${GREEN}[INFO] Firewalld 服务已经停止或未安装.${NC}"
        else
            echo -e "${GREEN}[INFO] Firewalld service is not installed.${NC}"
        fi
    fi
}

###############################################
# 描述: 关闭swap
# QingHub Studio官网: https://qinghub.net
# 如过您安装遇到问题,请到官网查找官方联系方式或加支持群:
#                                https://qinghub.net
###############################################
function disable_swap() {
    if swapoff -a; then
        sed -i '/swap/s/^/#/' /etc/fstab
        if [ "$LANG" == "zh_CN.UTF-8" ]; then
            echo -e "${GREEN}[INFO] swap 已经禁用.${NC}"
        else
            echo -e "${GREEN}[INFO] swap has been disabled.${NC}"
        fi
    fi
}

function check_time_sync() {

    if timedatectl status | grep "NTP synchronized" | grep -q "yes" >/dev/null 2>&1 || timedatectl show | grep "NTPSynchronized=yes" >/dev/null 2>&1; then
        if [ "$LANG" == "zh_CN.UTF-8" ]; then
            echo -e "${GREEN}[INFO] NTP 时间同步已经启用.${NC}"
        else
            echo -e "${GREEN}[INFO] NTP time synchronization has been enabled.${NC}"
        fi
    else
        if [ "$LANG" == "zh_CN.UTF-8" ]; then
            echo -e "${YELLOW}[WARN] NTP 时间同步未启用.${NC}"
        else
            echo -e "${YELLOW}[WARN] NTP time synchronization is not enabled.${NC}"
        fi
    fi
}

###############################################
# 描述: 安装时钟同步,请酌情修改并安装
# QingHub Studio官网: https://qinghub.net
# 如过您安装遇到问题,请到官网查找官方联系方式或加支持群:
#                                https://qinghub.net
###############################################
install_chrony(){
  case $os_type in
    ubuntu|debian)
      if dpkg -l | grep -q chrony >/dev/null 2>&1; then
        echo -e "${GREEN}[INFO] chrony 已经安装在主机上.${NC}"
      else
        echo -e "${YELLOW}[WARN] chrony 未安装在主机上, 请执行命令安装 'apt -y install chrony'.${NC}"
        apt -y install chrony &> /dev/null;
        systemctl restart chronyd && systemctl enable --now chronyd &> /dev/null
        systemctl is-active chronyd &> /dev/null
      fi
    ;;
    *)
      if rpm -qa | grep -q chrony >/dev/null 2>&1; then
          if [ "$LANG" == "zh_CN.UTF-8" ]; then
              echo -e "${GREEN}[INFO] chrony 已经安装在主机上.${NC}"
          else
              echo -e "${GREEN}[INFO] chrony has been installed on the host.${NC}"
          fi
      else
          if [ "$LANG" == "zh_CN.UTF-8" ]; then
              echo -e "${YELLOW}[WARN] chrony 未安装在主机上, 请执行命令安装 'yum -y install chrony'.${NC}"
          else
              echo -e "${YELLOW}[WARN] chrony is not installed on the host, please execute the command install 'yum -y install chrony'.${NC}"
          fi
          yum -y install chrony
      fi
    ;;
    esac
    if [ "${CHRONY_TYPE}" == 'server' ]; then
      sudo bash -c 'cat > /etc/chrony.conf << EOF
pool ntp.aliyun.com iburst
driftfile /var/lib/chrony/drift
makestep 1.0 3
rtcsync
allow 10.0.0.0/24
local stratum 10
keyfile /etc/chrony.keys
leapsectz right/UTC
logdir /var/log/chrony
EOF'
    else
      sudo bash -c 'cat > /etc/chrony.conf << EOF
pool ${CHRONY_SERVER} iburst
driftfile /var/lib/chrony/drift
makestep 1.0 3
rtcsync
keyfile /etc/chrony.keys
leapsectz right/UTC
logdir /var/log/chrony
EOF'
    fi
    systemctl restart chronyd && systemctl enable --now chronyd &> /dev/null
    systemctl is-active chronyd &> /dev/null
    if [ "$LANG" == "zh_CN.UTF-8" ]; then
        echo -e "${GREEN}[INFO] chrony 完成配置在主机上.${NC}"
    else
        echo -e "${GREEN}[INFO] chrony has been configured on the host.${NC}"
    fi
}

###############################################
# 描述: 优化配置forwarding_ipv4
# QingHub Studio官网: https://qinghub.net
# 如过您安装遇到问题,请到官网查找官方联系方式或加支持群:
#                                https://qinghub.net
###############################################
function check_forwarding_ipv4() {
  sudo bash -c 'cat <<EOF | sudo tee /etc/modules-load.d/k8s.conf
overlay
br_netfilter
EOF'
  sudo modprobe overlay
  sudo modprobe br_netfilter
  sudo bash -c 'cat <<EOF | sudo tee /etc/sysctl.d/k8s.conf
net.bridge.bridge-nf-call-iptables  = 1
net.bridge.bridge-nf-call-ip6tables = 1
net.ipv4.ip_forward                 = 1
EOF'
  sudo sysctl --system

  #加载ipvs模块
  sudo bash -c 'cat <<EOF | sudo tee /etc/modules-load.d/ipvs.conf <<EOF
ip_vs
ip_vs_rr
ip_vs_wrr
ip_vs_sh
nf_conntrack
ip_tables
ip_set
xt_set
ipt_set
ipt_rpfilter
ipt_REJECT
ipip
EOF'
  systemctl restart systemd-modules-load.service
}

###############################################
# 描述: 检查服务器资源状况
# QingHub Studio官网: https://qinghub.net
# 如过您安装遇到问题,请到官网查找官方联系方式或加支持群:
#                                https://qinghub.net
###############################################
function check_resource(){
    cpu=$(grep -c 'processor' /proc/cpuinfo)
    mem=$(free -g | awk '/^Mem/{print $2}')
    DISK_SPACE=$(df /|sed -n '2p'|awk '{print $2}')

    # check cpu
    if [ "${cpu}" -lt 2 ]; then
        if [ "$LANG" == "zh_CN.UTF-8" ]; then
            echo -e "${YELLOW}[WARN] CPU核数建议至少为2核.${NC}"
        else
            echo -e "${YELLOW}[WARN] The cpu is recommended to be at least 2C.${NC}"
        fi
    fi

    # check memory
    if [ "${mem}" -lt 3 ]; then
        if [ "$LANG" == "zh_CN.UTF-8" ]; then
            echo -e "${YELLOW}[WARN] 内存建议至少为8G.${NC}"
        else
            echo -e "${YELLOW}[WARN] The Memory is recommended to be at least 8G.${NC}"
        fi
    fi

    # check disk space
    if [ "${DISK_SPACE}" -lt 47185920 ];then
        if [ "$LANG" == "zh_CN.UTF-8" ]; then
            echo -e "${YELLOW}[WARN] 根分区空间需大于 50G.${NC}"
        else
            echo -e "${YELLOW}[WARN] The root partition space must be greater than 50G.${NC}"
        fi
    fi
}

###############################################
# 描述: 检查内核版本
# QingHub Studio官网: https://qinghub.net
# 如过您安装遇到问题,请到官网查找官方联系方式或加支持群:
#                                https://qinghub.net
###############################################
function check_kernel() {
    kernel_version=$(uname -r | awk -F. '{print $1}')
    if [ "$kernel_version" -lt "4" ]; then
        if [ "$LANG" == "zh_CN.UTF-8" ]; then
            echo -e "${YELLOW}[WARN] 内核版本必须高于4.0, 请尽快升级内核到4.0+.${NC}"
        else
            echo -e "${YELLOW}[WARN] Kernel version must be higher than 4.0, Please upgrade the kernel to 4.0+ as soon as possible.${NC}"
        fi
    fi
}

###############################################
# 描述: 检查 nfs是否安装,这里并未自动安装
# QingHub Studio官网: https://qinghub.net
# 如过您安装遇到问题,请到官网查找官方联系方式或加支持群:
#                                https://qinghub.net
###############################################
function check_nfscli(){
    case $os_type in
        ubuntu|debian)
            if dpkg -l | grep -q nfs-common >/dev/null 2>&1; then
                if [ "$LANG" == "zh_CN.UTF-8" ]; then
                    echo -e "${GREEN}[INFO] nfs-common 已经安装在主机上.${NC}"
                else
                    echo -e "${GREEN}[INFO] nfs-common has been installed on the host.${NC}"
                fi
            else
                if [ "$LANG" == "zh_CN.UTF-8" ]; then
                    echo -e "${YELLOW}[WARN] nfs-common 未安装在主机上, 请执行命令安装 'apt -y install nfs-common'.${NC}"
                else
                    echo -e "${YELLOW}[WARN] nfs-common is not installed on the host, please execute the command install 'apt-get update && apt -y install nfs-common'.${NC}"
                fi
            fi
        ;;
        *)
            if rpm -qa | grep -q nfs-utils >/dev/null 2>&1; then
                if [ "$LANG" == "zh_CN.UTF-8" ]; then
                    echo -e "${GREEN}[INFO] nfs-utils 已经安装在主机上.${NC}"
                else
                    echo -e "${GREEN}[INFO] nfs-utils has been installed on the host.${NC}"
                fi
            else
                if [ "$LANG" == "zh_CN.UTF-8" ]; then
                    echo -e "${YELLOW}[WARN] nfs-utils 未安装在主机上, 请执行命令安装 'yum -y install nfs-utils'.${NC}"
                else
                    echo -e "${YELLOW}[WARN] nfs-utils is not installed on the host, please execute the command install 'yum -y install nfs-utils'.${NC}"
                fi
            fi
        ;;
        esac
}


function check_openssh(){

    if ssh -V >/dev/null 2>&1; then
      OPENSSH_VERSION=$(ssh -V |& awk -F[_.] '{print $2}')
      if [ "${OPENSSH_VERSION}" -lt "7" ];then
        if [ "$LANG" == "zh_CN.UTF-8" ]; then
            echo -e "${YELLOW}[WARN] Openssh 版本必须高于 7.0.${NC}"
        else
            echo -e "${YELLOW}[WARN] Openssh version must be higher than 7.0 ${NC}"
        fi
      fi
    else
        if [ "$LANG" == "zh_CN.UTF-8" ]; then
            echo -e "${RED}[ERROR] 需要安装 7.0+ 版本的openssh.${NC}"
            exit 1
        else
            echo -e "${RED}[ERROR] Need to install 7.0+ version of openssh.${NC}"
            exit 1
        fi
    fi

    if grep -v "^\s*#" /etc/ssh/sshd_config | grep "AllowTcpForwarding yes" >/dev/null 2>&1; then
        if [ "$LANG" == "zh_CN.UTF-8" ]; then
            echo -e "${GREEN}[INFO] /etc/ssh/sshd_config 已经配置 AllowTcpForwarding yes.${NC}"
        else
            echo -e "${GREEN}[INFO] /etc/ssh/sshd_config has been configured AllowTcpForwarding yes.${NC}"
        fi
    else
        if grep "AllowTcpForwarding no" /etc/ssh/sshd_config >/dev/null 2>&1; then
            sed -i '/AllowTcpForwarding/s/^/#/' /etc/ssh/sshd_config
            sed -i '$a\AllowTcpForwarding yes' /etc/ssh/sshd_config
        else
            sed -i '$a\AllowTcpForwarding yes' /etc/ssh/sshd_config
        fi
        if [ "$LANG" == "zh_CN.UTF-8" ]; then
            echo -e "${YELLOW}[WARN] /etc/ssh/sshd_config 配置 AllowTcpForwarding yes 成功, 请执行命令重启 sshd 服务生效, 'systemctl restart sshd'.${NC}"
        else
            echo -e "${YELLOW}[WARN] /etc/ssh/sshd_config AllowTcpForwarding yes is successfully configured, Run the following command to restart the sshd service to take effect, 'systemctl restart sshd'.${NC}"
        fi
    fi
}

###############################################
# 描述: 优化参数
# QingHub Studio官网: https://qinghub.net
# 如过您安装遇到问题,请到官网查找官方联系方式或加支持群:
#                                https://qinghub.net
###############################################
function optimize_linux() {
    sudo bash -c 'cat > /etc/sysctl.conf << EOF
net.bridge.bridge-nf-call-ip6tables=1
net.bridge.bridge-nf-call-iptables=1
net.ipv4.ip_forward=1
net.ipv4.conf.all.forwarding=1
net.ipv4.neigh.default.gc_thresh1=4096
net.ipv4.neigh.default.gc_thresh2=6144
net.ipv4.neigh.default.gc_thresh3=8192
net.ipv4.neigh.default.gc_interval=60
net.ipv4.neigh.default.gc_stale_time=120
kernel.perf_event_paranoid=-1
#sysctls for k8s node config
net.ipv4.tcp_slow_start_after_idle=0
net.core.rmem_max=16777216
fs.inotify.max_user_watches=524288
kernel.softlockup_all_cpu_backtrace=1
kernel.softlockup_panic=0
kernel.watchdog_thresh=30
fs.file-max=2097152
fs.inotify.max_user_instances=8192
fs.inotify.max_queued_events=16384
vm.max_map_count=262144
fs.may_detach_mounts=1
net.core.netdev_max_backlog=16384
net.ipv4.tcp_wmem=4096 12582912 16777216
net.core.wmem_max=16777216
net.core.somaxconn=32768
net.ipv4.ip_forward=1
net.ipv4.tcp_max_syn_backlog=8096
net.ipv4.tcp_rmem=4096 12582912 16777216

net.ipv6.conf.all.disable_ipv6=1
net.ipv6.conf.default.disable_ipv6=1
net.ipv6.conf.lo.disable_ipv6=1

kernel.yama.ptrace_scope=0
vm.swappiness=0
kernel.core_uses_pid=1
# Do not accept source routing
net.ipv4.conf.default.accept_source_route=0
net.ipv4.conf.all.accept_source_route=0

# Promote secondary addresses when the primary address is removed
net.ipv4.conf.default.promote_secondaries=1
net.ipv4.conf.all.promote_secondaries=1

# Enable hard and soft link protection
fs.protected_hardlinks=1
fs.protected_symlinks=1

net.ipv4.conf.all.rp_filter=0
net.ipv4.conf.default.rp_filter=0
net.ipv4.conf.default.arp_announce = 2
net.ipv4.conf.lo.arp_announce=2
net.ipv4.conf.all.arp_announce=2

net.ipv4.tcp_max_tw_buckets=5000
net.ipv4.tcp_syncookies=1
net.ipv4.tcp_fin_timeout=30
net.ipv4.tcp_synack_retries=2
kernel.sysrq=1
EOF'
    sudo sysctl -p >/dev/null 2>&1
    echo -e "${GREEN}[INFO] 优化kernel参数成功${NC}"
}


function optimize_limits() {
    sudo bash -c 'cat >> /etc/security/limits.conf <<EOF
* soft nofile 1024000
* hard nofile 1024000
EOF'
    echo -e "${GREEN}[INFO] 优化limits参数成功${NC}"
}
function check_syscfg(){
    sudo chmod 777 /etc/sysctl.conf
    sudo chmod 777 /sbin/sysctl
    sudo chmod 777 /etc/security/limits.conf
    optimize_linux
    optimize_limits
    sudo chmod 644 /etc/sysctl.conf
    sudo chmod 755 /sbin/sysctl
    sudo chmod 644 /etc/security/limits.conf
}


###############################################
# 描述: calico 网络配置初始化
# QingHub Studio官网: https://qinghub.net
# 如过您安装遇到问题,请到官网查找官方联系方式或加支持群:
#                                https://qinghub.net
###############################################
function  check_network() {
    sudo bash -c 'cat >> /etc/NetworkManager/conf.d/calico.conf << EOF
[keyfile]
unmanaged-devices=interface-name:cali*;interface-name:tunl*
unmanaged-devices=interface-name:cali*;interface-name:tunl*;interface-name:vxlan.calico;interface-name:wireguard.cali
EOF'
    systemctl restart NetworkManager
}


###############################################
# 描述: 主入口函数
# QingHub Studio官网: https://qinghub.net
# 如过您安装遇到问题,请到官网查找官方联系方式或加支持群:
#                                https://qinghub.net
###############################################
function main {
    echo -e "${GREEN}[INFO] ==========开始检查并配置初始化========= ${NC}"
    # 停止 friewalld
    disable_firewalld
    # 关闭 swap partition permanently
    disable_swap
    # 配置检查时间同步
    check_time_sync
    # 配置安装时间同步组件
    install_chrony
    # 配置检查 nfs-utils kubeadmin方式安装不需要检查
    #check_nfscli
    # 配置检查内核版本
    check_kernel
    # 配置检查资源情况
    check_resource
    # 配置检查SSH
    check_openssh
    # 配置检查系统配置
    check_syscfg
    # 转发 IPv4
    check_forwarding_ipv4
    # 配置检查Docker用户并添加ssh免密认证<authoirzed_keys>
    check_user
    # 配置检查Docker  容器运行时为Containerd时,不需要检查
    #check_docker
    # 配置检查Docker用户权限 容器运行时为Containerd时,不需要检查
    #check_user_permission
    # 配置检查网络
    check_network
    echo -e "${GREEN}[INFO] ==========成功完成检查并配置初始化========= ${NC}"
}

main
组件 安装
安装containerd
部署containerd 配置文件
安装cni plugin
安装crictl
安装runc
安装部署kubeadm、kubelet、kubectl
特别关注:
初始化集群第一控制平面节点
#!/bin/bash
###############################################
# QingHub K8S Install 版本: $VERSION
# 架构: $ARCH_TYPE 目前版本主要支持amd64,其他待敬请期待
# 操作系统: $os_type
# QingHub Studio官网: https://qinghub.net
# 如过您安装遇到问题,请到官网查找官方联系方式或加支持群:
#                           https://qinghub.net
###############################################
ENV_CFG=./env.cfg
if [ -f ${ENV_CFG} ] ; then
	chmod 777 ${ENV_CFG}
	source ${ENV_CFG}
fi
os_type=$(uname -s)

if [ $(arch) = "x86_64" ] || [ $(arch) = "amd64" ]; then
    arch_type=amd64
elif [ $(arch) = "aarch64" ] || [ $(arch) = "arm64" ]; then
    arch_type=arm64
elif [ $(arch) = "i386" ]; then
    arch_type=amd64
    echo -e "${YELLOW}[WAIN] 检测到 i386, 我们暂时把它当做 x86_64(amd64) ${NC}"
else
  echo -e "${RED}[ERROR] QingHub Studio 目前还不支持 $(arch) 架构 ${NC}"
  exit 1
fi


###############################################
# 复制并安装cri_containerd_cni 包括:cri, containerd,cni三合一,后续会覆盖安装
# QingHub Studio官网: https://qinghub.net
# 如过您安装遇到问题,请到官网查找官方联系方式或加支持群:
#                                https://qinghub.net
###############################################
function install_cri_containerd_cni(){
  echo -e "${GREEN}[INFO] 下载并安装cri_containerd_cni二级制文件 ${cri_containerd_cni_name} ${NC}"
  if [[ -e /usr/bin/curl ]]; then
       # 离线下载文件请修改TODO
      curl -L ${cri_containerd_cni_url} | sudo tar -C / -xz || {
          echo -e "${RED}[ERROR] 下载并安装cri_containerd_cni二进制文件失败 ${NC}"
          exit 1
      }
  else
      wget -c "$cri_containerd_cni_url" | sudo tar -C / -xz || {
          echo -e "${RED}[ERROR] 下载cri_containerd_cni二进制文件失败 ${NC}"
          exit 1
      }
  fi
  echo -e "${GREEN}[INFO] 创建containerd.service 文件 ${NC}"
  sudo systemctl enable --now containerd
  echo -e "${GREEN}[INFO] 安装containerd成功${NC}"
}


###############################################
# 描述: 初始化containerd 配置文件,添加修改仓库信息,请酌情修改
# QingHub Studio官网: https://qinghub.net
# 如过您安装遇到问题,请到官网查找官方联系方式或加支持群:
#                                https://qinghub.net
###############################################
function install_containerd_config(){
  mkdir -p /etc/containerd
  sudo /usr/local/bin/containerd config default | tee /etc/containerd/config.toml

  # 修改Containerd的配置文件
  sudo sed -i "s#SystemdCgroup\ \=\ false#SystemdCgroup\ \=\ true#g" /etc/containerd/config.toml
  cat /etc/containerd/config.toml | grep SystemdCgroup
  sudo sed -i "s#registry.k8s.io\/pause:3.8#qinghub.net:5000\/qingcloudtech\/pause:3.9#g" /etc/containerd/config.toml
  cat /etc/containerd/config.toml | grep sandbox_image
  sudo sed -i "s#config_path\ \=\ \"\"#config_path\ \=\ \"/etc/containerd/certs.d\"#g" /etc/containerd/config.toml
  cat /etc/containerd/config.toml | grep certs.d

  mkdir /etc/containerd/certs.d/qinghub.net:5000 -pv
  sudo bash -c 'cat > /etc/containerd/certs.d/qinghub.net:5000/hosts.toml << EOF
server = "qinghub.net:5000"
[host."qinghub.net:5000"]
    capabilities = ["pull", "resolve"]
EOF'

  mkdir /etc/containerd/certs.d/docker.io -pv
  sudo bash -c 'cat > /etc/containerd/certs.d/docker.io/hosts.toml << EOF
server = "https://docker.io"
[host."https://qinghub.net:5000"]
  capabilities = ["pull", "resolve"]
[host."https://dockerproxy.com"]
  capabilities = ["pull", "resolve"]
[host."https://docker.m.daocloud.io"]
  capabilities = ["pull", "resolve"]
[host."https://reg-mirror.qiniu.com"]
  capabilities = ["pull", "resolve"]
[host."http://hub-mirror.c.163.com"]
  capabilities = ["pull", "resolve"]
EOF'

  systemctl daemon-reload
  systemctl restart containerd.service
}

###############################################
# 描述: 安装cni文件
# QingHub Studio官网: https://qinghub.net
# 如过您安装遇到问题,请到官网查找官方联系方式或加支持群:
#                                https://qinghub.net
###############################################
function install_cni_plugins(){
  DEST="/opt/cni/bin"
  sudo mkdir -p "$DEST"
  echo -e "${GREEN}[INFO] 下载并安装cni_plugins二级制文件 ${cni_plugins_name} ${NC}"
  if [[ -e /usr/bin/curl ]]; then
      # 离线下载文件请修改TODO
      curl -L ${cni_plugins_url} | sudo tar -C "$DEST" -xz || {
          echo -e "${RED}[ERROR] 下载cni_plugins二进制文件失败 ${NC}"
          exit 1
      }
  else
      wget -c "$cni_plugins_url" | sudo tar -C "$DEST" -xz || {
          echo -e "${RED}[ERROR] 下载cni_plugins二进制文件失败 ${NC}"
          exit 1
      }
  fi
  echo -e "${GREEN}[INFO] 安装cni_plugins成功${NC}"
}

###############################################
# 描述: 拷贝runc文件
# QingHub Studio官网: https://qinghub.net
# 如过您安装遇到问题,请到官网查找官方联系方式或加支持群:
#                                https://qinghub.net
###############################################
function install_runc(){
  DEST="/usr/bin"
  sudo mkdir -p "$DEST"
  cd "$DEST"
  echo -e "${GREEN}[INFO] 下载并安装runc二级制文件 ${runc_name} ${NC}"
  if [[ -e /usr/bin/curl ]]; then
      # 离线下载文件请修改TODO
      curl -L -O ${runc_url} || {
          echo -e "${RED}[ERROR] 下载并安装runc二进制文件失败 ${NC}"
          exit 1
      }
  else
      wget -c "$runc_url" || {
          echo -e "${RED}[ERROR] 下载runc二进制文件失败 ${NC}"
          exit 1
      }
  fi
  if [ -f $DEST/runc.amd64 ]; then
     chmod +x $DEST/runc.amd64
     mv $DEST/runc.amd64 $DEST/runc
  fi
  echo -e "${GREEN}[INFO] 安装runc成功${NC}"
}

###############################################
# 描述: 拷贝crictl工具文件
# QingHub Studio官网: https://qinghub.net
# 如过您安装遇到问题,请到官网查找官方联系方式或加支持群:
#                                https://qinghub.net
###############################################
function install_crictl(){
  DEST="/usr/local/bin"
  sudo mkdir -p "$DEST"

  echo -e "${GREEN}[INFO] 下载并安装crictl二级制文件 ${crictl_name} ${NC}"
  if [[ -e /usr/bin/curl ]]; then
      # 离线下载文件请修改TODO
      sudo curl -L ${crictl_url} | sudo tar -C $DEST -xz || {
          echo -e "${RED}[ERROR] 下载crictl二进制文件失败 ${NC}"
          exit 1
      }
  else
      sudo wget -c "$crictl_url" | sudo tar -C "$DEST" -xz || {
          echo -e "${RED}[ERROR] 下载crictl二进制文件失败 ${NC}"
          exit 1
      }
  fi
  echo -e "${GREEN}[INFO] 安装crictl成功${NC}"
  #生成配置文件
  sudo bash -c "cat > /etc/crictl.yaml <<EOF
runtime-endpoint: unix:///run/containerd/containerd.sock
image-endpoint: unix:///run/containerd/containerd.sock
timeout: 10
EOF"
  systemctl restart containerd
}


###############################################
# 描述: 安装kubeadmin,kubelet,kubectl,在每个节点都需要安装kubeadmin,kubelet,
# kubectl根据情况在合适的控制平台节点安装,可以修改参数$QINGCLOUD_KUBECTL_FLAG=no关闭安装
# QingHub Studio官网: https://qinghub.net
# 如过您安装遇到问题,请到官网查找官方联系方式或加支持群:
#                                https://qinghub.net
###############################################
function install_kubeadm(){
  TEMP="/tmp"

  echo -e "${GREEN}[INFO] 下载Kubernetes二级制文件 ${KUBERNETES_VERSION} ${NC}"

  if [[ -e /usr/bin/curl ]]; then
      # 离线下载文件请修改TODO
      sudo curl -L "${kubernetes_server_url}" | sudo tar -C "$TEMP" -xz || {
          echo -e "${RED}[ERROR] 下载Kubernetes二进制文件失败 ${NC}"
          exit 1
      }
  else
      sudo wget -c "$kubernetes_server_url" | sudo tar -C "$TEMP" -xz || {
          echo -e "${RED}[ERROR] 下载Kubernetes二进制文件失败 ${NC}"
          exit 1
      }
  fi

  DEST="/usr/bin"
  cd $DEST
  sudo cp $TEMP/kubernetes/server/bin/{kubeadm,kubelet} .
  sudo chmod +x {kubeadm,kubelet}

  echo -e "${GREEN}[INFO] 成功安装kubeadm,kubelet到${DEST}目录 ${NC}"
  echo -e "${GREEN}[INFO] 创建kubelet.service 文件 ${NC}"
  sudo bash -c "cat > /usr/lib/systemd/system/kubelet.service <<EOF
[Unit]
Description=kubelet: The Kubernetes Node Agent
Documentation=https://kubernetes.io/docs/
Wants=network-online.target
After=network-online.target

[Service]
ExecStart=${DEST}/kubelet
Restart=always
StartLimitInterval=0
RestartSec=10

[Install]
WantedBy=multi-user.target
EOF"
  sudo mkdir -p /usr/lib/systemd/system/kubelet.service.d
  echo -e "${GREEN}[INFO] 创建10-kubeadm.conf 文件 ${NC}"
  sudo bash -c "cat > /usr/lib/systemd/system/kubelet.service.d/10-kubeadm.conf <<EOF
[Service]
Environment=\"KUBELET_KUBECONFIG_ARGS=--bootstrap-kubeconfig=/etc/kubernetes/bootstrap-kubelet.conf --kubeconfig=/etc/kubernetes/kubelet.conf\"
Environment=\"KUBELET_CONFIG_ARGS=--config=/var/lib/kubelet/config.yaml\"
EnvironmentFile=-/var/lib/kubelet/kubeadm-flags.env
EnvironmentFile=-/etc/sysconfig/kubelet
ExecStart=
ExecStart=$DEST/kubelet \\\$KUBELET_KUBECONFIG_ARGS \\\$KUBELET_CONFIG_ARGS \\\$KUBELET_KUBEADM_ARGS \\\$KUBELET_EXTRA_ARGS
EOF"
sudo bash -c "cat > /etc/sysconfig/kubelet <<EOF
KUBELET_EXTRA_ARGS=
EOF"
  #创建必须要的几个目录
  sudo mkdir -p /var/lib/kubelet
  sudo mkdir -p /etc/kubernetes/manifests
  sudo systemctl enable kubelet
  if [ "$QINGCLOUD_KUBECTL_FLAG" == "yes" ]; then
    cd $DEST
    sudo cp ${TEMP}/kubernetes/server/bin/kubectl .
    sudo chmod +x kubectl
    echo -e "${GREEN}[INFO] 成功安装kubectl到${DEST}目录 ${NC}"
  fi

  if [[ -d "${TEMP}/kubernetes" ]]; then
    sudo rm -rf "${TEMP}/kubernetes-server-linux-amd64"
    echo -e "${GREEN}[INFO] 临时安装文件${TEMP}/kubernetes-server-linux-amd64正常删除 ${NC}"
  fi
}

###############################################
# 描述: 初始化控制平面节点。
# ${QINGCLOUD_ADVERTISE_ADDRESS}       ApiServer地址,请根据情况填写,可以是配置的高可用地址
# ${LOCAL_IMAGE_DOMAIN}               本地容器镜像仓库地址
# ${LOCAL_IMAGE_NAMESPACE}            本地容器镜像命名空间
# ${KUBERNETES_VERSION}               K8S版本
# QingHub Studio官网: https://qinghub.net
# 如过您安装遇到问题,请到官网查找官方联系方式或加支持群:
#                                https://qinghub.net
###############################################
function init_cluster(){
  echo -e "${GREEN}[INFO] ==========初始化第一个控制平面,请根据输出结果初始其他他节点========= ${NC}"
  kubeadm init \
    --apiserver-advertise-address="${QINGCLOUD_ADVERTISE_ADDRESS}" \
    --image-repository "${LOCAL_IMAGE_DOMAIN}/${LOCAL_IMAGE_NAMESPACE}" \
    --kubernetes-version "${KUBERNETES_VERSION}" \
    --cri-socket=unix:///run/containerd/containerd.sock \
    --service-cidr=10.96.0.0/16 \
    --pod-network-cidr=172.16.0.0/16
}

# 主入口地址,根据实际可以手动执行相关内容
function main {
    echo -e "${GREEN}[INFO] ==========开始安装kubernetes========= ${NC}"
    #安装containerd
    install_cri_containerd_cni
    #安装cni plugin
    install_cni_plugins
    #安装containerd 配置文件
    install_containerd_config
    #安装crictl
    install_crictl
    #安装runc
    install_runc
    #安装kubeadm
    install_kubeadm
    #初始化集群master节点
    if [ "$QINGCLOUD_KUBECTL_FLAG" == "yes" ] ;then
      init_cluster
    fi
    echo -e "${GREEN}[INFO] ==========完成安装kubernetes========= ${NC}"
}

main在上节的安装过程中,实际以及包含了初始化第一个控制平面的脚本,由于其重要性,这里单独提出来详细说明。
kubeadm init \
  --apiserver-advertise-address="${QINGCLOUD_ADVERTISE_ADDRESS}" \
  --image-repository "${LOCAL_IMAGE_DOMAIN}/${LOCAL_IMAGE_NAMESPACE}" \
  --kubernetes-version "${KUBERNETES_VERSION}" \
  --cri-socket=unix:///run/containerd/containerd.sock \
  --service-cidr=10.96.0.0/16 \
--pod-network-cidr=172.16.0.0/16第一步:如下命令生成默认配置文件并作修改
kubeadm config print init-defaults > initConfig.yaml第二步:执行命令
kubeadm init --config=initConfig.yaml 根据上面的指令生成的结果,拷贝如下命令后直接执行,使得kubectl后面可以直接运行
mkdir -p $HOME/.kube
sudo cp -i /etc/kubernetes/admin.conf $HOME/.kube/config
sudo chown $(id -u):$(id -g) $HOME/.kube/configNode 节点根据执行命令生成第一个控制平面的结果,拷贝如下类似的文件到node节点。直接执行:
kubeadm join x.x.x.x:6443 --token picxyk.su53y03l1z0jh333e \
	--discovery-token-ca-cert-hash sha256:01fecbd4bdc0513811f7b65a43e41820d703a91c631e262b1ad4634e12cd0205
	--cri-socket=unix:///run/containerd/containerd.sock
执行kubectl get nodes 查看node节点执行结果
[root@itserver-master2 kube]# kubectl get nodes
NAME               STATUS   ROLES           AGE   VERSION
itserver-master2   Ready    control-plane   2h    v1.29.4
itserver-node4     Ready    <none>          1m    v1.29.4
[root@itserver-master2 kube]# 我们采用calico作为网络插件,calico最新版建议的部署方式为两个步骤,执行两个文件即可:
https://github.com/projectcalico/calico/blob/v3.27.3/manifests/tigera-operator.yaml https://github.com/projectcalico/calico/blob/v3.27.3/manifests/custom-resources.yaml
注意:修改镜像地址,请根据自己保存镜像的实际地址修改
[root@web02 v1.29.4]# cat tigera-operator.yaml | grep image:
                    image:
          image: quay.io/tigera/operator:v1.32.7
[root@web02 v1.29.4]#
[root@web02 v1.29.4]# sudo sed -i "s#quay.io\/tigera#qinghub.net:5000\/qingcloudtech#g" tigera-operator.yaml
[root@web02 v1.29.4]# cat tigera-operator.yaml | grep image:
                    image:
          image: qinghub.net:5000/qingcloudtech/operator:v1.32.7
[root@web02 v1.29.4]# ll[root@itserver-master2 kube]# kubectl create -f tigera-operator.yaml
namespace/tigera-operator created
customresourcedefinition.apiextensions.k8s.io/bgpconfigurations.crd.projectcalico.org created
customresourcedefinition.apiextensions.k8s.io/bgpfilters.crd.projectcalico.org created
customresourcedefinition.apiextensions.k8s.io/bgppeers.crd.projectcalico.org created
customresourcedefinition.apiextensions.k8s.io/blockaffinities.crd.projectcalico.org created
customresourcedefinition.apiextensions.k8s.io/caliconodestatuses.crd.projectcalico.org created
customresourcedefinition.apiextensions.k8s.io/clusterinformations.crd.projectcalico.org created
customresourcedefinition.apiextensions.k8s.io/felixconfigurations.crd.projectcalico.org created
customresourcedefinition.apiextensions.k8s.io/globalnetworkpolicies.crd.projectcalico.org created
customresourcedefinition.apiextensions.k8s.io/globalnetworksets.crd.projectcalico.org created
customresourcedefinition.apiextensions.k8s.io/hostendpoints.crd.projectcalico.org created
customresourcedefinition.apiextensions.k8s.io/ipamblocks.crd.projectcalico.org created
customresourcedefinition.apiextensions.k8s.io/ipamconfigs.crd.projectcalico.org created
customresourcedefinition.apiextensions.k8s.io/ipamhandles.crd.projectcalico.org created
customresourcedefinition.apiextensions.k8s.io/ippools.crd.projectcalico.org created
customresourcedefinition.apiextensions.k8s.io/ipreservations.crd.projectcalico.org created
customresourcedefinition.apiextensions.k8s.io/kubecontrollersconfigurations.crd.projectcalico.org created
customresourcedefinition.apiextensions.k8s.io/networkpolicies.crd.projectcalico.org created
customresourcedefinition.apiextensions.k8s.io/networksets.crd.projectcalico.org created
customresourcedefinition.apiextensions.k8s.io/apiservers.operator.tigera.io created
customresourcedefinition.apiextensions.k8s.io/imagesets.operator.tigera.io created
customresourcedefinition.apiextensions.k8s.io/installations.operator.tigera.io created
customresourcedefinition.apiextensions.k8s.io/tigerastatuses.operator.tigera.io created
serviceaccount/tigera-operator created
clusterrole.rbac.authorization.k8s.io/tigera-operator created
clusterrolebinding.rbac.authorization.k8s.io/tigera-operator created
deployment.apps/tigera-operator created
[root@itserver-master2 kube]# [root@itserver-master2 kube]# kubectl get pods -n tigera-operator
NAME READY STATUS RESTARTS AGE
tigera-operator-6779dc6889-zd4zt 1/1 Running 0 55s
[root@itserver-master2 kube]#
注意: 主要修改内容:cidr: 172.16.0.0/16,需要与控制平面初始化时的地址填写的地址一直
spec:
  # Configures Calico networking.
  calicoNetwork:
    # Note: The ipPools section cannot be modified post-install.
    ipPools:
    - blockSize: 26
      cidr: 172.16.0.0/12
      encapsulation: VXLANCrossSubnet
      natOutgoing: Enabled
nodeSelector: all()[root@itserver-master2 kube]# kubectl create -f custom-resources.yaml
installation.operator.tigera.io/default created
apiserver.operator.tigera.io/default created
[root@itserver-master2 kube]# kubectl get ns
NAME STATUS AGE
calico-system Active 48s
default Active 3h5m
kube-node-lease Active 3h5m
kube-public Active 3h5m
kube-system Active 3h5m
tigera-operator Active 6m35s
[root@itserver-master2 kube]# kubectl get pods -n calico-system
NAME READY STATUS RESTARTS AGE
calico-kube-controllers-68bf945ffc-mf7t2 0/1 ContainerCreating 0 75s
calico-node-27fgm 0/1 Init:ImagePullBackOff 0 75s
calico-typha-5886b45b65-pmsm7 0/1 ErrImagePull 0 75s
csi-node-driver-9b29j 0/2 ContainerCreating 0 75s
[root@itserver-master2 kube]# [root@itserver-master2 certs.d]# kubectl get pods --all-namespaces
NAMESPACE NAME READY STATUS RESTARTS AGE
calico-apiserver calico-apiserver-864697c659-2sdhd 1/1 Running 0 4m18s
calico-apiserver calico-apiserver-864697c659-c2vp9 1/1 Running 0 4m18s
calico-system calico-kube-controllers-68bf945ffc-dvrlf 1/1 Running 0 63m
calico-system calico-node-27fgm 1/1 Running 0 18h
calico-system calico-node-zwpls 1/1 Running 0 17h
calico-system calico-typha-5886b45b65-pmsm7 1/1 Running 0 18h
calico-system csi-node-driver-9b29j 2/2 Running 0 18h
calico-system csi-node-driver-mrtq5 2/2 Running 0 17h
kube-system coredns-67bd986d4c-67fvl 1/1 Running 0 16m
kube-system coredns-67bd986d4c-x7vk7 1/1 Running 0 56m
kube-system etcd-itserver-master2 1/1 Running 1 21h
kube-system kube-apiserver-itserver-master2 1/1 Running 1 21h
kube-system kube-controller-manager-itserver-master2 1/1 Running 1 21h
kube-system kube-proxy-9rv85 1/1 Running 0 21h
kube-system kube-proxy-l9rht 1/1 Running 1 17h
kube-system kube-scheduler-itserver-master2 1/1 Running 1 21h
tigera-operator tigera-operator-6779dc6889-zd4zt 1/1 Running 0 18h
[root@itserver-master2 certs.d]# 看到如上几个空间中的状态都变为runging时,网络部署成功
第一步、部署文件准备nginx.yaml
apiVersion: v1
kind: Service
metadata:
  name: nginx
  labels:
    app: nginx
spec:
  ports:
  - port: 80
    name: web
  selector:
    app: nginx

---
apiVersion: apps/v1
kind: Deployment
metadata:
  name: nginx-deployment
spec:
  replicas: 1
  selector:
    matchLabels:
      app: nginx
  template:
    metadata:
      labels:
        app: nginx
    spec:
      containers:
      - name: nginx
        image: qingcloudtech/nginx:1.25.4
        ports:
        - containerPort: 80
          name: web
第二部、执行命令
kubectl apply -f nginx.yaml 第三步、检查service及deployment
[root@itserver-master2 kube]# kubectl get svc
NAME         TYPE        CLUSTER-IP       EXTERNAL-IP   PORT(S)   AGE
kubernetes   ClusterIP   10.96.0.1        <none>        443/TCP   22h
nginx        ClusterIP   10.101.221.253   <none>        80/TCP    17s
[root@itserver-master2 kube]# kubectl get deploy -o wide
NAME               READY   UP-TO-DATE   AVAILABLE   AGE   CONTAINERS   IMAGES                       SELECTOR
nginx-deployment   1/1     1            1           35s   nginx        qingcloudtech/nginx:1.25.4   app=nginx
[root@itserver-master2 kube]#
[root@itserver-master2 kube]# curl http://172.24.128.130
<!DOCTYPE html>
<html>
<head>
<title>Welcome to nginx!</title>
<style>
html { color-scheme: light dark; }
body { width: 35em; margin: 0 auto;
font-family: Tahoma, Verdana, Arial, sans-serif; }
</style>
</head>
<body>
<h1>Welcome to nginx!</h1>
<p>If you see this page, the nginx web server is successfully installed and
working. Further configuration is required.</p>

<p>For online documentation and support please refer to
<a href="http://nginx.org/">nginx.org</a>.<br/>
Commercial support is available at
<a href="http://nginx.com/">nginx.com</a>.</p>

<p><em>Thank you for using nginx.</em></p>
</body>
</html>
[root@itserver-master2 kube]#
至此,完成整个部署过程
你可以通过【QingHub Studio】 ) 套件直接安装部署,也可以手动按如下文档操作,该项目已经全面开源,完整的脚本可以从如下开源地址获取:https://gitee.com/qingplus/qingcloud-platform 【QingHub Studio集成开发套件】
Play with Kubernetes 介绍 Play with Kubernetes是Docker 通过使用Docker-in-Docker(DinD)技术模拟了多个虚拟机 的效果,从而提供了一个在浏览器中免费使用CentOS Linux 虚拟机的接口和体验平台,Play with Kubernetes有如下几个优缺点:
优点
免费体验:每次登录后都有4个小时的体验时间,可以做想做的实验;
K8s环境使用kubeadm直接部署(使用 weave 网络);
平台共提供了5台Centos7设备供我们使用(docker版本为24.0.2),也就是可以创建5个虚拟node;
K8s也是比较新的版本1.27.2版本;
直接联网,需要apply的yaml或者下载的镜像是直接从官网下载的,而且是外网。
缺点
只能使用github或者docker账户做oauth验证,所以要首先拥有docker或者github账户;
每次4小时的Session过期后,再登录之后又要从0开始搭建k8s;
因为是浏览器中使用,所有交互不是很好,比如Windows 下的复制粘贴不是正常的Ctrl+C和Ctrl+V了(后边会介绍如何复制粘贴);
最多只能创建5个虚拟机,也就是只能搭建一个master+4 worker的5node的集群,当然对于体验来说也够用了。
总体来说,Play with Kubernetes是一个很好的免费体验平台,对于日常学习、理解和实践基础概念是完全够用了。
下边介绍下如何使用。
如何复制粘贴 工欲善其事必先利其器,之前说了使用过程中不能用正常的Ctrl+C和Ctrl+V来复制粘贴了,所以先介绍下如何复制粘贴。
@七禾页话
MAC电脑 登录后,如果是Mac电脑,Setting中可以看到会自动识别出来,如果没有识别出来,可以选中“Mac OSX”,复制粘贴键如下:
复制:Command键+C
粘贴:Command键+V
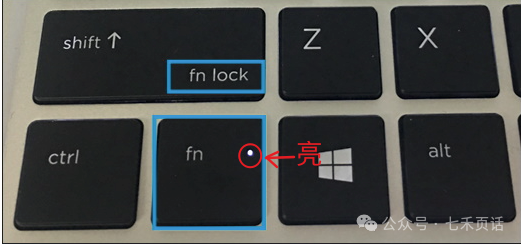
Windows电脑 如果不是Mac电脑,是Windows系统,那么登录后,Setting中识别的是None,这个时候的复制粘贴如下:
带Fn键的,需要开启Fn功能,也就是Fn键上的小灯是亮的:
Ctrl键+Fn键+Insert键(F10键)
Shift键+Fn键+Insert键(F10键)
Fn功能的开启先按fn然后迅速按左侧shift键,即可开启fn(功能)模式:
@七禾页话
如果不带Fn键的:
Ctrl键+Insert键
Shift键+Insert键
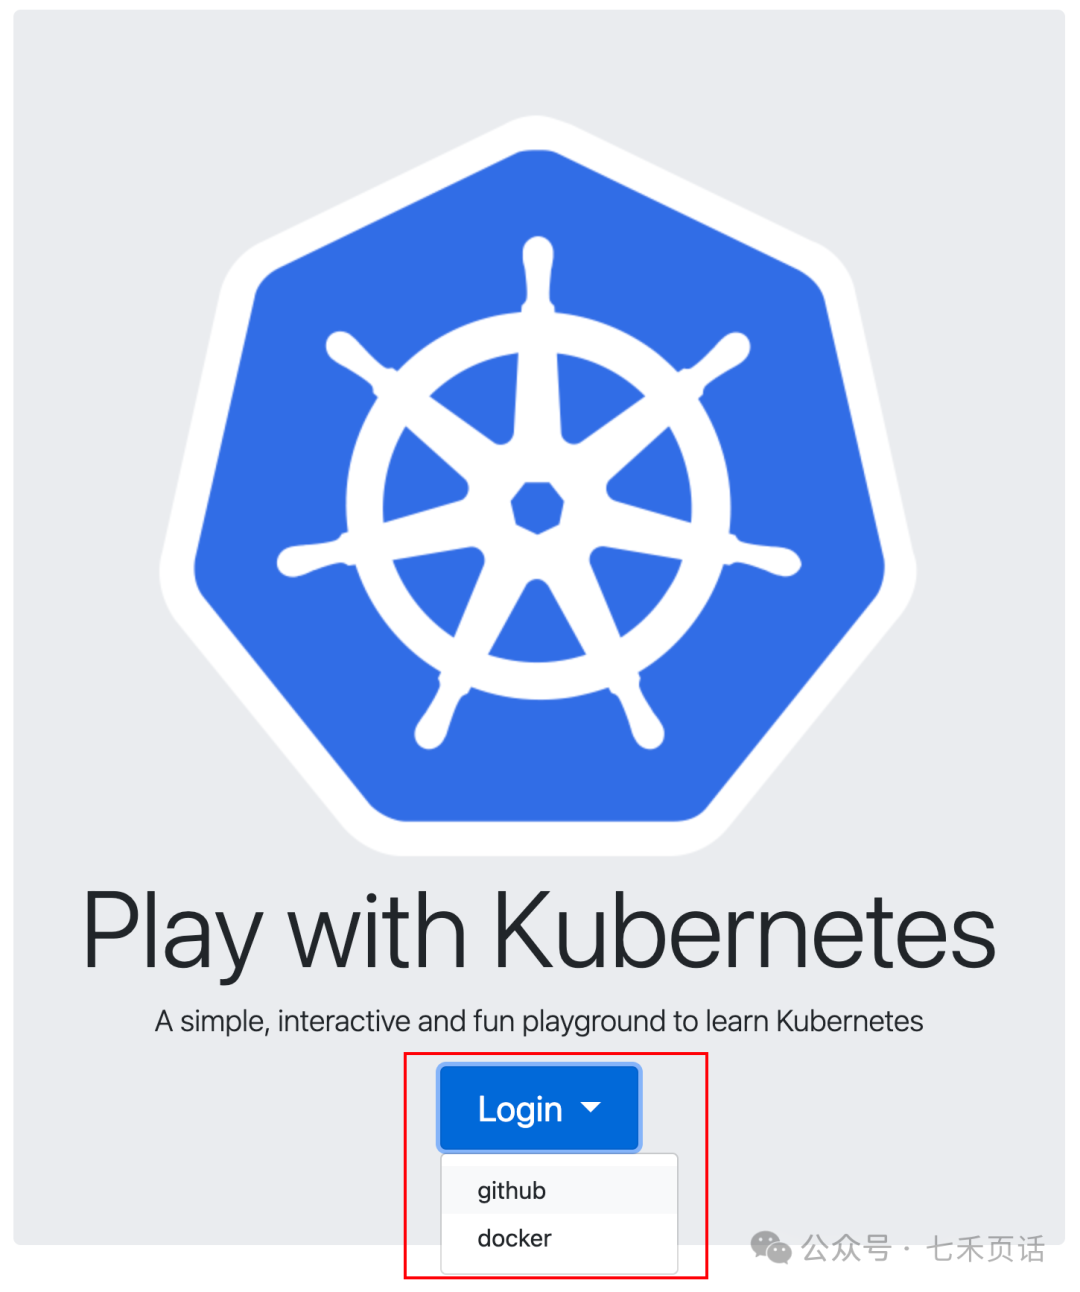
如何使用Play with Kubernetes 接下来就是正文如何使用Play with Kubernetes了。
打开网站https://labs.play-with-k8s.com/,选择使用Github或者Docker后跳转进行Oauth验证登录。
@七禾页话
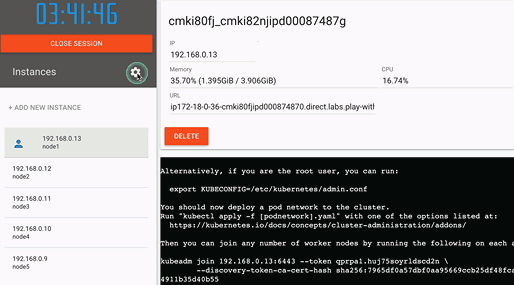
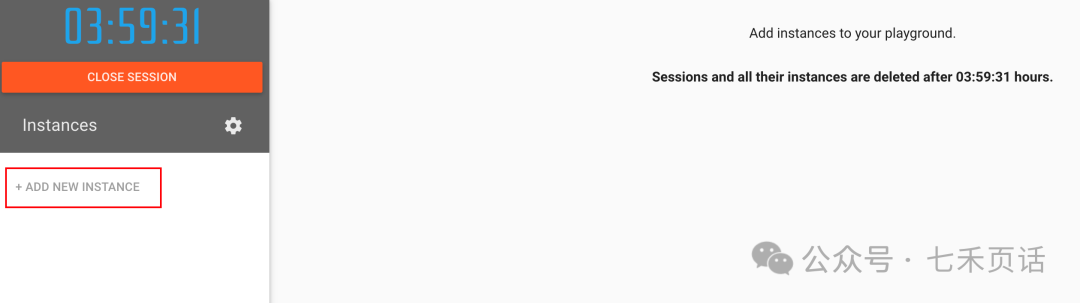
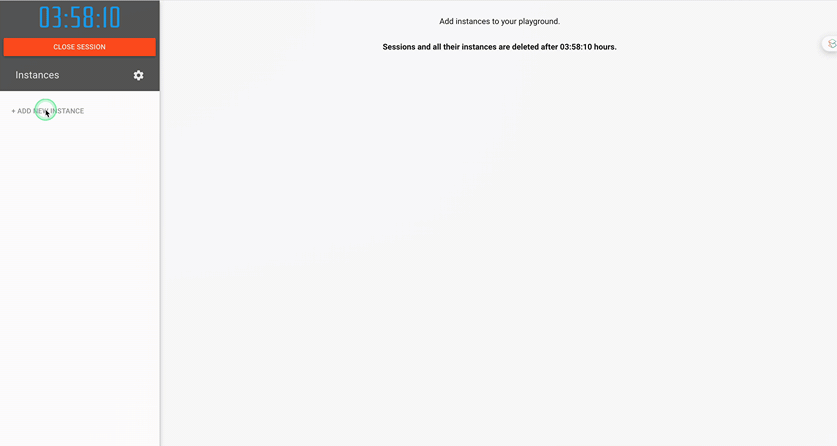
创建Instance 登录后首先要Add New Instance来创建Node,可以根据自己的需要创建多个node,最多5个:
@七禾页话
@七禾页话
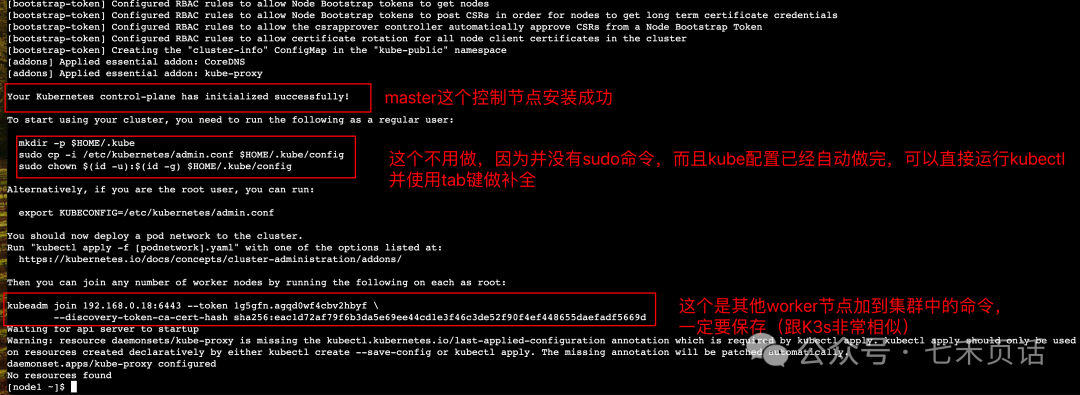
初始化集群的Master节点 创建完Node后,可以看到Warning提示初始化Master的过程,一共三部曲,其中必做的是头两步:
初始化K8s的Master节点;
初始化K8s的网络;
初始化K8s的Master节点命令如下:
#### 左右滑动,不需要任何修改
kubeadm init --apiserver-advertise-address $(hostname -i) --pod-network-cidr 10.5.0.0/16
Master节点启动过程如下:
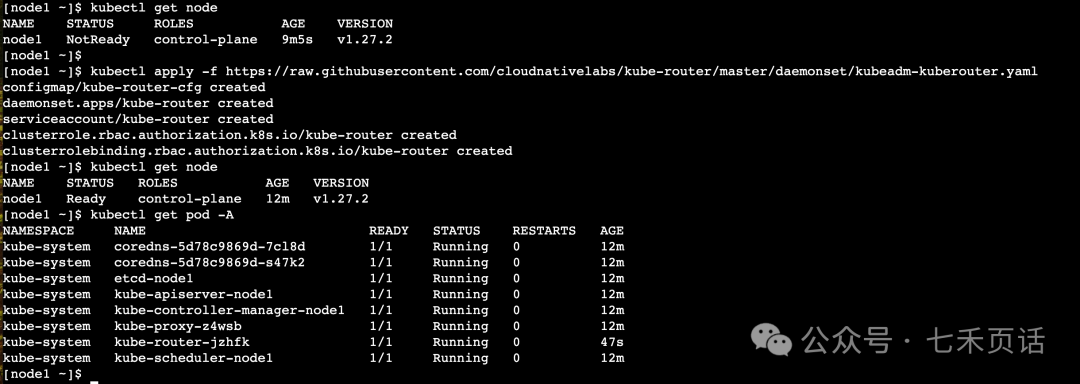
需要注意的在上图中已经标注,此时Node的状态是NotReady,而且coreDNS的POD也是pending的状态,原因是没有网络插件,所以需要运行第二步:初始化K8s的网络,命令如下:
#### 左右滑动,不需要任何修改
kubectl apply -f https://raw.githubusercontent.com/cloudnativelabs/kube-router/master/daemonset/kubeadm-kuberouter.yaml
安装结果如下,安装网络插件后,等一会儿Node就会Ready,所有的POD也都会Ready:
注册Worker到Master 如果已经创建了其他的node,直接在master以外的node上运行如下的命令,此命令是安装K8s master节点log中的join命令,其中token每次都会变,所以不要直接copy下边的例子:
#### 左右滑动
kubeadm join 192.168.0.18:6443 --token 1g5gfn.agqd0wf4cbv2hbyf \
        --discovery-token-ca-cert-hash sha256:eac1d72af79f6b3da5e69ee44cd1e3f46c3de52f90f4ef448655daefadf5669d
过程如下:
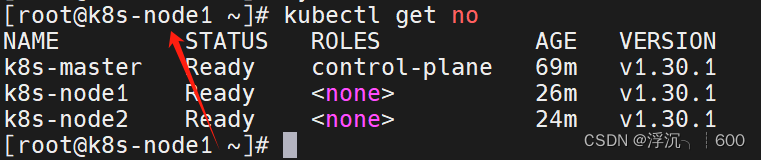
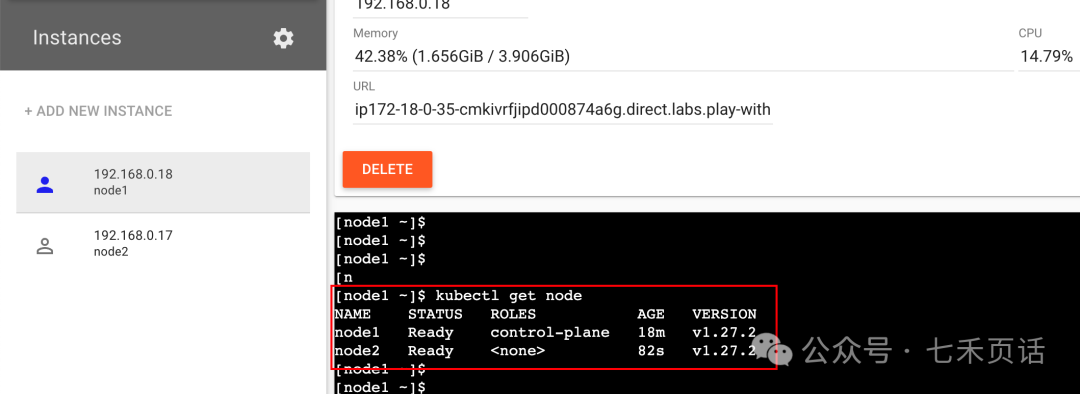
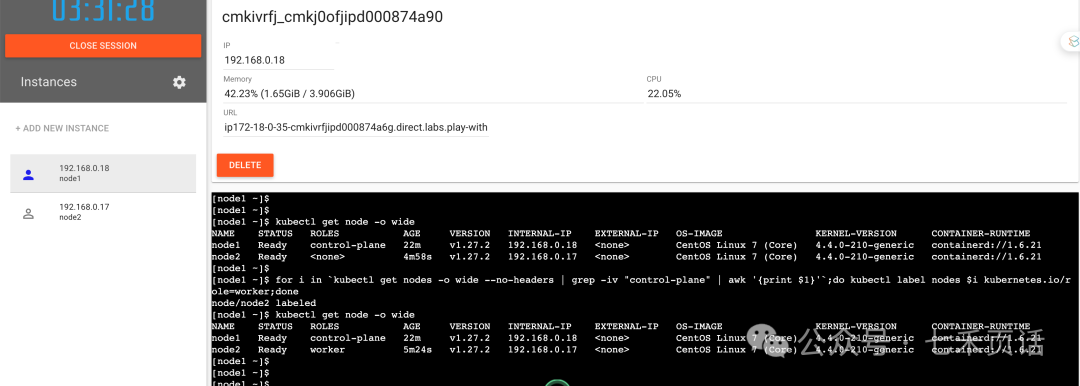
然后回到Master节点运行kubectl get node可以看到node2已经加入到集群了:
但是会看到worker的role是none,为了很清晰明了的知道各个node的角色,可以打label:
###左右滑动
kubectl label nodes <node name> kubernetes.io/role=worker

或者for循环
for i in `kubectl get nodes -o wide --no-headers | grep -iv "control-plane" | awk '{print $1}'`;do kubectl label nodes $i kubernetes.io/role=worker;done
效果如下:
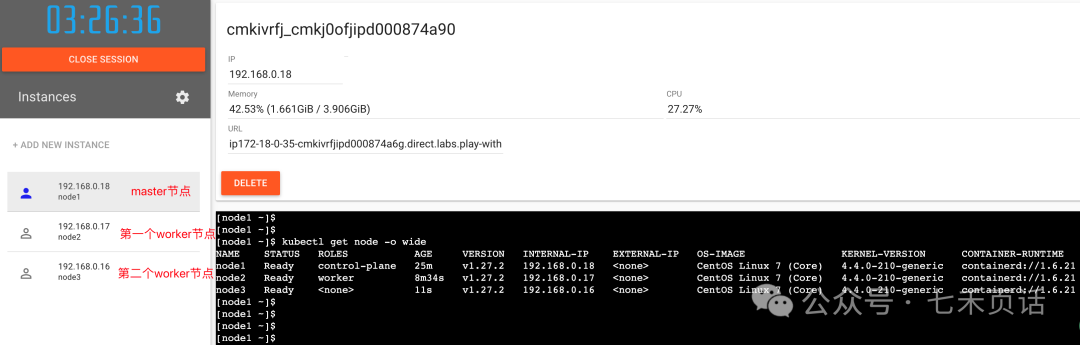
可以继续将第二个worker节点加入到集群中,到此一个Master加两个Worker的小K8s集群创建完成了。
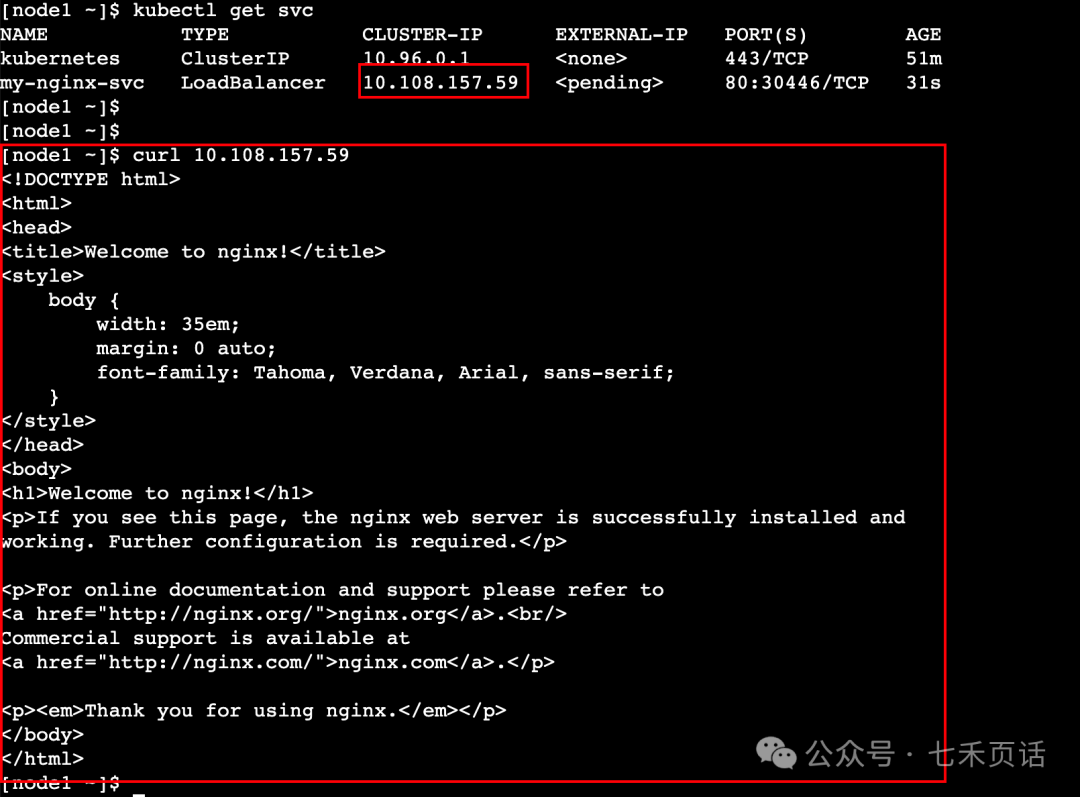
@七禾页话
实例化一个Nginx Ngnix作为云原生 界的hello world常常被用来验证集群是否好用,所以我们也继续用Ngnix来验证Cluster的基础功能是否好用:
####左右滑动
kubectl apply -f https://raw.githubusercontent.com/kubernetes/website/master/content/en/examples/application/nginx-app.yaml
结果如下:
查看service之后可以使用curl cluster-ip来确认nginx的业务是否好用,如果看到如下的Thank you for using nginx代表nginx业务是正常的:
以上就是使用Play with Kubernetes的过程,总体使用下来除了复制粘贴比较麻烦,偶尔会有卡顿,整体使用下来还是很好的,对于初次接触K8s或者做一些简单验证学习是很好的一个环境,当然一次性4个小时,如果想要验证的没有做完,那就要重来了,需要数秒刷副本!
以上,欢迎留言来一起了解学习ICT的相关知识!


 浙公网安备 33010602011771号