Linux Zero Copy 零拷贝
Linux Zero Copy 零拷贝
Purpose
目的
The purpose of this document is to highlight some of the aspects of various Linux subsystems (virtual memory, virtual file system) and how they relate to storage subsystems (file systems and block device drivers). Specifically, the goal is to provide enough information to intelligently design inter-process communication and logging software.
本文的目的是强调各种 Linux 子系统(虚拟内存、虚拟文件系统)的一些方面,以及它们与存储子系统(文件系统和块设备驱动程序)的关系。具体来说,我们的目标是提供足够的信息来智能地设计行程间通讯和日志软件。
Virtual Memory
虚拟内存
Much of this section is summarized from the very good introduction on The Linux Documentation Project.
这一部分的大部分内容是从《 Linux文档计划精彩的介绍中总结出来的。
The virtual memory subsystem presents a view of system memory that is larger than the physical memory available. In addition it provides a number of other features:
虚拟内存子系统提供的系统内存视图大于可用的物理内存。此外,它还提供了一些其他特性:
- Large address spaces 大地址空间
- Process isolation and protection 进程隔离和保护
- Memory mapping of files or devices 文件或设备的内存映射
- Allocation / division of physical memory 物理内存的分配/划分
- Shared memory 共享内存
Abstract Model
抽象模型
The address space of a process is the set of all addresses representable in a pointer (i.e. a 32 or 64 bit word). In userspace, all memory accesses are made against virtual addresses. A virtual address within the process address space is translated to physical addresses by lookup tables managed by the kernel. In order to keep these lookup tables efficient, they operate on fixed sized regions of memory, one unit of which is called a page. The lookup tables are called page tables. On x86 and arm the page size is 4kb (4096 bytes).
进程的地址空间是指针中可表示的所有地址的集合(即32位或64位字)。在用户空间中,所有的内存访问都是针对虚拟地址进行的。进程地址空间中的虚拟地址通过内核管理的查找表转换为物理地址。为了保持这些查找表的有效性,它们对固定大小的内存区域进行操作,其中一个单元称为页。查阅表称为页表。在 x86和 arm 上,页面大小为4kb (4096字节)。
Virtual addresses are composed of two fields: frame number and offset. The frame number is the table entry used to lookup the physical page and the offset is where within the physical page the address refers to.
虚拟地址由两个字段组成: 帧号和偏移量。帧号是用于查找物理页面的表条目,偏移量是地址在物理页面中引用的位置。

Abstract model of Virtual to Physical address mapping
虚拟到物理地址映射的抽象模型
The page table keeps track of some metadata associated with each mapping:
页面表跟踪与每个映射相关的一些元数据:
- Is this page table entry valid 此页表项有效吗
- The physical page number this entry points to 这个入口指向的物理页码
- Access control: read, write, executable 访问控制: 读,写,可执行
The physical processor is able to use the page table that is managed by the kernel. When a program attempts to access memory the processor will lookup the physical page from the table and (if valid) complete the access operation. If the table entry is not valid, it notifies the kernel by issuing a page fault.
物理处理器能够使用由内核管理的页表。当程序试图访问内存时,处理器将从表中查找物理页,并(如果有效)完成访问操作。如果表条目无效,它将通过发出一个页面错误通知内核。
Demand Paging
请求寻呼
Given that each process has it's own address space the amount of addressable virtual memory in a multiprocess system can be much greater than the physical memory. Linux implements a number of strategies to efficiently utilize this limited physical memory. One of those strategies is demand paging of process images.
假设每个进程都有自己的地址空间,那么多进程系统中的可寻址虚拟内存的数量可能远远大于物理内存。Linux 实现了许多策略来有效地利用这个有限的物理内存。其中一种策略是进程映像的请求分页。
When a program (in ELF format) is first started, the ELF interpreter maps the program file into memory at which point we refer to it as the process image. This mapping is initially unresolved (except for the initial portion) in the page table and physical memory is not yet dedicated to the process image. Instead, pages are filled on demand in response to page faults encountered as the program image is accessed.
当一个程序(ELF 格式)首次启动时,ELF 解释器将程序文件映射到内存中,此时我们将其称为进程映像。该映射最初在页表中无法解析(除了初始部分) ,物理内存尚未专用于进程映像。相反,在访问程序映像时遇到的页面错误将按需填充页面。
When the processor encounters a memory access in the program flow (it may need to fetch the next instruction, jump to a different instruction, or fetch or write to memory) it resolves the virtual address to a physical address through the processes page table. As mentioned above, if there is no entry in the process page table for that virtual address or if the entry is invalid the processor issues a page fault and control of the processor moves to the kernel.
当处理器在程序流中遇到内存访问时(它可能需要获取下一条指令、跳转到另一条指令,或者获取或写入内存) ,它通过进程页表将虚拟地址解析为物理地址。如上所述,如果进程页表中没有该虚拟地址的条目,或者该条目无效,则处理器会发出一个页面错误,并将对处理器的控制转移到内核。
For example, in the figure above there is no entry in process 1's page table for virtual page frame number 2 and so if process 1 attempts to read from an address within virtual page frame number 2 the processor cannot translate the address into a physical one.
例如,在上图中,进程1的页表中没有进入虚拟页帧2,因此如果进程1试图从虚拟页帧2中的地址读取地址,处理器不能将地址转换为物理地址。
If the virtual address of the access that induced the page fault is invalid, then the program is trying to read or write to an address that it has not configured. This is known as a segmentation fault. The kernel will signal the program with SIGSEGV and the program counter will jump to the signal handler (usually resulting in process termination).
如果导致页面错误的访问的虚拟地址无效,那么程序将尝试读取或写入一个它没有配置的地址。这就是所谓的内存区段错误。内核将用 SIGSEGV 向程序发出信号,程序计数器将跳转到信号处理程序(通常导致进程终止)。
If the virtual address of the access is valid but there is no physical page backing it, the kernel must assign a physical page to that virtual page, and then fill that page with the program contents read off from disk. In general this is a time consuming process and so this is an opportunity for the scheduler to service some other process on the processor that issued the fault. Once the fetched page is copied to physical memory and an entry is added to the page table, the process is restarted at the faulting instruction. This time the virtual memory address is successfully translated to a physical address by the processor and the program continues.
如果访问的虚拟地址是有效的,但是没有物理页面支持它,内核必须为该虚拟页面分配一个物理页面,然后用从磁盘读取的程序内容填充该页面。一般来说,这是一个耗时的过程,因此调度程序有机会在发出错误的处理器上为其他进程提供服务。一旦获取的页面被复制到物理内存并且一个条目被添加到页表中,进程就会在 faulting 指令处重新启动。这一次,虚拟内存地址被处理器成功地转换为物理地址,程序继续运行。
Linux Page Cache
页面缓存
In general, all reads and writes to real files in Linux go through the Linux page cache. This is a fundamental aspect of Linux performance and has far-reaching implications, including some that we may exploit for optimization.
通常,Linux 中对真实文件的所有读写操作都要经过 Linux 页面缓存。这是 Linux 性能的一个基本方面,具有深远的意义,包括我们可以利用的一些优化。
The Linux page cache is an in-memory generally write-back/read-through cache for file data. When data is read from a regular file it is first moved to page cache, and then made available through the filesystem driver. When data is written to a file, it is first copied to the page cache, and then flushed out to storage at some point later.
Linux 页面缓存通常是一个内存中的文件数据写回/读取缓存。当从一个普通文件中读取数据时,首先将数据移动到页面缓存,然后通过文件系统驱动程序使其可用。将数据写入文件时,首先将其复制到页面缓存,然后在稍后的某个时刻将其刷新到存储。
The purpose of the page cache is to speed up access to files on storage media. Files are generally read in a page at a time and these pages are stored in the page cache.
页面缓存的目的是加速对存储介质上文件的访问。文件通常一次读取一个页面,这些页面存储在页面缓存中。

The Linux Page Cache
页面缓存
Each file in Linux is identified by an data structure called an inode, and in Linux pretty much everything is a file (and so has an inode associated with it). When a page from a memory mapped file is read, it is processed through the page cache. If the cache is hot the page is served out of the cache. Otherwise a physical page is allocated and the filesystem or storage driver is informed to fill the page.
Linux 中的每个文件都由一个称为 inode 的数据结构来标识,在 Linux 中,几乎所有内容都是一个文件(因此有一个与之关联的 inode)。当读取内存映射文件中的页时,将通过页缓存处理该页。如果缓存处于热状态,则从缓存中提供页面。否则,将分配一个物理页面,并通知文件系统或存储驱动程序填充页面。
Pages filled in the page cache generally stay resident until something other demand pushes them out. This is of particular note because, in general, most of the physical memory is in use on Linux (by at least the page cache).
在页面缓存中填充的页面通常保持驻留状态,直到其他需求将它们推出。这一点特别值得注意,因为通常大部分物理内存都在 Linux 上使用(至少是通过页面缓存)。
Recovering physical memory
恢复物理记忆
The Linux kernel attempts to keep a pool of physical memory available for future use. The configurable behavior of this pool has two relative parameters:
Linux 内核试图保持一个可用的物理内存池,以供将来使用。该池的可配置行为有两个相关参数:
- high water mark 高水位线
- low water mark 低水位线
If the amount of physical memory available is greater than the high water mark then the kernel does nothing at all. Anything currently paged into the page cache is left there indefinitely.
如果可用的物理内存量大于最大值,那么内核什么也不做。当前页面缓存中的任何内容都会无限期地保留在那里。
Between the high water mark and low water mark the kernel begins to take action. It will start to evict pages out of physical memory. Below the low water mark the kernel gets more aggressive. The difference between the two is the number of pages the kernel will try to free during each attempt.
在高水位线和低水位线之间,果仁开始采取行动。它将开始从物理内存中删除页面。低于低水位标志的内核变得更具侵略性。两者之间的区别在于每次尝试期间内核尝试释放的页面数量。

kswapd decision points. (a): with lots of physical memory available, the swap daemon doesn't do anything. (b): when available memory drops below the high water mark, the swap daemon attempts to free a couple of pages per timer tick. (c): when available memory drops below the low water mark, the daemon attempts to free more pages per tick.
Kswapd 决策点。(a) : 有了大量可用的物理内存,交换守护进程不会做任何事情。(b) : 当可用内存降到高水位线以下时,交换守护进程会尝试释放每个定时器计时器的几个页面。(c) : 当可用内存降到低水位线以下时,守护进程每秒尝试释放更多页面。
The whole process is done by the a kernel thread called the kernel swap daemon (kswapd). It is serviced on a timer and at each service it looks at the number of free pages and takes action.
整个过程由一个称为内核交换守护进程(kswapd)的内核线程完成。它是通过计时器提供服务的,在每个服务中,它查看空闲页面的数量并采取行动。
When the swap daemon decides to try and free memory it first looks for page cache entries that can be discarded. It does this by walking around the page cache and inspecting some fixed number of pages at each iteration (clock algorithm), looking for any pages that can be discarded. A page is discardable if the page is not mapped into any process address space.
当交换守护进程决定尝试释放内存时,它首先查找可以丢弃的页面缓存条目。它通过遍历页面缓存并在每次迭代中检查一些固定数量的页面(时钟算法) ,寻找可以丢弃的任何页面来实现这一点。如果页没有映射到任何进程地址空间,则可放弃该页。
If the swap daemon doesn't recover enough pages through discarding of disk cache it will then attempt to swap out or discard mapped pages. It looks only at processes that are swappable (some are not), and that have swappable pages. A page can be locked removing it from the candidate pool of swappable pages. If disk swap is enabled, the swap daemon will consider swapping it out to swap file only if it cannot be recovered in another way. Demand-paged program storage, for instance, can be discarded without swapping because the data can be read back from disk if it's needed again later. The swap daemon will preferentially page out old pages versus those that were used recently.
如果交换守护进程无法通过丢弃磁盘缓存恢复足够的页面,那么它将尝试交换或丢弃映射的页面。它只关注可切换的进程(有些不可切换)和可切换页面的进程。从可切换页面的候选池中移除该页面可以被锁定。如果启用了磁盘交换,交换守护进程只有在无法以其他方式恢复时,才会考虑将其交换出交换文件。例如,需求分页的程序存储可以丢弃,而不需要进行交换,因为如果以后需要数据,可以从磁盘读取数据。交换守护进程将优先翻出旧页面而不是最近使用的页面。
Virtual File System
虚拟文件系统
Again, much of this section is summarized from the very good introduction on The Linux Documentation Project
同样,这一部分的大部分内容是从《 Linux文档计划精彩的介绍中总结出来的
The Linux Virtual File system (VFS) allows the operating system to interact with heterogeneous storage media utilizing a wide array of different filesystems. Filesystem drivers in Linux translate VFS interactions to filesystem specific interactions with the underlying storage media.
Linux 虚拟文件系统(Linux Virtual File system,VFS)允许操作系统利用大量不同的文件系统与异构存储介质进行交互。Linux 中的文件系统驱动程序将 VFS 交互转换为特定于文件系统的与底层存储介质的交互。

Schematic of the Linux virtual filesystem and caching.
Linux 虚拟档案系统和缓存示意图。
The basic building block of the Linux VFS is the inode. Every file in the filesystem is described by one and only one inode. They describe both the contents and topology of the VFS. inodes and directory contents are cached in the page cache like file contents, though these cache entries are not 1-1 mappings with data on the block-device of the storage medium. Rather, they are translated by the filesystem driver when they are read in. Never-the-less, they still are generally discardable cache entries as the data can always be restored by reading back the relevant blocks of the underlying storage medium (through the translation layer of the filesystem driver).
Linuxvfs 的基本构建块是 inode。文件系统中的每个文件都由一个且只有一个 inode 描述。它们描述了 VFS 的内容和拓扑结构。Inode 和目录内容像文件内容一样缓存在页面缓存中,尽管这些缓存条目不是与存储介质的块设备上的数据的1-1映射。相反,它们在读入时由文件系统驱动程序进行转换。尽管如此,它们通常仍然是可丢弃的高速缓存条目,因为数据总是可以通过读回底层存储介质的相关块(通过文件系统驱动程序的转换层)来还原。
A filesystem is basically two things:
文件系统基本上有两个方面:
- a specification for how file contents, metadata, and directory information are laid out on a continuous storage medium 文件内容、元数据和目录信息如何在连续存储介质上布局的规范
- a driver software which interprets this specification and provides a consistent API for the kernel to interact with. 一个驱动程序软件,它解释这个规范并为内核提供一致的 API 来进行交互
Storage media are block devices which are represented in Linux as files. Like other files they get an inode representation in the VFS and reads and writes to these files are cached in the page cache. When the filesystem driver reads data from the block device to, for instance, enumerate inodes or directory entries, the entire block is pulled into the page cache and then the exact data needed is read, interpreted, and used to fill inode and directory structures. These structures are themselves stored within pages of memory pulled from the page cache pool and are subject to cache rules.
存储介质是块设备,在 Linux 中以文件的形式表示。像其他文件一样,它们在 VFS 中获得一个 inode 表示,并将对这些文件的读写缓存在页面缓存中。当文件系统驱动程序将数据从块设备读取到,例如,枚举 inode 或目录条目时,整个块被拉到页面缓存中,然后所需的准确数据被读取、解释,并用于填充 inode 和目录结构。这些结构本身存储在从页缓存池提取的内存页中,并受缓存规则的约束。
Normally read() and write() act similarly. When the userspace read()s data from a file, the filesystem driver copies data from the block device into the userspace buffer for the read.
正常情况下,read ()和 write ()的动作相似。当用户空间从文件中读取()数据时,文件系统驱动程序将数据从块设备复制到用户空间缓冲区中进行读取。
Memory-mapped files are (potentially) dealt with a little differently. If the file contents are stored page-aligned and byte-for-byte on the block device (they are for a sane filesystem) then the filesystem driver can implement an optimization informing the kernel to map the existing cache pages directly into the process page table.
内存映射文件(可能)的处理方式稍有不同。如果文件内容以页面对齐和字节对字节的方式存储在块设备上(它们用于一个健全的文件系统) ,那么文件系统驱动程序可以实现一个优化,通知内核将现有的缓存页面直接映射到进程页表中。
Process Memory
进程记忆
The fundamental API with which a userspace program interacts with the kernel virtual memory subsystem is through the mmap(2) system call (and it's glibc wrapper function):
用户空间程序与内核虚拟内存子系统交互的基本 API 是通过 mmap (2)系统调用(以及它的 glibc 包装函式) :
void *mmap(void *addr, size_t length, int prot, int flags,
           int fd, off_t offset);
int munmap(void *addr, size_t length);
From the Linux manual:
来自 Linux 手册:
mmap() Mmap () creates a new mapping in the virtual address space of the calling process. The starting address for the new mapping is specified in addr. The length argument specifies the length of the mapping (which must be greater than 在编码过程的虚拟地址空间中创建一个新的映射。新映射的起始地址在 addr 中指定。Length 参数指定映射的长度(必须大于0).
mmap() can be used to map the contents of a file into the process address space. The process can then read from or write to the file by simply dereferencing a pointer. In particular:
Mmap ()可用于将文件的内容映射到进程地址空间。然后,进程可以通过简单地解引用一个指针来读取或写入文件。特别是:
The contents of a file mapping (as opposed to an anonymous mapping; see 文件映射的内容(与匿名映射相反) ,参见MAP_ANONYMOUS 匿名地图 below), are initialized using 下面) ,使用length 长度 bytes starting at 从... 开始offset 偏移 in the file (or other object) referred to by the file descriptor 在文件描述符引用的文件(或其他对象)中fd 消防局. offset 偏移 must be a multiple of the page size as returned by sysconf( 必须是 sysconf (返回的页大小的倍数_SC_PAGE_SIZE 页面大小).
Of particular note is how program instructions are accessed, which was introduced previously in the discussion on the virtual memory subsystem. Consider the execution of a program in the Executable and Linker File (ELF) format. When a program is executed with the exec(3) family of functions (and the underlying system call) Linux will replace the current process image with the system interpreter by mapping it into process address space and moving the program counter to first address in the interpreter program. The interpreter then maps the ELF file into memory, parses out some of the metadata, and then jumps to the start of the program in the mapped file. We often refer to the ELF file (as mapped into memory) as the program image. When the interpreter maps this file into memory it does so as an executable read-only mapping.
特别要注意的是如何访问程序指令,这在前面关于虚拟内存子系统的讨论中已经介绍过。考虑以可执行文件和链接器文件(ELF)格式执行程序。当一个程序用 exec (3)系列函数(和底层的系统调用)执行时,Linux 将用系统解释器替换当前进程映像,方法是将其映射到进程地址空间,并将程序计数器移动到解释器程序中的第一个地址。然后,解释器将 ELF 文件映射到内存中,解析出一些元数据,然后跳到映射文件中的程序开始。我们通常将 ELF 文件(映射到内存中)称为程序映像。当解释器将这个文件映射到内存中时,它作为一个可执行的只读映射来执行。
Calling mmap() with flags |= MAP_ANONYMOUS is how a process maps general purpose physical memory into it's address space. Specifically:
使用标志 | = MAP _ anonymous 调用 mmap ()是进程将通用物理内存映射到其地址空间的方式:
The mapping is not backed by any file; its contents are initialized to zero. The fd argument is ignored; however, some implementations require fd to be 映射不受任何文件的支持; 其内容被初始化为零。Fd 参数被忽略; 但是,有些实现要求 fd 为-1 if 如果MAP_ANONYMOUS 匿名地图 (or (或MAP_ANON 图片来源: anon) is specified, and portable applications should ensure this. The offset argument should be zero. The use of ) ,可移植应用程序应该确认这一点。偏移量参数应该为零MAP_ANONYMOUS 匿名地图 in conjunction with 与... 一起MAP_SHARED 图片共享 is supported on Linux only since kernel 2.4. 只在内核2.4版本中支持
This is the underlying mechanism of how memory allocators (i.e. malloc()) work. They call mmap() to map physical pages into the process address space, then they add additional metadata and various global data structures to provide a higher level interface on top of that. Note that the glibc implementation of malloc() never calls munmap(). Any free()ed memory is kept mapped for reuse in a later malloc() call.
这是内存分配器(即 malloc ())工作的基本机制。它们调用 mmap ()将物理页面映射到进程地址空间,然后添加额外的元数据和各种全局数据结构,以在此基础上提供更高级别的接口。注意,malloc ()的 glibc 实现从不调用 munmap ()。在以后的 malloc ()调用中,任何空闲的()内存都会被映射以便重用。
Calling mmap() with a file descriptor of an open file handle will initialize the map with the contents of the file, starting at offset. Calling with flags |= MAP_SHARED means that updates to the mapping are visible to other processes with the same region mapped into their address space, and (in the case of a file mapping), writes the the map are carried through to the underlying file. Specifically:
使用打开文件句柄的文件描述符调用 mmap ()将使用文件的内容初始化映射,从偏移量开始。使用标志 | = MAP _ shared 调用意味着对映射的更新对于其他进程是可见的,这些进程将相同的区域映射到它们的地址空间中,并且(在文件映射的情况下) ,将映射写入底层文件。具体来说:
MAP_SHARED 图片共享 Share this mapping. Updates to the mapping are visible to other processes mapping the same region, and (in the case of file-backed mappings) are carried through to the underlying file. (To precisely control when updates are carried through to the underlying file requires the use of 分享这个映射。对映射的更新对于映射相同区域的其他进程是可见的,并且(对于文件支持的映射来说)进行到底层文件。(要精确控制何时对基础文件执行更新,需要使用msync(2) 超级男孩(2).)
A shared mapping (whether anonymous or file-backed) allows the physical page to reside in the page table for more than one process.
共享映射(无论是匿名的还是文件支持的)允许物理页驻留在多个进程的页表中。
Process shared memory with a file-backing: Zerocopy
使用文件备份进程共享内存: Zerocopy
Processes may also share memory by mapping the same region of the same file into their address space using MAP_SHARED. The mapped regions of memory will refer to the same physical pages. Writes to a page by one process are visible through reads by any other processes.
进程还可以通过使用 MAP _ shared 将同一文件的相同区域映射到它们的地址空间来共享内存。被映射的内存区域将引用相同的物理页。通过任何其他进程的读操作可以看到一个进程对页的写操作。
More importantly, however, is the fact that the physical pages behind the backing are the same physical pages as the disk cache. This fact can be exploited in certain use cases to optimize data flow throughout the system.
然而,更重要的是,支持后面的物理页面与磁盘缓存是相同的物理页面。在某些用例中可以利用这一事实来优化整个系统的数据流。
Consider this scenario: We have an embedded Linux device receiving images from a MIPI camera through the Video For Linux (V4l2) API, saving them to a file, and also doing some useful work on them (perhaps analyzing them and recording statistics). If we're not careful, may end up copying the images multiple times.
考虑这个场景: 我们有一个嵌入式 Linux 设备,它通过 Video For Linux (V4l2) API 接收来自 MIPI 摄像机的图像,将它们保存到一个文件中,并对它们做一些有用的工作(可能是分析它们和记录统计数据)。如果我们不小心,可能最终复制的图像多次。

Simple embedded device application. One process reads camera images from a device, while another process writes those images to storage.
简单的嵌入式设备应用程序。一个进程从设备读取相机图像,而另一个进程将这些图像写入存储。
A simple choice of options for how we may implement this scenario is the following:
对于如何实现这一场景,一个简单的选择如下:
- Split the task into to two processes: one to manage the camera and read data in. A second to do useful work, and write data out. 将任务分成两个进程: 一个用于管理相机并读取数据。一秒钟做有用的工作,并写出数据
- process 1 程序1 allocates image buffers using 分配图像缓存使用malloc() Malloc () (or (或new() in c++ C + + 中的 new ()) and registers them with ) ,并以v4l2 (as (作为V4l2_USER_POINTER 4l2 user pointer structures). 结构)
- When images are received at 当图像接收到process 1 程序1, send() 发送() them over a Unix domain socket to 他们通过一个 Unix 域名套接字process 2 程序2
- recv() Recv () the image at 图片在process 2 程序2, do the work on the image, and then ,做工作的形象,然后write() Write () the data to an open file descriptor. 数据到一个打开的文件描述符
This choice may result in up to 5 separate instances of the same data in memory! A more informed choice may reduce this to only a single instance. Because we never copy this data, this is referred to as a zerocopy optimization.
这种选择最多可能导致内存中同一数据的5个单独实例!一个更明智的选择可能会将这种情况减少到只有一个实例。因为我们从不复制这些数据,所以这被称为零拷贝优化。
First, lets illustrate where all these extra instances are coming from.
首先,让我们说明所有这些额外的实例是从哪里来的。

Lower-level schematic representation of data flow for the camera to storage application example.
底层的数据流示意图表示为摄像机存储应用程序的例子。
First, the v4l2 driver may not be able to fill the userspace buffer directly due to page alignment or size restrictions. Instead, it may be forced to map and fill a buffer of it's own, and then copy that into the buffer that program 1 allocated. Second, when writing to a socket, data is copied to a network-stack buffer in the kernel until it can be delivered. When process 2 recv()s from the socket, the data is copied again into a process 2 allocated buffer. Finally when process 2 calls write() the data is copied from the userspace buffer into page cache and asynchronously flushed out to the storage medium through the storage driver.
首先,由于页面对齐或大小限制,v4l2驱动程序可能无法直接填充用户空间缓冲区。相反,它可能被迫映射并填充自己的缓冲区,然后将其复制到程序1分配的缓冲区中。其次,当写入套接字时,数据被复制到内核中的网络堆栈缓冲区,直到可以传递为止。当进程2从套接字获取 recv () s 时,数据将再次复制到进程2分配的缓冲区中。最后,当进程2调用 write ()时,数据从用户空间缓冲区复制到页面缓存,并通过存储驱动程序异步刷新到存储介质。
An zero-copy implementation of the same application might be as follows:
同一应用程序的零拷贝实现可能如下:
- Process 1 and 2 both 过程1和过程2mmap() Mmap () the same region of the output file into their address space. 把输出文件的相同区域放到这个区域
- Process 1 registers the buffer with 进程1注册缓冲区v4l2 (as (作为V4l2_MMAP 4l2 mmap structures). 结构)
- When an image is received at process 1 it notifies process 2 by sending a very small notification message over a Unix domain socket. 当进程1接收到一个图像时,它会通过 Unix domain socket 发送一个非常小的通知消息通知进程2
- Process 2 dereferences it's pointer to the mapped data and directly accesses the image memory. 进程2解除它对映射数据的指针,并直接访问映像内存

A note on O_DIRECT
关于 o _ direct 的一个注释
In the above zerocopy discussion we eliminate additional copies by taking advantage of the existing page cache copy of the data. Another option that can reduce data copies during write is to write to a file opened with O_DIRECT. The exact semantics of O_DIRECT depends on the implementation of the filesystem driver, but in general:
在上面的零拷贝讨论中,我们通过利用数据的现有页面缓存副本来消除额外的副本。另一种可以减少写入过程中的数据副本的方法是写入用 o _ direct 打开的文件。O _ direct 的确切语义取决于文件系统驱动程序的实现,但一般来说:
O_DIRECT O _ direct (since Linux 2.4.10) Try to minimize cache effects of the I/O to and from this file. In general this will degrade performance, but it is useful in special situations, such as when applications do their own caching. File I/O is done directly to/from user- space buffers. The (自 Linux 2.4.10以来)尝试最小化输入/输出到这个文件的缓存效果。一般来说,这会降低性能,但是在特殊情况下,比如应用程序执行自己的缓存时,这是很有用的。文件 i/o 是直接从用户空间缓冲区完成的。这个O_DIRECT O _ direct flag on its own makes an effort to transfer data synchronously, but does not give the guarantees of the 标志本身可以同步传输数据,但是不能保证O_SYNC 同步flag that data and necessary metadata are transferred. To guarantee synchronous I/O, 标记数据和必要的元数据被传输,O_SYNC 同步 must be used in addition to 除此之外O_DIRECT O _ direct.
Usually what this means is that a write() does not copy data to page cache. Instead, the file system driver will immediately attempt to flush data to the underlying storage medium. As mentioned in the manual quote above, in general this will degrade performance. Specifically, the filesystem and storage drivers may be forced to service the write() immediately, rather than interleaving the data flush with other system operations in an optimal way.
通常这意味着 write ()不会将数据复制到页面缓存。相反,文件系统驱动程序将立即尝试将数据刷新到底层存储介质。正如上面手册中提到的,一般来说这会降低性能。具体来说,文件系统和存储驱动程序可能会被迫立即为 write ()提供服务,而不是以最佳方式将数据刷新与其他系统操作交织在一起。
Filesystem Reliability
文件系统可靠性
While the Linux page cache is a significant boon to performance in general, one penalty of this system is the reliability of storage on an unclean shutdown or sudden loss of power situation. Any number filesystem changes may appear to a userspace program to have been written to disk, when in fact they have only been written to disk cache. This includes:
虽然 Linux 页面缓存通常对性能有很大的好处,但这个系统的一个缺点是在不干净的关机或突然断电情况下存储的可靠性。在用户空间程序看来,任何数量的文件系统更改都可能被写入磁盘,而实际上它们只被写入到磁盘缓存中。这包括:
- new files 新文件
- deleted file 已删除文件
- new data written to a file 写入文件的新数据
- file changed size 文件更改大小
Consider specifically the case of the ext2 filesystem, for which the inode structure is illustrated below.
具体考虑 ext2文件系统的情况,下面将说明 inode 的结构。

EXT2 filesystem inode structure and how it points to file data.
EXT2文件系统 inode 结构及其指向文件数据的方式。
The inode structure forms the root of an unbalanced tree of data blocks containing the actual file data. For small files all the data blocks are referenced directly in the inode data structure. For larger file, the first segment is referenced directly by the inode, and then for later segments the inode points to another data structure, which then points to the data blocks.
Inode 结构构成了包含实际文件数据的不平衡数据块树的根。对于小文件,所有数据块都在 inode 数据结构中直接引用。对于较大的文件,第一个段由 inode 直接引用,然后对于后面的段,inode 点指向另一个数据结构,后者指向数据块。
Now consider a process which performs following steps (indicated with their libc function calls):
现在考虑一个执行以下步骤的进程(用它们的 libc 函数调用表示) :
- open() 打开() a new file (i.e. with 一个新的文件flags |= O_CREAT 旗帜 | = o creat)
- periodically 周期性地write() Write () a chunk of data to the file 一大块数据到文件中
- close the file 关闭档案
Let's walk through the sequence of filesystem operations that will occur underlying the hood.
让我们遍历将在引擎盖下发生的文件系统操作序列。
- When the file is created, a new inode structure is allocated for the file, then a directory entry is added to the parent directory file pointing to this new inode. 创建文件时,将为该文件分配一个新的 inode 结构,然后将一个目录条目添加到指向这个新 inode 的父目录文件中
- Each time we write to the file, the filesystem driver will first check to see if there is an unfilled block already allocated to hold the data. If not it will find a free block and add a pointer to it in the inode and update it's accounting of the file size. Then it will fill that block with data and update the file modification time. 每次写入文件时,文件系统驱动程序都会首先检查是否已经分配了一个未填充的块来保存数据。如果没有,它将找到一个空闲块,并在 inode 中添加一个指向它的指针,并更新文件大小的记录。然后它将用数据填充该块并更新文件修改时间
- As the file gets larger, we'll overflow the direct blocks and the filesystem driver will need to allocate an indirect block structure, add a pointer to the inode structure, and then allocate a block and add a pointer to the indirection structure. 当文件变得更大时,我们会溢出直接块,文件系统驱动程序将需要分配一个间接块结构,添加一个指向 inode 结构的指针,然后分配一个块并添加一个指向间接结构的指针
Each of these modifications is essentially a write to some block of the underlying block device. Each of these writes are subject to page caching and so the actual write really just happens in memory. At some point in the future those dirty pages are flushed out to disk and persisted. In an unclean shutdown or sudden power loss any write waiting in page cache to be flushed will not be persisted to disk. This can include:
这些修改基本上都是对底层块设备的某个块的写操作。每一次写操作都会受到页面缓存的影响,因此实际的写操作实际上只发生在内存中。在将来的某个时候,这些脏页面将被刷新到磁盘并被持久化。在不干净的关机或突然断电的情况下,任何在页面缓存中等待刷新的写操作都不会被持久化到磁盘上。这包括:
- file data 文件数据
- inode data Inode 数据
- indirect block 间接块体
- entry data 输入数据
- directory content data. 目录内容数据
Modern journaled filesystems (like ext4) deal with this situation by recording in a "journal" all filesystem modifications in-sequence. It ensures these journal entries are flushed to disk before the corresponding data changes are, so that any outstanding changes can be completed by the filesystem driver the next time it is started.
现代的日志文件系统(如 ext4)通过在“日志”中按顺序记录所有的文件系统修改来处理这种情况。它确保在相应的数据更改之前将这些日志条目刷新到磁盘,以便文件系统驱动程序在下次启动时可以完成任何未完成的更改。
However, it is important to recognize the nature of these interactions and design filesystem access patterns to best account for what will happen on a sudden power loss. In the example above each incremental write may lead to a significant change of filesystem metadata. A sudden power loss may lose those metadata changes, those data changes, or both. A better design for such a process would be to open the file for writing, and then pre-truncate it to the desired size (if possible) or to some reasonably conservative estimate of it's size. This way the filesystem updates all it's metadata and storage allocations up front and it doesn't have to do any of those updates on the fly. A sudden power loss might still lose data of course, but it will be limited to only the unflushed pages in the page cache and not due to missing filesystem metadata or pointers.
然而,重要的是要认识到这些交互的本质,并设计文件系统访问模式,以便最好地解释在突然断电时会发生什么。在上面的示例中,每次增量写操作都可能导致文件系统元数据的重大更改。突然的电力中断可能会使元数据的变化、数据的变化或者两者都丢失。对于这样的进程,一个更好的设计是打开文件进行写操作,然后预先将其截断为所需的大小(如果可能的话)或对其大小进行合理的保守估计。这样,文件系统就可以预先更新所有的元数据和存储分配,而不必动态地进行任何更新。当然,突然断电仍然可能丢失数据,但它将仅限于页面缓存中未刷新的页面,而不是由于缺少文件系统元数据或指针。
A Note on Memory Usage Metrics
关于内存使用量度的一点注记
When it comes to system-level performance monitoring there are a couple of top level metrics that are often tracked:
当涉及到系统级的性能监控时,有两个顶级的指标经常被跟踪:
- CPU utilization CPU 利用率
- GPU (or other co-processor) utilization GPU (或其他协处理器)利用率
- memory utilization 存储器利用率
Given the discussion of the page cache and virtual memory systems above, we can now discuss how to measure and meaningfully understand memory utilization on a Linux system. Most userspace tools (like free, for instance) get their information from /proc/meminfo, a virtual file served up from the kernel containing information about memory usage. Due to the Linux page cache and demand-paged memory access, nearly all physical memory (up to the kswapd low-watermark) on a Linux system will be in use. When we talk about "free" memory on a Linux system we are usually referring to the MemAvailable entry of /proc/meminfo.
鉴于上面对页面缓存和虚拟内存系统的讨论,我们现在可以讨论如何测量和有意义地理解 Linux 系统上的内存使用情况。大多数用户空间工具(比如 free)从/proc/meminfo 获取信息,这是一个从内核提供的虚拟文件,包含内存使用信息。由于 Linux 页面缓存和按需分页的内存访问,Linux 系统上几乎所有的物理内存(直到 kswapd 低水印)都将被使用。当我们谈论 Linux 系统上的“免费”内存时,我们通常指的是/proc/meminfo 的 MemAvailable 条目。
MemAvailable %lu 可用率% lu (since Linux 3.14) An estimate of how much memory is available for start‐ ing new applications, without swapping. (自 Linux 3.14以来)估计有多少内存可用于启动新的应用程序,而不需要交换
Pages that are reclaimable without swapping include unlocked pages of both the disk cache and buffer cache, including demand-paged file data which is currently resident. Linux's accounting for this value, however, is inexact. It may not know whether a page memory can really be reclaimed until the swap daemon gets around to actually trying to free it. In addition, the fact that this amount of memory can be reclaimed doesn't mean that it can be reclaimed and repurposed instantaneously, and some actions may fail due to low memory if the swap daemon can't find enough pages to release fast enough.
无需交换即可回收的页包括磁盘缓存和缓冲区缓存的解锁页,包括当前常驻的需求分页文件数据。然而,Linux 对这个值的计算并不准确。它可能不知道页面内存是否真的可以回收,直到交换守护进程实际尝试释放它。此外,可以回收这么大的内存量并不意味着可以立即回收和重新利用它,如果交换守护进程无法找到足够的页面以足够快的速度释放,有些操作可能会由于内存不足而失败。
页面缓存:内存和文件之间的那些事
https://linux.cn/article-9528-1.html
上一篇文章中我们学习了内核怎么为一个用户进程 管理虚拟内存,而没有提及文件和 I/O。这一篇文章我们将专门去讲这个重要的主题 —— 页面缓存。文件和内存之间的关系常常很不好去理解,而它们对系统性能的影响却是非常大的。
在面对文件时,有两个很重要的问题需要操作系统去解决。第一个是相对内存而言,慢的让人发狂的硬盘驱动器,尤其是磁盘寻道。第二个是需要将文件内容一次性地加载到物理内存中,以便程序间共享文件内容。如果你在 Windows 中使用 进程浏览器 去查看它的进程,你将会看到每个进程中加载了大约 ~15MB 的公共 DLL。我的 Windows 机器上现在大约运行着 100 个进程,因此,如果不共享的话,仅这些公共的 DLL 就要使用高达 ~1.5 GB 的物理内存。如果是那样的话,那就太糟糕了。同样的,几乎所有的 Linux 进程都需要 ld.so 和 libc,加上其它的公共库,它们占用的内存数量也不是一个小数目。
幸运的是,这两个问题都用一个办法解决了:页面缓存 —— 保存在内存中的页面大小的文件块。为了用图去说明页面缓存,我捏造出一个名为 render 的 Linux 程序,它打开了文件 scene.dat,并且一次读取 512 字节,并将文件内容存储到一个分配到堆中的块上。第一次读取的过程如下:

Reading and the page cache
render请求scene.dat从位移 0 开始的 512 字节。- 内核搜寻页面缓存中
scene.dat的 4kb 块,以满足该请求。假设该数据没有缓存。 - 内核分配页面帧,初始化 I/O 请求,将
scend.dat从位移 0 开始的 4kb 复制到分配的页面帧。 - 内核从页面缓存复制请求的 512 字节到用户缓冲区,系统调用
read()结束。
读取完 12KB 的文件内容以后,render 程序的堆和相关的页面帧如下图所示:

Non-mapped file read
它看起来很简单,其实这一过程做了很多的事情。首先,虽然这个程序使用了普通的读取(read)调用,但是,已经有三个 4KB 的页面帧将文件 scene.dat 的一部分内容保存在了页面缓存中。虽然有时让人觉得很惊奇,但是,普通的文件 I/O 就是这样通过页面缓存来进行的。在 x86 架构的 Linux 中,内核将文件认为是一系列的 4KB 大小的块。如果你从文件中读取单个字节,包含这个字节的整个 4KB 块将被从磁盘中读入到页面缓存中。这是可以理解的,因为磁盘通常是持续吞吐的,并且程序一般也不会从磁盘区域仅仅读取几个字节。页面缓存知道文件中的每个 4KB 块的位置,在上图中用 #0、#1 等等来描述。Windows 使用 256KB 大小的视图view,类似于 Linux 的页面缓存中的页面page。
不幸的是,在一个普通的文件读取中,内核必须拷贝页面缓存中的内容到用户缓冲区中,它不仅花费 CPU 时间和影响 CPU 缓存,在复制数据时也浪费物理内存。如前面的图示,scene.dat 的内存被存储了两次,并且,程序中的每个实例都用另外的时间去存储内容。我们虽然解决了从磁盘中读取文件缓慢的问题,但是在其它的方面带来了更痛苦的问题。内存映射文件是解决这种痛苦的一个方法:

Mapped file read
当你使用文件映射时,内核直接在页面缓存上映射你的程序的虚拟页面。这样可以显著提升性能:Windows 系统编程 报告指出,在相关的普通文件读取上运行时性能提升多达 30% ,在 Unix 环境中的高级编程 的报告中,文件映射在 Linux 和 Solaris 也有类似的效果。这取决于你的应用程序类型的不同,通过使用文件映射,可以节约大量的物理内存。
对高性能的追求是永恒不变的目标,测量是很重要的事情,内存映射应该是程序员始终要使用的工具。这个 API 提供了非常好用的实现方式,它允许你在内存中按字节去访问一个文件,而不需要为了这种好处而牺牲代码可读性。在一个类 Unix 的系统中,可以使用 mmap 查看你的 地址空间,在 Windows 中,可以使用 CreateFileMapping,或者在高级编程语言中还有更多的可用封装。当你映射一个文件内容时,它并不是一次性将全部内容都映射到内存中,而是通过 页面故障 来按需映射的。在 获取 需要的文件内容的页面帧后,页面故障句柄 映射你的虚拟页面 到页面缓存上。如果一开始文件内容没有缓存,这还将涉及到磁盘 I/O。
现在出现一个突发的状况,假设我们的 render 程序的最后一个实例退出了。在页面缓存中保存着 scene.dat 内容的页面要立刻释放掉吗?人们通常会如此考虑,但是,那样做并不是个好主意。你应该想到,我们经常在一个程序中创建一个文件,退出程序,然后,在第二个程序去使用这个文件。页面缓存正好可以处理这种情况。如果考虑更多的情况,内核为什么要清除页面缓存的内容?请记住,磁盘读取的速度要慢于内存 5 个数量级,因此,命中一个页面缓存是一件有非常大收益的事情。因此,只要有足够大的物理内存,缓存就应该保持全满。并且,这一原则适用于所有的进程。如果你现在运行 render 一周后, scene.dat 的内容还在缓存中,那么应该恭喜你!这就是什么内核缓存越来越大,直至达到最大限制的原因。它并不是因为操作系统设计的太“垃圾”而浪费你的内存,其实这是一个非常好的行为,因为,释放物理内存才是一种“浪费”。(LCTT 译注:释放物理内存会导致页面缓存被清除,下次运行程序需要的相关数据,需要再次从磁盘上进行读取,会“浪费” CPU 和 I/O 资源)最好的做法是尽可能多的使用缓存。
由于页面缓存架构的原因,当程序调用 write() 时,字节只是被简单地拷贝到页面缓存中,并将这个页面标记为“脏”页面。磁盘 I/O 通常并不会立即发生,因此,你的程序并不会被阻塞在等待磁盘写入上。副作用是,如果这时候发生了电脑死机,你的写入将不会完成,因此,对于至关重要的文件,像数据库事务日志,要求必须进行 fsync()(仍然还需要去担心磁盘控制器的缓存失败问题),另一方面,读取将被你的程序阻塞,直到数据可用为止。内核采取预加载的方式来缓解这个矛盾,它一般提前预读取几个页面并将它加载到页面缓存中,以备你后来的读取。在你计划进行一个顺序或者随机读取时(请查看 madvise()、readahead()、Windows 缓存提示 ),你可以通过提示hint帮助内核去调整这个预加载行为。Linux 会对内存映射的文件进行 预读取,但是我不确定 Windows 的行为。当然,在 Linux 中它可能会使用 O_DIRECT 跳过预读取,或者,在 Windows 中使用 NO_BUFFERING 去跳过预读,一些数据库软件就经常这么做。
一个文件映射可以是私有的,也可以是共享的。当然,这只是针对内存中内容的更新而言:在一个私有的内存映射上,更新并不会提交到磁盘或者被其它进程可见,然而,共享的内存映射,则正好相反,它的任何更新都会提交到磁盘上,并且对其它的进程可见。内核使用写时复制copy on write(CoW)机制,这是通过页面表条目page table entry(PTE)来实现这种私有的映射。在下面的例子中,render 和另一个被称为 render3d 的程序都私有映射到 scene.dat 上。然后 render 去写入映射的文件的虚拟内存区域:

The Copy-On-Write mechanism
- 两个程序私有地映射
scene.dat,内核误导它们并将它们映射到页面缓存,但是使该页面表条目只读。 render试图写入到映射scene.dat的虚拟页面,处理器发生页面故障。- 内核分配页面帧,复制
scene.dat的第二块内容到其中,并映射故障的页面到新的页面帧。 - 继续执行。程序就当做什么都没发生。
上面展示的只读页面表条目并不意味着映射是只读的,它只是内核的一个用于共享物理内存的技巧,直到尽可能的最后一刻之前。你可以认为“私有”一词用的有点不太恰当,你只需要记住,这个“私有”仅用于更新的情况。这种设计的重要性在于,要想看到被映射的文件的变化,其它程序只能读取它的虚拟页面。一旦“写时复制”发生,从其它地方是看不到这种变化的。但是,内核并不能保证这种行为,因为它是在 x86 中实现的,从 API 的角度来看,这是有意义的。相比之下,一个共享的映射只是将它简单地映射到页面缓存上。更新会被所有的进程看到并被写入到磁盘上。最终,如果上面的映射是只读的,页面故障将触发一个内存段失败而不是写到一个副本。
动态加载库是通过文件映射融入到你的程序的地址空间中的。这没有什么可奇怪的,它通过普通的 API 为你提供与私有文件映射相同的效果。下面的示例展示了映射文件的 render 程序的两个实例运行的地址空间的一部分,以及物理内存,尝试将我们看到的许多概念综合到一起。

Mapping virtual memory to physical memory
这是内存架构系列的第三部分的结论。我希望这个系列文章对你有帮助,对理解操作系统的这些主题提供一个很好的思维模型。
via:https://manybutfinite.com/post/page-cache-the-affair-between-memory-and-files/
内核如何管理内存
在学习了进程的 虚拟地址布局 之后,让我们回到内核,来学习它管理用户内存的机制。这里再次使用 Gonzo:

Linux kernel mm_struct
Linux 进程在内核中是作为进程描述符 task_struct (LCTT 译注:它是在 Linux 中描述进程完整信息的一种数据结构)的实例来实现的。在 task_struct 中的 mm 域指向到内存描述符,mm_struct 是一个程序在内存中的执行摘要。如上图所示,它保存了起始和结束内存段,进程使用的物理内存页面的 数量(RSS 常驻内存大小Resident Set Size )、虚拟地址空间使用的 总数量、以及其它片断。 在内存描述符中,我们可以获悉它有两种管理内存的方式:虚拟内存区域集和页面表。Gonzo 的内存区域如下所示:

Kernel memory descriptor and memory areas
每个虚拟内存区域(VMA)是一个连续的虚拟地址范围;这些区域绝对不会重叠。一个 vm_area_struct 的实例完整地描述了一个内存区域,包括它的起始和结束地址,flags 决定了访问权限和行为,并且 vm_file 域指定了映射到这个区域的文件(如果有的话)。(除了内存映射段的例外情况之外,)一个 VMA 是不能匿名映射文件的。上面的每个内存段(比如,堆、栈)都对应一个单个的 VMA。虽然它通常都使用在 x86 的机器上,但它并不是必需的。VMA 也不关心它们在哪个段中。
一个程序的 VMA 在内存描述符中是作为 mmap 域的一个链接列表保存的,以起始虚拟地址为序进行排列,并且在 mm_rb 域中作为一个 红黑树 的根。红黑树允许内核通过给定的虚拟地址去快速搜索内存区域。在你读取文件 /proc/pid_of_process/maps 时,内核只是简单地读取每个进程的 VMA 的链接列表并显示它们。
在 Windows 中,EPROCESS 块大致类似于一个 task_struct 和 mm_struct 的结合。在 Windows 中模拟一个 VMA 的是虚拟地址描述符,或称为 VAD;它保存在一个 AVL 树 中。你知道关于 Windows 和 Linux 之间最有趣的事情是什么吗?其实它们只有一点小差别。
4GB 虚拟地址空间被分配到页面中。在 32 位模式中的 x86 处理器中支持 4KB、2MB、以及 4MB 大小的页面。Linux 和 Windows 都使用大小为 4KB 的页面去映射用户的一部分虚拟地址空间。字节 0-4095 在页面 0 中,字节 4096-8191 在页面 1 中,依次类推。VMA 的大小 必须是页面大小的倍数 。下图是使用 4KB 大小页面的总数量为 3GB 的用户空间:

4KB Pages Virtual User Space
处理器通过查看页面表去转换一个虚拟内存地址到一个真实的物理内存地址。每个进程都有它自己的一组页面表;每当发生进程切换时,用户空间的页面表也同时切换。Linux 在内存描述符的 pgd 域中保存了一个指向进程的页面表的指针。对于每个虚拟页面,页面表中都有一个相应的页面表条目(PTE),在常规的 x86 页面表中,它是一个简单的如下所示的大小为 4 字节的记录:

x86 Page Table Entry (PTE) for 4KB page
Linux 通过函数去 读取 和 设置 PTE 条目中的每个标志位。标志位 P 告诉处理器这个虚拟页面是否在物理内存中。如果该位被清除(设置为 0),访问这个页面将触发一个页面故障。请记住,当这个标志位为 0 时,内核可以在剩余的域上做任何想做的事。R/W 标志位是读/写标志;如果被清除,这个页面将变成只读的。U/S 标志位表示用户/超级用户;如果被清除,这个页面将仅被内核访问。这些标志都是用于实现我们在前面看到的只读内存和内核空间保护。
标志位 D 和 A 用于标识页面是否是“脏的”或者是已被访问过。一个脏页面表示已经被写入,而一个被访问过的页面则表示有一个写入或者读取发生过。这两个标志位都是粘滞位:处理器只能设置它们,而清除则是由内核来完成的。最终,PTE 保存了这个页面相应的起始物理地址,它们按 4KB 进行整齐排列。这个看起来不起眼的域是一些痛苦的根源,因为它限制了物理内存最大为 4 GB。其它的 PTE 域留到下次再讲,因为它是涉及了物理地址扩展的知识。
由于在一个虚拟页面上的所有字节都共享一个 U/S 和 R/W 标志位,所以内存保护的最小单元是一个虚拟页面。但是,同一个物理内存可能被映射到不同的虚拟页面,这样就有可能会出现相同的物理内存出现不同的保护标志位的情况。请注意,在 PTE 中是看不到运行权限的。这就是为什么经典的 x86 页面上允许代码在栈上被执行的原因,这样会很容易导致挖掘出栈缓冲溢出漏洞(可能会通过使用 return-to-libc 和其它技术来找出非可执行栈)。由于 PTE 缺少禁止运行标志位说明了一个更广泛的事实:在 VMA 中的权限标志位有可能或可能不完全转换为硬件保护。内核只能做它能做到的,但是,最终的架构限制了它能做的事情。
虚拟内存不保存任何东西,它只是简单地 映射 一个程序的地址空间到底层的物理内存上。物理内存被当作一个称之为物理地址空间的巨大块而由处理器访问。虽然内存的操作涉及到某些总线,我们在这里先忽略它,并假设物理地址范围从 0 到可用的最大值按字节递增。物理地址空间被内核进一步分解为页面帧。处理器并不会关心帧的具体情况,这一点对内核也是至关重要的,因为,页面帧是物理内存管理的最小单元。Linux 和 Windows 在 32 位模式下都使用 4KB 大小的页面帧;下图是一个有 2 GB 内存的机器的例子:

Physical Address Space
在 Linux 上每个页面帧是被一个 描述符 和 几个标志 来跟踪的。通过这些描述符和标志,实现了对机器上整个物理内存的跟踪;每个页面帧的具体状态是公开的。物理内存是通过使用 Buddy 内存分配 (LCTT 译注:一种内存分配算法)技术来管理的,因此,如果一个页面帧可以通过 Buddy 系统分配,那么它是未分配的(free)。一个被分配的页面帧可以是匿名的、持有程序数据的、或者它可能处于页面缓存中、持有数据保存在一个文件或者块设备中。还有其它的异形页面帧,但是这些异形页面帧现在已经不怎么使用了。Windows 有一个类似的页面帧号(Page Frame Number (PFN))数据库去跟踪物理内存。
我们把虚拟内存区域(VMA)、页面表条目(PTE),以及页面帧放在一起来理解它们是如何工作的。下面是一个用户堆的示例:

Physical Address Space
蓝色的矩形框表示在 VMA 范围内的页面,而箭头表示页面表条目映射页面到页面帧。一些缺少箭头的虚拟页面,表示它们对应的 PTE 的当前标志位被清除(置为 0)。这可能是因为这个页面从来没有被使用过,或者是它的内容已经被交换出去了。在这两种情况下,即便这些页面在 VMA 中,访问它们也将导致产生一个页面故障。对于这种 VMA 和页面表的不一致的情况,看上去似乎很奇怪,但是这种情况却经常发生。
一个 VMA 像一个在你的程序和内核之间的合约。你请求它做一些事情(分配内存、文件映射、等等),内核会回应“收到”,然后去创建或者更新相应的 VMA。 但是,它 并不立刻 去“兑现”对你的承诺,而是它会等待到发生一个页面故障时才去 真正 做这个工作。内核是个“懒惰的家伙”、“不诚实的人渣”;这就是虚拟内存的基本原理。它适用于大多数的情况,有一些类似情况和有一些意外的情况,但是,它是规则是,VMA 记录 约定的 内容,而 PTE 才反映这个“懒惰的内核” 真正做了什么。通过这两种数据结构共同来管理程序的内存;它们共同来完成解决页面故障、释放内存、从内存中交换出数据、等等。下图是内存分配的一个简单案例:

Example of demand paging and memory allocation
当程序通过 brk() 系统调用来请求一些内存时,内核只是简单地 更新 堆的 VMA 并给程序回复“已搞定”。而在这个时候并没有真正地分配页面帧,并且新的页面也没有映射到物理内存上。一旦程序尝试去访问这个页面时,处理器将发生页面故障,然后调用 do_page_fault()。这个函数将使用 find_vma() 去 搜索 发生页面故障的 VMA。如果找到了,然后在 VMA 上进行权限检查以防范恶意访问(读取或者写入)。如果没有合适的 VMA,也没有所尝试访问的内存的“合约”,将会给进程返回段故障。
当找到了一个合适的 VMA,内核必须通过查找 PTE 的内容和 VMA 的类型去处理故障。在我们的案例中,PTE 显示这个页面是 不存在的。事实上,我们的 PTE 是全部空白的(全部都是 0),在 Linux 中这表示虚拟内存还没有被映射。由于这是匿名 VMA,我们有一个完全的 RAM 事务,它必须被 do_anonymous_page() 来处理,它分配页面帧,并且用一个 PTE 去映射故障虚拟页面到一个新分配的帧。
有时候,事情可能会有所不同。例如,对于被交换出内存的页面的 PTE,在当前(Present)标志位上是 0,但它并不是空白的。而是在交换位置仍有页面内容,它必须从磁盘上读取并且通过 do_swap_page() 来加载到一个被称为 major fault 的页面帧上。
这是我们通过探查内核的用户内存管理得出的前半部分的结论。在下一篇文章中,我们通过将文件加载到内存中,来构建一个完整的内存框架图,以及对性能的影响。
via: http://duartes.org/gustavo/blog/post/how-the-kernel-manages-your-memory/
剖析内存中的程序之秘
内存管理是操作系统的核心任务;它对程序员和系统管理员来说也是至关重要的。在接下来的几篇文章中,我将从实践出发着眼于内存管理,并深入到它的内部结构。虽然这些概念很通用,但示例大都来自于 32 位 x86 架构的 Linux 和 Windows 上。这第一篇文章描述了在内存中程序如何分布。
在一个多任务操作系统中的每个进程都运行在它自己的内存“沙箱”中。这个沙箱是一个虚拟地址空间virtual address space,在 32 位的模式中它总共有 4GB 的内存地址块。这些虚拟地址是通过内核页表page table映射到物理地址的,并且这些虚拟地址是由操作系统内核来维护,进而被进程所消费的。每个进程都有它自己的一组页表,但是这里有点玄机。一旦虚拟地址被启用,这些虚拟地址将被应用到这台电脑上的 所有软件,包括内核本身。因此,一部分虚拟地址空间必须保留给内核使用:

Kernel/User Memory Split
但是,这并不是说内核就使用了很多的物理内存,恰恰相反,它只使用了很少一部分可用的地址空间映射到其所需要的物理内存。内核空间在内核页表中被标记为独占使用于 特权代码 (ring 2 或更低),因此,如果一个用户模式的程序尝试去访问它,将触发一个页面故障错误。在 Linux 中,内核空间是始终存在的,并且在所有进程中都映射相同的物理内存。内核代码和数据总是可寻址的,准备随时去处理中断或者系统调用。相比之下,用户模式中的地址空间,在每次进程切换时都会发生变化:

Process Switch Effects on Virtual Memory
蓝色的区域代表映射到物理地址的虚拟地址空间,白色的区域是尚未映射的部分。在上面的示例中,众所周知的内存“饕餮” Firefox 使用了大量的虚拟内存空间。在地址空间中不同的条带对应了不同的内存段,像堆heap、栈stack等等。请注意,这些段只是一系列内存地址的简化表示,它与 Intel 类型的段 并没有任何关系 。不过,这是一个在 Linux 进程的标准段布局:

Flexible Process Address Space Layout In Linux
当计算机还是快乐、安全的时代时,在机器中的几乎每个进程上,那些段的起始虚拟地址都是完全相同的。这将使远程挖掘安全漏洞变得容易。漏洞利用经常需要去引用绝对内存位置:比如在栈中的一个地址,一个库函数的地址,等等。远程攻击可以闭着眼睛选择这个地址,因为地址空间都是相同的。当攻击者们这样做的时候,人们就会受到伤害。因此,地址空间随机化开始流行起来。Linux 会通过在其起始地址上增加偏移量来随机化栈、内存映射段、以及堆。不幸的是,32 位的地址空间是非常拥挤的,为地址空间随机化留下的空间不多,因此 妨碍了地址空间随机化的效果。
在进程地址空间中最高的段是栈,在大多数编程语言中它存储本地变量和函数参数。调用一个方法或者函数将推送一个新的栈帧stack frame到这个栈。当函数返回时这个栈帧被删除。这个简单的设计,可能是因为数据严格遵循 后进先出(LIFO) 的次序,这意味着跟踪栈内容时不需要复杂的数据结构 —— 一个指向栈顶的简单指针就可以做到。推入和弹出也因此而非常快且准确。也可能是,持续的栈区重用往往会在 CPU 缓存 中保持活跃的栈内存,这样可以加快访问速度。进程中的每个线程都有它自己的栈。
向栈中推送更多的而不是刚合适的数据可能会耗尽栈的映射区域。这将触发一个页面故障,在 Linux 中它是通过 expand_stack() 来处理的,它会去调用 acct_stack_growth() 来检查栈的增长是否正常。如果栈的大小低于 RLIMIT_STACK 的值(一般是 8MB 大小),那么这是一个正常的栈增长和程序的合理使用,否则可能是发生了未知问题。这是一个栈大小按需调节的常见机制。但是,栈的大小达到了上述限制,将会发生一个栈溢出,并且,程序将会收到一个段故障Segmentation Fault错误。当映射的栈区为满足需要而扩展后,在栈缩小时,映射区域并不会收缩。就像美国联邦政府的预算一样,它只会扩张。
动态栈增长是 唯一例外的情况 ,当它去访问一个未映射的内存区域,如上图中白色部分,是允许的。除此之外的任何其它访问未映射的内存区域将触发一个页面故障,导致段故障。一些映射区域是只读的,因此,尝试去写入到这些区域也将触发一个段故障。
在栈的下面,有内存映射段。在这里,内核将文件内容直接映射到内存。任何应用程序都可以通过 Linux 的 mmap() 系统调用( 代码实现)或者 Windows 的 CreateFileMapping() / MapViewOfFile() 来请求一个映射。内存映射是实现文件 I/O 的方便高效的方式。因此,它经常被用于加载动态库。有时候,也被用于去创建一个并不匹配任何文件的匿名内存映射,这种映射经常被用做程序数据的替代。在 Linux 中,如果你通过 malloc() 去请求一个大的内存块,C 库将会创建这样一个匿名映射而不是使用堆内存。这里所谓的“大”表示是超过了MMAP_THRESHOLD 设置的字节数,它的缺省值是 128 kB,可以通过 mallopt() 去调整这个设置值。
接下来讲的是“堆”,就在我们接下来的地址空间中,堆提供运行时内存分配,像栈一样,但又不同于栈的是,它分配的数据生存期要长于分配它的函数。大多数编程语言都为程序提供了堆管理支持。因此,满足内存需要是编程语言运行时和内核共同来做的事情。在 C 中,堆分配的接口是 malloc() 一族,然而在支持垃圾回收的编程语言中,像 C#,这个接口使用 new 关键字。
如果在堆中有足够的空间可以满足内存请求,它可以由编程语言运行时来处理内存分配请求,而无需内核参与。否则将通过 brk() 系统调用(代码实现)来扩大堆以满足内存请求所需的大小。堆管理是比较 复杂的,在面对我们程序的混乱分配模式时,它通过复杂的算法,努力在速度和内存使用效率之间取得一种平衡。服务一个堆请求所需要的时间可能是非常可观的。实时系统有一个 特定用途的分配器 去处理这个问题。堆也会出现 碎片化 ,如下图所示:

Fragmented Heap
最后,我们抵达了内存的低位段:BSS、数据、以及程序文本。在 C 中,静态(全局)变量的内容都保存在 BSS 和数据中。它们之间的不同之处在于,BSS 保存 未初始化的 静态变量的内容,它的值在源代码中并没有被程序员设置。BSS 内存区域是 匿名 的:它没有映射到任何文件上。如果你在程序中写这样的语句 static int cntActiveUsers,cntActiveUsers 的内容就保存在 BSS 中。
反过来,数据段,用于保存在源代码中静态变量 初始化后 的内容。这个内存区域是 非匿名 的。它映射了程序的二进值镜像上的一部分,包含了在源代码中给定初始化值的静态变量内容。因此,如果你在程序中写这样的语句 static int cntWorkerBees = 10,那么,cntWorkerBees 的内容就保存在数据段中,并且初始值为 10。尽管可以通过数据段映射到一个文件,但是这是一个私有内存映射,意味着,如果改变内存,它并不会将这种变化反映到底层的文件上。必须是这样的,否则,分配的全局变量将会改变你磁盘上的二进制文件镜像,这种做法就太不可思议了!
用图去展示一个数据段是很困难的,因为它使用一个指针。在那种情况下,指针 gonzo 的内容(一个 4 字节的内存地址)保存在数据段上。然而,它并没有指向一个真实的字符串。而这个字符串存在于文本段中,文本段是只读的,它用于保存你的代码中的类似于字符串常量这样的内容。文本段也会在内存中映射你的二进制文件,但是,如果你的程序写入到这个区域,将会触发一个段故障错误。尽管在 C 中,它比不上从一开始就避免这种指针错误那么有效,但是,这种机制也有助于避免指针错误。这里有一个展示这些段和示例变量的图:

ELF Binary Image Mapped Into Memory
你可以通过读取 /proc/pid_of_process/maps 文件来检查 Linux 进程中的内存区域。请记住,一个段可以包含很多的区域。例如,每个内存映射的文件一般都在 mmap 段中的它自己的区域中,而动态库有类似于 BSS 和数据一样的额外的区域。下一篇文章中我们将详细说明“区域area”的真正含义是什么。此外,有时候人们所说的“数据段data segment”是指“数据data + BSS + 堆”。
你可以使用 nm 和 objdump 命令去检查二进制镜像,去显示它们的符号、地址、段等等。最终,在 Linux 中上面描述的虚拟地址布局是一个“弹性的”布局,这就是这几年来的缺省情况。它假设 RLIMIT_STACK 有一个值。如果没有值的话,Linux 将恢复到如下所示的“经典” 布局:

Classic Process Address Space Layout In Linux
这就是虚拟地址空间布局。接下来的文章将讨论内核如何对这些内存区域保持跟踪、内存映射、文件如何读取和写入、以及内存使用数据的意义。
via: http://duartes.org/gustavo/blog/post/anatomy-of-a-program-in-memory/
Memory Translation and Segmentation 记忆翻译与切分
This post is the first in a series about memory and protection in Intel-compatible (x86) computers, going further down the path of how kernels work. As in the boot series, I'll link to Linux kernel sources but give Windows examples as well (sorry, I'm ignorant about the BSDs and the Mac, but most of the discussion applies). Let me know what I screw up.
本文是英特尔兼容(x86)计算机内存和保护系列文章的第一篇,进一步探讨了内核是如何工作的。在引导系列中,我将链接到 Linux 内核源代码,但也会给出 Windows 示例(对不起,我对 bsd 和 Mac 一无所知,但大多数讨论都适用)。让我知道我搞砸了什么。
In the chipsets that power Intel motherboards, memory is accessed by the CPU via the front side bus, which connects it to the northbridge chip. The memory addresses exchanged in the front side bus are physical memory addresses, raw numbers from zero to the top of the available physical memory. These numbers are mapped to physical RAM sticks by the northbridge. Physical addresses are concrete and final - no translation, no paging, no privilege checks - you put them on the bus and that's that. Within the CPU, however, programs use logical memory addresses, which must be translated into physical addresses before memory access can take place. Conceptually address translation looks like this:
在为英特尔主板供电的芯片组中,CPU 通过前端总线访问内存,后者将内存连接到北桥芯片。在前端总线中交换的内存地址是物理内存地址,从零到可用物理内存顶部的原始数字。这些数字通过北桥映射到物理 RAM。物理地址是具体的和最终的——没有转换,没有分页,没有特权检查——你把它们放在总线上,就是这样。然而,在 CPU 内部,程序使用逻辑内存地址,在内存访问发生之前,逻辑内存地址必须转换为物理地址。概念地址转换是这样的:
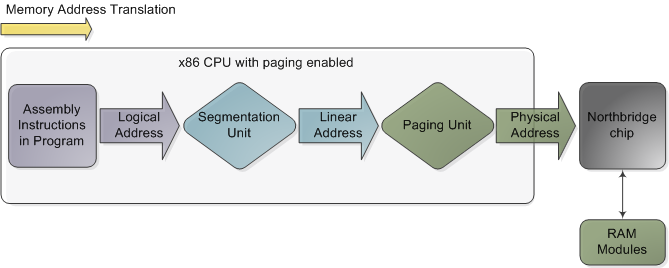
Memory address translation in x86 CPUs with paging enabled
在启用分页的 x86 cpu 中进行内存地址转换
This is not a physical diagram, only a depiction of the address translation process, specifically for when the CPU has paging enabled. If you turn off paging, the output from the segmentation unit is already a physical address; in 16-bit real mode that is always the case. Translation starts when the CPU executes an instruction that refers to a memory address. The first step is translating that logic address into a linear address. But why go through this step instead of having software use linear (or physical) addresses directly? For roughly the same reason humans have an appendix whose primary function is getting infected. It's a wrinkle of evolution. To really make sense of x86 segmentation we need to go back to 1978.
这不是一个物理关系图,而是地址转换过程的描述,特别是在启用 CPU 分页时。如果关闭分页,那么分割单元的输出已经是一个物理地址; 在16位实模式下,情况总是如此。当 CPU 执行引用内存地址的指令时,转换开始。第一步是将逻辑地址转换成线性地址。但是为什么不让软件直接使用线性(或物理)地址,而是通过这个步骤呢?出于大致相同的原因,人类有一个阑尾,其主要功能是感染。这是进化的一条皱纹。为了真正理解 x86的市场细分,我们需要回到1978年。
The original 8086 had 16-bit registers and its instructions used mostly 8-bit or 16-bit operands. This allowed code to work with 216 bytes, or 64K of memory, yet Intel engineers were keen on letting the CPU use more memory without expanding the size of registers and instructions. So they introduced segment registers as a means to tell the CPU which 64K chunk of memory a program's instructions were going to work on. It was a reasonable solution: first you load a segment register, effectively saying "here, I want to work on the memory chunk starting at X"; afterwards, 16-bit memory addresses used by your code are interpreted as offsets into your chunk, or segment. There were four segment registers: one for the stack (ss), one for program code (cs), and two for data (ds, es). Most programs were small enough back then to fit their whole stack, code, and data each in a 64K segment, so segmentation was often transparent.
最初的8086有16位寄存器,它的指令主要使用8位或16位操作数。这使得代码可以使用216字节或64K 的内存,然而英特尔的工程师热衷于让 CPU 使用更多的内存而不扩大寄存器和指令的大小。因此,他们引入段寄存器作为一种手段,告诉中央处理器的64K 内存块的程序的指令将要工作。这是一个合理的解决方案: 首先加载一个段寄存器,有效地说“ here,i want to work on the memory chunk starting at x”; 然后,将代码使用的16位内存地址解释为块或段的偏移量。有四个段寄存器: 一个用于堆栈(ss) ,一个用于程序代码(cs) ,两个用于数据(ds,es)。当时大多数程序都足够小,可以在64K 段中容纳整个堆栈、代码和数据,因此分段通常是透明的。
Nowadays segmentation is still present and is always enabled in x86 processors. Each instruction that touches memory implicitly uses a segment register. For example, a jump instruction uses the code segment register (cs) whereas a stack push instruction uses the stack segment register (ss). In most cases you can explicitly override the segment register used by an instruction. Segment registers store 16-bit segment selectors; they can be loaded directly with instructions like MOV. The sole exception is cs, which can only be changed by instructions that affect the flow of execution, like CALL or JMP. Though segmentation is always on, it works differently in real mode versus protected mode.
如今,分段仍然存在,并且总是在 x86处理器中启用。每条与内存隐式接触的指令都使用一个段寄存器。例如,跳转指令使用代码段寄存器(cs) ,而堆栈推送指令使用堆栈段寄存器(ss)。在大多数情况下,可以显式重写指令使用的段寄存器。段寄存器存储16位段选择器; 它们可以通过像 MOV 这样的指令直接加载。唯一的例外是 cs,它只能通过影响执行流程的指令进行更改,如 CALL 或 JMP。虽然分割总是开着的,但它在实模式和保护模式下的工作方式不同。
In real mode, such as during early boot, the segment selector is a 16-bit number specifying the physical memory address for the start of a segment. This number must somehow be scaled, otherwise it would also be limited to 64K, defeating the purpose of segmentation. For example, the CPU could use the segment selector as the 16 most significant bits of the physical memory address (by shifting it 16 bits to the left, which is equivalent to multiplying by 216). This simple rule would enable segments to address 4 gigs of memory in 64K chunks, but it would increase chip packaging costs by requiring more physical address pins in the processor. So Intel made the decision to multiply the segment selector by only 24 (or 16), which in a single stroke confined memory to about 1MB and unduly complicated translation. Here's an example showing a jump instruction where cs contains 0x1000:
在实模式下,例如在早期引导期间,段选择器是一个16位数字,指定段开始时的物理内存地址。这个数字必须以某种方式进行规模化,否则它也将被限制在64K 以内,从而达不到分割的目的。例如,CPU 可以使用段选择器作为物理内存地址的16个最有效位(将其向左移动16位,相当于乘以216)。这个简单的规则将使片段能够在64K 块中寻址4千兆的内存,但是它会增加芯片封装成本,因为它需要处理器中更多的物理地址引脚。因此英特尔决定只将段选择器乘以24(或16) ,这样一来,内存就被限制在大约1 MB 左右,并且转换过于复杂。下面是一个示例,其中 c 包含0x1000的转移指令:
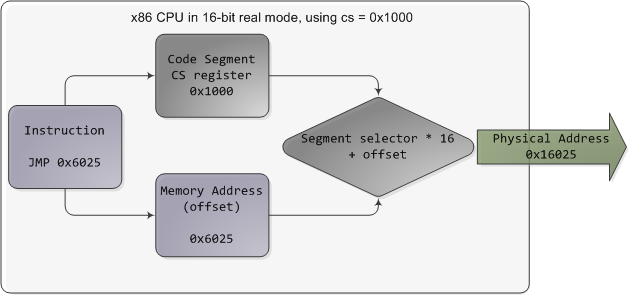
Real mode segmentation
实模式分割
Real mode segment starts range from 0 all the way to 0xFFFF0 (16 bytes short of 1 MB) in 16-byte increments. To these values you add a 16-bit offset (the logical address) between 0 and 0xFFFF. It follows that there are multiple segment/offset combinations pointing to the same memory location, and physical addresses fall above 1MB if your segment is high enough (see the infamous A20 line). Also, when writing C code in real mode a far pointer is a pointer that contains both the segment selector and the logical address, which allows it to address 1MB of memory. Far indeed. As programs started getting bigger and outgrowing 64K segments, segmentation and its strange ways complicated development for the x86 platform. This may all sound quaintly odd now but it has driven programmers into the wretched depths of madness.
实模式段的开始范围从0到0xff0(短于1mb 的16个字节) ,以16字节增量表示。对于这些值,在0和0xFFFF 之间添加16位偏移量(逻辑地址)。因此,有多个段/偏移量组合指向相同的内存位置,如果你的段足够高,物理地址大于1 MB (参见臭名昭著的 A20行)。另外,在实模式下编写 c 代码时,远端指针是一个包含段选择器和逻辑地址的指针,它允许它寻址1 MB 的内存。确实很远。随着程序开始变得越来越大,超出了64K 片段的范围,细分和它奇怪的方式使得 x86平台的开发变得复杂。这一切现在听起来可能有点奇怪,但它已经把程序员推入了疯狂的可怜深渊。
In 32-bit protected mode, a segment selector is no longer a raw number, but instead it contains an index into a table of segment descriptors. The table is simply an array containing 8-byte records, where each record describes one segment and looks thus:
在32位保护模式下,段选择器不再是原始数字,而是包含了段描述符表的索引。该表只是一个包含8字节记录的数组,其中每条记录描述一个段,因此看起来如下:

Segment descriptor
段描述符
There are three types of segments: code, data, and system. For brevity, only the common features in the descriptor are shown here. The base address is a 32-bit linear address pointing to the beginning of the segment, while the limit specifies how big the segment is. Adding the base address to a logical memory address yields a linear address. DPL is the descriptor privilege level; it is a number from 0 (most privileged, kernel mode) to 3 (least privileged, user mode) that controls access to the segment.
有三种类型的片段: 代码、数据和系统。为了简便起见,这里只显示描述符中的公共特性。基址是指向段开头的32位线性地址,而限制指定段的大小。将基地址添加到逻辑内存地址会产生线性地址。DPL 是描述符特权级别; 它是一个从0(最特权的内核模式)到3(最少特权的用户模式)的数字,用于控制对段的访问。
These segment descriptors are stored in two tables: the Global Descriptor Table (GDT) and the Local Descriptor Table (LDT). Each CPU (or core) in a computer contains a register called gdtr which stores the linear memory address of the first byte in the GDT. To choose a segment, you must load a segment register with a segment selector in the following format:
这些段描述符存储在两个表中: 全局描述符表描述符表(GDT)和本地描述符表(LDT)。计算机中的每个 CPU (或核心)都包含一个名为 gdtr 的寄存器,该寄存器存储 GDT 中第一个字节的线性内存地址。要选择一个段,你必须用一个段选择器加载一个段寄存器,格式如下:

Segment Selector
段选择器
The TI bit is 0 for the GDT and 1 for the LDT, while the index specifies the desired segment selector within the table. We'll deal with RPL, Requested Privilege Level, later on. Now, come to think of it, when the CPU is in 32-bit mode registers and instructions can address the entire linear address space anyway, so there's really no need to give them a push with a base address or other shenanigan. So why not set the base address to zero and let logical addresses coincide with linear addresses? Intel docs call this "flat model" and it's exactly what modern x86 kernels do (they use the basic flat model, specifically). Basic flat model is equivalent to disabling segmentation when it comes to translating memory addresses. So in all its glory, here's the jump example running in 32-bit protected mode, with real-world values for a Linux user-mode app:
TI 位对于 GDT 为0,对于 LDT 为1,而索引指定表中所需的段选择器。稍后我们将处理 RPL,请求的特权级别。现在,想想看,当 CPU 处于32位模式寄存器,并且指令无论如何都可以寻址整个线性地址空间,所以真的没有必要给它们一个基地址或其他诡计的推送。那么,为什么不将基地址设置为零,让逻辑地址与线性地址一致呢?英特尔的文档称之为“扁平模型”,这正是现代 x86内核所做的(特别是他们使用的基本扁平模型)。在翻译内存地址时,基本的平面模型等同于禁用分段。因此,在所有的荣耀中,这里有一个运行在32位保护模式下的跳转例子,它是一个 Linux 用户模式应用程序的真实值:

Protected Mode Segmentation
保护模式分割
The contents of a segment descriptor are cached once they are accessed, so there's no need to actually read the GDT in subsequent accesses, which would kill performance. Each segment register has a hidden part to store the cached descriptor that corresponds to its segment selector. For more details, including more info on the LDT, see chapter 3 of the Intel System Programming Guide Volume 3a. Volumes 2a and 2b, which cover every x86 instruction, also shed light on the various types of x86 addressing operands - 16-bit, 16-bit with segment selector (which can be used by far pointers), 32-bit, etc.
段描述符文件的内容一旦被访问就会被缓存,因此不需要在后续访问中实际读取 GDT,这会降低性能。每个段寄存器都有一个隐藏部分来存储与其段选择器对应的缓存描述符。更多细节,包括更多关于 LDT 的信息,请参阅英特尔系统编程指南第3卷第3章。卷2a 和卷2b 覆盖了每一条 x86指令,也揭示了各种类型的 x86寻址操作数——16位、16位的段选择器(可用于远处的指针)、32位等。
In Linux, only 3 segment descriptors are used during boot. They are defined with the GDT_ENTRY macro and stored in the boot_gdt array. Two of the segments are flat, addressing the entire 32-bit space: a code segment loaded into cs and a data segment loaded into the other segment registers. The third segment is a system segment called the Task State Segment. After boot, each CPU has its own copy of the GDT. They are all nearly identical, but a few entries change depending on the running process. You can see the layout of the Linux GDT in segment.h and its instantiation is here. There are four primary GDT entries: two flat ones for code and data in kernel mode, and another two for user mode. When looking at the Linux GDT, notice the holes inserted on purpose to align data with CPU cache lines - an artifact of the von Neumann bottleneck that has become a plague. Finally, the classic "Segmentation fault" Unix error message is not due to x86-style segments, but rather invalid memory addresses normally detected by the paging unit - alas, topic for an upcoming post.
在 Linux 中,在引导期间只使用3个段描述符。它们使用 GDT _ entry 宏定义,并存储在 boot _ GDT 数组中。其中两个段是平的,寻址整个32位空间: 加载到 cs 的代码段和加载到其他段寄存器的数据段。第三个段是称为任务状态段的系统段。引导之后,每个 CPU 都有自己的 GDT 副本。它们几乎都是相同的,但是有一些条目会根据运行过程而变化。您可以在 segment.h 中看到 Linux GDT 的布局,其实例化在这里。有四个主要 GDT 条目: 两个平面条目用于内核模式下的代码和数据,另外两个用于用户模式。在查看 Linux GDT 时,请注意为了使数据与 CPU 缓存线路保持一致而特意插入的漏洞——这是 von Neumann 瓶颈的一个产物,已经成为一种瘟疫。最后,经典的“内存区段错误”Unix 错误消息不是由于 x86样式的段,而是由于无效的内存地址通常由分页单元检测到-唉,主题为一个即将到来的帖子。
Intel deftly worked around their original segmentation kludge, offering a flexible way for us to choose whether to segment or go flat. Since coinciding logical and linear addresses are simpler to handle, they became standard, such that 64-bit mode now enforces a flat linear address space. But even in flat mode segments are still crucial for x86 protection, the mechanism that defends the kernel from user-mode processes and every process from each other. It's a dog eat dog world out there! In the next post, we'll take a peek at protection levels and how segments implement them.
英特尔灵巧地围绕他们的原始分割组装,为我们提供了一个灵活的方式来选择是否细分或平板。由于逻辑地址和线性地址的重合更容易处理,因此它们成为标准,以至于64位模式现在强制执行一个扁平线性地址空间。但是,即使在扁平模式段对于 x86保护仍然是至关重要的,这种机制保护内核免受用户模式进程和每个进程之间的攻击。这是一个狗咬狗的世界!在下一篇文章中,我们将对保护级别以及段是如何实现它们进行一次窥视。
零拷贝原理的文章网上满天飞,但你知道如何使用零拷贝吗?_中间件兴趣圈-CSDN博客
零拷贝是中间件相关面试中必考题,本文就和大家一起来总结一下NIO拷贝的原理,并结合Netty代码,从代码实现层面近距离观摩如何使用java实现零拷贝。
1、零拷贝实现原理
**“零拷贝”**其实包括两个层面的含义:
- 拷贝
一份相同的数据从一个地方移动到另外一个地方的过程,叫拷贝。 - 零
希望在IO读写过程中,CPU控制的数据拷贝到次数为0。
在IO编程领域,当然是拷贝的次数越少越好,逐步优化,将其拷贝次数将为0,最大化的提高性能。
那接下来我们循序渐进来看一下如何减少数据复制。
接下来我们将以RocketMQ消息发送、消息读取场景来阐述IO读写过程中可能需要进行的数据复制与上下文切换。
1.1 传统的IO读流程
一次传统的IO读序列流程如下所示: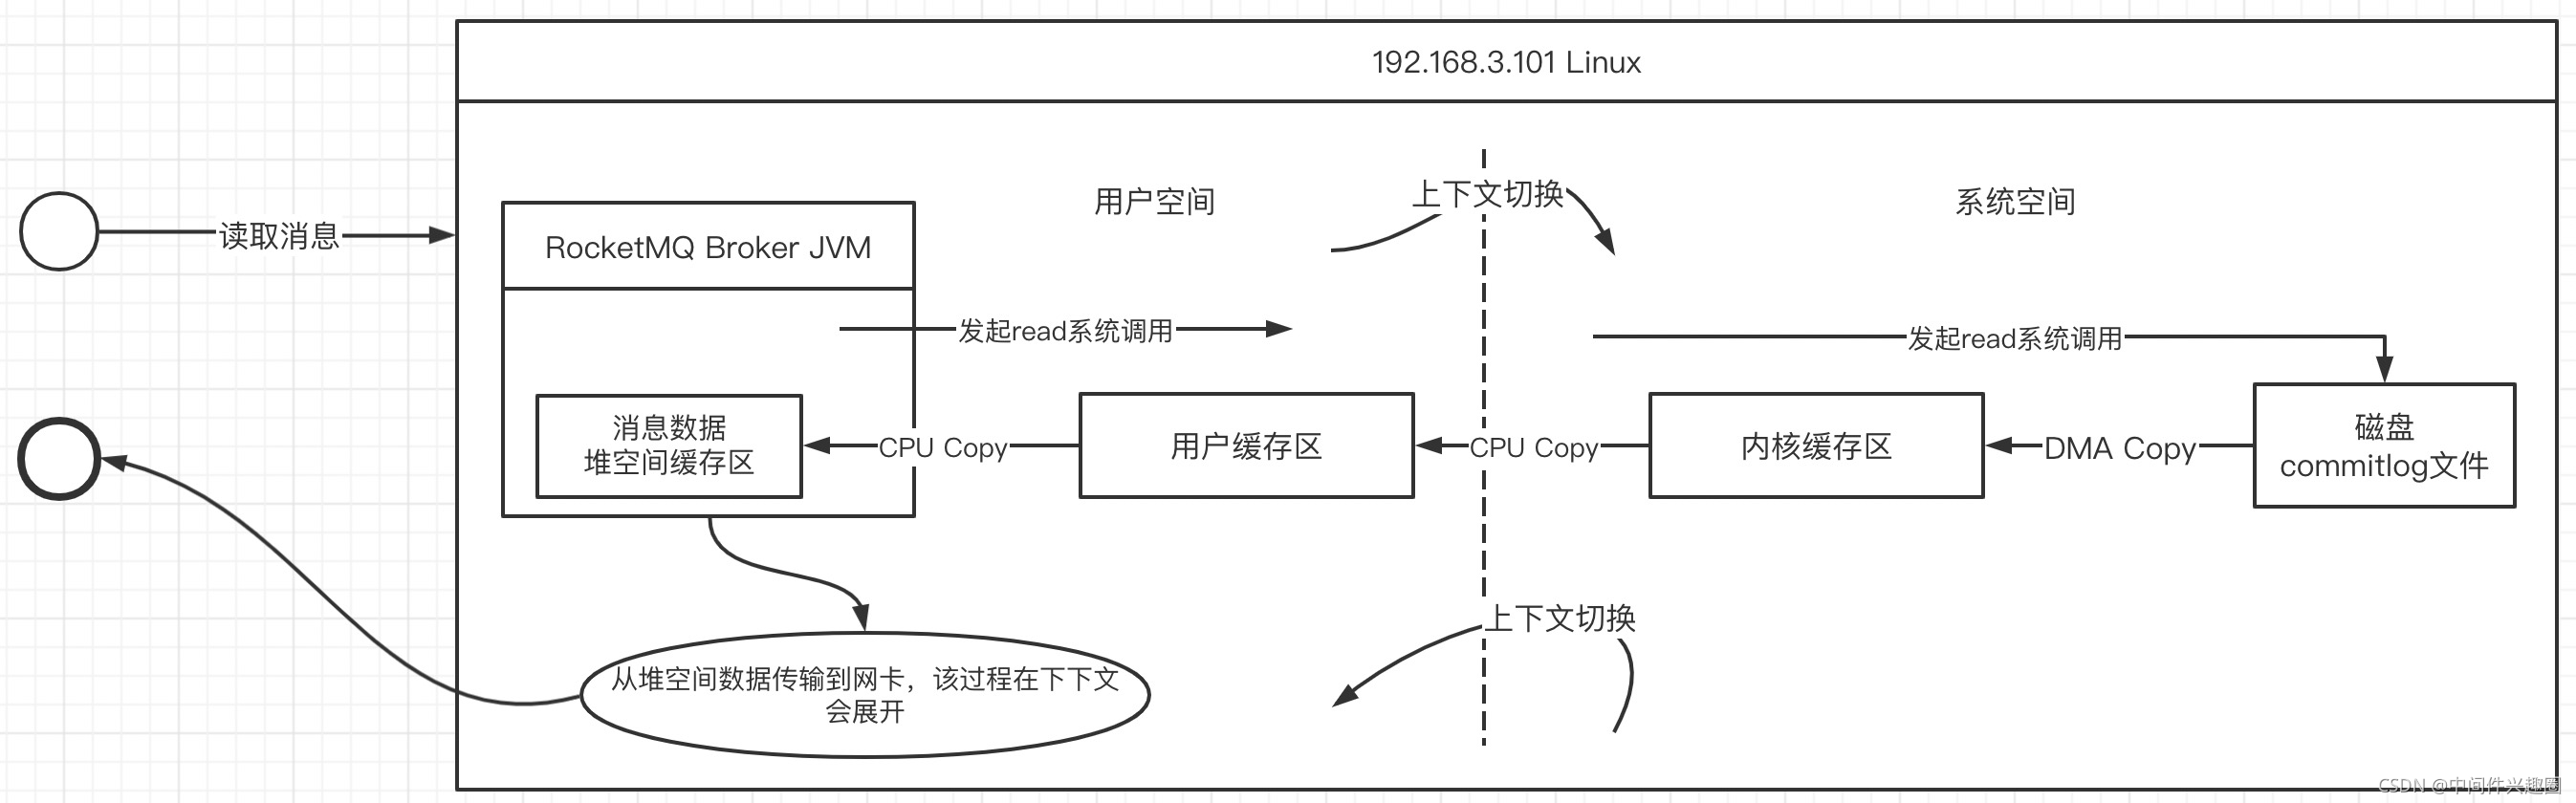
java应用中,如果要将从文件中读取数据,其基本的流程如下所示:
- 当broker收到拉取请求时发起一次read系统调用,此时操作系统会进行一次上下文的切换,从用态间切换到内核态。
- 通过直接存储访问器(DMA)从磁盘将数据加载到内核缓存区(DMA Copy,这个阶段不需要CPU参与,如果是阻塞型IO,该过程用户线程会处于阻塞状态)
- 然后在CPU的控制下,将内核缓存区的数据copy到用户空间的缓存区(由于这个是操作系统级别的行为,通常这里指的内存缓存区,通常使用的是堆外内存),这里将发生一次CPU复制与一次上下文切换(从内核态切换到用户态)
- 将堆外内存中的数据复制到应用程序的堆内存,供应用程序使用,本次复制需要经过CPU控制。
- 将数据加载到堆空间,需要传输到网卡,这个过程又要进入到内核空间,然后复制到sockebuffer,然后进入网卡协议引擎,从而进入到网络传输中。该部分会在接下来会详细介绍。
温馨提示:RocketMQ底层的工作机制并不是上述模型,是经过优化后的读写模型,本文将循序渐进的介绍优化过程。
1.2 传统的IO写流程
一次传统的IO写入流程如下图所示: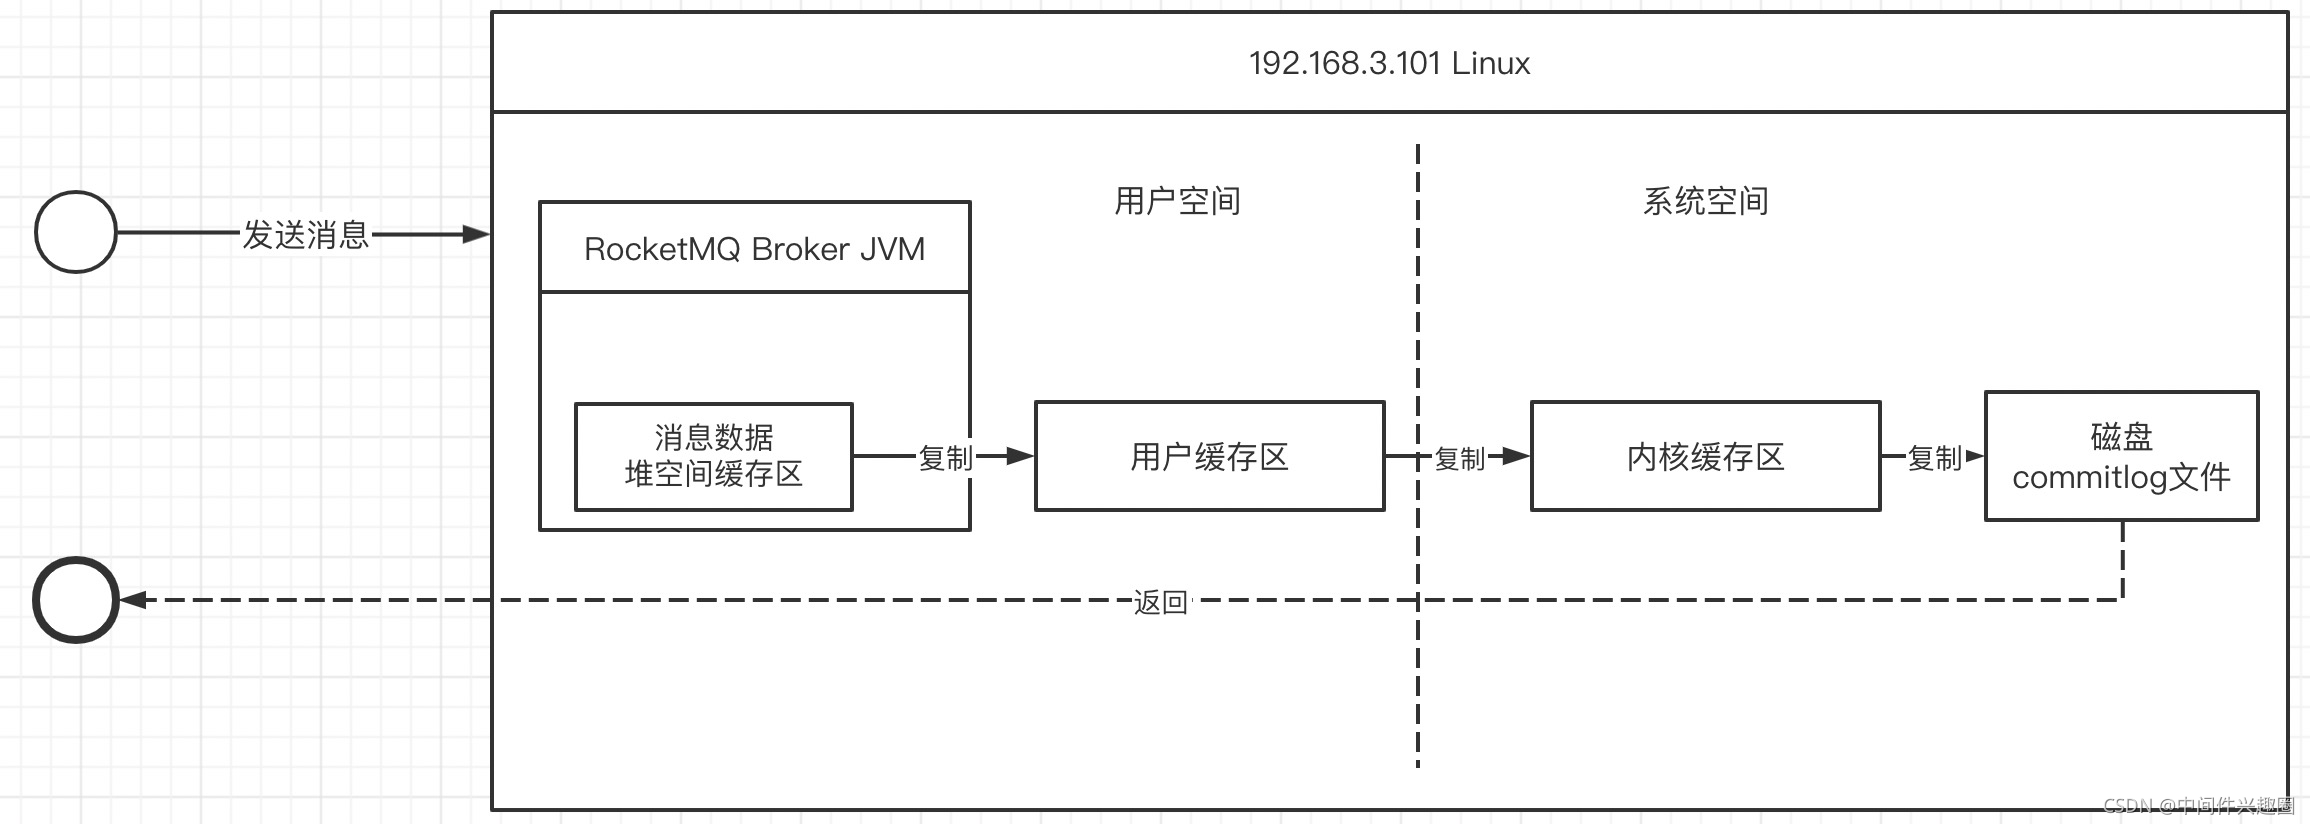
核心关键步骤如下:
- 在broker收到消息时首先会在堆空间中创建一个堆缓存区,用于存储用户需要写入的数据,然后需要将jvm堆内存中数据复制到操作系统内存(CPU COPY)
- 发起write系统调用,将用户空间中的数据复制到内存缓存区,**此过程发生一次上下文切换(用户态切换到内核态)**并进行一次CPU Copy。
- 通过直接存储访问器(DMA)将内核空间的数据写入到磁盘,并返回结果,此过程发生一次DMA Copy 与一次上下文切换(内核态切换到用户态)
1.3 读写优化技巧
从上面两张流程图,我们不能看出读写处理流程中存在太多复制,同样的数据需要被复制多次,造成性能损耗,故IO读写通常的优化方向主要为:减少复制次数、减少用户态/内核态切换次数。
1.3.1 引入堆外内存
jvm堆空间中数据要发送到内核缓存区,通常需要先将jvm堆空间中的数据拷贝到系统内存(一个非官方的理解,用C语言实现的本地方法调用中,首先需要将堆空间中数据拷贝到C语言相关的存储结构),故提高性能的第一个措施:使用堆外内存。
不过堆外内存中的数据,通常还是需要从堆空间中获取,从这个角度来看,貌似提升的性能有限。
1.3.2 引入内存映射(MMap与write)
通过引入内存映射机制,减少用户空间与内核空间之间的数据复制,如下图所示: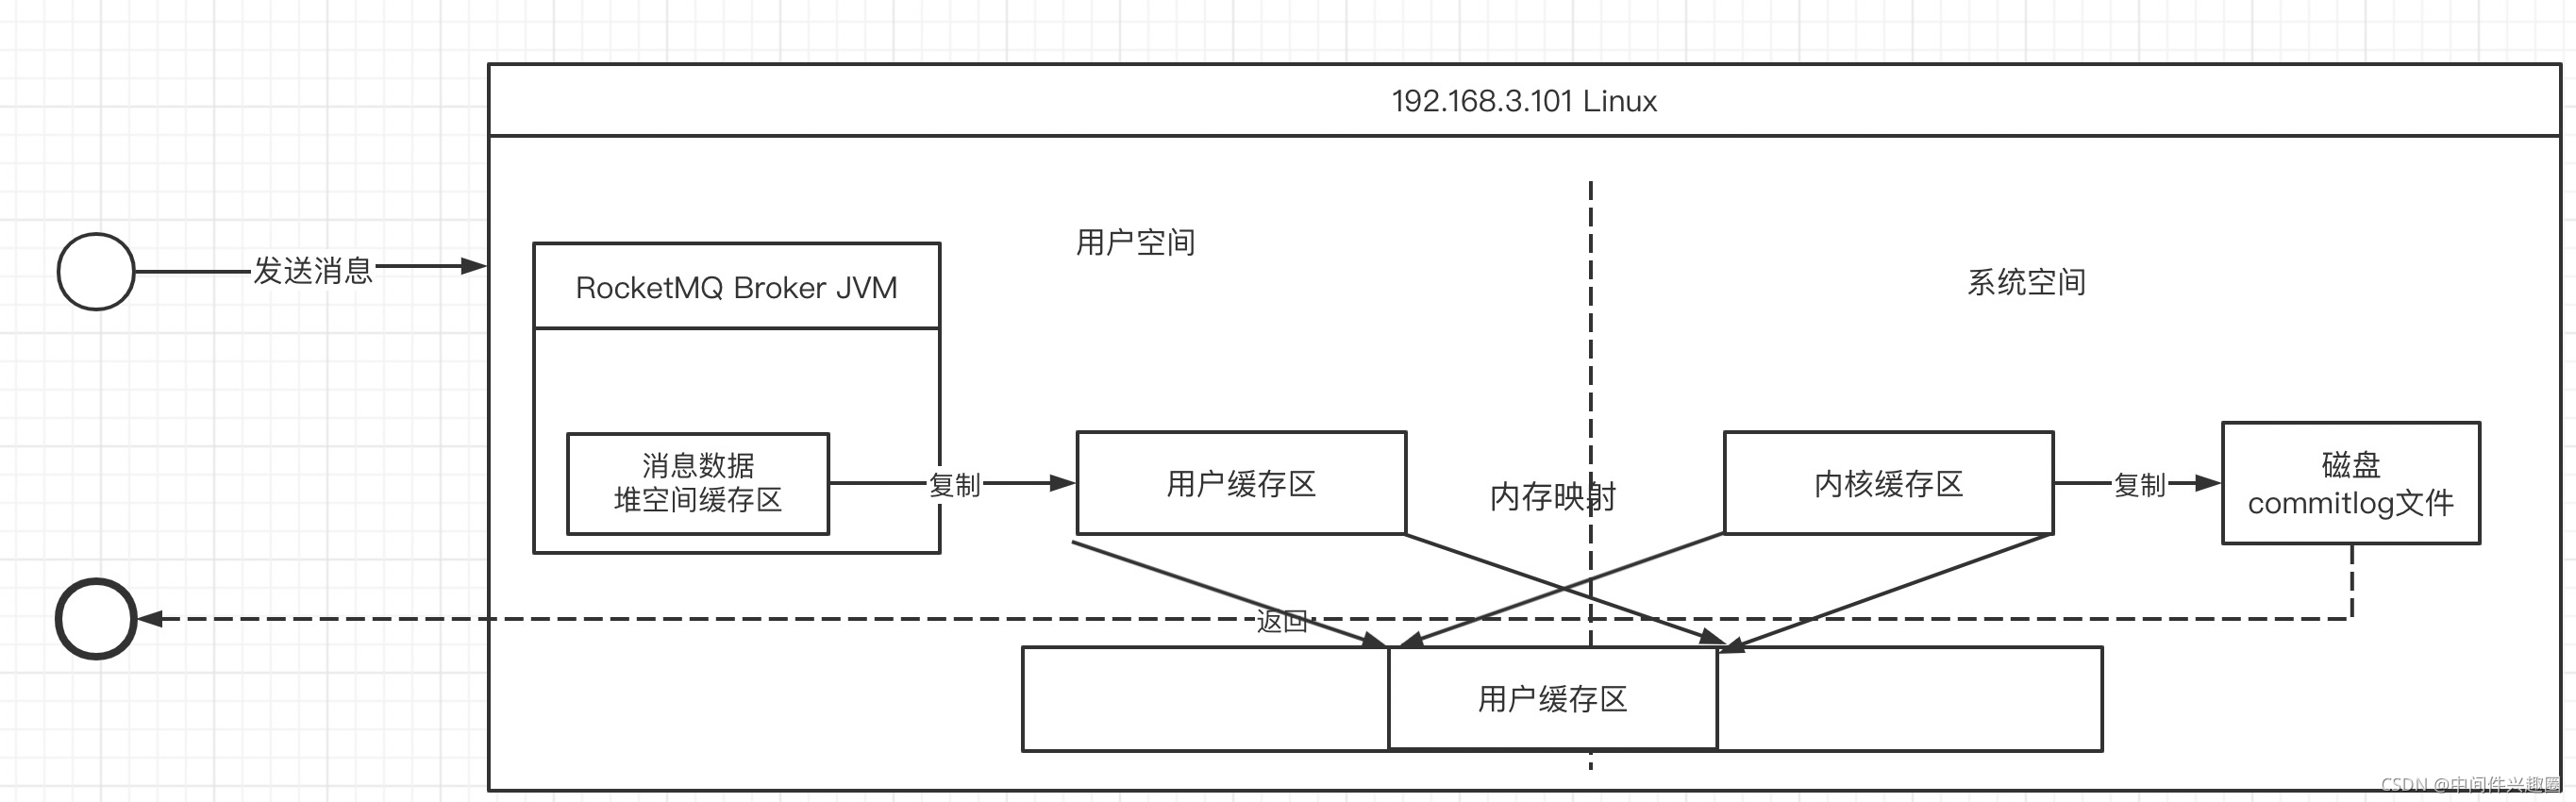
内存映射的核心思想就是将内核缓存区、用户空间缓存区映射到同一个物理地址上,可以减少用户缓存区与内核缓存区之间的数据拷贝。
但由于内存映射机制并不会减少上下文切换次数。
1.3.3 大名鼎鼎鼎sendfile
在Linux 2.1内核引入了sendfile函数用于将文件通过socket传送。
注意sendfile的传播方向:使用于将文件中的内容直接传播到Socket,通常使用客户端从服务端文件中读取数据,在服务端内部实现零拷贝。
在1.3.1中介绍客户端从服务端读取消息的过程中,并没有展开介绍从服务端写入到客户端网络中的过程,接下来看看sendfile的数据拷贝图解: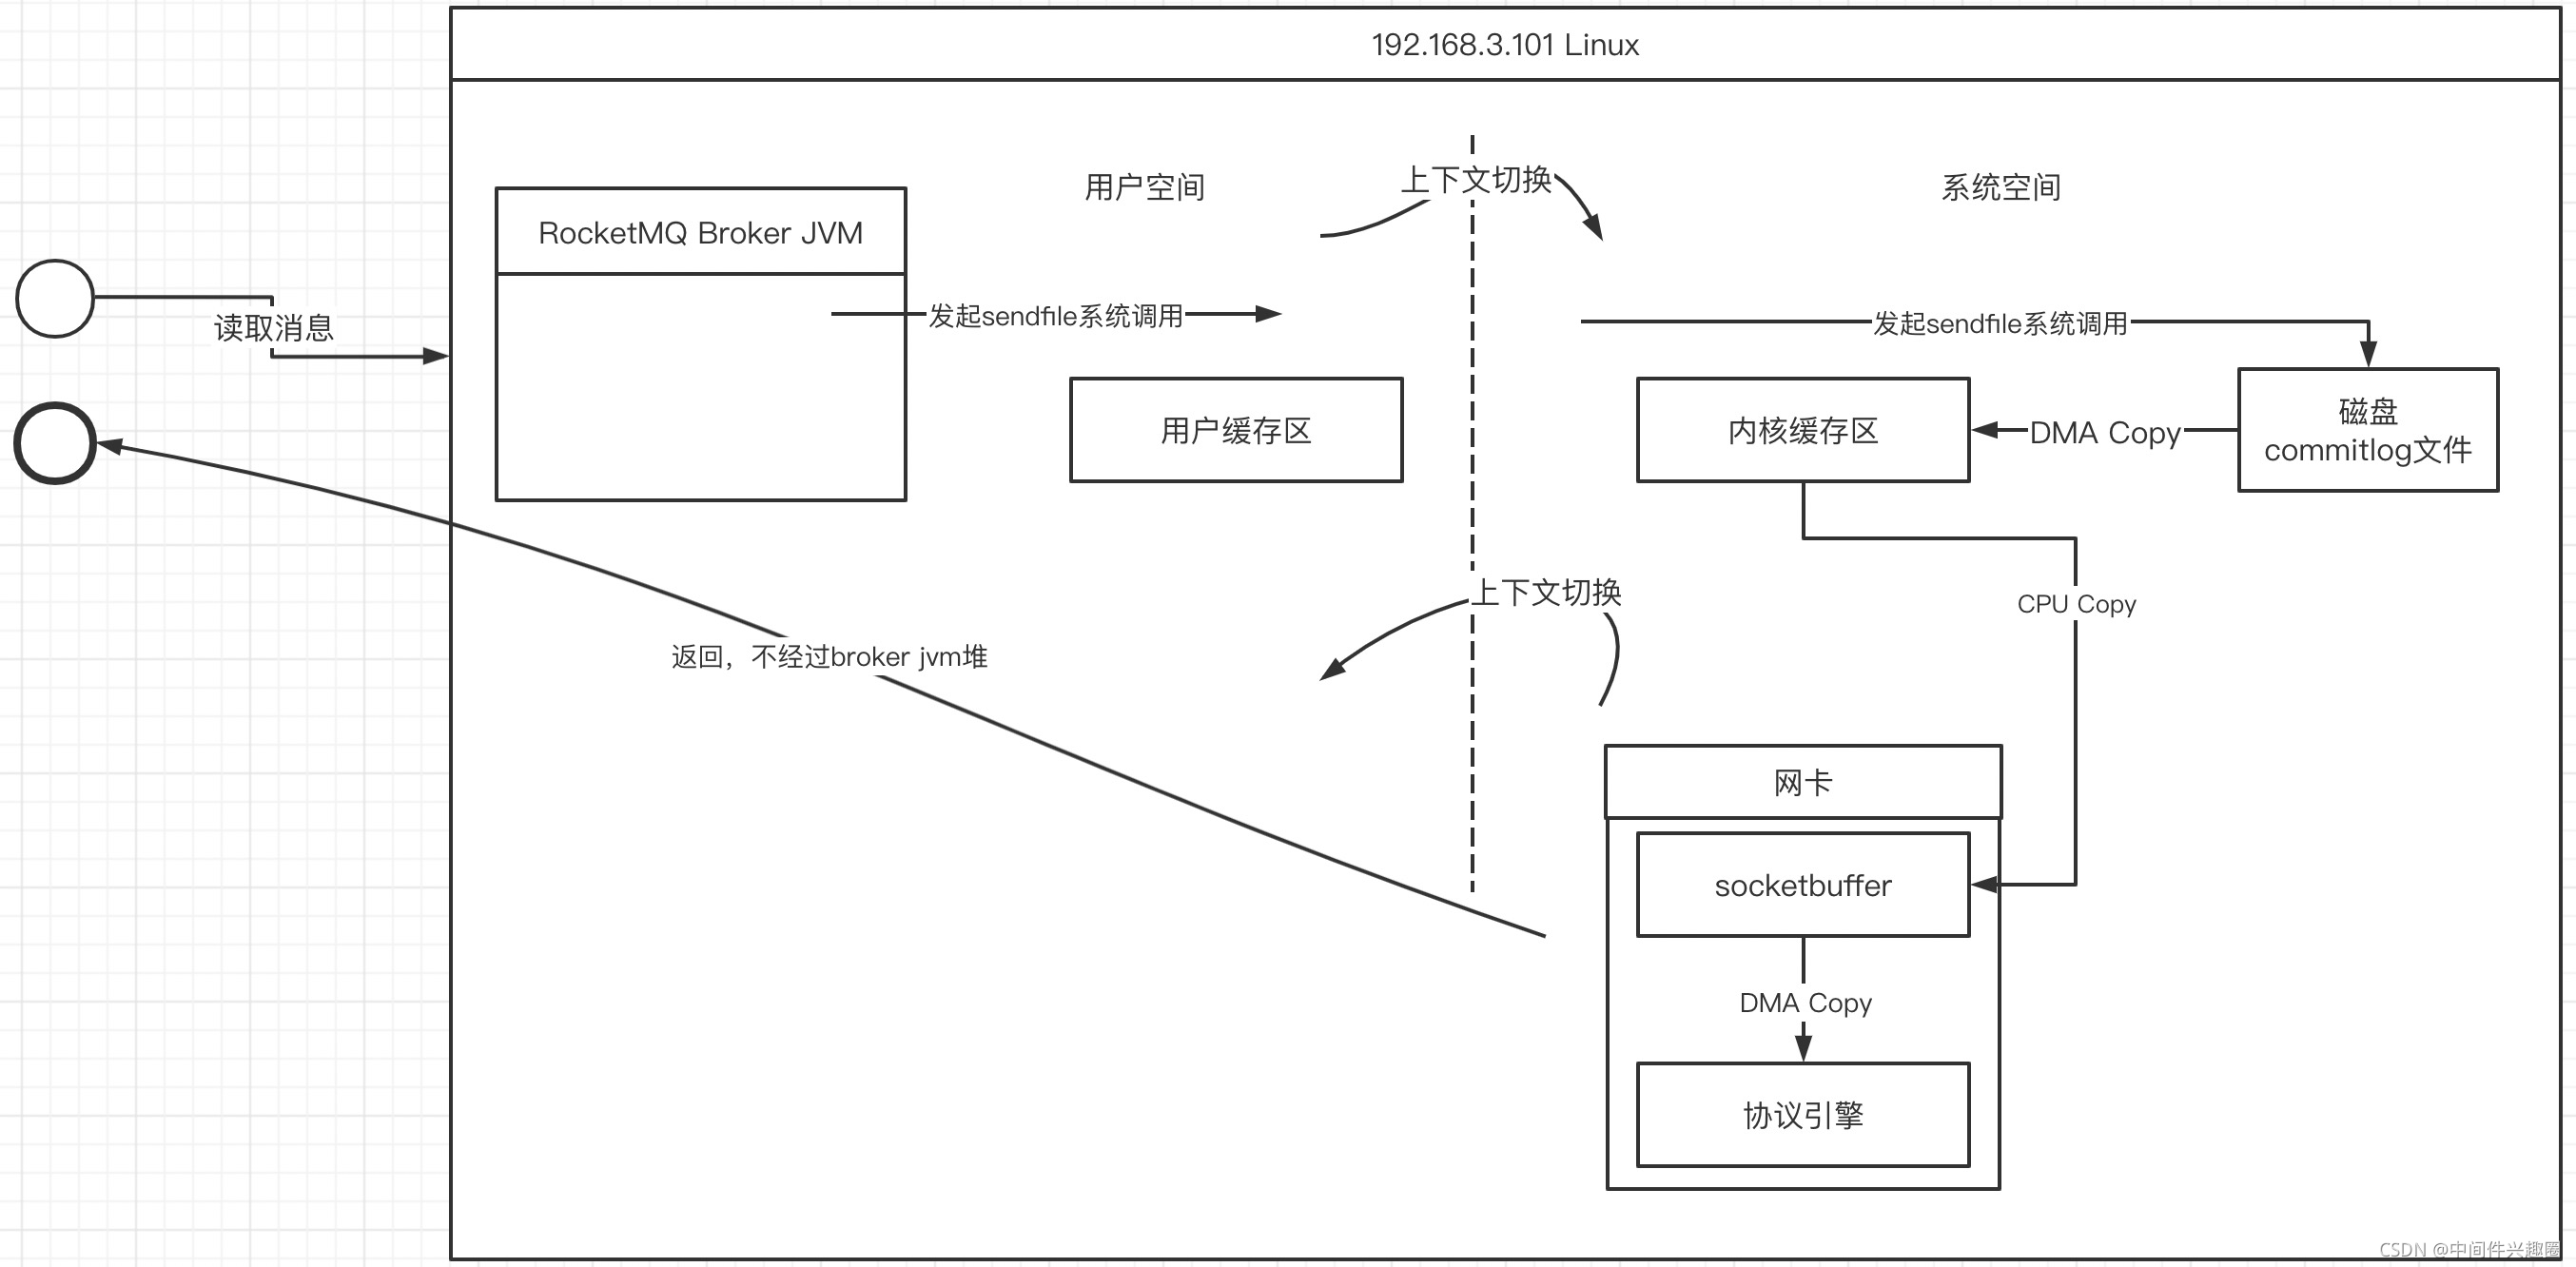
sendfile的主要特点是在内核空间中通过DMA将数据从磁盘文件拷贝到内核缓存区,然后可以直接将内核缓存区中的数据在CPU控制下将数据复制到socket缓存区,最终在DMA的控制下将socketbufer中拷贝到协议引擎,然后经网卡传输到目标端。
sendfile的优势(特点):
- 一次sendfile调用会只设计两次上下文切换,比read+write减少两次上下文切换。
- 一次sendfile会存在3次copy,其中一次CPU拷贝,两次DMA拷贝。
1.3.4 Linux Gather
Linux2.4内核引入了gather机制,用以消除最后一次CPU拷贝,即不再将内核缓存区中的数据拷贝到socketbuffer,而是将内存缓存区中的内存地址、需要读取数据的长度写入到socketbuffer中,然后DMA直接根据socketbuffer中存储的内存地址,直接从内核缓存区中的数据拷贝到协议引擎(注意,这次拷贝由DMA控制)。
从而实现真正的零拷贝。
2、结合Netty谈零拷贝实战
上面讲述了“零拷贝”的实现原理,接下来将尝试从Netty源码去探究在代码层面如何使用“零拷贝”。
从网上的资料可以得知,在java nio提供的类库中真正能运用底层操作系统的零拷贝机制只有FileChannel的transferTo,而在Netty中也不出意料的对这种方式进行了封装,其类图如下: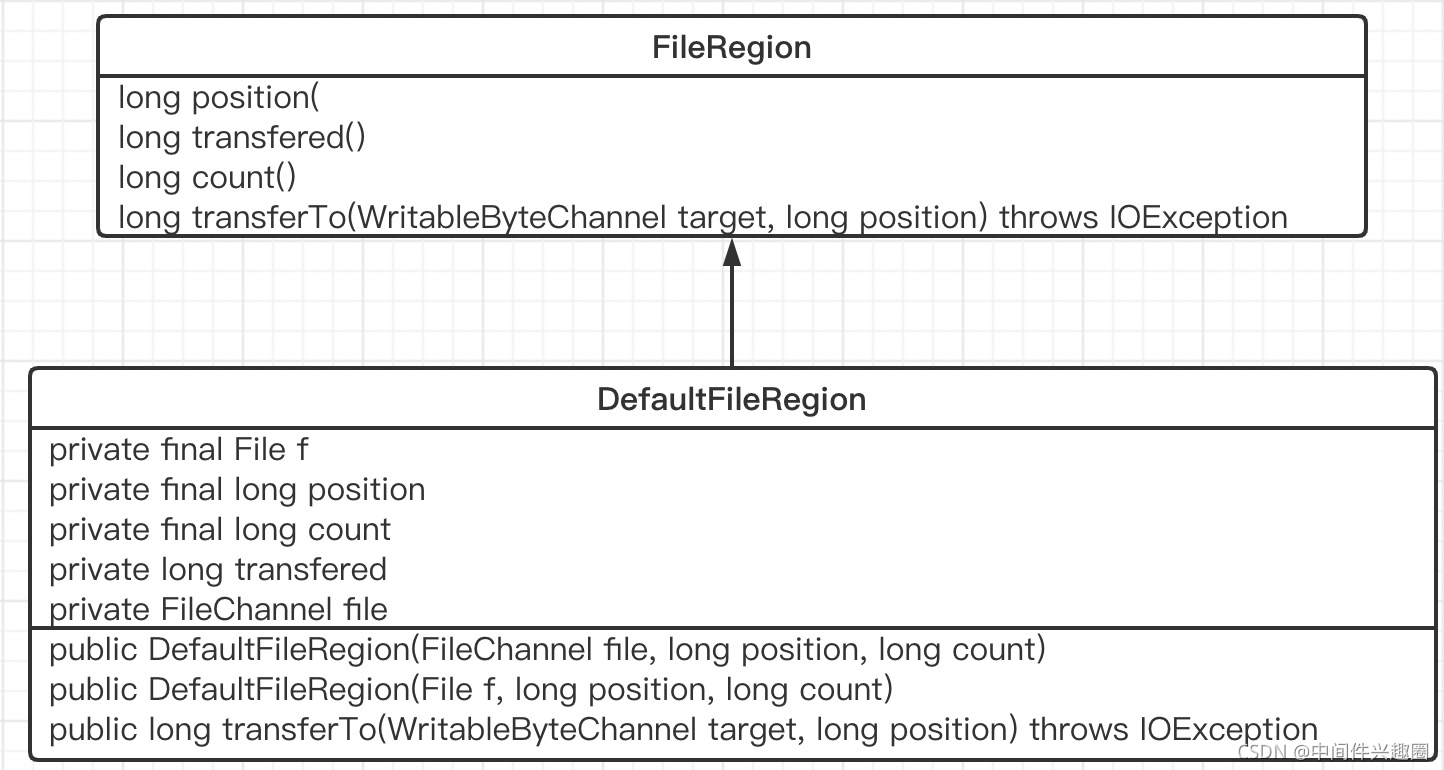
其主要的核心要点是FileRegion的transferTo方法,我们结合该方法再来介绍DefaultFileRegion各个核心属性的含义。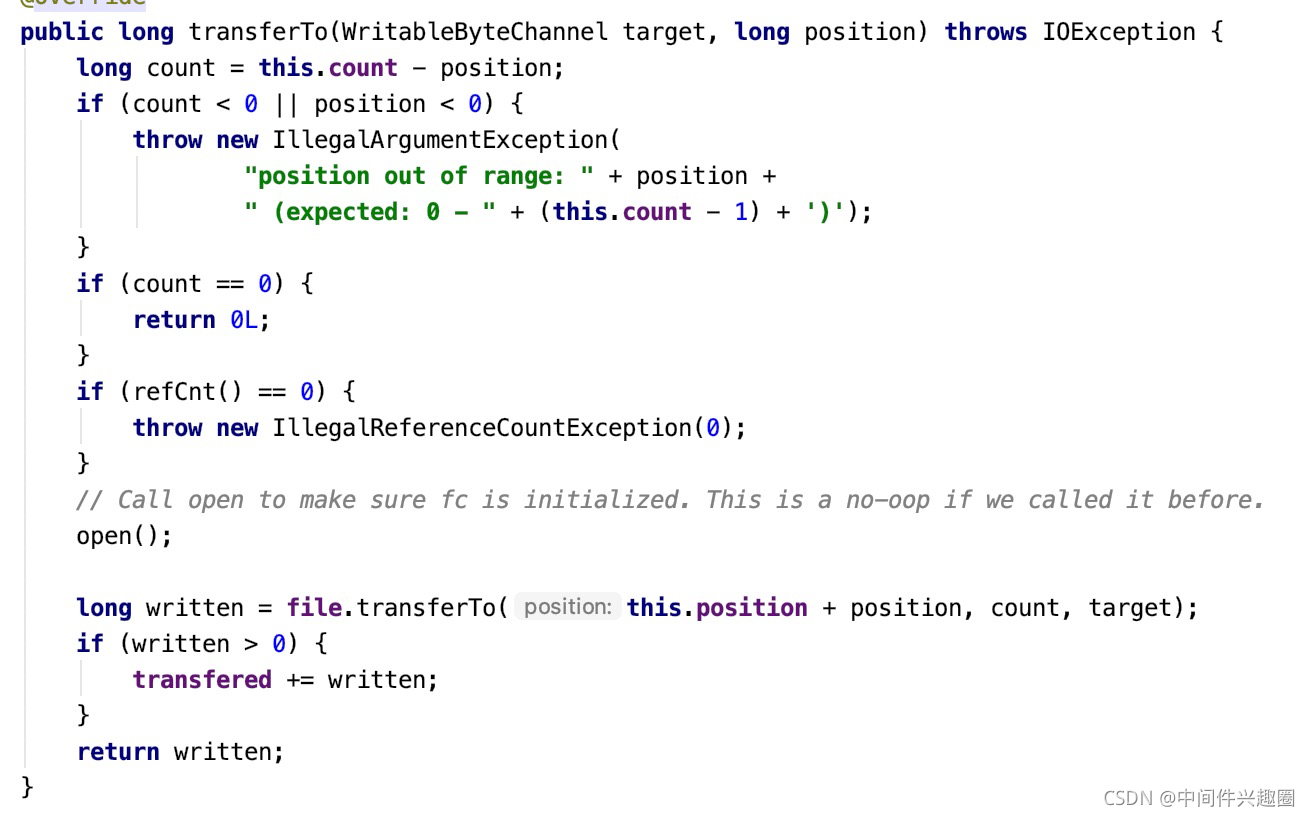
上述代码并不复杂,我们不难得出如下观点:
- 首先介绍DefaultFileRegion的核心属性含义:
- File f
底层抽取数据来源的底层磁盘文件 - FileChannel file
底层文件的文件通道。 - long position
数据从通道中抽取的起始位置 - long count
需要传递的总字节数 - long transfered
已传递的字节数量。
- File f
- 核心要点是调用java nio FileChannel的transferTo方法,底层调用的是操作系统的sendfile函数,即真正的零拷贝。
- 调用一次transferTo方法并不一定能将需要的数据全部传输完成,故该方法返回已传输的字节数,是否需要再次调用该方法的判断方法:已传递的字节数是否等于需要传递的总字节数(transfered == count)
接下来我们看一下FileRegion的transferTo在netty中的调用链,从而推断一下Netty中的零拷贝的触发要点。
在Netty中代表两个类型的通道:
-
EpollSocketChannel
基于Epoll机制进行事件的就绪选择机制。 -
NioSocketChannel
基于select机制的事件就绪选择。
在Netty中调用通道Channel的flush或writeAndFlush方法,都会最终触发底层通道的网络写事件,如果待写入的对象是FileRegion,则会触发零拷贝机制,接下来我们对两个简单介绍一下:
2.1 EpollSocketChannel 通道零拷贝
写入的入口函数为如下:
核心思想为:如果待写入的消息是DefaultFileRegion,EpollSocketChannel将直接调用sendfile函数进行数据传递;如果是FileRegion类型,则按照约定调用FileRegion的transferTo进行数据传递,这种方式是否真正进行零拷贝取决于FileRegion的transferTo中是否调用了FileChannel的transferTo方法。
温馨提示:本文并没有打算详细分析Epoll机制以及编程实践。
2.2 NioSocketChannel 通道零拷贝实现
实现入口为: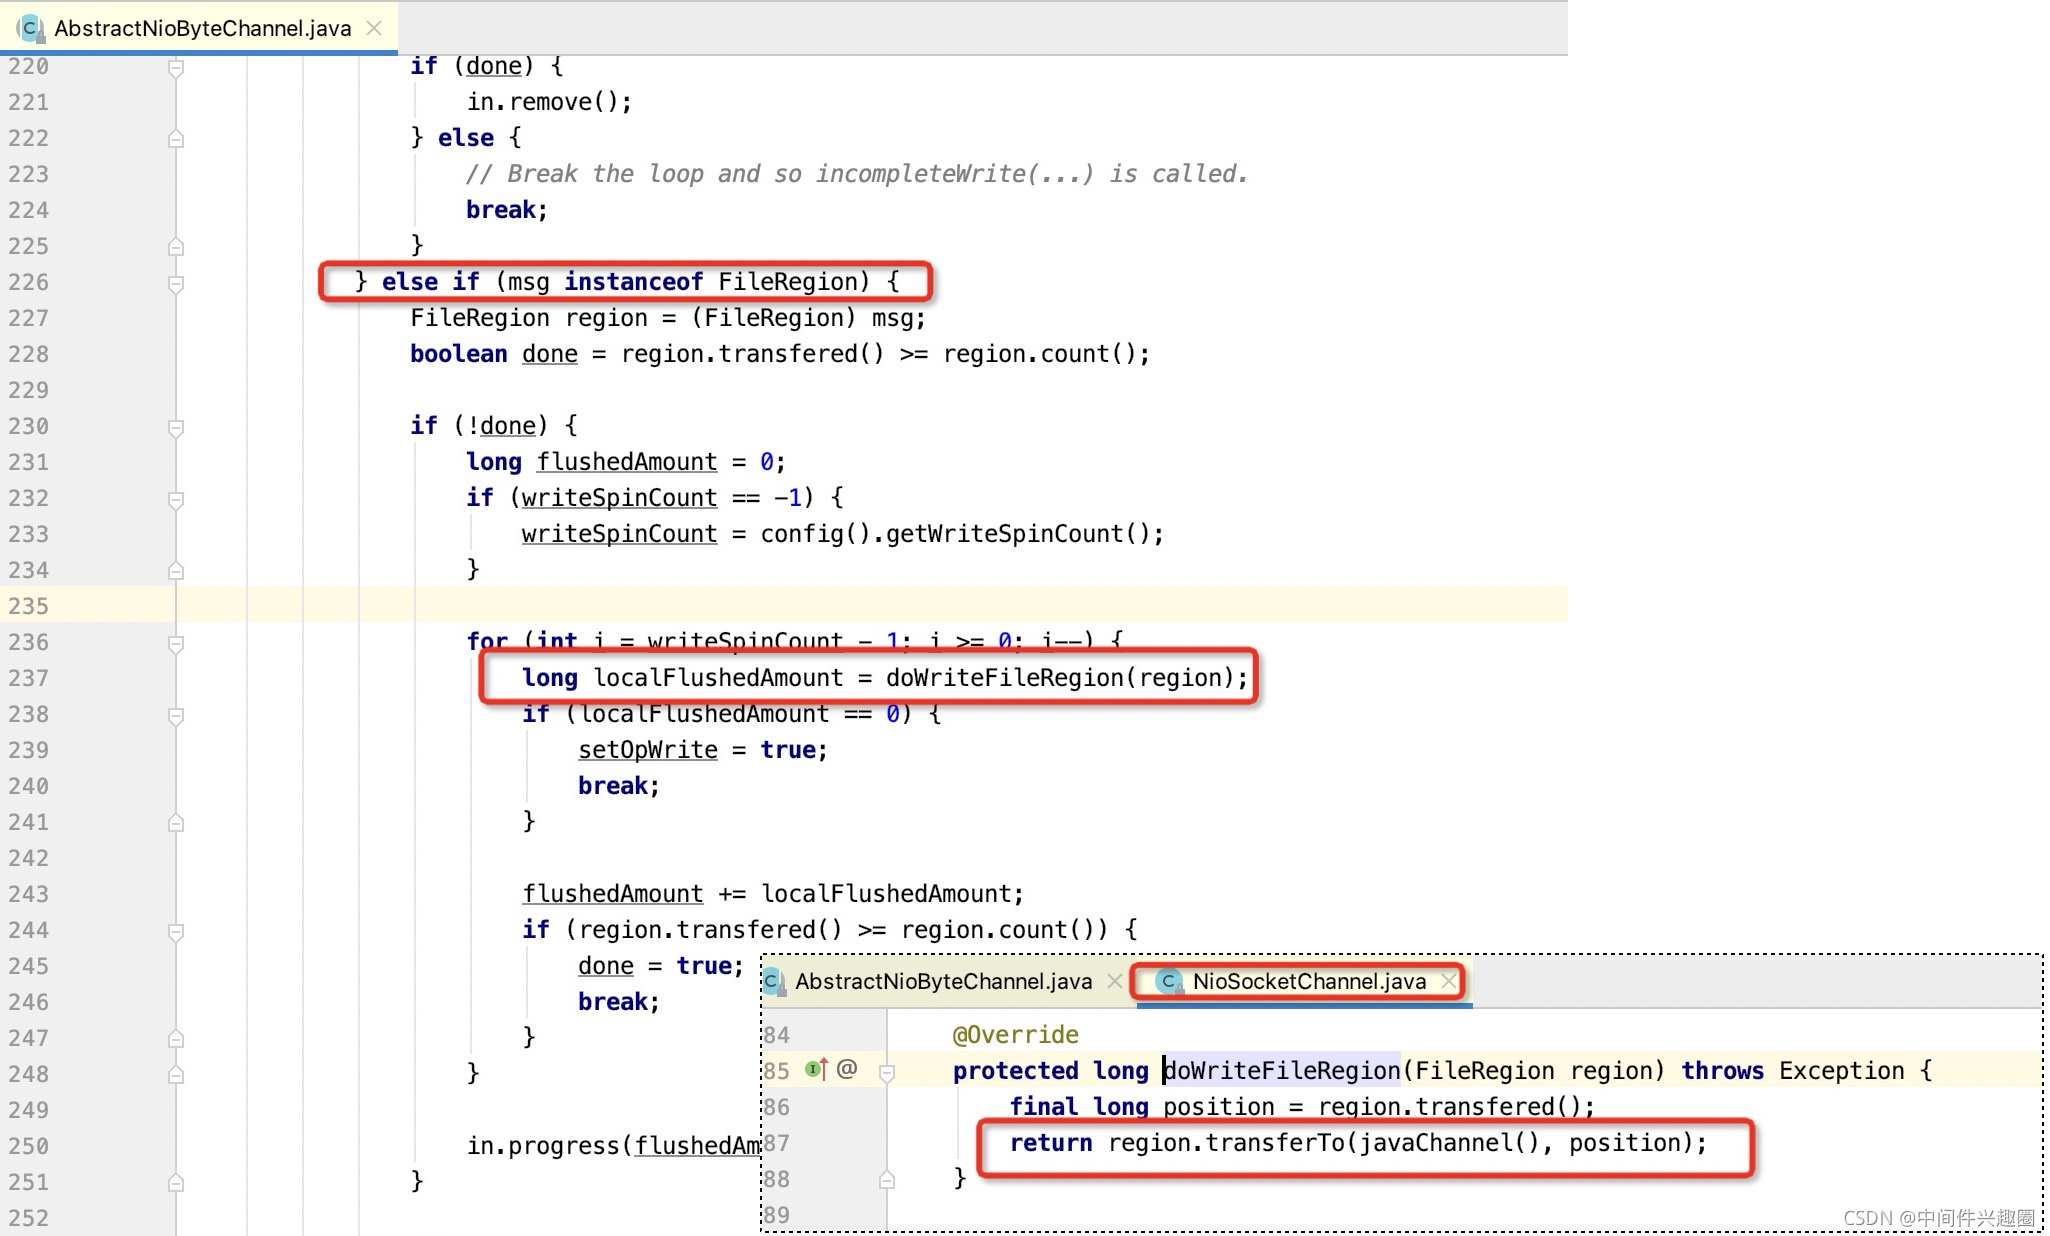
从这里可知,NioSocketChannel就是中规中矩的调用FileRegion的transferTo方法,是否真正实现了零拷贝,取决于底层是否调用了FileChannel的transferTo方法。
2.3 零拷贝实践总结
从Netty的实现中我们基本可以得出结论:是否是零拷贝,判断的依据是是否调用了FileChannel的transferTo方法,更准备的表述是底层是否调用了操作系统的sendfile函数,并且操作系统底层还需要支持gather机制,即linux的内核版本不低于2.4。
原文首发:https://www.codingw.net/content?id=738
一键三连(关注、点赞、留言)是对我最大的鼓励。
各位技术朋友们,我是《RocketMQ技术内幕》一书作者,CSDN2020博客之星TOP2,热衷于中间件领域的技术分享,维护「中间件兴趣圈」公众号,旨在成体系剖析Java主流中间件,构建完备的分布式架构体系,欢迎大家大家关注我,回复「专栏」可获取15个专栏;回复「PDF」可获取海量学习资料,回复「加群」可以拉你入技术交流群,零距离与BAT大厂的大神交流。

 浙公网安备 33010602011771号