实现一个基于react-easy-crop的可自定义截图比例与输出图片像素值的截图组件
裁切组件需求
-
裁切缩放的时候,裁切框不可以超出图片边界(调整最小缩放值)
未设置最小缩放值:
设置最小缩放值:
-
图片初始化展现在裁切组件中的时候,需要利用好组件空间,最大限度的展示图片(调整初始缩放值)
初始缩放值固定为1,可能无法完全展示图片:

调整缩放值,尽可能完全展示图片:
但是有些长宽比过于奇怪的图片,要加以限制,因为展示完全的话,就会违反需求1,超出图片边界:

-
裁切出来的图片需要指定宽高(使用canvas的api实现)
-
裁切框的比例可自定义、组件宽高可自定义、可以接受任何宽高比例的图片
代码实现
父组件cropView.js:
// cropView.jsx
import { useState, useMemo } from "react";
import ImgCropper from "./imgCropper";

function App() {
  // 初始url
  const url = require("./yigehezi.png");
  // 被剪裁的图像url
  const [croppedUrl, setCroppedUrl] = useState("");
  // 裁切框的宽高
  const cropSize = useMemo(() => ({ width: 280, height: 210 }), []); // 防止触发useEffect
  // "选中框"中,宽、高分别有多少像素
  let croppedAreaPixels = {};

  const handleOk = () => {
    // 点击确定裁剪图片
    let image = new Image();
    image.src = url;
    image.onload = async () => {
      // 使用canvas裁剪图片
      const cvs = document.createElement("canvas");
      const ctx = cvs.getContext("2d");
      const sx = croppedAreaPixels.x;
      const sy = croppedAreaPixels.y;
      const sWidth = croppedAreaPixels.width;
      const sHeight = croppedAreaPixels.height;

      cvs.width = cropSize.width; // 可以自定义成自己想要的截图的横向像素
      cvs.height = cropSize.height; // 可以自定义成自己想要的截图的纵向像素
      cvs.crossOrigin = "Anonymous";
      ctx.drawImage(image, sx, sy, sWidth, sHeight, 0, 0, cvs.width, cvs.height);

      // 生成裁剪后的图片dataUrl以及file对象
      const newImageUrl = cvs.toDataURL("image/jpeg");
      const newImageFile = dataURLtoFile(newImageUrl); // 可以使用newImageFile上传文件
      setCroppedUrl(newImageUrl);
    };

    function dataURLtoFile(dataurl) {
      var arr = dataurl.split(",");
      var mime = arr[0].match(/:(.*?);/)[1];
      var bstr = atob(arr[1]);
      var n = bstr.length;
      var u8arr = new Uint8Array(n);
      while (n--) {
        u8arr[n] = bstr.charCodeAt(n);
      }
      const blob = new Blob([u8arr], { type: mime });
      return new File([blob], "file", { type: "image/jpeg" });
    }
  };

  return (
    <div style={{ backgroundColor: "aqua", width: "800px", height: "800px" }}>
      <button onClick={handleOk}>裁切</button>

      <ImgCropper
        clipingImgUrl={url}
        imgCropperSize={{ width: 400, height: 600 }}
        cropSize={cropSize}
        maxZoom={4}
        onClipOk={(data) => {
          croppedAreaPixels = data;
        }}
        style={{ marginTop: 20 }}
        zoomSpeed={0.15}
      />

      <img src={croppedUrl} />
    </div>
  );
}

export default App;
子组件imgCropper:
// imgCropper.jsx
import { useEffect, useState, useCallback } from 'react'
import Cropper from 'react-easy-crop'
/* 注意:该组件在模态框Modal组件内使用时,需要禁用模态框动画效果,否则此组件会出现异常 */
export default function ImgCropper(props) {
const {
/* 必填参数 */
// 需要被裁切的图片地址
clipingImgUrl,
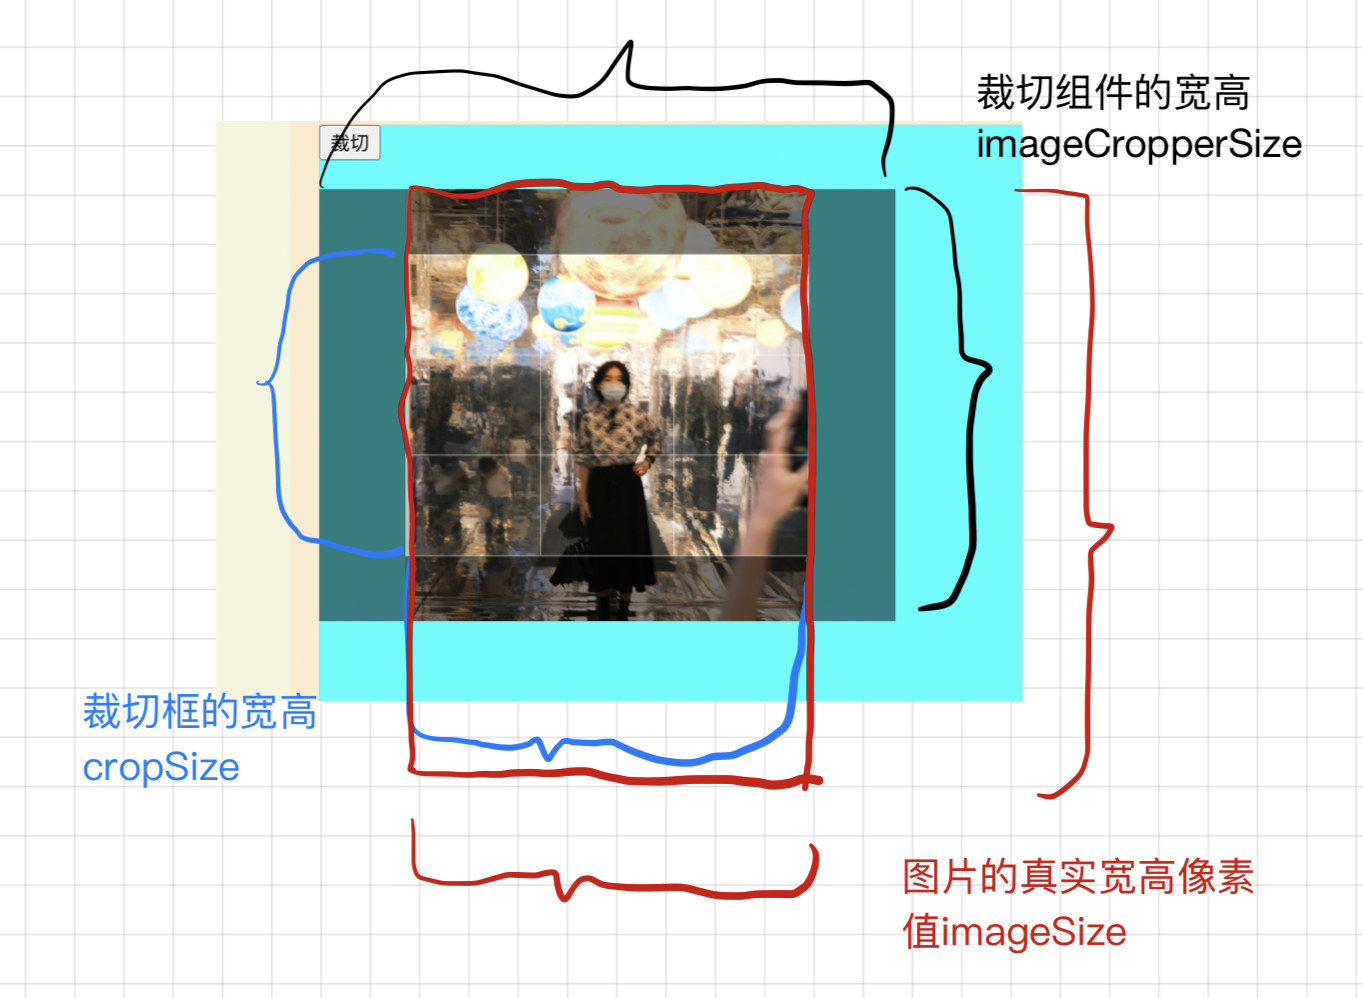
// 组件的宽高({width:xxx,height:xxx})
imgCropperSize,
// "裁切框"的宽高({width:xxx,height:xxx})
cropSize,
/* 可选参数 */
// 裁剪结束后的回调函数
onClipOk,
// 其他样式
style = {},
// 图片最大缩放系数
maxZoom,
// 图片缩放速度
zoomSpeed,
} = props
const [crop, setCrop] = useState({ x: 0, y: 0 }) // 图片的位置
const [zoom, setZoom] = useState(1) // 当前缩放系数
const [minZoom, setMinZoom] = useState(null) // 最小缩放系数
const [imageSize, setImageSize] = useState({}) // 当前图片宽高
// 获取图片的宽高(判断图片的横竖填充 | 设置最小缩放比例)
const getImageInfo = useCallback(() => {
if (clipingImgUrl) {
const image = new Image()
image.src = clipingImgUrl
image.onload = () => {
const { width, height } = image
setImageSize({
width,
height,
})
}
}
}, [clipingImgUrl])
useEffect(getImageInfo, [clipingImgUrl])
useEffect(() => {
// 裁切范围切换时,重置图片缩放
setCrop({ x: 0, y: 0 })
// 裁切范围切换时,重新计算最小缩放值
if (!Object.keys(imageSize).length) return
const { width: imageW, height: imageH } = imageSize
const { width: cropW, height: cropH } = cropSize
const { width: imgCropperW, height: imgCropperH } = imgCropperSize
let _minZoom = null
if (cropW < cropH) {
_minZoom = Math.max(cropW / ((imageW / imageH) * imgCropperH), cropH / imgCropperH)
} else {
_minZoom = Math.max(cropW / imgCropperW, cropH / ((imageH / imageW) * imgCropperW))
}
// 1表示刚好放下宽的缩放
let _zoom = Math.max(_minZoom, Math.min(1, imgCropperH / ((imgCropperW / imageW) * imageH)))
setMinZoom(_minZoom)
setZoom(_zoom)
}, [cropSize, imageSize])
return (
<div
style={{
width: imgCropperSize.width,
height: imgCropperSize.height,
position: 'relative',
...style,
}}
>
{minZoom && (
<Cropper
image={clipingImgUrl} // 图片地址
crop={crop} // 图片位置
zoom={zoom}
minZoom={minZoom || 1}
maxZoom={maxZoom || 3}
zoomSpeed={zoomSpeed || 0.2}
restrictPosition
objectFit={cropSize.width < cropSize.height ? 'vertical-cover' : 'horizontal-cover'}
cropSize={cropSize}
onCropChange={(crop) => {
// 拖拽、缩放图片后的回调
setCrop(crop)
}}
onCropComplete={(_, croppedAreaPixels) => {
// 裁切结束后的回调(停止缩放或滚轮停止滚动)
onClipOk?.({ ...croppedAreaPixels, zoom })
}}
onZoomChange={(zoom) => {
// 使用滚轮缩放后的回调
setZoom(zoom)
}}
/>
)}
</div>
)
}
重点分析
最小缩放值与初始缩放值处理
在imgCropper.jsx文件中,使用了如下变量进行计算,只需要知道zoom为1的时候,react-easy-crop会将图片变形缩放图片的宽度与裁切框的宽度相同即可,剩下的就是计算得出结果就行,类似于算法题或者应用题。
需要注意的是imageSize值存放的是图片的真实像素值,而非图中变形之后的宽高。
计算过程如下:
const { width: imageW, height: imageH } = imageSize
const { width: cropW, height: cropH } = cropSize
const { width: imgCropperW, height: imgCropperH } = imgCropperSize
let _minZoom = null

if (cropW < cropH) {
  _minZoom = Math.max(cropW / ((imageW / imageH) * imgCropperH), cropH / imgCropperH)
} else {
  _minZoom = Math.max(cropW / imgCropperW, cropH / ((imageH / imageW) * imgCropperW))
}

// 1表示刚好放下宽的缩放
let _zoom = Math.max(_minZoom, Math.min(1, imgCropperH / ((imgCropperW / imageW) * imageH)))

setMinZoom(_minZoom)
setZoom(_zoom)
canvas生成截图图片
react-easy-crop并不会帮助我们生成图片,只会给出坐标和宽高,我们需要根据坐标和宽高,结合canvas的API自行生成截图图片。以下是对应代码:
const cvs = document.createElement('canvas')
const ctx = cvs.getContext('2d')
const sx = croppedAreaPixels.x
const sy = croppedAreaPixels.y
const sWidth = croppedAreaPixels.width
const sHeight = croppedAreaPixels.height

cvs.width = cropSize.width // 可以自定义成自己想要的截图的横向像素
cvs.height = cropSize.height // 可以自定义成自己想要的截图的纵向像素
cvs.crossOrigin = "Anonymous";
ctx.drawImage(image, sx, sy, sWidth, sHeight, 0, 0, cvs.width, cvs.height)
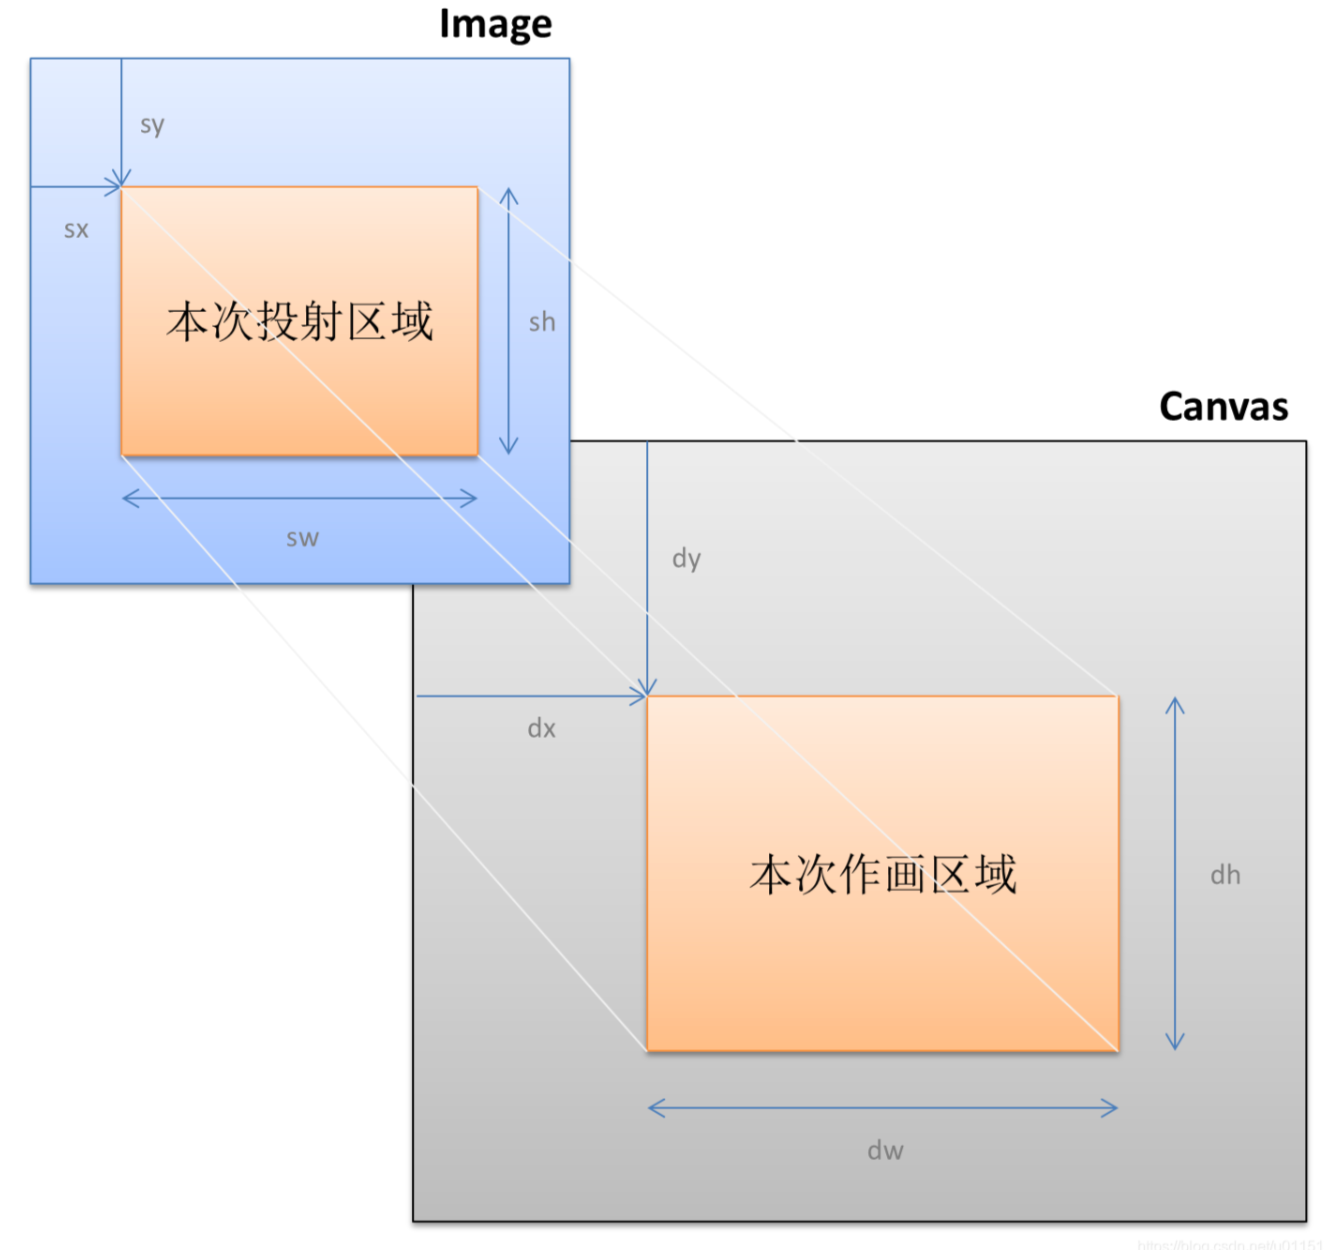
根据完整代码可知croppedAreaPixelsd对象就是react-easy-crop返回的坐标与宽高数据对象,数据含义如下:
croppedAreaPixels.x、croppedAreaPixels.y:裁切框的左上角相对于图片真实像素左上角的偏移量croppedAreaPixels.width、croppedAreaPixels.height:裁切框的宽高投射到图片上,对应图片真实像素的宽高drawImage方法的参数及含义如下:drawImage(img, sx, sy, sw, sh, dx, dy, dw, dh)img:需要插入的img/video/canvas 元素。dx/dy:canvas的开始绘制点位。dw/dh:canvas的绘制区域大小。sx/sy:image的开始绘制点位。sw/wh:image的绘制区域大小。
"Knowledge isn't free. You have to pay attention."

 浙公网安备 33010602011771号