
Spring 源码解析15——Spring消息
Java消息服务(Java Message Service,JMS)应用程序接口是一个Java平台中关于面向消息中间件(MOM)的 API,用于在两个应用程序之间或分布式系统中发送消息,并进行异步通信。Java 消息服务是一个与具体平台无关的 API,绝大多数 MOM 提供商都对 JMS 提供支持。Java 消息服务的规范包括两种消息模式,点对点和发布者/订阅者。许多提供商支持这一通用框架。因此,程序员可以在他们的分布式软件中实现面向消息的操作,这些操作将具有不同面向消息中间件产品的可移植性。
Java消息服务支持同步和异步的消息处理,在某些场景下,异步消息是必要的,而且比同步消息操作更加便利。
本章以Java消息服务的开源实现产品RabbitMQ为例来进行 Spring整合消息服务功能的实现分析。
1、RabbitMQ的单独使用
RabbitMQ是由erlang语言开发,基于AMQP(Advanced MessageQueue 高级消息队列协议)协议实现的消息队列,它是一种应用程序之间的通信方法。主要优点:
①、RabbitMQ是基于AMQP协议;
②、RabbitMQ的高并发性能非常好;
③、Spring Boot默认已集成RabbitMQ
④、与其他MQ的区别,就在于用户可以控制message queue与exchage的连接规则,这可以做很多有趣的事情,比如定义一条规则:“将所有包含这样这样的消息头的消息都复制一份再发送到消息队列中”。
RabbitMQ是由erlang语言开发,安装RabbitMQ需要安装Erlang/OTP,并保持版本匹配,如下图:
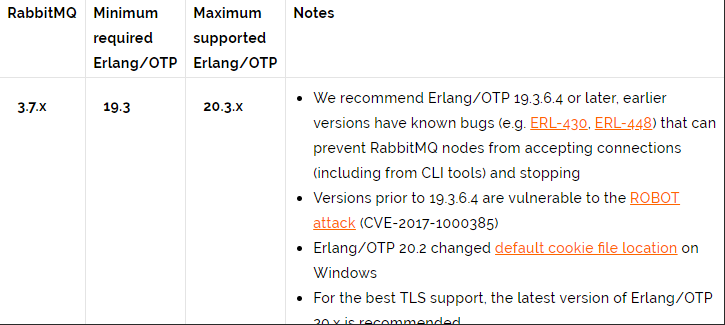
Erlang/OTP的下载地址
RabbitMQ的下载地址
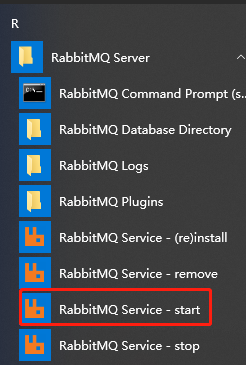
1.1、RabbitMQ的启动与安装插件
- window环境下,可以使用windows导航栏进行启动
![image]()
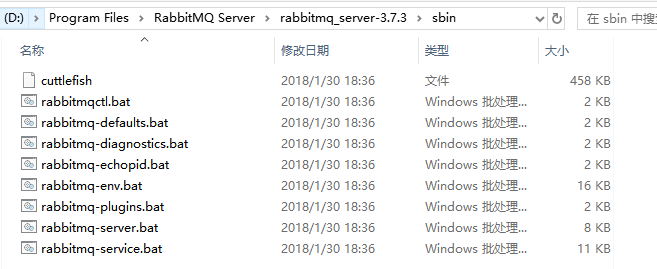
- linux环境或者windows环境,都可以通过RabbitMQ Server\rabbitmq_server-3.7.3\sbin目录进行启动
![image]()
用dos命令窗口执行以下命令可以启动,停止,安装RabbitMQ
①、rabbitmq-service.bat install 安装服务
②、rabbitmq-service.bat stop 停止服务
③、rabbitmq-service.bat start 启动服务 - 安装管理插件
在RabbitMQ Server\rabbitmq_server-3.7.3\sbin目录下,打开dos命令窗口,管理员身份运行 rabbitmq-plugins.bat enable rabbitmq_management。然后登陆RabbitMQ,进入浏览器,输入:http://localhost:15672,初始密码:guest/guest
1.2、实现生产者和消费者
1.2.1、RabbitMQ的生产者(Maven构建的工程)
- 配置maven的pom.xml文件
<?xml version="1.0" encoding="UTF-8"?>

<project xmlns="http://maven.apache.org/POM/4.0.0" xmlns:xsi="http://www.w3.org/2001/XMLSchema-instance"
  xsi:schemaLocation="http://maven.apache.org/POM/4.0.0 http://maven.apache.org/xsd/maven-4.0.0.xsd">
  <modelVersion>4.0.0</modelVersion>

  <groupId>com.xxx</groupId>
  <artifactId>SpringMvc02_fileUpload</artifactId>
  <version>1.0-SNAPSHOT</version>
  <packaging>war</packaging>

  <name>SpringMvc02_fileUpload Maven Webapp</name>
  <dependencies>
    <dependency>
        <groupId>com.rabbitmq</groupId>
        <artifactId>amqp-client</artifactId>
        <version>5.4.3</version>
    </dependency>
  </dependencies>

  <build>
    <finalName>SpringMvc02_fileUpload</finalName>
    <pluginManagement><!-- lock down plugins versions to avoid using Maven defaults (may be moved to parent pom) -->
      <plugins>
        <plugin>
          <artifactId>maven-clean-plugin</artifactId>
          <version>3.1.0</version>
        </plugin>
        <!-- see http://maven.apache.org/ref/current/maven-core/default-bindings.html#Plugin_bindings_for_war_packaging -->
        <plugin>
          <artifactId>maven-resources-plugin</artifactId>
          <version>3.0.2</version>
        </plugin>
        <plugin>
          <artifactId>maven-compiler-plugin</artifactId>
          <version>3.8.0</version>
        </plugin>
        <plugin>
          <artifactId>maven-surefire-plugin</artifactId>
          <version>2.22.1</version>
        </plugin>
        <plugin>
          <artifactId>maven-war-plugin</artifactId>
          <version>3.2.2</version>
        </plugin>
        <plugin>
          <artifactId>maven-install-plugin</artifactId>
          <version>2.5.2</version>
        </plugin>
        <plugin>
          <artifactId>maven-deploy-plugin</artifactId>
          <version>2.8.2</version>
        </plugin>
      </plugins>
    </pluginManagement>
  </build>
</project>
- 新增RabbitMQ的生产者类Producer01.class
package com.jms;

import com.rabbitmq.client.Channel;
import com.rabbitmq.client.Connection;
import com.rabbitmq.client.ConnectionFactory;
import java.io.IOException;
import java.util.concurrent.TimeoutException;
/**
 * Created by xxx on 2020/8/29
 */
//这是RabbitMQ的生产者,在Publish/Subscribe的工作模式下建立了一个helloword队列,并向该队列中放入一个"Hello World 华为程序员"内容的字符串
public class Producer01 {
    private static final String QUEUE = "helloword";

    public static void main(String[] args) {
        Connection connection = null;
        Channel channel = null;
        ConnectionFactory factory = new ConnectionFactory();
        factory.setHost("127.0.0.1");
        factory.setPort(5672);
        factory.setUsername("guest");
        factory.setPassword("guest");
        factory.setVirtualHost("/");//rabbitmq默认虚拟机名称为“/”,虚拟机相当于一个独立的mq服务。可以创建多个虚拟机
        try {
            //创建与RabbitMQ服务的TCP连接
            connection = factory.newConnection();
            //创建与Exchange的通道,每个连接可以创建多个通道,每个通道代表一个会话任务
            channel = connection.createChannel();

            //声明队列
         /*String queue,       队列名称
         boolean durable,   是否持久化,mq重启后,队列还在
         boolean exclusive, 是否独占连接,队列只允许在连接中访问,如果connection连接关闭队列则自动删除,如果将此参数设置为true,可用于临时队列创建
         boolean autoDelete,    自动删除,队列不在使用时自动删除此队列,如果将此参数和exclusive参数设置为true就可以实现临时队列(队列不用了自动删除)
         Map<String, Object> arguments 可以设置队列的扩展参数,比如:可以设置存活时间
         * */
            channel.queueDeclare(QUEUE, true, false, false, null);

            //发送消息
         /*String exchange, 不指定时,使用mq的默认交换机
         String routingKey, 路由key,交换机根据路由key来将消息转发到指定的队列,如果使用默认交换机,routingKey设置为队列的名称
          BasicProperties props, 消息属性
          byte[] body         消息内容
         * */
            String message = "Hello World 华为程序员";
            channel.basicPublish("", QUEUE, null, message.getBytes());
            System.out.println("send to mq " + message);
        } catch (IOException e) {
            e.printStackTrace();
        } catch (TimeoutException e) {
            e.printStackTrace();
        } finally {
            try {
                channel.close();
                connection.close();
            } catch (IOException e) {
                e.printStackTrace();
            } catch (TimeoutException e) {
                e.printStackTrace();
            }
        }
    }
}
1.2.2、RabbitMQ的消费者(Maven构建的工程)
- 配置maven的pom.xml文件
<?xml version="1.0" encoding="UTF-8"?>

<project xmlns="http://maven.apache.org/POM/4.0.0" xmlns:xsi="http://www.w3.org/2001/XMLSchema-instance"
  xsi:schemaLocation="http://maven.apache.org/POM/4.0.0 http://maven.apache.org/xsd/maven-4.0.0.xsd">
  <modelVersion>4.0.0</modelVersion>

  <groupId>com.xxx</groupId>
  <artifactId>Maven_HighLevel</artifactId>
  <version>1.0-SNAPSHOT</version>
  <packaging>war</packaging>
  <!-- 项目依赖jar包 -->
  <dependencies>
    <dependency>
        <groupId>com.rabbitmq</groupId>
        <artifactId>amqp-client</artifactId>
        <version>5.4.3</version>
    </dependency>
  </dependencies>
</project>
- 新增RabbitMQ的消费者类Consumer01.class
package com.xxx.jms;
import com.rabbitmq.client.*;
import java.io.IOException;
import java.util.concurrent.TimeoutException;

/**
 * Created by xxx on 2020/8/30
 */
public class Consumer01 {
    private static final String QUEUE = "helloword";

    public static void main(String[] args) {

        try {
            ConnectionFactory factory = new ConnectionFactory();
            //设置MabbitMQ所在服务器的ip和端口
            factory.setHost("127.0.0.1");
            factory.setPort(5672);
            factory.setUsername("guest");
            factory.setPassword("guest");
            factory.setVirtualHost("/");//rabbitmq默认虚拟机名称为“/”,虚拟机相当于一个独立的mq服务。可以创建多个虚拟机
            //建立新连接
            Connection connection = factory.newConnection();
            //创建会话通道
            Channel channel = connection.createChannel();

            //声明队列
         /*String queue,    队列名称
         boolean durable,   是否持久化,mq重启后,队列还在
         boolean exclusive, 是否独占连接,对列只允许在连接中访问,如果connection连接关闭队列则自动删除,如果将此参数设置为true,可用于临时队列创建
         boolean autoDelete,    自动删除,队列不在使用时自动删除此队列,如果将此参数和exclusive参数设置为true就可以实现临时队列(队列不用了自动删除)
         Map<String, Object> arguments 可以设置队列的扩展参数,比如:可以设置存活时间
         * */
            channel.queueDeclare(QUEUE,true,false,false,null);

            //定义消费方法
            DefaultConsumer consumer = new DefaultConsumer(channel){

                //重写handleDelivery,当接收到消息,此方法被调用
                /*
                 *@Param String consumerTag:消费者的标签,在channel.basicConsumer()去指定。
                 *@Param Envelope envelope: 消息包的内容,可以从中获取消息ID,消息routingKey,交换机,消息和重传标志
                 *@Param    AMQP.BasicProperties properties 消息属性
                 * Param    byte[] body
                 * */
                @Override
                public void handleDelivery(String consumerTag, Envelope envelope, AMQP.BasicProperties properties, byte[] body) throws IOException {
                    //交换机
                    String exChange = envelope.getExchange();
                    //路由key
                    String routingKey = envelope.getRoutingKey();
                    //消息id:mq在channel中用来标识消息的id,可用于确认消息已经接收
                    long deliveryTag = envelope.getDeliveryTag();
                    //消息内容
                    String message = new String(body, "UTF-8");
                    System.out.println("receive message :"+message);
                }
            };

            //监听队列
            /* 参数明细:
             * 1、String var1:监听队列String queue, 队列名称
             * 2、boolean autoAck:是否自动回复,设置为true为表示消息接收到自动向mq回复接收到了,mq接收到回复会删除消息,设置为false则需要手动回复
             * 3、Consumer callback:消费消息的方法,消费者接收到消息后调用此方法
             */
            channel.basicConsume(QUEUE, true, consumer);
        } catch (IOException e) {
            e.printStackTrace();
        } catch (TimeoutException e) {
            e.printStackTrace();
        }
    }
}
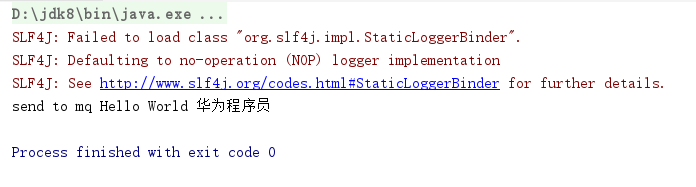
1.2.3、测试RabbitMQ的生产者和消费者
- 启动Producer01.class的main()函数,控制台打印如下
![image]()
- 启动Consumer01.class的main()函数,控制台打印如下
![image]()

2、Spring整合RabbitMQ
Spring整合RabbitMQ非常简单,就是把com.rabbitmq.client.ConnectionFactory配置到Spring的bean文件中。Spring下的RabbitMQ的过程中,RabbitMQ的启动与安装插件方式参照上文,没有变化,只是实现生产者的类Producer01和实现消费者的类Consumer01有一点改动。
2.1、实现Spring整合下的生产者和消费者
2.1.1、Spring整合下的RabbitMQ的生产者(Maven构建的工程)
- 配置maven的pom.xml文件
<?xml version="1.0" encoding="UTF-8"?>

<project xmlns="http://maven.apache.org/POM/4.0.0" xmlns:xsi="http://www.w3.org/2001/XMLSchema-instance"
  xsi:schemaLocation="http://maven.apache.org/POM/4.0.0 http://maven.apache.org/xsd/maven-4.0.0.xsd">
  <modelVersion>4.0.0</modelVersion>

  <groupId>com.xxx</groupId>
  <artifactId>SpringMvc02_fileUpload</artifactId>
  <version>1.0-SNAPSHOT</version>
  <packaging>war</packaging>

  <name>SpringMvc02_fileUpload Maven Webapp</name>
  <!-- FIXME change it to the project's website -->
  <url>http://www.example.com</url>

  <properties>
    <project.build.sourceEncoding>UTF-8</project.build.sourceEncoding>
    <maven.compiler.source>1.7</maven.compiler.source>
    <maven.compiler.target>1.7</maven.compiler.target>
    <spring.version>5.0.2.RELEASE</spring.version>
    <spring-rabbit.version>2.1.7.RELEASE</spring-rabbit.version>
  </properties>

  <dependencies>
    <dependency>
      <groupId>org.springframework.amqp</groupId>
      <artifactId>spring-rabbit</artifactId>
      <version>${spring-rabbit.version}</version>
    </dependency>
    <dependency>
      <groupId>org.springframework</groupId>
      <artifactId>spring-context</artifactId>
      <version>${spring.version}</version>
    </dependency>
    <dependency>
      <groupId>org.springframework</groupId>
      <artifactId>spring-web</artifactId>
      <version>${spring.version}</version>
    </dependency>
    <dependency>
      <groupId>org.springframework</groupId>
      <artifactId>spring-webmvc</artifactId>
      <version>${spring.version}</version>
    </dependency>
  </dependencies>


  <build>
    <finalName>SpringMvc02_fileUpload</finalName>
    <pluginManagement><!-- lock down plugins versions to avoid using Maven defaults (may be moved to parent pom) -->
      <plugins>
        <plugin>
          <artifactId>maven-clean-plugin</artifactId>
          <version>3.1.0</version>
        </plugin>
        <!-- see http://maven.apache.org/ref/current/maven-core/default-bindings.html#Plugin_bindings_for_war_packaging -->
        <plugin>
          <artifactId>maven-resources-plugin</artifactId>
          <version>3.0.2</version>
        </plugin>
        <plugin>
          <artifactId>maven-compiler-plugin</artifactId>
          <version>3.8.0</version>
        </plugin>
        <plugin>
          <artifactId>maven-surefire-plugin</artifactId>
          <version>2.22.1</version>
        </plugin>
        <plugin>
          <artifactId>maven-war-plugin</artifactId>
          <version>3.2.2</version>
        </plugin>
        <plugin>
          <artifactId>maven-install-plugin</artifactId>
          <version>2.5.2</version>
        </plugin>
        <plugin>
          <artifactId>maven-deploy-plugin</artifactId>
          <version>2.8.2</version>
        </plugin>
      </plugins>
    </pluginManagement>
  </build>
</project>
- 在/resources目录下新增spring的配置文件applicationContext.xml
<?xml version="1.0" encoding="UTF-8"?>
<beans xmlns="http://www.springframework.org/schema/beans"
       xmlns:xsi="http://www.w3.org/2001/XMLSchema-instance"
       xsi:schemaLocation="http://www.springframework.org/schema/beans
                http://www.springframework.org/schema/beans/spring-beans-3.0.xsd">
    <bean id="connectionFactory" class="com.rabbitmq.client.ConnectionFactory">
        <property name="host" value="127.0.0.1"></property>
        <property name="port" value = "5672"></property>
        <property name="username" value = "guest"></property>
        <property name="password" value = "guest"></property>
        <property name="virtualHost" value = "/"></property><!--rabbitmq默认虚拟机名称为“/”,虚拟机相当于一个独立的mq服务。可以创建多个虚拟机-->
    </bean>
</beans>
- 新增RabbitMQ的生产者类Producer01.class
package com.jms;
import com.rabbitmq.client.Channel;
import com.rabbitmq.client.Connection;
import com.rabbitmq.client.ConnectionFactory;
import org.springframework.context.support.ClassPathXmlApplicationContext;
import java.io.IOException;
import java.util.concurrent.TimeoutException;

/**
 * Created by xxx on 2020/8/29
 */
//这是RabbitMQ的生产者,在Publish/Subscribe的工作模式下建立了一个helloword队列,并向该队列中放入一个"Hello World 华为程序员"内容的字符串
public class Producer01 {
    private static final String QUEUE = "helloword";

    public static void main(String[] args) {
        Connection connection = null;
        Channel channel = null;
        ClassPathXmlApplicationContext context = new ClassPathXmlApplicationContext("applicationContext.xml");
        ConnectionFactory factory = context.getBean("connectionFactory", ConnectionFactory.class);
        try {
            //创建与RabbitMQ服务的TCP连接
            connection = factory.newConnection();
            //创建与Exchange的通道,每个连接可以创建多个通道,每个通道代表一个会话任务
            channel = connection.createChannel();

            //声明队列
         /*String queue,       队列名称
         boolean durable,   是否持久化,mq重启后,队列还在
         boolean exclusive, 是否独占连接,队列只允许在连接中访问,如果connection连接关闭队列则自动删除,如果将此参数设置为true,可用于临时队列创建
         boolean autoDelete,    自动删除,队列不在使用时自动删除此队列,如果将此参数和exclusive参数设置为true就可以实现临时队列(队列不用了自动删除)
         Map<String, Object> arguments 可以设置队列的扩展参数,比如:可以设置存活时间
         * */
            channel.queueDeclare(QUEUE, true, false, false, null);

            //发送消息
         /*String exchange, 不指定时,使用mq的默认交换机
         String routingKey, 路由key,交换机根据路由key来将消息转发到指定的队列,如果使用默认交换机,routingKey设置为队列的名称
          BasicProperties props, 消息属性
          byte[] body         消息内容
         * */
            String message = "Hello World 华为程序员";
            channel.basicPublish("", QUEUE, null, message.getBytes());
            System.out.println("send to mq " + message);
        } catch (IOException e) {
            e.printStackTrace();
        } catch (TimeoutException e) {
            e.printStackTrace();
        } finally {
            try {
                channel.close();
                connection.close();
            } catch (IOException e) {
                e.printStackTrace();
            } catch (TimeoutException e) {
                e.printStackTrace();
            }
        }
    }
}
2.1.2、Spring整合下的RabbitMQ的消费者(Maven构建的工程)
- 配置maven的pom.xml文件
<?xml version="1.0" encoding="UTF-8"?>

<project xmlns="http://maven.apache.org/POM/4.0.0" xmlns:xsi="http://www.w3.org/2001/XMLSchema-instance"
  xsi:schemaLocation="http://maven.apache.org/POM/4.0.0 http://maven.apache.org/xsd/maven-4.0.0.xsd">
  <modelVersion>4.0.0</modelVersion>

  <groupId>com.xxx</groupId>
  <artifactId>Maven_HighLevel</artifactId>
  <version>1.0-SNAPSHOT</version>
  <packaging>war</packaging>

  <properties>
    <project.build.sourceEncoding>UTF-8</project.build.sourceEncoding>
    <maven.compiler.source>1.8</maven.compiler.source>
    <maven.compiler.target>1.8</maven.compiler.target>
    <spring.version>5.0.2.RELEASE</spring.version>
    <spring-rabbit.version>2.1.7.RELEASE</spring-rabbit.version>
  </properties>

  <dependencies>
    <dependency>
      <groupId>org.springframework.amqp</groupId>
      <artifactId>spring-rabbit</artifactId>
      <version>${spring-rabbit.version}</version>
    </dependency>
    <dependency>
      <groupId>org.springframework</groupId>
      <artifactId>spring-context</artifactId>
      <version>${spring.version}</version>
    </dependency>
    <dependency>
      <groupId>org.springframework</groupId>
      <artifactId>spring-web</artifactId>
      <version>${spring.version}</version>
    </dependency>
    <dependency>
      <groupId>org.springframework</groupId>
      <artifactId>spring-webmvc</artifactId>
      <version>${spring.version}</version>
    </dependency>
  </dependencies>
</project>
- 在/resources目录下新增spring的配置文件applicationContext.xml
<?xml version="1.0" encoding="UTF-8"?>
<beans xmlns="http://www.springframework.org/schema/beans"
       xmlns:xsi="http://www.w3.org/2001/XMLSchema-instance"
       xmlns:context="http://www.springframework.org/schema/context"
       xmlns:aop="http://www.springframework.org/schema/aop"
       xmlns:tx="http://www.springframework.org/schema/tx"
       xsi:schemaLocation="http://www.springframework.org/schema/beans
                http://www.springframework.org/schema/beans/spring-beans.xsd
                http://www.springframework.org/schema/context
                http://www.springframework.org/schema/context/spring-context.xsd
                http://www.springframework.org/schema/aop
                http://www.springframework.org/schema/aop/spring-aop.xsd
                http://www.springframework.org/schema/tx
                http://www.springframework.org/schema/tx/spring-tx.xsd">


    <bean id="connectionFactory" class="com.rabbitmq.client.ConnectionFactory">
        <property name="host" value="127.0.0.1"></property>
        <property name="port" value = "5672"></property>
        <property name="username" value = "guest"></property>
        <property name="password" value = "guest"></property>
        <property name="virtualHost" value = "/"></property><!--rabbitmq默认虚拟机名称为“/”,虚拟机相当于一个独立的mq服务。可以创建多个虚拟机-->
    </bean>
</beans>
- 新增RabbitMQ的消费者类Consumer01.class
package com.xxx.jms;
import com.rabbitmq.client.*;
import org.springframework.context.support.ClassPathXmlApplicationContext;
import java.io.IOException;
import java.util.concurrent.TimeoutException;
/**
 * Created by xxx on 2020/8/30
 */
public class Consumer01 {
    private static final String QUEUE = "helloword";

    public static void main(String[] args) {

        try {
            ClassPathXmlApplicationContext context = new ClassPathXmlApplicationContext("applicationContext.xml");
            ConnectionFactory factory = context.getBean("connectionFactory", ConnectionFactory.class);
            //建立新连接
            Connection connection = factory.newConnection();
            //创建会话通道
            Channel channel = connection.createChannel();

            //声明队列
         /*String queue,    队列名称
         boolean durable,   是否持久化,mq重启后,队列还在
         boolean exclusive, 是否独占连接,对列只允许在连接中访问,如果connection连接关闭队列则自动删除,如果将此参数设置为true,可用于临时队列创建
         boolean autoDelete,    自动删除,队列不在使用时自动删除此队列,如果将此参数和exclusive参数设置为true就可以实现临时队列(队列不用了自动删除)
         Map<String, Object> arguments 可以设置队列的扩展参数,比如:可以设置存活时间
         * */
            channel.queueDeclare(QUEUE,true,false,false,null);

            //定义消费方法
            DefaultConsumer consumer = new DefaultConsumer(channel){

                //重写handleDelivery,当接收到消息,此方法被调用
                /*
                 *@Param String consumerTag:消费者的标签,在channel.basicConsumer()去指定。
                 *@Param Envelope envelope: 消息包的内容,可以从中获取消息ID,消息routingKey,交换机,消息和重传标志
                 *@Param    AMQP.BasicProperties properties 消息属性
                 * Param    byte[] body
                 * */
                @Override
                public void handleDelivery(String consumerTag, Envelope envelope, AMQP.BasicProperties properties, byte[] body) throws IOException {
                    //交换机
                    String exChange = envelope.getExchange();
                    //路由key
                    String routingKey = envelope.getRoutingKey();
                    //消息id:mq在channel中用来标识消息的id,可用于确认消息已经接收
                    long deliveryTag = envelope.getDeliveryTag();
                    //消息内容
                    String message = new String(body, "UTF-8");
                    System.out.println("receive message :"+message);
                }
            };

            //监听队列
            /* 参数明细:
             * 1、String var1:监听队列String queue, 队列名称
             * 2、boolean autoAck:是否自动回复,设置为true为表示消息接收到自动向mq回复接收到了,mq接收到回复会删除消息,设置为false则需要手动回复
             * 3、Consumer callback:消费消息的方法,消费者接收到消息后调用此方法
             */
            channel.basicConsume(QUEUE, true, consumer);
        } catch (IOException e) {
            e.printStackTrace();
        } catch (TimeoutException e) {
            e.printStackTrace();
        }
    }
}
2.1.3、测试RabbitMQ的生产者Producer01.class和消费者Consumer01.class
- 启动Producer01.class的main()函数,控制台打印如下
![image]()
- 启动Consumer01.class的main()函数,控制台打印如下
![image]()
3、源码分析
3.1、JmsTemplate
spring-jsm模块下有一个JmsTemplate.class,该类的UML图如下:
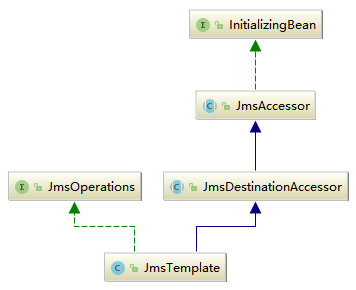
因为该类实现了InitializingBean.interface,所以在spring启动的时候,会首先执行afterPropertiesSet()函数,该函数的实现在JmsTemplate.class的父类abstract JmsAccessor.class::中。
abstract JmsAccessor.class::afterPropertiesSet()
    @Override
    public void afterPropertiesSet() {
        if (getConnectionFactory() == null) {
            throw new IllegalArgumentException("Property 'connectionFactory' is required");
        }
    }
该函数中只有一个验证功能,没有具体的实现,继续查看JmsTemplate.class::send()函数,如下:
JmsTemplate.class::send()
    @Override
    public void send(final Destination destination, final MessageCreator messageCreator) throws JmsException {
        execute(session -> {
            doSend(session, destination, messageCreator);
            return null;
        }, false);
    }
该函数的实现与JdbcTemplate.class的实现风格极为相似,都是提取一个公共的方法作为最底层、最通用的功能实现,然后又通过回调函数的不同来区分个性化的功能,首先查看通用代码的抽取实现。
3.1.1、通用代码抽取
根据之前分析 JdbcTemplate的经验,我们推断,在execute()函数中一定是封装了Connection 以及 Session 的创建操作。
如果想详细了解JdbcTemplate的相关分析,请看我的另一篇blog:Spring源码解析10——数据库连接JDBC
JmsTemplate.class::execute()
    @Nullable
    public <T> T execute(SessionCallback<T> action, boolean startConnection) throws JmsException {
        Assert.notNull(action, "Callback object must not be null");
        Connection conToClose = null;
        Session sessionToClose = null;
        try {
            Session sessionToUse = ConnectionFactoryUtils.doGetTransactionalSession(
                    obtainConnectionFactory(), this.transactionalResourceFactory, startConnection);
            if (sessionToUse == null) {
                //创建connection
                conToClose = createConnection();
                //根据connection创建session
                sessionToClose = createSession(conToClose);
                //是否开启向服务器推送连接信息,只有接受信息时需要,发送时不需要
                if (startConnection) {
                    conToClose.start();
                }
                sessionToUse = sessionToClose;
            }
            if (logger.isDebugEnabled()) {
                logger.debug("Executing callback on JMS Session: " + sessionToUse);
            }
            //调用回调函数
            return action.doInJms(sessionToUse);
        }
        catch (JMSException ex) {
            throw convertJmsAccessException(ex);
        }
        finally {
            //关闭session
            JmsUtils.closeSession(sessionToClose);
            //释放连接
            ConnectionFactoryUtils.releaseConnection(conToClose, getConnectionFactory(), startConnection);
        }
    }
3.1.2、发送消息的实现
有了基类辅助的实现,使得 Spring更加专注于个性的处理,也就是说Spring使用execute()函数封装了冗余代码,而将个性化的代码实现放在了回调函数SessionCallback.interface::doInJms()函数的实现中。在发送消息的功能中通过局部类实现回调函数。此时的发送逻辑已经完全被转向了 doSend方法,这样使整个功能实现变得更加清晰。
JmsTemplate.class::doSend()
    protected void doSend(Session session, Destination destination, MessageCreator messageCreator)
            throws JMSException {

        Assert.notNull(messageCreator, "MessageCreator must not be null");
        MessageProducer producer = createProducer(session, destination);
        try {
            Message message = messageCreator.createMessage(session);
            if (logger.isDebugEnabled()) {
                logger.debug("Sending created message: " + message);
            }
            doSend(producer, message);
            // Check commit - avoid commit call within a JTA transaction.
            if (session.getTransacted() && isSessionLocallyTransacted(session)) {
                // Transacted session created by this template -> commit.
                JmsUtils.commitIfNecessary(session);
            }
        }
        finally {
            JmsUtils.closeMessageProducer(producer);
        }
    }
3.1.3、接受消息
我们通常使用 JmsTemplate.class::receive(destination)来接收简单的消息,Spring的封装如下:
JmsTemplate.class::receive()
JmsTemplate.class::receiveSelected()
JmsTemplate.class::doReceive()
    @Override
    @Nullable
    public Message receive(Destination destination) throws JmsException {
        return receiveSelected(destination, null);
    }

    @Override
    @Nullable
    public Message receiveSelected(final Destination destination, @Nullable final String messageSelector) throws JmsException {
        return execute(session -> doReceive(session, destination, messageSelector), true);
    }

    @Nullable
    protected Message doReceive(Session session, Destination destination, @Nullable String messageSelector)
            throws JMSException {

        return doReceive(session, createConsumer(session, destination, messageSelector));
    }

    @Nullable
    protected Message doReceive(Session session, MessageConsumer consumer) throws JMSException {
        try {
            // Use transaction timeout (if available).
            long timeout = getReceiveTimeout();
            ConnectionFactory connectionFactory = getConnectionFactory();
            JmsResourceHolder resourceHolder = null;
            if (connectionFactory != null) {
                resourceHolder = (JmsResourceHolder) TransactionSynchronizationManager.getResource(connectionFactory);
            }
            if (resourceHolder != null && resourceHolder.hasTimeout()) {
                timeout = Math.min(timeout, resourceHolder.getTimeToLiveInMillis());
            }
            Message message = receiveFromConsumer(consumer, timeout);
            if (session.getTransacted()) {
                // Commit necessary - but avoid commit call within a JTA transaction.
                if (isSessionLocallyTransacted(session)) {
                    // Transacted session created by this template -> commit.
                    JmsUtils.commitIfNecessary(session);
                }
            }
            else if (isClientAcknowledge(session)) {
                // Manually acknowledge message, if any.
                if (message != null) {
                    message.acknowledge();
                }
            }
            return message;
        }
        finally {
            JmsUtils.closeMessageConsumer(consumer);
        }
    }

    @Nullable
    protected Message receiveFromConsumer(MessageConsumer consumer, long timeout) throws JMSException {
        if (timeout > 0) {
            return consumer.receive(timeout);
        }
        else if (timeout < 0) {
            return consumer.receiveNoWait();
        }
        else {
            return consumer.receive();
        }
    }
实现的套路与发送差不多,同样还是使用execute() 函数来封装冗余的公共操作,而最终的目标还是通过MessageConsumer.interface接口的实现类的receive()函数来接收消息,其中的过程就是对于MessageConsumer 的创建以及一些辅助操作。
3.2、监听器容器
消息监听器容器是一个用于查看JMS目标等待消息到达的特殊 bean,一旦消息到达它就可以获取到消息,并通过调用onMessage()函数将消息传递给一个MessageListener 实现。Spring中消息监听器容器的类型如下。
①、SimpleMessageListenerContainer:最简单的消息监听器容器,只能处理固定数量的JMS会话,且不支持事务。
②、DefaultMessageListenerContainer:这个消息监听器容器建立在 SimpleMessageListenerContainer容器之上,添加了对事务的支持。
下面以 DefaultMessageListenerContainer 为例进行分析,了解消息监听器容器的实现。在之前消息监听器的使用示例中,我们了解到在使用消息监听器容器时一定要将自定义的消息监听器置人到容器中,这样容器才可以在收到信息时,把消息转向监听器处理。DefaultMessageListenerContainer.class的UML结构图,如下:
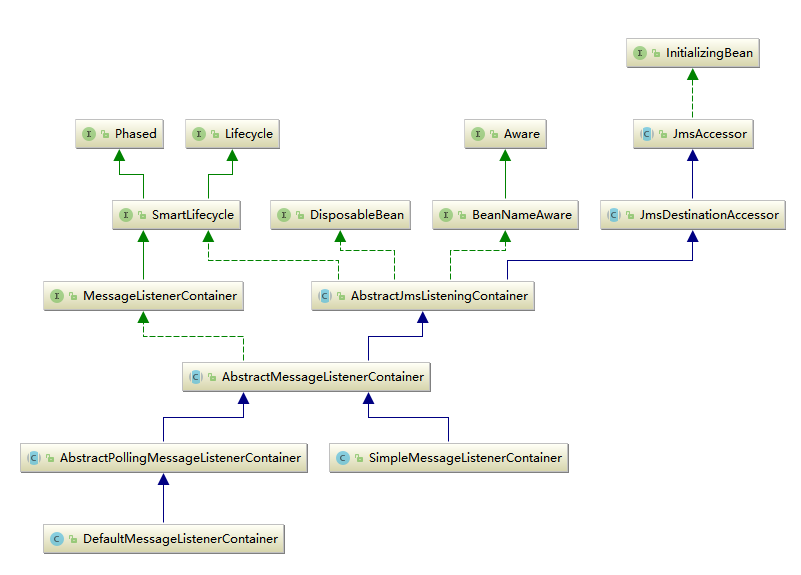
该类同样实现了InitializingBean.interface接口,所以在spring启动的时候,会首先执行afterPropertiesSet()函数,该函数的实现在其父类AbstractJmsListeningContainer.class中
AbstractJmsListeningContainer.class::afterPropertiesSet()
    @Override
    public void afterPropertiesSet() {
        //验证connectionFactory
        super.afterPropertiesSet();
        //验证配置文件
        validateConfiguration();
        //初始化
        initialize();
    }
监听器容器的初始化只包含了三行代码,其中前两句只用于属性的验证,比如connectionFactory或者destination等属性是否为空等,而真正用于初始化的操作委托在initialize()函数中执行
AbstractJmsListeningContainer.class::initialize()
    protected final Object lifecycleMonitor = new Object();
    public void initialize() throws JmsException {
        try {
            //lifecycleMonitor用于控制生命周期的同步处理
            synchronized (this.lifecycleMonitor) {
                this.active = true;
                this.lifecycleMonitor.notifyAll();
            }
            doInitialize();
        }
        catch (JMSException ex) {
            synchronized (this.sharedConnectionMonitor) {
                ConnectionFactoryUtils.releaseConnection(this.sharedConnection, getConnectionFactory(), this.autoStartup);
                this.sharedConnection = null;
            }
            throw convertJmsAccessException(ex);
        }
    }
DefaultMessageListenerContainer.class::doInitialize()
    private int concurrentConsumers = 1;
    protected final Object lifecycleMonitor = new Object();//定义在了AbstractJmsListeningContainer.class中

    @Override
    protected void doInitialize() throws JMSException {
        synchronized (this.lifecycleMonitor) {
            for (int i = 0; i < this.concurrentConsumers; i++) {
                scheduleNewInvoker();
            }
        }
    }
这里用到了int concurrentConsumers属性,网络中对此属性用法的说明如下。消息监听器允许创建多个Session和MessageConsumer 来接收消息。具体的个数由concurrentConsumers属性指定。需要注意的是,应该只是在JmsTemplate.class中的Object defaultDestination为Queue 的时候才使用多个 MessageConsumer(Queue 中的一个消息只能被一个Consumer接收),虽然使用多个MessageConsumer 会提高消息处理的性能,但是消息处理的顺序却得不到保证。消息被接收的顺序仍然是消息发送时的顺序,但是由于消息可能会被并发处理,因此消息处理的顺序可能和消息发送的顺序不同。此外,不应该在 Destination为Topic 的时候使用多个 MessageConsumer,因为多个 MessageConsumer 会接收到同样的消息
继续查看scheduleNewInvoker()函数
DefaultMessageListenerContainer.class::scheduleNewInvoker()
    private void scheduleNewInvoker() {
        AsyncMessageListenerInvoker invoker = new AsyncMessageListenerInvoker();
        if (rescheduleTaskIfNecessary(invoker)) {
            // This should always be true, since we're only calling this when active.
            this.scheduledInvokers.add(invoker);
        }
    }
abstract AbstractJmsListeningContainer.class::rescheduleTaskIfNecessary()
    protected final boolean rescheduleTaskIfNecessary(Object task) {
        if (this.running) {
            try {
                doRescheduleTask(task);
            }
            catch (RuntimeException ex) {
                logRejectedTask(task, ex);
                this.pausedTasks.add(task);
            }
            return true;
        }
        else if (this.active) {
            this.pausedTasks.add(task);
            return true;
        }
        else {
            return false;
        }
    }
    //这是一个模板设计模式的体现:如果子类不自行实现这个函数,那么new 出来的实例在执行的时候就无法覆盖这个函数,new 出来的实例最终执行到这里的时候就会报错
    protected void doRescheduleTask(Object task) {
        throw new UnsupportedOperationException(
                ClassUtils.getShortName(getClass()) + " does not support rescheduling of tasks");
    }
DefaultMessageListenerContainer.class::doRescheduleTask()
    @Override
    protected void doRescheduleTask(Object task) {
        Assert.state(this.taskExecutor != null, "No TaskExecutor available");
        this.taskExecutor.execute((Runnable) task);
    }
分析源码得知,根据int concurrentConsumers 数量建立了对应数量的线程,即使读者不了解线程池的使用,根据以上代码至少可以推断出 doRescheduleTask() 函数其实是在开启一个线程执行Runnable。我们反追踪这个传人的参数,可以看到它其实是AsyncMessageListenerInvoker.class 类型实例。因此我们可以推断,Spring根据int concurrentConsumers数量建立了对应数量的线程,而每个线程都作为一个独立的接收者在循环接收消息。
于是我们把所有的焦点转向AsyncMessageListenerInvoker.class 这个类的实现,因为它作为一个Runnable 角色去执行,所以对这个类的分析从run()函数开始。
DefaultMessageListenerContainer.class::AsyncMessageListenerInvoker.class::run()
    private int maxMessagesPerTask = Integer.MIN_VALUE;
    private class AsyncMessageListenerInvoker implements SchedulingAwareRunnable {

        @Nullable
        private Session session;

        @Nullable
        private MessageConsumer consumer;

        @Nullable
        private Object lastRecoveryMarker;

        private boolean lastMessageSucceeded;

        private int idleTaskExecutionCount = 0;

        private volatile boolean idle = true;

        @Nullable
        private volatile Thread currentReceiveThread;

        @Override
        public void run() {
            //并发控制
            synchronized (lifecycleMonitor) {
                activeInvokerCount++;
                lifecycleMonitor.notifyAll();
            }
            boolean messageReceived = false;
            try {
                //根据每个任务设置的最大处理消息数量而作不同处理
                //小于0默认为无限制,一直接受消息
                if (maxMessagesPerTask < 0) {
                    messageReceived = executeOngoingLoop();
                }
                else {
                    int messageCount = 0;
                    //消息数量控制,一旦超出数量则停止循环
                    while (isRunning() && messageCount < maxMessagesPerTask) {
                        messageReceived = (invokeListener() || messageReceived);
                        messageCount++;
                    }
                }
            }
            catch (Throwable ex) {
                //清理操作,包括关闭session等
                clearResources();
                if (!this.lastMessageSucceeded) {
                    // We failed more than once in a row or on startup -
                    // wait before first recovery attempt.
                    waitBeforeRecoveryAttempt();
                }
                this.lastMessageSucceeded = false;
                boolean alreadyRecovered = false;
                synchronized (recoveryMonitor) {
                    if (this.lastRecoveryMarker == currentRecoveryMarker) {
                        handleListenerSetupFailure(ex, false);
                        recoverAfterListenerSetupFailure();
                        currentRecoveryMarker = new Object();
                    }
                    else {
                        alreadyRecovered = true;
                    }
                }
                if (alreadyRecovered) {
                    handleListenerSetupFailure(ex, true);
                }
            }
            finally {
                synchronized (lifecycleMonitor) {
                    decreaseActiveInvokerCount();
                    lifecycleMonitor.notifyAll();
                }
                if (!messageReceived) {
                    this.idleTaskExecutionCount++;
                }
                else {
                    this.idleTaskExecutionCount = 0;
                }
                synchronized (lifecycleMonitor) {
                    if (!shouldRescheduleInvoker(this.idleTaskExecutionCount) || !rescheduleTaskIfNecessary(this)) {
                        // We're shutting down completely.
                        scheduledInvokers.remove(this);
                        if (logger.isDebugEnabled()) {
                            logger.debug("Lowered scheduled invoker count: " + scheduledInvokers.size());
                        }
                        lifecycleMonitor.notifyAll();
                        clearResources();
                    }
                    else if (isRunning()) {
                        int nonPausedConsumers = getScheduledConsumerCount() - getPausedTaskCount();
                        if (nonPausedConsumers < 1) {
                            logger.error("All scheduled consumers have been paused, probably due to tasks having been rejected. " +
                                    "Check your thread pool configuration! Manual recovery necessary through a start() call.");
                        }
                        else if (nonPausedConsumers < getConcurrentConsumers()) {
                            logger.warn("Number of scheduled consumers has dropped below concurrentConsumers limit, probably " +
                                    "due to tasks having been rejected. Check your thread pool configuration! Automatic recovery " +
                                    "to be triggered by remaining consumers.");
                        }
                    }
                }
            }
        }
    }
以上函数主要根据变量int maxMessagesPerTask 的值来分情况处理,当然,函数中还使用了大量的代码处理异常机制的数据维护,但是我相信大家跟我一样更加关注程序的正常流程是如何处理的。
其实核心的处理就是调用 invokeListener() 函数来接收消息并激活消息监听器,但是之所以两种情况分开处理,正是考虑到在无限制循环接收消息的情况下,用户可以通过设置标志位boolean running(在AbstractJmsListeningContainer.class中)来控制消息接收的暂停与恢复,并维护当前消息监听器的数量。
DefaultMessageListenerContainer.class::AsyncMessageListenerInvoker.class::executeOngoingLoop()
    private final Set<AsyncMessageListenerInvoker> scheduledInvokers = new HashSet<>();
    private int activeInvokerCount = 0;
    protected final Object lifecycleMonitor = new Object();//定义在AbstractJmsListeningContainer.class中
    private volatile boolean running = false;//定义在AbstractJmsListeningContainer.class中
    //isRunning()函数在AbstractJmsListeningContainer.class中,DefaultMessageListenerContainer.class时该类的子类
    @Override
    public final boolean isRunning() {
        return (this.running && runningAllowed());
    }
    private class AsyncMessageListenerInvoker implements SchedulingAwareRunnable {
        private boolean executeOngoingLoop() throws JMSException {
            boolean messageReceived = false;
            boolean active = true;
            while (active) {
                synchronized (lifecycleMonitor) {
                    boolean interrupted = false;
                    boolean wasWaiting = false;
                    //如果当前任务已经处于激活状态,但是却给了暂时终止的命令
                    while ((active = isActive()) && !isRunning()) {
                        if (interrupted) {
                            throw new IllegalStateException("Thread was interrupted while waiting for " +
                                    "a restart of the listener container, but container is still stopped");
                        }
                        if (!wasWaiting) {
                            //如果并非处于等待状态则说明是第一次执行,需要将激活任务数量减少
                            decreaseActiveInvokerCount();
                        }
                        //开始进入等待状态,等待任务的回复命令
                        wasWaiting = true;
                        try {
                            //通过wait()函数等待,也就是等待notify()或者notifyAll()函数来唤醒当前线程
                            lifecycleMonitor.wait();
                        }
                        catch (InterruptedException ex) {
                            // Re-interrupt current thread, to allow other threads to react.
                            Thread.currentThread().interrupt();
                            interrupted = true;
                        }
                    }
                    if (wasWaiting) {
                        activeInvokerCount++;
                    }
                    if (scheduledInvokers.size() > maxConcurrentConsumers) {
                        active = false;
                    }
                }
                //正常处理流程
                if (active) {
                    messageReceived = (invokeListener() || messageReceived);
                }
            }
            return messageReceived;
        }
    }
如果按照正常的流程其实是不会进入 while 循环中的,而是直接进人函数 invokeListener()函数来接收消息并激活监听器,但是,不可能让循环一直持续下去,我们要考虑到暂停线程或者恢复线程的情况,这时,isRunning()函数就派上用场了。
isRunning()函数用来检测标志位 this.running 状态进而判断是否需要进入 while 循环。由于要维护当前线程激活数量,所以引入了boolean wasWaiting变量,用来判断线程是否处于等待状态。如果线程首次进入等待状态,则需要减少线程来激活数量计数器。
当然,还有一个地方需要提一下,就是线程等待不是一味地采用while 循环来控制,因为如果单纯地采用 while循环会浪费 CPU的时钟周期,给资源造成巨大的浪费。这里,Spring采用全局控制变量Object lifecycleMonitor的 wait()函数来暂停线程,所以,如果终止线程需要再次恢复的话,除了更改 this.running 标志位外,还需要调用 lifecycleMonitor.notify()函数或者 lifecycle Monitor.notifyAll()函数来使线程恢复。
接下来就是消息接收的处理了
DefaultMessageListenerContainer.class::AsyncMessageListenerInvoker.class::invokeListener()
    private class AsyncMessageListenerInvoker implements SchedulingAwareRunnable {
        private boolean invokeListener() throws JMSException {
            this.currentReceiveThread = Thread.currentThread();
            try {
                //初始化资源,包括首次创建的时候创建session和consumer
                initResourcesIfNecessary();
                boolean messageReceived = receiveAndExecute(this, this.session, this.consumer);//具体实现在AbstractPollingMessageListenerContainer.class中
                //改变标志位,信息成功处理
                this.lastMessageSucceeded = true;
                return messageReceived;
            }
            finally {
                this.currentReceiveThread = null;
            }
        }
    }
AbstractPollingMessageListenerContainer.class::receiveAndExecute()
    protected boolean receiveAndExecute(
            Object invoker, @Nullable Session session, @Nullable MessageConsumer consumer)
            throws JMSException {

        if (this.transactionManager != null) {
            // Execute receive within transaction.
            TransactionStatus status = this.transactionManager.getTransaction(this.transactionDefinition);
            boolean messageReceived;
            try {
                messageReceived = doReceiveAndExecute(invoker, session, consumer, status);
            }
            catch (JMSException | RuntimeException | Error ex) {
                rollbackOnException(this.transactionManager, status, ex);
                throw ex;
            }
            this.transactionManager.commit(status);
            return messageReceived;
        }

        else {
            // Execute receive outside of transaction.
            return doReceiveAndExecute(invoker, session, consumer, null);
        }
    }
在介绍消息监听器容器的分类时,已介绍了DefaultMessageListenerContainer 消息监听器容器建立在 SimpleMessageListenerContainer 容器之上,它添加了对事务的支持,那么此时,事务特性的实现就开始了。如果用户配置了PlatformTransactionManager transactionManager,也就是配置了事务,那么,消息的接收会被控制在事务之内,一旦出现任何异常都会被回滚,而回滚操作也会交由事务管理器统一处理,比如:
this.transactionManager.rollback(status)。
doReceiveAndExecute()函数包含了整个消息的接收处理过程,由于掺杂着事务,所以并没有复用模板中的方法。
AbstractPollingMessageListenerContainer.class::doReceiveAndExecute()
    protected boolean doReceiveAndExecute(Object invoker, @Nullable Session session,
            @Nullable MessageConsumer consumer, @Nullable TransactionStatus status) throws JMSException {

        Connection conToClose = null;
        Session sessionToClose = null;
        MessageConsumer consumerToClose = null;
        try {
            Session sessionToUse = session;
            boolean transactional = false;
            if (sessionToUse == null) {
                sessionToUse = ConnectionFactoryUtils.doGetTransactionalSession(
                        obtainConnectionFactory(), this.transactionalResourceFactory, true);
                transactional = (sessionToUse != null);
            }
            if (sessionToUse == null) {
                Connection conToUse;
                if (sharedConnectionEnabled()) {
                    conToUse = getSharedConnection();
                }
                else {
                    conToUse = createConnection();
                    conToClose = conToUse;
                    conToUse.start();
                }
                sessionToUse = createSession(conToUse);
                sessionToClose = sessionToUse;
            }
            MessageConsumer consumerToUse = consumer;
            if (consumerToUse == null) {
                consumerToUse = createListenerConsumer(sessionToUse);
                consumerToClose = consumerToUse;
            }
            //接收消息
            Message message = receiveMessage(consumerToUse);
            if (message != null) {
                if (logger.isDebugEnabled()) {
                    logger.debug("Received message of type [" + message.getClass() + "] from consumer [" +
                            consumerToUse + "] of " + (transactional ? "transactional " : "") + "session [" +
                            sessionToUse + "]");
                }
                //模板函数,当消息接收且在未处理前则给子类机会做相应处理,当期空实现
                messageReceived(invoker, sessionToUse);
                boolean exposeResource = (!transactional && isExposeListenerSession() &&
                        !TransactionSynchronizationManager.hasResource(obtainConnectionFactory()));
                if (exposeResource) {
                    TransactionSynchronizationManager.bindResource(
                            obtainConnectionFactory(), new LocallyExposedJmsResourceHolder(sessionToUse));
                }
                try {
                    //激活监听器
                    doExecuteListener(sessionToUse, message);
                }
                catch (Throwable ex) {
                    if (status != null) {
                        if (logger.isDebugEnabled()) {
                            logger.debug("Rolling back transaction because of listener exception thrown: " + ex);
                        }
                        status.setRollbackOnly();
                    }
                    handleListenerException(ex);
                    // Rethrow JMSException to indicate an infrastructure problem
                    // that may have to trigger recovery...
                    if (ex instanceof JMSException) {
                        throw (JMSException) ex;
                    }
                }
                finally {
                    if (exposeResource) {
                        TransactionSynchronizationManager.unbindResource(obtainConnectionFactory());
                    }
                }
                // Indicate that a message has been received.
                return true;
            }
            else {
                if (logger.isTraceEnabled()) {
                    logger.trace("Consumer [" + consumerToUse + "] of " + (transactional ? "transactional " : "") +
                            "session [" + sessionToUse + "] did not receive a message");
                }
                //接收到空消息的处理
                noMessageReceived(invoker, sessionToUse);
                // Nevertheless call commit, in order to reset the transaction timeout (if any).
                if (shouldCommitAfterNoMessageReceived(sessionToUse)) {
                    commitIfNecessary(sessionToUse, null);
                }
                // Indicate that no message has been received.
                return false;
            }
        }
        finally {
            JmsUtils.closeMessageConsumer(consumerToClose);
            JmsUtils.closeSession(sessionToClose);
            ConnectionFactoryUtils.releaseConnection(conToClose, getConnectionFactory(), true);
        }
    }
上面函数代码看似繁杂,但是真正的逻辑并不多,大多是固定的套路,而我们最关心的问题就是监听器的激活处理。
AbstractMessageListenerContainer::doExecuteListener()
AbstractMessageListenerContainer::invokeListener()
AbstractMessageListenerContainer::doInvokeListener()
    protected void doExecuteListener(Session session, Message message) throws JMSException {
        if (!isAcceptMessagesWhileStopping() && !isRunning()) {
            if (logger.isWarnEnabled()) {
                logger.warn("Rejecting received message because of the listener container " +
                        "having been stopped in the meantime: " + message);
            }
            rollbackIfNecessary(session);
            throw new MessageRejectedWhileStoppingException();
        }

        try {
            invokeListener(session, message);
        }
        catch (JMSException | RuntimeException | Error ex) {
            rollbackOnExceptionIfNecessary(session, ex);
            throw ex;
        }
        commitIfNecessary(session, message);
    }

    @SuppressWarnings("rawtypes")
    protected void invokeListener(Session session, Message message) throws JMSException {
        Object listener = getMessageListener();

        if (listener instanceof SessionAwareMessageListener) {
            doInvokeListener((SessionAwareMessageListener) listener, session, message);
        }
        else if (listener instanceof MessageListener) {
            doInvokeListener((MessageListener) listener, message);
        }
        else if (listener != null) {
            throw new IllegalArgumentException(
                    "Only MessageListener and SessionAwareMessageListener supported: " + listener);
        }
        else {
            throw new IllegalStateException("No message listener specified - see property 'messageListener'");
        }
    }

    @SuppressWarnings({"rawtypes", "unchecked"})
    protected void doInvokeListener(SessionAwareMessageListener listener, Session session, Message message)
            throws JMSException {

        Connection conToClose = null;
        Session sessionToClose = null;
        try {
            Session sessionToUse = session;
            if (!isExposeListenerSession()) {
                // We need to expose a separate Session.
                conToClose = createConnection();
                sessionToClose = createSession(conToClose);
                sessionToUse = sessionToClose;
            }
            // Actually invoke the message listener...
            listener.onMessage(message, sessionToUse);
            // Clean up specially exposed Session, if any.
            if (sessionToUse != session) {
                if (sessionToUse.getTransacted() && isSessionLocallyTransacted(sessionToUse)) {
                    // Transacted session created by this container -> commit.
                    JmsUtils.commitIfNecessary(sessionToUse);
                }
            }
        }
        finally {
            JmsUtils.closeSession(sessionToClose);
            JmsUtils.closeConnection(conToClose);
        }
    }

    protected void doInvokeListener(MessageListener listener, Message message) throws JMSException {
        listener.onMessage(message);
    }

    protected void commitIfNecessary(Session session, @Nullable Message message) throws JMSException {
        // Commit session or acknowledge message.
        if (session.getTransacted()) {
            // Commit necessary - but avoid commit call within a JTA transaction.
            if (isSessionLocallyTransacted(session)) {
                // Transacted session created by this container -> commit.
                JmsUtils.commitIfNecessary(session);
            }
        }
        else if (message != null && isClientAcknowledge(session)) {
            message.acknowledge();
        }
    }
通过层层调用,最终提取监听器并使用 listener.onMessage(message)函数对其进行了激活,也就是激活了用户自定义的监听器逻辑。这里还有一句重要的代码很容易被忽略掉,那就是commitIfNecessary(session, message);,它完成的功能是 session.commit()。完成消息服务的事务提交,涉及两个事务,我们常说的 DefaultMessageListenerContainer增加了事务的支持,是通用的事务,也就是说我们在消息接收过程中如果产生其他操作,比如向数据库中插入数据,一旦出现异常时就需要全部回滚,包括回滚插人数据库中的数据。但是,除了我们常说的事务之外对于消息本身还有一个事务,当接收一个消息的时候,必须使用事务提交的方式,这是在告诉消息服务器本地已经正常接收消息,消息服务器接收到本地的事务提交后便可以将此消息删除,否则,当前消息会被其他接收者重新接收。

 浙公网安备 33010602011771号