
Spring 源码解析14——远程服务RMI
Java远程方法调用,即JavaRMI(JavaRemote Method Invocation),是Java 编程语言里一种用于实现远程过程调用的应用程序编程接口。它使客户机上运行的程序可以调用远程服务器上的对象。远程方法调用特性使 Java 编程人员能够在网络环境中分布操作。RMI全部的宗旨就是尽可能地简化远程接口对象的使用。
JavaRMI极大地依赖于接口。在需要创建一个远程对象时,程序员通过传递一个接口来隐藏底层的实现细节。客户端得到的远程对象句柄正好与本地的根代码连接,由后者负责透过网络通信。
Spring中提供了对的RMI,使得在Spring框架下,RMI开发变的简单。
1、Spring的RMI使用示例
1.1、服务端(maven工程)
- maven的pom.xml文件配置如下
<?xml version="1.0" encoding="UTF-8"?>

<project xmlns="http://maven.apache.org/POM/4.0.0" xmlns:xsi="http://www.w3.org/2001/XMLSchema-instance"
  xsi:schemaLocation="http://maven.apache.org/POM/4.0.0 http://maven.apache.org/xsd/maven-4.0.0.xsd">
  <modelVersion>4.0.0</modelVersion>

  <groupId>com.xxx</groupId>
  <artifactId>Maven_HighLevel</artifactId>
  <version>1.0-SNAPSHOT</version>
  <packaging>war</packaging>

  <!-- 统一管理jar包版本 -->
  <properties>
    <spring.version>5.0.2.RELEASE</spring.version>
  </properties>

  <!-- 锁定jar包版本 -->
  <dependencyManagement>
    <dependencies>
      <dependency>
        <groupId>org.springframework</groupId>
        <artifactId>spring-context</artifactId>
        <version>${spring.version}</version>
      </dependency>
      <dependency>
        <groupId>org.springframework</groupId>
        <artifactId>spring-web</artifactId>
        <version>${spring.version}</version>
      </dependency>
      <dependency>
        <groupId>org.springframework</groupId>
        <artifactId>spring-webmvc</artifactId>
        <version>${spring.version}</version>
      </dependency>
      <dependency>
        <groupId>org.springframework</groupId>
        <artifactId>spring-tx</artifactId>
        <version>${spring.version}</version>
      </dependency>
      <dependency>
        <groupId>org.springframework</groupId>
        <artifactId>spring-test</artifactId>
        <version>${spring.version}</version>
      </dependency>
    </dependencies>
  </dependencyManagement>

  <!-- 项目依赖jar包 -->
  <dependencies>
    <!-- spring -->
    <dependency>
      <groupId>org.aspectj</groupId>
      <artifactId>aspectjweaver</artifactId>
      <version>1.6.8</version>
    </dependency>
    <dependency>
      <groupId>org.springframework</groupId>
      <artifactId>spring-aop</artifactId>
      <version>${spring.version}</version>
    </dependency>
    <dependency>
      <groupId>org.springframework</groupId>
      <artifactId>spring-context</artifactId>
      <version>${spring.version}</version>
    </dependency>
    <dependency>
      <groupId>org.springframework</groupId>
      <artifactId>spring-context-support</artifactId>
      <version>${spring.version}</version>
    </dependency>
    <dependency>
      <groupId>org.springframework</groupId>
      <artifactId>spring-web</artifactId>
      <version>${spring.version}</version>
    </dependency>
    <dependency>
      <groupId>org.springframework</groupId>
      <artifactId>spring-orm</artifactId>
      <version>${spring.version}</version>
    </dependency>
    <dependency>
      <groupId>org.springframework</groupId>
      <artifactId>spring-beans</artifactId>
      <version>${spring.version}</version>
    </dependency>
    <dependency>
      <groupId>org.springframework</groupId>
      <artifactId>spring-core</artifactId>
      <version>${spring.version}</version>
    </dependency>
  </dependencies>
  <!-- 添加tomcat7插件 -->
  <build>
    <plugins>
      <plugin>
        <groupId>org.apache.tomcat.maven</groupId>
        <artifactId>tomcat7-maven-plugin</artifactId>
        <version>2.2</version>
      </plugin>
    </plugins>
  </build>


</project>
- 新增RMI对外服务的接口RMIInterface.interface
package com.xxx.rmi;
public interface RMIInterface {
    public int getAdd(int a, int b);
}
- 新增对外接口的实现类RMIInterfaceImpl.class
package com.xxx.rmi;
public class RMIInterfaceImpl implements RMIInterface {
    @Override
    public int getAdd(int a, int b) {
        System.out.println("服务端执行力a+b,并返回:"+(a+b));
        return a + b;
    }
}
- 新增spring的配置文件applicationContext.xml
<?xml version="1.0" encoding="UTF-8"?>
<beans xmlns="http://www.springframework.org/schema/beans"
       xmlns:xsi="http://www.w3.org/2001/XMLSchema-instance"
       xmlns:context="http://www.springframework.org/schema/context"
       xmlns:aop="http://www.springframework.org/schema/aop"
       xmlns:tx="http://www.springframework.org/schema/tx"
       xsi:schemaLocation="http://www.springframework.org/schema/beans
                http://www.springframework.org/schema/beans/spring-beans.xsd
                http://www.springframework.org/schema/context
                http://www.springframework.org/schema/context/spring-context.xsd
                http://www.springframework.org/schema/aop
                http://www.springframework.org/schema/aop/spring-aop.xsd
                http://www.springframework.org/schema/tx
                http://www.springframework.org/schema/tx/spring-tx.xsd">

    <!--RMI服务端配置-->
    <bean id="testRMIServiceImpl" class="com.xxx.rmi.RMIInterfaceImpl"/>
    <!--将RMIInterfaceImpl.class定义为一个RMI服务-->
    <bean id="myRMI" class="org.springframework.remoting.rmi.RmiServiceExporter">
        <!--服务类-->
        <property name="service" ref="testRMIServiceImpl"/>
        <!--服务名-->
        <property name="serviceName" value="helloRMI"/>
        <!--服务接口-->
        <property name="serviceInterface" value="com.xxx.rmi.RMIInterface"/>
        <!--服务端口-->
        <property name="registryPort" value="9999"/>
    </bean>
</beans>
- 新增服务端的启动类
import org.springframework.context.support.ClassPathXmlApplicationContext;
public class ServerTest {
    public static void main(String[] args) {
        new ClassPathXmlApplicationContext("applicationContext.xml");
    }
}
1.2、客户端(maven工程)
- maven的pom.xml文件配置如下
<?xml version="1.0" encoding="UTF-8"?>

<project xmlns="http://maven.apache.org/POM/4.0.0" xmlns:xsi="http://www.w3.org/2001/XMLSchema-instance"
  xsi:schemaLocation="http://maven.apache.org/POM/4.0.0 http://maven.apache.org/xsd/maven-4.0.0.xsd">
  <modelVersion>4.0.0</modelVersion>

  <groupId>com.xxx</groupId>
  <artifactId>SpringMvc02_fileUpload</artifactId>
  <version>1.0-SNAPSHOT</version>
  <packaging>war</packaging>

  <name>SpringMvc02_fileUpload Maven Webapp</name>
  <!-- FIXME change it to the project's website -->
  <url>http://www.example.com</url>

  <properties>
    <project.build.sourceEncoding>UTF-8</project.build.sourceEncoding>
    <maven.compiler.source>1.8</maven.compiler.source>
    <maven.compiler.target>1.8</maven.compiler.target>
    <spring.version>5.0.2.RELEASE</spring.version>
  </properties>

  <dependencies>
    <dependency>
      <groupId>org.springframework</groupId>
      <artifactId>spring-context</artifactId>
      <version>${spring.version}</version>
    </dependency>
    <dependency>
      <groupId>org.springframework</groupId>
      <artifactId>spring-web</artifactId>
      <version>${spring.version}</version>
    </dependency>
    <dependency>
      <groupId>org.springframework</groupId>
      <artifactId>spring-webmvc</artifactId>
      <version>${spring.version}</version>
    </dependency>
    <dependency>
      <groupId>javax.servlet</groupId>
      <artifactId>servlet-api</artifactId>
      <version>2.5</version>
      <scope>provided</scope>
    </dependency>
  </dependencies>
  <build>
    <finalName>SpringMvc02_fileUpload</finalName>
    <pluginManagement><!-- lock down plugins versions to avoid using Maven defaults (may be moved to parent pom) -->
      <plugins>
        <plugin>
          <artifactId>maven-clean-plugin</artifactId>
          <version>3.1.0</version>
        </plugin>
        <!-- see http://maven.apache.org/ref/current/maven-core/default-bindings.html#Plugin_bindings_for_war_packaging -->
        <plugin>
          <artifactId>maven-resources-plugin</artifactId>
          <version>3.0.2</version>
        </plugin>
        <plugin>
          <artifactId>maven-compiler-plugin</artifactId>
          <version>3.8.0</version>
        </plugin>
        <plugin>
          <artifactId>maven-surefire-plugin</artifactId>
          <version>2.22.1</version>
        </plugin>
        <plugin>
          <artifactId>maven-war-plugin</artifactId>
          <version>3.2.2</version>
        </plugin>
        <plugin>
          <artifactId>maven-install-plugin</artifactId>
          <version>2.5.2</version>
        </plugin>
        <plugin>
          <artifactId>maven-deploy-plugin</artifactId>
          <version>2.8.2</version>
        </plugin>
      </plugins>
    </pluginManagement>
  </build>
</project>
- 新增spring的配置文件applicationContext.xml
<?xml version="1.0" encoding="UTF-8"?>
<beans xmlns="http://www.springframework.org/schema/beans"
       xmlns:xsi="http://www.w3.org/2001/XMLSchema-instance"
       xsi:schemaLocation="http://www.springframework.org/schema/beans
                http://www.springframework.org/schema/beans/spring-beans-3.0.xsd">

    <!--这个是RMI客户端的配置,RMI服务端在Maven_HighLevel模块中的applicationContext.xml文件中配置,服务端口是9999,服务名是helloRMI-->
    <bean id="myClient" class="org.springframework.remoting.rmi.RmiProxyFactoryBean">
        <!--服务端的服务名是:helloRMI,在spring的配置文件中配置过(配置在了org.springframework.remoting.rmi.RmiServiceExporter中)-->
        <property name="serviceUrl" value="rmi://127.0.0.1:9999/helloRMI"/>
        <!--客户端调用的时候必须定义一个同名的接口-->
        <property name="serviceInterface" value="com.rmi.RMIInterface"/>
    </bean>
</beans>
- 新增一个RMI调用服务端的接口RMIInterface.interface
package com.rmi;
//户端调用的时候必须定义一个同名的接口(可以不同包,即class加载路径可以不同)
public interface RMIInterface {
    public int getAdd(int a, int b);
}
- 新增客户端端的测试类
package com.rmi;
import org.springframework.context.support.ClassPathXmlApplicationContext;
public class ClientTest {
    public static void main(String[] args) {
        ClassPathXmlApplicationContext context = new ClassPathXmlApplicationContext("applicationContext.xml");
        RMIInterface hms = context.getBean("myClient", RMIInterface.class);
        System.out.println("客户端调用了服务端的getAdd()函数,结果为:"+hms.getAdd(1, 2));

    }
}
1.3、测试
先启动服务端的启动类ServerTest.class,然后启动客户端的测试类ClientTest.class,服务端的控制台打印结果如下:
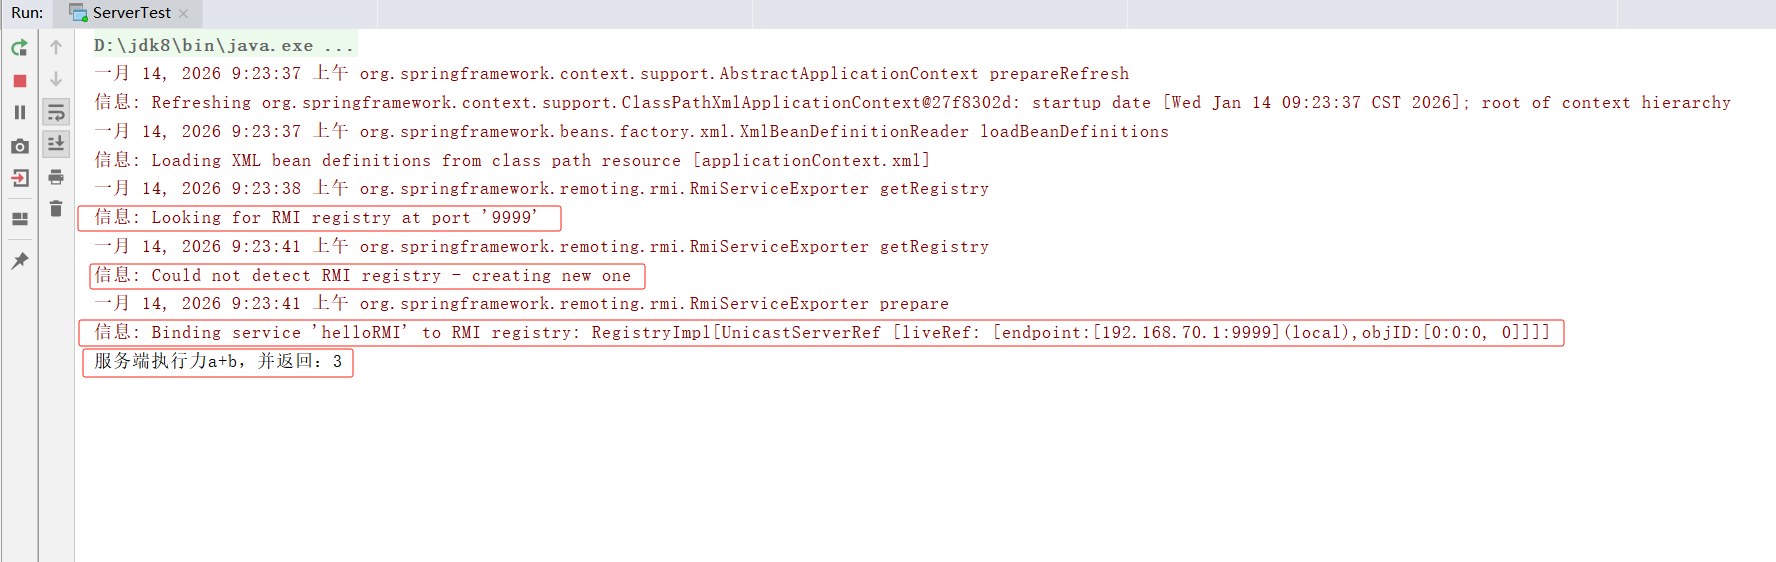
客户端的控制台打印结果如下:

2、服务端实现
首先我们从服务端的发布功能开始着手,在服务端的配置文件中我们可以看到,定义了两个 bean,其中一个是对接口实现类的发布,而另一个则是对 RMI服务的发布,使用org.springframework.remoting.rmi.RmiServiceExporter类进行封装,其中包括了服务类、服务名、服务接口、服务端口等若干属性,其中org.springframework.remoting.rmi.RmiServiceExporter 类应该是发布 RMI 的关键类。我们可以从此类人手进行分析。根据前面展示的示例,启动Spring中的RMI服务并没有多余的操作,仅仅是开启Spring的环境:
new ClassPathXmlApplicationContext("applicationContext.xml");
仅此一句。于是,我们分析很可能是 RmiServiceExporter.class 在初始化的时候做了某些操作完成了端口的发布功能,查看RmiServiceExporter.class的UML图,如下:
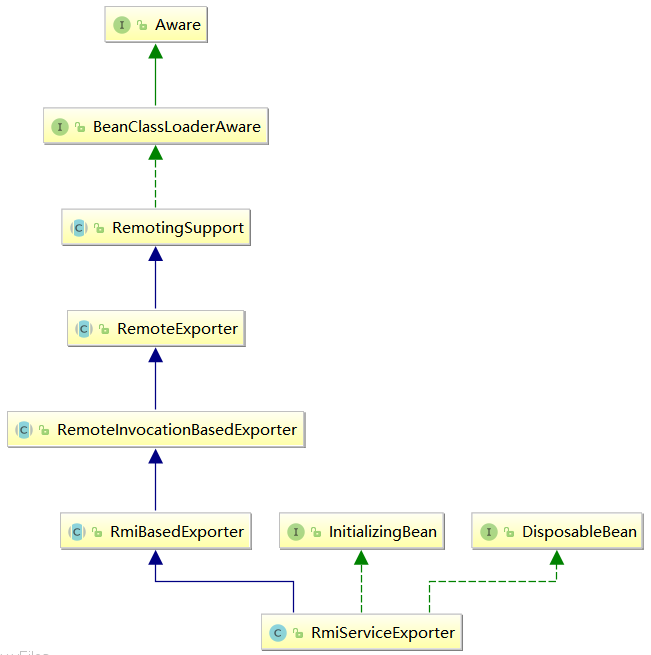
RmiServiceExporter.class 实现了Spring中几个比较敏感的接口:BeanClassLoaderAware.interface、DisposableBean.interface、InitializingBean.interface,其中,DisposableBean.interface 接口保证在实现该接口的 bean 销毁时调用其 destroy()函数,BeanClassLoaderAware.interface 接口保证在实现该接口的 bean 的初始化时调用其setBeanClassLoader() 函数,而InitializingBean.interface 接口则是保证在实现该接口的 bean 初始化时调用其 afterPropertiesSet() 方法,所以我们推断 RmiServiceExporter 的初始化函数入口一定在其afterPropertiesSet()函数 或者 setBeanClassLoader()函数。经过査看代码,确认 afterPropertiesSet()函数为RmiServiceExporter功能的初始化人口。
RmiServiceExporter.class::afterPropertiesSet()
RmiServiceExporter.class::prepare()
    private RMIClientSocketFactory registryClientSocketFactory;
    private RMIServerSocketFactory registryServerSocketFactory;
    private RMIClientSocketFactory clientSocketFactory;
    private RMIServerSocketFactory serverSocketFactory;

    @Override
    public void afterPropertiesSet() throws RemoteException {
        prepare();
    }

    /**
     * Initialize this service exporter, registering the service as RMI object.
     * <p>Creates an RMI registry on the specified port if none exists.
     * @throws RemoteException if service registration failed
     */
    public void prepare() throws RemoteException {
        //检查验证service
        checkService();

        if (this.serviceName == null) {
            throw new IllegalArgumentException("Property 'serviceName' is required");
        }

        // Check socket factories for exported object.
        //如果用户在配置文件中配置了clientSocketFactory或者serverSocketFactory的处理
        /*
         * 如果配置中的clientSocketFactory同时又实现了RMIServerSocketFactory接口,那么会忽略配置中的serverSocketFactory而使用clientSocketFactory代替
         * */
        if (this.clientSocketFactory instanceof RMIServerSocketFactory) {
            this.serverSocketFactory = (RMIServerSocketFactory) this.clientSocketFactory;
        }
        if ((this.clientSocketFactory != null && this.serverSocketFactory == null) ||
                (this.clientSocketFactory == null && this.serverSocketFactory != null)) {
            throw new IllegalArgumentException(
                    "Both RMIClientSocketFactory and RMIServerSocketFactory or none required");
        }

        // Check socket factories for RMI registry.
        /*
         * 如果配置中的registryClientSocketFactory同时又实现了RMIServerSocketFactory接口,那么会忽略配置中的registryServerSocketFactory而使用registryClientSocketFactory代替
         * */
        if (this.registryClientSocketFactory instanceof RMIServerSocketFactory) {
            this.registryServerSocketFactory = (RMIServerSocketFactory) this.registryClientSocketFactory;
        }
        //不允许出现只配置registryServerSocketFactory却没有配置registryClientSocketFactory的情况出现
        if (this.registryClientSocketFactory == null && this.registryServerSocketFactory != null) {
            throw new IllegalArgumentException(
                    "RMIServerSocketFactory without RMIClientSocketFactory for registry not supported");
        }

        this.createdRegistry = false;

        // Determine RMI registry to use.
        //确定 RMI registry
        if (this.registry == null) {
            this.registry = getRegistry(this.registryHost, this.registryPort,
                this.registryClientSocketFactory, this.registryServerSocketFactory);
            this.createdRegistry = true;
        }

        // Initialize and cache exported object.
        //当请求某个RMI服务的时候,RMI会根据注册的服务名称,将请求引导至远程对象处理类中,这个处理类便是用getObjectToExport()函数创建的
        //初始化以及缓存导出的Object
        //此时通常情况下是使用RMIInvocationWrapper封装的JDK代理class,切面为RemoteInvocationTraceInterceptor
        this.exportedObject = getObjectToExport();

        if (logger.isInfoEnabled()) {
            logger.info("Binding service '" + this.serviceName + "' to RMI registry: " + this.registry);
        }

        // Export RMI object.
        if (this.clientSocketFactory != null) {
            /*
             * 使用由给定的套接字工厂指定的传送方式导出远程对象,以便能够接收传入的调用
             * clientSocketFactory:进行远程对象调用的客户端套接字工厂
             * serverSocketFactory:接收远程调用的服务端套接字工厂
             * */
            UnicastRemoteObject.exportObject(
                    this.exportedObject, this.servicePort, this.clientSocketFactory, this.serverSocketFactory);
        }
        else {
            //导出remote object,以使它能接收特定端口的调用
            UnicastRemoteObject.exportObject(this.exportedObject, this.servicePort);
        }

        // Bind RMI object to registry.
        try {
            if (this.replaceExistingBinding) {
                this.registry.rebind(this.serviceName, this.exportedObject);
            }
            else {
                //绑定服务名称到remote object,外界调用serviceName的时候会被exportedObject接收
                this.registry.bind(this.serviceName, this.exportedObject);
            }
        }
        catch (AlreadyBoundException ex) {
            // Already an RMI object bound for the specified service name...
            unexportObjectSilently();
            throw new IllegalStateException(
                    "Already an RMI object bound for name '"  + this.serviceName + "': " + ex.toString());
        }
        catch (RemoteException ex) {
            // Registry binding failed: let's unexport the RMI object as well.
            unexportObjectSilently();
            throw ex;
        }
    }
果然,在 afterPropertiesSet()函数中将实现委托给了prepare()函数,而在prepare()函数中我们找到了 RMI服务发布的功能实现,同时,我们也大致清楚了RMI服务发布的流程。
①、验证 service。
此处的 service 对应的是配置中类型为RmiServiceExporter 的service 属性,它是实现类,并不是接口。尽管后期会对RmiServiceExporter 做一系列的封装,但是,无论怎么封装,最终还是会将逻辑引向至RmiServiceExporter来处理,所以,在发布之前需要进行验证。
②、处理用户自定义的 SocketFactory 属性
在 RMIServiceExporter 中提供了4个套接字工厂配置,分别是RMIClientSocketFactory clientSocketFactory、RMIServerSocketFactory serverSocketFactory 和RMIClientSocketFactory registryClientSocketFactory、RMIServerSocketFactory registryServerSocketFactory。那么这两对配置分别应用在以下场景中:
a、RMIClientSocketFactory registryClientSocketFactory与RMIServerSocketFactory registryServerSocketFactory用于主机与RMI服务器之间连接的创建,也就是当使用
LocateRegistry.createRegistry(registryPort, clientSocketFactory, serverSocketFactory);
函数创建 Registry实例时会在 RMI主机使用 serverSocketFactory创建套接字等待连接,而服务端与RMI主机通信时会使用clientSocketFactory 创建连接套接字。
b、RMIClientSocketFactory clientSocketFactory、RMIServerSocketFactory serverSocketFactory 同样是创建套接字,但是使用的位置不同,clientSocketFactory、serverSocketFactory用于导出远程对象,serverSocketFactory用于在服务端建立套接字等待客户端连接,而 clientSocketFactory 用于调用端建立套接字发起连接。
③、根据配置参数获取 Registry。
④、构造对外发布的实例。
构建对外发布的实例,当外界通过注册的服务名调用响应的方法时,RMI服务会将请求引人此类来处理。
⑤、发布实例。
在发布 RMI服务的流程中,有3个步骤可能是我们比较关心的。
2.1、获取registry
对 RMI稍有了解就会知道,由于底层的封装,获取Registy 实例是非常简单的,只需要使用1个JDK的函数
LocateRegistry.createRegistry()
创建 Registry 实例就可以了。但是,Spring 中并没有这么做,而是考虑得更多,比如Rmi注册主机与发布的服务并不在一台机器上,那么Spring需要使用
LocateRegistry.createRegistry(registryPort, clientSocketFactory, serverSocketFactory);
去远程获取 Registry 实例。
RmiServiceExporter.class::getRegistry(String registryHost, int registryPort,@Nullable RMIClientSocketFactory clientSocketFactory, @Nullable RMIServerSocketFactory serverSocketFactory)
    private boolean alwaysCreateRegistry = false;
    protected Registry getRegistry(String registryHost, int registryPort,
            @Nullable RMIClientSocketFactory clientSocketFactory, @Nullable RMIServerSocketFactory serverSocketFactory)
            throws RemoteException {

        if (registryHost != null) {
            // Host explicitly specified: only lookup possible.
            //远程连接测试
            if (logger.isInfoEnabled()) {
                logger.info("Looking for RMI registry at port '" + registryPort + "' of host [" + registryHost + "]");
            }
            //如果registryHost不为空,则尝试获取对应主机的Registry
            Registry reg = LocateRegistry.getRegistry(registryHost, registryPort, clientSocketFactory);
            testRegistry(reg);
            return reg;
        }

        else {
            //获取本机的Registry
            return getRegistry(registryPort, clientSocketFactory, serverSocketFactory);
        }
    }
如果并不是从另外的服务器上获取 Registry连接,那么就需要在本地创建 RMI的 Registry实例了。当然,这里有一个关键的参数 boolean alwaysCreateRegistry,如果此参数配置为 true,那么在获取 Registry 实例时会首先测试是否已经建立了对指定端口的连接,如果已经建立则复用已经
创建的实例,否则重新创建。当然,之前也提到过,创建 Registry 实例时可以使用自定义的连接工厂,而之前的判断也保证了 clientSocketFactory与serverSocketFactory要么同时出现,要么同时不出现,所以这里只对 clientSocketFactory 是否为空进行了判断。
RmiServiceExporter.class::getRegistry(int registryPort,@Nullable RMIClientSocketFactory clientSocketFactory, @Nullable RMIServerSocketFactory serverSocketFactory)
    protected Registry getRegistry(int registryPort,
            @Nullable RMIClientSocketFactory clientSocketFactory, @Nullable RMIServerSocketFactory serverSocketFactory)
            throws RemoteException {

        if (clientSocketFactory != null) {
            if (this.alwaysCreateRegistry) {
                logger.info("Creating new RMI registry");
                //使用clientSocketFactory创建Registry
                return LocateRegistry.createRegistry(registryPort, clientSocketFactory, serverSocketFactory);
            }
            if (logger.isInfoEnabled()) {
                logger.info("Looking for RMI registry at port '" + registryPort + "', using custom socket factory");
            }
            synchronized (LocateRegistry.class) {
                try {
                    // Retrieve existing registry.
                    //复用测试
                    Registry reg = LocateRegistry.getRegistry(null, registryPort, clientSocketFactory);
                    testRegistry(reg);
                    return reg;
                }
                catch (RemoteException ex) {
                    logger.debug("RMI registry access threw exception", ex);
                    logger.info("Could not detect RMI registry - creating new one");
                    // Assume no registry found -> create new one.
                    return LocateRegistry.createRegistry(registryPort, clientSocketFactory, serverSocketFactory);
                }
            }
        }

        else {
            return getRegistry(registryPort);
        }
    }
如果创建Registry实例时不需要使用自定义的套接字工厂,那么就可以直接使用JDK的LocateRegistry.createRegistry()函数来创建了,当然复用的检测还是必要的。
RmiServiceExporter.class::getRegistry(int registryPort)
    protected Registry getRegistry(int registryPort) throws RemoteException {
        if (this.alwaysCreateRegistry) {
            logger.info("Creating new RMI registry");
            return LocateRegistry.createRegistry(registryPort);
        }
        if (logger.isInfoEnabled()) {
            logger.info("Looking for RMI registry at port '" + registryPort + "'");
        }
        synchronized (LocateRegistry.class) {
            try {
                // Retrieve existing registry.
                //查看对应当前registryPort的Registry是否已经创建,如果创建直接使用
                Registry reg = LocateRegistry.getRegistry(registryPort);
                //测试是否可用,如果不可用则抛出异常
                testRegistry(reg);
                return reg;
            }
            catch (RemoteException ex) {
                logger.debug("RMI registry access threw exception", ex);
                logger.info("Could not detect RMI registry - creating new one");
                // Assume no registry found -> create new one.
                //根据端口创建Registry
                return LocateRegistry.createRegistry(registryPort);
            }
        }
    }
2.2、初始化将要导出的实体对象
之前有提到过,当请求某个RMI服务的时候,RMI会根据注册的服务名称,将请求引导至远程对象处理类中,这个处理类便是使用 getObjectToExport()函数进行创建。
RmiBasedExporter.class::getObjectToExport()
    protected Remote getObjectToExport() {
        // determine remote object
        //如果配置的service属性对应的class实现了Remote接口且没有配置serviceInterface属性
        if (getService() instanceof Remote &&
                (getServiceInterface() == null || Remote.class.isAssignableFrom(getServiceInterface()))) {
            // conventional RMI service
            return (Remote) getService();
        }
        else {
            // RMI invoker
            if (logger.isDebugEnabled()) {
                logger.debug("RMI service [" + getService() + "] is an RMI invoker");
            }
            //对service进行封装
            return new RmiInvocationWrapper(getProxyForService(), this);
        }
    }
请求处理类的初始化主要处理规则为:如果配置的service 属性对应的类实现了Remote接口且没有配置serviceInterface属性,那么直接使用service作为处理类;否则,使用RmiInvocationWrapper 对service 的代理类和当前类也就是RmiServiceExporter 进行封装。
经过这样的封装,客户端与服务端便可以达成一致协议,当客户端检测到是RmiInvocationWrapper 类型 stub的时候便会直接调用其invoke ()函数,使得调用端与服务端很好地连接在了一起。而 RmiInvocationWrapper 封装了用于处理请求的代理类,在invoke()函数中便会使用代理类进行进一步处理。
之前的逻辑已经非常清楚了,当请求Rmi服务时会由注册表Registry 实例将请求转向之前注册的处理类去处理,也就是之前封装的RmiInvocationWrapper,然后由RMIInvocationWrapper中的 invoke()函数进行处理,那么为什么不是在invoke()函数中直接使用 service,而是通过代理再次将 service 封装呢?
这其中的一个关键点是,在创建代理时添加了一个增强拦截器RemoteInvocationTraceInterceptor目的是为了对方法调用进行打印跟踪,但是如果直接在invoke()函数中硬编码这些日志,会使代码看起来很不优雅,而且耦合度很高,使用代理的方式就会解决这样的问题,而且会有很高的可扩展性。
RemoteExporter.class::getProxyForService()
    protected Object getProxyForService() {
        //验证service
        checkService();
        //验证serviceInterface
        checkServiceInterface();
        //使用JDK的方式创建代理
        ProxyFactory proxyFactory = new ProxyFactory();
        //添加代理接口
        proxyFactory.addInterface(getServiceInterface());

        if (this.registerTraceInterceptor != null ? this.registerTraceInterceptor : this.interceptors == null) {
            //加入代理的横切面RemoteInvocationTraceInterceptor并记录Exporter名称
            proxyFactory.addAdvice(new RemoteInvocationTraceInterceptor(getExporterName()));
        }
        if (this.interceptors != null) {
            AdvisorAdapterRegistry adapterRegistry = GlobalAdvisorAdapterRegistry.getInstance();
            for (Object interceptor : this.interceptors) {
                proxyFactory.addAdvisor(adapterRegistry.wrap(interceptor));
            }
        }
        //设置要代理的目标class
        proxyFactory.setTarget(getService());
        proxyFactory.setOpaque(true);
        //创建代理
        return proxyFactory.getProxy(getBeanClassLoader());
    }
2.3、RMI服务激活调用
之前反复提到过,由于在之前bean初始化的时候做了服务名称绑定
this.registry.bind(this.serviceName, this.exportedObject);
其中的 exportedObject 其实是被 RMIInvocationWrapper进行过封装的,也就是说当其它服务器调用serviceName的RMI服务时,Java 会为我们封装其内部操作,而直接会将代码转向RMInvocationWrapper的invoke()函数中。
RmiInvocationWrapper.class::invoke()
    private final RmiBasedExporter rmiExporter;
    private final Object wrappedObject;
    @Override
    @Nullable
    public Object invoke(RemoteInvocation invocation)
        throws RemoteException, NoSuchMethodException, IllegalAccessException, InvocationTargetException {

        return this.rmiExporter.invoke(invocation, this.wrappedObject);
    }
RmiBasedExporter.class::invoke()
    @Override
    protected Object invoke(RemoteInvocation invocation, Object targetObject)
            throws NoSuchMethodException, IllegalAccessException, InvocationTargetException {

        return super.invoke(invocation, targetObject);
    }
而此时 this.rmiExporter 为之前初始化的 RmiBasedExporter.class对象,invocation为包含着需要激活的方法参数,而 wrappedObject 则是之前封装的代理类。
RemoteInvocationBasedExporter.class::invoke()
    private RemoteInvocationExecutor remoteInvocationExecutor = new DefaultRemoteInvocationExecutor();
    public RemoteInvocationExecutor getRemoteInvocationExecutor() {
        return this.remoteInvocationExecutor;
    }
    protected Object invoke(RemoteInvocation invocation, Object targetObject)
            throws NoSuchMethodException, IllegalAccessException, InvocationTargetException {

        if (logger.isTraceEnabled()) {
            logger.trace("Executing " + invocation);
        }
        try {
            return getRemoteInvocationExecutor().invoke(invocation, targetObject);
        }
        catch (NoSuchMethodException ex) {
            if (logger.isDebugEnabled()) {
                logger.debug("Could not find target method for " + invocation, ex);
            }
            throw ex;
        }
        catch (IllegalAccessException ex) {
            if (logger.isDebugEnabled()) {
                logger.debug("Could not access target method for " + invocation, ex);
            }
            throw ex;
        }
        catch (InvocationTargetException ex) {
            if (logger.isDebugEnabled()) {
                logger.debug("Target method failed for " + invocation, ex.getTargetException());
            }
            throw ex;
        }
    }
DefaultRemoteInvocationExecutor.class::invoke()
public class DefaultRemoteInvocationExecutor implements RemoteInvocationExecutor {

    @Override
    public Object invoke(RemoteInvocation invocation, Object targetObject)
            throws NoSuchMethodException, IllegalAccessException, InvocationTargetException{

        Assert.notNull(invocation, "RemoteInvocation must not be null");
        Assert.notNull(targetObject, "Target object must not be null");
        //通过反射激活函数
        return invocation.invoke(targetObject);
    }
}
RemoteInvocation.class::invoke()
    public Object invoke(Object targetObject)
            throws NoSuchMethodException, IllegalAccessException, InvocationTargetException {
        //根据函数名称获取代理中对应的函数
        Method method = targetObject.getClass().getMethod(this.methodName, this.parameterTypes);
        //执行代理中的函数
        return method.invoke(targetObject, this.arguments);
    }
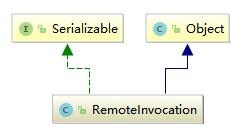
RemoteInvocation.class的UML关系图,如下:
3、客户端实现
根据客户端的applicationContext.xml配置文件,锁定人口类为RmiProxyFactoryBean,RmiProxyFactoryBean的UML图,如下所示:
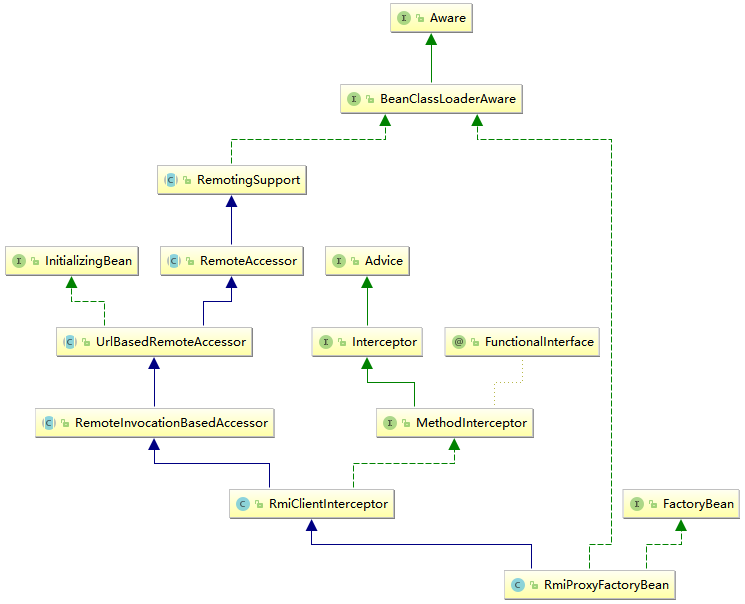
根据层次关系以及之前的分析,我们提取出该类实现的比较重要的接口InitializingBean.interface、BeanClassLoaderAware.interface 以及 MethodInterceptor.interface。实现了 InitializingBean.interface接口的类在 Spring 初始化 bean 的时候会调用 afterPropertiesSet()函数进行逻辑的初始化。
RmiProxyFactoryBean.class::afterPropertiesSet()
    private Object serviceProxy;
    @Override
    public void afterPropertiesSet() {
        super.afterPropertiesSet();
        Class<?> ifc = getServiceInterface();
        Assert.notNull(ifc, "Property 'serviceInterface' is required");
        //根据设置的接口创建代理,并使用当前类this作为增强器
        this.serviceProxy = new ProxyFactory(ifc, this).getProxy(getBeanClassLoader());
    }
同时,RmiProxyFactoryBean 又实现了FactoryBean.interface接口,那么当获取 bean 时并不是直接获取 bean,而是获取该 bean 的 getObject()函数。
RmiProxyFactoryBean.class::getObject()
    @Override
    public Object getObject() {
        return this.serviceProxy;
    }
这样,我们似乎已近形成了一个大致的轮廓,当获取该 bean 时,首先通过 afterPropertiesSet()函数创建代理类,并使用当前类作为增强函数,而在调用该bean时其实返回的是代理类,既然调用的是代理类,那么又会使用当前bean作为增强器进行增强,也就是说会调用RmiProxyFactoryBean.class 的父类RmiClientInterceptor.class的invoke() 函数。
RmiClientInterceptor.clas::afterPropertiesSet()
    @Override
    public void afterPropertiesSet() {
        super.afterPropertiesSet();
        prepare();
    }
继续追踪代码,发现了RmiClientInterceptor.class的父类,也就是UrlBasedRemoteAccessor.class中的afterPropertiesSet()函数只完成了对 serviceUrl属性的验证。
UrlBasedRemoteAccessor.class::afterPropertiesSet()
    @Override
    public void afterPropertiesSet() {
        if (getServiceUrl() == null) {
            throw new IllegalArgumentException("Property 'serviceUrl' is required");
        }
    }
因此,所有的逻辑只可能在RmiClientInterceptor.clas::prepare()函数中
3.1、通过代理拦截并获取stub
RmiClientInterceptor.clas::prepare()
    private boolean lookupStubOnStartup = true;
    public void prepare() throws RemoteLookupFailureException {
        // Cache RMI stub on initialization?
        //如果配置了lookupStubOnStartup属性便会在启动时寻找stub
        if (this.lookupStubOnStartup) {
            Remote remoteObj = lookupStub();
            if (logger.isDebugEnabled()) {
                if (remoteObj instanceof RmiInvocationHandler) {
                    logger.debug("RMI stub [" + getServiceUrl() + "] is an RMI invoker");
                }
                else if (getServiceInterface() != null) {
                    boolean isImpl = getServiceInterface().isInstance(remoteObj);
                    logger.debug("Using service interface [" + getServiceInterface().getName() +
                        "] for RMI stub [" + getServiceUrl() + "] - " +
                        (!isImpl ? "not " : "") + "directly implemented");
                }
            }
            if (this.cacheStub) {
                //将获取的stub缓存
                this.cachedStub = remoteObj;
            }
        }
    }
从上面的代码中,我们了解到了一个很重要的属性boolean lookupStubOnStartup,如果将此属性设置为true,那么获取Remote stub的工作就会在系统启动时被执行并缓存,从而提高使用时候的响应时间。
获取 Remote stub是 RMI应用中的关键步骤,当然你可以使用2种方式进行。
①、使用自定义的套接字工厂。如果使用这种方式,你需要在构造Registry 实例时将自定义套接字工厂传入,并使用Registry中提供的lookup()函数来获取对应的stub。
②、直接使用RMI提供的标准函数:Naming.lookup(getServiceUrl())。
RmiClientInterceptor.class::lookupStub()
    private RMIClientSocketFactory registryClientSocketFactory;
    protected Remote lookupStub() throws RemoteLookupFailureException {
        try {
            Remote stub = null;
            if (this.registryClientSocketFactory != null) {
                // RMIClientSocketFactory specified for registry access.
                // Unfortunately, due to RMI API limitations, this means
                // that we need to parse the RMI URL ourselves and perform
                // straight LocateRegistry.getRegistry/Registry.lookup calls.
                //使用自定义的socket(套接字)工厂
                URL url = new URL(null, getServiceUrl(), new DummyURLStreamHandler());
                //验证传输协议
                String protocol = url.getProtocol();
                if (protocol != null && !"rmi".equals(protocol)) {
                    throw new MalformedURLException("Invalid URL scheme '" + protocol + "'");
                }
                //主机
                String host = url.getHost();
                //端口
                int port = url.getPort();
                //服务名
                String name = url.getPath();
                if (name != null && name.startsWith("/")) {
                    name = name.substring(1);
                }
                Registry registry = LocateRegistry.getRegistry(host, port, this.registryClientSocketFactory);
                stub = registry.lookup(name);
            }
            else {
                // Can proceed with standard RMI lookup API...
                //直接使用RMI提供的标准函数
                stub = Naming.lookup(getServiceUrl());
            }
            if (logger.isDebugEnabled()) {
                logger.debug("Located RMI stub with URL [" + getServiceUrl() + "]");
            }
            return stub;
        }
        catch (MalformedURLException ex) {
            throw new RemoteLookupFailureException("Service URL [" + getServiceUrl() + "] is invalid", ex);
        }
        catch (NotBoundException ex) {
            throw new RemoteLookupFailureException(
                    "Could not find RMI service [" + getServiceUrl() + "] in RMI registry", ex);
        }
        catch (RemoteException ex) {
            throw new RemoteLookupFailureException("Lookup of RMI stub failed", ex);
        }
    }
为了使用 RMIClientSocketFactory registryClientSocketFactory代码量比使用RMI 标准获取 Remote stub 方法多出了很多, RMIClientSocketFactory registryClientSocketFactory 与之前服务端的套接字工厂类似,这里的RMIClientSocketFactory registryClientSocketFactory用来连接 RMI服务器用户通过实现 RMIClientSocketFactory.interface接口来控制用于连接的socket 的各种参数。
3.2、增强器进行远程连接
之前分析了类型为RmiProxyFactoryBean的bean 的初始化中完成的逻辑操作。在初始化时创建了代理并将本身作为增强器加入了代理中(RmiProxyFactoryBean间接实现了MethodInterceptor.interface接口 )。那么这样一来,当在客户端调用代理的接口中的某个方法时,就会首先执行RmiProxyFactoryBean 中的invoke() 函数进行增强。
RmiClientInterceptor.class::invoke()
    @Override
    public Object invoke(MethodInvocation invocation) throws Throwable {
        //获取服务器中对应注册的Remote对象,通过序列化传输
        Remote stub = getStub();
        try {
            return doInvoke(invocation, stub);
        }
        catch (RemoteConnectFailureException ex) {
            return handleRemoteConnectFailure(invocation, ex);
        }
        catch (RemoteException ex) {
            if (isConnectFailure(ex)) {
                return handleRemoteConnectFailure(invocation, ex);
            }
            else {
                throw ex;
            }
        }
    }
众所周知,当客户端使用接口进行方法调用时是通过RMI获取Remote stub的,然后再通过 stub中封装的信息进行服务器的调用,这个 stub 就是在构建服务器时发布的对象,那么,客户端调用时最关键的一步也是进行 Remote stub 的获取了。
    protected Remote getStub() throws RemoteLookupFailureException {
        if (!this.cacheStub || (this.lookupStubOnStartup && !this.refreshStubOnConnectFailure)) {
            //如果有缓存直接使用缓存
            return (this.cachedStub != null ? this.cachedStub : lookupStub());
        }
        else {
            synchronized (this.stubMonitor) {
                if (this.cachedStub == null) {
                    //获取Remote stub
                    this.cachedStub = lookupStub();
                }
                return this.cachedStub;
            }
        }
    }
当获取到 Remote stub后便可以进行远程方法的调用了。Spring 中对于远程方法的调用其实是分2种情况考虑的。
①、获取的 Remote stub是RmiInvocationHandler.interface 类型的,从服务端获取的Remote stub是RmiInvocationHandler.interface类型的,就意味着服务端也同样使用了 Spring 去构建,那么自然会使用 Spring 中作的约定,进行客户端调用处理。Spring中的处理方式被委托给了doInvoke()函数。
①、当获取的Remote stub 不是 RmiInvocationHandler.interface 类型,那么服务端构建RMI 服务可能是通过普通的方法或者借助于 Spring 外的第三方插件,那么处理方式自然会按照RMI中普通的处理方式进行,而这种普通的处理方式无非是反射。因为在invocation中包含了所需要调用的函数的各种信息,包括函数名称以及参数等,而调用的实体正是Remote stub,那么通过反射方法完全可以激活Remote stub 中的远程调用。
RmiClientInterceptor.class::doInvoke()
    //远程调用的实体是stub
    @Nullable
    protected Object doInvoke(MethodInvocation invocation, Remote stub) throws Throwable {
        if (stub instanceof RmiInvocationHandler) {
            //从服务器传回的stub是RmiInvocationHandler(是通过spring构建的stub)
            // RMI invoker
            try {
                return doInvoke(invocation, (RmiInvocationHandler) stub);
            }
            catch (RemoteException ex) {
                throw RmiClientInterceptorUtils.convertRmiAccessException(
                    invocation.getMethod(), ex, isConnectFailure(ex), getServiceUrl());
            }
            catch (InvocationTargetException ex) {
                Throwable exToThrow = ex.getTargetException();
                RemoteInvocationUtils.fillInClientStackTraceIfPossible(exToThrow);
                throw exToThrow;
            }
            catch (Throwable ex) {
                throw new RemoteInvocationFailureException("Invocation of method [" + invocation.getMethod() +
                        "] failed in RMI service [" + getServiceUrl() + "]", ex);
            }
        }
        else {
            //从服务器传回的stub不是RmiInvocationHandler(不是通过spring构建的stub)
            // traditional RMI stub
            try {
                //invocation中包含了所需要调用的函数的各种信息,包括函数名称以及参数等,直接使用反射的方式激活stub中的远程调用
                return RmiClientInterceptorUtils.invokeRemoteMethod(invocation, stub);
            }
            catch (InvocationTargetException ex) {
                Throwable targetEx = ex.getTargetException();
                if (targetEx instanceof RemoteException) {
                    RemoteException rex = (RemoteException) targetEx;
                    throw RmiClientInterceptorUtils.convertRmiAccessException(
                            invocation.getMethod(), rex, isConnectFailure(rex), getServiceUrl());
                }
                else {
                    throw targetEx;
                }
            }
        }
    }
之前反复提到了 Spring 中的客户端处理RMI的方式。其实,在分析服务端发布RMI的方式时,我们已经了解到,Spring将RMI的导出Object封装成了RmiInvocationHandler 类型进行发布,那么当客户端获取 stub 的时候是包含了远程连接信息代理类的 RmiInvocationHandler,也就是说当调用 RmiInvocationHandler 中的方法时会使用RMI中提供的代理进行远程连接,而此时,Spring中要做的就是将代码引向RmiInvocationHandler.interface 接口的invoke() 函数的调用。

 浙公网安备 33010602011771号