
Spring源码解析12——整合SpringMVC(一)
Spring 的 MVC是基于 Servlet功能实现的,通过实现 Servlet接口的 DispatcherServlet 来封装其核心功能实现,通过将请求分派给处理程序,同时带有可配置的处理程序映射、视图解析本地语言、主题解析以及上载文件支持。默认的处理程序是非常简单的Controller.interface 接口,如下所示:
package org.springframework.web.servlet.mvc;

import javax.servlet.http.HttpServletRequest;
import javax.servlet.http.HttpServletResponse;
import org.springframework.lang.Nullable;
import org.springframework.web.servlet.ModelAndView;

@FunctionalInterface
public interface Controller {
    @Nullable
    ModelAndView handleRequest(HttpServletRequest var1, HttpServletResponse var2) throws Exception;
}
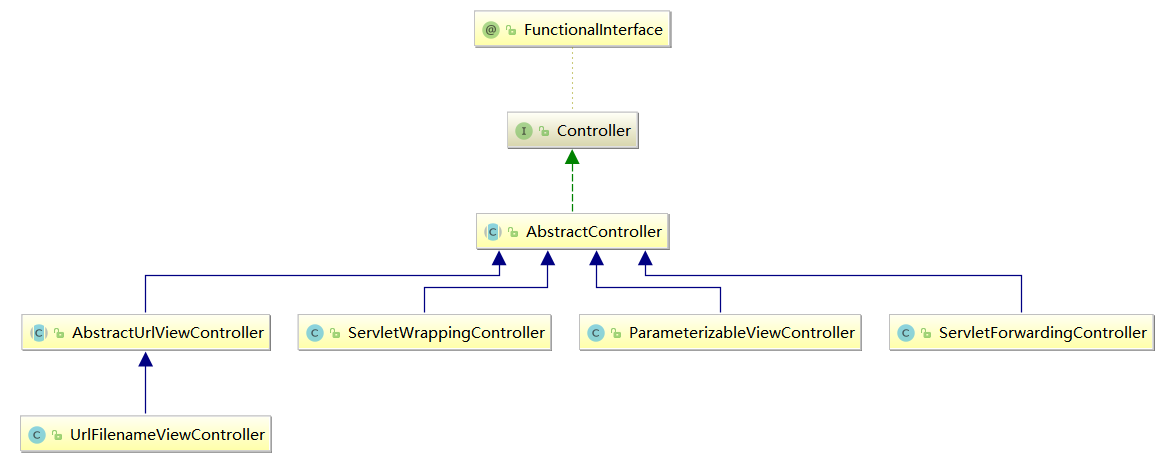
Controller.interface 接口的所有实现class的UML图,如下所示:
1、SpringMVC快速体验(maven项目)
- maven的pom.xml配置文件
<?xml version="1.0" encoding="UTF-8"?>
<project xmlns="http://maven.apache.org/POM/4.0.0" xmlns:xsi="http://www.w3.org/2001/XMLSchema-instance"
  xsi:schemaLocation="http://maven.apache.org/POM/4.0.0 http://maven.apache.org/xsd/maven-4.0.0.xsd">
  <modelVersion>4.0.0</modelVersion>

  <groupId>com.xxx</groupId>
  <artifactId>SpringMVC01_start</artifactId>
  <version>1.0-SNAPSHOT</version>
  <packaging>war</packaging>

  <name>SpringMVC01_start Maven Webapp</name>
  <!-- FIXME change it to the project's website -->
  <url>http://www.example.com</url>

  <properties>
    <project.build.sourceEncoding>UTF-8</project.build.sourceEncoding>
    <maven.compiler.source>1.8</maven.compiler.source>
    <maven.compiler.target>1.8</maven.compiler.target>
    <!-- 版本锁定 -->
    <spring.version>5.0.2.RELEASE</spring.version>
  </properties>
  <dependencies>
    <dependency>
      <groupId>org.springframework</groupId>
      <artifactId>spring-context</artifactId>
      <version>${spring.version}</version>
    </dependency>
    <dependency>
      <groupId>org.springframework</groupId>
      <artifactId>spring-web</artifactId>
      <version>${spring.version}</version>
    </dependency>
    <dependency>
      <groupId>org.springframework</groupId>
      <artifactId>spring-webmvc</artifactId>
      <version>${spring.version}</version>
    </dependency>
    <dependency>
      <groupId>javax.servlet</groupId>
      <artifactId>servlet-api</artifactId>
      <version>2.5</version>
      <scope>provided</scope>
    </dependency>
    <dependency>
      <groupId>javax.servlet.jsp</groupId>
      <artifactId>jsp-api</artifactId>
      <version>2.0</version>
      <scope>provided</scope>
    </dependency>
  </dependencies>
  <build>
    <finalName>SpringMVC01_start</finalName>
    <pluginManagement><!-- lock down plugins versions to avoid using Maven defaults (may be moved to parent pom) -->
      <plugins>
        <plugin>
          <artifactId>maven-clean-plugin</artifactId>
          <version>3.1.0</version>
        </plugin>
        <!-- see http://maven.apache.org/ref/current/maven-core/default-bindings.html#Plugin_bindings_for_war_packaging -->
        <plugin>
          <artifactId>maven-resources-plugin</artifactId>
          <version>3.0.2</version>
        </plugin>
        <plugin>
          <artifactId>maven-compiler-plugin</artifactId>
          <version>3.8.0</version>
        </plugin>
        <plugin>
          <artifactId>maven-surefire-plugin</artifactId>
          <version>2.22.1</version>
        </plugin>
        <plugin>
          <artifactId>maven-war-plugin</artifactId>
          <version>3.2.2</version>
        </plugin>
        <plugin>
          <artifactId>maven-install-plugin</artifactId>
          <version>2.5.2</version>
        </plugin>
        <plugin>
          <artifactId>maven-deploy-plugin</artifactId>
          <version>2.8.2</version>
        </plugin>
      </plugins>
    </pluginManagement>
  </build>
</project>
- 在/WEB-INF目录下添加web.xml文件
<!DOCTYPE web-app PUBLIC
 "-//Sun Microsystems, Inc.//DTD Web Application 2.3//EN"
 "http://java.sun.com/dtd/web-app_2_3.dtd" >

<web-app>
  <display-name>Archetype Created Web Application</display-name>

  <!-- SpringMVC的核心控制器:前端控制器 -->
  <servlet>
    <servlet-name>dispatcherServlet</servlet-name>
    <servlet-class>org.springframework.web.servlet.DispatcherServlet</servlet-class>

    <!-- 配置Servlet的初始化参数,读取springmvc的配置文件,创建spring容器 -->
    <init-param>
      <param-name>contextConfigLocation</param-name>
      <param-value>classpath:WEB-INF/applicationContext.xml</param-value>
    </init-param>
    <!-- 配置servlet启动时加载对象 -->
    <load-on-startup>1</load-on-startup>
  </servlet>
  <servlet-mapping>
    <servlet-name>dispatcherServlet</servlet-name>
    <url-pattern>/</url-pattern>
  </servlet-mapping>

    <!--配置解决中文乱码的过滤器-->
  <filter>
    <filter-name>charFilter</filter-name>
    <filter-class>org.springframework.web.filter.CharacterEncodingFilter</filter-class>
    <!--设置过滤器中的属性值-->
    <init-param>
      <param-name>encoding</param-name>
      <param-value>UTF-8</param-value>
    </init-param>
    <!-- 启动过滤器 -->
    <init-param>
      <param-name>forceEncoding</param-name>
      <param-value>true</param-value>
    </init-param>
  </filter>
  <filter-mapping>
    <filter-name>charFilter</filter-name>
    <url-pattern>/*</url-pattern>
  </filter-mapping>

  <!--请求方式转换的 过滤器-->
  <filter>
    <filter-name>hiddenHttpMethodFilter</filter-name>
    <filter-class>org.springframework.web.filter.HiddenHttpMethodFilter</filter-class>
  </filter>
  <filter-mapping>
    <filter-name>hiddenHttpMethodFilter</filter-name>
    <url-pattern>/*</url-pattern>
  </filter-mapping>
<!--配置上下文载人器
上下文载人器载入除 Dispatcherservlet 载人的配置文件之外的其他上下文配置文件)
最常用的上下文载人器是一个 Servlet 监听器,其名称为ContextLoaderListener -->
  <listener>
    <listener-class>org.springframework.web.context.ContextLoaderListener</listener-class>
  </listener>

</web-app>
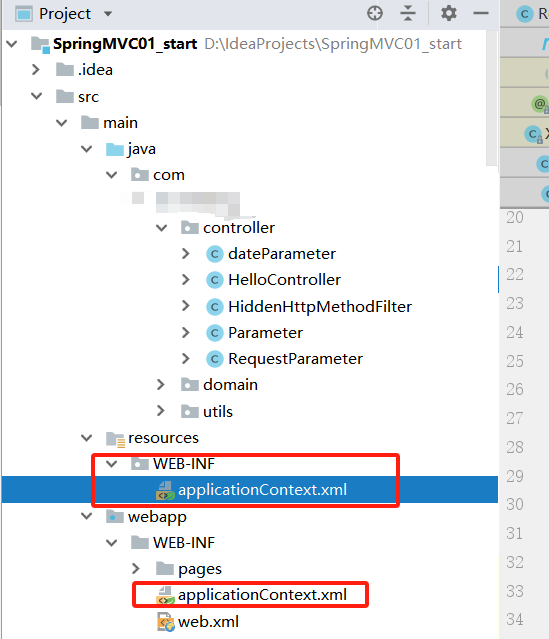
- 在/resources/WEB-INF目录(对应web.xml文件中的<param-value>标签中的配置内容)和/webapp/WEB-INF目录下分别添加applicationContext.xml文件
<?xml version="1.0" encoding="UTF-8"?>
<beans xmlns="http://www.springframework.org/schema/beans"
       xmlns:mvc="http://www.springframework.org/schema/mvc"
       xmlns:context="http://www.springframework.org/schema/context"
       xmlns:xsi="http://www.w3.org/2001/XMLSchema-instance"
       xsi:schemaLocation="
http://www.springframework.org/schema/beans
http://www.springframework.org/schema/beans/spring-beans.xsd
http://www.springframework.org/schema/mvc
http://www.springframework.org/schema/mvc/spring-mvc.xsd
http://www.springframework.org/schema/context
http://www.springframework.org/schema/context/spring-context.xsd">

    <!--配置spring创建容器时,要扫描的包-->
    <context:component-scan base-package="com.xxx"></context:component-scan>
    <!-- 配置视图解析器 -->
    <bean id="viewResolver" class="org.springframework.web.servlet.view.InternalResourceViewResolver">
        <!--扫描/WEB-INF/pages目录下的所有jsp页面-->
        <property name="prefix" value="/WEB-INF/pages/"></property>
        <property name="suffix" value=".jsp"></property>
    </bean>

    <!--配置自定义类型转换器-->
    <bean id="conversionService" class="org.springframework.context.support.ConversionServiceFactoryBean">
        <property name="converters">
            <set>
                <bean class="com.xxx.utils.StringToDateConverter"></bean>
            </set>
        </property>
    </bean>

    <!--配置spring开启注解mvc的支持-->
    <!-- 引用自定义类型转换器 -->
    <mvc:annotation-driven conversion-service="conversionService"></mvc:annotation-driven>

</beans>
目录结构如下图所示:
- 在/WEB-INF/pages/目录(对应applicationContext.xml文件中的InternalResourceViewResolver.class的String prefix变量的值)下添加success.jsp页面
<%--
  Created by IntelliJ IDEA.
  User: xxx
  Date: 2019/1/19
  Time: 11:47
  To change this template use File | Settings | File Templates.
--%>
<%@ page contentType="text/html;charset=UTF-8" language="java" isELIgnored="false" %>
<html>
<head>
    <title>success</title>
</head>
<body>
    <h3>入门案例成功</h3>
    <h3>从request域中取数据的数据如下</h3>
    <%--从request域中取数据--%>
    ${requestScope.username} ${requestScope.password} ${requestScope.age} ${requestScope.address}</br>
    <%--从session域中取数据--%>
    <h3>从sessionScope域中取数据的数据如下</h3>
    ${sessionScope}
</body>
</html>
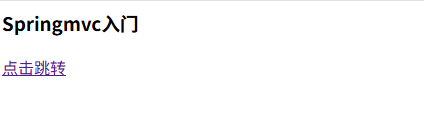
- 在/WEB-INF目录下添加index.jsp
<%--
  Created by IntelliJ IDEA.
  User: xxx
  Date: 2019/1/19
  Time: 11:41
  To change this template use File | Settings | File Templates.
--%>
<%@ page contentType="text/html;charset=UTF-8" language="java" %>
<html>
<head>
    <title>SpringMvc入门案例</title>
</head>
<body>
    <h3>Springmvc入门</h3>
    <a href="/controller/hello?username='zhangsan'&password='123'">点击跳转</a>
</body>
</html>
- 在/java/com/xxx目录(对应applicationContext.xml文件中<context:component-scan>标签的base-package属性的值)下添加HelloController.class
package com.xxx.controller;

import org.springframework.stereotype.Controller;
import org.springframework.ui.ModelMap;
import org.springframework.web.bind.annotation.RequestMapping;
import org.springframework.web.bind.annotation.RequestMethod;
import org.springframework.web.bind.annotation.SessionAttributes;
import org.springframework.web.servlet.ModelAndView;

@Controller
@RequestMapping("/controller")
@SessionAttributes(value = {"username", "password"})
public class HelloController {
    @RequestMapping(path = "/hello",method = {RequestMethod.GET},params = {"password","username"},headers = {"Accept"})
    public ModelAndView beginningProgram(String username,String password){
        System.out.println(username);
        System.out.println(password);
        System.out.println("hello SpringMvc 返回ModelAndView");
        ModelMap map = new ModelMap();
        map.addAttribute("username", username);
        map.addAttribute("password", password);
        map.addAttribute("age", "0");
        map.addAttribute("address", "新华街道");
        return new ModelAndView( "success",map);
    }
}
- 在/java/com/xxx/utils目录(对应applicationContext.xml文件<bean id="conversionService">标签的子标签<set>标签的配置内容)下添加StringToDateConverter.class
package com.xxx.utils;
import org.springframework.core.convert.converter.Converter;
import java.text.SimpleDateFormat;
import java.util.Date;

public class StringToDateConverter implements Converter<String,Date> {
    @Override
    public Date convert(String source) {
        try{
            if (source == null){
                throw new RuntimeException("传入数据为空,请您传入数据");
            }
            SimpleDateFormat dateFormat = new SimpleDateFormat("yyyy-MM-dd");
            Date date = dateFormat.parse(source);
            return date;
        }catch (Exception e){
            throw new RuntimeException(e);
        }
    }
}
-
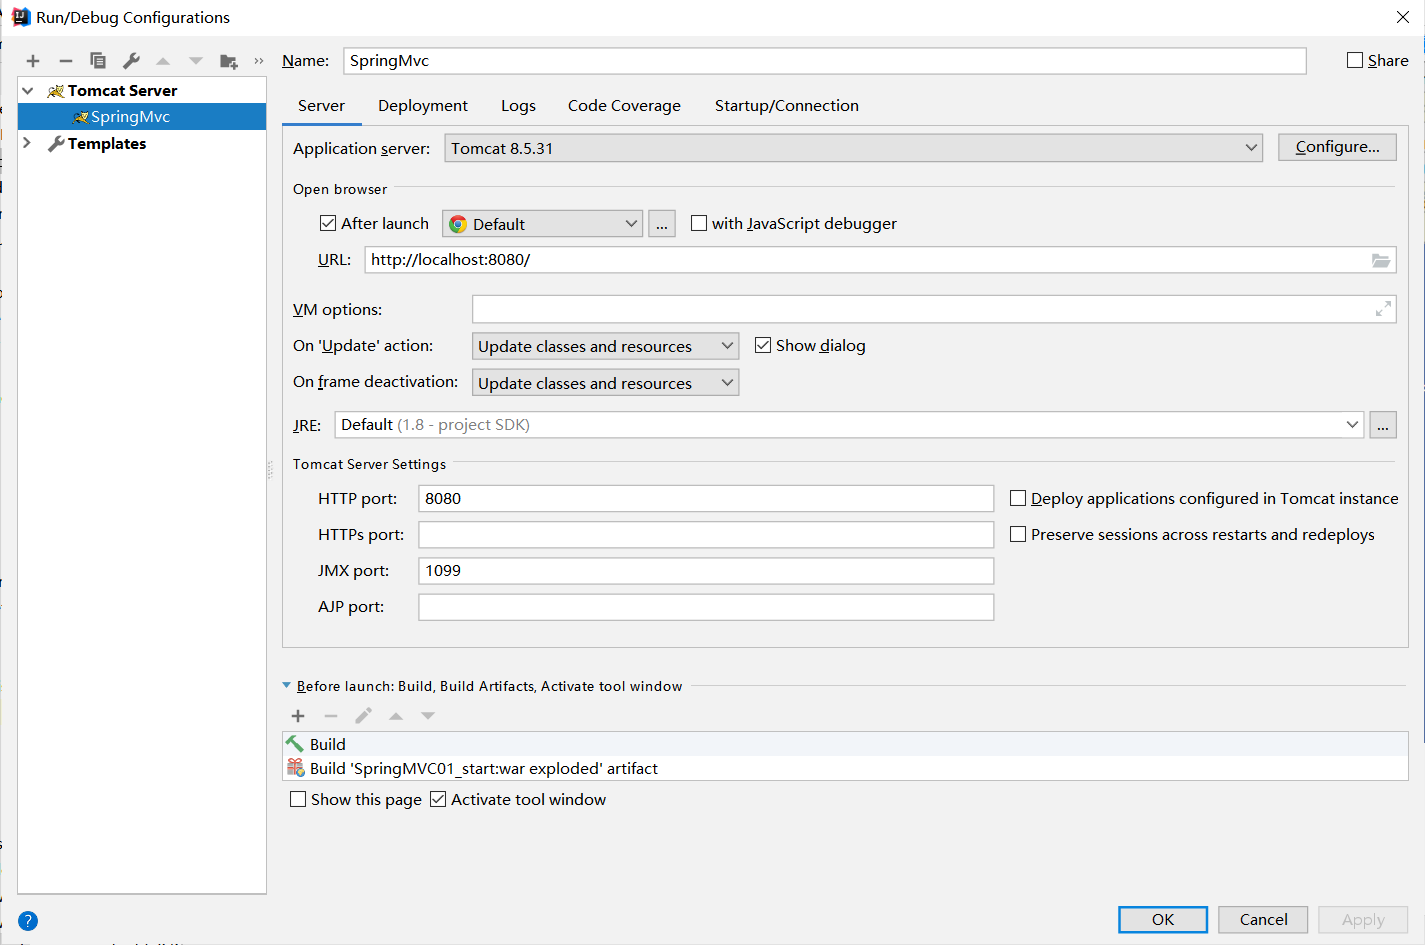
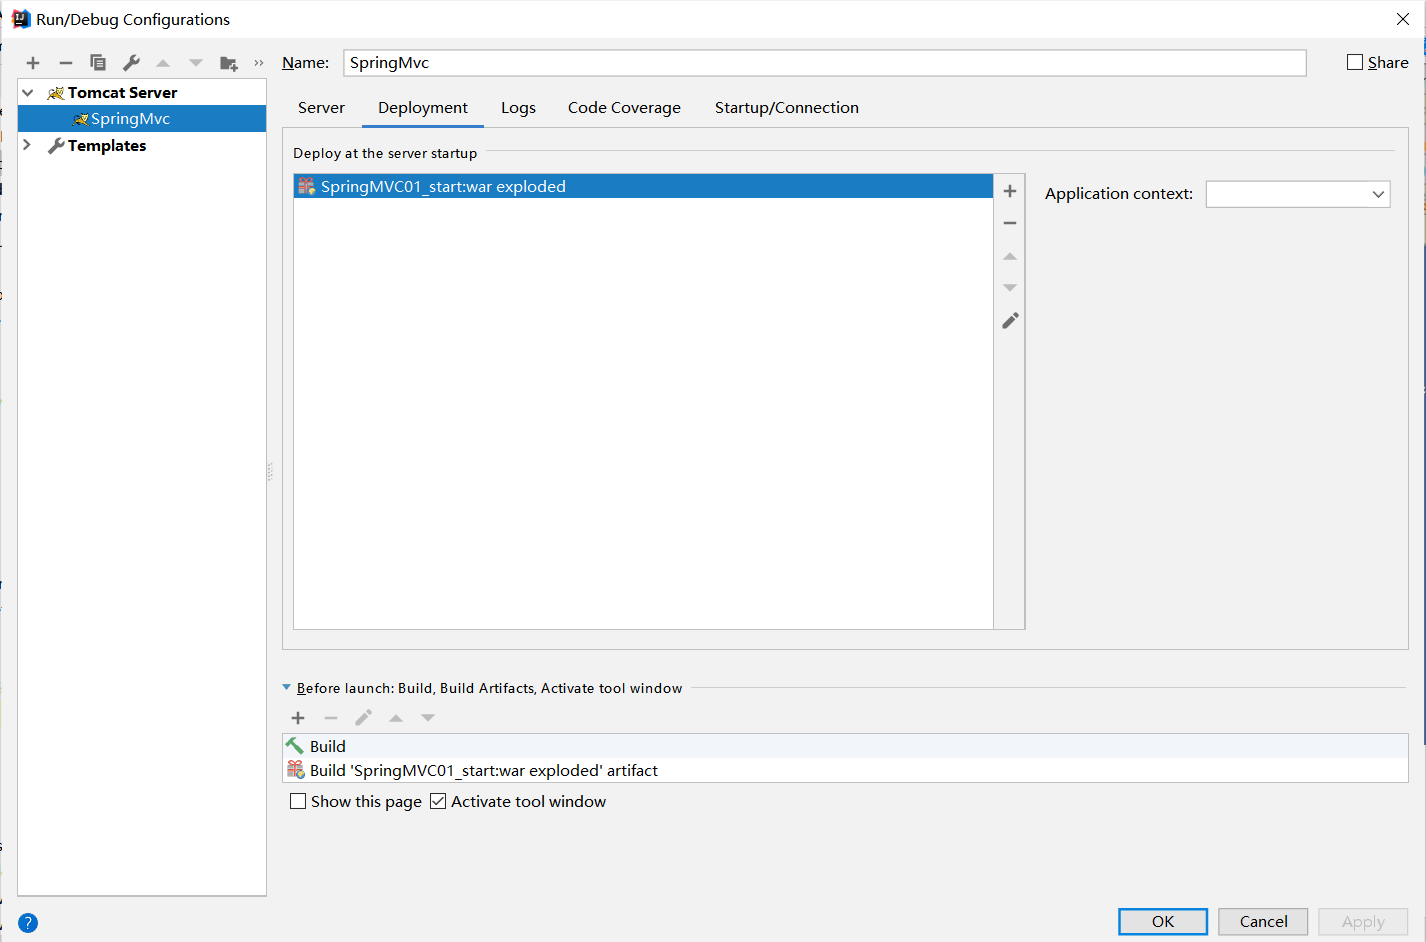
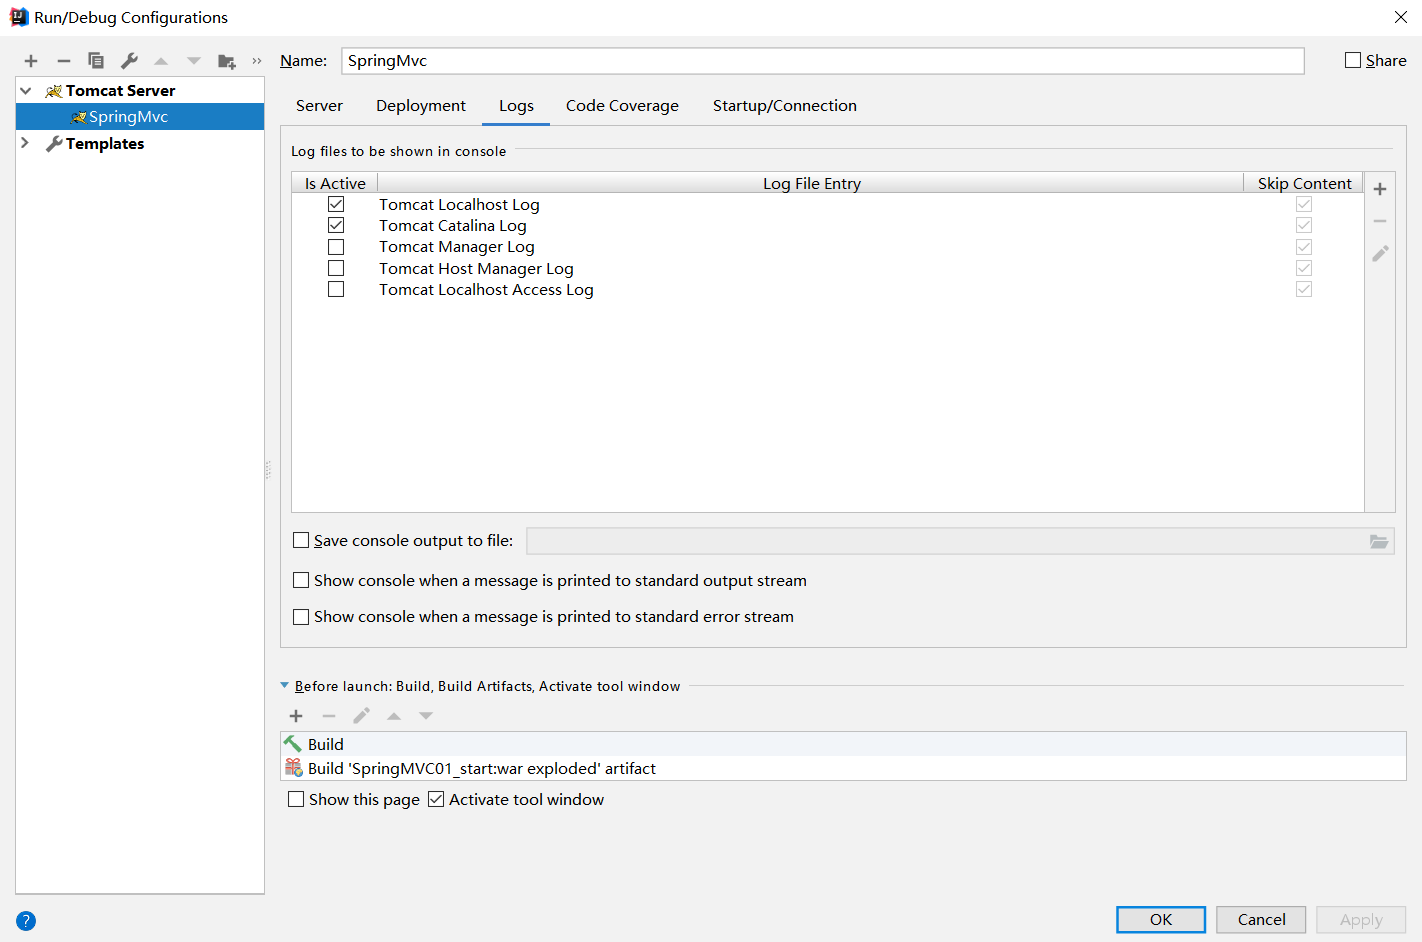
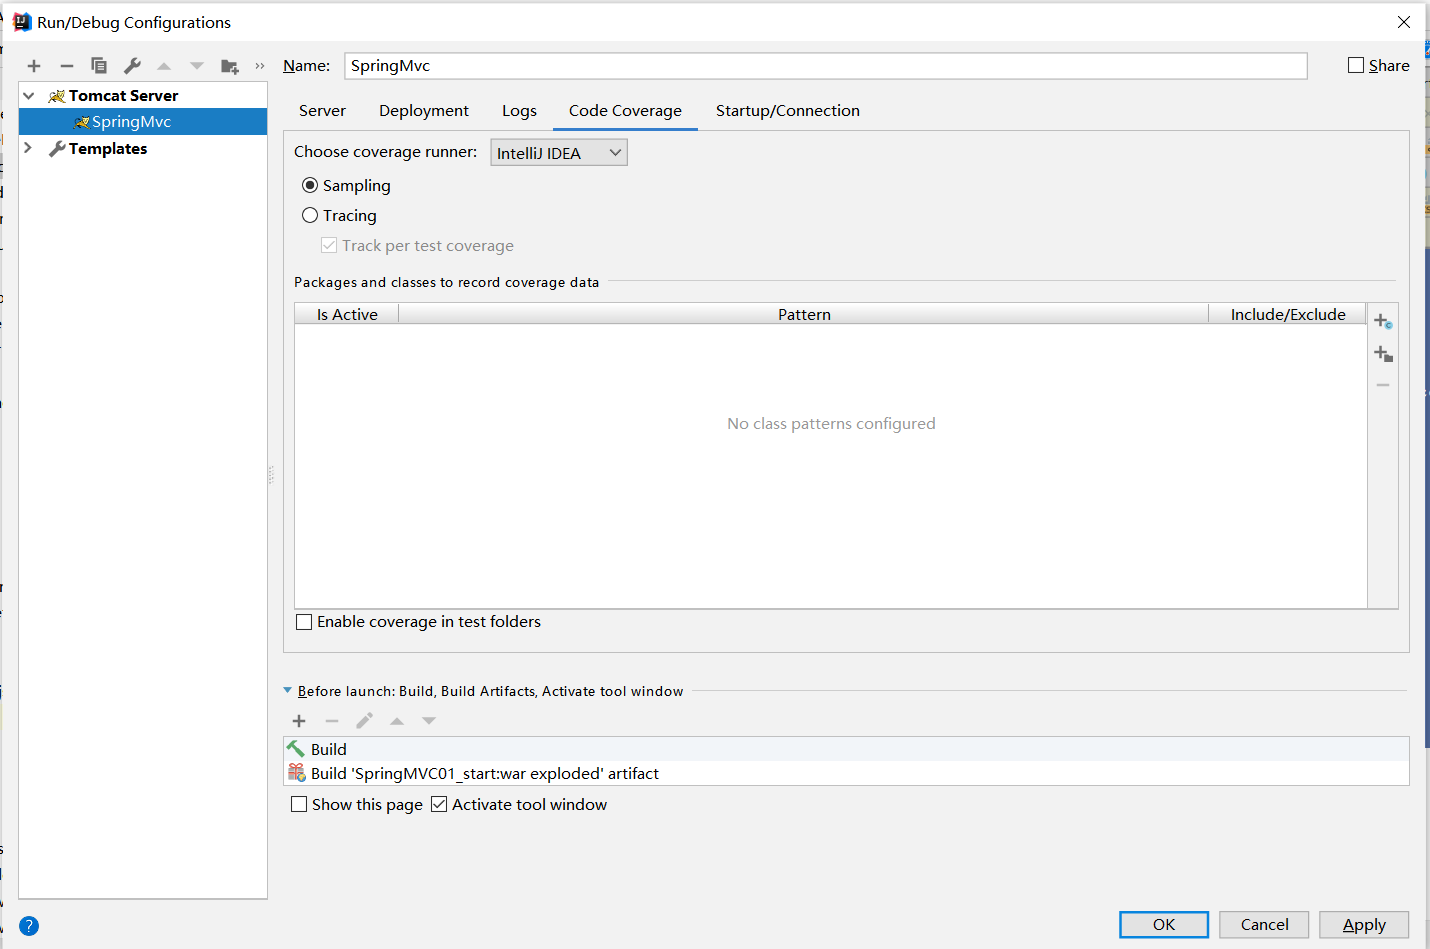
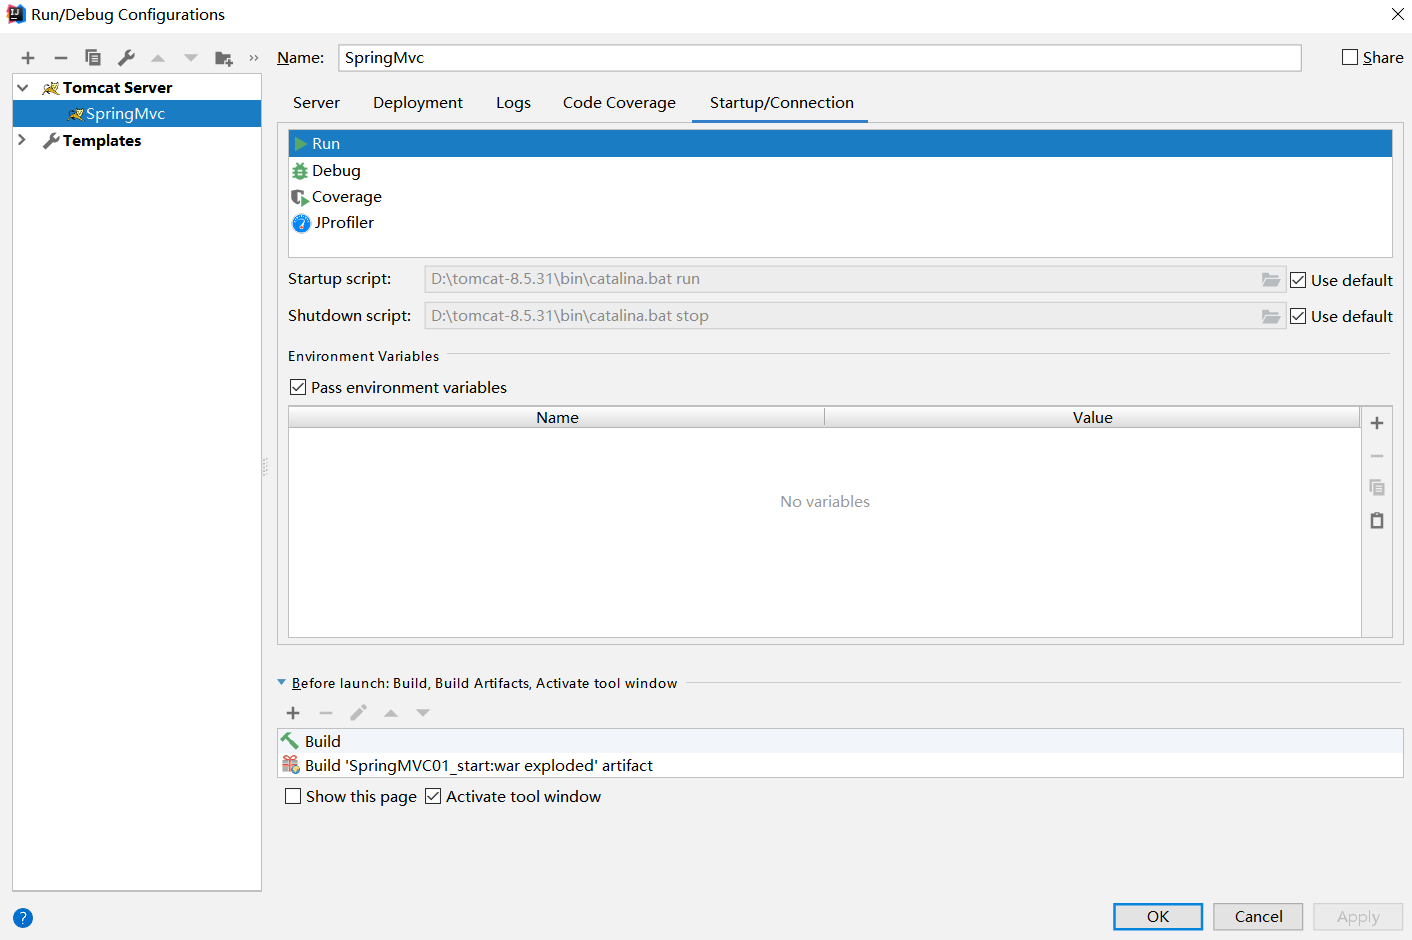
maven打包并部署到Tomcat中,此处往idea中添加一个tomcat服务,配置如下:
![image]()
![image]()
![image]()
![image]()
![image]()
-
测试,启动idea内置的tomcat并用浏览器访问http://localhost:8080/
![image]()
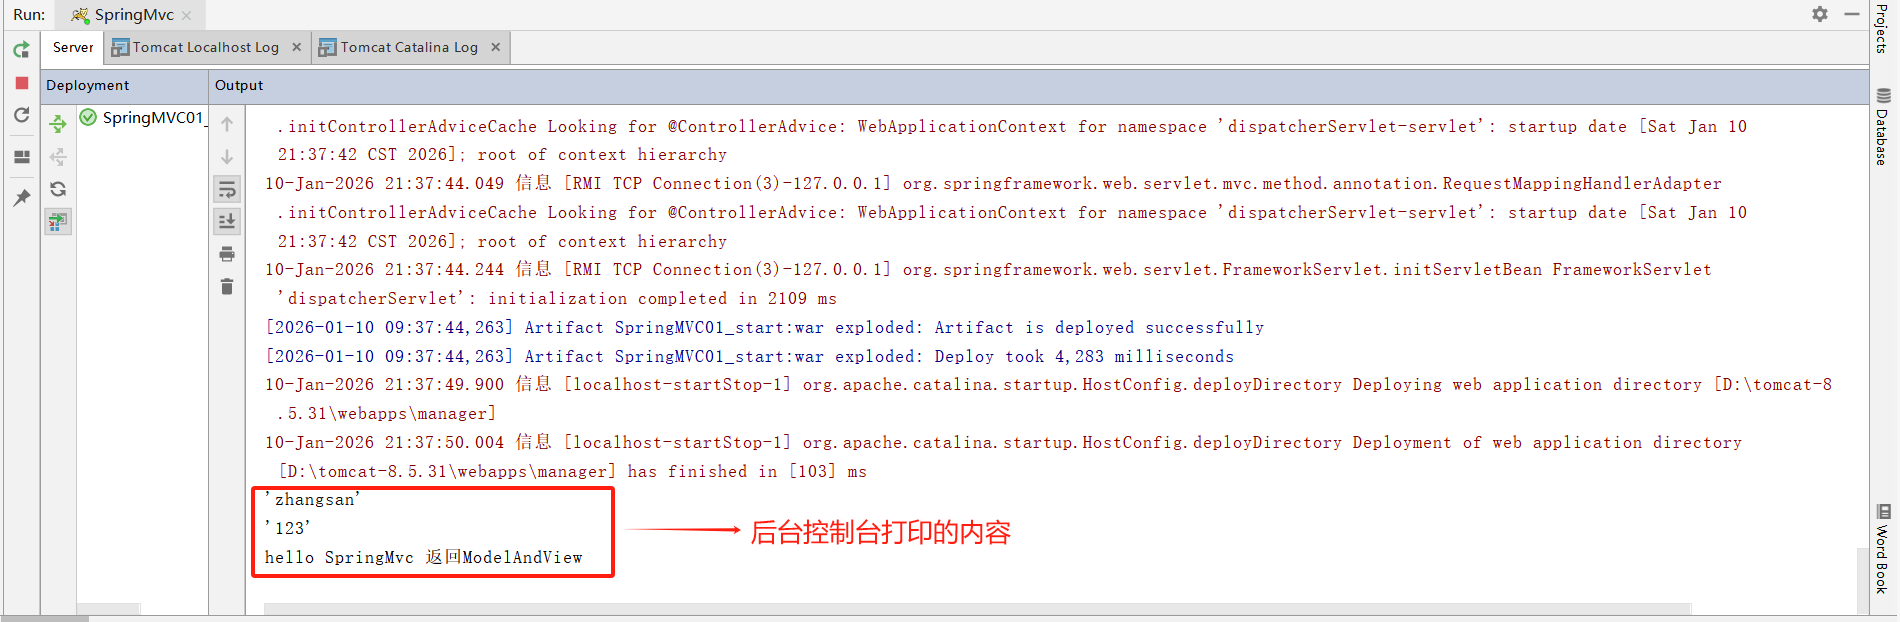
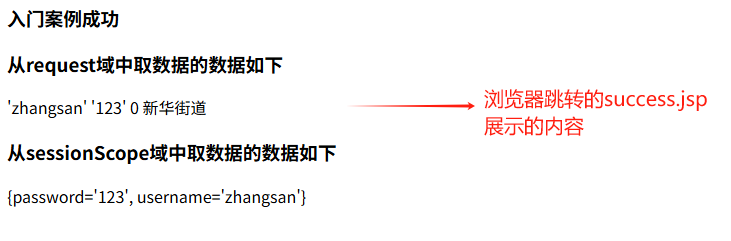
点击跳转后,后台控制台打印的内容和浏览器跳转的success.jsp页面分别如下:
![image]()
![image]()
2、ContextLoaderListener
对于 SpringMVC 功能实现的分析,我们首先从web.xml开始,在 web.xm 文件中我们首先配置的就是 ContextLoaderListener.class(在<listener> 标签中),那么它所提供的功能有哪些,又是如何实现的呢?当使用编程方式的时候我们可以直接将 Spring 配置信息作为参数传人Spring 容器中,如:
ApplicationContext ac = new ClassPathXmlApplicationContext("applicationContext.xml");
但是在Web下,我们需要更多的是与Web环境相互结合,通常的办法是将路径以context-param 的方式注册并使用ContextLoaderListener.class 进行监听读取。
ContextLoaderListener.class 的作用就是启动 Web 容器时,自动装配 ApplicationContext 的配置信息。因为它实现了 ServletContextListener.interface 这个接口,在 web.xml配置这个监听器,启动容器时就会默认执行它实现的方法,使用ServletContextListener.interface 接口,开发者能够在为客户端请求提供服务之前向 ServletContext 中添加任意的对象。这个对象在 ServletContext启动的时候被初始化,然后在 ServletContext整个运行期间都是可见的。每一个 Web 应用都有一个 ServletContext与之相关联。ServletContext 对象在应用启动时被创建在应用关闭的时候被销毁。ServletContext在全局范围内有效,类似于应用中的一个全局变量。在 ServletContextListener 中的核心逻辑便是初始化 WebApplicationContext 实例并存放至ServletContext 中。ServletContextListener.interface的UML关系图,如下所示:
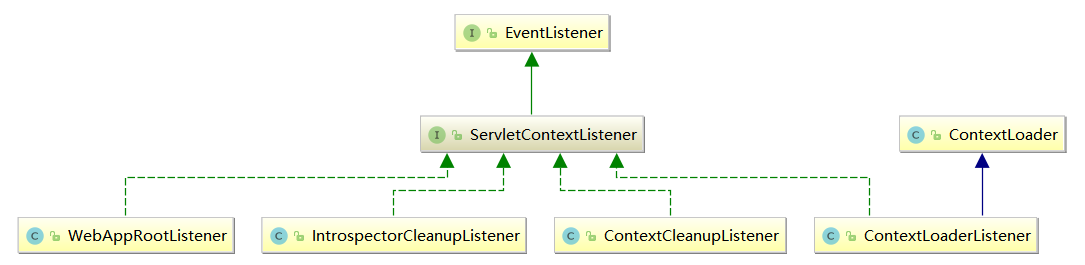
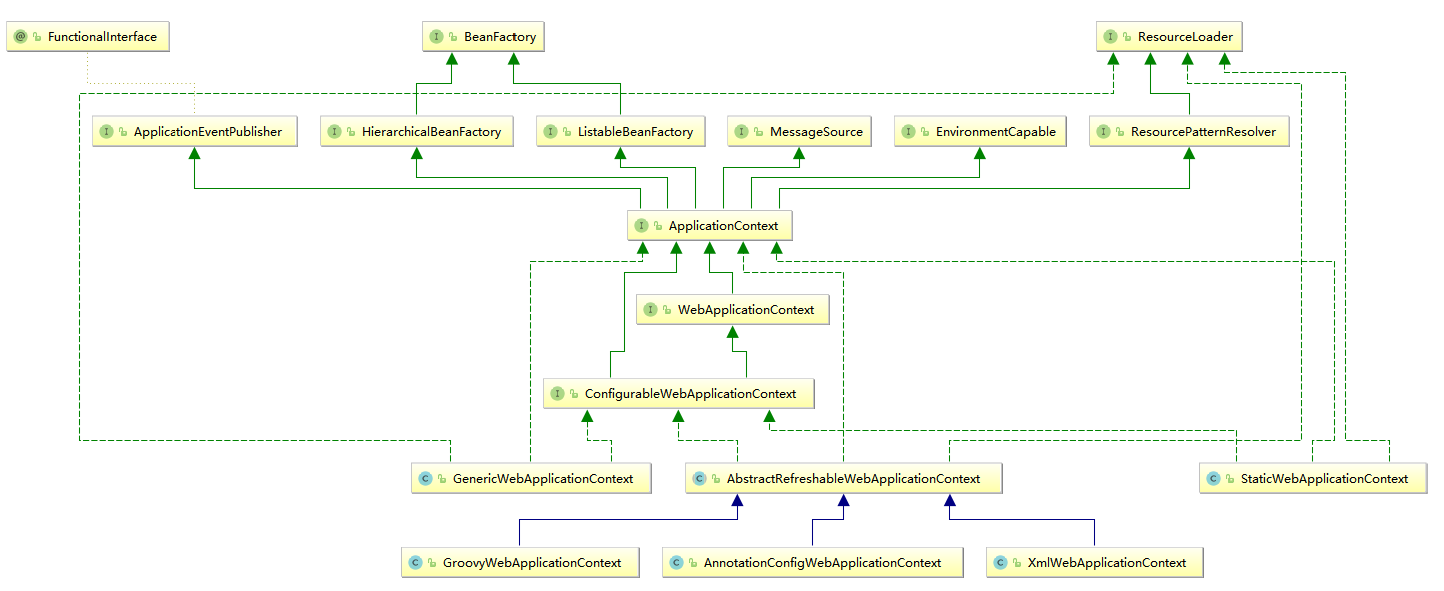
WebApplicationContext.interface的UML关系图,如下所示:
2.1、ServletContextListener的使用
①、创建自定义 ServletContextListener
首先我们创建 ServletContextListener,目标是在系统启动时添加自定义的属性,以便于在全局范围内可以随时调用。系统启动的时候会调用ServletContextListener.interface实现类的contextInitialized()函数,所以需要在这个方法中实现我们的初始化逻辑。所有修改和新增的代码都是基于上文1、SpringMVC快速体验(maven项目),新增MyDataContextListener.class
package com.xxx.listener;

import javax.servlet.ServletContext;
import javax.servlet.ServletContextEvent;
import javax.servlet.ServletContextListener;
public class MyDataContextListener implements ServletContextListener {
    private ServletContext context = null;

    public MyDataContextListener() {
    }
    //该函数在ServletContext启动之后被调用
    @Override
    public void contextInitialized(ServletContextEvent servletContextEvent) {
        this.context = servletContextEvent.getServletContext();
        //可以向ServletContext存入key-value格式的数据,之后可以在任意的Servlet或者JSP中获取这个key-value格式的数据
        context.setAttribute("ServletContextListener","通过ServletContextListener初始化的key-value参数或配置" );
    }
    //该函数在ServletContext将要关闭的时候调用
    @Override
    public void contextDestroyed(ServletContextEvent servletContextEvent) {
        this.context = null;
    }
}
②、修改HelloController.class继承ServletContextEvent.class,并新增成员变量ServletContext context,修改后如下所示:
package com.xxx.controller;

import org.springframework.stereotype.Controller;
import org.springframework.ui.ModelMap;
import org.springframework.web.bind.annotation.RequestMapping;
import org.springframework.web.bind.annotation.RequestMethod;
import org.springframework.web.bind.annotation.SessionAttributes;
import org.springframework.web.servlet.ModelAndView;
import javax.servlet.ServletContext;
import javax.servlet.ServletContextEvent;

@Controller
@RequestMapping("/controller")
@SessionAttributes(value = {"username", "password"})
public class HelloController extends ServletContextEvent {
    private ServletContext context = null;
    public HelloController(ServletContext source) {
        super(source);
        this.context = source;
    }

    @RequestMapping(path = "/hello",method = {RequestMethod.GET},params = {"password","username"},headers = {"Accept"})
    public ModelAndView beginningProgram(String username,String password){
        System.out.println(context.getAttribute("ServletContextListener"));
        ModelMap map = new ModelMap();
        map.addAttribute("username", username);
        map.addAttribute("password", password);
        map.addAttribute("age", "0");
        map.addAttribute("address", "新华街道");
        return new ModelAndView( "success",map);
    }
}
③、在web.xml中新增一个<listener>标签,新增后如下所示:
<!DOCTYPE web-app PUBLIC
 "-//Sun Microsystems, Inc.//DTD Web Application 2.3//EN"
 "http://java.sun.com/dtd/web-app_2_3.dtd" >
<web-app>
  <display-name>Archetype Created Web Application</display-name>

  <!-- SpringMVC的核心控制器:前端控制器 -->
  <servlet>
    <servlet-name>dispatcherServlet</servlet-name>
    <servlet-class>org.springframework.web.servlet.DispatcherServlet</servlet-class>

    <!-- 配置Servlet的初始化参数,读取springmvc的配置文件,创建spring容器 -->
    <init-param>
      <param-name>contextConfigLocation</param-name>
      <param-value>classpath:WEB-INF/applicationContext.xml</param-value>
    </init-param>
    <!-- 配置servlet启动时加载对象 -->
    <load-on-startup>1</load-on-startup>
  </servlet>
  <servlet-mapping>
    <servlet-name>dispatcherServlet</servlet-name>
    <url-pattern>/</url-pattern>
  </servlet-mapping>

    <!--配置解决中文乱码的过滤器-->
  <filter>
    <filter-name>charFilter</filter-name>
    <filter-class>org.springframework.web.filter.CharacterEncodingFilter</filter-class>
    <!--设置过滤器中的属性值-->
    <init-param>
      <param-name>encoding</param-name>
      <param-value>UTF-8</param-value>
    </init-param>
    <!-- 启动过滤器 -->
    <init-param>
      <param-name>forceEncoding</param-name>
      <param-value>true</param-value>
    </init-param>
  </filter>
  <filter-mapping>
    <filter-name>charFilter</filter-name>
    <url-pattern>/*</url-pattern>
  </filter-mapping>

  <!--请求方式转换的 过滤器-->
  <filter>
    <filter-name>hiddenHttpMethodFilter</filter-name>
    <filter-class>org.springframework.web.filter.HiddenHttpMethodFilter</filter-class>
  </filter>
  <filter-mapping>
    <filter-name>hiddenHttpMethodFilter</filter-name>
    <url-pattern>/*</url-pattern>
  </filter-mapping>
<!--配置上下文载人器
上下文载人器载入除 Dispatcherservlet 载人的配置文件之外的其他上下文配置文件)
最常用的上下文载人器是一个 Servlet 监听器,其名称为ContextLoaderListener -->
  <listener>
    <listener-class>org.springframework.web.context.ContextLoaderListener</listener-class>
  </listener>
  <!--新增一个自定义的Listener-->
  <listener>
    <listener-class>com.xxx.listener.MyDataContextListener</listener-class>
  </listener>
</web-app>
④、其余不变,用maven打包并部署到Tomcat中后,启动idea内置的tomcat并用浏览器访问http://localhost:8080/, 点击跳转后,后台控制台打印的内容如下:

2.2、Spring中的ContextLoaderListener
ServletContext启动之后会调用ServletContextListener.interface::contextInitialized()函数,集体实现在ContextLoaderListener.class::contextInitialized()函数中,这2个的关系参照上文中的UML图。
ContextLoaderListener.class::contextInitialized()
    @Override
    public void contextInitialized(ServletContextEvent event) {
        initWebApplicationContext(event.getServletContext());
    }
这里涉及了一个常用类 WebApplicationContext.class,在Web应用中,我们会用到WebApplicationContext,WebApplicationContext 继承自ApplicationContext,在ApplicationContext 的基础上又追加了一些特定于 Web的操作及属性,非常类似于我们通过编程方式使用 Spring 时使用的ClassPathXmlApplicationContext类提供的功能。继续跟踪代码:
ContextLoader.class::initWebApplicationContext()
    private static final Map<ClassLoader, WebApplicationContext> currentContextPerThread = new ConcurrentHashMap<>(1);
    String ROOT_WEB_APPLICATION_CONTEXT_ATTRIBUTE = WebApplicationContext.class.getName() + ".ROOT";

    public WebApplicationContext initWebApplicationContext(ServletContext servletContext) {
        if (servletContext.getAttribute(WebApplicationContext.ROOT_WEB_APPLICATION_CONTEXT_ATTRIBUTE) != null) {
            throw new IllegalStateException(
                    "Cannot initialize context because there is already a root application context present - " +
                    "check whether you have multiple ContextLoader* definitions in your web.xml!");
        }

        Log logger = LogFactory.getLog(ContextLoader.class);
        servletContext.log("Initializing Spring root WebApplicationContext");
        if (logger.isInfoEnabled()) {
            logger.info("Root WebApplicationContext: initialization started");
        }
        long startTime = System.currentTimeMillis();

        try {
            // Store context in local instance variable, to guarantee that
            // it is available on ServletContext shutdown.
            if (this.context == null) {
                //初始化context
                this.context = createWebApplicationContext(servletContext);
            }
            if (this.context instanceof ConfigurableWebApplicationContext) {
                ConfigurableWebApplicationContext cwac = (ConfigurableWebApplicationContext) this.context;
                if (!cwac.isActive()) {
                    // The context has not yet been refreshed -> provide services such as
                    // setting the parent context, setting the application context id, etc
                    if (cwac.getParent() == null) {
                        // The context instance was injected without an explicit parent ->
                        // determine parent for root web application context, if any.
                        ApplicationContext parent = loadParentContext(servletContext);
                        cwac.setParent(parent);
                    }
                    configureAndRefreshWebApplicationContext(cwac, servletContext);
                }
            }
            //记录在servletContext中
            servletContext.setAttribute(WebApplicationContext.ROOT_WEB_APPLICATION_CONTEXT_ATTRIBUTE, this.context);

            ClassLoader ccl = Thread.currentThread().getContextClassLoader();
            if (ccl == ContextLoader.class.getClassLoader()) {
                currentContext = this.context;
            }
            else if (ccl != null) {
                currentContextPerThread.put(ccl, this.context);
            }

            if (logger.isDebugEnabled()) {
                logger.debug("Published root WebApplicationContext as ServletContext attribute with name [" +
                        WebApplicationContext.ROOT_WEB_APPLICATION_CONTEXT_ATTRIBUTE + "]");
            }
            if (logger.isInfoEnabled()) {
                long elapsedTime = System.currentTimeMillis() - startTime;
                logger.info("Root WebApplicationContext: initialization completed in " + elapsedTime + " ms");
            }

            return this.context;
        }
        catch (RuntimeException ex) {
            logger.error("Context initialization failed", ex);
            servletContext.setAttribute(WebApplicationContext.ROOT_WEB_APPLICATION_CONTEXT_ATTRIBUTE, ex);
            throw ex;
        }
        catch (Error err) {
            logger.error("Context initialization failed", err);
            servletContext.setAttribute(WebApplicationContext.ROOT_WEB_APPLICATION_CONTEXT_ATTRIBUTE, err);
            throw err;
        }
    }
initWebApplicationContext()函数主要是体现了创建 WebApplicationContext 实例的一个功能架构,从函数中我们看到了初始化的大致步骤。
2.2.1、WebApplicationContext存在性的验证
在配置中只允许声明一次 ServletContextListener,多次声明会扰乱 Spring的执行逻辑,所以这里首先做的就是对此验证,在Spring中如果创建WebApplicationContext 实例会记录在ServletContext 中以方便全局调用,而使用的 key 就是 WebApplicationContext.ROOT_WEB_APPLICATION_CONTEXT_ATTRIBUTE,所以验证的方式就是查看 ServletContext 实例中是否有对应 key 的属性。
2.2.2、创建WebApplicationContext实例
如果通过验证,则Spring将创建WebApplicationContext实例的工作委托给了createWebApplicationContext()函数。
ContextLoader.class::createWebApplicationContext()
ContextLoader.class::determineContextClass()
ContextLoader.class中的静态代码块
    static {
        // Load default strategy implementations from properties file.
        // This is currently strictly internal and not meant to be customized
        // by application developers.
        try {
            ClassPathResource resource = new ClassPathResource(DEFAULT_STRATEGIES_PATH, ContextLoader.class);
            defaultStrategies = PropertiesLoaderUtils.loadProperties(resource);
        }
        catch (IOException ex) {
            throw new IllegalStateException("Could not load 'ContextLoader.properties': " + ex.getMessage());
        }
    }

    protected WebApplicationContext createWebApplicationContext(ServletContext sc) {
        Class<?> contextClass = determineContextClass(sc);
        if (!ConfigurableWebApplicationContext.class.isAssignableFrom(contextClass)) {
            throw new ApplicationContextException("Custom context class [" + contextClass.getName() +
                    "] is not of type [" + ConfigurableWebApplicationContext.class.getName() + "]");
        }
        return (ConfigurableWebApplicationContext) BeanUtils.instantiateClass(contextClass);
    }

    protected Class<?> determineContextClass(ServletContext servletContext) {
        String contextClassName = servletContext.getInitParameter(CONTEXT_CLASS_PARAM);
        if (contextClassName != null) {
            try {
                return ClassUtils.forName(contextClassName, ClassUtils.getDefaultClassLoader());
            }
            catch (ClassNotFoundException ex) {
                throw new ApplicationContextException(
                        "Failed to load custom context class [" + contextClassName + "]", ex);
            }
        }
        else {
            contextClassName = defaultStrategies.getProperty(WebApplicationContext.class.getName());
            try {
                return ClassUtils.forName(contextClassName, ContextLoader.class.getClassLoader());
            }
            catch (ClassNotFoundException ex) {
                throw new ApplicationContextException(
                        "Failed to load default context class [" + contextClassName + "]", ex);
            }
        }
    }
根据以上静态代码块的内容,我们推断在当前类ContextLoader 同样目录下必定会存在属性文件 ContextLoader.properties,查看后果然存在,内容如下:
org.springframework.web.context.WebApplicationContext=org.springframework.web.context.support.XmlWebApplicationContext
综合以上代码分析,在初始化的过程中,程序首先会读取ContextLoader.class的同目录下的属性文件 ContextLoader.properties,并根据其中的配置提取将要实现 WebApplicationContext 接口的实现类,并根据这个实现类通过反射的方式进行实例的创建。
2.2.3.将实例记录在 servletContext中。
2.2.4.映射当前的类加载器与创建的实例到全局变量Map<ClassLoader, WebApplicationContext> currentContextPerThread 中。
3、DispatcherServlet
在 Spring 中,ContextLoaderListener 只是辅助功能,用于创建 WebApplicationContext 类型实例,而真正的逻辑实现其实是在 DispatcherServlet中进行的,DispatcherServlet 是实现 servlet接口的实现类。
servlet是一个Java编写的程序,此程序是基于HTTP协议的,在服务器端运行的(如 Tomcat ),是按照 servlet 规范编写的一个Java类。主要是处理客户端的请求并将其结果发送到客户端。servlet的生命周期是由 servlet 的容器来控制的,它可以分为3个阶段:初始化、运行和销毁。
- servlet初始化阶段
①、servlet容器加载 servlet类,把servlet类的.class 文件中的数据读到内存中。
②、servlet 容器创建一个 ServletConfig 对象。ServletConfig 对象包含了 servlet的初始化配置信息。
③、servlet容器创建一个servlet 对象。
④、servlet容器调用 servlet对象的init方法进行初始化。 - 运行阶段
当 servlet 容器接收到一个请求时,servlet 容器会针对这个请求创建 servletRequest 和servletResponse 对象,然后调用 service()函数。并把这两个参数传递给 service()函数。service()函数通过 servletRequest 对象获得请求的信息。并处理该请求。再通过servletResponse 对象生成这个请求的响应结果。然后销毁 servletRequest和 servletResponse 对象。我们不管这个请求是post提交的还是 get提交的,最终这个请求都会由service()函数来处理。 - 销毁阶段
当 Web 应用被终止时,servlet容器会先调用 servlet对象的 destrory()函数,然后再销毁 servlet对象,同时也会销毁与 servlet对象相关联的servletConfg 对象。我们可以在 destrory()函数的实现中,释放 servlet所占用的资源,如关闭数据库连接,关闭文件输入输出流等。
servlet 的框架是由2个Java包组成:javax.servlet和javax.servlet.http。在javax.servlet包中定义了所有的 servlet 类都必须实现或扩展的通用接口和类,在javax.servlet.http 包中定义了采用 HTTP 通信协议的 HttpServlet 类。
servlet 被设计成请求驱动,servlet 的请求可能包含多个数据项,当 Web 容器接收到某个servlet 请求时,servlet 把请求封装成一个 HttpServletRequest 对象(在javax.servlet.http这个jar包中),然后把对象传给 servlet 的对应的服务方法。
HTTP 的请求方式包括 delete、get、options、post、put和trace,在 HttpServlet.class中分别提供了相应的服务方法,它们是 doDelete()、doGet()、doOptions()、doPost()、doPut()和 doTrace()。
3.1、servlet的使用
①、创建自定义 servlet
所有修改和新增的代码都是基于上文1、SpringMVC快速体验(maven项目)中的代码,新增MyServlet.class
package com.xxx.servlet;

import javax.servlet.RequestDispatcher;
import javax.servlet.ServletContext;
import javax.servlet.ServletException;
import javax.servlet.http.HttpServlet;
import javax.servlet.http.HttpServletRequest;
import javax.servlet.http.HttpServletResponse;
import java.io.IOException;
public class MyServlet extends HttpServlet {
    public void init() {
        System.out.println("this is init method");
    }

    public void doGet(HttpServletRequest request, HttpServletResponse response) {
        handleLogic(request, response);
    }

    public void doPost(HttpServletRequest request, HttpServletResponse response) {
        handleLogic(request, response);
    }

    private void handleLogic(HttpServletRequest request, HttpServletResponse response) {
        System.out.println("handle myLogic");
        ServletContext sc = getServletContext();
        RequestDispatcher rd = null;
        rd = sc.getRequestDispatcher("/myServlet.jsp");
        try {
            rd.forward(request, response);
        } catch (ServletException | IOException e) {
            //定向的页面
            e.printStackTrace();
        }
    }
}
MyServlet.class中包含了对init()函数和get()函数/post()函数的处理,init()函数保证在servlet加载的时候能做一些逻辑操作,而 HttpServlet则会帮助我们根据方法类型的不同而将逻辑引入不同的函数。在子类中我们只需要重写对应的函数逻辑便可,如以上代码重写了doGet()函数和doPost()函数并将逻辑处理部分引导至 handleLogic()函数中,最后,又将页面跳转至myServlet.jsp。
②、在/webapp目录下添加myServlet.jsp
<%@ page contentType="text/html;charset=UTF-8" language="java" %>
<html>
<head>
    <title>通过自定义Servlet跳转的jsp页面</title>
</head>
<body>
<h3>通过自定义Servlet跳转的jsp页面</h3>
</body>
</html>
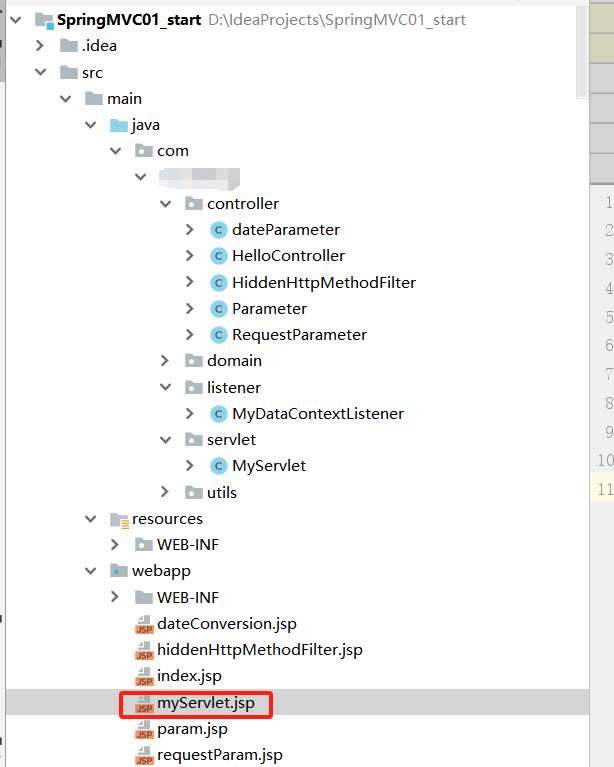
目录结构如下
③、在web.xml中新增一个<servlet>标签,新增后如下所示:
<!DOCTYPE web-app PUBLIC
 "-//Sun Microsystems, Inc.//DTD Web Application 2.3//EN"
 "http://java.sun.com/dtd/web-app_2_3.dtd" >

<web-app>
  <display-name>Archetype Created Web Application</display-name>

  <!-- SpringMVC的核心控制器:前端控制器 -->
  <servlet>
    <servlet-name>dispatcherServlet</servlet-name>
    <servlet-class>org.springframework.web.servlet.DispatcherServlet</servlet-class>

    <!-- 配置Servlet的初始化参数,读取springmvc的配置文件,创建spring容器 -->
    <init-param>
      <param-name>contextConfigLocation</param-name>
      <param-value>classpath:WEB-INF/applicationContext.xml</param-value>
    </init-param>
    <!-- 配置servlet启动时加载对象 -->
    <load-on-startup>1</load-on-startup>
  </servlet>
  <servlet-mapping>
    <servlet-name>dispatcherServlet</servlet-name>
    <url-pattern>/</url-pattern>
  </servlet-mapping>

<!--自定义servlet-->
  <servlet>
    <servlet-name>myservlet</servlet-name>
    <servlet-class>com.xxx.servlet.MyServlet</servlet-class>
    <!-- 配置servlet启动时加载对象 -->
    <load-on-startup>1</load-on-startup>
  </servlet>
  <servlet-mapping>
    <servlet-name>myservlet</servlet-name>
    <url-pattern>/myservlet</url-pattern>
  </servlet-mapping>

    <!--配置解决中文乱码的过滤器-->
  <filter>
    <filter-name>charFilter</filter-name>
    <filter-class>org.springframework.web.filter.CharacterEncodingFilter</filter-class>
    <!--设置过滤器中的属性值-->
    <init-param>
      <param-name>encoding</param-name>
      <param-value>UTF-8</param-value>
    </init-param>
    <!-- 启动过滤器 -->
    <init-param>
      <param-name>forceEncoding</param-name>
      <param-value>true</param-value>
    </init-param>
  </filter>
  <filter-mapping>
    <filter-name>charFilter</filter-name>
    <url-pattern>/*</url-pattern>
  </filter-mapping>

  <!--请求方式转换的 过滤器-->
  <filter>
    <filter-name>hiddenHttpMethodFilter</filter-name>
    <filter-class>org.springframework.web.filter.HiddenHttpMethodFilter</filter-class>
  </filter>
  <filter-mapping>
    <filter-name>hiddenHttpMethodFilter</filter-name>
    <url-pattern>/*</url-pattern>
  </filter-mapping>
<!--配置上下文载人器
上下文载人器载入除 Dispatcherservlet 载人的配置文件之外的其他上下文配置文件)
最常用的上下文载人器是一个 Servlet 监听器,其名称为ContextLoaderListener -->
  <listener>
    <listener-class>org.springframework.web.context.ContextLoaderListener</listener-class>
  </listener>
  <!--新增一个自定义的Listener-->
  <listener>
    <listener-class>com.xxx.listener.MyDataContextListener</listener-class>
  </listener>
</web-app>
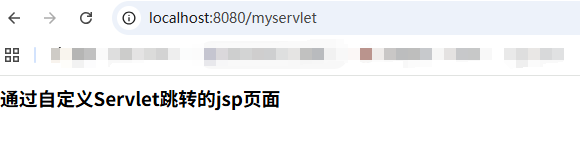
④、其余不变,用maven打包并部署到Tomcat中后,启动idea内置的tomcat并用浏览器访问http://localhost:8080/myservlet, 后台控制台打印的内容和通过自定义的servlet跳转的jsp页面分别如下:

3.2、DispatcherServlet的初始化
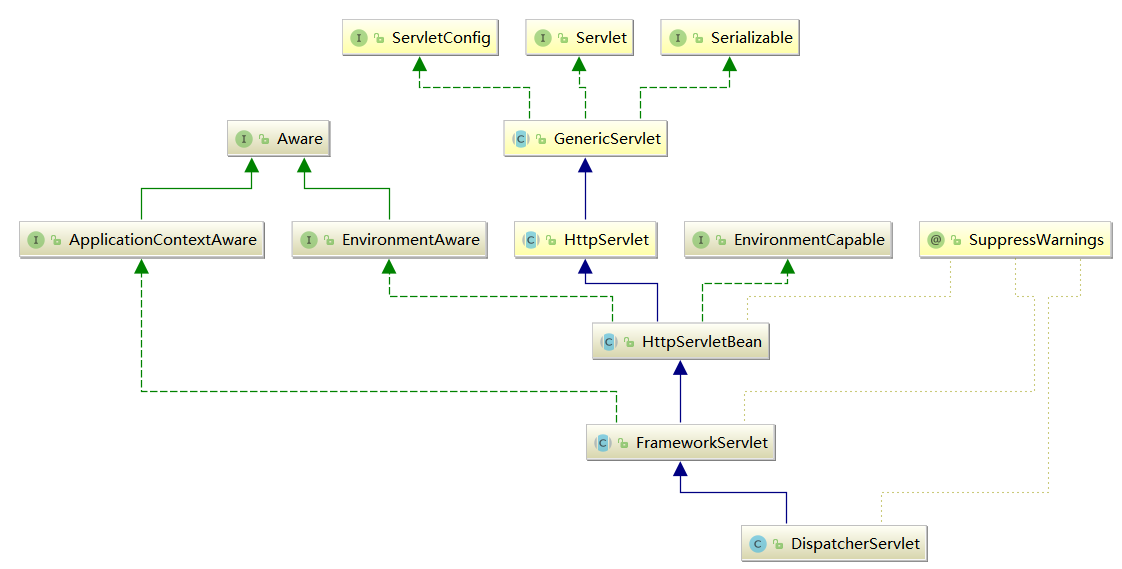
通过上面的实例我们了解到,在 servlet初始化阶段会调用其init()函数,所以我们首先要查看在 DispatcherServlet 中是否重写了 init ()函数。我们在其父类 HttpServletBean 中找到了该函数。DispatcherServlet的UML图,如下所示:
abstract HttpServletBean.class::init()
    private final Set<String> requiredProperties = new HashSet<>(4);

    @Override
    public final void init() throws ServletException {
        if (logger.isDebugEnabled()) {
            logger.debug("Initializing servlet '" + getServletName() + "'");
        }

        // Set bean properties from init parameters.
        //解析init-param并封装至pvs中
        PropertyValues pvs = new ServletConfigPropertyValues(getServletConfig(), this.requiredProperties);
        if (!pvs.isEmpty()) {
            try {
                //将当前这个servlet转化为一个BeanWrapper,从而能够以spring的方式来对init-param的值进行注入
                BeanWrapper bw = PropertyAccessorFactory.forBeanPropertyAccess(this);
                ResourceLoader resourceLoader = new ServletContextResourceLoader(getServletContext());
                //注册自定义属性编辑器,一旦遇到Resource类型的属性将会使用ResourceEditor进行解析
                bw.registerCustomEditor(Resource.class, new ResourceEditor(resourceLoader, getEnvironment()));
                //空实现,留给子类覆盖
                initBeanWrapper(bw);
                //属性注入
                bw.setPropertyValues(pvs, true);
            }
            catch (BeansException ex) {
                if (logger.isErrorEnabled()) {
                    logger.error("Failed to set bean properties on servlet '" + getServletName() + "'", ex);
                }
                throw ex;
            }
        }

        // Let subclasses do whatever initialization they like.
        //留给子类扩展
        initServletBean();

        if (logger.isDebugEnabled()) {
            logger.debug("Servlet '" + getServletName() + "' configured successfully");
        }
    }
DipatcherServlet 的初始化过程主要是通过将当前的 servlet 类型实例转换为 BeanWrapper 类型实例,以便使用 Spring中提供的注入功能进行对应属性的注人。这些属性如contextAtribute、contextClass、nameSpace、contextConfigLocation 等,都可以在 web.xml 文件中以初始化参数的方式配置在 servlet 的声明中。DispatcherServlet继承自抽象类FrameworkServlet,FrameworkServlet类上包含对应的同名属性,Spring 会保证这些参数被注入到对应的值中。属性注入主要包含以下几个步骤。
3.2.1、封装及验证初始化参数
ServletConfigPropertyValues.class 除了封装属性外还有对属性验证的功能。
abstract HttpServletBean.class::static ServletConfigPropertyValues.class
    private static class ServletConfigPropertyValues extends MutablePropertyValues {

        /**
         * Create new ServletConfigPropertyValues.
         * @param config ServletConfig we'll use to take PropertyValues from
         * @param requiredProperties set of property names we need, where
         * we can't accept default values
         * @throws ServletException if any required properties are missing
         */
        public ServletConfigPropertyValues(ServletConfig config, Set<String> requiredProperties)
                throws ServletException {

            Set<String> missingProps = (!CollectionUtils.isEmpty(requiredProperties) ?
                    new HashSet<>(requiredProperties) : null);

            Enumeration<String> paramNames = config.getInitParameterNames();
            while (paramNames.hasMoreElements()) {
                String property = paramNames.nextElement();
                Object value = config.getInitParameter(property);
                addPropertyValue(new PropertyValue(property, value));
                if (missingProps != null) {
                    missingProps.remove(property);
                }
            }

            // Fail if we are still missing properties.
            if (!CollectionUtils.isEmpty(missingProps)) {
                throw new ServletException(
                        "Initialization from ServletConfig for servlet '" + config.getServletName() +
                        "' failed; the following required properties were missing: " +
                        StringUtils.collectionToDelimitedString(missingProps, ", "));
            }
        }
    }
从代码中得知,封装属性主要是对初始化的参数进行封装,也就是servlet中配置的 <init-param> 中配置的封装。当然,用户可以通过对 Set<String> requiredProperties 参数的初始化来强制验证某些属性的必要性,这样,在属性封装的过程中,一旦检测到Set<String> requiredProperties 中的属性没有指定初始值,就会抛出异常。
3.2.2、将当前servlet实例转化成BeanWrapper实例
PropertyAccessorFactory.class::forBeanPropertyAccess()函数是Spring 中提供的工具方法,主要用于将指定实例转化为 Spring 中可以处理的 BeanWrapper 类型的实例。
3.2.3、注册自定义属性编辑器
属性编辑器,我们在上文中已经介绍并且分析过其原理,这里使用属性编辑器的目的是在对当前实例(DispatcherServlet)属性注人过程中一旦遇到Resource 类型的属性就会使用ResourceEditor 去解析。
3.2.4、属性注入
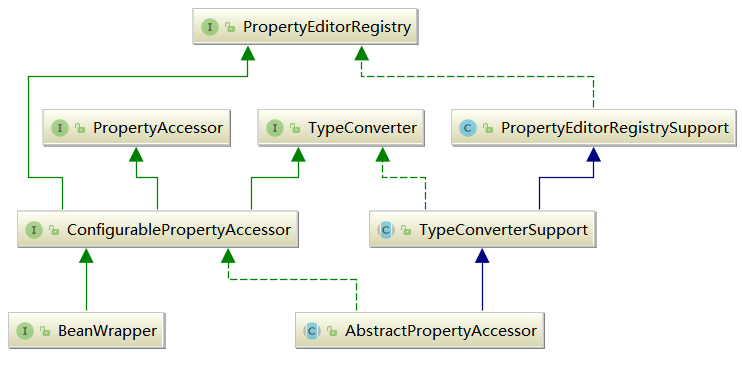
BeanWrapper.interface::setPropertyValues()(具体实现在abstract AbstractPropertyAccessor.class中)为Spring-bean 中的类和函数,支持Spring的自动注人。其实我们最常用的属性注人无非是contextAttribute、contextClass、nameSpace、contextConfigLocation 等。BeanWrapper.interface和abstract AbstractPropertyAccessor.class的UML关系图,如下所示:
3.2.5、servletBean的初始化
在 ContextLoaderListener 加载的时候已经创建了 WebApplicationContext实例,而在这个函数中最重要的就是对这个实例进行进一步的补充初始化。继续查看 initServletBean()函数。子类FrameworkServlet.class 覆盖了HttpServletBean.class 中的initServletBean()函数
abstract FrameworkServlet.class::initServletBean()
    @Override
    protected final void initServletBean() throws ServletException {
        getServletContext().log("Initializing Spring FrameworkServlet '" + getServletName() + "'");
        if (logger.isInfoEnabled()) {
            logger.info("FrameworkServlet '" + getServletName() + "': initialization started");
        }
        long startTime = System.currentTimeMillis();

        try {
            this.webApplicationContext = initWebApplicationContext();
            //设计为子类覆盖
            initFrameworkServlet();
        }
        catch (ServletException | RuntimeException ex) {
            logger.error("Context initialization failed", ex);
            throw ex;
        }

        if (logger.isInfoEnabled()) {
            long elapsedTime = System.currentTimeMillis() - startTime;
            logger.info("FrameworkServlet '" + getServletName() + "': initialization completed in " +
                    elapsedTime + " ms");
        }
    }
上面的函数设计了计时器来统计初始化的执行时间,而且提供了一个扩展方法initFrameworkServlet()用于子类的覆盖操作,而作为关键的初始化逻辑实现委托给了initWebApplicationContext()函数。
3.3、WebApplicationContext的初始化
initWebApplicationContext()函数的主要工作就是创建或刷新WebApplicationContext实例并对servlet功能所使用的变量进行初始化。
abstract FrameworkServlet.class::initWebApplicationContext()
    protected WebApplicationContext initWebApplicationContext() {
        WebApplicationContext rootContext =
                WebApplicationContextUtils.getWebApplicationContext(getServletContext());
        WebApplicationContext wac = null;

        if (this.webApplicationContext != null) {
            // A context instance was injected at construction time -> use it
            //this.webApplicationContext实例在构造函数中被注入
            wac = this.webApplicationContext;
            if (wac instanceof ConfigurableWebApplicationContext) {
                ConfigurableWebApplicationContext cwac = (ConfigurableWebApplicationContext) wac;
                if (!cwac.isActive()) {
                    // The context has not yet been refreshed -> provide services such as
                    // setting the parent context, setting the application context id, etc
                    if (cwac.getParent() == null) {
                        // The context instance was injected without an explicit parent -> set
                        // the root application context (if any; may be null) as the parent
                        cwac.setParent(rootContext);
                    }
                    //刷新上下文环境
                    configureAndRefreshWebApplicationContext(cwac);
                }
            }
        }
        if (wac == null) {
            // No context instance was injected at construction time -> see if one
            // has been registered in the servlet context. If one exists, it is assumed
            // that the parent context (if any) has already been set and that the
            // user has performed any initialization such as setting the context id
            //根据contextAttribute属性加载WebApplicationContext
            wac = findWebApplicationContext();
        }
        if (wac == null) {
            // No context instance is defined for this servlet -> create a local one
            wac = createWebApplicationContext(rootContext);
        }

        if (!this.refreshEventReceived) {
            // Either the context is not a ConfigurableApplicationContext with refresh
            // support or the context injected at construction time had already been
            // refreshed -> trigger initial onRefresh manually here.
            synchronized (this.onRefreshMonitor) {
                onRefresh(wac);
            }
        }

        if (this.publishContext) {
            // Publish the context as a servlet context attribute.
            String attrName = getServletContextAttributeName();
            getServletContext().setAttribute(attrName, wac);
            if (this.logger.isDebugEnabled()) {
                this.logger.debug("Published WebApplicationContext of servlet '" + getServletName() +
                        "' as ServletContext attribute with name [" + attrName + "]");
            }
        }

        return wac;
    }
3.3.1、寻找或创建对应的 WebApplicationContext实例
WebApplicationContext的寻找及创建包括以下2个步骤。
①、通过构造函数的注人进行初始化
当进人 initWebApplicationContext() 函数后通过判断 this.webApplicationContext != null 后,便可以确定 this.webApplicationContext是否是通过构造函数来初始化的。可是有读者可能会有疑问,在 abstract FrameworkServlet.class::initServletBean() 函数中明明是把创建好的实例记录在了this.webApplicationContext变量中
this.webApplicationContext = initWebApplicationContext();
何以判定这个参数是通过构造函数初始化,而不是通过上一次的函数返回值初始化呢?如果存在这个问题,那么就是读者忽略一个问题了:在Web中包含SpringWeb的核心逻辑的DispatcherServlet只可以被声明为一次,在Spring中已经存在验证,所以这就确保了如果this.webApplicationContext !=null,则可以直接判定 this.webApplicationContext 已经通过构造函数初始化。
②、通过 contextAttribute 进行初始化
通过在 web.xml 文件中配置的 servlet 参数 contextAttribute 来查找 ServletContext 中对应的属性,默认为 WebApplicationContext.class.getName()+".ROOT",也就是在 ContextLoaderListener加载时会创建 WebApplicationContext.class类型的实例,并将实例以 WebApplicationContext.class.getName()+".ROOT"为key放人 ServletContext 中,当然读者可以重写初始化逻辑使用自己创建的WebApplicationContext,并在 servlet 的配置中通过初始化参数 contextAttribute 指定 key。
abstract FrameworkServlet.class::findWebApplicationContext()
    @Nullable
    protected WebApplicationContext findWebApplicationContext() {
        String attrName = getContextAttribute();
        if (attrName == null) {
            return null;
        }
        WebApplicationContext wac =
                WebApplicationContextUtils.getWebApplicationContext(getServletContext(), attrName);
        if (wac == null) {
            throw new IllegalStateException("No WebApplicationContext found: initializer not registered?");
        }
        return wac;
    }
③、重新创建 WebApplicationContext 实例
如果通过以上两种方式并没有找到任何突破,那就没办法了,只能在这里重新创建新的实例了。
abstract FrameworkServlet.class::createWebApplicationContext()
    protected WebApplicationContext createWebApplicationContext(@Nullable WebApplicationContext parent) {
        return createWebApplicationContext((ApplicationContext) parent);
    }

    protected WebApplicationContext createWebApplicationContext(@Nullable ApplicationContext parent) {
        //获取servlet的初始化参数contextClass,如果没有配置默认为XmlWebApplicationContext.class
        Class<?> contextClass = getContextClass();
        if (this.logger.isDebugEnabled()) {
            this.logger.debug("Servlet with name '" + getServletName() +
                    "' will try to create custom WebApplicationContext context of class '" +
                    contextClass.getName() + "'" + ", using parent context [" + parent + "]");
        }
        if (!ConfigurableWebApplicationContext.class.isAssignableFrom(contextClass)) {
            throw new ApplicationContextException(
                    "Fatal initialization error in servlet with name '" + getServletName() +
                    "': custom WebApplicationContext class [" + contextClass.getName() +
                    "] is not of type ConfigurableWebApplicationContext");
        }
        //通过反射方式实例化contextClass
        ConfigurableWebApplicationContext wac =
                (ConfigurableWebApplicationContext) BeanUtils.instantiateClass(contextClass);

        wac.setEnvironment(getEnvironment());
        //parent为在ContextLoaderListener中创建的实例,在ContextLoaderListener加载的时候初始化了WebApplicationContext类型实例
        wac.setParent(parent);
        //获取contextConfigLocation属性,配置在servlet初始化参数中
        String configLocation = getContextConfigLocation();
        if (configLocation != null) {
            wac.setConfigLocation(configLocation);
        }
        //初始化Spring环境包括加载配置文件等
        configureAndRefreshWebApplicationContext(wac);

        return wac;
    }
3.3.2、刷新上下文环境configureAndRefreshWebApplicationContext()函数
无论是通过构造函数注人还是单独创建,都会调用configureAndRefreshWebApplicationContext()函数来对已经创建的 WebApplicationContext 实例进行配置及刷新,如下
abstract FrameworkServlet.class::configureAndRefreshWebApplicationContext()
    protected void configureAndRefreshWebApplicationContext(ConfigurableWebApplicationContext wac) {
        if (ObjectUtils.identityToString(wac).equals(wac.getId())) {
            // The application context id is still set to its original default value
            // -> assign a more useful id based on available information
            if (this.contextId != null) {
                wac.setId(this.contextId);
            }
            else {
                // Generate default id...
                wac.setId(ConfigurableWebApplicationContext.APPLICATION_CONTEXT_ID_PREFIX +
                        ObjectUtils.getDisplayString(getServletContext().getContextPath()) + '/' + getServletName());
            }
        }

        wac.setServletContext(getServletContext());
        wac.setServletConfig(getServletConfig());
        wac.setNamespace(getNamespace());
        wac.addApplicationListener(new SourceFilteringListener(wac, new ContextRefreshListener()));

        // The wac environment's #initPropertySources will be called in any case when the context
        // is refreshed; do it eagerly here to ensure servlet property sources are in place for
        // use in any post-processing or initialization that occurs below prior to #refresh
        ConfigurableEnvironment env = wac.getEnvironment();
        if (env instanceof ConfigurableWebEnvironment) {
            ((ConfigurableWebEnvironment) env).initPropertySources(getServletContext(), getServletConfig());
        }

        postProcessWebApplicationContext(wac);
        applyInitializers(wac);
        //加载配置文件及整合parent到ConfigurableWebApplicationContext中
        wac.refresh();
    }
无论调用方式如何变化,只要是使用 ApplicationContext.interface类型的实例所提供的功能,最后都免不了使用公共父类 AbstractApplicationContext.class::refresh()函数(在spring-context模块中)进行配置文件加载。
如果要详细了解AbstractApplicationContext.class::refresh(),请查看我的另一篇博客:Spring源码解析7——容器功能扩展
3.3.3、刷新
onRefresh()函数是FrameworkServlet.class中提供的模板函数,在其子类 DispatcherServlet.class 中进行了重写,主要用于刷新 Spring在 Web功能实现中所必须使用的全局变量。下面我们会介绍它们的初始化过程以及使用场景,而至于具体的使用细节会在稍后的章节中再做详细介绍。
DispatcherServlet.class::initStrategies()
    @Override
    protected void onRefresh(ApplicationContext context) {
        initStrategies(context);
    }

    protected void initStrategies(ApplicationContext context) {
        initMultipartResolver(context);//初始化MultipartResolver
        initLocaleResolver(context);//初始化LocaleResolver
        initThemeResolver(context);//初始化ThemeResolver
        initHandlerMappings(context);//初始化HandlerMappings
        initHandlerAdapters(context);//初始化HandlerAdapters
        initHandlerExceptionResolvers(context);//初始化HandlerExceptionResolvers
        initRequestToViewNameTranslator(context);//初始化RequestToViewNameTranslator
        initViewResolvers(context);//初始化ViewResolvers
        initFlashMapManager(context);//初始化FlashMapManager
    }
①、初始化MultipartResolver
在 Spring 中,MultipartResolver 主要用来处理文件上传。默认情况下,Spring是没有 multipart处理的,因为一些开发者想要自己处理它们。如果想使用Spring的multipart,则需要在 Web应用的上下文中添加 multipart解析器。这样,每个请求就会被检査是否包含 multipart。然而,如果请求中包含 multipart,那么上下文中定义的 MultipartResolver 就会解析它,这样请求中的multipart 属性就会像其他属性一样被处理。常用配置如下(配置在web.xml文件中的<servlet>标签的子标签<param-value>指定的classpath文件中,比如上文中/WEB-INF/applicationContext.xml文件):
    <!--配置文件解析器对象,单位byte-->
    <bean id="multipartResolver" class="org.springframework.web.multipart.commons.CommonsMultipartResolver">
        <property name="maxUploadSize" value="10485760"></property>
    </bean>
MultipartResolver就是在initMultipartResolver()函数中被加入到DispatcherServlet中的,如下:
DispatcherServlet.class::initMultipartResolver()
    private void initMultipartResolver(ApplicationContext context) {
        try {
            this.multipartResolver = context.getBean(MULTIPART_RESOLVER_BEAN_NAME, MultipartResolver.class);
            if (logger.isDebugEnabled()) {
                logger.debug("Using MultipartResolver [" + this.multipartResolver + "]");
            }
        }
        catch (NoSuchBeanDefinitionException ex) {
            // Default is no multipart resolver.
            this.multipartResolver = null;
            if (logger.isDebugEnabled()) {
                logger.debug("Unable to locate MultipartResolver with name '" + MULTIPART_RESOLVER_BEAN_NAME +
                        "': no multipart request handling provided");
            }
        }
    }
②、初始化LocaleResolver
在 Spring 的国际化配置中一共有3种使用方式。
- 基于 URL 参数的配置。
通过 URL 参数来控制国际化,比如你在页面上加一句<a href="?locale=zh_CN"> 简体中文来控制项目中使用的国际化参数。而提供这个功能的就是AcceptHeaderLocaleResolver,默认的参数名为locale,注意大小写。里面放的就是你的提交参数,比如en_US、zh_CN之类的具体配置如下;
<bean id="localeResolver" class="org,Springframework.web.servlet.i18n.AcceptHeaderLocaleResolver"/>
- 基于session的配置。
它通过检验用户会话中预置的属性来解析区域。最常用的是根据用户本次会话过程中的语言设定决定语言种类(例如,用户登录时选择语言种类,则此次登录周期内统一使用此语言设定 ),如果该会话属性不存在,它会根据 accept-language HTTP 头部确定默认区域。
<bean id-"localeResolver" class="org.Springframework.web.servlet.i18n.SessionlocaleResolver"/>
- 基于 cookie 的国际化配置。
CookieLocaleResolver 用于通过浏览器的 cookie 设置取得 Locale 对象。这种策略在应用程序不支持会话或者状态必须保存在客户端时有用,配置如下:
<bean id="localeResolver" class="org.springframework.web.servlet.i18n.CookieLocaleResolver"/>
这3种方式都可以解决国际化的问题,但是,对于LocalResolver的使用基础是在DispatcherServlet中的初始化
DispatcherServlet.class::initLocaleResolver()
    private void initLocaleResolver(ApplicationContext context) {
        try {
            this.localeResolver = context.getBean(LOCALE_RESOLVER_BEAN_NAME, LocaleResolver.class);
            if (logger.isDebugEnabled()) {
                logger.debug("Using LocaleResolver [" + this.localeResolver + "]");
            }
        }
        catch (NoSuchBeanDefinitionException ex) {
            // We need to use the default.
            this.localeResolver = getDefaultStrategy(context, LocaleResolver.class);
            if (logger.isDebugEnabled()) {
                logger.debug("Unable to locate LocaleResolver with name '" + LOCALE_RESOLVER_BEAN_NAME +
                        "': using default [" + this.localeResolver + "]");
            }
        }
    }
提取配置文件中设置的LocaleResolver来初始化DispatcherServlet中的localeResolver属性。
③、初始化ThemeResolver
在 Web 开发中经常会遇到通过主题 Theme 来控制网页风格,这将进一步改善用户体验。简单地说,一个主题就是一组静态资源(比如样式表和图片),它们可以影响应用程序的视觉效果。Spring中的主题功能和国际化功能非常类似,该功能的构成包括3个内容,分别是主题资源、主题解析器和拦截器,具体配置此处省略,但都还是通过ThemeResolver进行加载的。
DispatcherServlet.class::initLocaleResolver()
    private void initThemeResolver(ApplicationContext context) {
        try {
            this.themeResolver = context.getBean(THEME_RESOLVER_BEAN_NAME, ThemeResolver.class);
            if (logger.isDebugEnabled()) {
                logger.debug("Using ThemeResolver [" + this.themeResolver + "]");
            }
        }
        catch (NoSuchBeanDefinitionException ex) {
            // We need to use the default.
            this.themeResolver = getDefaultStrategy(context, ThemeResolver.class);
            if (logger.isDebugEnabled()) {
                logger.debug("Unable to locate ThemeResolver with name '" + THEME_RESOLVER_BEAN_NAME +
                        "': using default [" + this.themeResolver + "]");
            }
        }
    }
④、初始化HandlerMappings
当客户端发出Request时DispatcherServlet会将Request 提交给 HandlerMapping,然后HanlerMapping 根据 WebApplicationContext 的配置来回传给 DispatcherServlet相应的 Controller。
在基于 SpringMVC 的 Web应用程序中,我们可以为 DispatcherServlet 提供多个 HandlerMapping 供其使用。DispatcherServlet 在选用 HandlerMapping 的过程中,将根据我们所指定的一系列 HandlerMapping 的优先级进行排序,然后优先使用优先级在前的HandlerMapping。如果当前的 HandlerMapping能够返回可用的Handler,DispatcherServlet则使用当前返回的 Handler进行 Web请求的处理,而不再继续询问其他的 HandlerMapping。否则,DispatcherServlet 将继续按照各个 HandlerMapping 的优先级进行询问,直到获取一个可用的 Handler 为止。初始化配置如下:
DispatcherServlet.class::initHandlerMappings()
    private void initHandlerMappings(ApplicationContext context) {
        this.handlerMappings = null;

        if (this.detectAllHandlerMappings) {
            // Find all HandlerMappings in the ApplicationContext, including ancestor contexts.
            Map<String, HandlerMapping> matchingBeans =
                    BeanFactoryUtils.beansOfTypeIncludingAncestors(context, HandlerMapping.class, true, false);
            if (!matchingBeans.isEmpty()) {
                this.handlerMappings = new ArrayList<>(matchingBeans.values());
                // We keep HandlerMappings in sorted order.
                AnnotationAwareOrderComparator.sort(this.handlerMappings);
            }
        }
        else {
            try {
                HandlerMapping hm = context.getBean(HANDLER_MAPPING_BEAN_NAME, HandlerMapping.class);
                this.handlerMappings = Collections.singletonList(hm);
            }
            catch (NoSuchBeanDefinitionException ex) {
                // Ignore, we'll add a default HandlerMapping later.
            }
        }

        // Ensure we have at least one HandlerMapping, by registering
        // a default HandlerMapping if no other mappings are found.
        if (this.handlerMappings == null) {
            this.handlerMappings = getDefaultStrategies(context, HandlerMapping.class);
            if (logger.isDebugEnabled()) {
                logger.debug("No HandlerMappings found in servlet '" + getServletName() + "': using default");
            }
        }
    }
默认情况下,SpringMVC将加载当前系统中所有实现了HandlerMapping接口的bean。如果只期望 SpringMVC 加载指定的 handlermapping 时,可以修改 web.xml 中的 DispatcherServlet的初始参数,将boolean detectAllHandlerMappings的值设置为false:
<init-param>
    <param-name>detectAllHandlerMappings</param-name>
    <param-value>false</param-value>
</init-param>
此时,SpringMVC将查找名为“handlerMapping”的bean,并作为当前系统中唯一的handlermapping。如果没有定义handlerMapping的话,则SpringMVC 将按照 org.Springframeworkweb.servlet.DispatcherServlet所在目录下的DispatcherServlet.properties中所定义的org.Springframeworkweb.servlet.HandlerMapping 的内容来加载默认的 handlerMapping(用户没有自定义 Strategies的情况下 ),DispatcherServlet.properties中的handlerMapping默认配置如下:
org.springframework.web.servlet.HandlerMapping=org.springframework.web.servlet.handler.BeanNameUrlHandlerMapping,\
    org.springframework.web.servlet.mvc.method.annotation.RequestMappingHandlerMapping
⑤、初始化HandlerAdapters
从名字也能联想到这是一个典型的适配器模式的使用,在计算机编程中,适配器模式将一个类的接口适配成用户所期待的。使用适配器,可以使接口不兼容而无法在一起工作的类协同工作,做法是将类自己的接口包裹在一个已存在的类中。那么在处理handler 时为什么会使用适配器模式呢?回答这个问题我们首先要分析它的初始化逻辑。
DispatcherServlet.class::initHandlerAdapters()
    private void initHandlerAdapters(ApplicationContext context) {
        this.handlerAdapters = null;

        if (this.detectAllHandlerAdapters) {
            // Find all HandlerAdapters in the ApplicationContext, including ancestor contexts.
            Map<String, HandlerAdapter> matchingBeans =
                    BeanFactoryUtils.beansOfTypeIncludingAncestors(context, HandlerAdapter.class, true, false);
            if (!matchingBeans.isEmpty()) {
                this.handlerAdapters = new ArrayList<>(matchingBeans.values());
                // We keep HandlerAdapters in sorted order.
                AnnotationAwareOrderComparator.sort(this.handlerAdapters);
            }
        }
        else {
            try {
                HandlerAdapter ha = context.getBean(HANDLER_ADAPTER_BEAN_NAME, HandlerAdapter.class);
                this.handlerAdapters = Collections.singletonList(ha);
            }
            catch (NoSuchBeanDefinitionException ex) {
                // Ignore, we'll add a default HandlerAdapter later.
            }
        }

        // Ensure we have at least some HandlerAdapters, by registering
        // default HandlerAdapters if no other adapters are found.
        if (this.handlerAdapters == null) {
            this.handlerAdapters = getDefaultStrategies(context, HandlerAdapter.class);
            if (logger.isDebugEnabled()) {
                logger.debug("No HandlerAdapters found in servlet '" + getServletName() + "': using default");
            }
        }
    }
同样在初始化的过程中涉及了一个变量boolean detectAllHandlerAdapters,boolean detectAllHandlerAdapters作用和 detectAllHandlerMappings类似,只不过作用对象为 handlerAdapter。亦可通过如下配置来强制系统只加载beanname为“handlerAdapter”的handlerAdapter。配置如下:
<init-param>
    <param-name>detectAllHandlerAdapters</param-name>
    <param-value>false</param-value>
</init-param>
如果无法找到对应的 bean,那么系统会尝试加载默认的handlerAdapter
DispatcherServlet.class::getDefaultStrategies()
    protected <T> List<T> getDefaultStrategies(ApplicationContext context, Class<T> strategyInterface) {
        String key = strategyInterface.getName();
        String value = defaultStrategies.getProperty(key);
        if (value != null) {
            String[] classNames = StringUtils.commaDelimitedListToStringArray(value);
            List<T> strategies = new ArrayList<>(classNames.length);
            for (String className : classNames) {
                try {
                    Class<?> clazz = ClassUtils.forName(className, DispatcherServlet.class.getClassLoader());
                    Object strategy = createDefaultStrategy(context, clazz);
                    strategies.add((T) strategy);
                }
                catch (ClassNotFoundException ex) {
                    throw new BeanInitializationException(
                            "Could not find DispatcherServlet's default strategy class [" + className +
                            "] for interface [" + key + "]", ex);
                }
                catch (LinkageError err) {
                    throw new BeanInitializationException(
                            "Unresolvable class definition for DispatcherServlet's default strategy class [" +
                            className + "] for interface [" + key + "]", err);
                }
            }
            return strategies;
        }
        else {
            return new LinkedList<>();
        }
    }
在 DispatcherServlet.class中存在这样一段初始化代码块:
    private static final Properties defaultStrategies;
    static {
        // Load default strategy implementations from properties file.
        // This is currently strictly internal and not meant to be customized
        // by application developers.
        try {
            ClassPathResource resource = new ClassPathResource(DEFAULT_STRATEGIES_PATH, DispatcherServlet.class);
            defaultStrategies = PropertiesLoaderUtils.loadProperties(resource);
        }
        catch (IOException ex) {
            throw new IllegalStateException("Could not load '" + DEFAULT_STRATEGIES_PATH + "': " + ex.getMessage());
        }
    }
在系统加载的时候,Properties defaultStrategies 根据当前路径 DispatcherServlet.properties 来初始化本身,查看 DispatcherServlet.properties 中对应于HandlerAdapter 的配置:
org.springframework.web.servlet.HandlerAdapter=org.springframework.web.servlet.mvc.HttpRequestHandlerAdapter,\
    org.springframework.web.servlet.mvc.SimpleControllerHandlerAdapter,\
    org.springframework.web.servlet.mvc.method.annotation.RequestMappingHandlerAdapter
由此得知,如果程序开发人员没有在配置文件中定义自己的适配器,那么 Spring 会默认加载配置文件中的3个适配器。
作为总控制器的派遣器 servlet通过处理器映射得到处理器后,会轮询处理器适配器模块查找能够处理当前 HTTP请求的处理器适配器的实现,处理器适配器模块根据处理器映射返回的处理器类型,例如简单的控制器类型、注解控制器类型或者远程调用处理器类型,来选择某一个适当的处理器适配器的实现,从而适配当前的HTTP请求。
- HTTP 请求处理器适配器(HttpRequestHandlerAdapter)
HTTP请求处理器适配器仅仅支持对HTTP请求处理器的适配。它简单地将HTTP请求对象和响应对象传递给 HTTP请求处理器的实现,它并不需要返回值。它主要应用在基于HTTP的远程调用的实现上。 - 简单控制器处理器适配器(SimpleControllerHandlerAdapter)
这个实现类将 HTTP请求适配到一个控制器的实现进行处理。这里控制器的实现是一个简单的控制器接口的实现。简单控制器处理器适配器被设计成一个框架类的实现,不需要被改写,客户化的业务逻辑通常是在控制器接口的实现类中实现的。 - RequestMappingHandlerAdapter
略
⑥、初始化HandlerExceptionResolvers
基于HandlerExceptionResolver.interface接口的异常处理,使用这种方式只需要实现resolveException()函数,该函数返回一个ModelAndView对象,在方法内部对异常的类型进行判断,然后尝试生成对应的 ModelAndView 对象,如果该方法返回了 nul,则 Spring 会继续寻找其它的实现了HandlerExceptionResolver.interface 接口的bean。换句话说,Spring 会搜索所有注册在其环境中的实现了HandlerExceptionResolver.interface 接口的 bean,逐个执行,直到返回了一个 ModelAndView 对象。初始化代码如下:
DispatcherServlet.class::initHandlerExceptionResolvers()
    private void initHandlerExceptionResolvers(ApplicationContext context) {
        this.handlerExceptionResolvers = null;

        if (this.detectAllHandlerExceptionResolvers) {
            // Find all HandlerExceptionResolvers in the ApplicationContext, including ancestor contexts.
            Map<String, HandlerExceptionResolver> matchingBeans = BeanFactoryUtils
                    .beansOfTypeIncludingAncestors(context, HandlerExceptionResolver.class, true, false);
            if (!matchingBeans.isEmpty()) {
                this.handlerExceptionResolvers = new ArrayList<>(matchingBeans.values());
                // We keep HandlerExceptionResolvers in sorted order.
                AnnotationAwareOrderComparator.sort(this.handlerExceptionResolvers);
            }
        }
        else {
            try {
                HandlerExceptionResolver her =
                        context.getBean(HANDLER_EXCEPTION_RESOLVER_BEAN_NAME, HandlerExceptionResolver.class);
                this.handlerExceptionResolvers = Collections.singletonList(her);
            }
            catch (NoSuchBeanDefinitionException ex) {
                // Ignore, no HandlerExceptionResolver is fine too.
            }
        }

        // Ensure we have at least some HandlerExceptionResolvers, by registering
        // default HandlerExceptionResolvers if no other resolvers are found.
        if (this.handlerExceptionResolvers == null) {
            this.handlerExceptionResolvers = getDefaultStrategies(context, HandlerExceptionResolver.class);
            if (logger.isDebugEnabled()) {
                logger.debug("No HandlerExceptionResolvers found in servlet '" + getServletName() + "': using default");
            }
        }
    }
⑦、初始化RequestToViewNameTranslator
当Controller 处理器方法没有返回一个 Vew对象或逻辑视图名称,并且在该方法中没有直接往 response 的输出流里面写数据的时候,Spring就会采用约定好的方式提供一个逻辑视图名称。这个逻辑视图名称是通过 Spring定义的org.springframework.web.servlet.RequestToViewNameTranslator 接口的 getViewName() 函数来实现的,我们可以实现自己的 RequestToViewNameTranslator.interface 接口来约定好没有返回视图名称的时候如何确定视图名称。Spring已经给我们提供了一个它自己的实现,那就是 org.springframework.web.servlet.view.DefaultRequestToViewNameTranslator。
在介绍 DefaultRequestToViewNameTranslator.class 是如何约定视图名称之前,先来看一下它支持用户定义的属性。
- String prefix:前缀,表示约定好的视图名称需要加上的前缀,默认是空,
- String suffix:后缀,表示约定好的视图名称需要加上的后缀,默认是空。
- String separator:分隔符,默认是斜杠“/”。
- boolean stripLeadingSlash:如果首字符是分隔符,是否要去除,默认是true。
- boolean stripTrailingSlash:如果最后一个字符是分隔符,是否要去除,默认是true。
- boolean stripExtension:如果请求路径包含扩展名是否要去除,默认是true。
- UrlPathHelper urlPathHelper:URL编码和解码相关的配置,其中有一个UrlPathHelper.class::urlDecode变量,默认是 true。它会采用 request 指定的编码或者ISO-8859-1编码对 URL进行解码。
当我们没有在 SpringMVC 的配置文件中手动的定义一个名为viewNameTranlator 的 Bean的时候,Spring 就会为我们提供一个默认的 viewNameTranslator,即 DefaultRequestToViewNameTranslator。
接下来看一下,当 Controller 处理器方法没有返回逻辑视图名称时,DefaultRequestToViewNameTranslator 是如何约定视图名称的。DefaultRequestToViewNameTranslator 会获取到请求的URI,然后根据提供的属性做一些改造,把改造之后的结果作为视图名称返回。这里以请求路径 htp:/localhost/test/index.html 为例,来说明一下 DefaultRequestToViewNameTranslator是如何工作的。该请求路径对应的请求 URI为/test/index.html,我们来看以下几种情况,它分别对应的逻辑视图名称是什么。
- prefix 和 suffix 如果都存在,其他为默认值,那么对应返回的逻辑视图名称应该是prefixtest/indexsuffix。
- stripLeadingSlash和stripExtension都为false,其他默认,这时候对应的逻辑视图名称是/test/index.html.
- 都采用默认配置时,返回的逻辑视图名称应该是 test/index。
如果逻辑视图名称跟请求路径相同或者相关关系都是一样的,那么我们就可以采用Spring为我们事先约定好的逻辑视图名称返回,这可以大大简化我们的开发工作,而以上功能实现的关键属性 viewNameTranslator,则是在 initRequestToViewNameTranslator() 函数中完成。
DispatcherServlet.class::initRequestToViewNameTranslator()
    private void initRequestToViewNameTranslator(ApplicationContext context) {
        try {
            this.viewNameTranslator =
                    context.getBean(REQUEST_TO_VIEW_NAME_TRANSLATOR_BEAN_NAME, RequestToViewNameTranslator.class);
            if (logger.isDebugEnabled()) {
                logger.debug("Using RequestToViewNameTranslator [" + this.viewNameTranslator + "]");
            }
        }
        catch (NoSuchBeanDefinitionException ex) {
            // We need to use the default.
            this.viewNameTranslator = getDefaultStrategy(context, RequestToViewNameTranslator.class);
            if (logger.isDebugEnabled()) {
                logger.debug("Unable to locate RequestToViewNameTranslator with name '" +
                        REQUEST_TO_VIEW_NAME_TRANSLATOR_BEAN_NAME + "': using default [" + this.viewNameTranslator +
                        "]");
            }
        }
    }
⑧、初始化ViewResolvers
在SpringMVC中,当Controller将请求处理结果放入到ModelAndView中以后,DispatcherServet 会根据 ModelAndView选择合适的视图进行渲染。SpringMVC选择 View 和创建View 对象是在 ViewResolver中。ViewResolver接口定义了 resolverViewName() 函数,根据 viewName 创建合适类型的 View 实现。那么如何配置 ViewResolver 呢?在Spring中,ViewResolver作为 Spring Bean 存在,可以在 Spring 配置文件中进行配置,例如下面的代码,配置了JSP相关的 viewResolver。
<bean class="org.springframework.web.servlet.view.InternalResourceViewResolver">
    <property name="prefix" value="/WEB-INF/views"/>
    <property name="suffix" value=".jsp"/>
</bean>
viewResolvers属性的初始化工作在initViewResolvers() 函数中完成。
DispatcherServlet.class::initViewResolvers()
    private void initViewResolvers(ApplicationContext context) {
        this.viewResolvers = null;

        if (this.detectAllViewResolvers) {
            // Find all ViewResolvers in the ApplicationContext, including ancestor contexts.
            Map<String, ViewResolver> matchingBeans =
                    BeanFactoryUtils.beansOfTypeIncludingAncestors(context, ViewResolver.class, true, false);
            if (!matchingBeans.isEmpty()) {
                this.viewResolvers = new ArrayList<>(matchingBeans.values());
                // We keep ViewResolvers in sorted order.
                AnnotationAwareOrderComparator.sort(this.viewResolvers);
            }
        }
        else {
            try {
                ViewResolver vr = context.getBean(VIEW_RESOLVER_BEAN_NAME, ViewResolver.class);
                this.viewResolvers = Collections.singletonList(vr);
            }
            catch (NoSuchBeanDefinitionException ex) {
                // Ignore, we'll add a default ViewResolver later.
            }
        }

        // Ensure we have at least one ViewResolver, by registering
        // a default ViewResolver if no other resolvers are found.
        if (this.viewResolvers == null) {
            this.viewResolvers = getDefaultStrategies(context, ViewResolver.class);
            if (logger.isDebugEnabled()) {
                logger.debug("No ViewResolvers found in servlet '" + getServletName() + "': using default");
            }
        }
    }
⑨、初始化FlashMapManager
SpringMVC Flash attributes 提供了一个请求存储属性,可供其他请求使用。在使用重定向时候非常必要,例如 Post/Redirect/Get模式。Flash attributes 在重定向之前暂存(就像存在 session中)以便重定向之后还能使用,并立即删除。
SpringMVC有两个主要的抽象来支持flash attributes。FlashMap用于保持 flash attributes,而 FlashMapManager 用于存储、检索、管理 FlashMap 实例。
flash attribute 支持默认开启("on")并不需要显式启用,它永远不会导致 HTTP Session 的创建。这2个 FlashMap 实例都可以通过静态方法 RequestContextUtils从Spring MVC 的任何位置访问。
flashMapManager 的初始化在 initFlashMapManager() 中完成。
DispatcherServlet.class::initFlashMapManager()
    private void initFlashMapManager(ApplicationContext context) {
        try {
            this.flashMapManager = context.getBean(FLASH_MAP_MANAGER_BEAN_NAME, FlashMapManager.class);
            if (logger.isDebugEnabled()) {
                logger.debug("Using FlashMapManager [" + this.flashMapManager + "]");
            }
        }
        catch (NoSuchBeanDefinitionException ex) {
            // We need to use the default.
            this.flashMapManager = getDefaultStrategy(context, FlashMapManager.class);
            if (logger.isDebugEnabled()) {
                logger.debug("Unable to locate FlashMapManager with name '" +
                        FLASH_MAP_MANAGER_BEAN_NAME + "': using default [" + this.flashMapManager + "]");
            }
        }
    }

 浙公网安备 33010602011771号