
Spring基础6——事务和动态代理(Spring中的事务采用动态代理)
一、Spring中的事务
1.1、事务的不一致性:
在转账过程中,一个账户加钱,另一个账户就需要减钱;如果在这个时间中,程序发生了故障,则有能导致数据库发生不一致,出现一种特殊情况:一个账户有改变,另一个账户没有改变。这个情况下,就是事务的不一致性。如下例子:
-
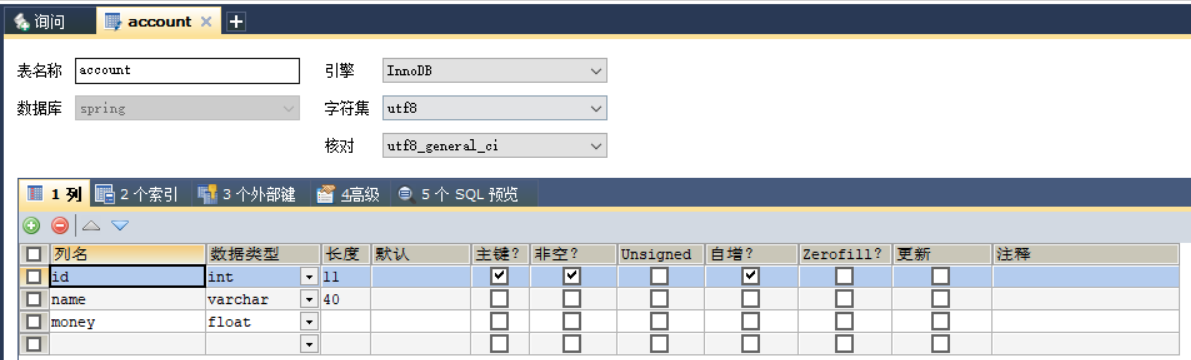
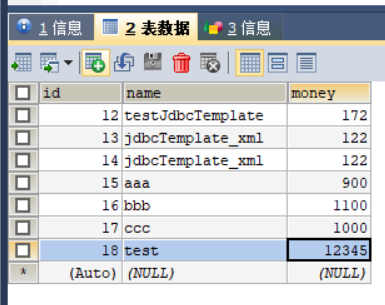
mysql数据库中有一张account表,表结构和数据如下所示:
![image]()
![image]()
-
以下几个类通过调用关系,模拟service层调用dao层,,dao层最后对数据库进行修改
service层:
package xxx.xxx.service.impl;
import org.springframework.beans.factory.annotation.Autowired;
import org.springframework.stereotype.Service;
import xxx.xxx.dao.IAccountDao;
import xxx.xxx.domain.Account;
import xxx.xxx.service.IAccountService;
import java.util.*;

//spring中的注解,将该类的对象加入bean容器中管理,id为accountService
@Service("accountService")
public class AccountServiceImpl implements IAccountService {
    //spring中的注解,依据类型注入该类型的变量,只能用于spring容器中只有一个该类型的变量
   @Autowired
   private IAccountDao accountDao;

   @Override
    public void transfer(String sourceName, String targetName, float money) {
        //1、查找转出账户
        Account source = accountDao.findAccountByNmae(sourceName);
        //2、查找转入账户
        Account target = accountDao.findAccountByNmae(targetName);
        //3、转出账户减钱
        source.setMoney(source.getMoney() - money);
        //4、转入账户加钱
        target.setMoney(target.getMoney() + money);
        //5、更新转出账户
        accountDao.updateAccount(source);
        //此处模拟一个异常出现
        int i = 1 / 0;
        //6、更新转入账户
        accountDao.updateAccount(target);
    }
}
dao层:
package xxx.xxx.dao.impl;
import xxx.xxx.dao.IAccountDao;
import xxx.xxx.domain.Account;
import org.apache.commons.dbutils.QueryRunner;
import org.apache.commons.dbutils.handlers.BeanHandler;
import org.apache.commons.dbutils.handlers.BeanListHandler;
import org.springframework.beans.factory.annotation.Autowired;
import org.springframework.stereotype.Repository;
import java.util.List;
/**
* 账户的持久层实现类
*/
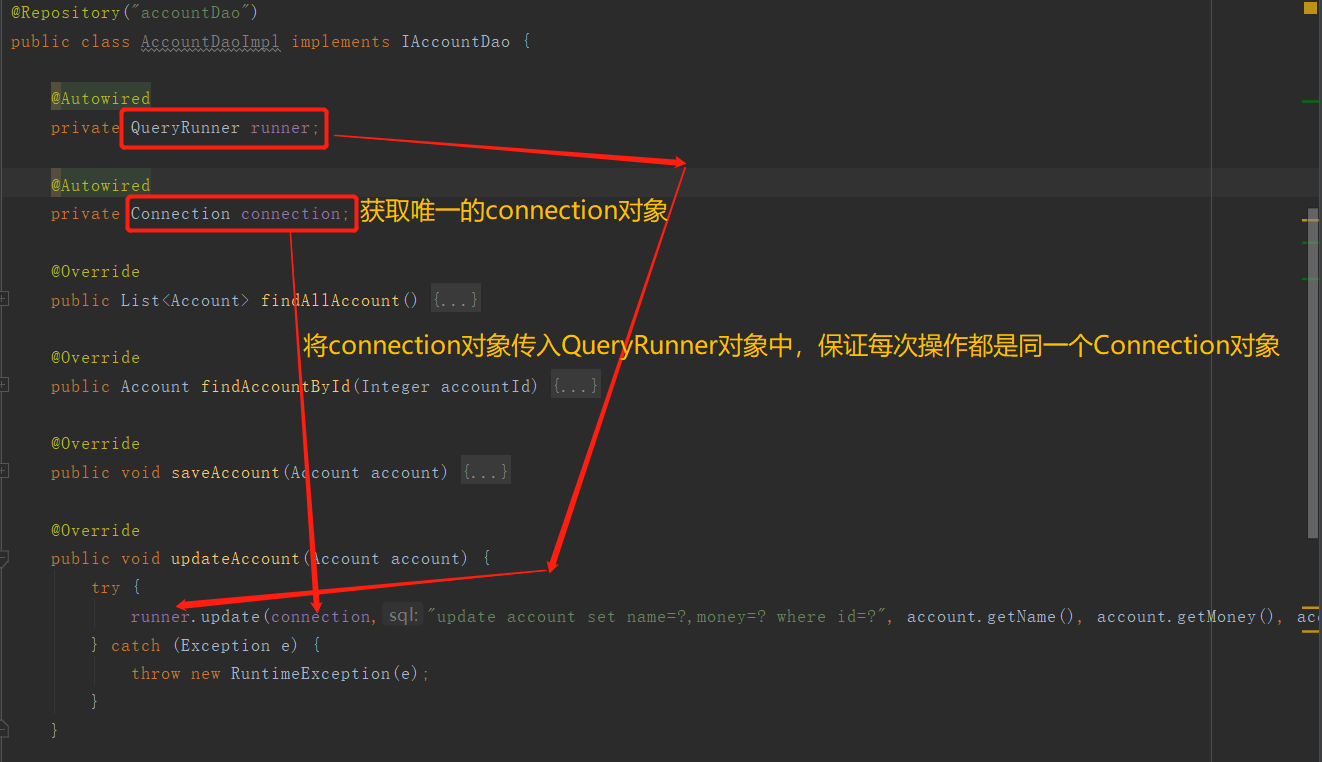
@Repository("accountDao")
public class AccountDaoImpl implements IAccountDao {
@Autowired
private QueryRunner runner;
@Override
public void updateAccount(Account account) {
try {
//此处QueryRunner对象调用update方法时,会创建一个Connection连接
runner.update("update account set name=?,money=? where id=?", account.getName(), account.getMoney(), account.getId());
} catch (Exception e) {
throw new RuntimeException(e);
}
}
@Override
public Account findAccountByNmae(String accountName) {
try {
//此处QueryRunner对象调用query方法时,会创建一个Connection连接
List<Account> accounts = runner.query("select * from account where name = ? ", new BeanListHandler<Account>(Account.class), accountName);
if (accounts == null && accounts.size() < 1) {
return null;
} else if (accounts != null && accounts.size() > 1){
throw new RuntimeException("查询到的用户多于一个");
} else {
return accounts.get(0);
}
} catch (Exception e) {
throw new RuntimeException(e);
}
}
}
以上调用过程容易出现的问题:
①、如果程序出现一个异常,之前执行的数据库的数据操作不会进行回滚。因为事务默认自动提交。
②、每次操作数据库,都会创建一个新的Connection连接,并且自动提交事务。
③、整个转账过程,创建了4个Connection对象
④、整个转账的过程,事务是分开进行的,相互独立,不具有一致性。
1.2、通过增加工具类(ConnectionUtil,TransactionManager)保证数据库连接对象Connection是单例,并且配置事务
1.1中的问题在于每次操作数据库,都会创建一个新的Connection连接,并且自动提交事务。因此,在控制事务之前,需要先保证数据库的连接对象为单例,然后再配置事务的类(TransactionManager类)等,如下所示:
- 获取单例Connection连接的类(ConnectionUtil类):
package xxx.xxx.util;

import org.springframework.beans.factory.annotation.Autowired;
import org.springframework.beans.factory.annotation.Qualifier;
import org.springframework.context.annotation.Bean;
import javax.sql.DataSource;
import java.sql.Connection;

public class ConnectionUtil {
    //获取当前线程中的Connection对象
   private ThreadLocal<Connection> tl = new ThreadLocal<Connection>();
   @Autowired
   @Qualifier("ds1")
   private DataSource ds;

   /**
    * 获取当前线程上的连接
    * */
   @Bean("connection")
   public Connection getThreadConnection(){
      Connection conn = null;
      try {
         //先从ThreadLocal的对象上获取连接connection
         conn = tl.get();
         //若当前线程上的Connection对象为null
         if (conn == null){
            //再从DataSource对象上获取connection
            conn = ds.getConnection();
            //将Connection对象存入当前线程
            tl.set(conn);
         }
      } catch (Exception e){
         e.printStackTrace();
      }
      return conn;
   }

   /**
    * 把Connection连接和线程解绑,解绑后,再将Connection对象归还到线程池
    * */
   public void removeConnection(){
      tl.remove();
   }
}
- 配置事务的类(TransactionManager类):
package xxx.xxx.util;
import org.springframework.beans.factory.annotation.Autowired;
import org.springframework.stereotype.Component;
import java.sql.Connection;
import java.sql.SQLException;

@Component("transactionManager")
public class TransactionManager {

   @Autowired
   private ConnectionUtil connUtil;

   /**
   * 开启事务
   * */
   public void beginTransaction(){
      try {
         Connection conn = connUtil.getThreadConnection();
         conn.setAutoCommit(false);
      } catch (SQLException e) {
         throw new RuntimeException(e);
      }
   }

   /**
    * 提交事务
    * */
   public void commit(){
      try {
         Connection conn = connUtil.getThreadConnection();
         conn.commit();
      } catch (SQLException e) {
         throw new RuntimeException(e);
      }
   }

   /**
    * 回滚事务
    * */
   public void rollback(){
      try {
         Connection conn = connUtil.getThreadConnection();
         conn.rollback();
      } catch (SQLException e) {
         throw new RuntimeException(e);
      }
   }

   /**
    * 释放连接事务
    * */
   public void remove(){
      try {
         connUtil.getThreadConnection().close();
         connUtil.removeConnection();
      } catch (SQLException e) {
         throw new RuntimeException(e);
      }
   }
}
- 配置DataSource数据库相关连接的类(jdbcConfig类)
package config;

import com.mchange.v2.c3p0.ComboPooledDataSource;
import org.apache.commons.dbutils.QueryRunner;
import org.springframework.beans.factory.annotation.Qualifier;
import org.springframework.beans.factory.annotation.Value;
import org.springframework.context.annotation.Bean;
import org.springframework.context.annotation.Scope;

import javax.sql.DataSource;

/**
 * 和spring连接数据库相关的配置类
 */
public class JdbcConfig {

    @Value("${jdbc.driver}")
    private String driver;

    @Value("${jdbc.url}")
    private String url;

    @Value("${jdbc.username}")
    private String username;

    @Value("${jdbc.password}")
    private String password;

    /**
     * 用于创建一个QueryRunner对象
     * @return
     */
    @Bean(name="runner")
    @Scope("prototype")
    //@Autowired   默认隐藏
    public QueryRunner createQueryRunner(){
        return new QueryRunner();
    }

    /**
     * 创建数据源对象
     * @return
     */
    @Bean(name="ds2")
    public DataSource createDataSource(){
        try {
            ComboPooledDataSource ds = new ComboPooledDataSource();
            ds.setDriverClass(driver);
            ds.setJdbcUrl(url);
            ds.setUser(username);
            ds.setPassword(password);
            return ds;
        }catch (Exception e){
            throw new RuntimeException(e);
        }
    }

    @Bean(name="ds1")
    public DataSource createDataSource1(){
        try {
            ComboPooledDataSource ds = new ComboPooledDataSource();
            ds.setDriverClass(driver);
            ds.setJdbcUrl("jdbc:mysql://localhost:3306/spring");
            ds.setUser(username);
            ds.setPassword(password);
            return ds;
        }catch (Exception e){
            throw new RuntimeException(e);
        }
    }
}
- spring的加载类:
package config;

import xxx.xxx.util.ConnectionUtil;
import org.springframework.context.annotation.ComponentScan;
import org.springframework.context.annotation.Configuration;
import org.springframework.context.annotation.Import;
import org.springframework.context.annotation.PropertySource;

@Configuration
@ComponentScan({"xxx.xxx.util","xxx.xxx"})
//将单例Connection连接的ConnectionUtil类,作为配置加载进spring容器
@Import({JdbcConfig.class, ConnectionUtil.class})
@PropertySource("classpath:jdbcConfig.properties")
public class SpringConfiguration {
}
- 配置数据库连接信息的jdbcConfig.properties文件
jdbc.driver=com.mysql.jdbc.Driver
jdbc.url=jdbc:mysql://localhost:3306/spring
jdbc.username=root
jdbc.password=root
- 在之前的AccountServiceImpl类中,增加如下事务配置
@Override
public void transfer(String sourceName, String targetName, float money) {
   try {
      //1.开启事务
      transactionManager.beginTransaction();
      Account source = accountDao.findAccountByNmae(sourceName);
      Account target = accountDao.findAccountByNmae(targetName);
      source.setMoney(source.getMoney() - money);
      target.setMoney(target.getMoney() + money);

      accountDao.updateAccount(source);
      int i = 1 / 0;
      accountDao.updateAccount(target);

      //2.提交事务
      transactionManager.commit();
   } catch (Exception e) {
      //3.事务回滚
      transactionManager.rollback();
      System.out.println("转账失败,事务回滚");
      throw new RuntimeException(e);
   } finally {
      //4.释放线程的连接
      transactionManager.remove();
   }
}
经过上面的连接对象ConnectionUtil,TransactionManager....等配置,就完成了事务控制
- Spring的bean.xml配置文件
<?xml version="1.0" encoding="UTF-8"?>
<beans xmlns="http://www.springframework.org/schema/beans"
       xmlns:xsi="http://www.w3.org/2001/XMLSchema-instance"
       xmlns:aop="http://www.springframework.org/schema/aop"
       xsi:schemaLocation="http://www.springframework.org/schema/beans
        http://www.springframework.org/schema/beans/spring-beans.xsd
        http://www.springframework.org/schema/aop
        http://www.springframework.org/schema/aop/spring-aop.xsd">

     <!-- 配置Service -->
    <bean id="accountService" class="xxx.xxx.service.impl.AccountServiceImpl">
        <!-- 注入dao -->
        <property name="accountDao" ref="accountDao"></property>
    </bean>

    <!--配置Dao对象-->
    <bean id="accountDao" class="xxx.xxx.dao.impl.AccountDaoImpl">
        <!-- 注入QueryRunner -->
        <property name="runner" ref="runner"></property>
        <!-- 注入ConnectionUtils -->
        <property name="connectionUtils" ref="connectionUtils"></property>
    </bean>

    <!--配置QueryRunner-->
    <bean id="runner" class="org.apache.commons.dbutils.QueryRunner" scope="prototype"></bean>

    <!-- 配置数据源 -->
    <bean id="dataSource" class="com.mchange.v2.c3p0.ComboPooledDataSource">
        <!--连接数据库的必备信息-->
        <property name="driverClass" value="com.mysql.jdbc.Driver"></property>
        <property name="jdbcUrl" value="jdbc:mysql://localhost:3306/spring"></property>
        <property name="user" value="root"></property>
        <property name="password" value="root"></property>
    </bean>

    <!-- 配置Connection的工具类 ConnectionUtils -->
    <bean id="connectionUtils" class="xxx.xxx.utils.ConnectionUtils">
        <!-- 注入数据源-->
        <property name="dataSource" ref="dataSource"></property>
    </bean>

    <!-- 配置事务管理器-->
    <bean id="txManager" class="xxx.xxx.utils.TransactionManager">
        <!-- 注入ConnectionUtils -->
        <property name="connectionUtils" ref="connectionUtils"></property>
    </bean>

    <!--配置aop-->
    <aop:config>
        <!--配置通用切入点表达式-->
        <aop:pointcut id="pt1" expression="execution(* xxx.xxx.service.impl.*.*(..))"></aop:pointcut>
        <aop:aspect id="txAdvice" ref="txManager">
            <!--配置前置通知:开启事务-->
            <aop:before method="beginTransaction" pointcut-ref="pt1"></aop:before>
            <!--配置后置通知:提交事务-->
            <aop:after-returning method="commit" pointcut-ref="pt1"></aop:after-returning>
            <!--配置异常通知:回滚事务-->
            <aop:after-throwing method="rollback" pointcut-ref="pt1"></aop:after-throwing>
            <!--配置最终通知:释放连接-->
            <aop:after method="release" pointcut-ref="pt1"></aop:after>
        </aop:aspect>
    </aop:config>
</beans>
- Maven的pom.xml配置文件
<?xml version="1.0" encoding="UTF-8"?>
<project xmlns="http://maven.apache.org/POM/4.0.0"
         xmlns:xsi="http://www.w3.org/2001/XMLSchema-instance"
         xsi:schemaLocation="http://maven.apache.org/POM/4.0.0 http://maven.apache.org/xsd/maven-4.0.0.xsd">
    <modelVersion>4.0.0</modelVersion>

    <groupId>xxx.xxx</groupId>
    <artifactId>Spring04_account_AopTx</artifactId>
    <version>1.0-SNAPSHOT</version>
    <build>
        <plugins>
            <plugin>
                <groupId>org.apache.maven.plugins</groupId>
                <artifactId>maven-compiler-plugin</artifactId>
                <configuration>
                    <source>6</source>
                    <target>6</target>
                </configuration>
            </plugin>
        </plugins>
    </build>
    <packaging>jar</packaging>

    <dependencies>
        <dependency>
            <groupId>org.springframework</groupId>
            <artifactId>spring-context</artifactId>
            <version>5.0.2.RELEASE</version>
        </dependency>
        <dependency>
            <groupId>org.springframework</groupId>
            <artifactId>spring-test</artifactId>
            <version>5.0.2.RELEASE</version>
        </dependency>
        <dependency>
            <groupId>commons-dbutils</groupId>
            <artifactId>commons-dbutils</artifactId>
            <version>1.4</version>
        </dependency>

        <dependency>
            <groupId>mysql</groupId>
            <artifactId>mysql-connector-java</artifactId>
            <version>5.1.6</version>
        </dependency>

        <dependency>
            <groupId>c3p0</groupId>
            <artifactId>c3p0</artifactId>
            <version>0.9.1.2</version>
        </dependency>

        <dependency>
            <groupId>junit</groupId>
            <artifactId>junit</artifactId>
            <version>4.12</version>
        </dependency>
        <dependency>
            <groupId>org.aspectj</groupId>
            <artifactId>aspectjweaver</artifactId>
            <version>1.8.7</version>
        </dependency>
        <dependency>
            <groupId>org.springframework</groupId>
            <artifactId>spring-tx</artifactId>
            <version>5.0.2.RELEASE</version>
        </dependency>
    </dependencies>

</project>
- 进行测试:
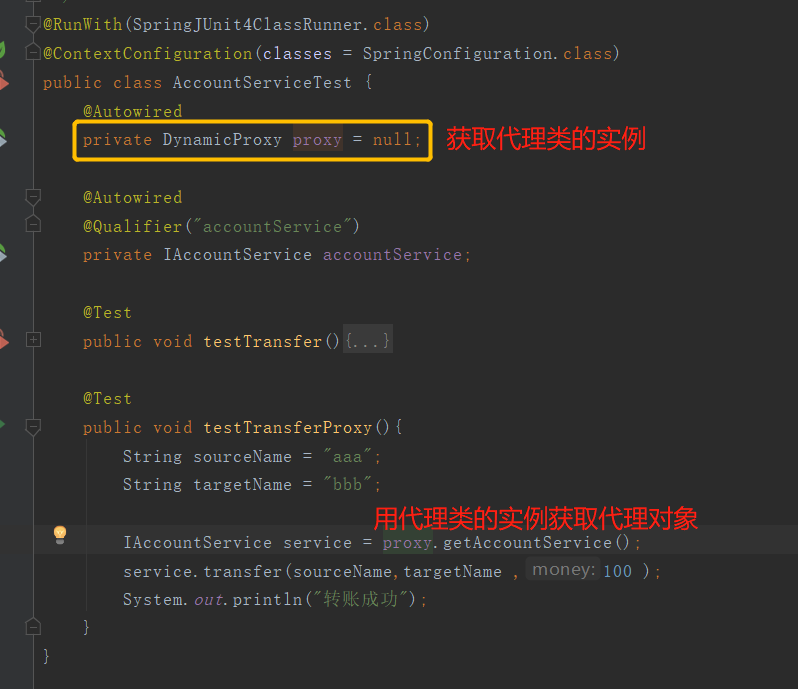
//spring整合junit注解
@RunWith(SpringJUnit4ClassRunner.class)
//加载配置类 的注解
@ContextConfiguration(classes = SpringConfiguration.class)
public class AccountServiceTest {
    @Autowired
   @Qualifier("accountService")
   private IAccountService accountService;

    @Test
   public void testTransfer(){
      String sourceName = "aaa";
      String targetName = "bbb";

      accountService.transfer(sourceName,targetName ,100 );
      System.out.println("转账成功");
   }
}
测试结果:如果出现了程序异常,则数据库进行回滚操作
二、动态代理
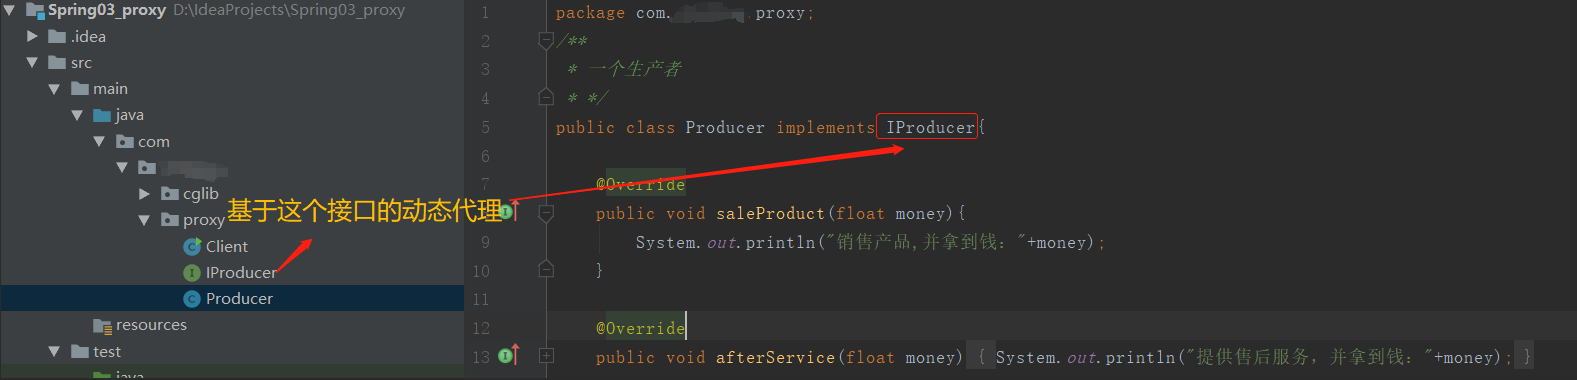
2.1、基于接口的动态代理,JDK的Proxy.newProxyInstance()函数
被代理对象的结构,如下图所示:
实现代理的代码,如下所示:
- 接口
package xxx.xxx.proxy;

public interface IProducer {
	public void saleProduct(float money);

	public void afterService(float money);
}
- 实现了上面接口的具体class
package xxx.xxx.proxy;
/**
 * 一个生产者
 * */
public class Producer implements IProducer{

	@Override
	public void saleProduct(float money){
		System.out.println("销售产品,并拿到钱:"+money);
	}

	@Override
	public void afterService(float money){
		System.out.println("提供售后服务,并拿到钱:"+money);
	}
}
- JDK原生的动态代理
package xxx.xxx.proxy;
import java.lang.reflect.InvocationHandler;
import java.lang.reflect.Method;
import java.lang.reflect.Proxy;
public class Client {
public static void main(String[] args) {
final Producer producer = new Producer();
/**
* 动态代理:
* 特点:字节码随用随创建,随用随加载
* 作用:不修改源码的基础上,对方法进行增强
* 分类:
* 基于接口的动态代理
* 基于实现类的动态代理
* 基于接口的动态代理:
* 涉及的类:Proxy,JDK官方提供
* 如何创建:
* 使用Proxy类中的newProxyInstance方法
* 创建代理对象的要求:
* 被代理对象至少实现一个接口,如果没有则不能使用
* newProxyInstance方法的参数:
* ClassLoader:类加载器
* 它是用于加载代理对象字节码的,和被代理对象使用相同的类加载器。固定写法
* Class[]:字节码数组
* 它是用于让代理对象和被代理对象有相同的方法,固定写法
* InvocationHandler:
* 它是让我们写如何代理,我们一般都是写一个该接口的实现类,通常情况下都是匿名内部类,但不是必须的。
* 此接口的实现类都是谁用谁写。
* */
IProducer proxyProducer = (IProducer)Proxy.newProxyInstance(producer.getClass().getClassLoader(), producer.getClass().getInterfaces(), new InvocationHandler() {
/**
* 作用:执行被代理对象的任何接口方法都会经过该方法
* 方法参数的定义:
* proxy:代理对象的引用
* method:当前执行的方法
* args:当前执行方法所需要的参数
* 返回值Object:和被代理对象的方法有相同的返回值
* */
@Override
public Object invoke(Object proxy, Method method, Object[] args) throws Throwable {
Object returnValue = null;
//1.获取方法执行的参数,进行了自动装箱和自动拆箱
float money = (Float) args[0];
//2.判断方法名称,进行不同代理
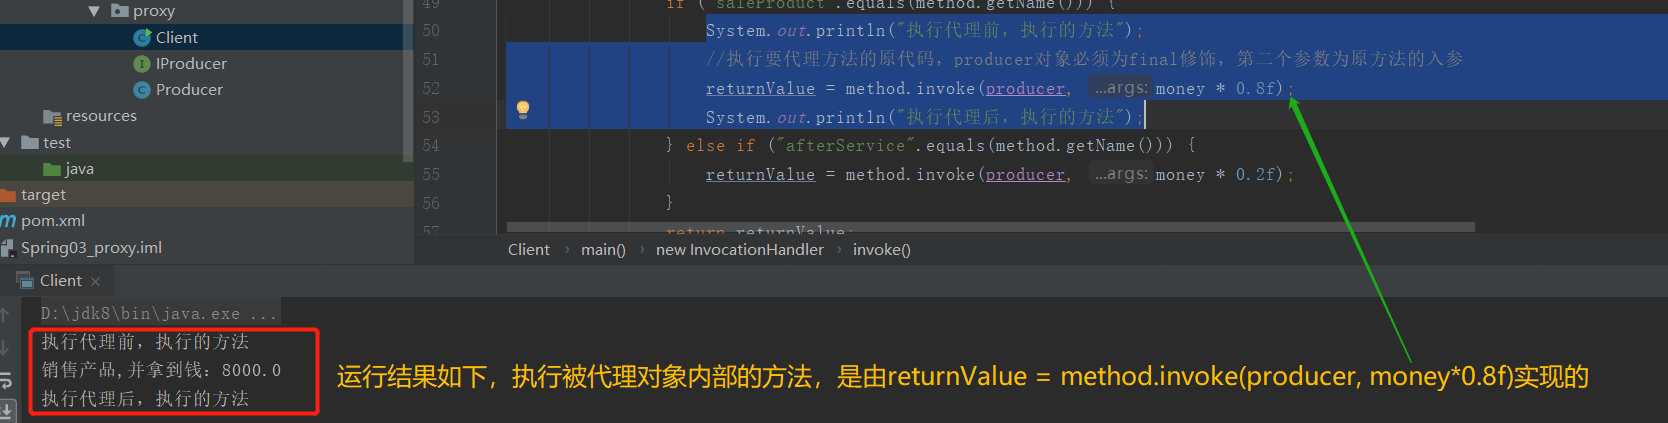
if ("saleProduct".equals(method.getName())) {
System.out.println("执行代理前,执行的方法");
//执行要代理方法的原代码,producer对象必须为final修饰,第二个参数为原方法的入参
returnValue = method.invoke(producer, money * 0.8f);
System.out.println("执行代理后,执行的方法");
} else if ("afterService".equals(method.getName())) {
returnValue = method.invoke(producer, money * 0.2f);
}
return returnValue;
}
});
//用代理对象执行方法
proxyProducer.saleProduct(10000f);
}
}
上述代码的执行结果,如下所示:
2.2、基于实现类的动态代理cglib工具类
首先需要cglib的jar包,导入如下pom文件的坐标
<dependencies>
    <dependency>
        <groupId>cglib</groupId>
        <artifactId>cglib</artifactId>
        <version>2.1_3</version>
    </dependency>
</dependencies>
被代理对象的结构,如下图所示:

实现代理的代码,如下所示:
- 不需要实现接口的class
package com.chelong.cglib;

/**
 * 一个生产者
 * */
public class Producer {

	public void saleProduct(float money){
		System.out.println("销售产品,并拿到钱:"+money);
	}

	public void afterService(float money){
		System.out.println("提供售后服务,并拿到钱:"+money);
	}
}
- 基于第三方工具Cglib的动态代理
package xxx.xxx.cglib;
import xxx.xxx.proxy.Producer;
import net.sf.cglib.proxy.Enhancer;
import net.sf.cglib.proxy.MethodInterceptor;
import net.sf.cglib.proxy.MethodProxy;
import java.lang.reflect.Method;
public class Client {
public static void main(String[] args) {
final Producer producer = new Producer();
/**
* 动态代理:
* 特点:字节码随用随创建,随用随加载
* 作用:不修改源码的基础上,对方法进行增强
* 分类:
* 基于接口的动态代理
* 基于实现类的动态代理
* 基于普通类的动态代理:
* 涉及的类:Enhancer,第三方类库Cglib提供
* 如何创建:
* 使用Enhancer类中的create方法
* 创建代理对象的要求:
* 被代理对象不能是最终类
* create方法的参数:
* Class:字节码
* 它是用于指定被代理对象的字节码
* Callback:用于提供增强的代码
* 它是让我们写如何代理,我们一般都是写一个该接口的实现类,通常情况下都是匿名内部类(通产情况)。
* 此接口的实现类都是谁用谁写。
* 我们一般写该接口的子接口的实现类:MethodInterceptor
* */
//匿名内部类 new MethodInterceptor
Producer cglibProducer = (Producer) Enhancer.create(producer.getClass(), new MethodInterceptor() {
/**
* 作用:执行被代理对象的任何接口方法都会经过该方法
* 方法参数的定义:
* o:代理对象的引用
* method:当前执行的方法
* objects:当前执行方法所需要的参数
* methodProxy:当前执行方法的代理对象
* 返回值Object:和被代理对象的方法有相同的返回值
* */
@Override
public Object intercept(Object o, Method method, Object[] objects, MethodProxy methodProxy) throws Throwable {
Object returnValue = null;
float money = (Float) objects[0];
if ("saleProduct".equals(method.getName())) {
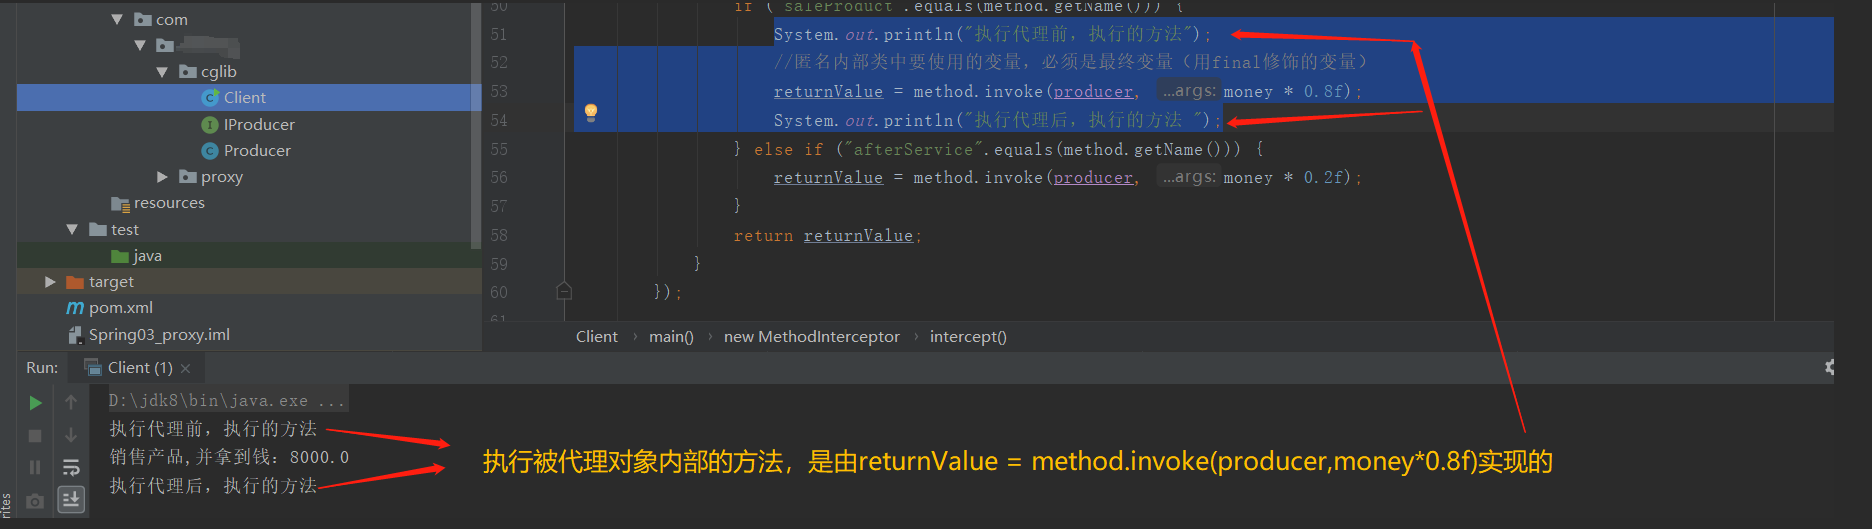
System.out.println("执行代理前,执行的方法");
//执行要代理方法的原代码,producer对象必须为final修饰,第二个参数为原方法的入参
returnValue = method.invoke(producer, money * 0.8f);
System.out.println("执行代理后,执行的方法");
} else if ("afterService".equals(method.getName())) {
returnValue = method.invoke(producer, money * 0.2f);
}
return returnValue;
}
});
//用代理对象执行方法
cglibProducer.saleProduct(10000);
}
}
上述代码的执行结果,如下所示:
三、事务控制结合动态代理
- 将编写基于IAccountService接口的DynamicProxy代理类
package xxx.xxx.proxy;
import xxx.xxx.service.IAccountService;
import xxx.xxx.util.TransactionManager;
import org.springframework.beans.factory.annotation.Autowired;
import org.springframework.beans.factory.annotation.Qualifier;
import org.springframework.stereotype.Component;
import javax.annotation.Resource;
import java.lang.reflect.InvocationHandler;
import java.lang.reflect.Method;
import java.lang.reflect.Proxy;

@Component("dynamicProxy")
public class DynamicProxy {

   @Autowired
   @Qualifier("accountServiceProxy")
   private final IAccountService accountService = null;

   @Resource(name = "transactionManager")
   private TransactionManager transactionManager;


   public IAccountService getAccountService(){
      IAccountService accountServiceProxy = (IAccountService)Proxy.newProxyInstance(accountService.getClass().getClassLoader(), accountService.getClass().getInterfaces(),
            new InvocationHandler() {
               @Override
               public Object invoke(Object proxy, Method method, Object[] args) throws Throwable {
                  Object returnValue = null;
                  //1.开启事务
                  try {
                     transactionManager.beginTransaction();
                     //被代理对象中,要执行的内容
                     returnValue = method.invoke(accountService, args);
                     //2.提交事务
                     transactionManager.commit();
                     return returnValue;
                  } catch (Exception e) {
                     //3.事务回滚
                     transactionManager.rollback();
                     System.out.println("操作失败,有异常,事务回滚...");
                     throw new RuntimeException(e);
                  } finally {
                     //4.释放线程的连接
                     transactionManager.remove();
                  }
               }
            });
    //返回代理对象
      return accountServiceProxy;
   }
}
-
在dao层做下面的处理
![clipboard]()
-
测试
![clipboard]()
测试结果:如果出现了程序异常,则数据库进行回滚操作

 浙公网安备 33010602011771号