
在Ubuntu下运行PQUIC
官网教程:https://pquic.org/
PQUIC简介
PQUIC (Pluginized quic),即插件化QUIC,是一个框架,使QUIC客户端和服务器能够动态地交换协议插件(可以在每个连接的基础上扩展协议)。其中,QUIC(Quick UDP Internet Connection)是谷歌制定的一种基于UDP的低时延的互联网传输层协议。
运行步骤
在教程中,假设我们的工作目录为working_dir
Step 1:编译PQUIC
首先,需要clone picotls,picotls提供PQUIC所基于的TLS实现,picotls自身需要openssl
$ sudo apt install libssl-dev  # or dnf install openssl-devel
$ cd working_dir
$ git clone https://github.com/p-quic/picotls.git
$ cd picotls
# the following instructions just come from the picotls README
$ git submodule init
# 初始化本地配置文件
$ git submodule update
# 从该项目中抓取所有数据并检出父项目中列出的合适的提交
$ cmake .
# 如果缺少依赖,cmake可能失败,下载这些依赖之后重试cmake
$ make
# once picotls is compiled, just go back to the working directory
$ cd ..
# 应该回到目录working_dir
在picotls准备好之后,可以用下面的命令编译pquic
$ git clone https://github.com/p-quic/pquic
$ cd pquic
# install libarchive, used for the plugin exchange (on Fedora, dnf install libarchive-devel)
$ sudo apt install libarchive-dev
# fetch and compile ubpf, the virtual machine used within PQUIC
$ git submodule update --init
$ cd ubpf/vm
$ make
# make might generate warnings, but should compile
$ cd ../..
# compile michelfralloc dependency to handle memory
$ cd picoquic/michelfralloc
$ make
$ cd ../..
# also install gperftools, required in the current build process (on Fedora, dnf install gperftools)
$ sudo apt install google-perftools
$ cmake .
# if all the dependencies are present, cmake should not report any issue
$ make
这一步结束时,应该生成了多个可执行文件,包括picoquicdemo,可以充当PQUIC客户端和服务器
Step 2:检查picoquicdemo的运行
在进一步实验前,先检查我们编译好的代码可以交换数据。根据提供的参数,picoquicdemo可以用作(P)QUIC客户端或(P)QUIC服务器,接下来我们生成第一个连接。
我们打开两个不同的终端,首先,在一个终端中,我们用下面的命令来运行服务器:
$ cd working_dir/pquic
$ ./picoquicdemo
Starting PicoQUIC server on port 4443, server name = ::, just_once = 0, hrr= 0, 0 local plugins and 0 both plugins
接着在另一个终端中按如下命令运行客户端:
$ cd working_dir/pquic
$ ./picoquicdemo ::1 4443
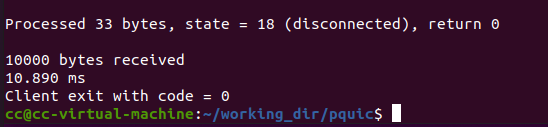
会显示大量的日志,但在客户端的最后一行,我们应该看到连接是成功完成的且没有报错,效果如下图:
(服务器端)

(客户端执行./picoquicdemo ::1 4443)

Step 3:编译第一个插件
现在基础的实现工作正常,我们可以做一点修改,让它可以通过前向纠错来保护交换的数据。fec插件实现了这一点,但首先,我们需要把它编译成eBPF代码。
编译过程需要clang-6.0和llc-6.0,可以根据https://apt.llvm.org/中的内容进行下载。更新的版本也可用,但在本实验中,需要在Makefile中对CLANG和LLC变量进行修改。准备好之后,可以用以下命令对fec插件进行编译:
$ cd working_dir/pquic
$ cd plugins/fec
$ make
# if it raises an error about clang-6.0 not found, update the CLANG and LLC variables in Makefile
生成了几个对象文件,每个都是包含实现插件行为的eBPF代码的ELF文件,我们可以在PQUIC中插入这些文件
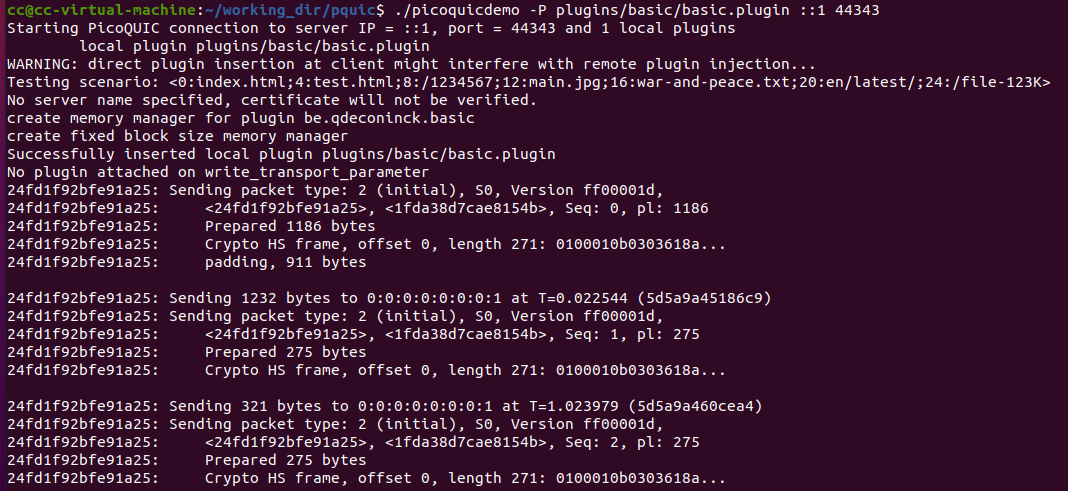
Step 4:在PQUIC中运行第一个插件
与第一次运行picoquicdemo一样,打开两个终端,首先,在一个终端运行带有fec插件的服务器:
$ cd working_dir/pquic
$ ./picoquicdemo -P plugins/fec/fec.plugin
Starting PicoQUIC server on port 4443, server name = ::, just_once = 0, hrr= 0, 1 local plugins and 0 both plugins
	local plugin plugins/fec/fec.plugin
在另一个终端,运行带有fec插件的客户端。在这里为了更简单的日志处理,我们使用-G和-4选项,将传输交换限制在10KB
$ cd working_dir/pquic
$ ./picoquicdemo -4 -G 10000 -P plugins/fec/fec.plugin ::1 4443
查看客户端的日志可以看到,新帧SFPID FRAME在连接上使用。这些帧对于注入的fec插件是特殊的,说明我们在这个连接中成功注入了前向纠错。
问题与解决方法
1.找不到-lprofiler
在运行Compiling PQUIC的最后一步make时,出现报错
/usr/bin/ld:找不到 -lprofiler

解决方法:
使用sudo apt install mlocate命令下载locate之后,查看locate libprofiler

可以看到,存在libprofiler.so.***文件,但不存在libprofiler.so文件,所以需要新建一个软链接
cd /usr/lib/x86_64-linux-gnu/
//进入对应目录
sudo ln -s libprofiler.so.0 libprofiler.so
//新建一个libprofiler.so的软链接,链接到已有的libprofiler.so.***文件
ll libprofiler.so*
//完成后可以查看是否成功
效果如图:

重新回到/working_dir/pquic执行make命令,编译成功:

2.编译plugin时的clang,llc版本问题
直接运行make很可能报错,提示找不到clang-6.0和llc-6.0
解决方法一:
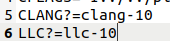
查看系统中安装的clang和llc的版本号(在/usr/bin下执行ls命令即可),在Makefile中修改变量的值,如图所示:
解决方法二:
如果已经安装了clang-6.0和llc-6.0,但--version时显示的版本是更高的版本,可以将默认的版本改成6.0
参考链接:https://blog.csdn.net/DumpDoctorWang/article/details/84567757
拓展
运行basic,和运行fec插件是同理的,要先进到plugins/basic下执行一个make之后,再执行运行的命令
效果如图:
(服务器端)

(客户端)

 浙公网安备 33010602011771号