Linux(centos)系统下安装fastdfs安装部署步骤,问题复现 并在java中集成测试demo
试验环境,所以打算把跟踪器和存储器安装到同一台实例上
FastDFS_v5.05.tar.gz (FastDFS安装包)
libfastcommonV1.0.7.tar.gz (FastDFS依赖程序)
nginx-1.8.0.tar.gz (nginx安装包,用于做文件请求http代理服务器)
fastdfs-nginx-module_v1.16.tar.gz (nginx和fastdfs的桥梁插件模块)
安装包路径:
链接:https://pan.baidu.com/s/1sR1FbaFOg0WJ2GejsaqZBw
提取码:4dxf
2、安装C/C++ 编译环境
yum -y install libevent
3、安装 libfastcommon
cd /usr/local/fastdfs
tar -zxf libfastcommonV1.0.7.tar.gz
cd libfastcommon-1.0.7
./make.sh
./make.sh install
cp /usr/lib64/libfastcommon.so /usr/lib
cd /usr/local/fastdfs
tar -zxf FastDFS_v5.05.tar.gz
cd FastDFS
./make.sh
./make.sh install
cd conf
cp * /etc/fdfs
5、编辑/etc/fdfs/tracker.conf
vi /etc/fdfs/tracker.conf
base_path=/usr/local/fastdfs/FastDFS/tracker
/usr/bin/fdfs_trackerd /etc/fdfs/tracler.conf
7、配置storage节点
vi /etc/fdfs/storage.conf
base_path=/usr/local/fastdfs/FastDFS/storage
store_path0=/usr/local/fastdfs/FastDFS/storage
tracker_server = 192.168.0.107:22122
8、启动storage节点
/usr/bin/fdfs_storaged/etc/fdfs/storage.conf
可能会出现的问题
[2019-06-18 15:51:26] ERROR - file: shared_func.c, line: 968, file /storage.conf not exist
[2019-06-18 15:51:26] ERROR - file: storage_func.c, line: 1079, load conf file "storage.conf" fail, ret code: 2
[2019-06-18 15:51:26] CRIT - exit abnormally!
最后把设置文件移到/etc/fdfs下,再执行就好了
执行 fdfs_storaged /etc/fdfs/storage.conf 节点的启动 重启 关闭方式 点击 https://blog.csdn.net/weixin_40576010/article/details/88900810
9、配置测试
cd /usr/local/fastdfs//FastDFS/client/
cp libfastclient.so /usr/lib
10、修改测试配置文件
base_path=/usr/local/fastdfs/FastDFS/client
tracker_server=192.168.0.107:22122
11、测试上传
/usr/bin/fdfs_test /etc/fdfs/client.conf upload /root/hi.html
可能会出现的错误
文件夹没有

该错误是 /etc/fdfs 的storage.conf配置文件出错。

修改storage.conf中的store_path0=xx ,xx为你自定义的文件存储位置,路径必须存在
store_path0=/home/fastdfs/storage
改 store_path0=你的路径(必须存在)
配置完需重启。
二 本地上传文件到FastDFS命令上传报错:ERROR - file: connection_pool.c, line: 130, connect to 47.96.88.***:22122 fail
报错的完整信息:ERROR - file: connection_pool.c, line: 130, connect to 47.96.88.***:22122 fail, errno: 110, error info: Connection timed out
问题分析:错误信息提示错误的原因为连接超时,连接超时有两种可能的原因,一种是云服务器拒绝我们的访问,另一种是我们服务器电脑开启了开机启动防火墙。
注:不管你进行什么操作,只要是报了类似连接失败错误代号,大部分都是由于两种原因造成
解决方法一:
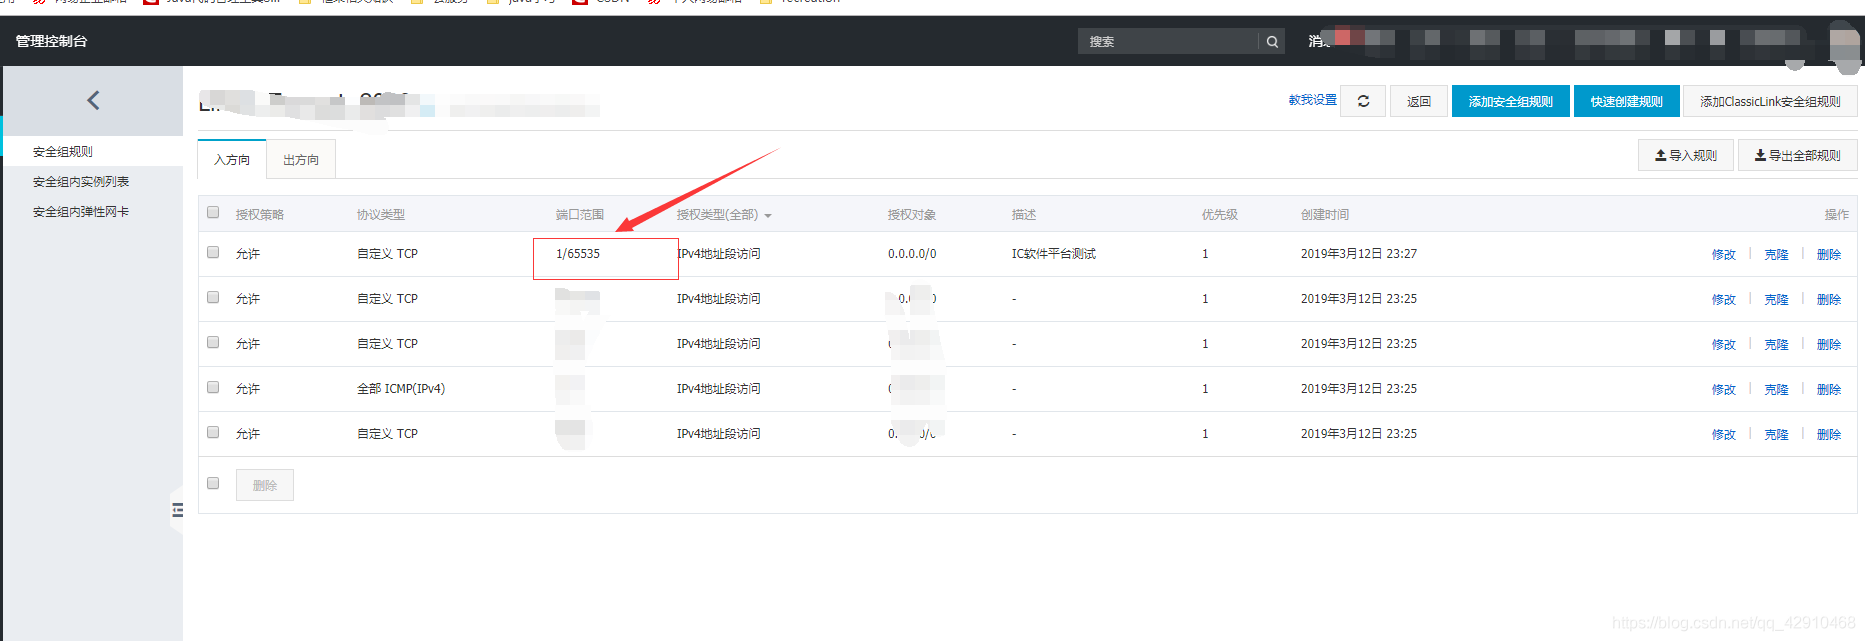
故先检查云服务是否对我们的23000端口(FastDFS的默认端口)进行了拦截,有的话创建安全组对该端口进行放行应用到实例上再次上传就能解决上传成功(lz由于阿里云配置较低,故放行所有端口)。
解决方法二:
由于出现该问题的原因是因为自己的防火墙没有开启,故开启防火墙即可解决问题,Linux上的指令如下:
1、关闭防火墙:
sudo systemctl stop firewalld.service
2、关闭开机启动:
sudo systemctl disable firewalld.service12、安装nginx
yum install -y pcre pcre-devel
yum install -y zlib zlib-devel
yum install -y openssl openssl-devel
13、解压fastdfs-nginx-module_v1.16.tar.gz
tar -zxf fastdfs-nginx-module_v1.16.tar.gz
14、修改fastdfs-nginx-module/src/config配置文件
修改为:CORE_INCS="$CORE_INCS /usr/include/fastdfs /usr/include/fastcommon/"
把CORE_LIBS="$CORE_LIBS -L/usr/local/lib -lfastcommon -lfdfsclient"
修改为:CORE_LIBS="$CORE_LIBS -L/usr/lib -lfastcommon -lfdfsclient"
实际就是把路径中的local这一层删除掉
并编辑
cp mod_fastdfs.conf /etc/fdfs/
tracker_server=192.168.0.107:22122
url_have_group_name = true
storage_server_port=23000
group_name=group1
store_path0=/usr/local/fastdfs/FastDFS/storage
16、安装nginx
cd /usr/local/fastdfs
tar -zxf nginx-1.8.0.tar.gz
cd nginx-1.8.0
./configure --add-module=/usr/local/fastdfs/fastdfs-nginx-module/src
make
make install
17、配置nginx
cd /usr/local/nginx/conf
vim nginx.conf
server{
listen 80;
server_name localhost;
location /group1/M00/{
ngx_fastdfs_module;
}
}
18、重启nginx
/usr/local/nginx/sbin/nginx
配置步骤原文链接 https://www.cnblogs.com/qiaolizhi/p/12461901.html
java集成fastDFS
java代码部分
2.1 引入相关依赖包
<groupId>com.github.tobato</groupId>
<artifactId>fastdfs-client</artifactId>
<version>1.26.5</version>
</dependency>
2.2 FDFS 配置类
@Configuration@Import(FdfsClientConfig.class) // 导入FastDFS-Client组件
@EnableMBeanExport(registration = RegistrationPolicy.IGNORE_EXISTING) // 解决jmx重复注册bean的问题
public class FdfsConfiguration {}
2.3 配置文件
# 分布式文件系统fastdfs配置
fdfs:
# socket连接超时时长
 soTimeout: 1500
# 连接tracker服务器超时时长
connectTimeout: 600
# nginx 访问的地址和端口
reqHost: 114.55.164.189
reqPort: 80
pool:
# 从池中借出的对象的最大数目
max-total: 153
# 获取连接时的最大等待毫秒数100
max-wait-millis: 102
# 缩略图生成参数,可选
thumbImage:
width: 150
height: 150
# 跟踪服务器tracker_server请求地址,支持多个,这里只有一个,如果有多个在下方加- x.x.x.x:port
trackerList:   - 114.55.164.189:22122
# # 存储服务器storage_server访问地址
 web-server-url: http://114.55.164.189:80/
配置文件看不明白可以直接点击原文 出处https://juejin.im/post/6869982744529600519#heading-7
2.4 读取配置文件的实体类
@Data@ConfigurationProperties(prefix = "fdfs",ignoreInvalidFields = true)@Slf4jpublic class FastdfsProperties implements InitializingBean { private String reqHost; private String reqPort; private String webServerUrl; private String soTimeout; @Override public void afterPropertiesSet() throws Exception { log.debug("fdfs.reqHost is {},fdfs.reqPort is {},fdfs.webServerUrl is {}",getReqHost(),getReqPort(),getWebServerUrl()); if (StringUtils.isBlank(getReqHost())) { throw new IllegalStateException("Property \"fdfs.reqHost\" cannot be blank"); } if (StringUtils.isBlank(getReqPort())) { throw new IllegalStateException("Property \"fdfs.reqPort\" cannot be blank"); } if (StringUtils.isBlank(getWebServerUrl())) { throw new IllegalStateException("Property \"fdfs.webServerUrl\" cannot be blank"); } if (StringUtils.isBlank(getSoTimeout())) { throw new IllegalStateException("Property \"fdfs.soTimeout\" cannot be blank"); } }}
「注意启动类需要添加自动加载配置类注解」
@EnableConfigurationProperties({ApplicationProperties.class,FastdfsProperties.class})
 浙公网安备 33010602011771号