
Spring Boot快速掌握(1):核心技术
.jpg) Spring Boot 是 Spring 开源组织下的子项目,是 Spring 组件一站式解决方案,主要是简化了使用 Spring 的难度,简省了繁重的配置,提供了各种启动器,开发者能快速上手。
Spring Boot 是 Spring 开源组织下的子项目,是 Spring 组件一站式解决方案,主要是简化了使用 Spring 的难度,简省了繁重的配置,提供了各种启动器,开发者能快速上手。
一、Spring Boot入门
1.Spring Boot简介
Spring Boot makes it easy to create stand-alone, production-grade Spring based Applications that you can “just run”.We take an opinionated view of the Spring platform and third-party libraries so you can get started with minimum fuss. Most Spring Boot applications need minimal Spring configuration.
Spring Boot 是 Spring 开源组织下的子项目,是 Spring 组件一站式解决方案,主要是简化了使用 Spring 的难度,简省了繁重的配置,提供了各种启动器,开发者能快速上手。
- 简化Spring应用开发的一个框架;
- 整个Spring技术栈的一个大整合;
- J2EE开发的一站式解决方案;
2.微服务
首先,认识一下这位大佬

2014 Martin Fowler https://martinfowler.com/tags/microservices.html
微服务:架构风格(服务微化)
一个应用是一组小型服务;可以通过HTTP的方式进行互通;
单体应用:All In One
微服务: 每一个功能元素都是一个可独立替换和独立升级的软件单元;
3.Spring Boot AreYouOk
一个功能:
向服务器发送AreYouOk请求,服务器接收请求并处理,响应3Q,I'm very ok!字符串;
3.1.使用Spring Initializer创建一个Spring Boot项目
3.2.编写一个主程序,启动Spring Boot应用
/**
 * AreYouOkApplication
 * ·@SpringBootApplication 用来标注一个主程序类,说明这是一个Spring Boot应用
 * @author 78698
 */
@SpringBootApplication
public class AreYouOkApplication {

    public static void main(String[] args) {
        /**
         * Spring Boot应用启动
         */
        SpringApplication.run(AreYouOkApplication.class, args);
    }

}
3.3.编写相关的Controller
/**
 * 描述:控制层类
 * ·@Controller注解 标注此类为控制层类,同时让Spring Boot容器管理起来。
 * ·@RequestMapping注解 是用来处理请求地址映射的注解,可用于类或方法上。
 *  用于类上,表示类中的所有响应请求的方法都是以该地址作为父路径。
 * @author 78698
 */
//@Controller
//@ResponseBody
@RestController

public class AreYouOkController {

    @RequestMapping("/areYouOk")
    public String areYouOk(){
        return "3Q,I'm very ok!";
    }

}
3.4.运行主程序,进行测试
服务启动成功之后在浏览器中访问如下地址,服务响应返回:3Q,I'm very ok!
http://localhost:8080/areYouOk
问:运行 Spring Boot 有哪几种方式?
3.5.简化部署
将本应用打包成一个可执行的jar包,直接使用" java -jar "的命令运行
在pom.xml文件中:
<!-- 本插件可以将应用打包成一个可执行的jar包 -->
    <build>
        <plugins>
            <plugin>
                <groupId>org.springframework.boot</groupId>
                <artifactId>spring-boot-maven-plugin</artifactId>
            </plugin>
        </plugins>
    </build>
问:Spring Boot 打成的 jar 和普通的 jar 有什么区别 ?
java -jar xxx.jar 命令来运行,这种 jar 不可以作为普通的 jar 被其他项目依赖,即使依赖了也无法使用其中的类。\BOOT-INF\classes 目录下才是我们的代码,因此无法被直接引用。如果非要引用,可以在 pom.xml 文件中增加配置,将 Spring Boot 项目打包成两个 jar ,一个可执行,一个可引用。4.Spring Boot AreYouOk 探究
4.1.POM文件
4.1.1.父项目
问:spring-boot-starter-parent 有什么用 ?
答:我们都知道,新创建一个 Spring Boot 项目,默认都是有 parent 的,这个 parent 就是 spring-boot-starter-parent ,spring-boot-starter-parent 主要有如下作用:
-
定义了 Java 编译版本为 1.8 。
-
使用 UTF-8 格式编码。
-
继承自 spring-boot-dependencies,这个里边定义了依赖的版本,也正是因为继承了这个依赖,所以我们在写依赖时才不需要写版本号。
-
执行打包操作的配置。
-
自动化的资源过滤。
-
自动化的插件配置。
-
针对 application.properties 和 application.yml 的资源过滤,包括通过 profile 定义的不同环境的配置文件,例如 application-dev.properties 和 application-dev.yml。
<parent>
     <groupId>org.springframework.boot</groupId>
     <artifactId>spring-boot-starter-parent</artifactId>
     <version>2.4.2</version>
     <relativePath/> <!-- lookup parent from repository -->
</parent>

的父项目是:
<parent>
    <groupId>org.springframework.boot</groupId>
    <artifactId>spring-boot-dependencies</artifactId>
    <version>2.4.2</version>
</parent>
它来管理Spring Boot应用里面的所有依赖版本;
4.1.2.启动器
问:Spring Boot 中的 starter 到底是什么 ?
答:首先,这个 Starter 并非什么新的技术点,基本上还是基于 Spring 已有功能来实现的。首先它提供了一个自动化配置类,一般命名为 XXXAutoConfiguration ,在这个配置类中通过条件注解来决定一个配置是否生效(条件注解就是 Spring 中原本就有的),然后它还会提供一系列的默认配置,也允许开发者根据实际情况自定义相关配置,然后通过类型安全的属性注入将这些配置属性注入进来,新注入的属性会代替掉默认属性。正因为如此,很多第三方框架,我们只需要引入依赖就可以直接使用了。当然,开发者也可以自定义 Starter。
<dependency>
      <groupId>org.springframework.boot</groupId>
      <artifactId>spring-boot-starter-web</artifactId>
</dependency>
spring-boot-starter-web:
spring-boot-starter:Spring Boot场景启动器;帮我们自动导入了web模块正常运行所依赖的组件;

spring boot将所有功能场景抽取出来,做成一个个starts启动器。只需要在项目中引入这些starts,相关场景的所有依赖都会导入进来。需要什么功能就引入其对应的starts。
比如:
Spring Boot集成Redis:
<dependency>
     <groupId>org.springframework.boot</groupId>
     <artifactId>spring-boot-starter-data-redis</artifactId>
</dependency>4.2.
4.2.主程序类,主入口类
/**
 * AreYouOkApplication
 * ·@SpringBootApplication 用来标注一个主程序类,说明这是一个Spring Boot应用
 * @author 78698
 */
@SpringBootApplication
public class AreYouOkApplication {

    public static void main(String[] args) {
        /**
         * Spring Boot应用启动
         */
        SpringApplication.run(AreYouOkApplication.class, args);
    }

}
注解@SpringBootApplication 用来标注一个主程序类,说明这是一个Spring Boot应用;
Spring Boot通过运行这个类的main方法来启动Spring Boot应用。
4.3.Spring Boot核心注解
问:Spring Boot 的核心注解是哪个?它主要由哪几个注解组成的?
- @SpringBootConfiguration:组合了 @Configuration 注解,实现配置文件的功能。标注在某一个类上,表示该类是Spring Boot的配置类。
- @EnableAutoConfiguration:打开自动配置的功能。也可以关闭某个自动配置的选项,如关闭数据源自动配置功能:@SpringBootApplication(exclude = { DataSourceAutoConfiguration.class })。
- @ComponentScan:Spring组件扫描。
- @SpringBootApplication核心注解
package org.springframework.boot.autoconfigure;

import java.lang.annotation.Documented;
import java.lang.annotation.ElementType;
import java.lang.annotation.Inherited;
import java.lang.annotation.Retention;
import java.lang.annotation.RetentionPolicy;
import java.lang.annotation.Target;

import org.springframework.beans.factory.support.BeanNameGenerator;
import org.springframework.boot.SpringApplication;
import org.springframework.boot.SpringBootConfiguration;
import org.springframework.boot.context.TypeExcludeFilter;
import org.springframework.context.annotation.AnnotationBeanNameGenerator;
import org.springframework.context.annotation.Bean;
import org.springframework.context.annotation.ComponentScan;
import org.springframework.context.annotation.ComponentScan.Filter;
import org.springframework.context.annotation.Configuration;
import org.springframework.context.annotation.FilterType;
import org.springframework.core.annotation.AliasFor;
import org.springframework.data.repository.Repository;

/**
* Indicates a {@link Configuration configuration} class that declares one or more
* {@link Bean @Bean} methods and also triggers {@link EnableAutoConfiguration
* auto-configuration} and {@link ComponentScan component scanning}. This is a convenience
* annotation that is equivalent to declaring {@code @Configuration},
* {@code @EnableAutoConfiguration} and {@code @ComponentScan}.
*
* @author Phillip Webb
* @author Stephane Nicoll
* @author Andy Wilkinson
* @since 1.2.0
*/
@Target(ElementType.TYPE)
@Retention(RetentionPolicy.RUNTIME)
@Documented
@Inherited
@SpringBootConfiguration
@EnableAutoConfiguration
@ComponentScan(excludeFilters = { @Filter(type = FilterType.CUSTOM, classes = TypeExcludeFilter.class),
      @Filter(type = FilterType.CUSTOM, classes = AutoConfigurationExcludeFilter.class) })
public @interface SpringBootApplication {
      /**略*/
}
- 1)@SpringBootConfiguration注解
标明该类使用Spring基于Java的注解,Spring Boot推荐使用基于Java而不是XML的配置。查看@SpringBootConfiguration源代码,可以看到它就是对@Configuration进行简单的“包装”,然后取名为SpringBootConfiguration。
我们对@Configuration注解并不陌生,它就是JavaConfig形式的SpringIoC容器的配置类使用的那个@Configuration。
其源代码如下:
package org.springframework.boot;

import java.lang.annotation.Documented;
import java.lang.annotation.ElementType;
import java.lang.annotation.Retention;
import java.lang.annotation.RetentionPolicy;
import java.lang.annotation.Target;

import org.springframework.context.annotation.Bean;
import org.springframework.context.annotation.Configuration;
import org.springframework.core.annotation.AliasFor;

/**
* Indicates that a class provides Spring Boot application
* {@link Configuration @Configuration}. Can be used as an alternative to the Spring's
* standard {@code @Configuration} annotation so that configuration can be found
* automatically (for example in tests).
* <p>
* Application should only ever include <em>one</em> {@code @SpringBootConfiguration} and
* most idiomatic Spring Boot applications will inherit it from
* {@code @SpringBootApplication}.
*
* @author Phillip Webb
* @author Andy Wilkinson
* @since 1.4.0
*/
@Target(ElementType.TYPE)
@Retention(RetentionPolicy.RUNTIME)
@Documented
@Configuration
public @interface SpringBootConfiguration {

   /**
    * Specify whether {@link Bean @Bean} methods should get proxied in order to enforce
    * bean lifecycle behavior, e.g. to return shared singleton bean instances even in
    * case of direct {@code @Bean} method calls in user code. This feature requires
    * method interception, implemented through a runtime-generated CGLIB subclass which
    * comes with limitations such as the configuration class and its methods not being
    * allowed to declare {@code final}.
    * <p>
    * The default is {@code true}, allowing for 'inter-bean references' within the
    * configuration class as well as for external calls to this configuration's
    * {@code @Bean} methods, e.g. from another configuration class. If this is not needed
    * since each of this particular configuration's {@code @Bean} methods is
    * self-contained and designed as a plain factory method for container use, switch
    * this flag to {@code false} in order to avoid CGLIB subclass processing.
    * <p>
    * Turning off bean method interception effectively processes {@code @Bean} methods
    * individually like when declared on non-{@code @Configuration} classes, a.k.a.
    * "@Bean Lite Mode" (see {@link Bean @Bean's javadoc}). It is therefore behaviorally
    * equivalent to removing the {@code @Configuration} stereotype.
    * @return whether to proxy {@code @Bean} methods
    * @since 2.2
    */
   @AliasFor(annotation = Configuration.class)
   boolean proxyBeanMethods() default true;

}
- 2)@EnableAutoConfiguration注解:该注解可以开启自动配置的功能。
从@EnableAutoConfiguration源代码可以看出,其包含@Import注解。我们知道,@Import注解的主要作用就是借助EnableAutoConfigurationImportSelector将Spring Boot应用所有符合条件的@Configuration配置都加载到当前Spring Boot创建并使用的IoC容器中。
IoC容器就是我们所说的Spring应用程序上下文ApplicationContext。
学习过Spring框架就知道,Spring框架提供了很多@Enable开头的注解定义,比如@EnableScheduling、@EnableCaching等。这些@Enable开头的注解都有一个共同的功能,就是借助@Import的支持,收集和注册特定场景相关的bean定义。
Spring Boot在启动的时候从类路径的META-INF/spring.factories中获取EnableAutoConfiguration指定的值,将这些值作为自动配置类导入到容器中,自动配置类就会生效,帮助我们进行自动配置工作。
其源代码如下:
package org.springframework.boot.autoconfigure;

import java.lang.annotation.Documented;
import java.lang.annotation.ElementType;
import java.lang.annotation.Inherited;
import java.lang.annotation.Retention;
import java.lang.annotation.RetentionPolicy;
import java.lang.annotation.Target;

import org.springframework.boot.autoconfigure.condition.ConditionalOnBean;
import org.springframework.boot.autoconfigure.condition.ConditionalOnClass;
import org.springframework.boot.autoconfigure.condition.ConditionalOnMissingBean;
import org.springframework.boot.web.embedded.tomcat.TomcatServletWebServerFactory;
import org.springframework.boot.web.servlet.server.ServletWebServerFactory;
import org.springframework.context.annotation.Conditional;
import org.springframework.context.annotation.Configuration;
import org.springframework.context.annotation.Import;
import org.springframework.core.io.support.SpringFactoriesLoader;

/**
* Enable auto-configuration of the Spring Application Context, attempting to guess and
* configure beans that you are likely to need. Auto-configuration classes are usually
* applied based on your classpath and what beans you have defined. For example, if you
* have {@code tomcat-embedded.jar} on your classpath you are likely to want a
* {@link TomcatServletWebServerFactory} (unless you have defined your own
* {@link ServletWebServerFactory} bean).
* <p>
* When using {@link SpringBootApplication @SpringBootApplication}, the auto-configuration
* of the context is automatically enabled and adding this annotation has therefore no
* additional effect.
* <p>
* Auto-configuration tries to be as intelligent as possible and will back-away as you
* define more of your own configuration. You can always manually {@link #exclude()} any
* configuration that you never want to apply (use {@link #excludeName()} if you don't
* have access to them). You can also exclude them via the
* {@code spring.autoconfigure.exclude} property. Auto-configuration is always applied
* after user-defined beans have been registered.
* <p>
* The package of the class that is annotated with {@code @EnableAutoConfiguration},
* usually via {@code @SpringBootApplication}, has specific significance and is often used
* as a 'default'. For example, it will be used when scanning for {@code @Entity} classes.
* It is generally recommended that you place {@code @EnableAutoConfiguration} (if you're
* not using {@code @SpringBootApplication}) in a root package so that all sub-packages
* and classes can be searched.
* <p>
* Auto-configuration classes are regular Spring {@link Configuration @Configuration}
* beans. They are located using the {@link SpringFactoriesLoader} mechanism (keyed
* against this class). Generally auto-configuration beans are
* {@link Conditional @Conditional} beans (most often using
* {@link ConditionalOnClass @ConditionalOnClass} and
* {@link ConditionalOnMissingBean @ConditionalOnMissingBean} annotations).
*
* @author Phillip Webb
* @author Stephane Nicoll
* @since 1.0.0
* @see ConditionalOnBean
* @see ConditionalOnMissingBean
* @see ConditionalOnClass
* @see AutoConfigureAfter
* @see SpringBootApplication
*/
@Target(ElementType.TYPE)
@Retention(RetentionPolicy.RUNTIME)
@Documented
@Inherited
@AutoConfigurationPackage
@Import(AutoConfigurationImportSelector.class)
public @interface EnableAutoConfiguration {

   String ENABLED_OVERRIDE_PROPERTY = "spring.boot.enableautoconfiguration";

   /**
    * Exclude specific auto-configuration classes such that they will never be applied.
    * @return the classes to exclude
    */
   Class<?>[] exclude() default {};

   /**
    * Exclude specific auto-configuration class names such that they will never be
    * applied.
    * @return the class names to exclude
    * @since 1.3.0
    */
   String[] excludeName() default {};

}
- 3)@ComponentScan注解:启动组件扫描
开发的组件或bean定义能被自动发现并注入到Spring应用程序上下文。比如我们在控制层添加@Controller注解、服务层添加的@Service注解和@Component注解等,这些注解都可以被@ComponentScan注解扫描到。
二、Spring Boot配置
1.Spring Boot 自动配置原理
1)、Spring Boot启动的时候加载主配置类,开启了自动配置功能@EnableAutoConfiguration
2)、@EnableAutoConfiguration 利用EnableAutoConfigurationImportSelector给容器导入META-INF/spring.factories 里定义的自动配置类组件。
3)、筛选有效的自动配置类。
4)、每一个自动配置类结合对应的 xxxProperties.java 读取配置文件进行自动配置功能。
xxxAutoConfiguration: 自动配置类,给容器中添加组件。
xxxProperties:封装配置文件中相关属性。
2.配置文件
配置文件的作用:修改Spring Boot自动配置的默认值。
Spring Boot使用一个全局配置文件,并且配置文件的名称是固定的。
- application.properties
- application.yaml
问:你如何理解 Spring Boot 配置加载顺序?
答:在 Spring Boot 里面,可以使用以下几种方式来加载配置。
1)properties文件;
2)YAML文件;
问:什么是 YAML?YAML 配置的优势在哪里 ?
答:YAML 是一种人类可读的数据序列化语言。它通常用于配置文件。与属性文件相比,如果我们想要在配置文件中添加复杂的属性,YAML 文件就更加结构化,而且更少混淆。可以看出 YAML 具有分层配置数据。
-
配置有序,在一些特殊的场景下,配置有序很关键
-
支持数组,数组中的元素可以是基本数据类型也可以是对象
-
简洁
问:Spring Boot 是否可以使用 XML 配置 ?
答:Spring Boot 推荐使用 Java 配置而非 XML 配置,但是 Spring Boot 中也可以使用 XML 配置,通过 @ImportResource 注解可以引入一个 XML 配置。
问:spring boot 核心配置文件是什么?bootstrap.properties 和 application.properties 有何区别 ?
答:单纯做 Spring Boot 开发,可能不太容易遇到 bootstrap.properties 配置文件,但是在结合 Spring Cloud 时,这个配置就会经常遇到了,特别是在需要加载一些远程配置文件的时侯。
spring boot 核心的两个配置文件:
- application (. yml 或者 . properties):由ApplicatonContext 加载,用于 spring boot 项目的自动化配置;
- bootstrap (. yml 或者 . properties):boostrap 由父 ApplicationContext 加载的,比 applicaton 优先加载,配置在应用程序上下文的引导阶段生效。一般来说我们在 Spring Cloud Config 或者 Nacos 中会用到它。且 boostrap 里面的属性不能被覆盖。
2.1.配置文件值注入
配置文件
person:
    lastName: JiaLuo
    age: 18
    boss: false
    birth: 2021/01/02
    maps: {K1: V1,K2: V2}
    lists:
        - anqila
        - caiwenji
    dog:
        name: 大狗
        age: 11
JavaBean:
/**
 * 将配置文件中配置的每一个属性的值,映射到这个组件中
 * @ConfigurationProperties:告诉SpringBoot将本类中的所有属性和配置文件中相关的配置进行绑定;
 *      prefix = "person":配置文件中哪个下面的所有属性进行一一映射
 *
 * 只有这个组件是容器中的组件,才能容器提供的@ConfigurationProperties功能;
 *  @ConfigurationProperties(prefix = "person")默认从全局配置文件中获取值;
 *
 */
@Component
@ConfigurationProperties(prefix = "person")
public class Person {
    private String lastName;
    private Integer age;
    private Boolean boss;

    private Date birth;
    private Map<String,Object> maps;
    private List<Object> lists;
    private Dog dog;
在pom文件中引入配置文件处理器,以后编写配置就有提示了
<!--导入配置文件处理器,配置文件进行绑定就会有提示-->
        <dependency>
            <groupId>org.springframework.boot</groupId>
            <artifactId>spring-boot-configuration-processor</artifactId>
            <optional>true</optional>
        </dependency>
2.1.1.@Value获取值和@ConfigurationProperties获取值方式的比较
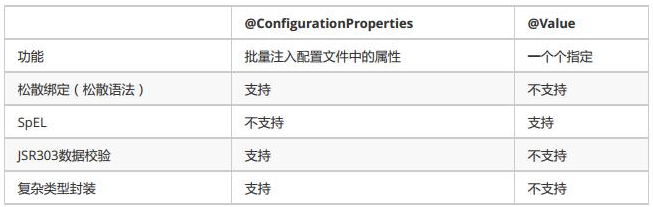
使用场景:
- -IF在某个业务逻辑中需要获取一下配置文件中的某项值,THEN使用@Valus;
- -IF专门编写一个JavaBean来和配置文件进行映射,THEN使用@ConfigurationProperties;
2.1.2.加载配置文件的方式
- Spring Boot推荐给容器中添加组件的方式:推荐使用全注解的方式
-配置类@Configuration
-使用@Bean给容器中添加组件
/**
 * @Configuration:指明当前类是一个配置类;就是来替代之前的Spring配置文件
 *
 * 在配置文件中用<bean><bean/>标签添加组件
 *
 */
@Configuration
public class MyAppConfig {

    //将方法的返回值添加到容器中;容器中这个组件默认的id就是方法名
    @Bean
    public HelloService helloService02(){
        System.out.println("配置类@Bean给容器中添加组件了...");
        return new HelloService();
    }
}
- @PropertySource: 加载指定的配置文件
@PropertySource(value = {"classpath:heros.properties"})
- @ImportResource: 导入Spring的配置文件
@ImportResource(location = {"classpath:hexos.xml"})
3.YAML语法
3.1.基本语法
K: V (冒号后面必须有空格)
以空格的缩进来控制层级关系;左对齐的一列数据属于同一层级;
server:
    port: 8081
    path: /areyouok
3.2.值的写法
3.2.1.字面量:普通的值(数字,字符串,布尔)
K: V
字符串默认不用加单双引号;
K: ‘V’ 单引号
会转译特殊字符,特殊字符最终只是一个普通的字符串数据
如:name: 'SunShangXiang \n DiaoChan' 输出:SunShangXiang \n DiaoChan
K: "V" 双引号
不会转译特殊字符,特殊字符会作为本身想表达的意思
如:name: 'SunShangXiang \n DiaoChan' 输出:SunShangXiang 换行 DiaoChan
3.2.2.对象、Map(属性和值)(键值对)
K: V 在下一行来写对象的属性和值,注意缩进;
Hero:
    heroName: JiaLuo
    profession: sharp-shooter
行内写法:
Hero: {heroName: JiaLuo,profession: sharp-shooter}
3.2.3.数组(List、Set)
用- 值表示数组中的一个元素
Heros:
    - JiaLuo
    - DiaoChan
    - SunShangXiang
行内写法
Heros: [JiaLuo,DiaoChan,SunShangXiang]
3.2.4.YAML支持多文档块方式
server:
  port: 8081
spring:
  profiles:
    active: prod

---
server:
  port: 8083
spring:
  profiles: dev


---

server:
  port: 8084
spring:
  profiles: prod
三、日志
1.日志框架
Spring Boot底层是Spring框架,Spring框架默认使用JCL;
But
Spring Boot选用:
- SLF4j(Simple Logging Facade for Java)<日志抽象层>
- Logback <日志实现>
2.SLF4j使用
在开发中日志记录方法的调用不应该直接来调用日志的实现类,而是调用日志抽象层里面的方法;
import org.slf4j.Logger;
import org.slf4j.LoggerFactory;

@Component
public class LcShoppingConsumer {
    /**
     * 日志
     */
    Logger logger = LoggerFactory.getLogger(LcOrderDetailsServiceImpl.class);
logger.info("LcOrderDetailsService save and killProduct: " + lcOrderDetails);
}
持续更新中······

 浙公网安备 33010602011771号