
elk+filebeat+redis日志系统部署
日志系统架构图

软件版本:
filebeat-7.5.1
elasticsearch-7.5.1
logstash-7.5.1
kibana-7.5.1
redis-5.0.8
主机:
system:Centos 7.7
host IP: 192.168.1.105 安装 elasticsearch、kibana、logstash
192.168.1.103 安装 redis
192.168.1.111 安装 filebeat、nginx
192.168.1.79 安装 filebeat、nginx
JDK:jdk-8u231-linux-x64
安装:
1、安装elasticsearch(单机)
修改环境参数,配置线程个数。修改配置文件/etc/security/limits.conf,增加配置
* hard nofile 65536
* soft nofile 65536
* soft nproc 2048
* hard nproc 4096
修改/etc/sysctl.conf文件,增加配置:
vim /etc/sysctl.conf
vm.max_map_count=262144
执行 sysctl -p 命令,使配置生效
增加普通用户
groupadd elsearch --- 添加elsearch组
useradd elsearch -g elsearch ---添加elsearch用户,并加入elsearch组
groupadd kibana
useradd kibana -g kibana
修改Elasticsearch配置文件
vim /software/elasticsearch/config/elasticsearch.yml --- 修改以下参数
======================== Elasticsearch Configuration =========================
NOTE: Elasticsearch comes with reasonable defaults for most settings.
Before you set out to tweak and tune the configuration, make sure you
understand what are you trying to accomplish and the consequences.
The primary way of configuring a node is via this file. This template lists
the most important settings you may want to configure for a production cluster.
Please consult the documentation for further information on configuration options:
https://www.elastic.co/guide/en/elasticsearch/reference/index.html
---------------------------------- Cluster -----------------------------------
Use a descriptive name for your cluster:
cluster.name: "es-cluster" #集群名称
#
# ------------------------------------ Node ------------------------------------
#
# Use a descriptive name for the node:
#
node.name: "node-1" #节点名称
#
# Add custom attributes to the node:
#
#node.attr.rack: r1
#
# ----------------------------------- Paths ------------------------------------
#
# Path to directory where to store the data (separate multiple locations by comma):
#
path.data: "/ctdata1/esdata/elasticsearch/data" #数据存储目录
#
# Path to log files:
#
path.logs: "/ctdata1/esdata/elasticsearch/logs" #日志存储目录
#
# ----------------------------------- Memory -----------------------------------
#
# Lock the memory on startup:
#
#bootstrap.memory_lock: true
#
# Make sure that the heap size is set to about half the memory available
# on the system and that the owner of the process is allowed to use this
# limit.
#
# Elasticsearch performs poorly when the system is swapping the memory.
#
# ---------------------------------- Network -----------------------------------
#
# Set the bind address to a specific IP (IPv4 or IPv6):
#
network.host: "192.168.1.105" #配置本地绑定的网卡IP
#
# Set a custom port for HTTP:
#
http.port: 9200 #http协议端口
#
# For more information, consult the network module documentation.
#
# --------------------------------- Discovery ----------------------------------
#
# Pass an initial list of hosts to perform discovery when new node is started:
# The default list of hosts is ["127.0.0.1", "[::1]"]
#
discovery.zen.ping.unicast.hosts: ["192.168.1.105"] #开启发现新节点的IP
#
# Prevent the "split brain" by configuring the majority of nodes (total number of master-eligible nodes / 2 + 1):
#
#discovery.zen.minimum_master_nodes: #最多发现主节点的个数(单机安装不启用)
#
# For more information, consult the zen discovery module documentation.
#
# ---------------------------------- Gateway -----------------------------------
#
# Block initial recovery after a full cluster restart until N nodes are started:
#
#gateway.recover_after_nodes: 3 #集群重启后最少启动N个节点后开始做恢复(单机安装不启用)
#
# For more information, consult the gateway module documentation.
#
# ---------------------------------- Various -----------------------------------
#
# Require explicit names when deleting indices:
#
action.destructive_requires_name: true #删除索引需要指定索引具体的名称
添加java环境变量
vim /software/elasticsearch/bin/elasticsearch-env --- 在头部添加java环境变量
JAVA_HOME=/software/jdk1.8.0_231
JRE_HOME=/software/jdk1.8.0_231/jre
PATH=$PATH:$JAVA_HOME/bin:$JRE_HOME/bin
CLASSPATH=.:$JAVA_HOME/lib/dt.jar:$JAVA_HOME/lib/tools.jar:$JRE_HOME/lib
export JAVA_HOME JRE_HOME PATH CLASSPATH
修改程序权限(Elasticsearch、kibana不能使用root权限启动,只能使用普通用户)
chown -R elsearch.elsearch elasticsearch/
启动服务
su - elsearch
/software/elasticsearch/bin/elasticsearch -d --- -d参数指定程序在后台运行
访问:
http://IPaddr:9200

查看状态

集群状态相关参数说明
URL中_cat表示查看信息,health表明返回的信息为集群健康信息,?v表示返回的信息加上头信息,跟返回JSON信息加上?pretty同理,就是为了获得更直观的信息,当然,你也可以不加,不要头信息,特别是通过代码获取返回信息进行解释,头信息有时候不
需要,写shell脚本也一样,经常要去除一些多余的信息。
通过这个链接会返回下面的信息,下面的信息包括:
集群的状态(status):red红表示集群不可用,有故障。yellow黄表示集群不可靠但可用,一般单节点时就是此状态。green正常状态,表示集群一切正常。
节点数(node.total):节点数,这里是2,表示该集群有两个节点。
数据节点数(node.data):存储数据的节点数,这里是2。数据节点在Elasticsearch概念介绍有。
分片数(shards):这是 0,表示我们把数据分成多少块存储。
主分片数(pri):primary shards,这里是6,实际上是分片数的两倍,因为有一个副本,如果有两个副本,这里的数量应该是分片数的三倍,这个会跟后面的索引分片数对应起来,这里只是个总数。
激活的分片百分比(active_shards_percent):这里可以理解为加载的数据分片数,只有加载所有的分片数,集群才算正常启动,在启动的过程中,如果我们不断刷新这个页面,我们会发现这个百分比会不断加大。
1.1、安装elasticsearch-head 插件
因为head是一个用于管理Elasticsearch的web前端插件,该插件在es5版本以后采用独立服务的形式进行安装使用,因此需要安装nodejs、npm
yum -y install nodejs npm
如果没有安装git,还需要先安装git:
yum -y install git
然后安装elasticsearch-head插件:
git clone https://github.com/mobz/elasticsearch-head.git
cd elasticsearch-head/
npm install
执行npm install 命令, 执行该命令可能会出现以下错误:
npm ERR! phantomjs-prebuilt@2.1.16 install: node install.js
npm ERR! Exit status 1
npm ERR!
npm ERR! Failed at the phantomjs-prebuilt@2.1.16 install script 'node install.js'.
npm ERR! Make sure you have the latest version of node.js and npm installed.
npm ERR! If you do, this is most likely a problem with the phantomjs-prebuilt package,
npm ERR! not with npm itself.
npm ERR! Tell the author that this fails on your system:
npm ERR! node install.js
npm ERR! You can get information on how to open an issue for this project with:
npm ERR! npm bugs phantomjs-prebuilt
npm ERR! Or if that isn't available, you can get their info via:
npm ERR! npm owner ls phantomjs-prebuilt
npm ERR! There is likely additional logging output above.
npm ERR! Please include the following file with any support request:
npm ERR! /software/elasticsearch/elasticsearch-head/npm-debug.log
此时忽略phantomjs-prebuilt@2.1.16,执行命令如下
npm install phantomjs-prebuilt@2.1.16 --ignore-scripts
然后执行:
npm install
npm WARN deprecated coffee-script@1.10.0: CoffeeScript on NPM has moved to "coffeescript" (no hyphen)
npm WARN deprecated http2@3.3.7: Use the built-in module in node 9.0.0 or newer, instead
npm WARN deprecated phantomjs-prebuilt@2.1.16: this package is now deprecated
npm WARN deprecated json3@3.2.6: Please use the native JSON object instead of JSON 3
npm WARN deprecated json3@3.3.2: Please use the native JSON object instead of JSON 3
npm WARN prefer global coffee-script@1.10.0 should be installed with -g
> phantomjs-prebuilt@2.1.16 install /software/elasticsearch-head/node_modules/phantomjs-prebuilt
> node install.js
PhantomJS not found on PATH
Downloading https://github.com/Medium/phantomjs/releases/download/v2.1.1/phantomjs-2.1.1-linux-x86_64.tar.bz2
Saving to /tmp/phantomjs/phantomjs-2.1.1-linux-x86_64.tar.bz2
Receiving...
[=======---------------------------------] 19%
插件安装相对会慢一些。。。
配置插件,停止elasticsearch
ps -ef | grep java | grep elsearch
kill -9 PID
修改:
vim /software/elasticsearch/config/elasticsearch.yml
添加以下参数:
http.cors.enabled: true
http.cors.allow-origin: "*"
启动elasticsearch
/software/elasticsearch/bin/elasticsearch -d
启动elasticsearch-head 插件(后台运行)
nohup npm run start &
[1] 11047
nohup: 忽略输入并把输出追加到"/home/elsearch/nohup.out"
netstat -anlp | grep 9100
tcp 0 0 0.0.0.0:9100 0.0.0.0:* LISTEN 11058/grunt
使用浏览器访问插件并与ES进行交互
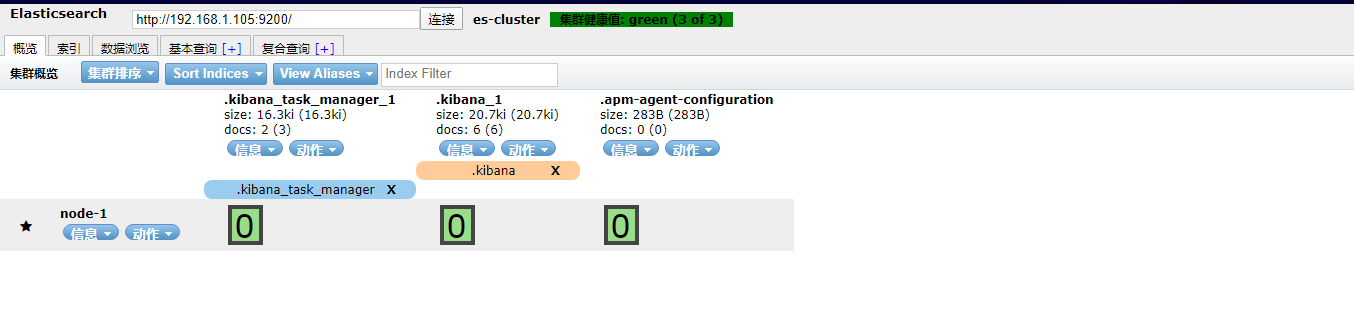
2、安装kibana
tar xf kibana-7.5.1-linux-x86_64.tar.gz
mv kibana-7.5.1-linux-x86_64 kibana
cd kibana
vim /software/kibana/config/kibana.yml
server.port: 5601
server.host: "192.168.1.105"
elasticsearch.hosts: ["http://192.168.1.105:9200"] --- 这个写的就是本机安装的Elasticsearch,只能写一个地址,目前还不支持写多个节点。如果想要对接Elasticsearch集群就需要搭建一个只能用来进行协调的Elasticsearch节点,这个节点不参与主节点选举、不存储数据。
只是用来处理传入的HTTP请求,并将操作重定向到集群中的其他Elasticsearch节点,然后收集并返回结果。这个“协调”节点本质上也起了一个负载均衡的作用。
/bin/sh
RETVAL=
PID=ps -ef | grep "kibana" | awk -F ' ' '{print $2}'
echo $PID
KIBANA_DIR=/software/kibana
KIBANA=$KIBANA_DIR/bin/kibana
PROG=$(basename $KIBANA)
CONF=$KIBANA_DIR/config/kibana.yml
if [ ! -x $KIBANA ]; then
echo -n $"$KIBANA not exist.";warning;echo
exit 0
fi
start(){
echo -n $"Starting $PROG: "
nohup $KIBANA >/dev/null 2>&1 &
RETVAL=$?
if [ $RETVAL -eq 0 ]; then
echo "start OK"
else
echo "start failure"
fi
return $RETVAL
}
stop(){
echo -n $"Stopping $PROG: "
kill -TERM $PID >/dev/null 2>&1
RETVAL=$?
echo "stop OK"
return $RETVAL
}
restart(){
stop
sleep 2
start
}
case "$1" in
start)
start
;;
stop)
stop
;;
restart)
restart
;;
status)
ps -ef|grep $PID|grep kibana
RETVAL=$?
;;
*)
echo $"Usage: $0 {start|stop|status|restart}"
RETVAL=1
esac
exit $RETVAL
访问:http://192.168.1.105:5601

3、安装redis
cd /software/ && tar xf redis-5.0.8.tar.gz && mkdir redis
cd redis-5.0.8
make && cd src/
make install PREFIX=/software/redis/ -- 指定redis安装目录为/software/redis/
cd ../ && mkdir /software/redis/conf && cp redis.conf /software/redis/conf/
vim /software/redis/conf/redis.conf
修改以下参数:
bind 192.168.1.103 --- 将这里的127.0.0.1改为192.168.1.103,否则只能连接127.0.0.1本地回环地址,无法远程连接
protected-mode yes 改为 protected-mode no --- yes改为no,目的是为了解决安全模式引起的报错
port 6379 --- 打开注释
daemonize no 改为 daemonize yes --- no改为yes,目的是为了设置后台运行
pidfile /software/redis/redis.pid --- 设置redis.pid 文件存储目录
logfile "/software/redis/logs/redis.log" --- 设置redis.log 文件存储目录
连接测试:

4、安装logstash-server
vim /software/logstash/config/logstash.yml
修改参数:
node.name: logstash-server -- 设置节点名称,一般为主机名
path.data: /software/logstash/data --- 设置logstash 和插件使用的持久化目录
config.reload.automatic: true --- 开启配置文件自动加载
config.reload.interval: 10s --- 定义配置文件重载时间周期
http.host: "192.168.1.105" --- 定义访问主机名,一般为域名或IP
http.port: 9600-9700 --- 打开logstash 端口注释
vim /software/logstash/config/logstash_server.conf
input {
redis {
host => "192.168.1.103"
port => "6379"
db => "0"
data_type => "list"
key => "nginx-access-log"
codec => json
}
}
filter {
mutate {
split => [ "upstreamtime", "," ]
}
mutate {
convert => [ "upstreamtime", "float" ]
}
json {
source => "message"
remove_field => ["message"]
}
geoip {
source => clientip
target => "geoip"
add_field => [ "[geoip][coordinates]", "%{[geoip][longitude]}" ]
add_field => [ "[geoip][coordinates]", "%{[geoip][latitude]}" ]
}
}
output {
elasticsearch {
hosts => "192.168.1.105:9200"
index => "logstash-%{[project]}-%{+YYYY.MM.dd}"
}
}
编辑启动脚本
/bin/sh
RETVAL=
PID=ps -ef | grep java | grep "logstash_server\.conf" | awk -F ' ' '{print $2}'
LOGSTASH_DIR=/software/logstash
LOGSTASH=$LOGSTASH_DIR/bin/logstash
PROG=$(basename $LOGSTASH)
CONF=$LOGSTASH_DIR/config/logstash_server.conf
LOG=$LOGSTASH_DIR/logs/logstash.log
if [ ! -x $LOGSTASH ]; then
echo -n $"$LOGSTASH not exist.";warning;echo
exit 0
fi
start(){
echo -n $"Starting $PROG: "
nohup $LOGSTASH --config $CONF --log $LOG >/dev/null 2>&1 &
RETVAL=$?
if [ $RETVAL -eq 0 ]; then
echo "start OK"
else
echo "start failure"
fi
return $RETVAL
}
stop(){
echo -n $"Stopping $PROG: "
kill -TERM $PID >/dev/null 2>&1
RETVAL=$?
echo "stop OK"
return $RETVAL
}
restart(){
stop
sleep 2
start
}
case "$1" in
start)
start
;;
stop)
stop
;;
restart)
restart
;;
status)
ps -ef|grep $PID|grep logstash_server.conf
RETVAL=$?
;;
*)
echo $"Usage: $0 {start|stop|status|restart}"
RETVAL=1
esac
exit $RETVAL
修改logstash-server JVM
vim /software/logstash/config/jvm.options
-Xms1g 改为 -Xms500m -- 根据自己的实际情况
-Xmx1g 改为 -Xmx500m -- 根据自己的实际情况
启动logstash

程序已经正常运行
5、filebeat 安装
tar xf filebeat-7.5.1.tar.gz
cd filebeat-7.5.1
vim filebeat.yml
filebeat.prospectors:
- input_type: log
paths:
- /ctdata1/nginx/access.log #日志文件目录
fields:
project: nginx-access
nginx_host: #主机名
fields_under_root: true
tail_files: true
- input_type: log
paths:
- /var/log/nginx/error.log
fields:
project: nginx-error
nginx_host:
fields_under_root: true
output.redis:
enabled: true
hosts: ["localhost:6379"] #redis主机地址
keys:
- key: "nginx-access"
when.contains:
project: "nginx-access"
- key: "nginx-error"
when.contains:
project: "nginx-error"
保存文件后启动filebeat服务
nohup ./filebeat -e -c filebeat.yml > filebeat.log &

 浙公网安备 33010602011771号