LNMP环境学习--wordpress安装
基础环境:
[root@web01 ~]# cat /etc/redhat-release
CentOS Linux release 7.6.1810 (Core)
[root@web01 ~]# sed -i 's/SELINUX=enforcing/SELINUX=disabled/g' /etc/selinux/config
[root@web01 ~]# setenforce 0
[root@web01 ~]# firewall-cmd --permanent --add-service=http
[root@web01 ~]# firewall-cmd --reload
1. MySQL 安装
1.mysql 5.6 yum源
[root@web01 ~]# cat  /etc/yum.repos.d/mysql-community.repo
[mysql56-community]
name=MySQL 5.6 Community Server
baseurl=http://repo.mysql.com/yum/mysql-5.6-community/el/7/$basearch/
enabled=1
gpgcheck=0
2.安装yum安装MySQL
[root@web01 ~]# yum -y install mysql-community-server
3.开机启动、启动MySQL
[root@web01 ~]# systemctl start mysqld.service
[root@web01 ~]# systemctl enable mysqld.service
4.安全初始化,设置密码,并设置安全项
[root@web01 ~]# mysql_secure_installation
NOTE: RUNNING ALL PARTS OF THIS SCRIPT IS RECOMMENDED FOR ALL MySQL
      SERVERS IN PRODUCTION USE!  PLEASE READ EACH STEP CAREFULLY!
In order to log into MySQL to secure it, we'll need the current
password for the root user.  If you've just installed MySQL, and
you haven't set the root password yet, the password will be blank,
so you should just press enter here.
Enter current password for root (enter for none):
OK, successfully used password, moving on...
Setting the root password ensures that nobody can log into the MySQL
root user without the proper authorisation.
Set root password? [Y/n] y
New password:
Re-enter new password:
Password updated successfully!
Reloading privilege tables..
 ... Success!
By default, a MySQL installation has an anonymous user, allowing anyone
to log into MySQL without having to have a user account created for
them.  This is intended only for testing, and to make the installation
go a bit smoother.  You should remove them before moving into a
production environment.
Remove anonymous users? [Y/n] Y
 ... Success!
Normally, root should only be allowed to connect from 'localhost'.  This
ensures that someone cannot guess at the root password from the network.
Disallow root login remotely? [Y/n] Y
 ... Success!
By default, MySQL comes with a database named 'test' that anyone can
access.  This is also intended only for testing, and should be removed
before moving into a production environment.
Remove test database and access to it? [Y/n] Y
 - Dropping test database...
ERROR 1008 (HY000) at line 1: Can't drop database 'test'; database doesn't exist
 ... Failed!  Not critical, keep moving...
 - Removing privileges on test database...
 ... Success!
Reloading the privilege tables will ensure that all changes made so far
will take effect immediately.
Reload privilege tables now? [Y/n] Y
 ... Success!
All done!  If you've completed all of the above steps, your MySQL
installation should now be secure.
Thanks for using MySQL!
Cleaning up...
5.查看版本、登录,为workpress创建数据,授权workpress用户
[root@web01 ~]# mysql --version
mysql  Ver 14.14 Distrib 5.6.48, for Linux (x86_64) using  EditLine wrapper
[root@web01 ~]# mysql -uroot -p
Enter password:
mysql>create database wordpress;
mysql> grant all on wordpress.* to 'blogadmin'@'%' identified by '123456';
mysql> flush privileges;
2. PHP7.1安装
使用第三方扩展源安装php7.1
1.移除旧版本php(之前通过base或epel库安装过的,必须执行这个操作)
yum remove php-mysql-5.4 php php-fpm php-common
2.安装第三方扩展源
第三方源网页地址:https://us-east.repo.webtatic.com/yum/el7/webtatic-release.rpm
yum -y install http://us-east.repo.webtatic.com/yum/el7/webtatic-release.rpm
3.安装php7.1版本
[root@web01 ~]# yum -y install php71w php71w-cli php71w-common php71w-devel \ php71w-fpm php71w-embedded php71w-gd php71w-mcrypt php71w-mbstring php71w-pdo \ php71w-xml php71w-mysqlnd php71w-opcache php71w-pecl-memcached php71w-pecl-redis\ php71w-pecl-mongodb
4.启动php-fpm管理进程
[root@web01 ~]# systemctl enable php-fpm.service
[root@web01 ~]# systemctl start php-fpm.service
root@web01 ~]# php -v
PHP 7.1.33 (cli) (built: Oct 26 2019 10:16:23) ( NTS )
Copyright (c) 1997-2018 The PHP Group
Zend Engine v3.1.0, Copyright (c) 1998-2018 Zend Technologies
    with Zend OPcache v7.1.33, Copyright (c) 1999-2018, by Zend Technologies
5.php配置文件:
/etc/php-fpm.d/www.conf
如需更改php-fpm用户和组身份用如下命令:
[root@web01 ~]# sed  -i '/^user/c    user = www'  /etc/php-fpm.d/www.conf
[root@web01 ~]# sed  -i '/^group/c  group = www' /etc/php-fpm.d/www.conf
[root@web01 ~]# systemctl restart php-fpm.service
3. Nginx安装
1、官方yum源码安装方式:
[root@web01 ~]# vim /etc/yum.repos.d/nginx.repo
[nginx-stable]
name=nginx stable repo
baseurl=http://nginx.org/packages/centos/$releasever/$basearch/
gpgcheck=1
enabled=1
gpgkey=https://nginx.org/keys/nginx_signing.key
module_hotfixes=true
2、安装Nginx
[root@web01 ~]#  yum -y install nginx
[root@web01 ~]# nginx -v
nginx version: nginx/1.18.0
3、开机启动、启动Nginx
[root@web01 ~]# systemctl enable nginx.service
[root@web01 ~]# systemctl start nginx.service
4. 检验LNMP环境
1、测试PHP和Nginx是否正常调用
[root@web01 ~]# mkdir -p /code/www/
[root@web01 ~]# cat /etc/nginx/conf.d/php.conf
server {
    listen       80;
    server_name  www.testx.com;
    root   /code/www;
    index  index.php index.html index.htm;
	location ~ \.php$ {
		root         /code/www;
       		fastcgi_pass   127.0.0.1:9000;
       		fastcgi_index  index.php;
       		fastcgi_param  SCRIPT_FILENAME  $document_root$fastcgi_script_name;
      		include        fastcgi_params;
         }
}
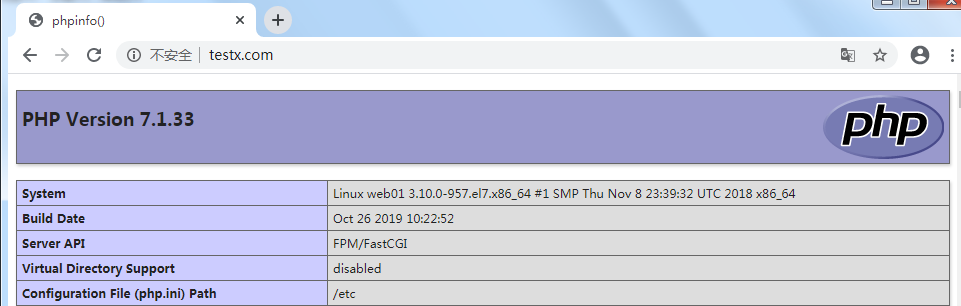
Php测试页面:
[root@web01 ~]# cat /code/www/index.php
<?php
	phpinfo();
?>
打开浏览器测试(注意本地host解析):
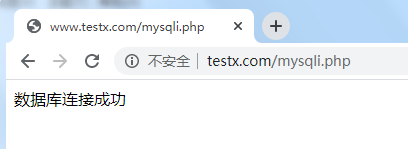
2、检测数据库连接
[root@web01 ~]# vim /code/www/mysqli.php
<?php
	$servername = "localhost";
	$username = "root";
	$password = "123456";
	$conn = mysqli_connect($servername,$username,$password);

	if(!$conn){die("connection failed: " . mysqli_connect_error());
	}
	echo "数据库连接成功";
?>
使用浏览器访问,测试用户访问php首页时php是否正常解析,同时通过php的mysql_connect函数测试数据连接是否成功
5. WordPress 安装
创建用户和组,设置目录权限
[root@web01 ~]# mkdir -p /code/www
[root@web01 ~]# groupadd -g 666 www
[root@web01 ~]# useradd -u  666 -g 666 -M -s /sbin/nologin www
[root@web01 ~]# chown -R www.www /code/
[root@web01 ~]# ll -d /code/
drwxr-xr-x. 3 www www 17 Oct 30 18:54 /code/
修改Nginx程序用户:
[root@web01 ~]# sed -i '/^user/c user www;' /etc/nginx/nginx.conf
修改php程序用户和组(上面已经修改,请忽略):
[root@web01 ~]# sed -i '/^user/c user = www' /etc/php-fpm.d/www.conf
[root@web01 ~]# sed -i '/^group/c group = www' /etc/php-fpm.d/www.conf
创建Nginx站点:
[root@web01 conf.d]# mv /etc/nginx/conf.d/php.conf  /etc/nginx/conf.d/php.conf.bak  #将PHP测试站点移除
[root@web01 ~]# vim  /etc/nginx/conf.d/blog.conf
server {
    listen         80;
    server_name  www.testx.com;
	location / {
        root   /code/wordpress;
        index  index.php index.html index.htm;
        }
	location ~ \.php$ {
		root         /code/wordpress;
       		fastcgi_pass   127.0.0.1:9000;
       		fastcgi_index  index.php;
       		fastcgi_param  SCRIPT_FILENAME  $document_root$fastcgi_script_name;
      		include        fastcgi_params;
         }
}
检查配置,重启Nginx
[root@web01 ~]# nginx -t
nginx: the configuration file /etc/nginx/nginx.conf syntax is ok
nginx: configuration file /etc/nginx/nginx.conf test is successfu
[root@web01 ~]# systemctl restart nginx.service
上传文件,并解压
[root@web01 code]# ll wordpress-4.7-zh_CN.tar.gz
-rw-r--r--. 1 root root 8479240 May  5 14:05 wordpress-4.7-zh_CN.tar.gz
[root@web01 code]# tar xf wordpress-4.7-zh_CN.tar.gz
[root@web01 code]# chown -R www.www /code/
[root@web01 code]# ll -d wordpress
drwxr-xr-x. 5 www www 4096 Dec  8  2016 wordpress
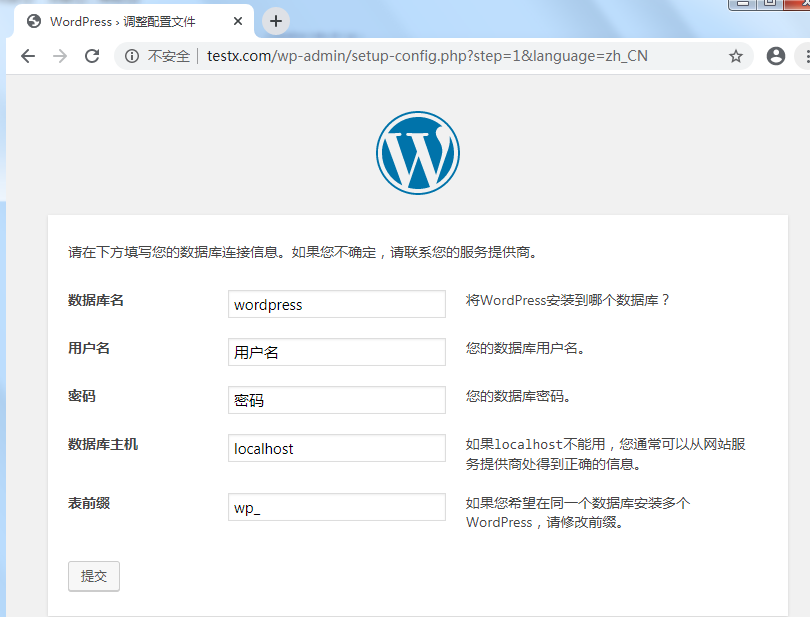
web页面打开,开始安装workpress
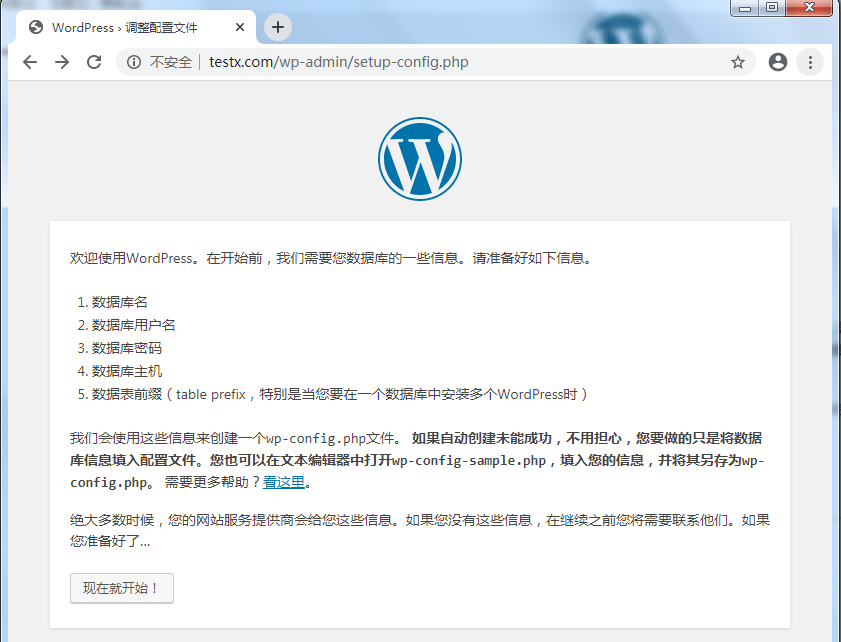
填写数据库信息:
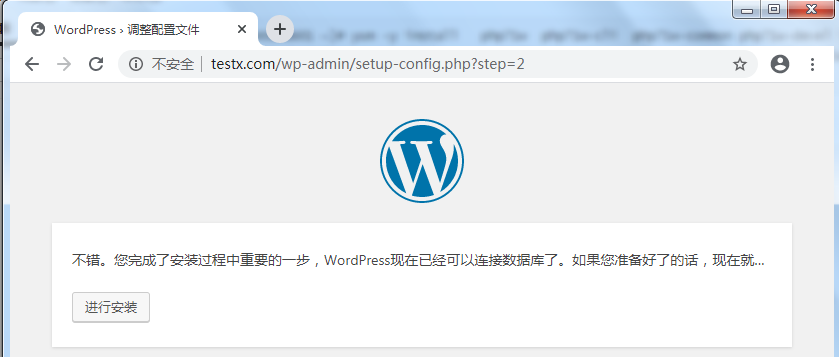
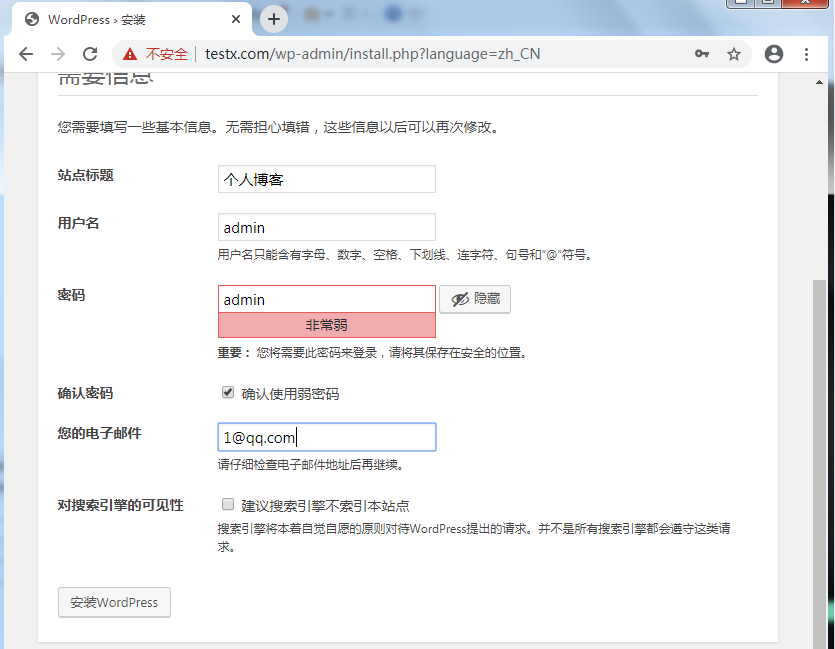
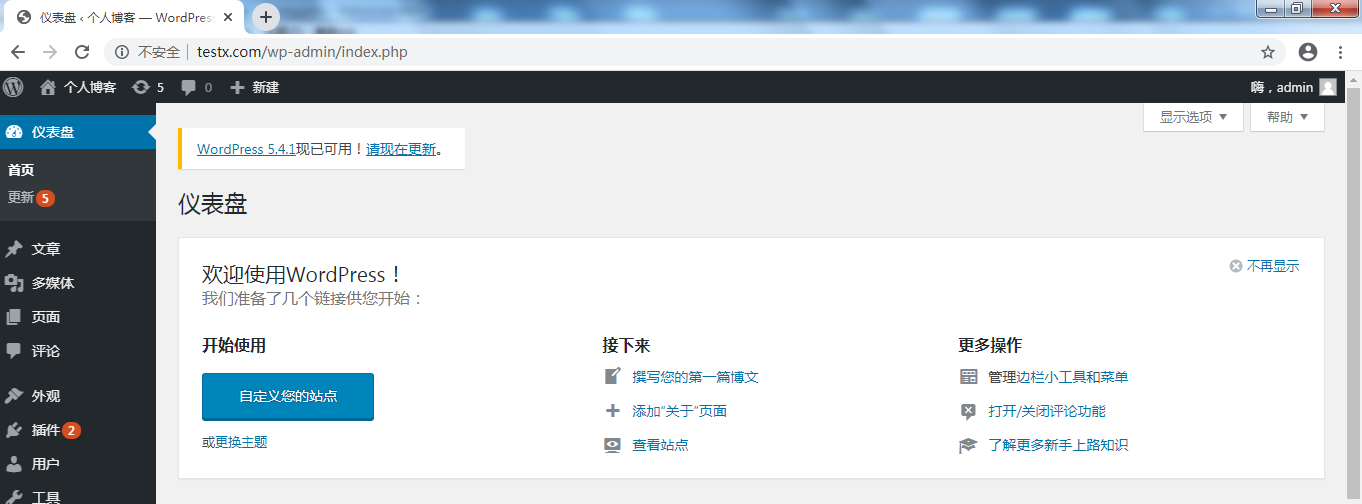
已经完成安装。

 浙公网安备 33010602011771号