
SpringBoot+Mybatis注解实现简单crud
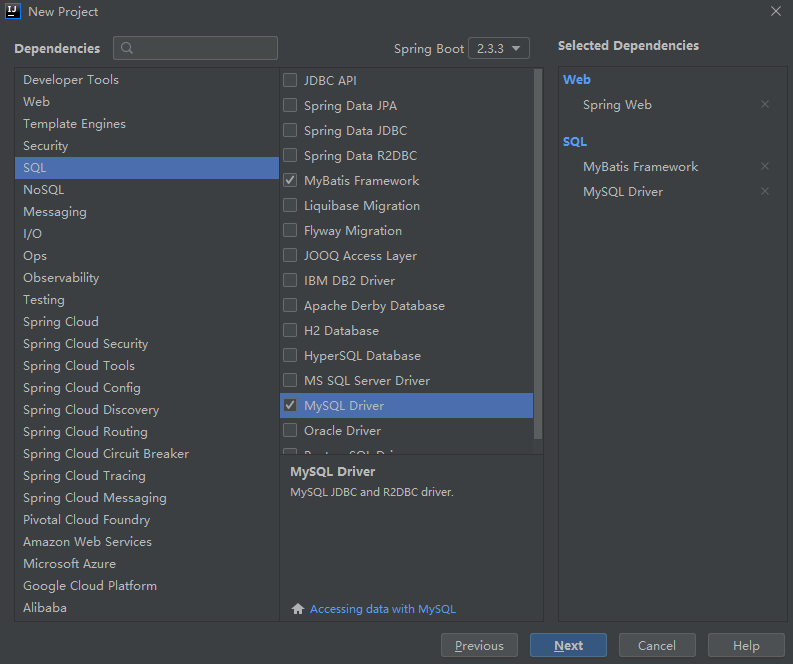
- 使用idea自带的SpringBoot项目创建工具进行创建,选中自己所需模块
![]()
![]()
-
maven进行项目管理,其中pom.xml文件中会生成以下依赖(SpringBoot开启了所需功能的启动器,会自动将你所需模块可能用到的jar全部导入)
![]() View Code
View Code<?xml version="1.0" encoding="UTF-8"?> <project xmlns="http://maven.apache.org/POM/4.0.0" xmlns:xsi="http://www.w3.org/2001/XMLSchema-instance" xsi:schemaLocation="http://maven.apache.org/POM/4.0.0 https://maven.apache.org/xsd/maven-4.0.0.xsd"> <modelVersion>4.0.0</modelVersion> <parent> <groupId>org.springframework.boot</groupId> <artifactId>spring-boot-starter-parent</artifactId> <version>2.3.3.RELEASE</version> <relativePath/> <!-- lookup parent from repository --> </parent> <groupId>com.examin</groupId> <artifactId>smdemo</artifactId> <version>0.0.1-SNAPSHOT</version> <packaging>war</packaging> <name>smdemo</name> <description>Demo project for Spring Boot</description> <properties> <java.version>1.8</java.version> </properties> <dependencies> <dependency> <groupId>org.springframework.boot</groupId> <artifactId>spring-boot-starter-web</artifactId> </dependency> <dependency> <groupId>org.mybatis.spring.boot</groupId> <artifactId>mybatis-spring-boot-starter</artifactId> <version>2.1.3</version> </dependency> <dependency> <groupId>org.springframework.boot</groupId> <artifactId>spring-boot-starter-tomcat</artifactId> <scope>provided</scope> </dependency> <dependency> <groupId>org.springframework.boot</groupId> <artifactId>spring-boot-starter-test</artifactId> <scope>test</scope> <exclusions> <exclusion> <groupId>org.junit.vintage</groupId> <artifactId>junit-vintage-engine</artifactId> </exclusion> </exclusions> </dependency> </dependencies> <build> <plugins> <plugin> <groupId>org.springframework.boot</groupId> <artifactId>spring-boot-maven-plugin</artifactId> </plugin> </plugins> </build> </project>
-
配置数据源(在resources目录下有application.properties(或创建application.yml)配置文件,SpringBoot会自动识别并将其作为该项目的总配置文件)
spring:
  datasource:
    driver-class-name: com.mysql.cj.jdbc.Driver
    url: jdbc:mysql://localhost:3306/crud?serverTimezone=GMT%2B8
    username: root
    password: root
- 接下来就是编写代码


首先,是实体类(该类中的两个成员变量均与数据库所建表的列名保持一致)

package com.examin.demo.bean;

/**
 * @Author:S_minveo
 * @Date:2020/9/14 18:38
 * @Description:
 */
public class User {
    private int id;

    private String name;

    private int age;

    private String pass;

    public User() {
    }

    public User(int id, String name, int age, String pass) {
        this.id = id;
        this.name = name;
        this.age = age;
        this.pass = pass;
    }

    public int getId() {
        return id;
    }

    public void setId(int id) {
        this.id = id;
    }

    public String getName() {
        return name;
    }

    public void setName(String name) {
        this.name = name;
    }

    public int getAge() {
        return age;
    }

    public void setAge(int age) {
        this.age = age;
    }

    public String getPass() {
        return pass;
    }

    public void setPass(String pass) {
        this.pass = pass;
    }

    @Override
    public String toString() {
        return "User{" +
                "id=" + id +
                ", name='" + name + '\'' +
                ", age=" + age +
                ", pass='" + pass + '\'' +
                '}';
    }
}
dao层(@Repository注解,该注解的类作为Dao对象(此处为接口),同时需在SpringBoot启动类加上@MapperScan("Dao接口所处的全包名"比如"com.examin.demo.dao
"),Mybatis将自动扫描这个包,找到被@Repository标记的接口,使用动态代理实现方法增强,并交由SpringBoot进行管理。)
@Repository
public interface UserMapper {
    @Select("select * from user")
    List<User> SelectAll();

    @Select("select * from user where id=#{id}")
    User SelectUser(Integer id);

    @Delete("delete from user where id=#{id}")
    int DeleteUser(Integer id);

    @Insert("insert into user (id,name) values(#{id},#{name})")
    int InsertUser(User user);

    @Update("update user set name=#{name} where id=#{id}")
    int UpdateUser(User user);
}
controller层
@Controller
@ResponseBody
public class UserController {

        @Autowired
        UserMapper userMapper;

        @GetMapping("/SelectAll")
        List<User> SelectAll(){
            return userMapper.SelectAll();
        }

        @GetMapping("/SelectUser/{id}")
        User SelectUser(@PathVariable Integer id){
            return userMapper.SelectUser(id);
        }

        @DeleteMapping("/DeleteUser/{id}")
        int DeleteUser(@PathVariable Integer id){
            return userMapper.DeleteUser(id);
        }

        @PostMapping("/InsertUser")
        int InsertUser(@RequestBody User user){
            return userMapper.InsertUser(user);
        }

        @PutMapping("/UpdateUser")
        int UpdateUser(@RequestBody User user){
            return userMapper.UpdateUser(user);
        }
}
运行http://localhost:8080/SelectAll

 浙公网安备 33010602011771号