昨日作业笔记
find补充练习
1.找出根下名字叫做yuchao.pwd的⽂件
2.找出/var下所有超过2M的log⽂件。
3.限定搜索最⼤⽬录为3层,找出系统中的log⽂件。
4.限定搜索最⼤⽬录为2层,找出系统中权限为640的⽂件,且显示其详细信息。
5.限定搜索最⼤⽬录为2层,找出系统中权限为644的⽂件,且统计有多少个。
1.
[root@pig YSL]# find / -name 'yuchao.pwd'
[root@pig YSL]#


2.
[root@pig YSL]# find /var -type f -size +2M
/var/lib/rpm/Packages
/var/lib/rpm/Basenames
/var/log/audit/audit.log
/var/log/messages-20220306
/var/log/bak_log/audit.txt
/var/log/messages-20220314
/var/cache/yum/x86_64/7/base/gen/primary_db.sqlite
/var/cache/yum/x86_64/7/base/6d0c3a488c282fe537794b5946b01e28c7f44db79097bb06826e1c0c88bad5ef-primary.sqlite.bz2
/var/cache/yum/x86_64/7/updates/gen/primary_db.sqlite
/var/cache/yum/x86_64/7/updates/2d69d28700b725aac11caa123929a65d95c7e5d02d45445438cc7c5583aee364-primary.sqlite.bz2
/var/cache/yum/x86_64/7/epel/gen/primary_db.sqlite
/var/cache/yum/x86_64/7/epel/6eefb2557eb8738d68069e56f387cb2a060c1db4edda01d62f6d4282de9ec7a5-primary.sqlite.bz2


3.
[root@pig YSL]#  find / -maxdepth 3 -type f -name '*.log'
/var/log/boot.log
/var/log/vmware-vmsvc.log
/var/log/yum.log
/home/YSL/ysl.log
/test_linux01/我是bob.log
/sbit_test/sbit_ysl.log


4.
[root@pig YSL]# find / -maxdepth 2 -type f -perm 640
/etc/libaudit.conf
/etc/sudo-ldap.conf
/etc/sudo.conf
[root@pig YSL]#


5.
[root@pig YSL]# find / -maxdepth 2 -type f -perm 644
/boot/.vmlinuz-3.10.0-862.el7.x86_64.hmac
/boot/config-3.10.0-862.el7.x86_64
/boot/symvers-3.10.0-862.el7.x86_64.gz
/proc/mtrr
/proc/timer_stats
/run/sshd.pid
/run/dhclient-ens33.pid
/run/crond.pid
/run/auditd.pid
/etc/fstab
/etc/resolv.conf
/etc/GeoIP.conf
/etc/magic
.......................


# -maxdepth 搜索深度,以用户指定的 搜索路径为起点

find 搜索路径 -maxdepth 深度  -type f  -name '*.log'


最顶级的目录
/

第一级目录
/etc
/var
/opt
/usr
/tmp
/home

第二级
/etc/sysconfig
/var/log
/opt/nginx/
/usr/bin/
/usr/sbin/
/tmp/呵呵/
/home/cc03/

第三级

/home/cc03/王力宏.log

第四级
/home/cc03/my/王力宏.log
按照如下要求,查看系统时间
1.查看当前时分秒
[root@localhost ~]# date +%T
20:21:34

2.查看当前⽇期
[root@localhost ~]# date +%F
2022-03-17

3.查看当前系统⽇期和时分秒
[root@localhost ~]# date '+%T %F'
21:18:41 2022-03-17

4.格式化显示时间,格式为 15:27:14 17-03-2022
[root@localhost ~]# date '+%H:%M:%S %d-%m-%Y'
21:23:44 17-03-2022

5.如何纠正,同步系统为正确的互联⽹时间。
[root@localhost ~]# yum -y install ntp ntpdate
[root@localhost ~]# ntpdate ntp2.aliyun.com
17 Mar 21:30:18 ntpdate[7106]: step time server 203.107.6.88 offset -1.582667 sec
history命令
history -c # 清空历史记录命令,清空当前以登录的这个会话,所敲打的命令

所有的历史记录,想要持久化存储,被写入到文件里 ~/.bash_history


1.你登录了一个机器,你的操作,都会被history记录,临时存储在哎内存中
2.退出登录后,记录被写入到文件,永久存储,下一次登录 ,系统会去加载家目录中的资料,也包括 ~/.bash_hisotry


彻底清空的动作
> .bash_history


1.你登录了某机器,做了某操作,不想被记录, 直接hisotry -c ,清空你当前登录后,执行的所有操作

2. 把当前的历史记录,写入到文件中,强制写入(退出登录)
history -w # 把当前的历史记录,内存中的数据,写入到文件里


history -c
history -w

这样操作后下次再登录,就什么也看不到了
day14今日笔记--服务管理
端口查看命令结合管道符
以查看ssh服务为例:

[root@yuanlai-0224 opt]# netstat -tnlp |grep sshd
tcp        0      0 0.0.0.0:22              0.0.0.0:*               LISTEN      1129/sshd
tcp        0      0 127.0.0.1:6010          0.0.0.0:*               LISTEN      125786/sshd: root@p
tcp6       0      0 :::22                   :::*                    LISTEN      1129/sshd
tcp6       0      0 ::1:6010                :::*                    LISTEN      125786/sshd: root@p
network服务
管理linux的网络功能

systemctl stop network 停止

systemctl status network 查看状态

systemctl start network   启动

systemctl restart   重启
systemctl服务管理命令(centos7)
systemctl(英文全拼:system control)用于控制 systemd 系统和管理服务。

语法

systemctl [OPTIONS...] COMMAND [UNIT...]

command 选项字如下:

unit(单元,服务,指的是如sshd,network,nginx,这样的服务名(unit))

这几个指令,就替代了旧版的service 服务名 start/stop/等等
start:启动指定的 unit。
stop:关闭指定的 unit。
restart:重启指定 unit。
reload:重载指定 unit。
status:查看指定 unit 当前运行状态。
is-enabled :查看是否设置了开机自启


替代了旧版的chkconfig 服务名 on/off

enable:系统开机时自动启动指定 unit,前提是配置文件中有相关配置。  设置开机自启
disable:开机时不自动运行指定 unit。  禁用开机自


参数:unit 是要配置的服务名称。
具体用法,比如sshd服务,你也可以更换为其他的内置服务名,即可管理.

- 启动sshd,systemctl start sshd
- 关闭,systemctl stop sshd
- 重启,systemctl restart sshd
- 重新加载 systemctl reload sshd
- 开机自启  ,systemctl enable sshd
- 禁止开机自启,systemctl disbale sshd
- 查看,sshd服务,是否开机自启,systemctl is-enabled sshd.service


列出系统中,所有的内置服务,名字,和状态
systemctl list-units --type service --all      #不加--all就是只列出正在运行的
运行中的,挂掉的全列出来


可以利用该命令,搜索出,系统内置服务名的完整名称,才可以去管理
[root@yuanlai-0224 ~]# systemctl list-units --type service --all |grep ssh
  sshd-keygen.service                                   loaded    inactive dead    OpenSSH Server Key Generation
  sshd.service                                          loaded    active   running OpenSSH server daemon


[root@yuanlai-0224 ~]# systemctl is-enabled sshd.service
enabled
centos6的服务管理命令
在centos6时代,是用service管理服务的运行状态

service命令用于对系统服务进行管理,比如启动(start)、停止(stop)、重启(restart)、重新加载配置(reload)、查看状态(status)等。

# service mysqld  指令      #打印指定服务mysqld的命令行使用帮助。

# service mysqld start    #启动mysqld

# service mysqld stop    #停止mysqld

# service mysqld restart    #重启mysqld (先停止,再运行 ,进程会断开,id会变化)

# service mysqld reload    # 当你修改了mysqld程序的配置文件,需要重新加载该配置文件,而不重启
chkconfig: 指定服务是否开机启动

sshd 远程连接服务
network 提供网络的服务

设置开机自启


提供了一个维护/etc/rc[0~6] d 文件夹的命令行工具,它减轻了系统直接管理这些文件夹中的符号连接的负担。chkconfig主要包括5个原始功能:为系统管理增加新的服务、为系统管理移除服务、列出单签服务的启动信息、改变服务的启动信息和检查特殊服务的启动状态。当单独运行chkconfig命令而不加任何参数时,他将显示服务的使用信息。

[root@localhost www]# chkconfig --list    #查看系统程序列表

[root@localhost www]# chkconfig httpd on  #将httpd加入开机启动

[root@localhost www]# chkconfig httpd off  #关闭httpd开机启动


备注:
在centos7中,service启停服务的命令和 chkconfig命令,都被统一整合为了systemctl
并且你依然可以使用旧的命令,系统会自动的转变为systemctl去执行。
做了向下兼容的操作,新命令,兼容旧命令。
修改网络模式,修改静态ip,动态ip获取方式
1.确保你的机器,是连接的网络的,是插上了网线的。(模拟了物理服务器的软件是vmware)
2.进入系统,查看软件的网络配置文件内容
进入网卡配置文件目录
[root@yuanlai-0224 ~]# cd /etc/sysconfig/network-scripts/
[root@yuanlai-0224 network-scripts]#
[root@yuanlai-0224 network-scripts]#
[root@yuanlai-0224 network-scripts]# ll
总用量 248
-rw-r--r--. 1 root root 310 2月 25 15:12 ifcfg-ens33
-rw-r--r--. 1 root root 254 1月 3 2018 ifcfg-lo
lrwxrwxrwx. 1 root root 24 2月 25 15:05 ifdown -> ../../../usr/sbin/ifdown
-rwxr-xr-x. 1 root root 654 1月 3 2018 ifdown-bnep
-rwxr-xr-x. 1 root root 6569 1月 3 2018 ifdown-eth
-rwxr-xr-x. 1 root root 6190 4月 11 2018 ifdown-ib
-rwxr-xr-x. 1 root root 781 1月 3 2018 ifdown-ippp
-rwxr-xr-x. 1 root root 4540 1月 3 2018 ifdown-ipv6
lrwxrwxrwx. 1 root root 11 2月 25 15:05 ifdown-isdn -> ifdown-ippp
-rwxr-xr-x. 1 root root 2102 1月 3 2018 ifdown-post
-rwxr-xr-x. 1 root root 1068 1月 3 2018 ifdown-ppp
-rwxr-xr-x. 1 root root 870 1月 3 2018 ifdown-routes
-rwxr-xr-x. 1 root root 1456 1月 3 2018 ifdown-sit
-rwxr-xr-x. 1 root root 1621 3月 18 2017 ifdown-Team
-rwxr-xr-x. 1 root root 1556 3月 18 2017 ifdown-TeamPort
-rwxr-xr-x. 1 root root 1462 1月 3 2018 ifdown-tunnel
lrwxrwxrwx. 1 root root 22 2月 25 15:05 ifup -> ../../../usr/sbin/ifup
-rwxr-xr-x. 1 root root 12415 1月 3 2018 ifup-aliases
-rwxr-xr-x. 1 root root 910 1月 3 2018 ifup-bnep
-rwxr-xr-x. 1 root root 13442 1月 3 2018 ifup-eth
-rwxr-xr-x. 1 root root 10114 4月 11 2018 ifup-ib
-rwxr-xr-x. 1 root root 12075 1月 3 2018 ifup-ippp
-rwxr-xr-x. 1 root root 11893 1月 3 2018 ifup-ipv6
lrwxrwxrwx. 1 root root 9 2月 25 15:05 ifup-isdn -> ifup-ippp
-rwxr-xr-x. 1 root root 650 1月 3 2018 ifup-plip
-rwxr-xr-x. 1 root root 1064 1月 3 2018 ifup-plusb
-rwxr-xr-x. 1 root root 4981 1月 3 2018 ifup-post
-rwxr-xr-x. 1 root root 4154 1月 3 2018 ifup-ppp
-rwxr-xr-x. 1 root root 2001 1月 3 2018 ifup-routes
-rwxr-xr-x. 1 root root 3303 1月 3 2018 ifup-sit
-rwxr-xr-x. 1 root root 1755 3月 18 2017 ifup-Team
-rwxr-xr-x. 1 root root 1876 3月 18 2017 ifup-TeamPort
-rwxr-xr-x. 1 root root 2711 1月 3 2018 ifup-tunnel
-rwxr-xr-x. 1 root root 1836 1月 3 2018 ifup-wireless
-rwxr-xr-x. 1 root root 5419 1月 3 2018 init.ipv6-global
-rw-r--r--. 1 root root 19948 1月 3 2018 network-functions
-rw-r--r--. 1 root root 31027 1月 3 2018 network-functions-ipv6
[root@yuanlai-0224 network-scripts]#
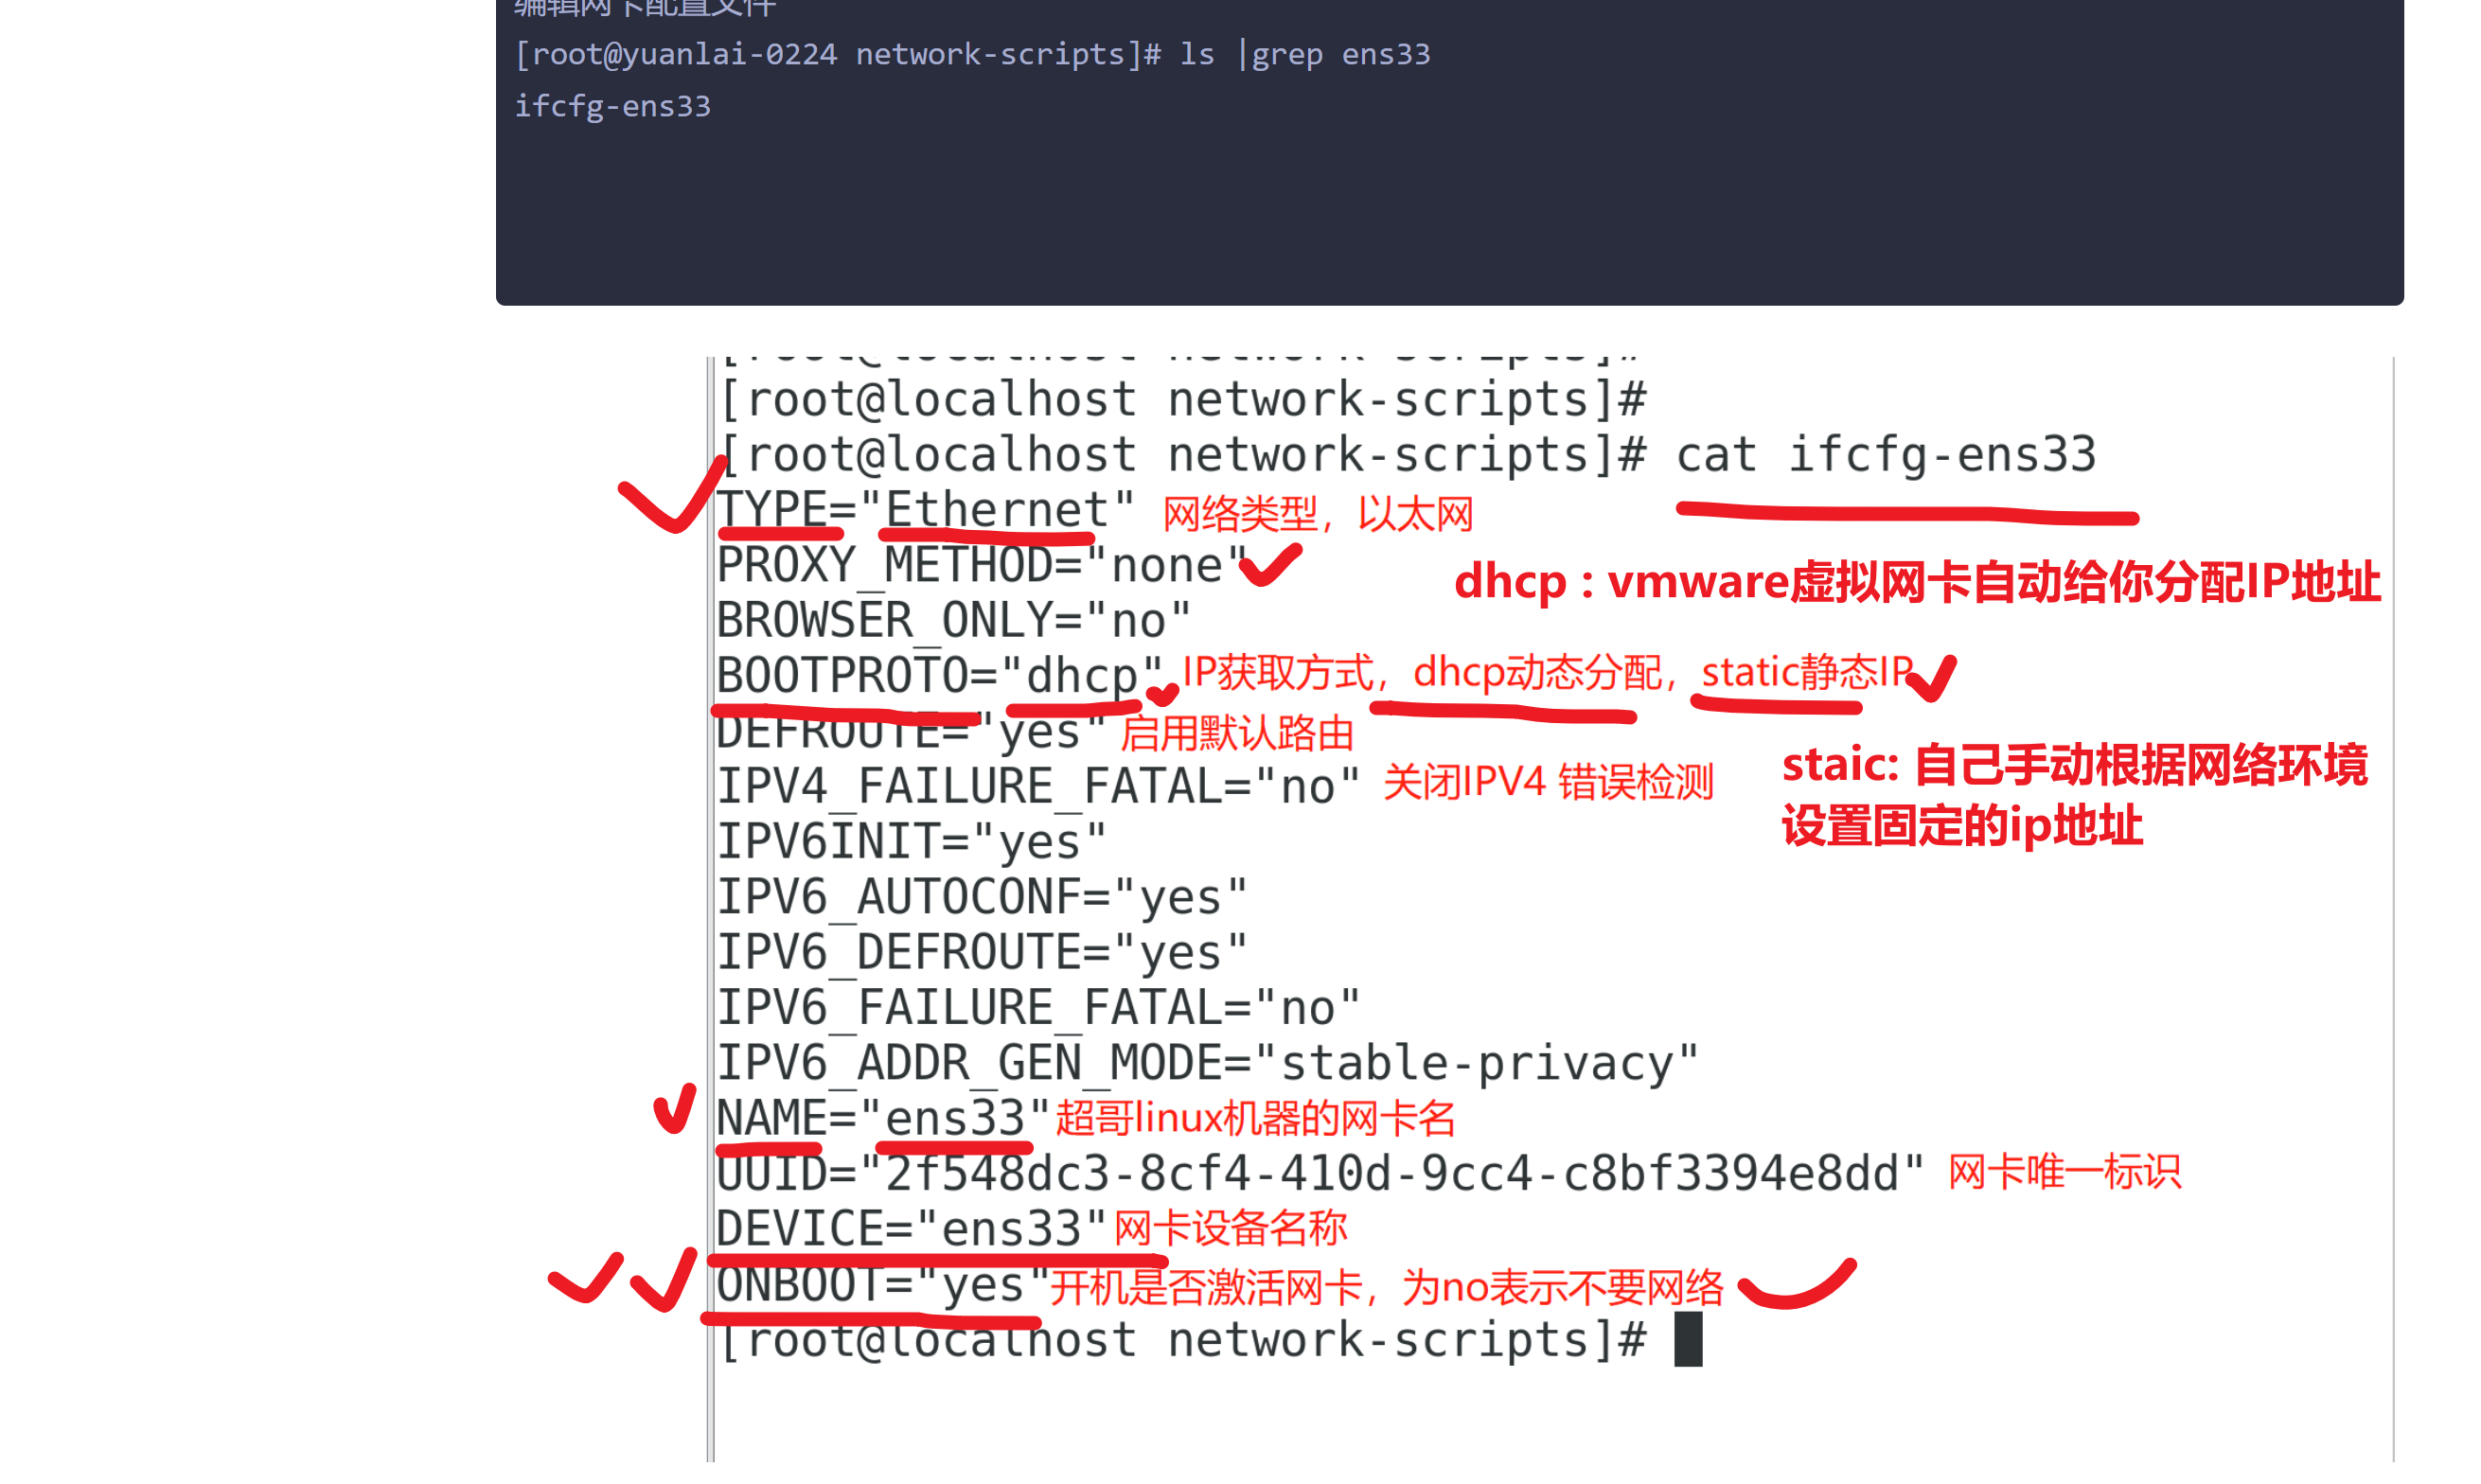
3.编辑网卡的配置文件
[root@yuanlai-0224 network-scripts]# ls |grep ens33
ifcfg-ens33
4.需要关闭,禁用centos7在图形化下,设置的网络服务,同时管理wifi和有线
服务名  NetworkManager

systemctl stop NetworkManager # 关闭
systemctl is-enabled NetworkManager  # 查看是否开机自启

# 禁止开机运行
systemctl disbale NetworkManager


5.启动管理网络的服务
systemctl start network

systemctl  status network # 查看网络服务状态


6.通过ip命令,查看ip地址信息
具体改静态ip的过程
查看你的vmware虚拟网卡,网络环境是什么(NAT)

桥接
	你的linux采用桥接,等于你去这个路由器分配的局域网中,拿走一个ip,等于教室多了一个学生

NAT
	网络地址转换
	ip地址映射表
	vmnet8先找到你的虚拟网卡
图解虚拟机是如何上网的
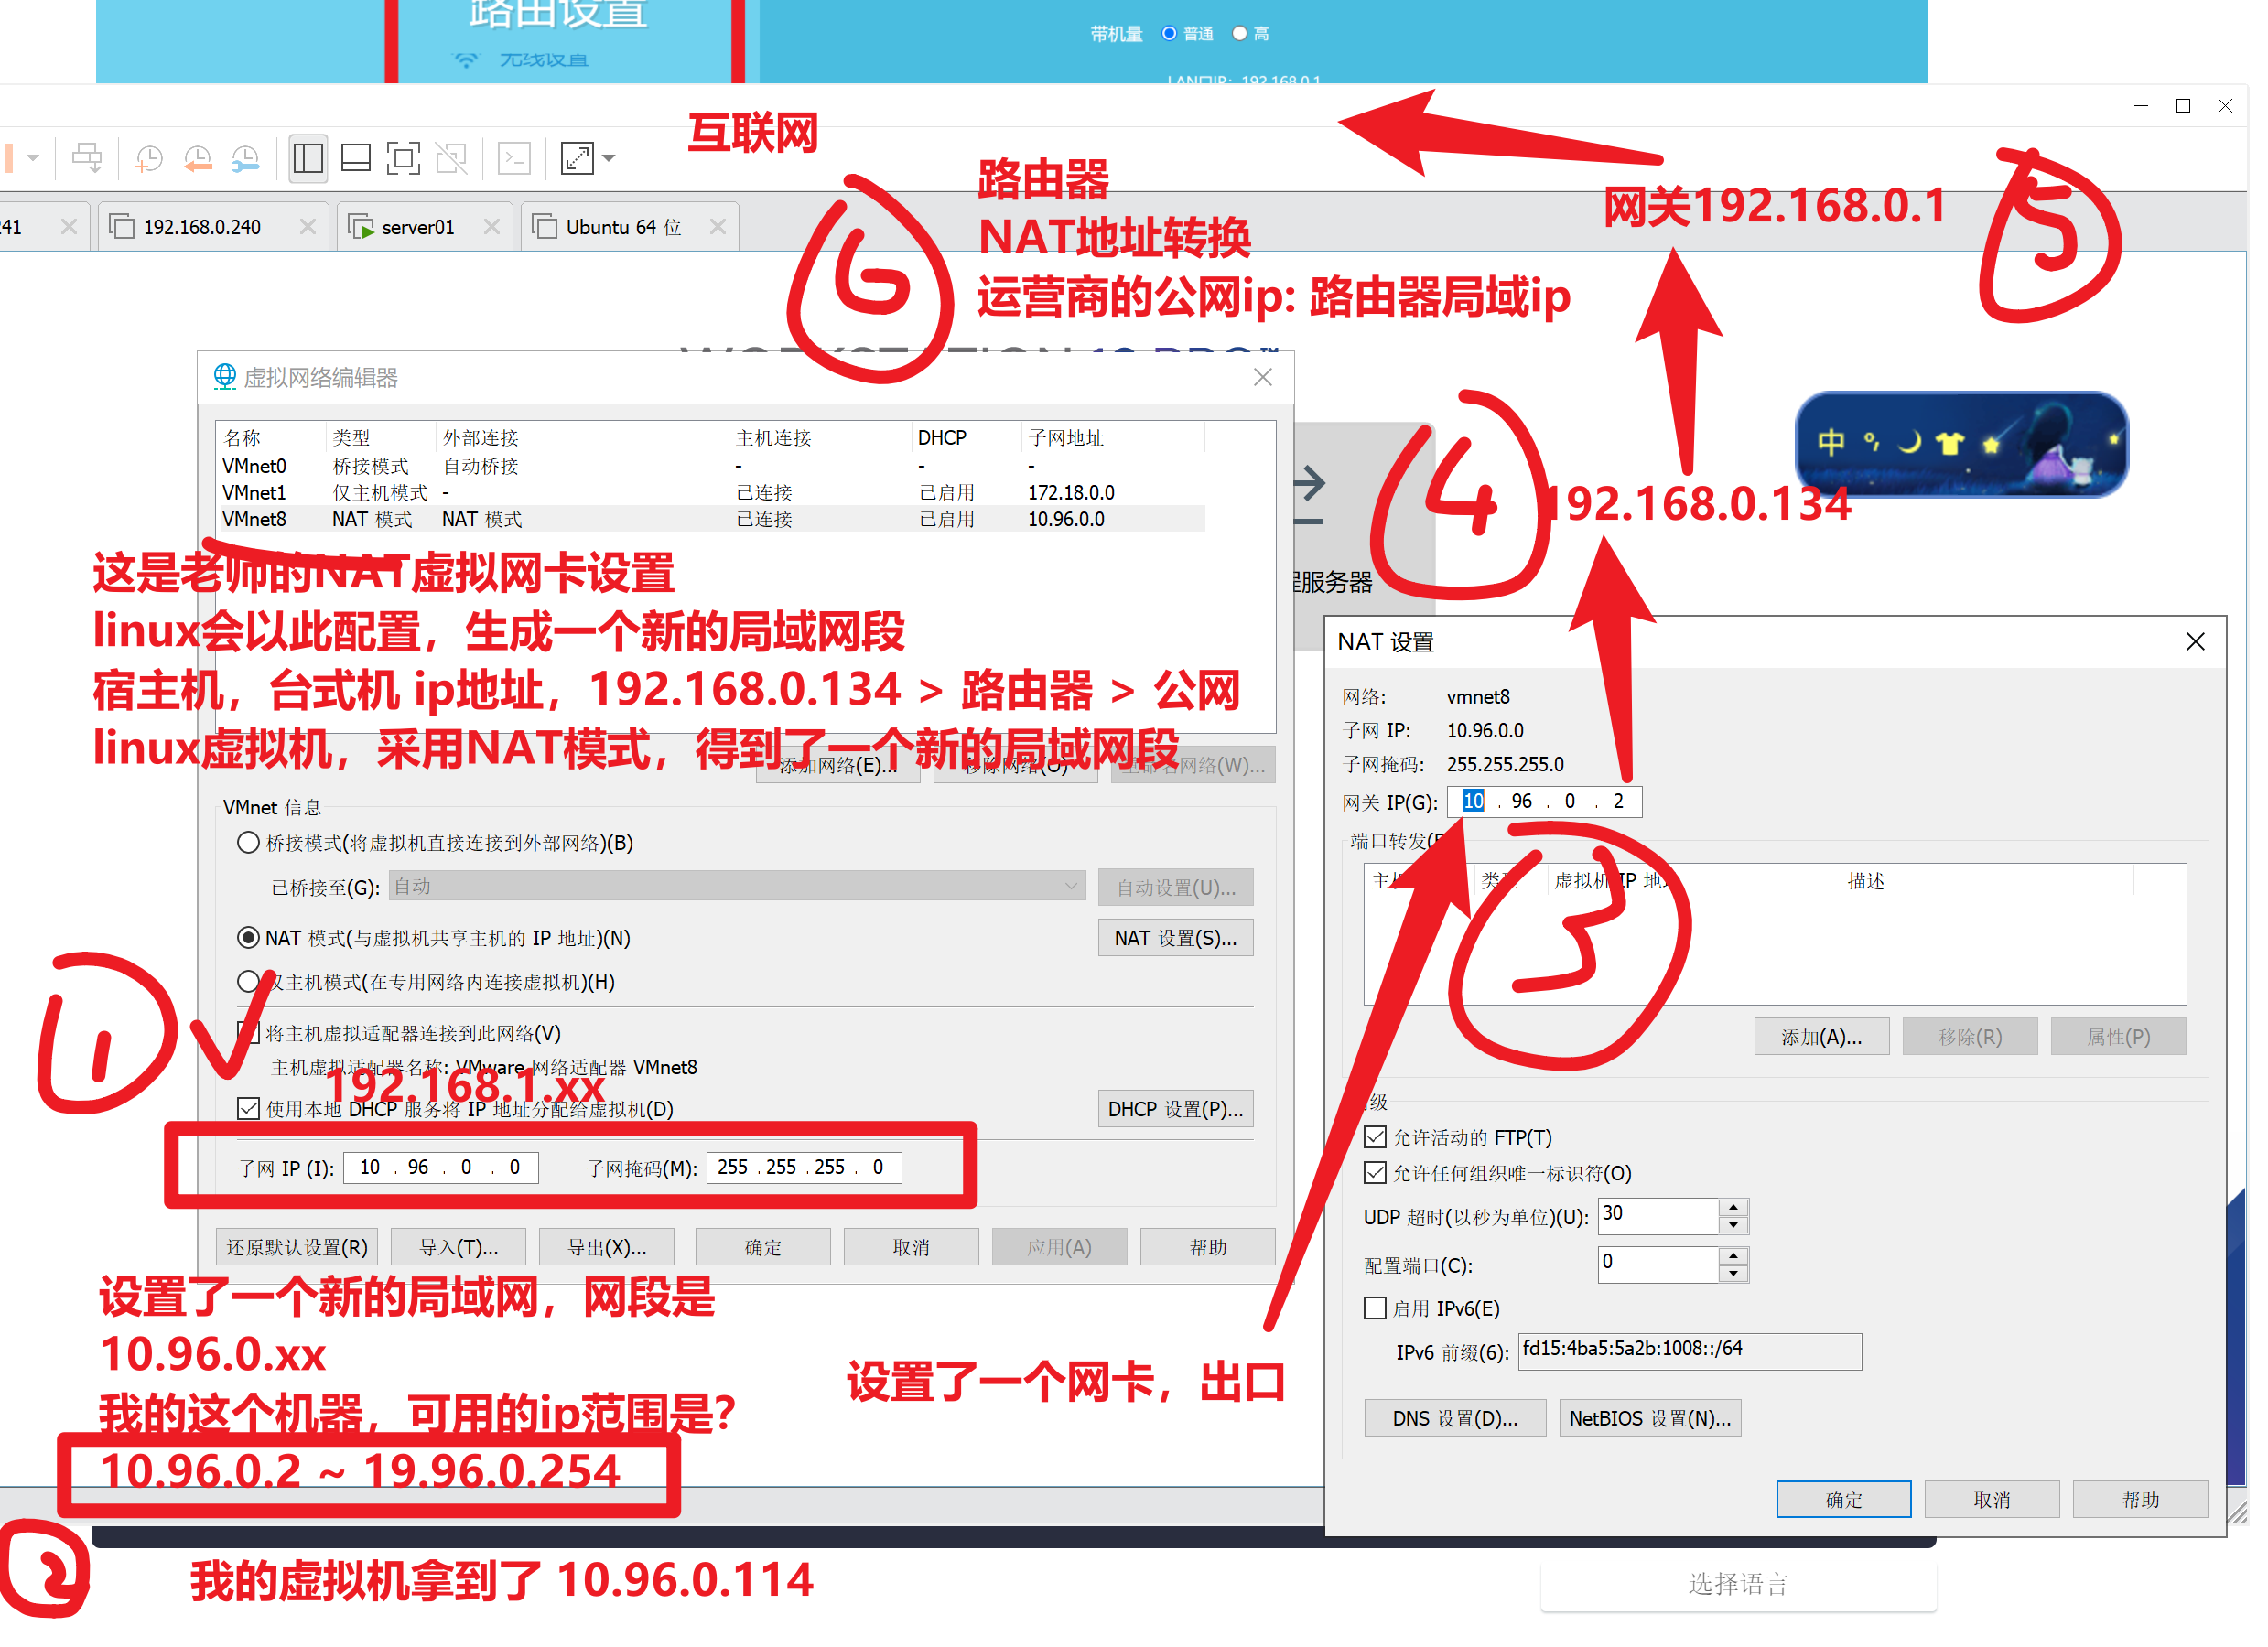
给虚拟机配置静态ip,需要根据如上配置来,找到哪些信息

1. 确认你所在的网段环境 (10.96.0.xx)
2. 确认网关
3. 填写dns服务器地址
4. 修改网卡为 static模式
[root@yuanlai-0224 network-scripts]# cat ifcfg-ens33
TYPE="Ethernet"
PROXY_METHOD="none"
BROWSER_ONLY="no"

# 你要根据你的网络环境修改的信息如下这几个
BOOTPROTO="static"
IPADDR="10.96.0.77"
NETMASK="255.255.255.0"
GATEWAY="10.96.0.2"
DNS1='114.114.114.114'
DNS2='115.115.115.115'

DEFROUTE="yes"
IPV4_FAILURE_FATAL="no"
IPV6INIT="yes"
IPV6_AUTOCONF="yes"
IPV6_DEFROUTE="yes"
IPV6_FAILURE_FATAL="no"
IPV6_ADDR_GEN_MODE="stable-privacy"
NAME="ens33"
UUID="c00d6dd2-38dd-4f08-ba63-44333a825502"
DEVICE="ens33"
ONBOOT="yes"
修改配置文件,一定要重启网络服务

systemctl restart network
重新使用新的ip地址,试试连接

[root@yuanlai-0224 ~]# ip addr
1: lo: <LOOPBACK,UP,LOWER_UP> mtu 65536 qdisc noqueue state UNKNOWN group default qlen 1000
    link/loopback 00:00:00:00:00:00 brd 00:00:00:00:00:00
    inet 127.0.0.1/8 scope host lo
       valid_lft forever preferred_lft forever
    inet6 ::1/128 scope host
       valid_lft forever preferred_lft forever
2: ens33: <BROADCAST,MULTICAST,UP,LOWER_UP> mtu 1500 qdisc pfifo_fast state UP group default qlen 1000
    link/ether 00:0c:29:c2:f1:f1 brd ff:ff:ff:ff:ff:ff
    inet 10.96.0.77/24 brd 10.96.0.255 scope global noprefixroute ens33
       valid_lft forever preferred_lft forever
    inet6 fe80::409b:ebcf:7ff7:7764/64 scope link noprefixroute
       valid_lft forever preferred_lft forever
3: virbr0: <NO-CARRIER,BROADCAST,MULTICAST,UP> mtu 1500 qdisc noqueue state DOWN group default qlen 1000
    link/ether 52:54:00:2e:55:62 brd ff:ff:ff:ff:ff:ff
    inet 192.168.122.1/24 brd 192.168.122.255 scope global virbr0
       valid_lft forever preferred_lft forever
4: virbr0-nic: <BROADCAST,MULTICAST> mtu 1500 qdisc pfifo_fast master virbr0 state DOWN group default qlen 1000
    link/ether 52:54:00:2e:55:62 brd ff:ff:ff:ff:ff:ff
[root@yuanlai-0224 ~]#
[root@yuanlai-0224 ~]#
[root@yuanlai-0224 ~]# ping baidu.com
PING baidu.com (220.181.38.148) 56(84) bytes of data.
64 bytes from 220.181.38.148 (220.181.38.148): icmp_seq=1 ttl=128 time=8.80 ms


64 bytes from 220.181.38.148 (220.181.38.148): icmp_seq=3 ttl=128 time=7.45 ms
64 bytes from 220.181.38.148 (220.181.38.148): icmp_seq=4 ttl=128 time=7.10 ms

最后可以访问外网,证明你的静态ip配置是对的

 浙公网安备 33010602011771号