gin(欢呼)
 gin框架的快速上手使用,gin、jwt、gorm,提供常见前端模板页,web快速成型
gin
导包
进入ide中,点击下方终端,一条命令解决
go get github.com/gin-gonic/gin
一个简单示例Gin yes
package main

import (
    "github.com/gin-gonic/gin"
)

func main() {
    route := gin.Default()
    route.GET("/index", Hello)
    route.Run(":8080")
}

func Hello(c *gin.Context) {
    c.String(200, "Gin Yes!你在访问/index,后端执行了Hello函数")
}
让我们来看这段示例代码
创建默认路由,通俗一点的说就是uri管理器:route := gin.Default()
绑定路由,GET请求/index会触发hello方法:route.GET("/gin", hello)
开放8080端口,通过8080端口开放web服务:route.Run("0.0.0.0:8080")
ps:这个0.0.0.0表示本机上的所有网卡,写127的话则仅本机可以访问
在访问url触发的函数中,有个参数是*gin.Context
这个Context对象可以用来读取请求包和控制返回包
请求包
获取header
以获取UA为例,以下代码可以获取UA头
UA:=c.GetHeader("User-Agent")
获取请求参数
//http:xxx.com/download?filename=1.txt
//a="1.txt"
a:=c.Query("filename")
保存上传的文件
保存请求包中上传的文件
fileHeader, err := c.FormFile("file")
c.SaveUploadedFile(fileHeader, "./Upload/"+fileHeader.Filename)
响应包
header
修改返回包的header,使用c.Header("【头】":"【值】")
以content-type为例子,下面代码为修改服务器返回包content-type的代码
//纯文本的content-type
c.Header("content-type", "text/plain; charset=utf-8")

//能作为html解析的content-type
c.Header("content-type", "text/html; charset=utf-8")

//下载的content-type
c.Header("content-type", "application/octet-stream")
字符串
返回一个字符串c.String(200,"抽象")
200是状态码,后面第二个参数是返回的字符串
通过此方法返回的字符串不会作为html解析(除非你自己设置content-type)
json
type Myjson struct {                //结构体
    Id       int                    //Id值(要大写开头)
    Name     string `json:"dog"`    //名字(要大写开头)
    Password string `json:"-"`
}

func json(c *gin.Context) {
    dog := Myjson{666, "dog", "123456"}
    c.JSON(200, dog)
}
返回包响应json,结构体要满足驼峰命名法,给json标记为默认值,若为-则不渲染至返回包中
文件
返回一个文件,示例代码
c.File("download/FileDownload.exe")
控制下载后的文件名称
AfterDownloadFileName = c.Query("filename")
fmt.Println(AfterDownloadFileName)
c.Header("Content-Disposition", fmt.Sprintf(`attachment; filename="%s"`, AfterDownloadFileName))
html
首先在主函数中,加载模板文件
route.LoadHTMLGlob("tmpl/*") //加载html模板
在tmpl文件夹下放入模板home.html
<!DOCTYPE html>
<html lang="en">
<head>
    <meta charset="UTF-8">
    <title>Home</title>
</head>
<body>
<h1>hello {{.username}}</h1>
</body>
</html>
对应函数
func Home(c *gin.Context) {
    c.HTML(200, "home.html", gin.H{"username": "AAA"})
}
主函数加载模板
模板文件中用{{.username}}进行占位
函数中使用HTML函数进行模板渲染并返回
其中第一个参数为状态码
第二个参数为模板文件名
第三个参数为要注入的参数值(要为gin.H{"xx":"xx"}的格式)
ps:小心SSTI
重定向
让浏览器进行跳转
c.Redirect(http.StatusMovedPermanently, "http://www.baidu.com/")
简单登录
使用gin自带的登录中间件进行登录控制
route := gin.Default()
accounts := gin.Accounts{
    "admin": "gin-pwd",
}
route.Use(gin.BasicAuth(accounts))
route.GET("/index", Hello)
route.Run(":8080")
jwt登录
jwt登录需要引入jwt包
go get -u github.com/golang-jwt/jwt/v5
用以下代码创建jwt和验证jwt并取出对应内容
记得自己修改jwt密钥 !!!
记得自己修改jwt密钥 !!!
记得自己修改jwt密钥 !!!
package LoginJWT

import (
    "fmt"
    "github.com/golang-jwt/jwt/v5"
    "time"
)

// jwt的密钥!!!!!!
var key []byte = []byte("kC4wAAas0sWW1hXpNGsv8KKsDw2lASdcOsgnJdrxhhJjxssoAwavcytTaYIrlFGx")
var t *jwt.Token
var httpJWT string //返回的jwt

// 传入要记录的参数,生成签名后的jwt
func CreateJwt(loginInfo string) string {
    // 获取第二天零点时间戳
    nowTime := time.Now()
    nowTimeStr := nowTime.Format("2006-01-02") //这个是golang时间戳的参考时间
    //使用Parse 默认获取为UTC时区 需要获取本地时区 所以使用ParseInLocation
    t2, _ := time.ParseInLocation("2006-01-02", nowTimeStr, time.Local)
    tomorrow := t2.AddDate(0, 0, 1).Unix()
    fmt.Println(tomorrow)

    t = jwt.NewWithClaims(jwt.SigningMethodHS256,
        jwt.MapClaims{
            "exp":       tomorrow,  //第二天失效
            "loginInfo": loginInfo, //记录自定义的jwt内容
        })
    httpJWT, _ = t.SignedString(key)
    return httpJWT
}

// 传入jwt字符串进行解析
func ParJWT(tokenString string) (info string, err error) {
    info = ""
    err = nil

    token, err := jwt.Parse(tokenString, func(token *jwt.Token) (interface{}, error) {
        // 禁止空签名
        if _, ok := token.Method.(*jwt.SigningMethodHMAC); !ok {
            return nil, fmt.Errorf("Hacker by: %v", token.Header["alg"])
        }
        return key, nil
    })

    if err != nil {
        //jwt验证失败
        return "error", err
    }

    if claims, ok := token.Claims.(jwt.MapClaims); ok {
        //返回jwt的内容
        fmt.Println(claims["loginInfo"])
        return (claims["loginInfo"]).(string), err
    } else {
        fmt.Println(err)
        return "error", err
    }
    return "error", err
}
登录页面
package LoginJWT

import (
    "github.com/gin-gonic/gin"
)

func Login(c *gin.Context) {
    c.HTML(200, "Login.html", nil)
}

func CheckPwd(c *gin.Context) {
//这里写登录的判断!!!!!
    if c.PostForm("username") == "admin" && c.PostForm("password") == "ADccc22gin" {
        jwt := CreateJwt(c.PostForm("username"))
        c.SetCookie("gint", jwt, 3600, "/", "/", false, true)
        c.String(200, "login yes")

    } else {
        c.SetCookie("gint", "no", 3600, "/", "/", false, true)
        c.HTML(200, "Error.html", nil)
    }
}

func CheckJWT(c *gin.Context) {
    gintjwt, err := c.Cookie("gint")
    if err != nil {
        c.HTML(200, "Error.html", nil)
        c.Abort()
        return
    }
    info, err := ParJWT(gintjwt)
    if info != "error" && err != nil {
        c.Next()
        return
    } else {
        c.HTML(200, "Error.html", nil)
        c.Abort()
        return
    }
}
GORM
安装
go get -u gorm.io/gorm
go get -u gorm.io/driver/sqlite
连接SQLite
import (
  "gorm.io/driver/sqlite" // Sqlite driver based on CGO
  // "github.com/glebarez/sqlite" // Pure go SQLite driver, checkout https://github.com/glebarez/sqlite for details
  "gorm.io/gorm"
)

// github.com/mattn/go-sqlite3
db, err := gorm.Open(sqlite.Open("gorm.db"), &gorm.Config{})
查询单条数据
type Result struct {
    username string
    hash     string
    salt     string
    uid      int
}
var result Result
r := db.Raw("SELECT username,hash,salt,uid FROM user where username=?", "admin").Row()
r.Scan(&result.username, &result.hash, &result.salt, &result.uid)
fmt.Println(result)
查询多条记录
type Result struct {
    username string
    hash     string
    salt     string
    uid      int
}

var result Result
rs, _ := db.Raw("SELECT username,hash,salt,uid FROM user ").Rows()
defer rs.Close()
for rs.Next() {
    rs.Scan(&result.username, &result.hash, &result.salt, &result.uid)
    fmt.Println(result)
    // 业务逻辑...
}
前端模板
为gin提供的一些前端模板,实现登录,表格展示,导航页,统计图,ok/error页面
表格展示
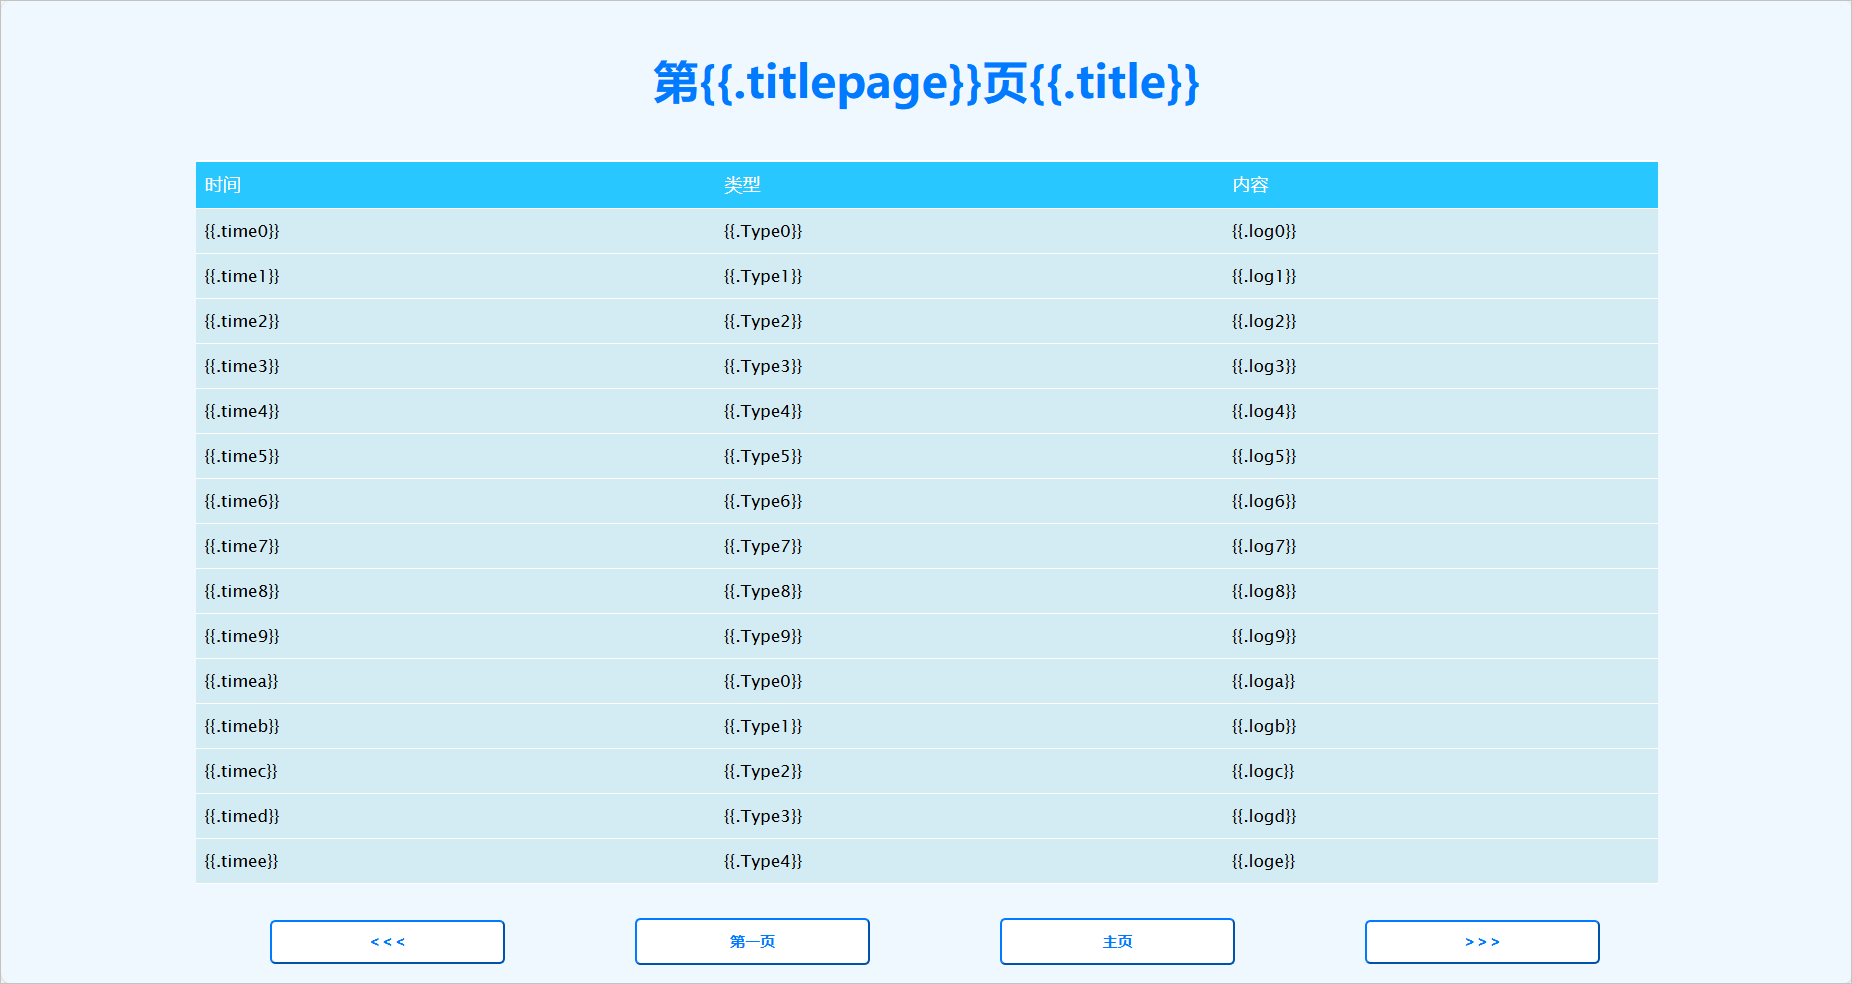
<tr><td>{{.time0}} </td><td>{{.Type0}}</td><td>{{.log0}}</td></tr>为数据具体的值
鼠标悬停在具体的值上会有变色效果
底部翻页的url和数据包格式按需更改
<!DOCTYPE html>
<html lang="zh-CN">
<head>
<meta charset="UTF-8">
<meta name="viewport" content="width=device-width, initial-scale=1.0">
<title>表格</title>
<style>
body {
display: flex;
justify-content: center; /* 水平居中 */
align-items: center; /* 垂直居中 */
height: 100vh; /* 使body高度等于视口高度 */
margin: 0; /* 移除默认的外边距 */
background-color: #f0f8ff; /* 可选:为页面背景设置淡蓝色 */
}
table {
width:1000px;
border-collapse: collapse;
}
.blueButton {
width: 15%;
padding: 10px;
margin-top: 20px;
margin-left: 8%;
background-color: #ffffff;
border-color: #007BFF;
color: #007BFF;
text-decoration: none;
font-weight: bold;
border-radius: 5px;
}
.blueButton:hover {
background-color: #e4f0ff;
}
#box-table-a
{
font-family: "Lucida Sans Unicode", "Lucida Grande", Sans-Serif;
font-size: 12px;
margin: 45px;
width: 1300px; /*表格宽度*/
text-align: left;
border-collapse: collapse;
margin-bottom: 10px;
}
#box-table-a th
{
font-size: 13px;
font-weight: normal;
padding: 8px;
background: #29c7ff;
border-top: 2px solid #ffffff;
border-bottom: 1px solid #fff;
color: rgb(255, 255, 255);
font-size: 16px; /*表格头部字体大小*/
}
#box-table-a td
{
padding: 8px;
background: #d3ebf3;
border-bottom: 1px solid #fff;
color: #000000;
font-size: 15px; /*表格内容字体大小*/
border-top: 1px solid transparent;
}
#box-table-a tr:hover td
{
background: #a4e6ee;
color: rgb(0, 0, 0);
}
</style>
</head>
<body>
<div>
<h1 style="color: #007BFF; font-size: 40px;text-align: center;">第{{.titlepage}}页{{.title}}</h1>
<div>
<table id="box-table-a">
<thead>
<tr>
<th>时间</th>
<th>类型</th>
<th>内容</th>
</tr>
</thead>
<tbody>
<!-- 15行数据 -->
<tr><td>{{.time0}} </td><td>{{.Type0}}</td><td>{{.log0}}</td></tr>
<tr><td>{{.time1}} </td><td>{{.Type1}}</td><td>{{.log1}}</td></tr>
<tr><td>{{.time2}} </td><td>{{.Type2}}</td><td>{{.log2}}</td></tr>
<tr><td>{{.time3}} </td><td>{{.Type3}}</td><td>{{.log3}}</td></tr>
<tr><td>{{.time4}} </td><td>{{.Type4}}</td><td>{{.log4}}</td></tr>
<tr><td>{{.time5}} </td><td>{{.Type5}}</td><td>{{.log5}}</td></tr>
<tr><td>{{.time6}} </td><td>{{.Type6}}</td><td>{{.log6}}</td></tr>
<tr><td>{{.time7}} </td><td>{{.Type7}}</td><td>{{.log7}}</td></tr>
<tr><td>{{.time8}} </td><td>{{.Type8}}</td><td>{{.log8}}</td></tr>
<tr><td>{{.time9}} </td><td>{{.Type9}}</td><td>{{.log9}}</td></tr>
<tr><td>{{.timea}} </td><td>{{.Type0}}</td><td>{{.loga}}</td></tr>
<tr><td>{{.timeb}} </td><td>{{.Type1}}</td><td>{{.logb}}</td></tr>
<tr><td>{{.timec}} </td><td>{{.Type2}}</td><td>{{.logc}}</td></tr>
<tr><td>{{.timed}} </td><td>{{.Type3}}</td><td>{{.logd}}</td></tr>
<tr><td>{{.timee}} </td><td>{{.Type4}}</td><td>{{.loge}}</td></tr>
</tbody>
</table>
</div>
<!-- 此处按需修改 -->
<div>
<form action="/AAA" method="post" id="myForm1"style="display: inline;">
<input type="hidden" name="page" value={{.prepage}}>
<input type="submit" value="< < <" class="blueButton">
</form>
<form action="/BBB" method="post" id="myForm0" style="display: inline;">
<input type="hidden" name="page" value=0>
<input type="submit" value="第一页" class="blueButton">
</form>
<form action="/CCC" method="get" id="myForm" style="display: inline;">
<input type="submit" value="主页" class="blueButton">
</form>
<form action="/DDD" method="post" id="myForm2" style="display: inline;">
<input type="hidden" name="page" value={{.nextpage}}>
<input type="submit" value="> > >" class="blueButton">
</form>
</div>
</div>
</body>
</html>
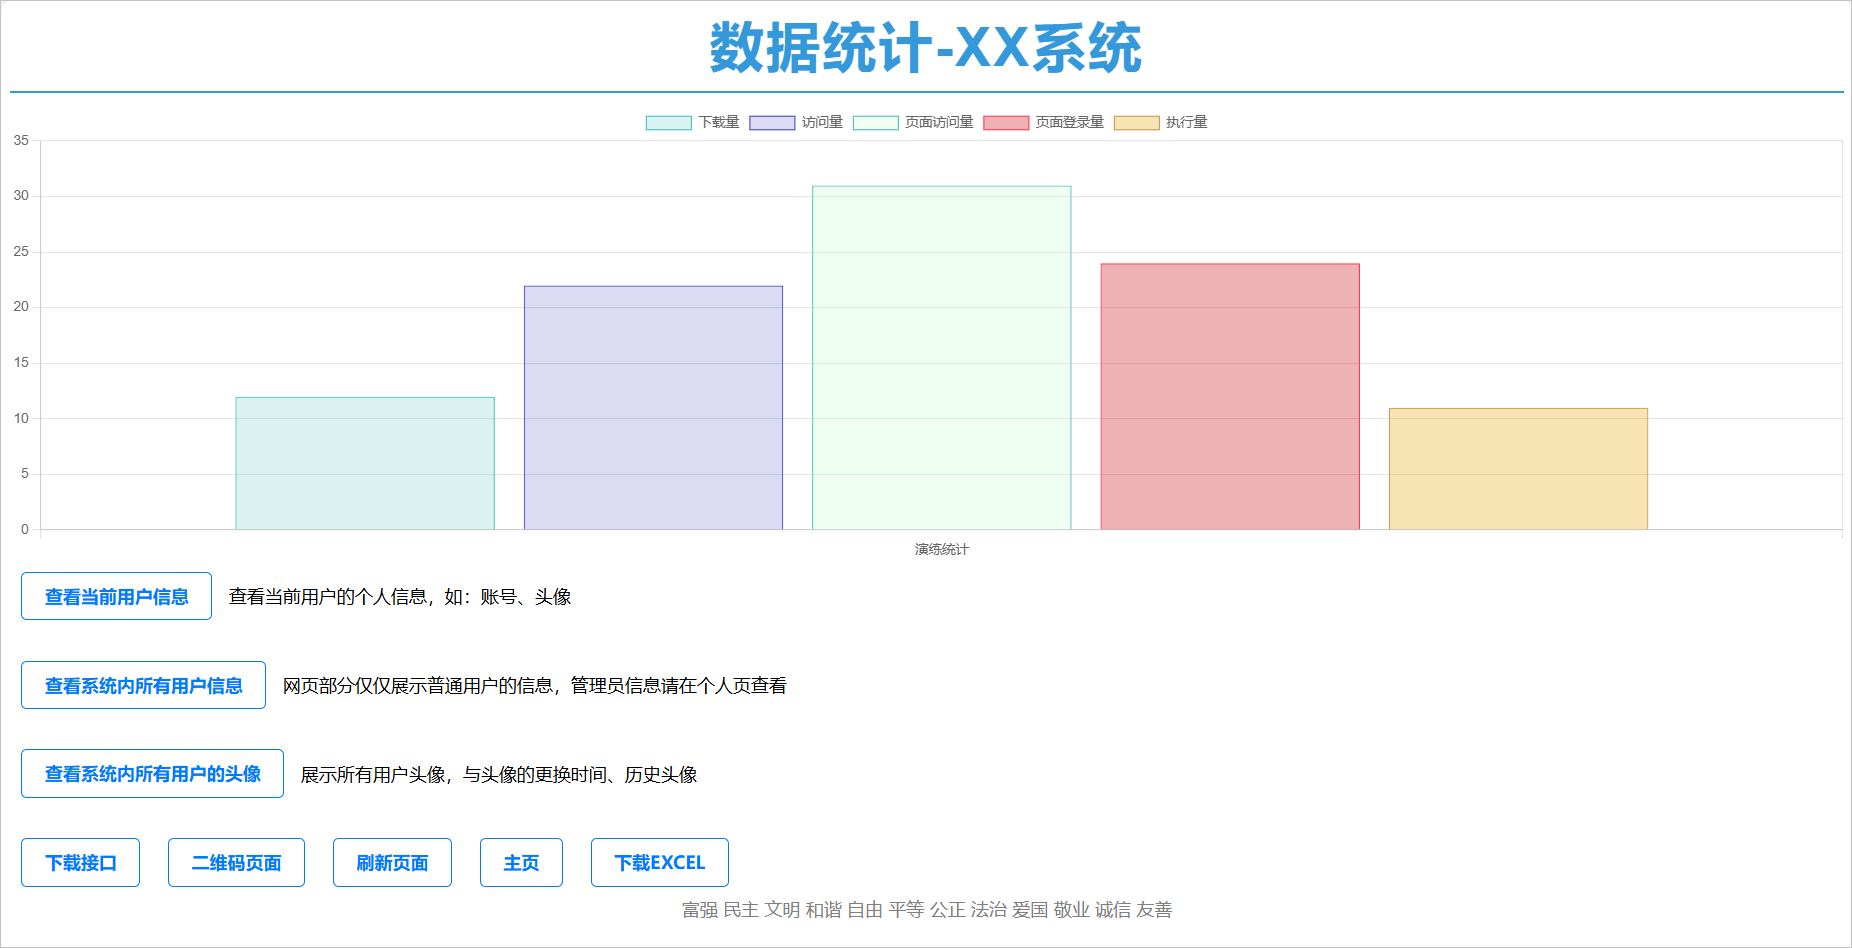
统计图
通过一个条形统计图,下方有多个按钮
<!DOCTYPE html>
<html lang="en">
<head>
    <meta charset="UTF-8">
    <meta name="viewport" content="width=device-width, initial-scale=1.0">
    <title>Minipage</title>
    <!-- 引入Chart.js库 -->
    <script src="https://cdn.staticfile.net/Chart.js/3.9.1/chart.js"></script>


    <style>
        h1 {
            color: #3498db; /* 蓝色字体 */
            font-family: 'Arial', sans-serif; /* 使用 Arial 字体 */
            text-align: center; /* 文本居中 */
            font-size: 3em; /* 字体大小 */
            margin-top: 0px; /* 上边距 */
            margin-bottom: 10px; /* 下边距 */
            text-transform: uppercase; /* 大写字母 */
            letter-spacing: 2px; /* 字母间距 */
            border-bottom: 2px solid #2e9fcc; /* 下边框 */
            padding-bottom: 10px; /* 下内边距 */
        }

        a {
            color: #007BFF;
            text-decoration: none;
            font-weight: bold;
            transition: color 0.3s ease;
        }
        a:hover {
            color: #0056b3;
        }
        p {
            color: #666;
            line-height: 1.6;
        }
        .links {
            margin-top: 20px;

        }
        .links a {
            margin: 0 10px;
            padding: 10px 20px;
            border: 1px solid #007BFF;
            border-radius: 5px;
            transition: background-color 0.3s ease, color 0.3s ease;
        }
        .links a:hover {
            background-color: #007BFF;
            color: #fff;
        }
        .centered-gray-text {
            text-align: center; /* 文字居中 */
            color: #808080;     /* 灰色,这里使用的是十六进制颜色代码,你也可以使用其他颜色表示方法,如rgb()或颜色名称 */
            font-size: 16px;    /* 可选:设置字体大小 */
            margin: 20px;       /* 可选:设置外边距,使文字与周围元素保持一定距离 */
        }
    </style>
</head>
<body>
<h1>数据统计-xx系统</h1>
<!-- 定义canvas元素 -->
<canvas id="myBarChart" width="400" height="100"></canvas>

<script>
    // 获取canvas元素
    var ctx = document.getElementById('myBarChart').getContext('2d');

    // 配置图表数据 此处按需修改
    var data = {
        labels: ['演练统计'],                                       /*表格标题*/
        datasets: [{
            label: '下载量',                                        /*数据名称*/
            backgroundColor: 'rgba(75, 192, 192, 0.2)',             /*数据背景颜色*/
            borderColor: 'rgba(75, 192, 192, 1)',                   /**数据边框颜色*/
            borderWidth: 1,                                         /*边框厚度*/
            data: [12]                                              /*数据值*/
    },{
        label: '访问量',
        backgroundColor: 'rgba(75, 75, 200, 0.2)',
        borderColor: 'rgba(75, 75, 192, 1)',
        borderWidth: 1,
        data: [22]
    },{
        label: '页面访问量',
        backgroundColor: 'rgba(175, 255, 192, 0.2)',
        borderColor: 'rgba(75, 192, 192, 1)',
        borderWidth: 1,
        data: [31]
    },{
        label: '页面登录量',
        backgroundColor: 'rgba(200, 0, 0, 0.3)',
        borderColor: 'rgba(255, 55, 92, 1)',
        borderWidth: 1,
        data: [24]
    },{
        label: '执行量',
        backgroundColor: 'rgba(230, 165, 0, 0.3)',
        borderColor: 'rgba(200, 155, 92, 1)',
        borderWidth: 1,
        data: [11]
    }]
    };

    // 配置图表选项
    var config = {
        type: 'bar',
        data: data,
        options: {
            scales: {
                y: {
                    beginAtZero: true
                }
            }
        }
    };

    // 创建并渲染图表
    var myBarChart = new Chart(ctx, config);
</script>


<div class="links"><!-- 此处按需修改 -->
    <a href="/AAA">查看当前用户信息</a>
    <span>查看当前用户的个人信息,如:账号、头像</span>

    <p><br></p>
    <a href="/BBB">查看系统内所有用户信息</a>
    <span>网页部分仅仅展示普通用户的信息,管理员信息请在个人页查看</span>
    <p><br></p>

    <a href="/CCC">查看系统内所有用户的头像</a>
    <span>展示所有用户头像,与头像的更换时间、历史头像</span>

    <p><br></p>

    <a href="/DDD">下载接口</a>
    <a href="/EEE">二维码页面</a>
    <a href="/FFF">刷新页面</a>
    <a href="/GGG">主页</a>
    <a href="/HHH">下载EXCEL</a>

</div>

<div class="centered-gray-text">富强 民主 文明 和谐 自由 平等 公正 法治 爱国 敬业 诚信 友善</div>
</body>

</html>
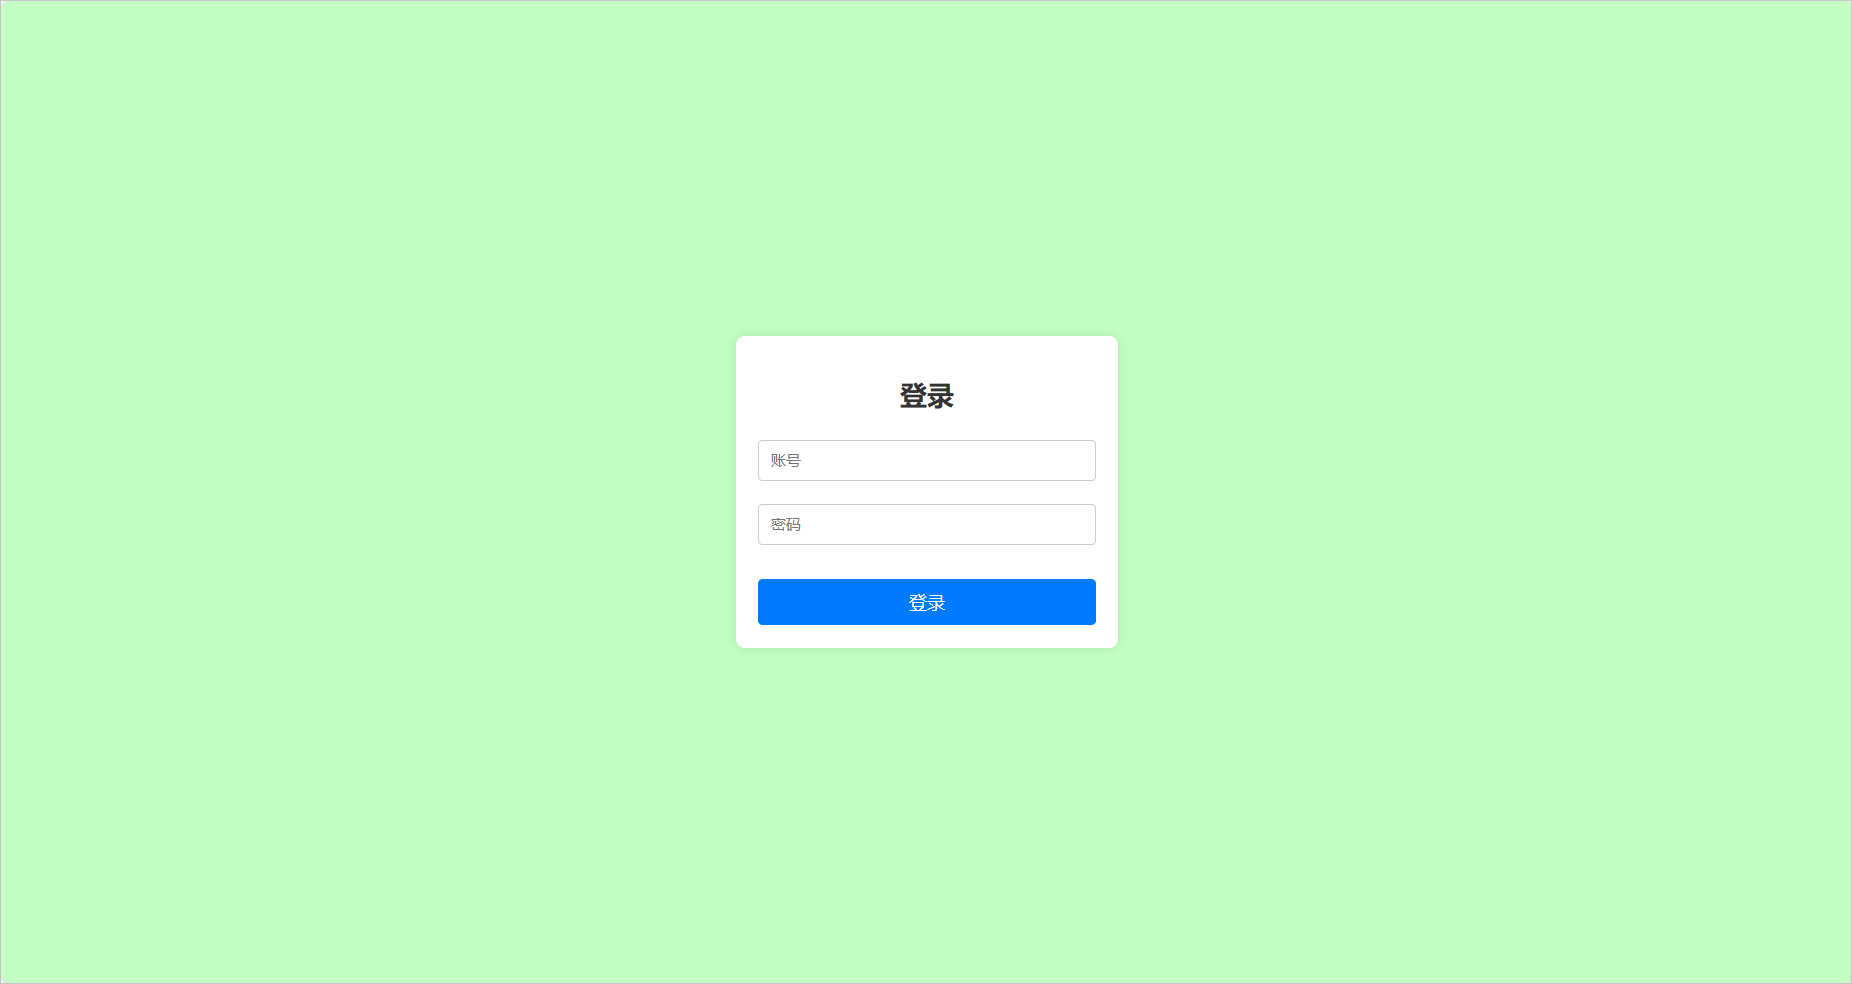
登录框
一个简单的登录框
<!DOCTYPE html>
<html lang="zh-CN">
<head>
    <meta charset="UTF-8">
    <meta name="viewport" content="width=device-width, initial-scale=1.0">
    <title>登录页面</title>
    <style>
        body {
            font-family: Arial, sans-serif;
            background-color: #c3ffc3;
            display: flex;
            justify-content: center;
            align-items: center;
            height: 100vh;
            margin: 0;
        }

        .login-container {
            background-color: #fff;
            padding: 20px;
            border-radius: 8px;
            box-shadow: 0 0 10px rgba(0, 0, 0, 0.1);
            width: 300px;
            text-align: center;
        }

        .login-container h2 {
            margin-bottom: 20px;
            margin: 15px;
            color: #333;
        }

        .login-container input[type="text"],
        .login-container input[type="password"] {
            width: calc(100% - 22px);
            padding: 10px;
            margin: 10px 0;
            border: 1px solid #ccc;
            border-radius: 4px;
        }

        .login-container button {
            width: 100%;
            padding: 10px;
            margin-top: 20px;
            background-color: #007BFF;
            border: none;
            border-radius: 4px;
            color: #fff;
            font-size: 16px;
            cursor: pointer;
        }

        .login-container button:hover {
            background-color: #0056b3;
        }
    </style>
</head>
<body>
<div class="login-container">
    <h2>登录</h2>
    <form action="/CheckPwd" method="post"><!-- 此处按需修改 -->
        <input type="text" name="username" placeholder="账号" required>
        <input type="password" name="password" placeholder="密码" required>
        <button type="submit">登录</button>
    </form>
</div>
</body>
</html>
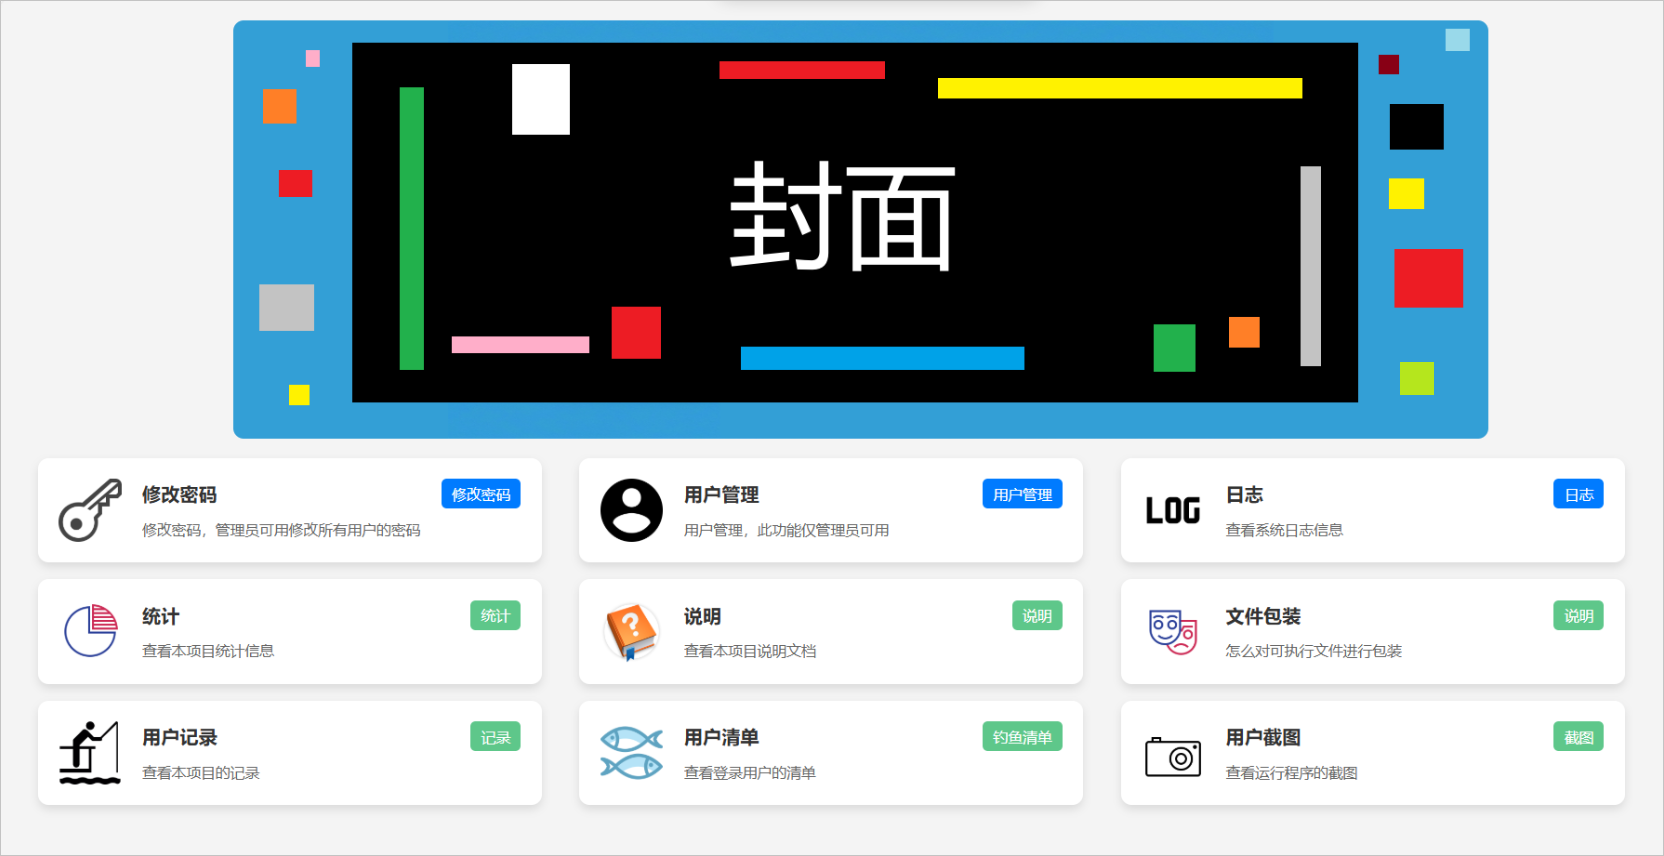
导航页
三个导航格子为一行的导航页
找图标的网站:https://icon-icons.com/
<!DOCTYPE html>
<html lang="zh-CN">
<head>
    <meta charset="UTF-8">
    <meta name="viewport" content="width=device-width, initial-scale=1.0">
    <style>
        img {
            display: block;
            margin: 0 auto;
            border-radius: 10px;
        }
        body {
            font-family: Arial, sans-serif;
            background-color: #f4f4f4;
            margin: 0;
            padding: 20px;
        }

        .content.cards {
            display: flex;
            gap: 20px;
            margin-bottom: 1%;

        }

        .card-box {
            background-color: #fff;
            border-radius: 10px;
            width: 30%;
            margin-left: 1%;
            box-shadow: 0 4px 8px rgba(0, 0, 0, 0.1);
            overflow: hidden;
            text-decoration: none;
            transition: transform 0.2s;
        }

        .card-box:hover {
            transform: translateY(-5px);
        }

        .card-content {
            display: flex;
            padding: 20px;
        }

        .card-left img {
            width: 60px;
            height: 60px;
            border-radius: 10%;
            object-fit: cover;
        }

        .card-right {
            flex-grow: 1;
            padding-left: 20px;
        }

        .card-right-top {
            display: flex;
            justify-content: space-between;
            align-items: center;
            margin-bottom: 10px;
        }

        .card-right-title {
            font-size: 18px;
            font-weight: bold;
            color: #333;
        }

        .card-tag {
            background-color: #007bff;
            color: #fff;
            padding: 5px 10px;
            border-radius: 5px;
            font-size: 14px;
        }

        .card-right-bottom {
            font-size: 14px;
            color: #666;
            white-space: nowrap;
            overflow: hidden;
            text-overflow: ellipsis;
        }
    </style>
</head>
<body>
<!-- 此处按需修改 -->
<img src="/Status/Logo.png" style="width: 1200px ;height: 400px" >       	 <!-- 封面 -->
<br>
<div class="content cards">
    <a href="/AAA" target="_self" class="card-box">
        <div class="card-content">
            <div class="card-left"><img src="/Status/钥匙.png" alt="修改密码"></div>		<!-- 小选项封面 -->
            <div class="card-right">
                <div class="card-right-top">
                    <span class="card-right-title" title="修改密码">修改用户密码</span>		<!-- 小选项标题 -->
                    <span class="card-tag" title="修改密码">修改密码</span>					 <!-- 小选项标签 -->
                </div>
                <div class="card-right-bottom" title="修改密码">修改密码,管理员可用修改所有用户的密码</div><!-- 内容 -->
            </div>
        </div>
    </a>
<!-- 此处按需修改 -->


    <a href="/BBB" target="_self" class="card-box">
        <div class="card-content">
            <div class="card-left"><img src="/Status/用户.png" alt="用户管理"></div>
            <div class="card-right">
                <div class="card-right-top">
                    <span class="card-right-title" title="用户管理">用户管理</span>
                    <span class="card-tag" title="用户管理">用户管理</span>
                </div>
                <div class="card-right-bottom" title="用户管理">用户管理,此功能仅管理员可用</div>
            </div>
        </div>
    </a>

    <a href="/CCC" target="_self"  class="card-box">
        <div class="card-content">
            <div class="card-left"><img src="/Status/日志.png" alt="日志"></div>
            <div class="card-right">
                <div class="card-right-top">
                    <span class="card-right-title" title="日志">日志</span>
                    <span class="card-tag" title="日志">日志</span>
                </div>
                <div class="card-right-bottom" title="日志">查看系统日志信息</div>
            </div>
        </div>
    </a>
</div>

<div class="content cards">
    <a href="/DDD" target="_self"  class="card-box">
        <div class="card-content">
            <div class="card-left"><img src="/Status/统计.png" alt="统计"></div>
            <div class="card-right">
                <div class="card-right-top">
                    <span class="card-right-title" title="统计">统计</span>
                    <span class="card-tag" title="统计" style="background-color:#5ec78a">统计</span>
                </div>
                <div class="card-right-bottom" title="统计">查看本项目统计信息</div>
            </div>
        </div>
    </a>

    <a href="/EEE" target="_self"  class="card-box">
        <div class="card-content">
            <div class="card-left"><img src="/Status/说明.png" alt="说明"></div>
            <div class="card-right">
                <div class="card-right-top">
                    <span class="card-right-title" title="说明">说明</span>
                    <span class="card-tag" title="说明" style="background-color:#5ec78a">说明</span>
                </div>
                <div class="card-right-bottom" title="说明">查看本项目说明文档</div>
            </div>
        </div>
    </a>
    <a href="/FFF" target="_self"  class="card-box">
        <div class="card-content">
            <div class="card-left"><img src="/Status/文件伪装.png" alt="文件伪装"></div>
            <div class="card-right">
                <div class="card-right-top">
                    <span class="card-right-title" title="文件伪装">文件伪装</span>
                    <span class="card-tag" title="说明" style="background-color:#5ec78a">说明</span>
                </div>
                <div class="card-right-bottom" title="文件伪装">怎么对可执行文件进行伪装</div>
            </div>
        </div>
    </a>
</div>
    <div class="content cards">

        <a href="/GGG" target="_self"  class="card-box">
            <div class="card-content">
                <div class="card-left"><img src="/Status/用户日志.png" alt="用户日志"></div>
                <div class="card-right">
                    <div class="card-right-top">
                        <span class="card-right-title" title="用户日志">用户记录</span>
                        <span class="card-tag" title="日志" style="background-color:#5ec78a">记录</span>
                    </div>
                    <div class="card-right-bottom" title="说明">查看本项目用户的记录</div>
                </div>
            </div>
        </a>
        <a href="/HHH" target="_self"  class="card-box">
            <div class="card-content">
                <div class="card-left"><img src="/Status/用户清单.png" alt="用户清单"></div>
                <div class="card-right">
                    <div class="card-right-top">
                        <span class="card-right-title" title="用户清单">用户清单</span>
                        <span class="card-tag" title="用户清单" style="background-color:#5ec78a">用户清单</span>
                    </div>
                    <div class="card-right-bottom" title="说明">查看登录用户页的清单</div>
                </div>
            </div>
        </a>
        <a href="/III" target="_self"  class="card-box">
            <div class="card-content">
                <div class="card-left"><img src="/Status/用户截图.png" alt="用户截图"></div>
                <div class="card-right">
                    <div class="card-right-top">
                        <span class="card-right-title" title="用户截图">用户截图</span>
                        <span class="card-tag" title="用户截图" style="background-color:#5ec78a">截图</span>
                    </div>
                    <div class="card-right-bottom" title="用户截图">查看运行了程序的截图</div>
                </div>
            </div>
        </a>
</div>
</body>
</html>
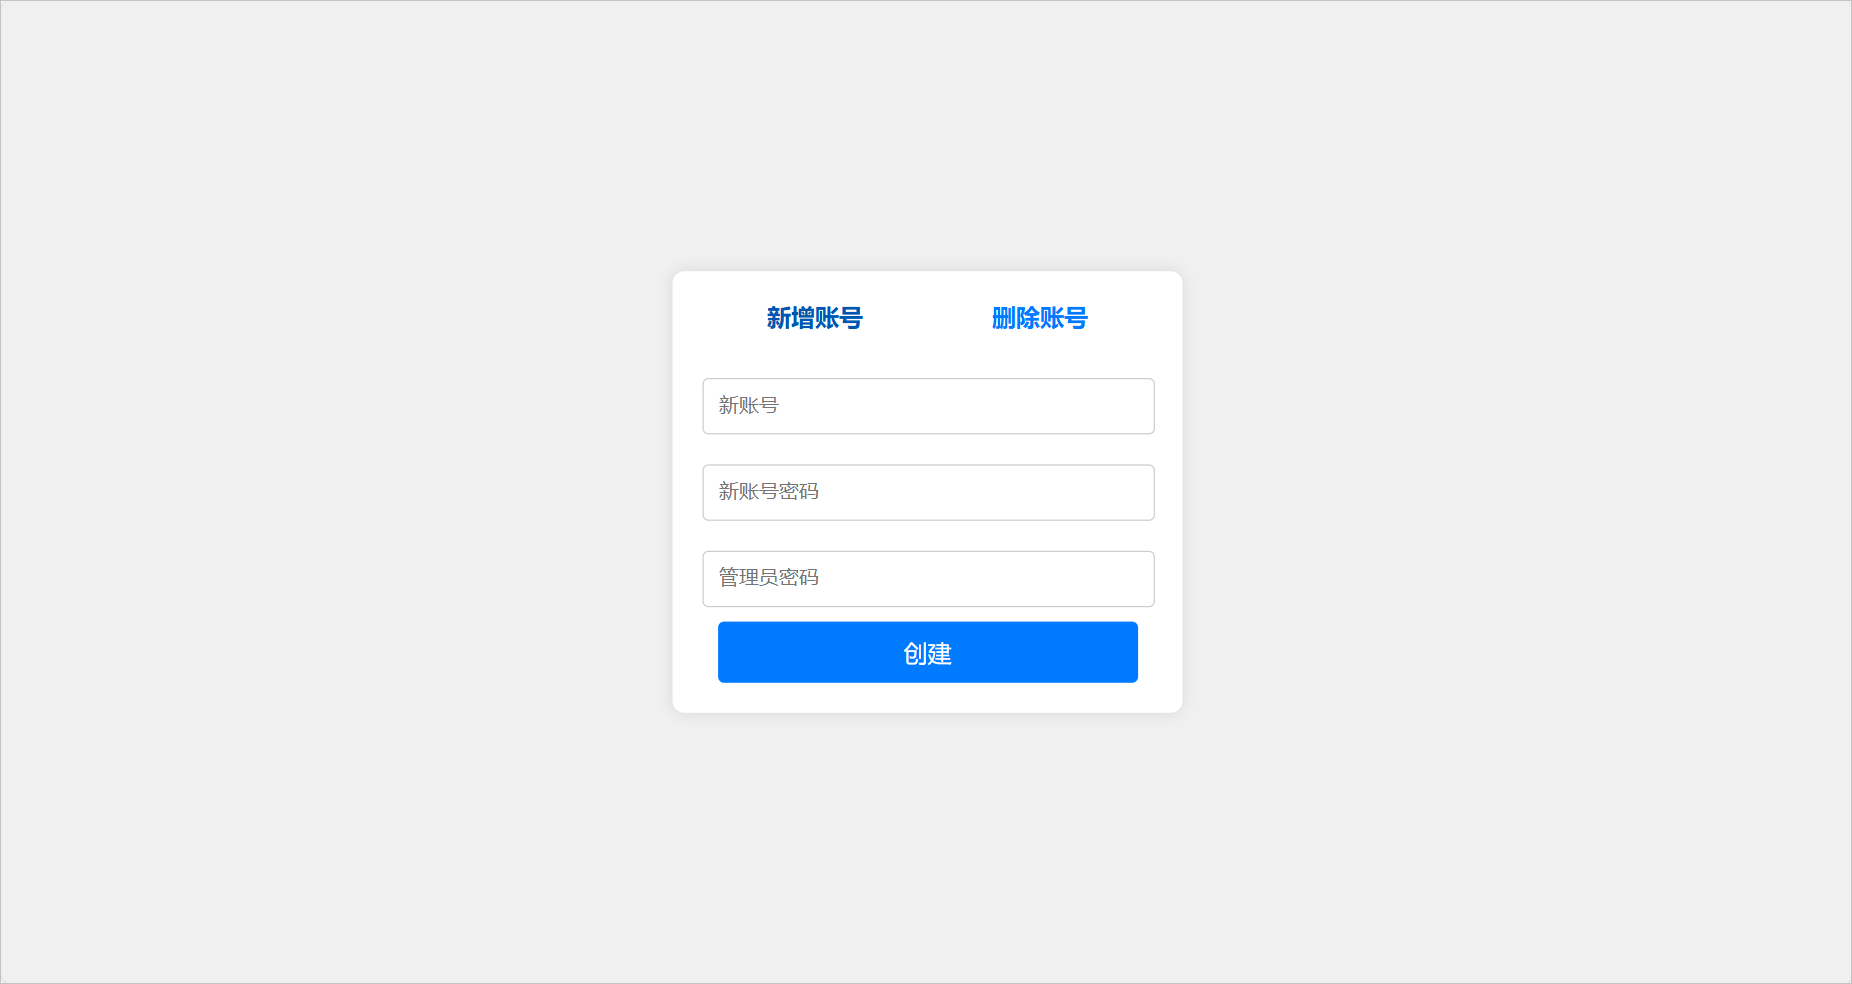
双表单页面
A-tab和B-tab的div标签中,分别为两个表单页
<!DOCTYPE html>
<html lang="zh-CN">
<head>
    <link rel="icon" type="image/x-icon" href="/status/icon.png" />

    <meta charset="UTF-8">
    <meta name="viewport" content="width=device-width, initial-scale=1.0">
    <title>登录</title>
    <style>
        .login-container {
            transform: scale(1.2);
        }
        body {
            /*background-image: url('/status/背景.png'); !* 替换为你的图片路径 *!*/
            background-size: cover; /* 使背景图片覆盖整个页面 */
            background-repeat: no-repeat; /* 防止背景图片重复 */
            background-position: center; /* 将背景图片居中 */
            font-family: Arial, sans-serif;
            display: flex;
            justify-content: center;
            align-items: center;
            height: 100vh;
            margin: 0;
            background-color: #f0f0f0;
        }
        .login-container {
            position: absolute;

            background-color: white;
            padding: 20px;
            border-radius: 8px;
            box-shadow: 0 0 10px rgba(0, 0, 0, 0.1);
            width: 300px;
            text-align: center;
        }
        .login-container h2 {
            margin-bottom: 20px;
        }
        .login-container input[type="text"],
        .login-container input[type="password"],
        .login-container input[type="tel"] {
            width: calc(100% - 20px);
            padding: 10px;
            margin: 10px 0;
            border: 1px solid #ccc;
            border-radius: 4px;
        }
        .login-container button {
            width: calc(100% - 20px);
            padding: 10px;
            background-color: #007BFF;
            border: none;
            border-radius: 4px;
            color: white;
            font-size: 16px;
            cursor: pointer;
        }
        .login-container button:hover {
            background-color: #0056b3;
        }
        .tab-links {
            display: flex;
            justify-content: space-around;
            margin-bottom: 20px;
        }
        .tab-link {
            color: #007BFF;
            text-decoration: none;
            font-weight: bold;
        }
        .tab-link.active, .tab-link:hover {
            color: #0056b3;
        }
        .tab-content {
            display: none;
        }
        .tab-content.active {
            display: block;
        }
    </style>
</head>
<body>

<div class="login-container">
    <div class="tab-links">
        <a href="#" class="tab-link active" onclick="showTab('A')">新增账号</a>
        <a href="#" class="tab-link" onclick="showTab('B')">删除账号</a>
    </div>

    <!-- 此处按需修改 -->
    <div id="A-tab" class="tab-content active">
        <form action="/AAA" method="post">
            <input type="tel" name="Username" id="creatusername" placeholder="新账号">
            <input type="password" name="newPwd" id="password" placeholder="新账号密码">
            <input type="password" name="adminPwd" id="admpassword" placeholder="管理员密码">
            <button type="submit">创建</button>
        </form>
    </div>
    <div id="B-tab" class="tab-content">
        <form action="/BBB" method="post">
            <input type="text" name="Username"  id="delusername" placeholder="待删除的账号">
            <input type="password" name="adminPwd" id="adminPwd" placeholder="管理员密码">
            <button type="submit" style="background-color: red">删除</button>
        </form>
    </div>
    <!-- 此处按需修改 -->


</div>

<script>
    function showTab(tabId) {
        const ATab = document.getElementById('A-tab');
        const BTab = document.getElementById('B-tab');
        const ALink = document.querySelector('.tab-link[onclick="showTab(\'A\')"]');
        const BLink = document.querySelector('.tab-link[onclick="showTab(\'B\')"]');

        if (tabId === 'A') {
            ATab.classList.add('active');
            BTab.classList.remove('active');
            ALink.classList.add('active');
            BLink.classList.remove('active');
        } else if (tabId === 'B') {
            ATab.classList.remove('active');
            BTab.classList.add('active');
            ALink.classList.remove('active');
            BLink.classList.add('active');
        }
    }
</script>

</body>
</html>
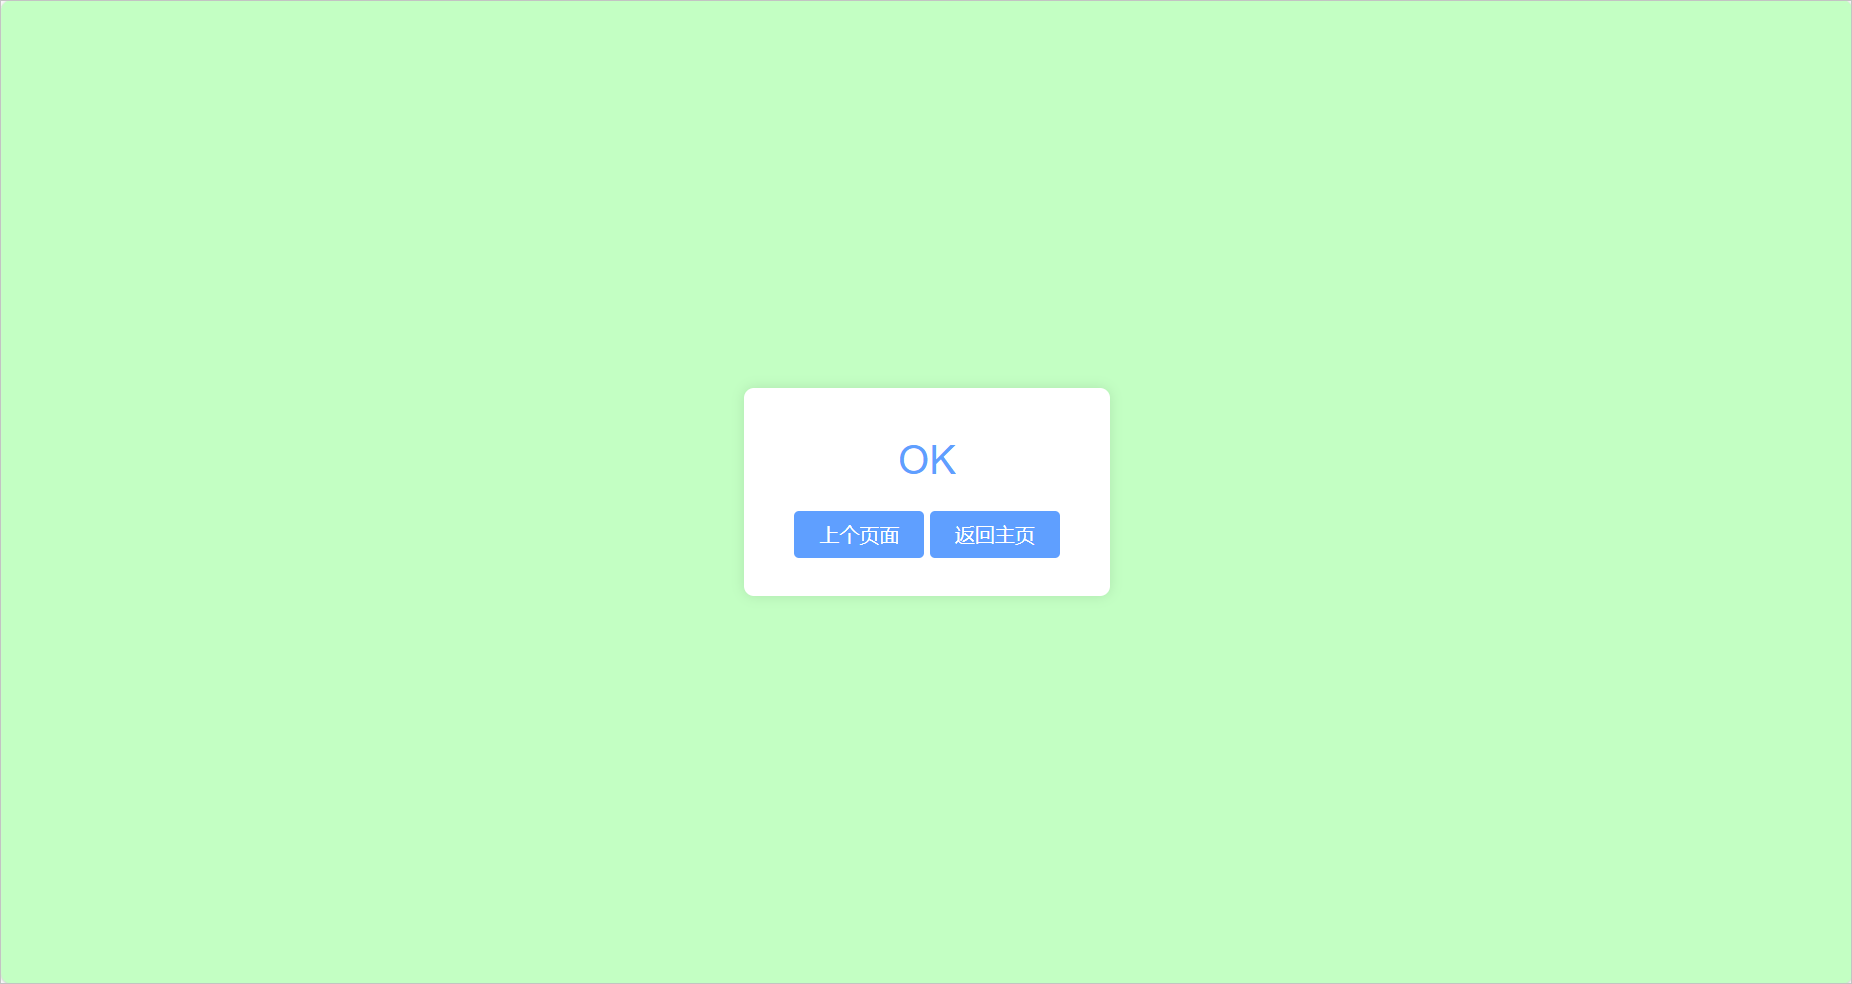
ok页面
一个ok页面,提供两个按钮,一个是返回上一个页面,一个是返回主页(按需更改url)
鼠标悬停在按钮上颜色会加深
<!DOCTYPE html>
<html lang="zh-CN">
<head>
    <meta charset="UTF-8">
    <meta name="viewport" content="width=device-width, initial-scale=1.0">
    <title>Yes</title>
    <style>
        body {
            font-family: Arial, sans-serif;
            display: flex;
            justify-content: center;
            align-items: center;
            height: 100vh;
            margin: 0;
            background-color: #c3ffc3;
        }
        .info-container {
            text-align: center;
            background-color: #fff;
            padding: 40px;
            border-radius: 8px;
            box-shadow: 0 0 10px rgba(0, 0, 0, 0.1);
        }
        .info-code {
            font-size: 2em;
            margin-top: 0px;
            margin-bottom: 30px ;
            color: #5f9fFF;
        }
        .info-message {
            font-size: 1.5em;
            color: #333;
            margin-bottom: 20px;
        }
        .return-button {
            background-color: #5f9fFF;
            color: #fff;
            border: none;
            padding: 10px 20px;
            font-size: 1em;
            border-radius: 4px;
            cursor: pointer;
            text-decoration: none;
        }
        .return-button:hover {
            background-color: #007BFF;
        }
    </style>
</head>
<body>
<div class="info-container">
    <div class="info-code">OK</div>
    <a href="javascript:history.back()" class="return-button">上个页面</a>
    <a href="/Gint/Index" class="return-button">返回主页</a>					<!-- 此处按需修改 -->
</div>
</body>
</html>
error页面
一个报错页面,提供两个按钮,一个是返回上一个页面,一个是返回主页(按需更改url)
{{.errinfo}}是报错信息,鼠标悬停在按钮上颜色会加深

<!DOCTYPE html>
<html lang="zh-CN">
<head>
    <meta charset="UTF-8">
    <meta name="viewport" content="width=device-width, initial-scale=1.0">
    <title>错误页面</title>
    <style>
        body {
            font-family: Arial, sans-serif;
            display: flex;
            justify-content: center;
            align-items: center;
            height: 100vh;
            margin: 0;
            background-color: rgba(255, 0, 0, 0.69);
        }
        .error-container {
            text-align: center;
            background-color: #fff;
            padding: 40px;
            border-radius: 8px;
            box-shadow: 0 0 10px rgba(0, 0, 0, 0.1);
        }
        .error-code {
            font-size: 2em;
            margin-top: 0px;
            margin-bottom: 30px ;
            color: #ff0000;
        }
        .error-message {
            font-size: 1.5em;
            color: #333;
            margin-bottom: 20px;
        }
        .return-button {
            background-color: #ffabab;
            color: #fff;
            border: none;
            padding: 10px 20px;
            font-size: 1em;
            border-radius: 4px;
            cursor: pointer;
            text-decoration: none;
        }
        .return-button:hover {
            background-color: #ff0000;
        }
    </style>
</head>
<body>
<div class="error-container">
    <div class="error-code">NO</div>
    <div class="error-code">{{.errinfo}}</div>								<!-- 此处按需修改 -->
    <a href="javascript:history.back()" class="return-button">上个页面</a>
    <a href="/Gint/Index" class="return-button">返回主页</a>					<!-- 此处按需修改 -->
</div>
</body>
</html>
复制按钮
点击复制
<div id="copy">展示结果(待复制的内容)</div>

<button id="copyButton" type="button" class="styled-submit">复制结果</button>
        <script>
            document.getElementById('copyButton').addEventListener('click', async function() {
                try {
                    await navigator.clipboard.writeText(document.getElementById('copy').innerText);
                } catch (err) {
                    console.error('无法复制文本: ', err);
                }
            });
</script>

 浙公网安备 33010602011771号