设计模式
一、23(三大类)种设计模式图
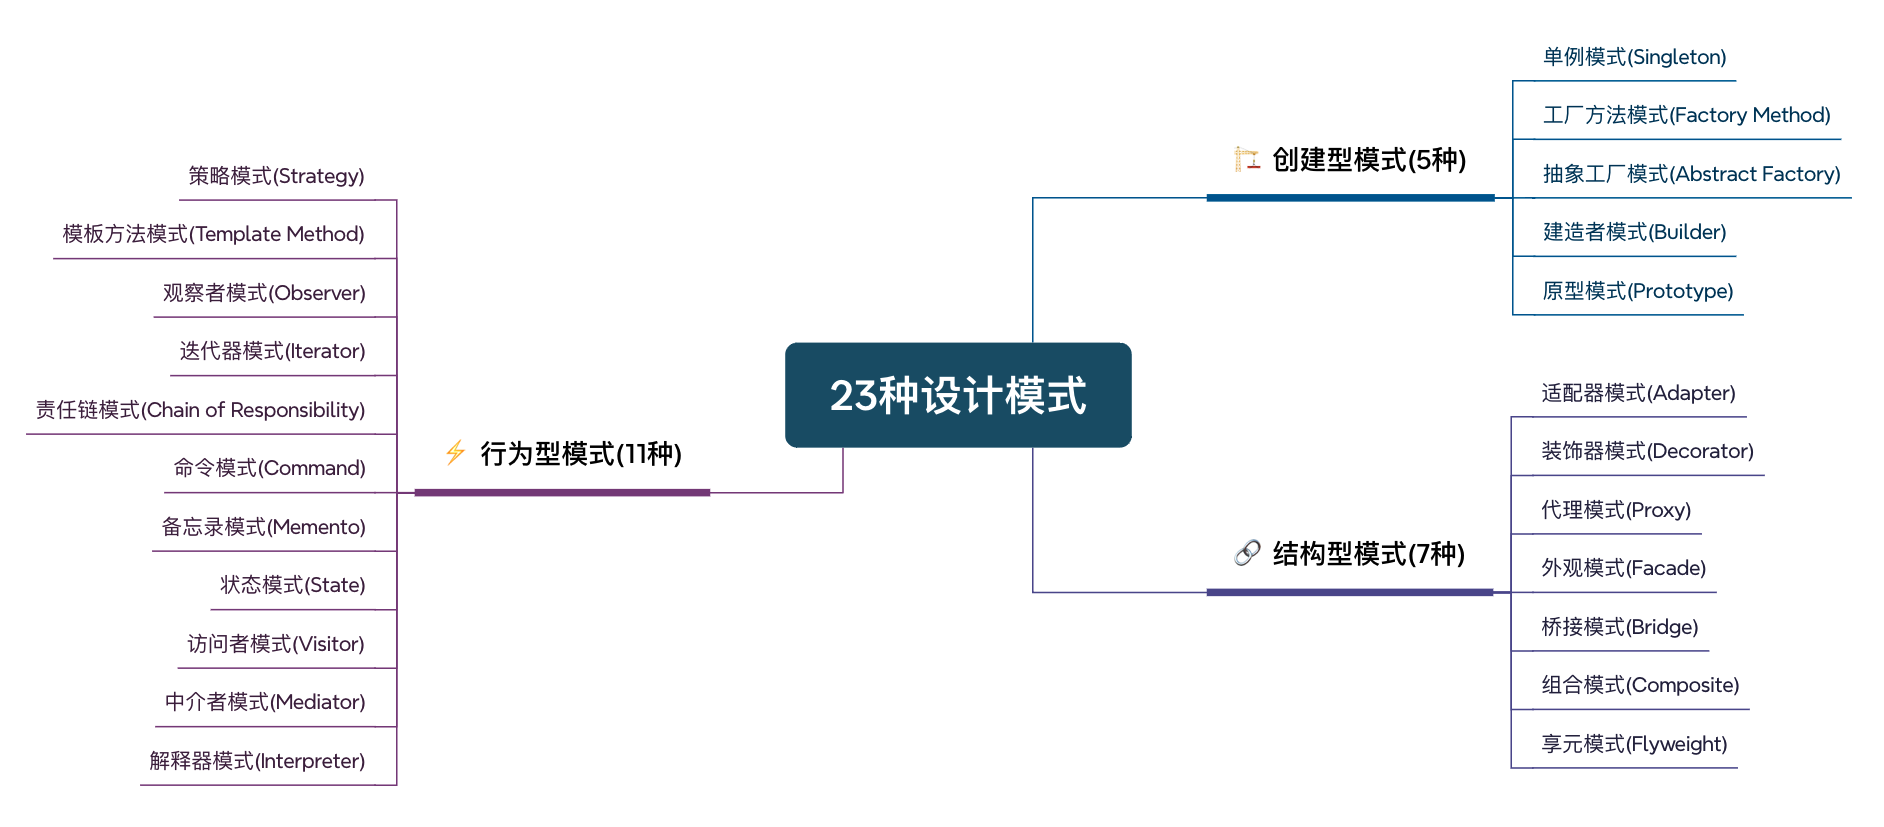
二、设计模式简要说明
🏗 创建型模式(5种)
| 模式名称 | 特点说明 |
|---|---|
| 单例模式 (Singleton) | 保证一个类仅有一个实例,并提供全局访问点 |
| 工厂方法模式 (Factory Method) | 定义创建对象的接口,让子类决定实例化哪一个类 |
| 抽象工厂模式 (Abstract Factory) | 创建一组相关对象的接口,隐藏具体实现类 |
| 建造者模式 (Builder) | 分离构建与表示,构建复杂对象的多种表示 |
| 原型模式 (Prototype) | 通过复制已有对象来创建新对象 |
🧱 结构型模式(7种)
| 模式名称 | 特点说明 |
|---|---|
| 适配器模式 (Adapter) | 转换接口,使原本不兼容的类能协同工作 |
| 装饰器模式 (Decorator) | 动态增强对象功能,替代继承扩展 |
| 代理模式 (Proxy) | 控制对目标对象的访问 |
| 外观模式 (Facade) | 提供统一接口,简化子系统调用 |
| 桥接模式 (Bridge) | 分离抽象与实现,使它们独立变化 |
| 组合模式 (Composite) | 统一处理单个对象和组合对象 |
| 享元模式 (Flyweight) | 共享相同对象,节省内存 |
⚡ 行为型模式(11种)
| 模式名称 | 特点说明 |
|---|---|
| 策略模式 (Strategy) | 定义一组可替换算法,独立封装 |
| 模板方法模式 (Template Method) | 定义算法框架,部分步骤交由子类实现 |
| 观察者模式 (Observer) | 一对多依赖,状态变更通知所有观察者 |
| 迭代器模式 (Iterator) | 顺序访问集合,不暴露内部结构 |
| 责任链模式 (Chain of Responsibility) | 请求沿链传递,直到被处理 |
| 命令模式 (Command) | 将请求封装为对象,支持撤销/重做 |
| 备忘录模式 (Memento) | 保存对象状态,便于恢复 |
| 状态模式 (State) | 状态切换时改变对象行为 |
| 访问者模式 (Visitor) | 封装作用于对象的操作,支持扩展 |
| 中介者模式 (Mediator) | 通过中介降低对象之间耦合 |
| 解释器模式 (Interpreter) | 定义语言的文法规则与解释器 |
三、设计模式详细说明
(一)创建型模式
1.单例模式
通过私有化构造器阻止外部实例化,提供静态实例变量和公共静态访问方法,确保全局唯一实例。支持多种实现方式来处理线程安全和延迟加载问题。
1.饿汉式
public class Person {
    //类加载就创建实例,加上final关键字,防止重复创建
    private static final Person instance = new Person();

    //私有化构造器,保证外部无法创建实例。
    private Person() {
        System.out.println("对象创建了");
    }
	//获取实例的方法
    public static Person getInstance() {
        return instance;
    }
}
2.枚举饿汉式
// enum 本身也是一个Class类
public enum Person {
    //定义一个枚举的元素,它就代表了Singleton的一个实例。
    INSTANCE;

    //对外部提供调用方法:将创建的对象返回,只能通过类来调用
    public Person getInstance(){
        return INSTANCE;
    }
}
3.懒汉式
public class Person {
    //保证一个类只有一个用于返回的对象
    private static Person instance;
    //私有化构造器,保证外部无法创建实例。
    private Person(){
        System.out.println("对象创建了");
    }
    //创建实例
    public static Person getInstance(){
        //如果instance为空则新 new 一个对象
        if(instance==null){
            instance = new Person();
        }
        //如果不为空,则直接返回
        return instance;
    }
}
4.DCL懒汉式
public class Person {
    //保证一个类只有一个用于返回的对象
    private static volatile Person instance;//volatile解决可见性,有序性
    //私有化构造器,保证外部无法创建实例。
    private Person(){
        System.out.println("对象创建了");
    }
    //创建实例
    public static Person getInstance(){
        //如果instance为空则新 new 一个对象
        if(instance==null){
            synchronized(Person.class){
                if(instance==null){
            		instance = new Person();
        		}
            }
        }
        //如果不为空,则直接返回
        return instance;
    }
}
5.内部类懒汉式
public class Person {
    //私有化构造器,保证外部无法创建实例。
    private Person(){
        System.out.println("对象创建了");
    }

    private static class Holder{
        static Person INSTANCE = new Person();
    }
    //创建实例
    public static Person getInstance(){
        return Holder.INSTANCE;
    }
}
2.工厂方法模式
工厂方法模式定义了一个创建对象的接口,让子类决定实例化哪一个类。它将对象的创建延迟到子类进行。
简单工厂模式
// 抽象产品
public interface Shape {
    void draw();
}

// 具体产品:圆形
public class Circle implements Shape {
    @Override
    public void draw() {
        System.out.println("绘制圆形");
    }
}

// 具体产品:矩形
public class Rectangle implements Shape {
    @Override
    public void draw() {
        System.out.println("绘制矩形");
    }
}

// 具体产品:三角形
public class Triangle implements Shape {
    @Override
    public void draw() {
        System.out.println("绘制三角形");
    }
}

// 简单工厂类
public class ShapeFactory {
    public static Shape createShape(String shapeType) {
        if ("circle".equalsIgnoreCase(shapeType)) {
            return new Circle();
        } else if ("rectangle".equalsIgnoreCase(shapeType)) {
            return new Rectangle();
        } else if ("triangle".equalsIgnoreCase(shapeType)) {
            return new Triangle();
        }
        return null;
    }
}

// 客户端使用
public class Client {
    public static void main(String[] args) {
        // 通过工厂创建对象
        Shape circle = ShapeFactory.createShape("circle");
        circle.draw();

        Shape rectangle = ShapeFactory.createShape("rectangle");
        rectangle.draw();
    }
}
工厂方法模式
// 抽象产品
public interface Product {
    void use();
}

// 具体产品A
public class ConcreteProductA implements Product {
    @Override
    public void use() {
        System.out.println("使用产品A");
    }
}

// 具体产品B
public class ConcreteProductB implements Product {
    @Override
    public void use() {
        System.out.println("使用产品B");
    }
}

// 抽象工厂
public abstract class Factory {
    // 工厂方法
    public abstract Product createProduct();
}

// 具体工厂A
public class ConcreteFactoryA extends Factory {
    @Override
    public Product createProduct() {
        return new ConcreteProductA();
    }
}

// 具体工厂B
public class ConcreteFactoryB extends Factory {
    @Override
    public Product createProduct() {
        return new ConcreteProductB();
    }
}

// 客户端使用
public class Client {
    public static void main(String[] args) {
        // 创建具体工厂
        Factory factoryA = new ConcreteFactoryA();
        Product productA = factoryA.createProduct();
        productA.use();

        Factory factoryB = new ConcreteFactoryB();
        Product productB = factoryB.createProduct();
        productB.use();
    }
}
3.抽象工厂模式
抽象工厂模式提供一个创建一系列相关或相互依赖对象的接口,而无需指定它们具体的类。
// 抽象产品:按钮
public interface Button {
    void paint();
}

// 抽象产品:复选框
public interface Checkbox {
    void paint();
}

// 具体产品:Windows按钮
public class WindowsButton implements Button {
    @Override
    public void paint() {
        System.out.println("渲染Windows风格按钮");
    }
}

// 具体产品:Mac按钮
public class MacButton implements Button {
    @Override
    public void paint() {
        System.out.println("渲染Mac风格按钮");
    }
}

// 具体产品:Windows复选框
public class WindowsCheckbox implements Checkbox {
    @Override
    public void paint() {
        System.out.println("渲染Windows风格复选框");
    }
}

// 具体产品:Mac复选框
public class MacCheckbox implements Checkbox {
    @Override
    public void paint() {
        System.out.println("渲染Mac风格复选框");
    }
}

// 抽象工厂
public interface GUIFactory {
    Button createButton();
    Checkbox createCheckbox();
}

// 具体工厂:Windows工厂
public class WindowsFactory implements GUIFactory {
    @Override
    public Button createButton() {
        return new WindowsButton();
    }

    @Override
    public Checkbox createCheckbox() {
        return new WindowsCheckbox();
    }
}

// 具体工厂:Mac工厂
public class MacFactory implements GUIFactory {
    @Override
    public Button createButton() {
        return new MacButton();
    }

    @Override
    public Checkbox createCheckbox() {
        return new MacCheckbox();
    }
}

// 客户端使用
public class Application {
    private Button button;
    private Checkbox checkbox;

    public Application(GUIFactory factory) {
        button = factory.createButton();
        checkbox = factory.createCheckbox();
    }

    public void paint() {
        button.paint();
        checkbox.paint();
    }

    public static void main(String[] args) {
        // 根据系统类型选择工厂
        String osName = System.getProperty("os.name").toLowerCase();
        GUIFactory factory;

        if (osName.contains("windows")) {
            factory = new WindowsFactory();
        } else {
            factory = new MacFactory();
        }

        Application app = new Application(factory);
        app.paint();
    }
}
4.建造者模式
建造者模式将一个复杂对象的构建与它的表示分离,使得同样的构建过程可以创建不同的表示。
// 产品类:电脑
public class Computer {
    private String cpu;
    private String memory;
    private String hardDisk;
    private String display;
    private String keyboard;
    private String mouse;

    // 私有构造器,只能通过Builder创建
    private Computer(Builder builder) {
        this.cpu = builder.cpu;
        this.memory = builder.memory;
        this.hardDisk = builder.hardDisk;
        this.display = builder.display;
        this.keyboard = builder.keyboard;
        this.mouse = builder.mouse;
    }

    @Override
    public String toString() {
        return "Computer{" +
                "cpu='" + cpu + '\'' +
                ", memory='" + memory + '\'' +
                ", hardDisk='" + hardDisk + '\'' +
                ", display='" + display + '\'' +
                ", keyboard='" + keyboard + '\'' +
                ", mouse='" + mouse + '\'' +
                '}';
    }

    // 静态内部建造者类
    public static class Builder {
        // 必须的参数
        private String cpu;
        private String memory;

        // 可选的参数
        private String hardDisk;
        private String display;
        private String keyboard;
        private String mouse;

        // 构造器只包含必须的参数
        public Builder(String cpu, String memory) {
            this.cpu = cpu;
            this.memory = memory;
        }

        // 可选参数的设置方法,返回Builder实现链式调用
        public Builder setHardDisk(String hardDisk) {
            this.hardDisk = hardDisk;
            return this;
        }

        public Builder setDisplay(String display) {
            this.display = display;
            return this;
        }

        public Builder setKeyboard(String keyboard) {
            this.keyboard = keyboard;
            return this;
        }

        public Builder setMouse(String mouse) {
            this.mouse = mouse;
            return this;
        }

        // 构建方法
        public Computer build() {
            return new Computer(this);
        }
    }
}

// 客户端使用
public class Client {
    public static void main(String[] args) {
        // 使用建造者模式创建电脑对象
        Computer computer = new Computer.Builder("Intel i7", "16GB")
                .setHardDisk("512GB SSD")
                .setDisplay("27寸 4K显示器")
                .setKeyboard("机械键盘")
                .setMouse("游戏鼠标")
                .build();

        System.out.println(computer);

        // 创建简化版电脑
        Computer simpleComputer = new Computer.Builder("Intel i5", "8GB")
                .setHardDisk("256GB SSD")
                .build();

        System.out.println(simpleComputer);
    }
}
传统建造者模式
// 产品类:房子
public class House {
    private String foundation;
    private String structure;
    private String roof;
    private String interior;

    public void setFoundation(String foundation) {
        this.foundation = foundation;
    }

    public void setStructure(String structure) {
        this.structure = structure;
    }

    public void setRoof(String roof) {
        this.roof = roof;
    }

    public void setInterior(String interior) {
        this.interior = interior;
    }

    @Override
    public String toString() {
        return "House{" +
                "foundation='" + foundation + '\'' +
                ", structure='" + structure + '\'' +
                ", roof='" + roof + '\'' +
                ", interior='" + interior + '\'' +
                '}';
    }
}

// 抽象建造者
public abstract class HouseBuilder {
    protected House house = new House();

    public abstract void buildFoundation();
    public abstract void buildStructure();
    public abstract void buildRoof();
    public abstract void buildInterior();

    // 返回建造好的房子
    public House getHouse() {
        return house;
    }
}

// 具体建造者:别墅建造者
public class VillaBuilder extends HouseBuilder {
    @Override
    public void buildFoundation() {
        house.setFoundation("别墅地基");
    }

    @Override
    public void buildStructure() {
        house.setStructure("别墅框架");
    }

    @Override
    public void buildRoof() {
        house.setRoof("别墅屋顶");
    }

    @Override
    public void buildInterior() {
        house.setInterior("别墅内饰");
    }
}

// 具体建造者:公寓建造者
public class ApartmentBuilder extends HouseBuilder {
    @Override
    public void buildFoundation() {
        house.setFoundation("公寓地基");
    }

    @Override
    public void buildStructure() {
        house.setStructure("公寓框架");
    }

    @Override
    public void buildRoof() {
        house.setRoof("公寓屋顶");
    }

    @Override
    public void buildInterior() {
        house.setInterior("公寓内饰");
    }
}

// 指挥者
public class Director {
    private HouseBuilder houseBuilder;

    public Director(HouseBuilder houseBuilder) {
        this.houseBuilder = houseBuilder;
    }

    // 指挥建造过程
    public House constructHouse() {
        houseBuilder.buildFoundation();
        houseBuilder.buildStructure();
        houseBuilder.buildRoof();
        houseBuilder.buildInterior();
        return houseBuilder.getHouse();
    }
}

// 客户端使用
public class Client {
    public static void main(String[] args) {
        // 建造别墅
        HouseBuilder villaBuilder = new VillaBuilder();
        Director director = new Director(villaBuilder);
        House villa = director.constructHouse();
        System.out.println("别墅: " + villa);

        // 建造公寓
        HouseBuilder apartmentBuilder = new ApartmentBuilder();
        director = new Director(apartmentBuilder);
        House apartment = director.constructHouse();
        System.out.println("公寓: " + apartment);
    }
}
5.原型模式
原型模式用于创建重复的对象,同时又能保证性能。这种模式是实现了一个原型接口,该接口用于创建当前对象的克隆。
// 抽象原型类
public abstract class Prototype implements Cloneable {
    private String id;

    public Prototype(String id) {
        this.id = id;
    }

    public String getId() {
        return id;
    }

    // 克隆方法
    @Override
    public abstract Prototype clone();
}

// 具体原型类:学生
public class Student extends Prototype {
    private String name;
    private int age;
    private String grade;

    public Student(String id, String name, int age, String grade) {
        super(id);
        this.name = name;
        this.age = age;
        this.grade = grade;
    }

    // 拷贝构造器
    private Student(Student student) {
        super(student.getId());
        this.name = student.name;
        this.age = student.age;
        this.grade = student.grade;
    }

    @Override
    public Student clone() {
        return new Student(this);
    }

    public void setName(String name) {
        this.name = name;
    }

    public void setAge(int age) {
        this.age = age;
    }

    public void setGrade(String grade) {
        this.grade = grade;
    }

    @Override
    public String toString() {
        return "Student{" +
                "id='" + getId() + '\'' +
                ", name='" + name + '\'' +
                ", age=" + age +
                ", grade='" + grade + '\'' +
                '}';
    }
}

// 具体原型类:教师
public class Teacher extends Prototype {
    private String name;
    private String subject;
    private int experience;

    public Teacher(String id, String name, String subject, int experience) {
        super(id);
        this.name = name;
        this.subject = subject;
        this.experience = experience;
    }

    // 拷贝构造器
    private Teacher(Teacher teacher) {
        super(teacher.getId());
        this.name = teacher.name;
        this.subject = teacher.subject;
        this.experience = teacher.experience;
    }

    @Override
    public Teacher clone() {
        return new Teacher(this);
    }

    public void setName(String name) {
        this.name = name;
    }

    public void setSubject(String subject) {
        this.subject = subject;
    }

    public void setExperience(int experience) {
        this.experience = experience;
    }

    @Override
    public String toString() {
        return "Teacher{" +
                "id='" + getId() + '\'' +
                ", name='" + name + '\'' +
                ", subject='" + subject + '\'' +
                ", experience=" + experience +
                '}';
    }
}

// 原型管理器
public class PrototypeManager {
    private Map<String, Prototype> prototypes = new HashMap<>();

    public void addPrototype(String key, Prototype prototype) {
        prototypes.put(key, prototype);
    }

    public Prototype getPrototype(String key) {
        Prototype prototype = prototypes.get(key);
        return prototype != null ? prototype.clone() : null;
    }
}

// 客户端使用
public class Client {
    public static void main(String[] args) {
        // 创建原型管理器
        PrototypeManager manager = new PrototypeManager();

        // 添加原型
        manager.addPrototype("student", new Student("S001", "张三", 20, "大三"));
        manager.addPrototype("teacher", new Teacher("T001", "李老师", "数学", 10));

        // 克隆学生对象
        Student student1 = (Student) manager.getPrototype("student");
        Student student2 = (Student) manager.getPrototype("student");

        // 修改克隆对象的属性
        student1.setName("王五");
        student2.setName("赵六");
        student2.setAge(21);

        System.out.println("原型学生: " + manager.getPrototype("student"));
        System.out.println("克隆学生1: " + student1);
        System.out.println("克隆学生2: " + student2);

        // 克隆教师对象
        Teacher teacher1 = (Teacher) manager.getPrototype("teacher");
        teacher1.setName("王老师");
        teacher1.setSubject("语文");

        System.out.println("原型教师: " + manager.getPrototype("teacher"));
        System.out.println("克隆教师: " + teacher1);
    }
}
(二)结构型模式
6.适配器模式
适配器模式将一个类的接口转换成客户希望的另一个接口,使得原本由于接口不兼容而不能一起工作的那些类可以一起工作。
对象适配器模式
// 目标接口(客户期望的接口)
public interface Target {
    void request();
}

// 需要适配的类(已存在的类)
public class Adaptee {
    public void specificRequest() {
        System.out.println("执行特殊请求");
    }
}

// 适配器类(对象适配器)
public class ObjectAdapter implements Target {
    private Adaptee adaptee;

    public ObjectAdapter(Adaptee adaptee) {
        this.adaptee = adaptee;
    }

    @Override
    public void request() {
        // 委托给被适配者
        adaptee.specificRequest();
    }
}

// 客户端使用
public class Client {
    public static void main(String[] args) {
        // 创建被适配者
        Adaptee adaptee = new Adaptee();

        // 通过适配器使用
        Target target = new ObjectAdapter(adaptee);
        target.request();
    }
}
类适配器模式
// 目标接口
public interface Target {
    void request();
}

// 被适配者
public class Adaptee {
    public void specificRequest() {
        System.out.println("执行特殊请求");
    }
}

// 类适配器(通过继承实现)
public class ClassAdapter extends Adaptee implements Target {
    @Override
    public void request() {
        // 调用父类方法
        super.specificRequest();
    }
}

// 客户端使用
public class Client {
    public static void main(String[] args) {
        Target target = new ClassAdapter();
        target.request();
    }
}
实际应用示例:媒体播放器
// 媒体播放器接口
public interface MediaPlayer {
    void play(String audioType, String fileName);
}

// 高级媒体播放器接口
public interface AdvancedMediaPlayer {
    void playVlc(String fileName);
    void playMp4(String fileName);
}

// VLC播放器
public class VlcPlayer implements AdvancedMediaPlayer {
    @Override
    public void playVlc(String fileName) {
        System.out.println("正在播放vlc文件: " + fileName);
    }

    @Override
    public void playMp4(String fileName) {
        // 什么都不做
    }
}

// MP4播放器
public class Mp4Player implements AdvancedMediaPlayer {
    @Override
    public void playVlc(String fileName) {
        // 什么都不做
    }

    @Override
    public void playMp4(String fileName) {
        System.out.println("正在播放mp4文件: " + fileName);
    }
}

// 媒体适配器
public class MediaAdapter implements MediaPlayer {
    AdvancedMediaPlayer advancedMusicPlayer;

    public MediaAdapter(String audioType) {
        if ("vlc".equalsIgnoreCase(audioType)) {
            advancedMusicPlayer = new VlcPlayer();
        } else if ("mp4".equalsIgnoreCase(audioType)) {
            advancedMusicPlayer = new Mp4Player();
        }
    }

    @Override
    public void play(String audioType, String fileName) {
        if ("vlc".equalsIgnoreCase(audioType)) {
            advancedMusicPlayer.playVlc(fileName);
        } else if ("mp4".equalsIgnoreCase(audioType)) {
            advancedMusicPlayer.playMp4(fileName);
        }
    }
}

// 音频播放器
public class AudioPlayer implements MediaPlayer {
    MediaAdapter mediaAdapter;

    @Override
    public void play(String audioType, String fileName) {
        // 播放mp3音乐文件的内置支持
        if ("mp3".equalsIgnoreCase(audioType)) {
            System.out.println("正在播放mp3文件: " + fileName);
        }
        // mediaAdapter 提供了播放其他文件格式的支持
        else if ("vlc".equalsIgnoreCase(audioType) || "mp4".equalsIgnoreCase(audioType)) {
            mediaAdapter = new MediaAdapter(audioType);
            mediaAdapter.play(audioType, fileName);
        } else {
            System.out.println("不支持的音频格式: " + audioType);
        }
    }
}

// 客户端使用
public class Client {
    public static void main(String[] args) {
        AudioPlayer audioPlayer = new AudioPlayer();

        audioPlayer.play("mp3", "beyond_the_horizon.mp3");
        audioPlayer.play("mp4", "alone.mp4");
        audioPlayer.play("vlc", "far_far_away.vlc");
        audioPlayer.play("avi", "mind_me.avi");
    }
}
7.装饰器模式
装饰器模式允许向一个现有的对象添加新的功能,同时又不改变其结构。这种模式创建了一个装饰类,用来包装原有的类,并在保持类方法签名完整性的前提下,提供了额外的功能。
// 抽象组件
public interface Component {
    void operation();
}

// 具体组件
public class ConcreteComponent implements Component {
    @Override
    public void operation() {
        System.out.println("执行基本操作");
    }
}

// 抽象装饰器
public abstract class Decorator implements Component {
    protected Component component;

    public Decorator(Component component) {
        this.component = component;
    }

    @Override
    public void operation() {
        component.operation();
    }
}

// 具体装饰器A
public class ConcreteDecoratorA extends Decorator {
    public ConcreteDecoratorA(Component component) {
        super(component);
    }

    @Override
    public void operation() {
        super.operation();
        addedBehavior();
    }

    private void addedBehavior() {
        System.out.println("添加装饰器A的功能");
    }
}

// 具体装饰器B
public class ConcreteDecoratorB extends Decorator {
    public ConcreteDecoratorB(Component component) {
        super(component);
    }

    @Override
    public void operation() {
        super.operation();
        addedBehavior();
    }

    private void addedBehavior() {
        System.out.println("添加装饰器B的功能");
    }
}

// 客户端使用
public class Client {
    public static void main(String[] args) {
        // 创建基本组件
        Component component = new ConcreteComponent();

        // 使用装饰器A装饰
        Component decoratedA = new ConcreteDecoratorA(component);
        decoratedA.operation();

        System.out.println("-------------------");

        // 使用装饰器B再次装饰
        Component decoratedB = new ConcreteDecoratorB(decoratedA);
        decoratedB.operation();
    }
}
实际应用示例:咖啡店
// 饮料接口
public interface Beverage {
    String getDescription();
    double getCost();
}

// 具体饮料:浓缩咖啡
public class Espresso implements Beverage {
    @Override
    public String getDescription() {
        return "浓缩咖啡";
    }

    @Override
    public double getCost() {
        return 1.99;
    }
}

// 具体饮料:混合咖啡
public class HouseBlend implements Beverage {
    @Override
    public String getDescription() {
        return "混合咖啡";
    }

    @Override
    public double getCost() {
        return 0.89;
    }
}

// 抽象调料装饰器
public abstract class CondimentDecorator implements Beverage {
    protected Beverage beverage;

    public CondimentDecorator(Beverage beverage) {
        this.beverage = beverage;
    }

    @Override
    public abstract String getDescription();
}

// 具体装饰器:牛奶
public class Milk extends CondimentDecorator {
    public Milk(Beverage beverage) {
        super(beverage);
    }

    @Override
    public String getDescription() {
        return beverage.getDescription() + ", 牛奶";
    }

    @Override
    public double getCost() {
        return beverage.getCost() + 0.10;
    }
}

// 具体装饰器:豆浆
public class Soy extends CondimentDecorator {
    public Soy(Beverage beverage) {
        super(beverage);
    }

    @Override
    public String getDescription() {
        return beverage.getDescription() + ", 豆浆";
    }

    @Override
    public double getCost() {
        return beverage.getCost() + 0.15;
    }
}

// 具体装饰器:摩卡
public class Mocha extends CondimentDecorator {
    public Mocha(Beverage beverage) {
        super(beverage);
    }

    @Override
    public String getDescription() {
        return beverage.getDescription() + ", 摩卡";
    }

    @Override
    public double getCost() {
        return beverage.getCost() + 0.20;
    }
}

// 具体装饰器:奶泡
public class Whip extends CondimentDecorator {
    public Whip(Beverage beverage) {
        super(beverage);
    }

    @Override
    public String getDescription() {
        return beverage.getDescription() + ", 奶泡";
    }

    @Override
    public double getCost() {
        return beverage.getCost() + 0.10;
    }
}

// 客户端使用
public class StarbuzzCoffee {
    public static void main(String[] args) {
        // 订一杯浓缩咖啡,不需要调料
        Beverage beverage = new Espresso();
        System.out.println(beverage.getDescription() + " $" + beverage.getCost());

        // 订一杯混合咖啡,加双摩卡,加奶泡,加牛奶
        Beverage beverage2 = new HouseBlend();
        beverage2 = new Mocha(beverage2);
        beverage2 = new Mocha(beverage2);
        beverage2 = new Whip(beverage2);
        beverage2 = new Milk(beverage2);
        System.out.println(beverage2.getDescription() + " $" + beverage2.getCost());

        // 订一杯浓缩咖啡,加豆浆,加摩卡,加奶泡
        Beverage beverage3 = new Espresso();
        beverage3 = new Soy(beverage3);
        beverage3 = new Mocha(beverage3);
        beverage3 = new Whip(beverage3);
        System.out.println(beverage3.getDescription() + " $" + beverage3.getCost());
    }
}
8.代理模式
代理模式为另一个对象提供一个替身或占位符以控制对这个对象的访问。代理对象在客户端和目标对象之间起到中介的作用。
静态代理
// 抽象主题
public interface Subject {
    void request();
}

// 真实主题
public class RealSubject implements Subject {
    @Override
    public void request() {
        System.out.println("真实主题执行请求");
    }
}

// 代理
public class Proxy implements Subject {
    private RealSubject realSubject;

    @Override
    public void request() {
        // 在调用真实主题之前进行预处理
        preRequest();

        // 懒加载真实主题
        if (realSubject == null) {
            realSubject = new RealSubject();
        }

        // 调用真实主题的方法
        realSubject.request();

        // 在调用真实主题之后进行后处理
        postRequest();
    }

    private void preRequest() {
        System.out.println("代理:预处理");
    }

    private void postRequest() {
        System.out.println("代理:后处理");
    }
}

// 客户端使用
public class Client {
    public static void main(String[] args) {
        Subject proxy = new Proxy();
        proxy.request();
    }
}
实际应用示例:图片代理
// 图片接口
public interface Image {
    void display();
}

// 真实图片
public class RealImage implements Image {
    private String filename;

    public RealImage(String filename) {
        this.filename = filename;
        loadFromDisk();
    }

    private void loadFromDisk() {
        System.out.println("从磁盘加载图片: " + filename);
        // 模拟耗时操作
        try {
            Thread.sleep(2000);
        } catch (InterruptedException e) {
            e.printStackTrace();
        }
    }

    @Override
    public void display() {
        System.out.println("显示图片: " + filename);
    }
}

// 图片代理
public class ProxyImage implements Image {
    private RealImage realImage;
    private String filename;

    public ProxyImage(String filename) {
        this.filename = filename;
    }

    @Override
    public void display() {
        // 只有在需要显示时才加载真实图片
        if (realImage == null) {
            realImage = new RealImage(filename);
        }
        realImage.display();
    }
}

// 客户端使用
public class Client {
    public static void main(String[] args) {
        // 使用代理
        Image image1 = new ProxyImage("photo1.jpg");
        Image image2 = new ProxyImage("photo2.jpg");

        System.out.println("===== 第一次显示 =====");
        image1.display(); // 加载并显示

        System.out.println("\n===== 第二次显示 =====");
        image1.display(); // 直接显示,不再加载

        System.out.println("\n===== 显示第二张图片 =====");
        image2.display(); // 加载并显示
    }
}
9.外观模式
外观模式提供了一个统一的接口,用来访问子系统中的一群接口。它定义了一个高层接口,让子系统更容易使用。
// 子系统A
public class SubSystemA {
    public void methodA() {
        System.out.println("子系统A的方法");
    }
}

// 子系统B
public class SubSystemB {
    public void methodB() {
        System.out.println("子系统B的方法");
    }
}

// 子系统C
public class SubSystemC {
    public void methodC() {
        System.out.println("子系统C的方法");
    }
}

// 外观类
public class Facade {
    private SubSystemA subSystemA;
    private SubSystemB subSystemB;
    private SubSystemC subSystemC;

    public Facade() {
        subSystemA = new SubSystemA();
        subSystemB = new SubSystemB();
        subSystemC = new SubSystemC();
    }

    // 提供简化的接口
    public void operation1() {
        System.out.println("===== 执行操作1 =====");
        subSystemA.methodA();
        subSystemB.methodB();
    }

    public void operation2() {
        System.out.println("===== 执行操作2 =====");
        subSystemB.methodB();
        subSystemC.methodC();
    }

    public void operation3() {
        System.out.println("===== 执行操作3 =====");
        subSystemA.methodA();
        subSystemB.methodB();
        subSystemC.methodC();
    }
}

// 客户端使用
public class Client {
    public static void main(String[] args) {
        Facade facade = new Facade();

        facade.operation1();
        System.out.println();

        facade.operation2();
        System.out.println();

        facade.operation3();
    }
}
实际应用示例:家庭影院系统
// DVD播放器
public class DVDPlayer {
    public void on() {
        System.out.println("DVD播放器开启");
    }

    public void play(String movie) {
        System.out.println("DVD播放器播放电影:" + movie);
    }

    public void stop() {
        System.out.println("DVD播放器停止播放");
    }

    public void off() {
        System.out.println("DVD播放器关闭");
    }
}

// 投影仪
public class Projector {
    public void on() {
        System.out.println("投影仪开启");
    }

    public void setInput(String input) {
        System.out.println("投影仪设置输入:" + input);
    }

    public void off() {
        System.out.println("投影仪关闭");
    }
}

// 音响系统
public class StereoSystem {
    public void on() {
        System.out.println("音响系统开启");
    }

    public void setVolume(int volume) {
        System.out.println("音响系统设置音量:" + volume);
    }

    public void off() {
        System.out.println("音响系统关闭");
    }
}

// 灯光系统
public class Lights {
    public void dim(int level) {
        System.out.println("灯光调暗到:" + level + "%");
    }

    public void on() {
        System.out.println("灯光开启");
    }
}

// 家庭影院外观
public class HomeTheaterFacade {
    private DVDPlayer dvdPlayer;
    private Projector projector;
    private StereoSystem stereoSystem;
    private Lights lights;

    public HomeTheaterFacade(DVDPlayer dvdPlayer, Projector projector,
                           StereoSystem stereoSystem, Lights lights) {
        this.dvdPlayer = dvdPlayer;
        this.projector = projector;
        this.stereoSystem = stereoSystem;
        this.lights = lights;
    }

    // 观看电影
    public void watchMovie(String movie) {
        System.out.println("准备观看电影...");
        lights.dim(10);
        projector.on();
        projector.setInput("DVD");
        stereoSystem.on();
        stereoSystem.setVolume(5);
        dvdPlayer.on();
        dvdPlayer.play(movie);
    }

    // 结束观看
    public void endMovie() {
        System.out.println("关闭家庭影院...");
        dvdPlayer.stop();
        dvdPlayer.off();
        stereoSystem.off();
        projector.off();
        lights.on();
    }
}

// 客户端使用
public class Client {
    public static void main(String[] args) {
        // 创建子系统组件
        DVDPlayer dvdPlayer = new DVDPlayer();
        Projector projector = new Projector();
        StereoSystem stereoSystem = new StereoSystem();
        Lights lights = new Lights();

        // 创建外观
        HomeTheaterFacade homeTheater = new HomeTheaterFacade(
                dvdPlayer, projector, stereoSystem, lights);

        // 使用外观观看电影
        homeTheater.watchMovie("复仇者联盟");

        System.out.println("\n--- 电影结束 ---\n");

        homeTheater.endMovie();
    }
}
10.桥接模式
桥接模式将抽象部分与实现部分分离,使它们都可以独立地变化。通过组合的方式建立两个类之间的联系,而不是继承。
// 实现接口
public interface DrawAPI {
    void drawCircle(int radius, int x, int y);
    void drawRectangle(int width, int height, int x, int y);
}

// 具体实现A:红色画笔
public class RedPen implements DrawAPI {
    @Override
    public void drawCircle(int radius, int x, int y) {
        System.out.println("用红色画笔画圆形:半径=" + radius + ", 中心点(" + x + "," + y + ")");
    }

    @Override
    public void drawRectangle(int width, int height, int x, int y) {
        System.out.println("用红色画笔画矩形:宽=" + width + ", 高=" + height + ", 起点(" + x + "," + y + ")");
    }
}

// 具体实现B:蓝色画笔
public class BluePen implements DrawAPI {
    @Override
    public void drawCircle(int radius, int x, int y) {
        System.out.println("用蓝色画笔画圆形:半径=" + radius + ", 中心点(" + x + "," + y + ")");
    }

    @Override
    public void drawRectangle(int width, int height, int x, int y) {
        System.out.println("用蓝色画笔画矩形:宽=" + width + ", 高=" + height + ", 起点(" + x + "," + y + ")");
    }
}

// 抽象形状类
public abstract class Shape {
    protected DrawAPI drawAPI;

    protected Shape(DrawAPI drawAPI) {
        this.drawAPI = drawAPI;
    }

    public abstract void draw();
}

// 扩展抽象类:圆形
public class Circle extends Shape {
    private int x, y, radius;

    public Circle(int x, int y, int radius, DrawAPI drawAPI) {
        super(drawAPI);
        this.x = x;
        this.y = y;
        this.radius = radius;
    }

    @Override
    public void draw() {
        drawAPI.drawCircle(radius, x, y);
    }
}

// 扩展抽象类:矩形
public class Rectangle extends Shape {
    private int x, y, width, height;

    public Rectangle(int x, int y, int width, int height, DrawAPI drawAPI) {
        super(drawAPI);
        this.x = x;
        this.y = y;
        this.width = width;
        this.height = height;
    }

    @Override
    public void draw() {
        drawAPI.drawRectangle(width, height, x, y);
    }
}

// 客户端使用
public class Client {
    public static void main(String[] args) {
        // 红色圆形
        Shape redCircle = new Circle(100, 100, 10, new RedPen());
        // 蓝色圆形
        Shape blueCircle = new Circle(100, 100, 10, new BluePen());
        // 红色矩形
        Shape redRectangle = new Rectangle(50, 50, 20, 30, new RedPen());
        // 蓝色矩形
        Shape blueRectangle = new Rectangle(50, 50, 20, 30, new BluePen());

        redCircle.draw();
        blueCircle.draw();
        redRectangle.draw();
        blueRectangle.draw();
    }
}
11.组合模式
组合模式将对象组合成树形结构来表示"部分-整体"的层次结构。组合模式使得用户对单个对象和组合对象的使用具有一致性。
// 抽象组件
public abstract class Component {
    protected String name;

    public Component(String name) {
        this.name = name;
    }

    public abstract void add(Component component);
    public abstract void remove(Component component);
    public abstract void display(int depth);
}

// 叶子组件
public class Leaf extends Component {
    public Leaf(String name) {
        super(name);
    }

    @Override
    public void add(Component component) {
        System.out.println("叶子节点不能添加子组件");
    }

    @Override
    public void remove(Component component) {
        System.out.println("叶子节点不能删除子组件");
    }

    @Override
    public void display(int depth) {
        StringBuilder indent = new StringBuilder();
        for (int i = 0; i < depth; i++) {
            indent.append("-");
        }
        System.out.println(indent + name);
    }
}

// 组合组件
public class Composite extends Component {
    private List<Component> children = new ArrayList<>();

    public Composite(String name) {
        super(name);
    }

    @Override
    public void add(Component component) {
        children.add(component);
    }

    @Override
    public void remove(Component component) {
        children.remove(component);
    }

    @Override
    public void display(int depth) {
        StringBuilder indent = new StringBuilder();
        for (int i = 0; i < depth; i++) {
            indent.append("-");
        }
        System.out.println(indent + name);

        // 显示子组件
        for (Component component : children) {
            component.display(depth + 2);
        }
    }
}

// 客户端使用
public class Client {
    public static void main(String[] args) {
        // 创建根节点
        Composite root = new Composite("根目录");

        // 创建子目录
        Composite branch1 = new Composite("子目录1");
        Composite branch2 = new Composite("子目录2");

        // 创建叶子节点
        Leaf leaf1 = new Leaf("文件1.txt");
        Leaf leaf2 = new Leaf("文件2.txt");
        Leaf leaf3 = new Leaf("文件3.txt");

        // 构建树形结构
        root.add(branch1);
        root.add(branch2);
        branch1.add(leaf1);
        branch1.add(leaf2);
        branch2.add(leaf3);

        // 显示整个树形结构
        root.display(0);
    }
}
实际应用示例:公司组织架构
import java.util.ArrayList;
import java.util.List;

// 员工抽象类
public abstract class Employee {
    protected String name;
    protected String dept;
    protected int salary;

    public Employee(String name, String dept, int salary) {
        this.name = name;
        this.dept = dept;
        this.salary = salary;
    }

    public abstract void add(Employee employee);
    public abstract void remove(Employee employee);
    public abstract void display();
}

// 普通员工(叶子)
public class Developer extends Employee {
    public Developer(String name, String dept, int salary) {
        super(name, dept, salary);
    }

    @Override
    public void add(Employee employee) {
        // 普通员工不能添加下属
    }

    @Override
    public void remove(Employee employee) {
        // 普通员工不能删除下属
    }

    @Override
    public void display() {
        System.out.println("员工:" + name + ", 部门:" + dept + ", 薪资:" + salary);
    }
}

// 经理(组合)
public class Manager extends Employee {
    private List<Employee> employees = new ArrayList<>();

    public Manager(String name, String dept, int salary) {
        super(name, dept, salary);
    }

    @Override
    public void add(Employee employee) {
        employees.add(employee);
    }

    @Override
    public void remove(Employee employee) {
        employees.remove(employee);
    }

    @Override
    public void display() {
        System.out.println("经理:" + name + ", 部门:" + dept + ", 薪资:" + salary);
        System.out.println("下属员工:");
        for (Employee emp : employees) {
            System.out.print("  ");
            emp.display();
        }
    }
}

// 客户端使用
public class Client {
    public static void main(String[] args) {
        // 创建CEO
        Manager ceo = new Manager("张总", "CEO", 100000);

        // 创建部门经理
        Manager hrManager = new Manager("李经理", "人事部", 50000);
        Manager itManager = new Manager("王经理", "技术部", 60000);

        // 创建普通员工
        Developer dev1 = new Developer("程序员1", "技术部", 20000);
        Developer dev2 = new Developer("程序员2", "技术部", 25000);
        Developer hr1 = new Developer("HR专员1", "人事部", 15000);
        Developer hr2 = new Developer("HR专员2", "人事部", 18000);

        // 构建组织架构
        ceo.add(hrManager);
        ceo.add(itManager);

        hrManager.add(hr1);
        hrManager.add(hr2);

        itManager.add(dev1);
        itManager.add(dev2);

        // 显示整个组织架构
        ceo.display();
    }
}
12.享元模式
享元模式通过共享技术有效地支持大量细粒度的对象。它减少创建对象的数量,以减少内存占用和提高性能。
// 享元接口
public interface Flyweight {
    void operation(String extrinsicState);
}

// 具体享元类
public class ConcreteFlyweight implements Flyweight {
    private String intrinsicState; // 内部状态

    public ConcreteFlyweight(String intrinsicState) {
        this.intrinsicState = intrinsicState;
    }

    @Override
    public void operation(String extrinsicState) {
        System.out.println("内部状态:" + intrinsicState + ", 外部状态:" + extrinsicState);
    }
}

// 享元工厂
public class FlyweightFactory {
    private Map<String, Flyweight> flyweights = new HashMap<>();

    public Flyweight getFlyweight(String key) {
        Flyweight flyweight = flyweights.get(key);
        if (flyweight == null) {
            flyweight = new ConcreteFlyweight(key);
            flyweights.put(key, flyweight);
            System.out.println("创建享元对象:" + key);
        } else {
            System.out.println("复用享元对象:" + key);
        }
        return flyweight;
    }

    public int getFlyweightSize() {
        return flyweights.size();
    }
}

// 客户端使用
public class Client {
    public static void main(String[] args) {
        FlyweightFactory factory = new FlyweightFactory();

        // 获取享元对象
        Flyweight flyweight1 = factory.getFlyweight("A");
        flyweight1.operation("第一次使用");

        Flyweight flyweight2 = factory.getFlyweight("B");
        flyweight2.operation("第一次使用");

        Flyweight flyweight3 = factory.getFlyweight("A"); // 复用
        flyweight3.operation("第二次使用");

        System.out.println("享元对象总数:" + factory.getFlyweightSize());
    }
}
实际应用示例:文字处理器
import java.util.HashMap;
import java.util.Map;

// 字符享元接口
public interface Character {
    void display(int size, String color, String font);
}

// 具体字符享元
public class ConcreteCharacter implements Character {
    private char symbol; // 内部状态:字符

    public ConcreteCharacter(char symbol) {
        this.symbol = symbol;
    }

    @Override
    public void display(int size, String color, String font) {
        System.out.println("字符:'" + symbol + "', 大小:" + size +
                         ", 颜色:" + color + ", 字体:" + font);
    }
}

// 字符工厂
public class CharacterFactory {
    private Map<java.lang.Character, Character> characters = new HashMap<>();

    public Character getCharacter(char symbol) {
        Character character = characters.get(symbol);
        if (character == null) {
            character = new ConcreteCharacter(symbol);
            characters.put(symbol, character);
            System.out.println("创建字符对象:'" + symbol + "'");
        }
        return character;
    }

    public int getCharacterCount() {
        return characters.size();
    }
}

// 文档类(上下文)
public class Document {
    private java.util.List<CharacterContext> characters = new java.util.ArrayList<>();

    public void addCharacter(char symbol, int size, String color, String font) {
        CharacterFactory factory = CharacterFactory.getInstance();
        Character character = factory.getCharacter(symbol);
        characters.add(new CharacterContext(character, size, color, font));
    }

    public void display() {
        for (CharacterContext context : characters) {
            context.display();
        }
    }

    // 字符上下文
    private static class CharacterContext {
        private Character character;
        private int size;       // 外部状态
        private String color;   // 外部状态
        private String font;    // 外部状态

        public CharacterContext(Character character, int size, String color, String font) {
            this.character = character;
            this.size = size;
            this.color = color;
            this.font = font;
        }

        public void display() {
            character.display(size, color, font);
        }
    }
}

// 单例字符工厂
class CharacterFactory {
    private static CharacterFactory instance = new CharacterFactory();
    private Map<java.lang.Character, Character> characters = new HashMap<>();

    private CharacterFactory() {}

    public static CharacterFactory getInstance() {
        return instance;
    }

    public Character getCharacter(char symbol) {
        Character character = characters.get(symbol);
        if (character == null) {
            character = new ConcreteCharacter(symbol);
            characters.put(symbol, character);
            System.out.println("创建字符对象:'" + symbol + "'");
        }
        return character;
    }

    public int getCharacterCount() {
        return characters.size();
    }
}

// 客户端使用
public class Client {
    public static void main(String[] args) {
        Document document = new Document();

        // 添加字符到文档
        document.addCharacter('H', 12, "红色", "宋体");
        document.addCharacter('e', 12, "红色", "宋体");
        document.addCharacter('l', 12, "红色", "宋体");
        document.addCharacter('l', 12, "红色", "宋体"); // 复用字符'l'
        document.addCharacter('o', 12, "红色", "宋体");

        System.out.println("\n文档内容:");
        document.display();

        CharacterFactory factory = CharacterFactory.getInstance();
        System.out.println("\n创建的字符对象总数:" + factory.getCharacterCount());
    }
}
(三)行为型模式
13.策略模式
策略模式定义了一系列算法,并将每个算法封装起来,使它们可以相互替换,且算法的变化不会影响使用算法的客户。
// 策略接口
public interface Strategy {
    int calculate(int a, int b);
}

// 具体策略:加法
public class AddStrategy implements Strategy {
    @Override
    public int calculate(int a, int b) {
        return a + b;
    }
}

// 具体策略:减法
public class SubtractStrategy implements Strategy {
    @Override
    public int calculate(int a, int b) {
        return a - b;
    }
}

// 具体策略:乘法
public class MultiplyStrategy implements Strategy {
    @Override
    public int calculate(int a, int b) {
        return a * b;
    }
}

// 上下文类
public class Calculator {
    private Strategy strategy;

    public Calculator(Strategy strategy) {
        this.strategy = strategy;
    }

    public void setStrategy(Strategy strategy) {
        this.strategy = strategy;
    }

    public int execute(int a, int b) {
        return strategy.calculate(a, b);
    }
}

// 客户端使用
public class Client {
    public static void main(String[] args) {
        Calculator calculator = new Calculator(new AddStrategy());
        System.out.println("10 + 5 = " + calculator.execute(10, 5));

        calculator.setStrategy(new SubtractStrategy());
        System.out.println("10 - 5 = " + calculator.execute(10, 5));

        calculator.setStrategy(new MultiplyStrategy());
        System.out.println("10 * 5 = " + calculator.execute(10, 5));
    }
}
实际应用示例:支付系统
// 支付策略接口
public interface PaymentStrategy {
    void pay(double amount);
}

// 具体策略:信用卡支付
public class CreditCardPayment implements PaymentStrategy {
    private String cardNumber;
    private String name;

    public CreditCardPayment(String cardNumber, String name) {
        this.cardNumber = cardNumber;
        this.name = name;
    }

    @Override
    public void pay(double amount) {
        System.out.println("使用信用卡支付 $" + amount);
        System.out.println("卡号:" + cardNumber + ", 持卡人:" + name);
    }
}

// 具体策略:支付宝支付
public class AlipayPayment implements PaymentStrategy {
    private String account;

    public AlipayPayment(String account) {
        this.account = account;
    }

    @Override
    public void pay(double amount) {
        System.out.println("使用支付宝支付 $" + amount);
        System.out.println("账号:" + account);
    }
}

// 具体策略:微信支付
public class WechatPayment implements PaymentStrategy {
    private String openId;

    public WechatPayment(String openId) {
        this.openId = openId;
    }

    @Override
    public void pay(double amount) {
        System.out.println("使用微信支付 $" + amount);
        System.out.println("OpenID:" + openId);
    }
}

// 购物车上下文
public class ShoppingCart {
    private List<String> items = new ArrayList<>();
    private PaymentStrategy paymentStrategy;

    public void addItem(String item) {
        items.add(item);
    }

    public void setPaymentStrategy(PaymentStrategy paymentStrategy) {
        this.paymentStrategy = paymentStrategy;
    }

    public void checkout(double amount) {
        System.out.println("购买商品:" + items);
        if (paymentStrategy != null) {
            paymentStrategy.pay(amount);
        } else {
            System.out.println("请选择支付方式");
        }
        System.out.println("支付完成\n");
    }
}

// 客户端使用
public class Client {
    public static void main(String[] args) {
        ShoppingCart cart = new ShoppingCart();
        cart.addItem("笔记本电脑");
        cart.addItem("鼠标");

        // 使用信用卡支付
        cart.setPaymentStrategy(new CreditCardPayment("1234-5678-9012-3456", "张三"));
        cart.checkout(5999.99);

        // 使用支付宝支付
        cart.setPaymentStrategy(new AlipayPayment("zhangsan@example.com"));
        cart.checkout(5999.99);

        // 使用微信支付
        cart.setPaymentStrategy(new WechatPayment("wx_123456789"));
        cart.checkout(5999.99);
    }
}
14.模板方法模式
模板方法模式在一个方法中定义一个算法的骨架,而将一些步骤延迟到子类中。模板方法使得子类可以在不改变算法结构的情况下,重新定义算法中的某些步骤。
// 抽象类
public abstract class DataProcessor {
    // 模板方法:定义算法骨架
    public final void process() {
        readData();
        processData();
        writeData();
    }

    // 具体方法
    private void readData() {
        System.out.println("读取数据");
    }

    // 抽象方法:由子类实现
    protected abstract void processData();

    // 钩子方法:子类可以选择性重写
    protected void writeData() {
        System.out.println("写入数据");
    }
}

// 具体子类A
public class CSVProcessor extends DataProcessor {
    @Override
    protected void processData() {
        System.out.println("处理CSV格式数据");
    }

    @Override
    protected void writeData() {
        System.out.println("将处理后的数据写入CSV文件");
    }
}

// 具体子类B
public class JSONProcessor extends DataProcessor {
    @Override
    protected void processData() {
        System.out.println("处理JSON格式数据");
    }

    @Override
    protected void writeData() {
        System.out.println("将处理后的数据写入JSON文件");
    }
}

// 客户端使用
public class Client {
    public static void main(String[] args) {
        DataProcessor csvProcessor = new CSVProcessor();
        csvProcessor.process();

        System.out.println("-------------------");

        DataProcessor jsonProcessor = new JSONProcessor();
        jsonProcessor.process();
    }
}
实际应用示例:制作饮品
// 抽象饮品制作类
public abstract class BeverageMaker {
    // 模板方法:制作饮品的流程
    public final void makeBeverage() {
        boilWater();
        brew();
        pourInCup();
        if (customerWantsCondiments()) {
            addCondiments();
        }
    }

    // 烧水(对所有饮品都一样)
    private void boilWater() {
        System.out.println("把水烧开");
    }

    // 倒入杯子(对所有饮品都一样)
    private void pourInCup() {
        System.out.println("把饮品倒进杯子");
    }

    // 抽象方法:冲泡
    protected abstract void brew();

    // 抽象方法:添加调料
    protected abstract void addCondiments();

    // 钩子方法:是否需要调料
    protected boolean customerWantsCondiments() {
        return true;
    }
}

// 咖啡制作类
public class Coffee extends BeverageMaker {
    @Override
    protected void brew() {
        System.out.println("用沸水冲泡咖啡");
    }

    @Override
    protected void addCondiments() {
        System.out.println("加糖和牛奶");
    }

    @Override
    protected boolean customerWantsCondiments() {
        return getUserInput();
    }

    private boolean getUserInput() {
        System.out.println("您想要加糖和牛奶吗?(y/n)");
        // 简化处理,实际应该从控制台读取
        return true;
    }
}

// 茶制作类
public class Tea extends BeverageMaker {
    @Override
    protected void brew() {
        System.out.println("用沸水浸泡茶叶");
    }

    @Override
    protected void addCondiments() {
        System.out.println("加柠檬");
    }

    @Override
    protected boolean customerWantsCondiments() {
        return getUserInput();
    }

    private boolean getUserInput() {
        System.out.println("您想要加柠檬吗?(y/n)");
        // 简化处理,实际应该从控制台读取
        return false;
    }
}

// 客户端使用
public class Client {
    public static void main(String[] args) {
        System.out.println("制作咖啡:");
        BeverageMaker coffee = new Coffee();
        coffee.makeBeverage();

        System.out.println("\n制作茶:");
        BeverageMaker tea = new Tea();
        tea.makeBeverage();
    }
}
15.观察者模式
观察者模式定义了一种一对多的依赖关系,让多个观察者对象同时监听某一个主题对象。这个主题对象在状态发生变化时,会通知所有观察者对象,使它们能够自动更新自己。
import java.util.ArrayList;
import java.util.List;

// 观察者接口
public interface Observer {
    void update(String message);
}

// 主题接口
public interface Subject {
    void addObserver(Observer observer);
    void removeObserver(Observer observer);
    void notifyObservers();
}

// 具体主题
public class NewsAgency implements Subject {
    private List<Observer> observers = new ArrayList<>();
    private String news;

    @Override
    public void addObserver(Observer observer) {
        observers.add(observer);
    }

    @Override
    public void removeObserver(Observer observer) {
        observers.remove(observer);
    }

    @Override
    public void notifyObservers() {
        for (Observer observer : observers) {
            observer.update(news);
        }
    }

    public void setNews(String news) {
        this.news = news;
        notifyObservers();
    }
}

// 具体观察者:新闻频道
public class NewsChannel implements Observer {
    private String name;
    private String news;

    public NewsChannel(String name) {
        this.name = name;
    }

    @Override
    public void update(String news) {
        this.news = news;
        System.out.println(name + " 收到新闻:" + news);
    }
}

// 具体观察者:手机用户
public class PhoneUser implements Observer {
    private String name;

    public PhoneUser(String name) {
        this.name = name;
    }

    @Override
    public void update(String news) {
        System.out.println("手机用户 " + name + " 收到推送:" + news);
    }
}

// 客户端使用
public class Client {
    public static void main(String[] args) {
        // 创建新闻社
        NewsAgency newsAgency = new NewsAgency();

        // 创建观察者
        NewsChannel cnn = new NewsChannel("CNN");
        NewsChannel bbc = new NewsChannel("BBC");
        PhoneUser user1 = new PhoneUser("张三");
        PhoneUser user2 = new PhoneUser("李四");

        // 订阅新闻
        newsAgency.addObserver(cnn);
        newsAgency.addObserver(bbc);
        newsAgency.addObserver(user1);
        newsAgency.addObserver(user2);

        // 发布新闻
        newsAgency.setNews("重大新闻:股市大涨!");

        System.out.println("\n用户李四取消订阅...\n");
        newsAgency.removeObserver(user2);

        // 再次发布新闻
        newsAgency.setNews("科技新闻:新AI技术发布!");
    }
}
实际应用示例:股票价格监控
import java.util.ArrayList;
import java.util.List;

// 股票主题
public class Stock implements Subject {
    private List<Observer> observers = new ArrayList<>();
    private String symbol;
    private double price;

    public Stock(String symbol, double price) {
        this.symbol = symbol;
        this.price = price;
    }

    @Override
    public void addObserver(Observer observer) {
        observers.add(observer);
    }

    @Override
    public void removeObserver(Observer observer) {
        observers.remove(observer);
    }

    @Override
    public void notifyObservers() {
        for (Observer observer : observers) {
            observer.update(symbol, price);
        }
    }

    public void setPrice(double price) {
        this.price = price;
        notifyObservers();
    }

    public String getSymbol() {
        return symbol;
    }

    public double getPrice() {
        return price;
    }
}

// 股票观察者接口
interface Observer {
    void update(String symbol, double price);
}

// 投资者观察者
public class Investor implements Observer {
    private String name;

    public Investor(String name) {
        this.name = name;
    }

    @Override
    public void update(String symbol, double price) {
        System.out.println("投资者 " + name + " 收到通知:" +
                         symbol + " 股票价格更新为 $" + price);
    }
}

// 股票分析师观察者
public class StockAnalyst implements Observer {
    private String name;

    public StockAnalyst(String name) {
        this.name = name;
    }

    @Override
    public void update(String symbol, double price) {
        System.out.println("分析师 " + name + " 分析:" +
                         symbol + " 当前价格 $" + price +
                         (price > 100 ? " [建议买入]" : " [建议观望]"));
    }
}

// 客户端使用
public class Client {
    public static void main(String[] args) {
        // 创建股票
        Stock appleStock = new Stock("AAPL", 150.0);

        // 创建观察者
        Investor investor1 = new Investor("张三");
        Investor investor2 = new Investor("李四");
        StockAnalyst analyst = new StockAnalyst("王分析师");

        // 订阅股票价格变化
        appleStock.addObserver(investor1);
        appleStock.addObserver(investor2);
        appleStock.addObserver(analyst);

        // 股票价格变化
        System.out.println("=== 股票价格上涨 ===");
        appleStock.setPrice(155.0);

        System.out.println("\n=== 股票价格下跌 ===");
        appleStock.setPrice(95.0);
    }
}
16.命令模式
命令模式将一个请求封装成一个对象,从而使您可以用不同的请求对客户进行参数化;对请求排队或记录请求日志,以及支持可撤销的操作。
// 命令接口
public interface Command {
    void execute();
    void undo();
}

// 接收者:电灯
public class Light {
    private boolean isOn = false;

    public void turnOn() {
        isOn = true;
        System.out.println("电灯打开");
    }

    public void turnOff() {
        isOn = false;
        System.out.println("电灯关闭");
    }

    public boolean isOn() {
        return isOn;
    }
}

// 具体命令:打开电灯
public class LightOnCommand implements Command {
    private Light light;

    public LightOnCommand(Light light) {
        this.light = light;
    }

    @Override
    public void execute() {
        light.turnOn();
    }

    @Override
    public void undo() {
        light.turnOff();
    }
}

// 具体命令:关闭电灯
public class LightOffCommand implements Command {
    private Light light;

    public LightOffCommand(Light light) {
        this.light = light;
    }

    @Override
    public void execute() {
        light.turnOff();
    }

    @Override
    public void undo() {
        light.turnOn();
    }
}

// 空命令(空对象模式)
public class NoCommand implements Command {
    @Override
    public void execute() {
        // 什么都不做
    }

    @Override
    public void undo() {
        // 什么都不做
    }
}

// 调用者:遥控器
public class RemoteControl {
    private Command[] onCommands;
    private Command[] offCommands;
    private Command undoCommand;

    public RemoteControl() {
        onCommands = new Command[7];
        offCommands = new Command[7];

        Command noCommand = new NoCommand();
        for (int i = 0; i < 7; i++) {
            onCommands[i] = noCommand;
            offCommands[i] = noCommand;
        }
        undoCommand = noCommand;
    }

    public void setCommand(int slot, Command onCommand, Command offCommand) {
        onCommands[slot] = onCommand;
        offCommands[slot] = offCommand;
    }

    public void onButtonPressed(int slot) {
        onCommands[slot].execute();
        undoCommand = onCommands[slot];
    }

    public void offButtonPressed(int slot) {
        offCommands[slot].execute();
        undoCommand = offCommands[slot];
    }

    public void undoButtonPressed() {
        undoCommand.undo();
    }
}

// 客户端使用
public class Client {
    public static void main(String[] args) {
        // 创建接收者
        Light livingRoomLight = new Light();
        Light kitchenLight = new Light();

        // 创建命令
        LightOnCommand livingRoomLightOn = new LightOnCommand(livingRoomLight);
        LightOffCommand livingRoomLightOff = new LightOffCommand(livingRoomLight);
        LightOnCommand kitchenLightOn = new LightOnCommand(kitchenLight);
        LightOffCommand kitchenLightOff = new LightOffCommand(kitchenLight);

        // 创建调用者
        RemoteControl remote = new RemoteControl();

        // 设置命令
        remote.setCommand(0, livingRoomLightOn, livingRoomLightOff);
        remote.setCommand(1, kitchenLightOn, kitchenLightOff);

        // 测试命令
        System.out.println("=== 按下客厅灯开关 ===");
        remote.onButtonPressed(0);

        System.out.println("=== 按下厨房灯开关 ===");
        remote.onButtonPressed(1);

        System.out.println("=== 按下客厅灯关闭 ===");
        remote.offButtonPressed(0);

        System.out.println("=== 撤销上一个操作 ===");
        remote.undoButtonPressed();
    }
}
17.迭代器模式
迭代器模式提供一种方法顺序访问一个聚合对象中各个元素,而又无须暴露该对象的内部表示。
// 迭代器接口
public interface Iterator<T> {
    boolean hasNext();
    T next();
}

// 聚合接口
public interface Aggregate<T> {
    Iterator<T> createIterator();
}

// 具体聚合:菜单
public class Menu implements Aggregate<MenuItem> {
    private List<MenuItem> items = new ArrayList<>();

    public void addItem(MenuItem item) {
        items.add(item);
    }

    @Override
    public Iterator<MenuItem> createIterator() {
        return new MenuIterator();
    }

    // 内部迭代器类
    private class MenuIterator implements Iterator<MenuItem> {
        private int position = 0;

        @Override
        public boolean hasNext() {
            return position < items.size();
        }

        @Override
        public MenuItem next() {
            if (!hasNext()) {
                throw new RuntimeException("没有更多元素");
            }
            return items.get(position++);
        }
    }
}

// 菜单项
public class MenuItem {
    private String name;
    private String description;
    private double price;

    public MenuItem(String name, String description, double price) {
        this.name = name;
        this.description = description;
        this.price = price;
    }

    @Override
    public String toString() {
        return name + " - " + description + " ($" + price + ")";
    }
}

// 客户端使用
public class Client {
    public static void main(String[] args) {
        Menu menu = new Menu();
        menu.addItem(new MenuItem("煎蛋", "新鲜鸡蛋煎制", 12.0));
        menu.addItem(new MenuItem("咖啡", "现磨咖啡", 18.0));
        menu.addItem(new MenuItem("三明治", "火腿芝士三明治", 25.0));

        Iterator<MenuItem> iterator = menu.createIterator();
        System.out.println("菜单内容:");
        while (iterator.hasNext()) {
            MenuItem item = iterator.next();
            System.out.println(item);
        }
    }
}
18.责任链模式
责任链模式为请求创建了一个接收者对象的链。这种模式给予请求的类型,对请求的发送者和接收者进行解耦。
// 抽象处理者
public abstract class Handler {
    protected Handler nextHandler;

    public void setNextHandler(Handler nextHandler) {
        this.nextHandler = nextHandler;
    }

    public abstract void handleRequest(Request request);
}

// 请求类
public class Request {
    private String type;
    private int amount;

    public Request(String type, int amount) {
        this.type = type;
        this.amount = amount;
    }

    public String getType() {
        return type;
    }

    public int getAmount() {
        return amount;
    }
}

// 具体处理者:经理
public class Manager extends Handler {
    @Override
    public void handleRequest(Request request) {
        if ("请假".equals(request.getType()) && request.getAmount() <= 3) {
            System.out.println("经理批准了 " + request.getAmount() + " 天的请假申请");
        } else if (nextHandler != null) {
            nextHandler.handleRequest(request);
        } else {
            System.out.println("没有人能处理这个请求");
        }
    }
}

// 具体处理者:总监
public class Director extends Handler {
    @Override
    public void handleRequest(Request request) {
        if ("请假".equals(request.getType()) && request.getAmount() <= 7) {
            System.out.println("总监批准了 " + request.getAmount() + " 天的请假申请");
        } else if (nextHandler != null) {
            nextHandler.handleRequest(request);
        } else {
            System.out.println("没有人能处理这个请求");
        }
    }
}

// 具体处理者:总经理
public class GeneralManager extends Handler {
    @Override
    public void handleRequest(Request request) {
        if ("请假".equals(request.getType()) && request.getAmount() <= 15) {
            System.out.println("总经理批准了 " + request.getAmount() + " 天的请假申请");
        } else if (nextHandler != null) {
            nextHandler.handleRequest(request);
        } else {
            System.out.println("请假时间太长,无法批准");
        }
    }
}

// 客户端使用
public class Client {
    public static void main(String[] args) {
        // 创建责任链
        Handler manager = new Manager();
        Handler director = new Director();
        Handler generalManager = new GeneralManager();

        manager.setNextHandler(director);
        director.setNextHandler(generalManager);

        // 发送请求
        Request request1 = new Request("请假", 2);
        Request request2 = new Request("请假", 5);
        Request request3 = new Request("请假", 10);
        Request request4 = new Request("请假", 20);

        System.out.println("=== 处理2天请假申请 ===");
        manager.handleRequest(request1);

        System.out.println("=== 处理5天请假申请 ===");
        manager.handleRequest(request2);

        System.out.println("=== 处理10天请假申请 ===");
        manager.handleRequest(request3);

        System.out.println("=== 处理20天请假申请 ===");
        manager.handleRequest(request4);
    }
}
19.备忘录模式
备忘录模式在不破坏封装性的前提下,捕获一个对象的内部状态,并在该对象之外保存这个状态,以便以后当需要时能将该对象恢复到原先保存的状态。
// 备忘录类
public class Memento {
    private String state;

    public Memento(String state) {
        this.state = state;
    }

    public String getState() {
        return state;
    }
}

// 发起人类
public class Originator {
    private String state;

    public void setState(String state) {
        this.state = state;
        System.out.println("当前状态:" + state);
    }

    public String getState() {
        return state;
    }

    // 创建备忘录
    public Memento createMemento() {
        return new Memento(state);
    }

    // 恢复状态
    public void restoreMemento(Memento memento) {
        this.state = memento.getState();
        System.out.println("恢复状态:" + state);
    }
}

// 管理者类
public class Caretaker {
    private List<Memento> mementos = new ArrayList<>();

    public void addMemento(Memento memento) {
        mementos.add(memento);
    }

    public Memento getMemento(int index) {
        return mementos.get(index);
    }

    public int getMementoCount() {
        return mementos.size();
    }
}

// 客户端使用
public class Client {
    public static void main(String[] args) {
        Originator originator = new Originator();
        Caretaker caretaker = new Caretaker();

        // 设置状态并保存
        originator.setState("状态1");
        caretaker.addMemento(originator.createMemento());

        originator.setState("状态2");
        caretaker.addMemento(originator.createMemento());

        originator.setState("状态3");

        System.out.println("\n=== 开始恢复状态 ===");
        // 恢复到状态2
        originator.restoreMemento(caretaker.getMemento(1));

        // 恢复到状态1
        originator.restoreMemento(caretaker.getMemento(0));
    }
}
实际应用示例:文本编辑器
import java.util.Stack;

// 文档备忘录
public class DocumentMemento {
    private String content;
    private String fontStyle;
    private int fontSize;

    public DocumentMemento(String content, String fontStyle, int fontSize) {
        this.content = content;
        this.fontStyle = fontStyle;
        this.fontSize = fontSize;
    }

    public String getContent() {
        return content;
    }

    public String getFontStyle() {
        return fontStyle;
    }

    public int getFontSize() {
        return fontSize;
    }
}

// 文档类
public class Document {
    private String content = "";
    private String fontStyle = "Arial";
    private int fontSize = 12;

    public void type(String text) {
        content += text;
        System.out.println("输入文本:" + text);
        showDocument();
    }

    public void setFontStyle(String fontStyle) {
        this.fontStyle = fontStyle;
        System.out.println("字体样式更改为:" + fontStyle);
        showDocument();
    }

    public void setFontSize(int fontSize) {
        this.fontSize = fontSize;
        System.out.println("字体大小更改为:" + fontSize);
        showDocument();
    }

    public DocumentMemento save() {
        System.out.println("保存文档状态");
        return new DocumentMemento(content, fontStyle, fontSize);
    }

    public void restore(DocumentMemento memento) {
        this.content = memento.getContent();
        this.fontStyle = memento.getFontStyle();
        this.fontSize = memento.getFontSize();
        System.out.println("恢复文档状态");
        showDocument();
    }

    private void showDocument() {
        System.out.println("文档内容:\"" + content + "\" [字体:" + fontStyle + ", 大小:" + fontSize + "]");
        System.out.println();
    }
}

// 文档历史管理器
public class DocumentHistory {
    private Stack<DocumentMemento> history = new Stack<>();

    public void push(DocumentMemento memento) {
        history.push(memento);
    }

    public DocumentMemento pop() {
        if (!history.isEmpty()) {
            return history.pop();
        }
        return null;
    }

    public boolean hasHistory() {
        return !history.isEmpty();
    }
}

// 客户端使用
public class Client {
    public static void main(String[] args) {
        Document document = new Document();
        DocumentHistory history = new DocumentHistory();

        // 编辑文档
        document.type("Hello ");
        history.push(document.save());

        document.type("World!");
        history.push(document.save());

        document.setFontStyle("Times New Roman");
        history.push(document.save());

        document.setFontSize(14);

        System.out.println("=== 撤销操作 ===");
        // 撤销字体大小更改
        if (history.hasHistory()) {
            document.restore(history.pop());
        }

        // 撤销字体样式更改
        if (history.hasHistory()) {
            document.restore(history.pop());
        }

        // 撤销部分文本输入
        if (history.hasHistory()) {
            document.restore(history.pop());
        }
    }
}
20.状态模式
状态模式允许对象在内部状态发生改变时改变它的行为,对象看起来好像修改了它的类。
// 状态接口
public interface State {
    void insertCoin(VendingMachine machine);
    void selectProduct(VendingMachine machine);
    void dispense(VendingMachine machine);
}

// 自动售货机类
public class VendingMachine {
    private State noCoinState;
    private State hasCoinState;
    private State soldState;
    private State emptyState;

    private State currentState;
    private int productCount;

    public VendingMachine(int productCount) {
        noCoinState = new NoCoinState();
        hasCoinState = new HasCoinState();
        soldState = new SoldState();
        emptyState = new EmptyState();

        this.productCount = productCount;
        if (productCount > 0) {
            currentState = noCoinState;
        } else {
            currentState = emptyState;
        }
    }

    public void insertCoin() {
        currentState.insertCoin(this);
    }

    public void selectProduct() {
        currentState.selectProduct(this);
    }

    public void dispense() {
        currentState.dispense(this);
    }

    public void setState(State state) {
        this.currentState = state;
    }

    public State getNoCoinState() {
        return noCoinState;
    }

    public State getHasCoinState() {
        return hasCoinState;
    }

    public State getSoldState() {
        return soldState;
    }

    public State getEmptyState() {
        return emptyState;
    }

    public void releaseProduct() {
        if (productCount > 0) {
            productCount--;
            System.out.println("商品已出售,剩余数量:" + productCount);
        }
    }

    public int getProductCount() {
        return productCount;
    }
}

// 无硬币状态
public class NoCoinState implements State {
    @Override
    public void insertCoin(VendingMachine machine) {
        System.out.println("硬币已投入");
        machine.setState(machine.getHasCoinState());
    }

    @Override
    public void selectProduct(VendingMachine machine) {
        System.out.println("请先投入硬币");
    }

    @Override
    public void dispense(VendingMachine machine) {
        System.out.println("请先投入硬币");
    }
}

// 有硬币状态
public class HasCoinState implements State {
    @Override
    public void insertCoin(VendingMachine machine) {
        System.out.println("已有硬币,无法再次投入");
    }

    @Override
    public void selectProduct(VendingMachine machine) {
        System.out.println("商品已选择");
        machine.setState(machine.getSoldState());
    }

    @Override
    public void dispense(VendingMachine machine) {
        System.out.println("请先选择商品");
    }
}

// 售出状态
public class SoldState implements State {
    @Override
    public void insertCoin(VendingMachine machine) {
        System.out.println("正在出售商品,请稍等");
    }

    @Override
    public void selectProduct(VendingMachine machine) {
        System.out.println("正在出售商品,请稍等");
    }

    @Override
    public void dispense(VendingMachine machine) {
        machine.releaseProduct();
        if (machine.getProductCount() > 0) {
            machine.setState(machine.getNoCoinState());
        } else {
            System.out.println("商品已售完");
            machine.setState(machine.getEmptyState());
        }
    }
}

// 空状态
public class EmptyState implements State {
    @Override
    public void insertCoin(VendingMachine machine) {
        System.out.println("商品已售完,无法购买");
    }

    @Override
    public void selectProduct(VendingMachine machine) {
        System.out.println("商品已售完,无法购买");
    }

    @Override
    public void dispense(VendingMachine machine) {
        System.out.println("商品已售完,无法出售");
    }
}

// 客户端使用
public class Client {
    public static void main(String[] args) {
        VendingMachine machine = new VendingMachine(2);

        System.out.println("=== 第一次购买 ===");
        machine.insertCoin();
        machine.selectProduct();
        machine.dispense();

        System.out.println("\n=== 第二次购买 ===");
        machine.insertCoin();
        machine.selectProduct();
        machine.dispense();

        System.out.println("\n=== 第三次购买(商品已售完)===");
        machine.insertCoin();
        machine.selectProduct();
        machine.dispense();
    }
}
21.访问者模式
访问者模式表示一个作用于某对象结构中的各元素的操作。它使你可以在不改变各元素的类的前提下定义作用于这些元素的新操作。
// 抽象访问者
public interface Visitor {
    void visit(Book book);
    void visit(Music music);
    void visit(Movie movie);
}

// 抽象元素
public interface Element {
    void accept(Visitor visitor);
}

// 具体元素:书籍
public class Book implements Element {
    private String title;
    private String author;
    private double price;

    public Book(String title, String author, double price) {
        this.title = title;
        this.author = author;
        this.price = price;
    }

    @Override
    public void accept(Visitor visitor) {
        visitor.visit(this);
    }

    public String getTitle() {
        return title;
    }

    public String getAuthor() {
        return author;
    }

    public double getPrice() {
        return price;
    }
}

// 具体元素:音乐
public class Music implements Element {
    private String title;
    private String artist;
    private int duration; // 秒

    public Music(String title, String artist, int duration) {
        this.title = title;
        this.artist = artist;
        this.duration = duration;
    }

    @Override
    public void accept(Visitor visitor) {
        visitor.visit(this);
    }

    public String getTitle() {
        return title;
    }

    public String getArtist() {
        return artist;
    }

    public int getDuration() {
        return duration;
    }
}

// 具体元素:电影
public class Movie implements Element {
    private String title;
    private String director;
    private int duration; // 分钟

    public Movie(String title, String director, int duration) {
        this.title = title;
        this.director = director;
        this.duration = duration;
    }

    @Override
    public void accept(Visitor visitor) {
        visitor.visit(this);
    }

    public String getTitle() {
        return title;
    }

    public String getDirector() {
        return director;
    }

    public int getDuration() {
        return duration;
    }
}

// 具体访问者:打印访问者
public class PrintVisitor implements Visitor {
    @Override
    public void visit(Book book) {
        System.out.println("书籍:《" + book.getTitle() + "》- 作者:" +
                         book.getAuthor() + " - 价格:$" + book.getPrice());
    }

    @Override
    public void visit(Music music) {
        System.out.println("音乐:《" + music.getTitle() + "》- 艺术家:" +
                         music.getArtist() + " - 时长:" + music.getDuration() + "秒");
    }

    @Override
    public void visit(Movie movie) {
        System.out.println("电影:《" + movie.getTitle() + "》- 导演:" +
                         movie.getDirector() + " - 时长:" + movie.getDuration() + "分钟");
    }
}

// 具体访问者:统计访问者
public class StatisticsVisitor implements Visitor {
    private int bookCount = 0;
    private int musicCount = 0;
    private int movieCount = 0;
    private double totalPrice = 0;

    @Override
    public void visit(Book book) {
        bookCount++;
        totalPrice += book.getPrice();
    }

    @Override
    public void visit(Music music) {
        musicCount++;
        // 假设音乐价格为1美元
        totalPrice += 1.0;
    }

    @Override
    public void visit(Movie movie) {
        movieCount++;
        // 假设电影价格为5美元
        totalPrice += 5.0;
    }

    public void printStatistics() {
        System.out.println("=== 统计信息 ===");
        System.out.println("书籍数量:" + bookCount);
        System.out.println("音乐数量:" + musicCount);
        System.out.println("电影数量:" + movieCount);
        System.out.println("总价值:$" + totalPrice);
    }
}

// 对象结构
public class Library {
    private List<Element> elements = new ArrayList<>();

    public void addElement(Element element) {
        elements.add(element);
    }

    public void accept(Visitor visitor) {
        for (Element element : elements) {
            element.accept(visitor);
        }
    }
}

// 客户端使用
public class Client {
    public static void main(String[] args) {
        Library library = new Library();
        library.addElement(new Book("设计模式", "GoF", 59.99));
        library.addElement(new Book("Java编程思想", "Bruce Eckel", 79.99));
        library.addElement(new Music("月亮代表我的心", "邓丽君", 240));
        library.addElement(new Movie("肖申克的救赎", "弗兰克·德拉邦特", 142));

        System.out.println("=== 打印信息 ===");
        PrintVisitor printVisitor = new PrintVisitor();
        library.accept(printVisitor);

        System.out.println();
        StatisticsVisitor statsVisitor = new StatisticsVisitor();
        library.accept(statsVisitor);
        statsVisitor.printStatistics();
    }
}
22.中介者模式
中介者模式定义了一系列对象之间的交互方式,通过使各对象不需要显式地相互引用,从而使其耦合松散,而且可以独立地改变它们之间的交互。
// 抽象中介者
public abstract class Mediator {
    public abstract void send(String message, Colleague colleague);
}

// 抽象同事类
public abstract class Colleague {
    protected Mediator mediator;

    public Colleague(Mediator mediator) {
        this.mediator = mediator;
    }

    public abstract void receive(String message);
    public abstract void send(String message);
}

// 具体中介者:聊天室
public class ChatRoom extends Mediator {
    private List<Colleague> colleagues = new ArrayList<>();

    public void addColleague(Colleague colleague) {
        colleagues.add(colleague);
    }

    @Override
    public void send(String message, Colleague sender) {
        for (Colleague colleague : colleagues) {
            if (colleague != sender) {
                colleague.receive(message);
            }
        }
    }
}

// 具体同事类:用户
public class User extends Colleague {
    private String name;

    public User(String name, Mediator mediator) {
        super(mediator);
        this.name = name;
    }

    @Override
    public void receive(String message) {
        System.out.println(name + " 收到消息:" + message);
    }

    @Override
    public void send(String message) {
        System.out.println(name + " 发送消息:" + message);
        mediator.send(message, this);
    }

    public String getName() {
        return name;
    }
}

// 客户端使用
public class Client {
    public static void main(String[] args) {
        ChatRoom chatRoom = new ChatRoom();

        User user1 = new User("张三", chatRoom);
        User user2 = new User("李四", chatRoom);
        User user3 = new User("王五", chatRoom);

        chatRoom.addColleague(user1);
        chatRoom.addColleague(user2);
        chatRoom.addColleague(user3);

        user1.send("大家好!");
        System.out.println();

        user2.send("你好,张三!");
        System.out.println();

        user3.send("大家下午好!");
    }
}
23.解释器模式
解释器模式给定一个语言,定义它的文法的一种表示,并定义一个解释器,这个解释器使用该表示来解释语言中的句子。
import java.util.Stack;

// 抽象表达式
public interface Expression {
    int interpret();
}

// 终结符表达式:数字
public class NumberExpression implements Expression {
    private int number;

    public NumberExpression(int number) {
        this.number = number;
    }

    @Override
    public int interpret() {
        return number;
    }
}

// 非终结符表达式:加法
public class AddExpression implements Expression {
    private Expression left;
    private Expression right;

    public AddExpression(Expression left, Expression right) {
        this.left = left;
        this.right = right;
    }

    @Override
    public int interpret() {
        return left.interpret() + right.interpret();
    }
}

// 非终结符表达式:减法
public class SubtractExpression implements Expression {
    private Expression left;
    private Expression right;

    public SubtractExpression(Expression left, Expression right) {
        this.left = left;
        this.right = right;
    }

    @Override
    public int interpret() {
        return left.interpret() - right.interpret();
    }
}

// 上下文:表达式解析器
public class Calculator {
    public static Expression parse(String expression) {
        String[] tokens = expression.split(" ");
        Stack<Expression> stack = new Stack<>();

        for (String token : tokens) {
            if (token.equals("+")) {
                Expression right = stack.pop();
                Expression left = stack.pop();
                stack.push(new AddExpression(left, right));
            } else if (token.equals("-")) {
                Expression right = stack.pop();
                Expression left = stack.pop();
                stack.push(new SubtractExpression(left, right));
            } else {
                stack.push(new NumberExpression(Integer.parseInt(token)));
            }
        }

        return stack.pop();
    }
}

// 客户端使用
public class Client {
    public static void main(String[] args) {
        // 使用后缀表达式:3 4 + 2 -(即:(3 + 4) - 2 = 5)
        String expression = "3 4 + 2 -";
        Expression parsedExpression = Calculator.parse(expression);
        int result = parsedExpression.interpret();

        System.out.println("表达式:" + expression);
        System.out.println("结果:" + result);

        // 另一个例子:10 5 - 2 +(即:(10 - 5) + 2 = 7)
        String expression2 = "10 5 - 2 +";
        Expression parsedExpression2 = Calculator.parse(expression2);
        int result2 = parsedExpression2.interpret();

        System.out.println("表达式:" + expression2);
        System.out.println("结果:" + result2);
    }
}
四、设计模式总结
设计模式的七大原则
- 单一职责原则(SRP):一个类应该只有一个发生变化的原因
- 开闭原则(OCP):对扩展开放,对修改关闭
- 里氏替换原则(LSP):子类必须能够替换其基类
- 接口隔离原则(ISP):客户端不应该依赖它不需要的接口
- 依赖倒置原则(DIP):高层模块不应该依赖低层模块,二者都应该依赖其抽象
- 迪米特法则(LoD):一个对象应该对其他对象保持最少的了解
- 合成复用原则(CRP):尽量使用合成/聚合的方式,而不是使用继承
设计模式的使用建议
- 创建型模式:主要解决对象创建的问题,隐藏创建逻辑
- 结构型模式:主要解决类或对象的组合问题
- 行为型模式:主要解决类或对象之间的交互问题
选择设计模式时要根据具体场景和需求,避免过度设计。设计模式是解决问题的工具,而不是目的。

 浙公网安备 33010602011771号