企业实战之监控升级可视化zabbix4.0 系列 一
@AchEng
zabbix简介前言
常见开源的的监控系统有zabbix ,nagios ,cacti。
nagios的简单介绍
1,重在监控告警,在这一方面zabbix比他更优秀,告警配置可视化,web化
2,nagios添加监控需要更改配置文件。
3,没有监控的历史数据,图形支持差,也就是说只是知道报警,但是没有记录原因
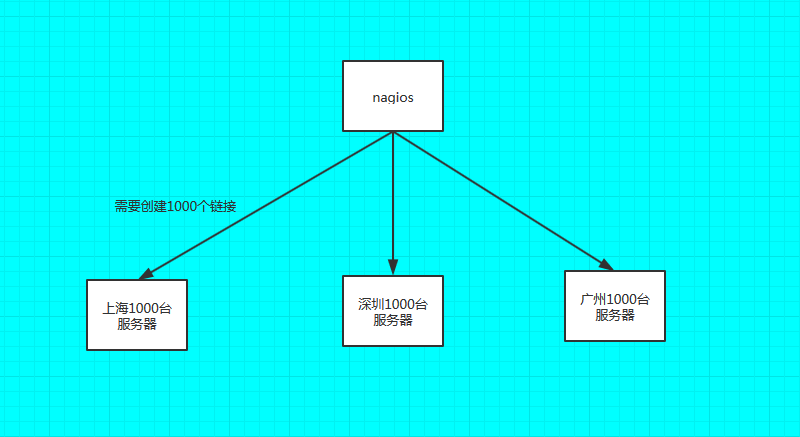
4,不支持分布时候监控系统。
比如:不支持分布式部署
Cacti的简单介绍
1,重在采集服务器。网路设备的监控数据并绘图
2,依赖于snmp协议
3,不好自定义监控
4,告警支持不友好
zabbix的简单介绍
1,所有监控配置都web化,web采用php开发
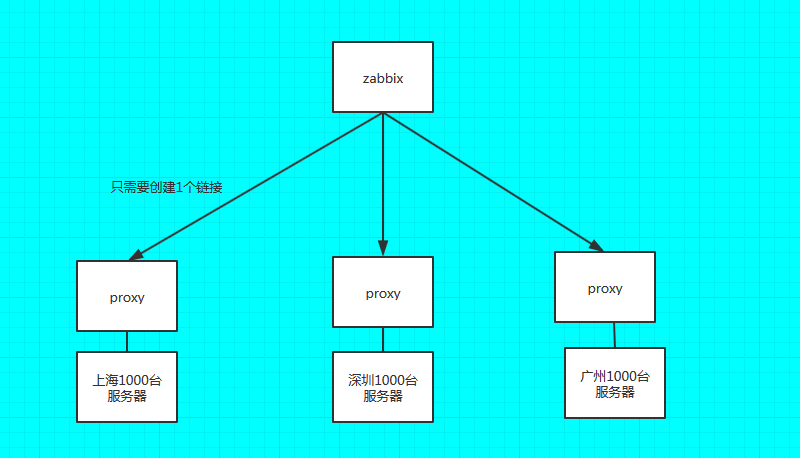
2,支持分布式监控
3,支持多种方式数据采集:简单监控,agent监控,snmp接口,jmx接口监控
4,告警配置web化:邮件,微信,钉钉,短信
5,zaabix和grafana的结合方便监控数据的可视化
比如:支持
zabbix监控的搭建简单理论
1,zabbix server会去采集监控数据,采集的监控数据会写入到sql数据库
2,zabbix的web后端采用的php语言开发,所有的配置信息,用户认证等都会写入到sql数据库。
3,企业级zabbix的搭建依赖环境:主流采用LNMP(centos7+nginx+mysql+php)
4,环境下用户请求流程
用户->nginx—>php-fpm->运行php程序->操作mysql
zabbix工作原理图

zabbix 由以下几个组件部分构成:
>1) Zabbix Server:负责接收 agent 发送的报告信息的核心组件,所有配置,统计数据及操作数据均由其组织进行;--->2) Database Storage:专用于存储所有配置信息,以及由 zabbix 收集的数据;--->3) Web interface:zabbix 的 GUI 接口,通常与 Server 运行在同一台主机上;--->4) Proxy:可选组件,常用于分布监控环境中,代理 Server 收集部分被监控端的监控数据并统一发往 Server 端;--->5) Agent:部署在被监控主机上,负责收集本地数据并发往 Server 端或 Proxy 端;注:zabbix node 也是 zabbix server 的一种 。--->进程默认情况下zabbix包含5个程序: zabbix_agentd、 zabbix_get、 zabbix_proxy、zabbix_sender、zabbix_server,另外一个 zabbix_java_gateway 是可选,这个需要另外安装---下面来分别介绍下他们各自的作用:abbix_agentd客户端守护进程,此进程收集客户端数据,例如 cpu 负载、内存、硬盘使用情况等。--->zabbix_getzabbix 工具,单独使用的命令,通常在 server 或者proxy端执行获取远程客户端信息的命令。 通常用户排错。 例如在server端获取不到客户端的内存数据, 我们可以使用zabbix_get获取客户端的内容的方式来做故障排查。--->zabbix_senderzabbix 工具,用于发送数据给 server 或者proxy,通常用于耗时比较长的检查。很多检查非常耗时间,导致 zabbix 超时。于是我们在脚本执行完毕之后,使用 sender 主动提交数据。--->zabbix_serverzabbix 服务端守护进程。zabbix_agentd、zabbix_get、zabbix_sender、zabbix_proxy、zabbix_java_gateway 的数据最终都是提交到 server备注:当然不是数据都是主动提交给 zabbix_server,也有的是 server 主动去取数据。--->zabbix_proxyzabbix 代理守护进程。功能类似server,唯一不同的是它只是一个中转站,它需要把收集到的数据提交/被提交到 server 里。--->zabbix_java_gatewayzabbix2.0 之后引入的一个功能。顾名思义:Java 网关,类似 agentd,但是只用于Java方面。需要特别注意的是,它只能主动去获取数据,而不能被动获取数据。 它的数据最终会给到server或者proxy。---
zabbix监控环境中相关术语
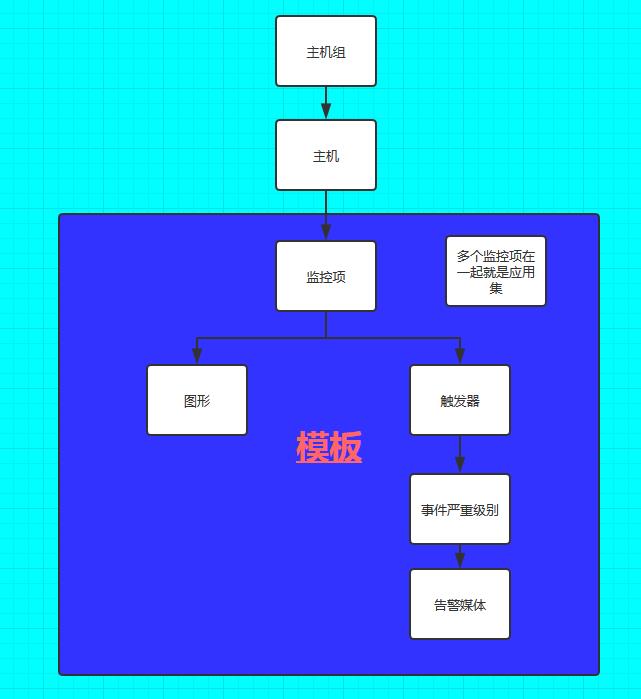
#主机(host) :要监控的网络设备,可由 IP 或 DNS 名称指定;---#主机组(host group):主机的逻辑容器,可以包含主机和模板,但同一个组织内的主机和模板不能互相链接;主机组通常在给用户或用户组指派监控权限时使用;---#监控项(item) :一个特定监控指标的相关的数据;这些数据来自于被监控对象;item是 zabbix 进行数据收集的核心,相对某个监控对象,每个 item 都由"key"标识;---#触发器(trigger) :一个表达式,用于评估某监控对象的特定 item 内接收到的数据是否在合理范围内,也就是阈值;接收的数据量大于阈值时,触发器状态将从"OK"转变为"Problem",当数据再次恢复到合理范围,又转变为"OK";---#事件(event) :触发一个值得关注的事情,比如触发器状态转变,新的 agent 或重新上线的 agent 的自动注册等;---#动作(action) :指对于特定事件事先定义的处理方法,如发送通知,何时执行操作;---#报警媒介类型(media) :发送通知的手段或者通道,如 Email、Jabber 或者 SMS 等;---#模板 (template) :用于快速定义被监控主机的预设条目集合, 通常包含了 item、 trigger、graph、screen、 application 以及 low-level discovery rule;模板可以直接链接至某个主机;---#前端(frontend) :Zabbix 的 web 接口
zabbix各种相关组件关系图
一搭建zabbix
1搭建环境
| 操作系统 | 主机名 | ip | 内存 |
|---|---|---|---|
| centos7.5 | zabbix | 192.168.200.173 | 1G |
1.1搭建nginx
[root@zabbix ~]# cat /etc/redhat-releaseCentOS Linux release 7.5.1804 (Core)[root@zabbix ~]# setenforce 0setenforce: SELinux is disabled[root@zabbix ~]# systemctl stop firewalld[root@zabbix ~]# systemctl stop NetworkManager[root@zabbix ~]# lsanaconda-ks.cfg nginx-1.16.1.tar.gz[root@zabbix ~]# yum install -y wget gcc gcc-c++ make pcre pcre-devel zlib zlib-devel openssl openssl-devel#安装支持程序我们源码编译[root@zabbix ~]# tar xf nginx-1.16.1.tar.gz -C /usr/src/[root@zabbix ~]# cd /usr/src/nginx-1.16.1/[root@zabbix nginx-1.16.1]# lsauto CHANGES CHANGES.ru conf configure contrib html LICENSE man README src[root@zabbix nginx-1.16.1]# ./configure --prefix=/usr/local/nginx && make && make install#编译安装[root@zabbix nginx-1.16.1]# ln -s /usr/local/nginx/sbin/* /usr/bin/ #将命令链接出来[root@zabbix nginx-1.16.1]#which nginx#查看有了nginx的命令/usr/bin/nginx[root@zabbix nginx-1.16.1]# cd /usr/local/nginx/conf/[root@zabbix conf]# lsfastcgi.conf fastcgi_params.default mime.types nginx.conf.default uwsgi_paramsfastcgi.conf.default koi-utf mime.types.default scgi_params uwsgi_params.defaultfastcgi_params koi-win nginx.conf scgi_params.default win-utf[root@zabbix conf]# egrep -v "#|^$" nginx.conf.default > nginx.conf#精简配置文件[root@zabbix conf]# cat nginx.confworker_processes 1;events {worker_connections 1024;}http {include mime.types;default_type application/octet-stream;sendfile on;keepalive_timeout 65;server {listen 80;server_name localhost;location / {root html;index index.html index.htm;}error_page 500 502 503 504 /50x.html;location = /50x.html {root html;}}}[root@zabbix conf]# nginx -t#检测一下配置文件有没有语法错误nginx: the configuration file /usr/local/nginx/conf/nginx.conf syntax is oknginx: configuration file /usr/local/nginx/conf/nginx.conf test is successful[root@zabbix conf]# /usr/local/nginx/sbin/nginx#启动nginx[root@zabbix conf]# ss -antup | grep 80tcp LISTEN 0 128 *:80 *:* users:(("nginx",pid=18266,fd=6),("nginx",pid=18265,fd=6))#查看下nginx的端口有没有开#使用systemctl管理nginx[root@zabbix conf]# vim /usr/lib/systemd/system/nginx.service[Unit] #这个模块主要是对服务的描述Description=nginx #描述服务是什么After=network.target # 描述服务的类别[Service] #是服务的具体运行参数Type=forking #后台运行的形式ExecStart=/usr/local/nginx/sbin/nginx #启动命令[Install] #服务安装的相关设置WantedBy=multi-user.target#测试一下啊systemctl管理(如果这里有问题,请重启下服务器就可以了)[root@zabbix conf]# ss -antup | grep 80tcp LISTEN 0 128 *:80 *:* users:(("nginx",pid=1213,fd=6),("nginx",pid=1212,fd=6))[root@zabbix conf]# systemctl stop nginx[root@zabbix conf]# ss -antup | grep 80[root@zabbix conf]##开启[root@zabbix conf]# systemctl start nginx[root@zabbix conf]# ss -antup | grep 80tcp LISTEN 0 128 *:80 *:* users:(("nginx",pid=1249,fd=6),("nginx",pid=1248,fd=6))
1.2关于systemctl管理服务参数说明
- [Service]部分是服务的关键,是服务的一些具体运行参数的设置
- Type=forking是后台运行的形式,
- PIDFile为存放PID的文件路径,
- ExecStart为服务的运行命令,
- ExecReload为重启命令,
- ExecStop为停止命令,
- rivateTmp=True表示给服务分配独立的临时空间,
*注意:[Service]部分的启动、重启、停止命令全部要求使用绝对路径,使用相对路径则会报错;
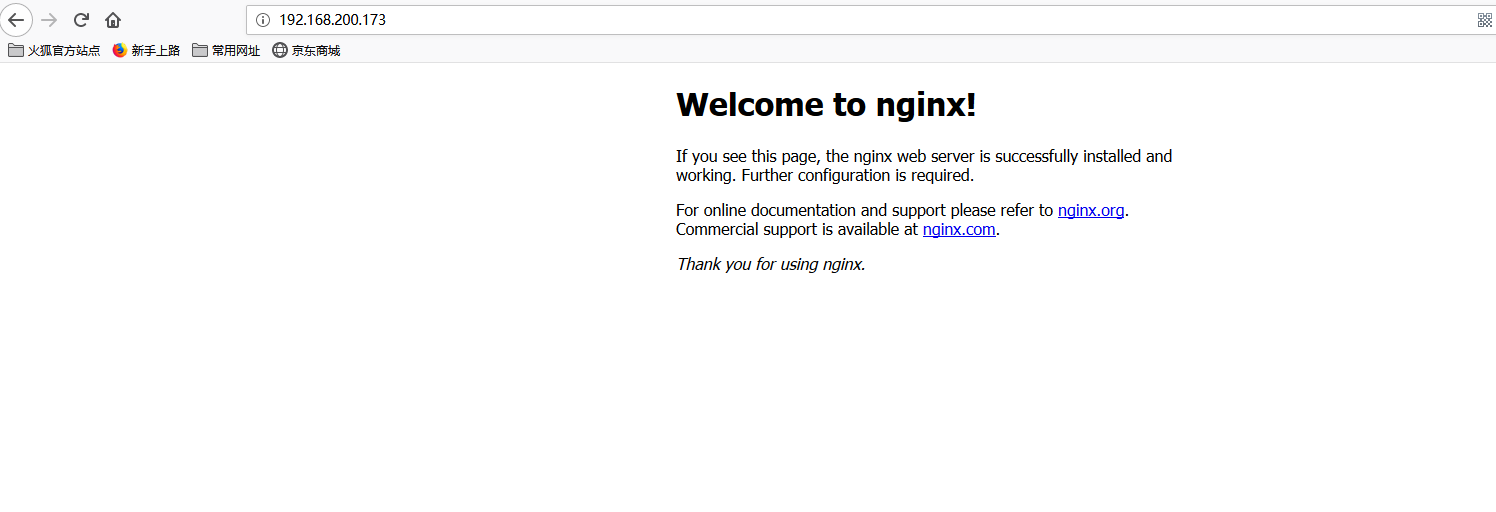
1.3在浏览器上验证下nginx
二搭建php
php和nginx结合使用是有2中方式的,
1是socket方式(这个方式需要两个服务在同一个服务器上)
2是网络方式,这样的可以不在同一个服务其上 (默认是网络)
2.1编译安装php
[root@zabbix conf]# cd ~[root@zabbix ~]# wget http://hk1.php.net/distributions/php-5.6.40.tar.gz #现在5.64安装包[root@zabbix ~]# yum -y install epel-release #用yum安装一个epel源,这个文件是扩展的一些服务的源[root@zabbix ~]# yum -y clean all[root@zabbix ~]# yum makecache[root@zabbix ~]# yum -y install gcc gcc-c++ make pcre pcre-devel zlib zlib-devel openssl openssl-devel libxml2 libxml2-devel libcurl libcurl-devel libjpeg libjpeg-devel libpng libpng-devel freetype freetype-devel openldap openldap-devel libmcrypt libmcrypt-devel[root@zabbix ~]# wget https://www.php.net/distributions/php-5.6.40.tar.gz[root@zabbix ~]# echo "$?"0[root@zabbix ~]# lsanaconda-ks.cfg nginx-1.16.1.tar.gz php-5.6.40.tar.gz[root@zabbix ~]# tar xf php-5.6.40.tar.gz -C /usr/src/[root@zabbix ~]# cd /usr/src/php-5.6.40/[root@zabbix php-5.6.40]# ./configure --prefix=/usr/local/php --with-config-file-path=/usr/local/php/etc --enable-ctype --with-mysql=mysqlnd --with-mysqli=mysqlnd --with-freetype-dir --with-jpeg-dir --with-png-dir --with-zlib --with-libxml-dir=/usr --enable-xml --disable-rpath --enable-bcmath --enable-shmop --enable-sysvsem --enable-inline-optimization --with-curl --enable-mbregex --enable-mbstring --with-mcrypt --with-gd --enable-gd-native-ttf --with-openssl --with-mhash --enable-pcntl --enable-sockets --with-ldap-sasl --with-xmlrpc --enable-zip --enable-soap --with-gettext --enable-fpm#出现一下的式样就ok了Generating filesconfigure: creating ./config.statuscreating main/internal_functions.ccreating main/internal_functions_cli.c+--------------------------------------------------------------------+| License: || This software is subject to the PHP License, available in this || distribution in the file LICENSE. By continuing this installation || process, you are bound by the terms of this license agreement. || If you do not agree with the terms of this license, you must abort || the installation process at this point. |+--------------------------------------------------------------------+Thank you for using PHP.[root@zabbix php-5.6.40]# make && make install
php主要编译安装说明
- [x]--prefix指定php的安装目录
- [x]--with-config-file-path指定php的配置文件位置
- [x]--with-mysql、--with-mysqli让php可以操作mysql
- [x]--enable-fpm主要是nginx要来调用php语言得使用php-fpm
2.2启动php
[root@zabbix php-5.6.40]# tail -1 /etc/profile #添加环境变量export PATH=$PATH:/usr/local/php/sbin/:/usr/local/php/bin/[root@zabbix php-5.6.40]# source /etc/profile #让他立即生效[root@zabbix php-5.6.40]# php-fpm -t #检测一下配置文件有没有错误,现在报错是因为没有配置文件在里面,我们需要复制一份过去,[04-Nov-2019 10:04:15] ERROR: failed to open configuration file '/usr/local/php/etc/php-fpm.conf': No such file or directory (2)[04-Nov-2019 10:04:15] ERROR: failed to load configuration file '/usr/local/php/etc/php-fpm.conf'[04-Nov-2019 10:04:15] ERROR: FPM initialization failed[root@zabbix php-5.6.40]# ls php.ini-php.ini-development php.ini-production# deve是开发环境的,production是生产环境的[root@zabbix php-5.6.40]# cp php.ini-production /usr/local/php/etc/php.ini[root@zabbix php-5.6.40]# cd /usr/local/php/etc/[root@zabbix etc]# lspear.conf php-fpm.conf.default php.ini[root@zabbix etc]# cp php-fpm.conf.default php-fpm.conf[root@zabbix etc]# lspear.conf php-fpm.conf php-fpm.conf.default php.ini[root@zabbix etc]# php-fpm -t[04-Nov-2019 10:16:00] NOTICE: configuration file /usr/local/php/etc/php-fpm.conf test is successful[root@zabbix etc]# php-fpm -vPHP 5.6.40 (fpm-fcgi) (built: Nov 4 2019 09:37:11)Copyright (c) 1997-2016 The PHP GroupZend Engine v2.6.0, Copyright (c) 1998-2016 Zend Technologies#使用systemctl将php管理起来,并启动[root@zabbix etc]# cat /usr/lib/systemd/system/php-fpm.service[Unit]Description=php-fpmAfter=network.target[Service]Type=forkingExecStart=/usr/local/php/sbin/php-fpm[Install]WantedBy=multi-user.target[root@zabbix etc]# systemctl start php-fpm[root@zabbix etc]# ss -antup | grep 9000tcp LISTEN 0 128 127.0.0.1:9000 *:* users:(("php-fpm",pid=8872,fd=0),("php-fpm",pid=8871,fd=0),("php-fpm",pid=8870,fd=7))
2.3修改nginx的配置,让php和nginx连用起来
[root@zabbix etc]# cd /usr/local/nginx/conf/[root@zabbix conf]# cat nginx.confworker_processes 1;events {worker_connections 1024;}http {include mime.types;default_type application/octet-stream;sendfile on;keepalive_timeout 65;server {listen 80;server_name localhost;location / {root html;index index.html index.htm index.php; #必须加上.php结尾的主页,要不然nginx调用动态的时候找不到回直接报错就不找了}location ~ \.php$ {root html;fastcgi_pass 127.0.0.1:9000;fastcgi_index index.php;fastcgi_param SCRIPT_FILENAME $document_root$fastcgi_script_name; #去哪里寻找php文件。include fastcgi_params;}error_page 500 502 503 504 /50x.html;location = /50x.html {root html;}}}[root@zabbix conf]# nginx -tnginx: the configuration file /usr/local/nginx/conf/nginx.conf syntax is oknginx: configuration file /usr/local/nginx/conf/nginx.conf test is successful[root@zabbix conf]# nginx -s reload[root@zabbix conf]# cd /usr/local/nginx/html/[root@zabbix html]# touch index.php #里边什么都不用写[root@zabbix html]# cat test.php<?phpecho "mr.su it's ok";?>
2.4验证php+nginx是否连接成功

三mysql数据库安装
3.1搭建mysql数据库
[root@zabbix html]# cd ~[root@zabbix ~]# wget https://www.mysql.com//Downloads/MySQL-5.6/mysql-5.6.39.tar.gz[root@zabbix ~]# lsanaconda-ks.cfg mysql-5.6.39.tar.gz nginx-1.16.1.tar.gz php-5.6.40.tar.gz[root@zabbix ~]# yum install -y gcc gcc-c++ make tar openssl openssl-devel cmake ncurses ncurses-devel[root@zabbix ~]# useradd -M -s /sbin/nologin mysql[root@zabbix ~]# tar xf mysql-5.6.39.tar.gz -C /usr/src/[root@zabbix ~]# cd /usr/src/mysql-5.6.39/[root@zabbix mysql-5.6.39]# cmake -DCMAKE_INSTALL_PREFIX=/usr/local/mysql -DMYSQL_DATADIR=/data/mysql -DDEFAULT_CHARSET=utf8 -DDEFAULT_COLLATION=utf8_general_ci -DWITH_EXTRA_CHARSETS:STRING=all -DWITH_DEBUG=0 -DWITH_SSL=yes -DWITH_READLINE=1 -DENABLED_LOCAL_INFILE=1[root@zabbix mysql-5.6.39]# echo "$?"0[root@zabbix mysql-5.6.39]# make && make install[root@zabbix mysql-5.6.39]# echo "$?"0[root@zabbix mysql-5.6.39]# cp support-files/mysql.server /etc/init.d/mysqld[root@zabbix mysql-5.6.39]# chmod +x /etc/init.d/mysqld[root@zabbix mysql-5.6.39]# tail -1 /etc/profile #修改环境变量,本质是要服务器找到命令,所以做软连接也是可以的export PATH=$PATH:/usr/local/mysql/bin/#修改配置文件[root@zabbix mysql-5.6.39]# cat /etc/my.cnf[mysqld]bind-address=0.0.0.0port=3306datadir=/data/mysqluser=mysqlskip-name-resolvelong_query_time=2slow_query_log_file=/data/mysql/mysql-slow.logexpire_logs_days=2innodb-file-per-table=1innodb_flush_log_at_trx_commit = 2log_warnings = 1max_allowed_packet = 512Mconnect_timeout = 60net_read_timeout = 120[mysqld_safe]log-error=/data/mysql/mysqld.logpid-file=/data/mysql/mysqld.pid
重要的编译选项说明
- [x] CMACK_INSTALL_PREFIX指定安装的目录
- [x] MYSQL_DATADIR指定Mysql的数据目录
3.2初始化数据库
[root@zabbix mysql-5.6.39]# mkdir -p /data/mysql #建立数据目录[root@zabbix mysql-5.6.39]# chown -R mysql:mysql /usr/local/mysql /data/mysql/ #分别对数据目录,和运行目录授权[root@zabbix mysql-5.6.39]# yum install -y perl-Module-Install #初始数据库的一个依赖程序[root@zabbix mysql-5.6.39]# /usr/local/mysql/scripts/mysql_install_db --basedir=/usr/local/mysql --user=mysql --datadir=/data/mysql/ #初始完成以后输出的特别像乱码,往上看,找到两个ok就初始化完成了[root@zabbix mysql-5.6.39]# cat /usr/lib/systemd/system/mysqld.service #使用systemctl管理mysql[Unit]Description=mysqldAfter=network.target[Service]Type=forkingExecStart=/etc/init.d/mysqld start[Install]WantedBy=multi-user.target[root@zabbix mysql-5.6.39]# systemctl start mysqld[root@zabbix mysql-5.6.39]# ss -antup | grep 3306tcp LISTEN 0 80 *:3306 *:* users:(("mysqld",pid=26225,fd=10))
3.3给mysql建立zabbix账号并验证连接
[root@zabbix mysql-5.6.39]# cd ~[root@zabbix ~]# mysqladmin -h 127.0.0.1 -u root password 'zabbixpwd'Warning: Using a password on the command line interface can be insecure.[root@zabbix ~]# echo "$?"0[root@zabbix ~]# mysql -uroot -pzabbixpwd -h 127.0.0.1Warning: Using a password on the command line interface can be insecure.Welcome to the MySQL monitor. Commands end with ; or \g.Your MySQL connection id is 3Server version: 5.6.39 Source distributionCopyright (c) 2000, 2018, Oracle and/or its affiliates. All rights reserved.Oracle is a registered trademark of Oracle Corporation and/or itsaffiliates. Other names may be trademarks of their respectiveowners.Type 'help;' or '\h' for help. Type '\c' to clear the current input statement.mysql> mysql> GRANT ALL PRIVILEGES ON *.* TO 'root'@'192.168.200.%' IDENTIFIED BY 'zabbixpwd' WITH GRANT OPTION;Query OK, 0 rows affected (0.00 sec)mysql> flush privileges;Query OK, 0 rows affected (0.00 sec)mysql> exit[root@zabbix ~]# mysql -uroot -pzabbixpwd -h 192.168.200.173 #验证密码在远处登录mysql> exit[root@zabbix ~]# cat /usr/local/nginx/html/test_mysql.php #建立测试nginx+php+mysql 的测试文件<?php$link=mysql_connect("127.0.0.1","root","zabbixpwd");if(!$link) echo "FAILD!连接错误,用户名密码不对";else echo "OK!可以连接";?>
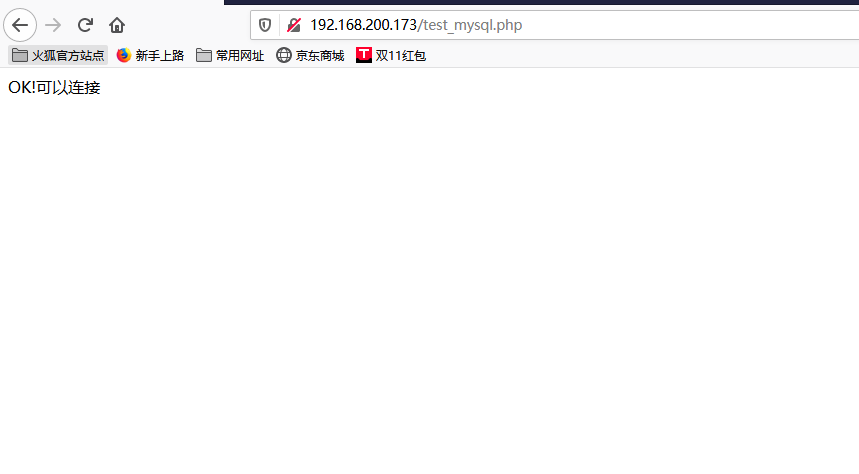
3.4通过http://192.168.200.173/test_mysqsl.php
四搭建zabbix4.0
4.1下载并编译安装zabbix
[root@zabbix ~]# yum install -y libevent-devel wget tar gcc gcc-c++ make net-snmp-devel libxml2-devel libcurl-devel #yum安装zabbix的支持程序[root@zabbix ~]# useradd -M -s /sbin/nologin zabbix[root@zabbix ~]# wget https://nchc.dl.sourceforge.net/project/zabbix/ZABBIX%20Latest%20Stable/4.0.3/zabbix-4.0.3.tar.gz #下载zabbix4.0的源码包[root@zabbix ~]# lsanaconda-ks.cfg mysql-5.6.39.tar.gz nginx-1.16.1.tar.gz php-5.6.40.tar.gz zabbix-4.0.3.tar.gz[root@zabbix ~]# tar xf zabbix-4.0.3.tar.gz -C /usr/src/[root@zabbix ~]# cd /usr/src/zabbix-4.0.3/[root@zabbix zabbix-4.0.3]# ./configure --prefix=/usr/local/zabbix --enable-server --enable-agent --with-mysql=/usr/local/mysql/bin/mysql_config --with-net-snmp --with-libcurl --with-libxml2#出现以下的就ok了************************************************************ Now run 'make install' ** ** Thank you for using Zabbix! ** <http://www.zabbix.com> ************************************************************[root@zabbix zabbix-4.0.3]# make && make install[root@zabbix zabbix-4.0.3]# tail -1 /etc/profile #修改变量文件,使其能找到命令export PATH=$PATH:/usr/local/zabbix/sbin/:/usr/local/zabbix/bin/[root@zabbix zabbix-4.0.3]# source /etc/profile #立即生效[root@zabbix zabbix-4.0.3]# zabbix_server --versionzabbix_server (Zabbix) 4.0.3Revision 87993 20 December 2018, compilation time: Nov 13 2019 09:44:17Copyright (C) 2018 Zabbix SIALicense GPLv2+: GNU GPL version 2 or later <http://gnu.org/licenses/gpl.html>.This is free software: you are free to change and redistribute it according tothe license. There is NO WARRANTY, to the extent permitted by law.
选项说明
- --prefix指定安装目录
- --enable-server安装zabbix server
- --enable-agent安装zabbix agent
- --with-mysql用mysql来存储
4.2初始化zabbix数据库,启动zabbix
[root@zabbix zabbix-4.0.3]# mysql -h 127.0.0.1 -uroot -pzabbixpwdmysql> create database zabbix character set utf8 collate utf8_bin;Query OK, 1 row affected (0.00 sec)mysql> grant all privileges on zabbix.* to zabbix@'127.0.0.1' identified by 'zabbixpwd';Query OK, 0 rows affected (0.04 sec)mysql> flush privileges;Query OK, 0 rows affected (0.04 sec)mysql> set names utf8; #设置编码Query OK, 0 rows affected (0.00 sec)mysql> use zabbix; #切换数据库准备导表Database changedmysql> source /usr/src/zabbix-4.0.3/database/mysql/schema.sql #开始导表,不要顺序乱了mysql> source /usr/src/zabbix-4.0.3/database/mysql/data.sqlmysql> source /usr/src/zabbix-4.0.3/database/mysql/images.sql #导表完成#修改zabbix的配置文件[root@zabbix zabbix-4.0.3]# cd /usr/local/zabbix/etc/[root@zabbix etc]# lszabbix_agentd.conf zabbix_agentd.conf.d zabbix_server.conf zabbix_server.conf.d[root@zabbix etc]# cp zabbix_server.conf zabbix_server.conf.bak[root@zabbix etc]# lszabbix_agentd.conf zabbix_agentd.conf.d zabbix_server.conf zabbix_server.conf.bak zabbix_server.conf.d[root@zabbix etc]# cat zabbix_server.confLogFile=/usr/local/zabbix/zabbix_server.logDBHost=127.0.0.1DBName=zabbixDBUser=zabbixDBPassword=zabbixpwdDBPort=3306Timeout=30AlertScriptsPath=/usr/local/zabbix/alertscripts #放置我们微信告警,以及邮件告警脚本的位置。ExternalScripts=/usr/local/zabbix/externalscriptsLogSlowQueries=3000#一定要把配置文件里的#号都删掉#启动zabbix[root@zabbix etc]# chown zabbix:zabbix -R /usr/local/zabbix/ #给目录降权[root@zabbix etc]# zabbix_server #启动zabbix,命令就是zabbix[root@zabbix etc]# ss -lntup | grep 10051 #查看端口,server端已经启动tcp LISTEN 0 128 *:10051[root@zabbix etc]# mkdir -p /usr/local/nginx/html/zabbix[root@zabbix etc]# cp -a /usr/src/zabbix-4.0.3/frontends/php/* /usr/local/nginx/html/zabbix/ #将所有的zabbix的网页复制到nginx下
4.3在web界面登录zabbix
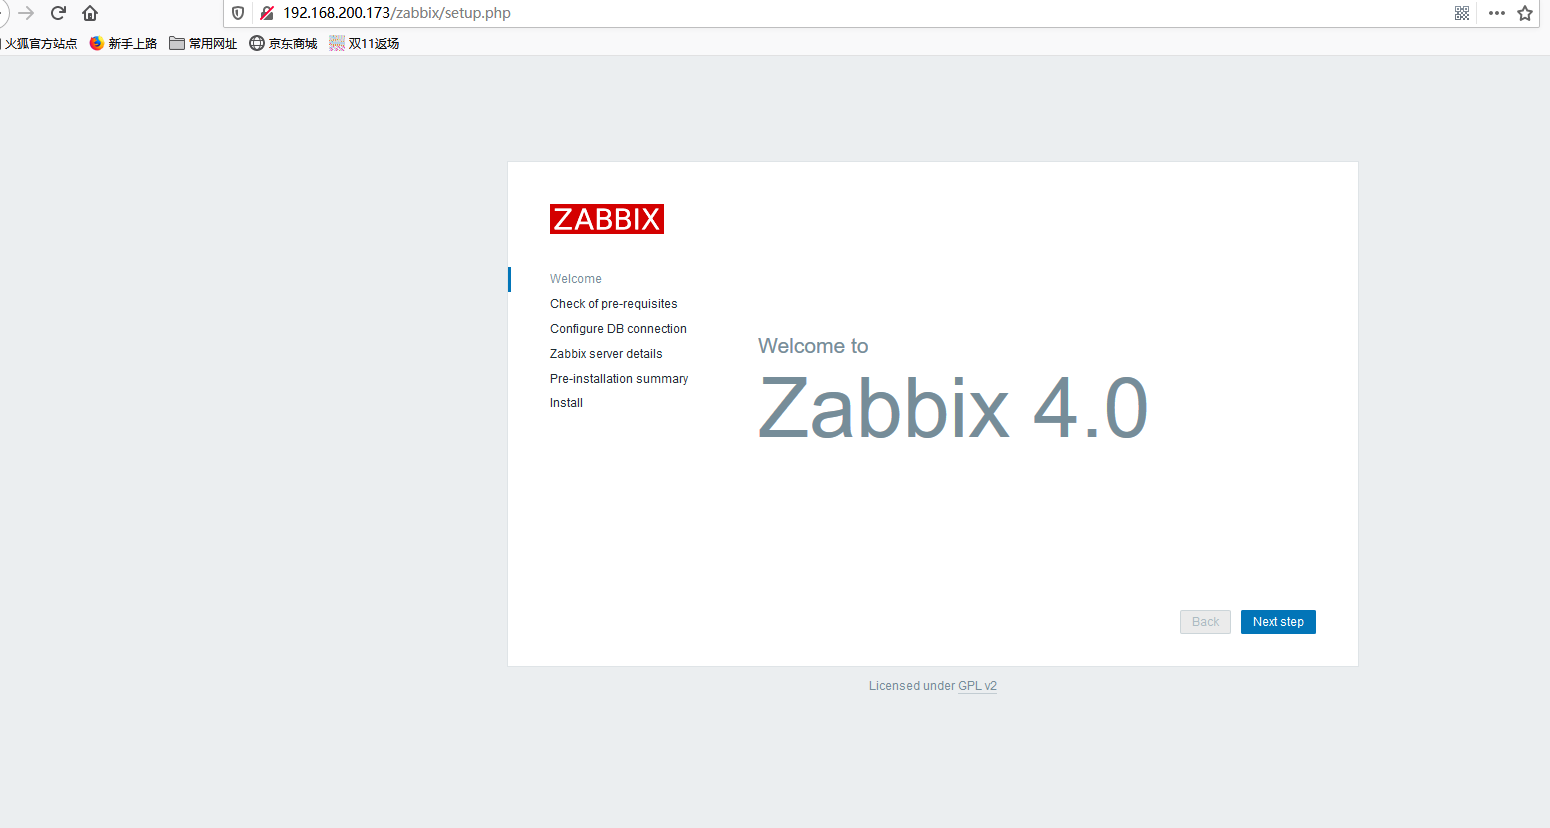
使用ip登录。ip/zabbix
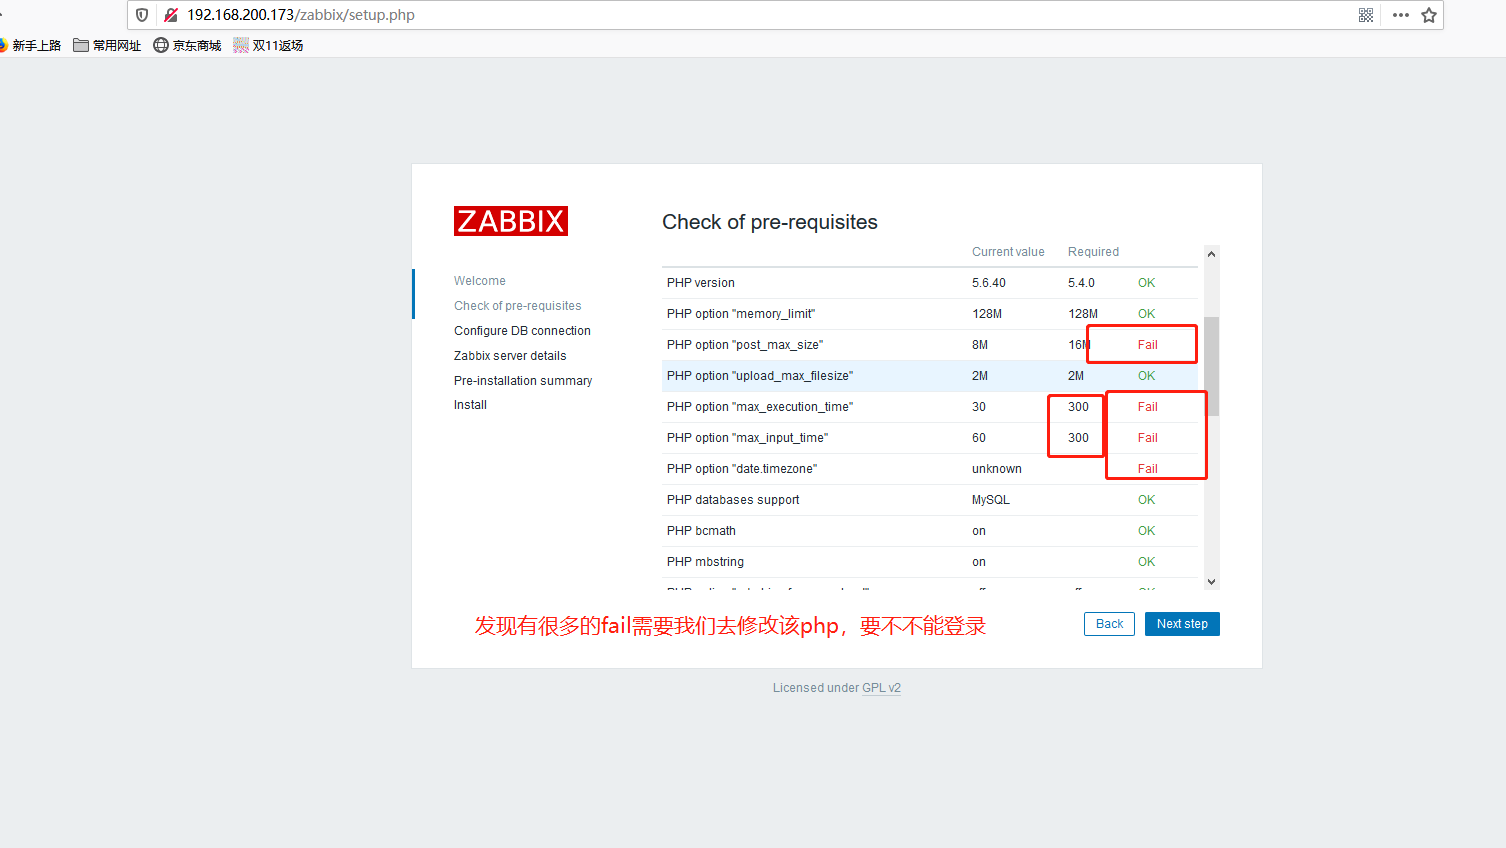
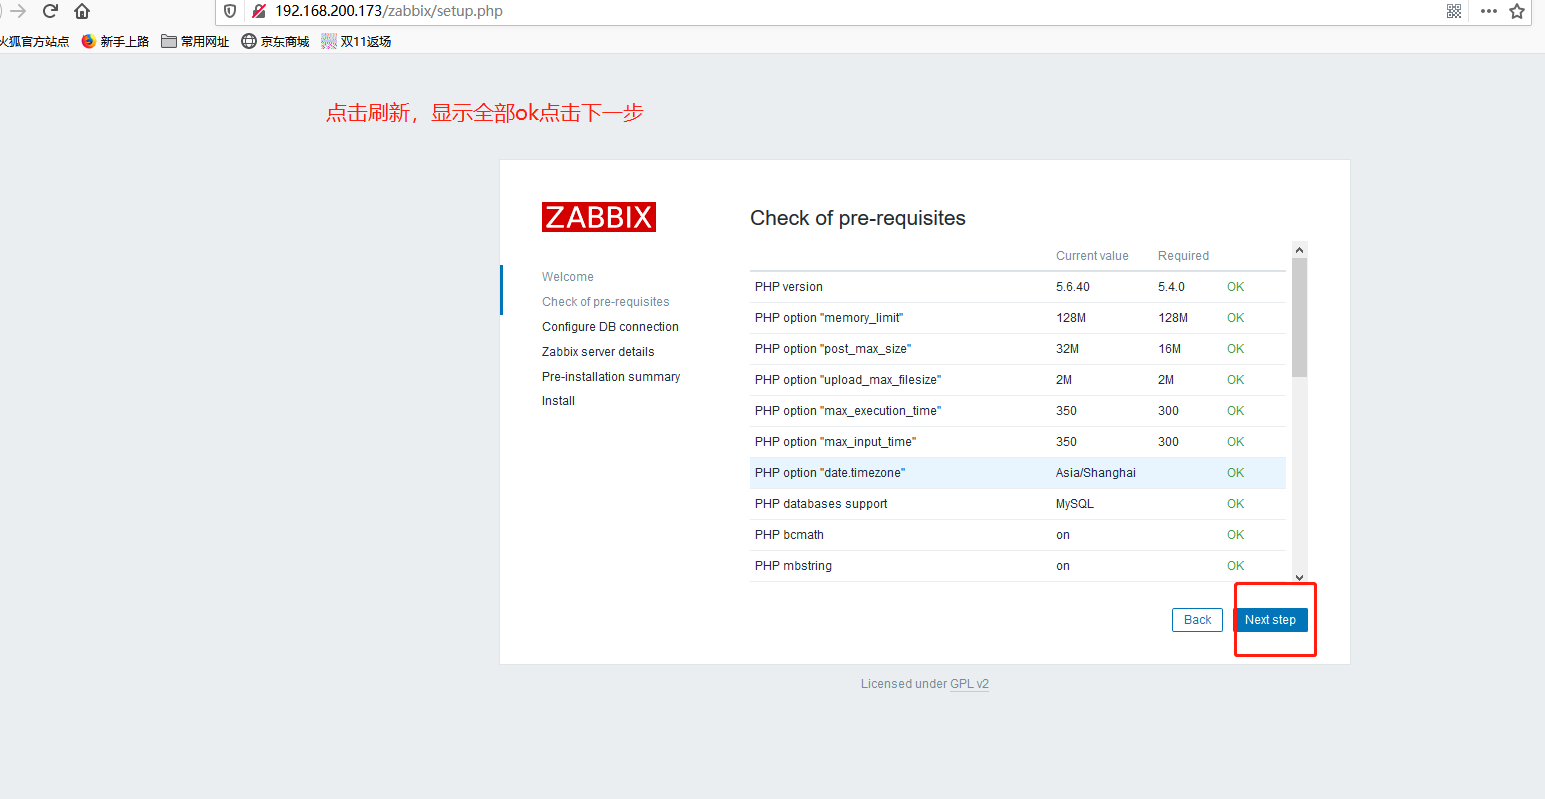
#修改php的文件[root@zabbix etc]# vim /usr/local/php/etc/php.ini#将以下几行修改成这个样子660:post_max_size = 32M372:max_execution_time = 350382:max_input_time = 350936:date.timezone = Asia/Shanghai702:always_populate_raw_post_data = -1[root@zabbix etc]# systemctl restart php-fpm #重启php[root@zabbix etc]# ss -antup | grep 9000tcp LISTEN 0 128 127.0.0.1:9000 *:* users:(("php-fpm",pid=42895,fd=0),("php-fpm",pid=42894,fd=0),("php-fpm",pid=42893,fd=7))

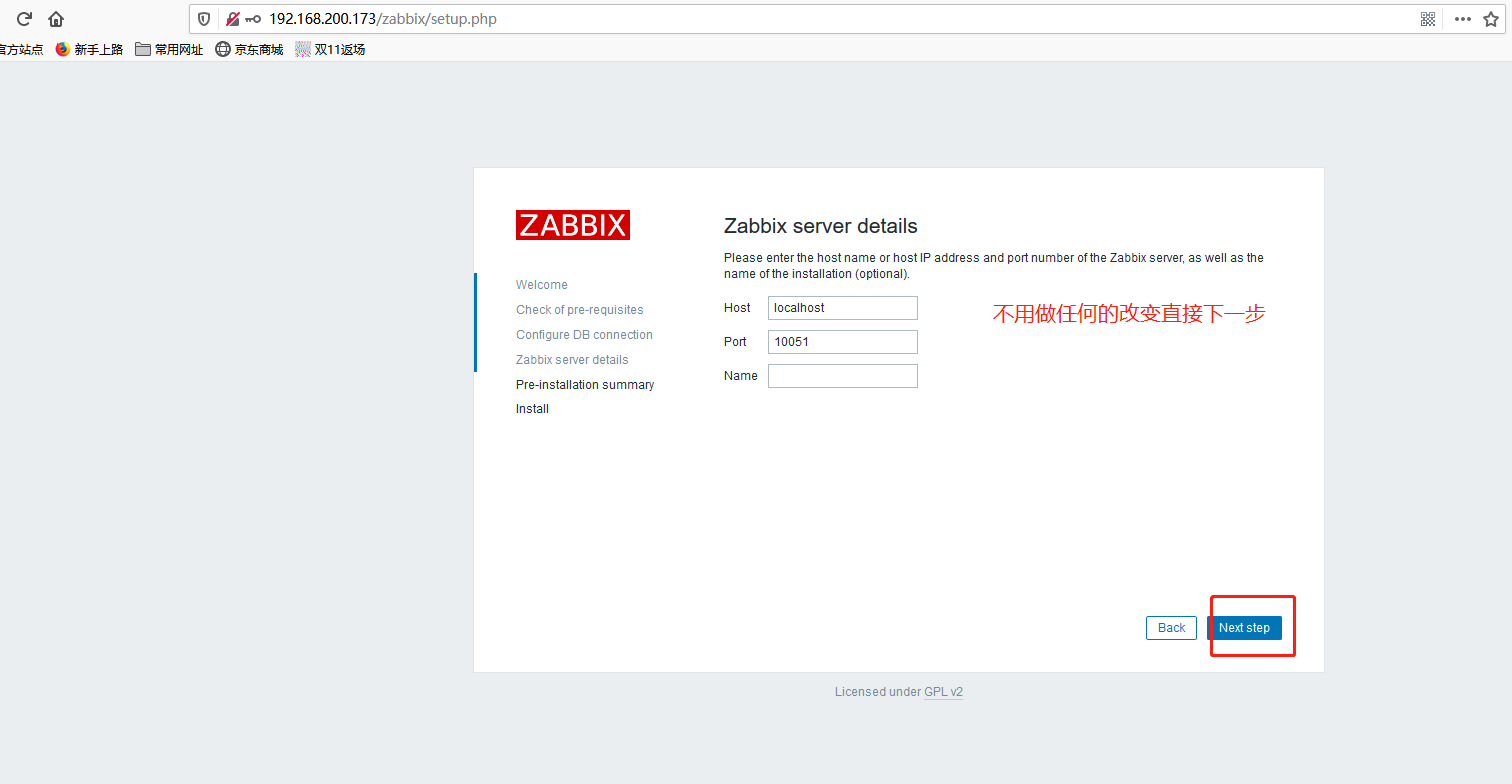
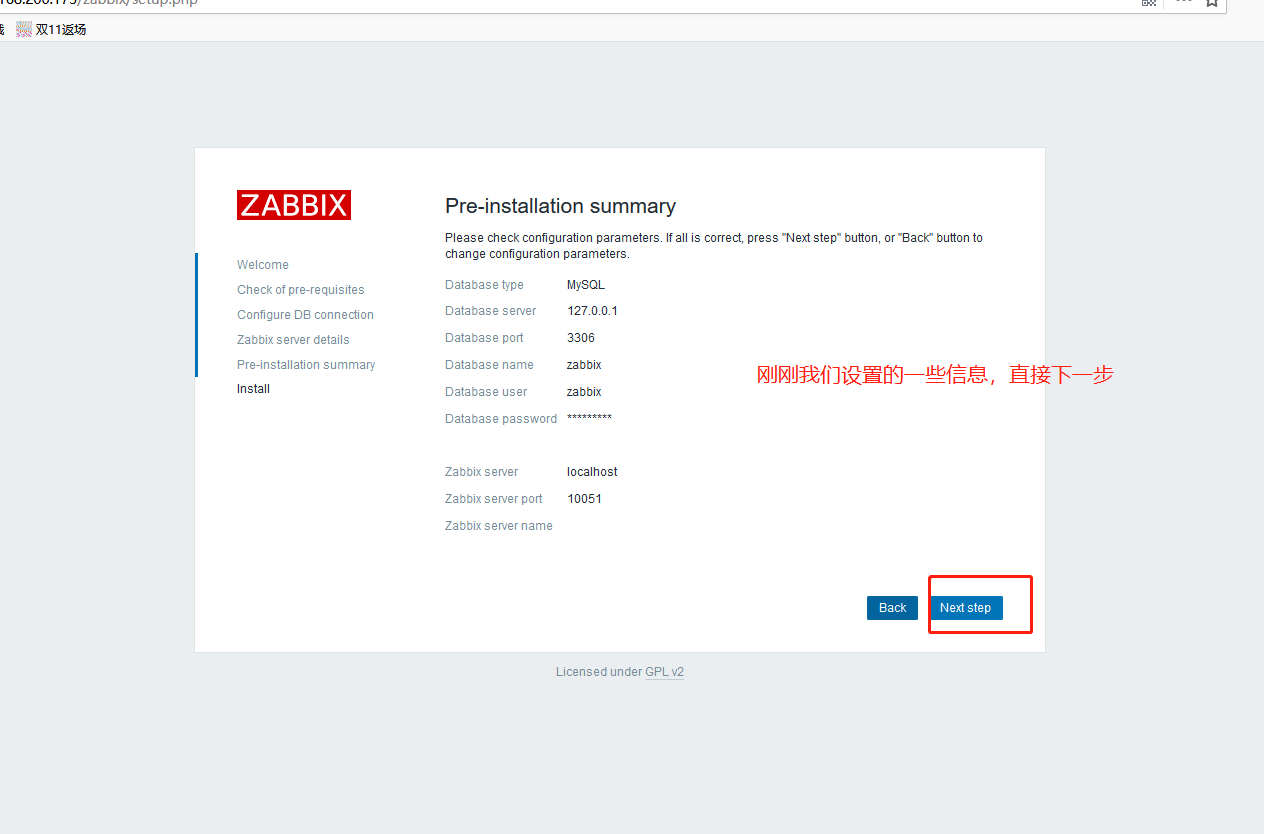
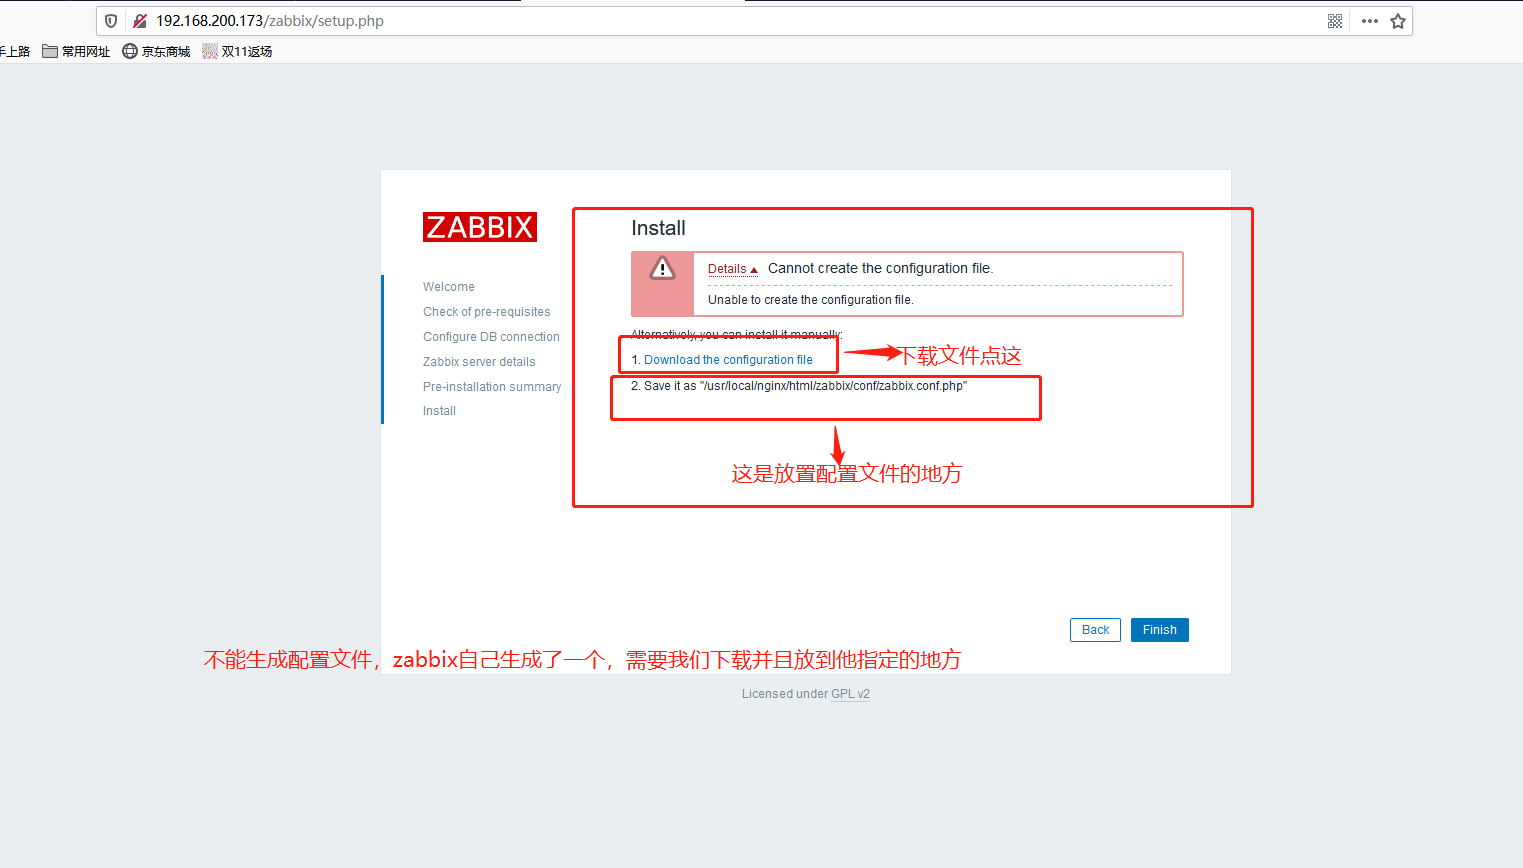
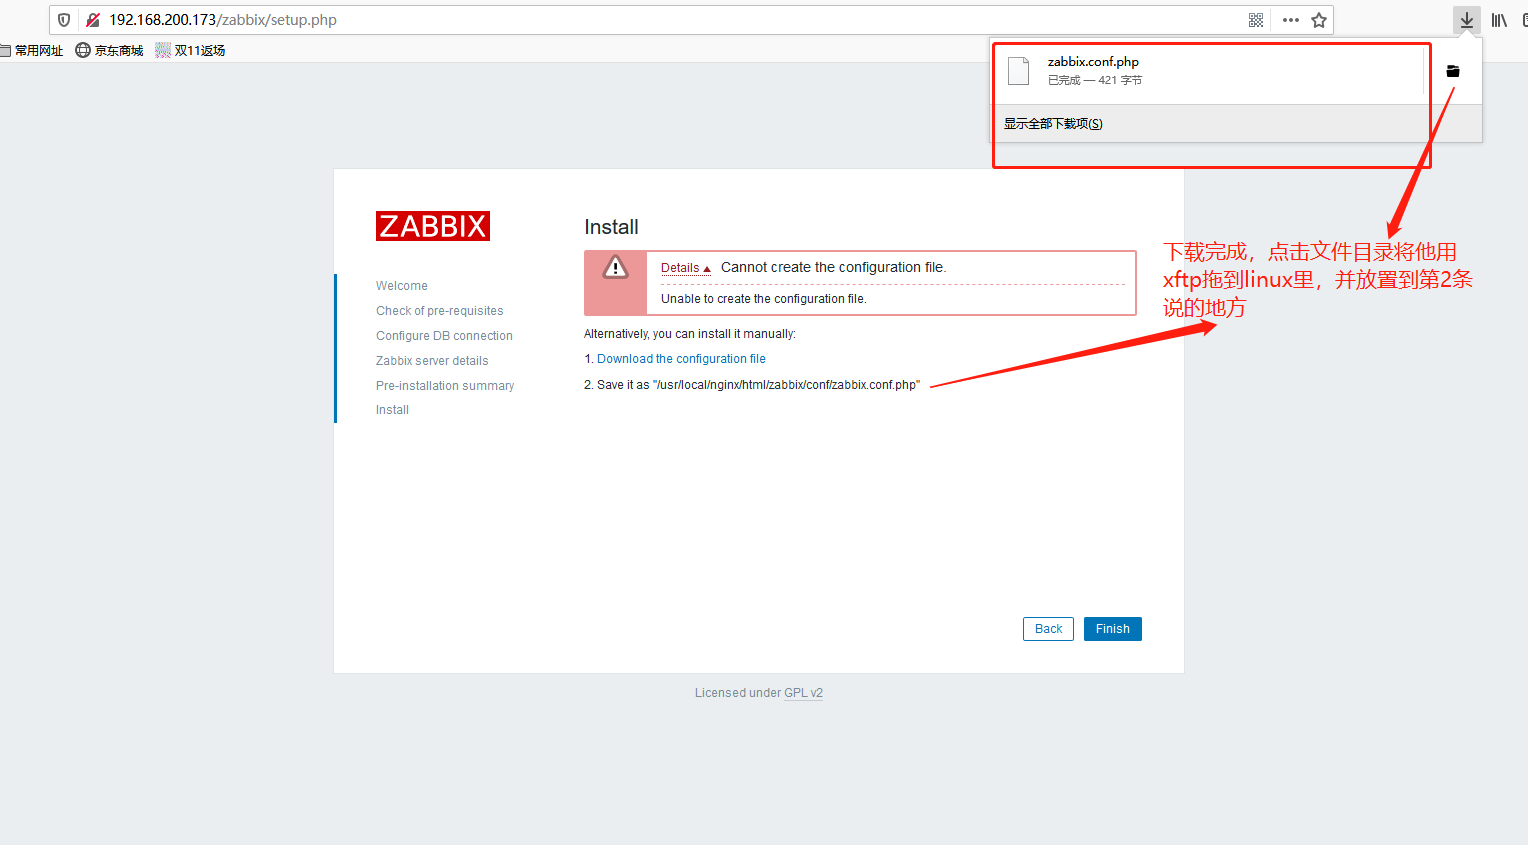
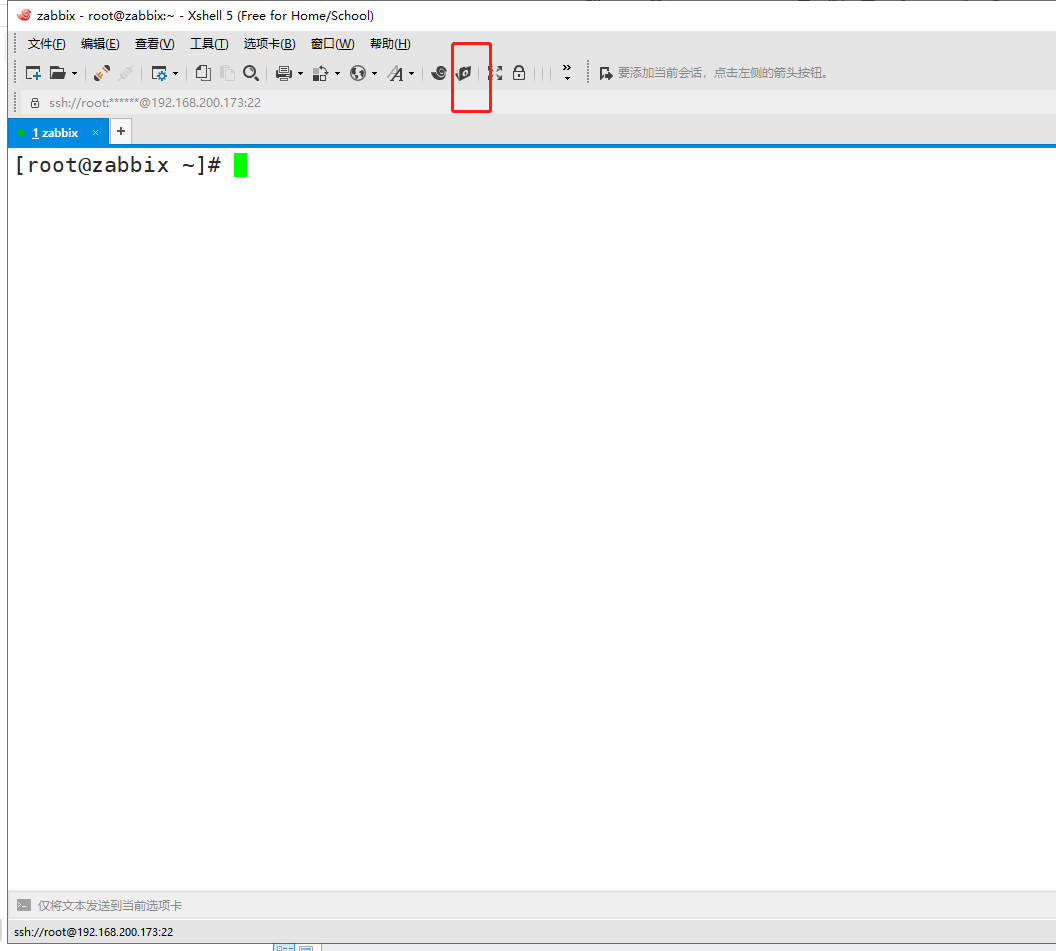
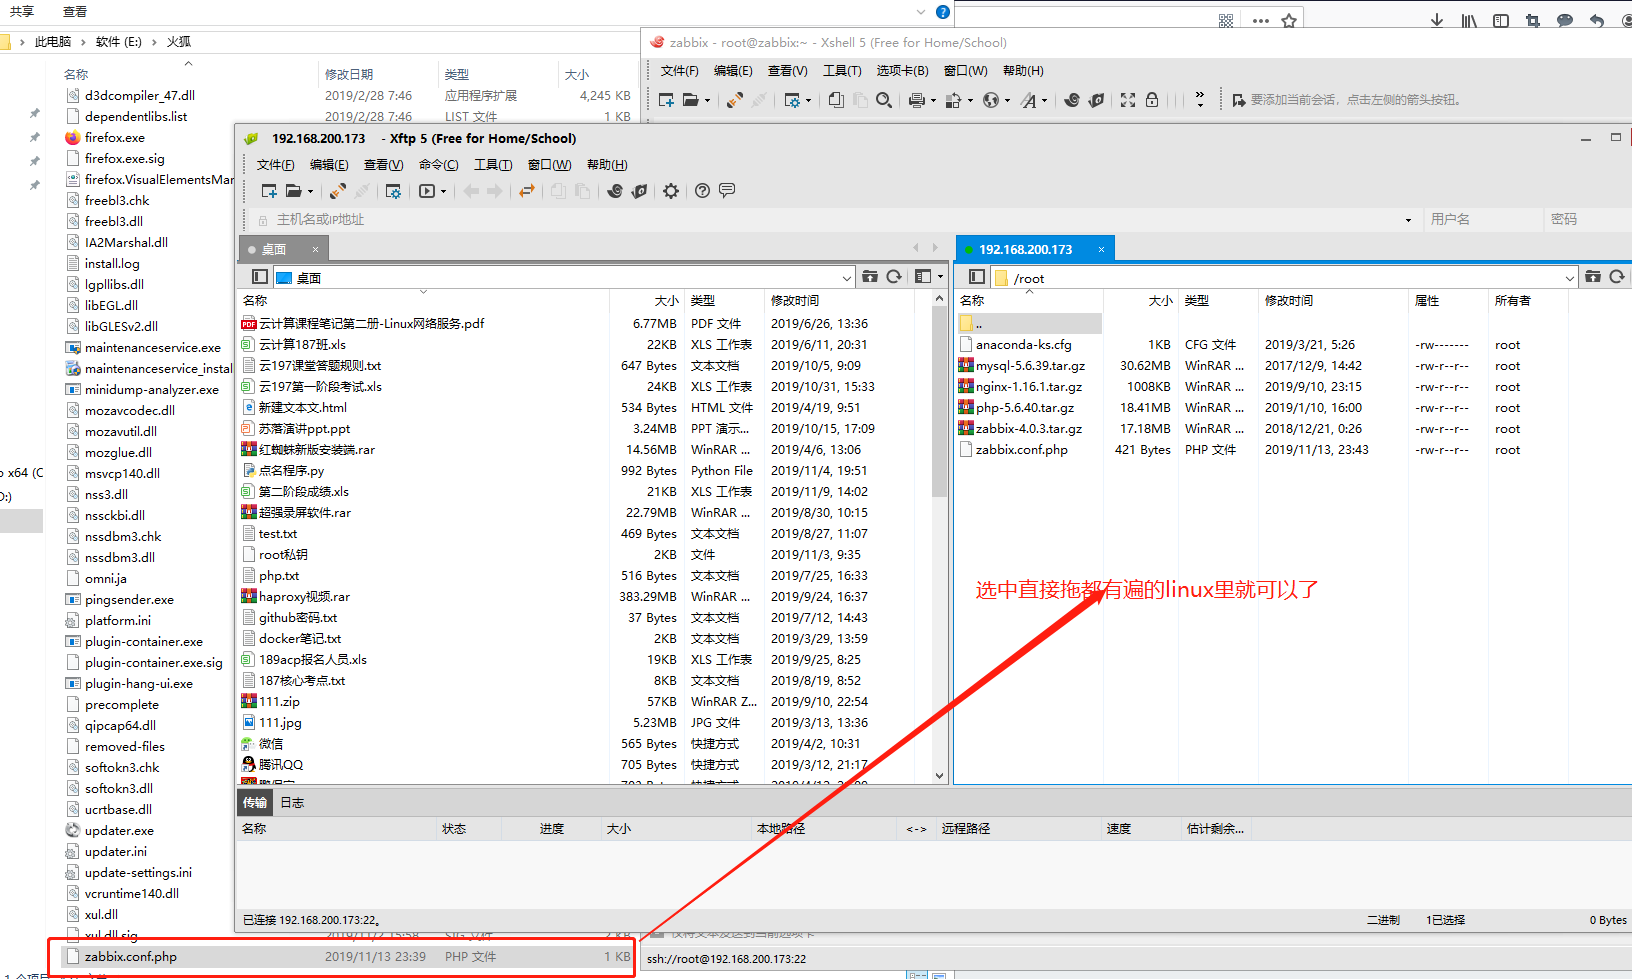
root@zabbix ~]# lsanaconda-ks.cfg mysql-5.6.39.tar.gz nginx-1.16.1.tar.gz php-5.6.40.tar.gz zabbix-4.0.3.tar.gz zabbix.conf.php[root@zabbix ~]# mv zabbix.conf.php /usr/local/nginx/html/zabbix/conf/[root@zabbix ~]# cat /usr/local/nginx/html/zabbix/conf/zabbix.conf.php #里面改就是我们刚刚形成的一些内容<?php// Zabbix GUI configuration file.global $DB;$DB['TYPE'] = 'MYSQL';$DB['SERVER'] = '127.0.0.1';$DB['PORT'] = '3306';$DB['DATABASE'] = 'zabbix';$DB['USER'] = 'zabbix';$DB['PASSWORD'] = 'zabbixpwd';// Schema name. Used for IBM DB2 and PostgreSQL.$DB['SCHEMA'] = '';$ZBX_SERVER = 'localhost';$ZBX_SERVER_PORT = '10051';$ZBX_SERVER_NAME = '';$IMAGE_FORMAT_DEFAULT = IMAGE_FORMAT_PNG;
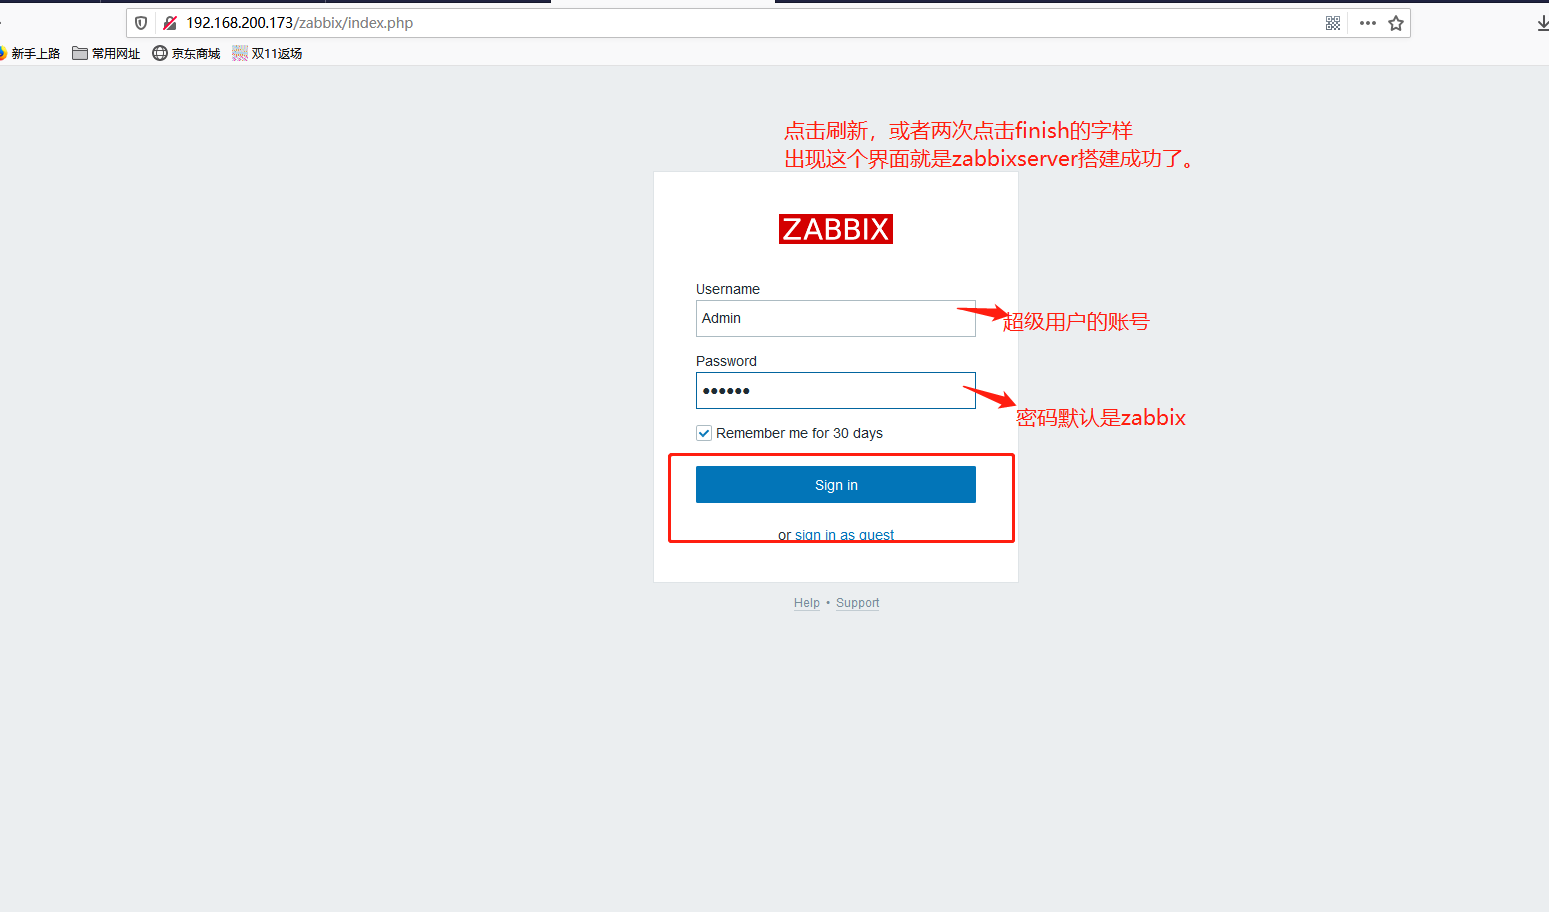
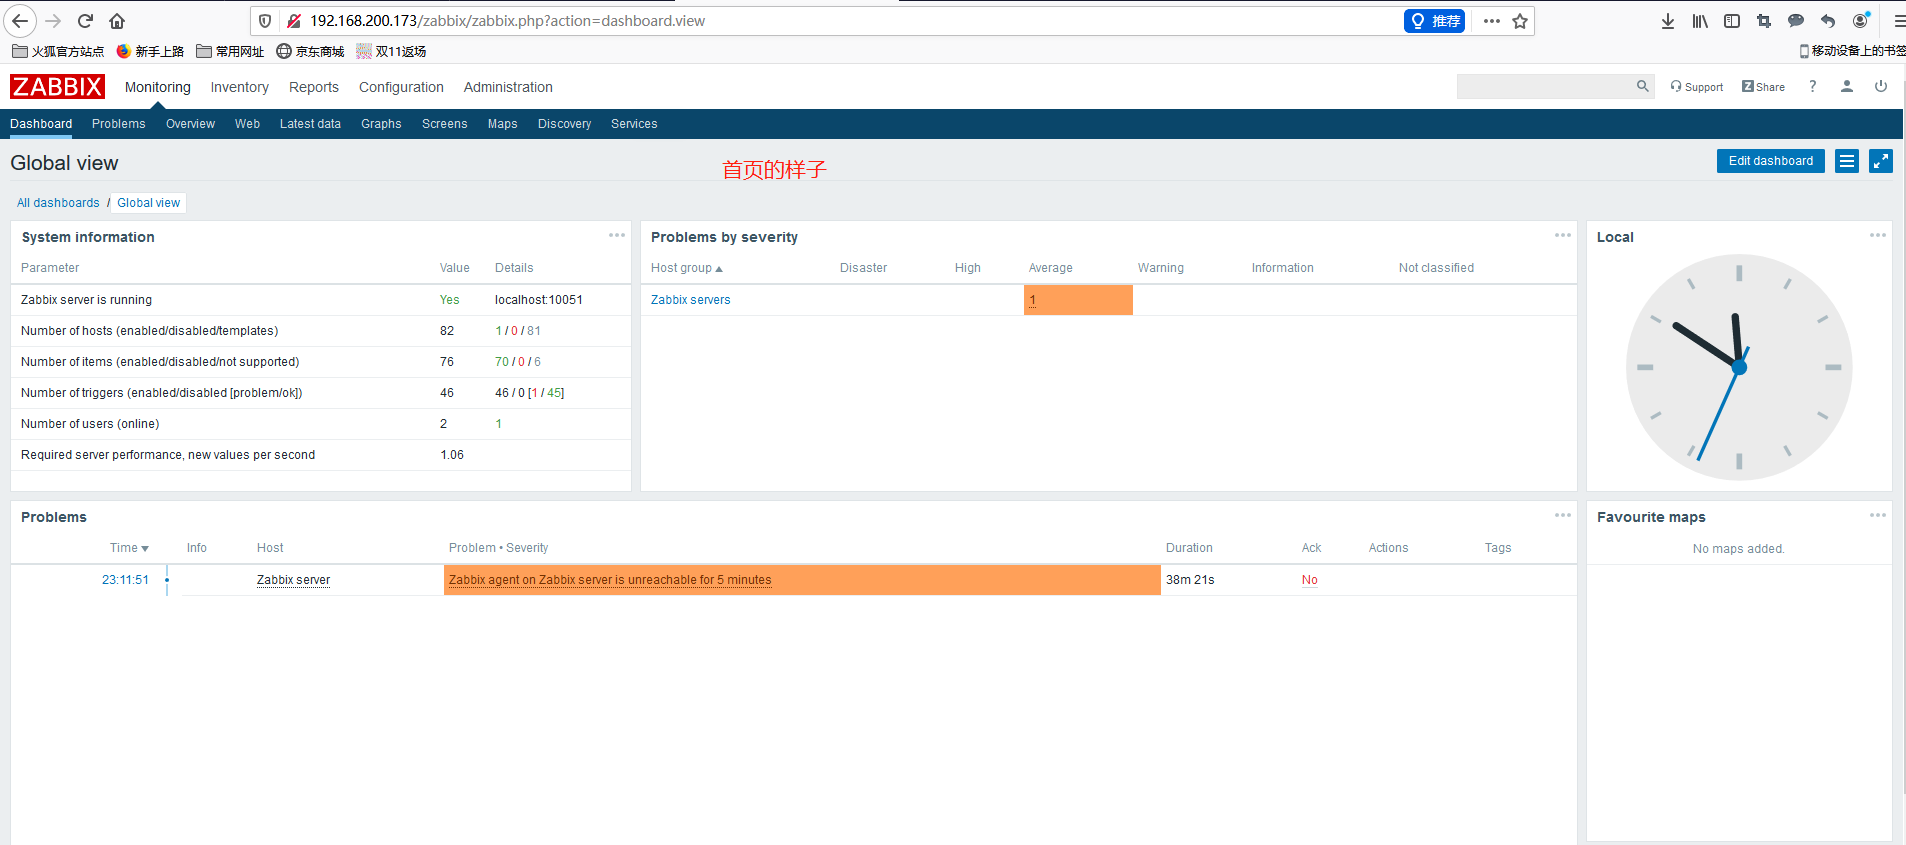
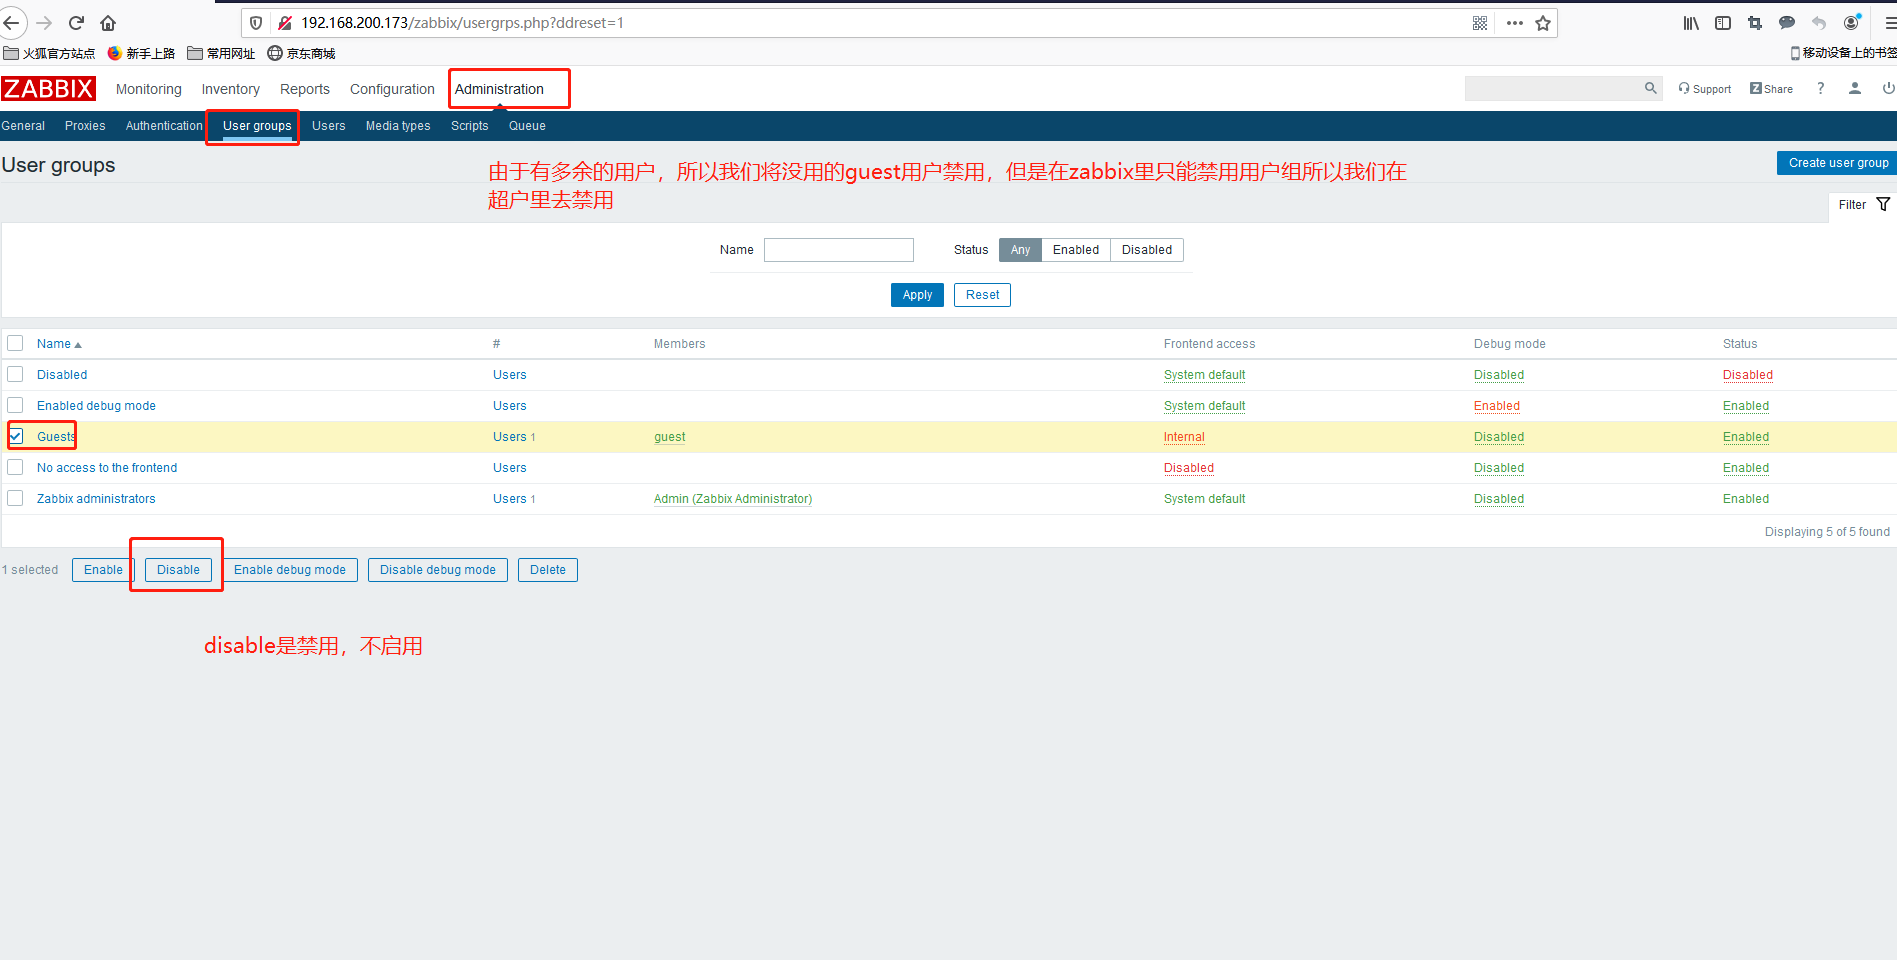
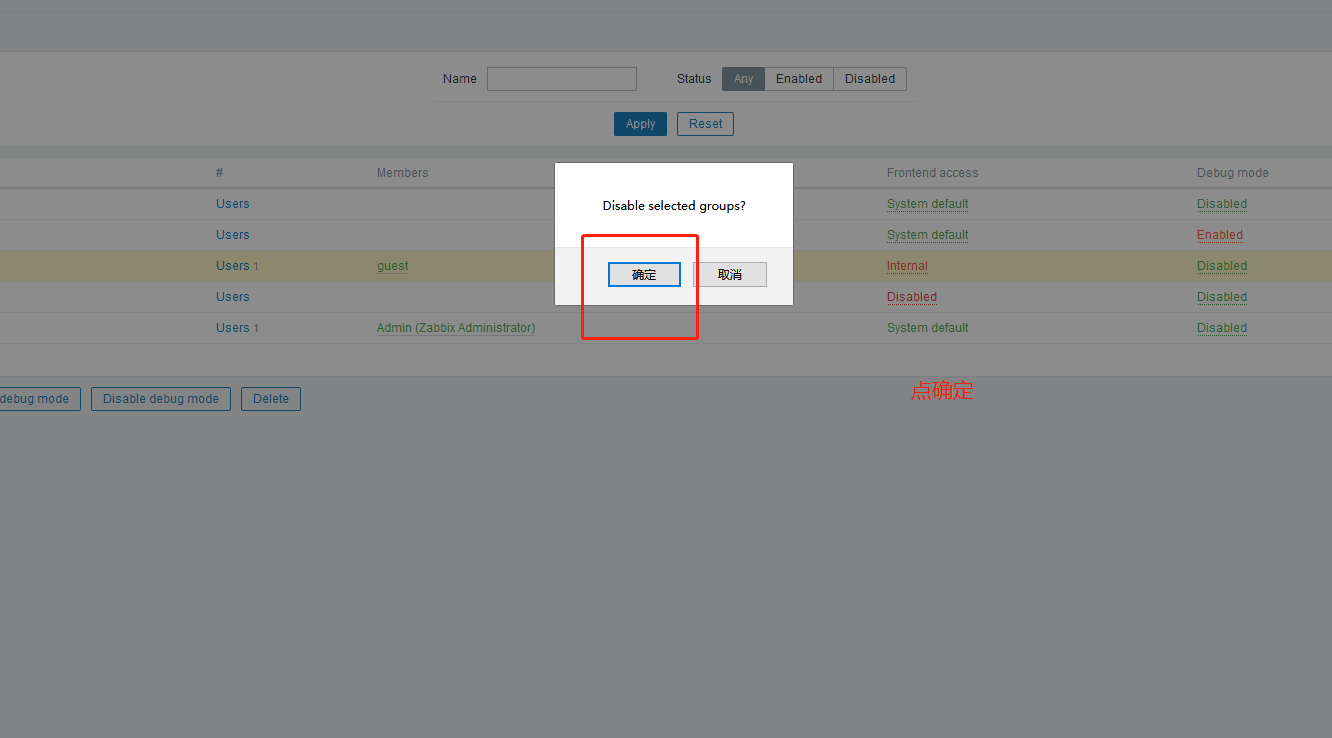
4.4禁用没用的用户
4.5修改超户的密码

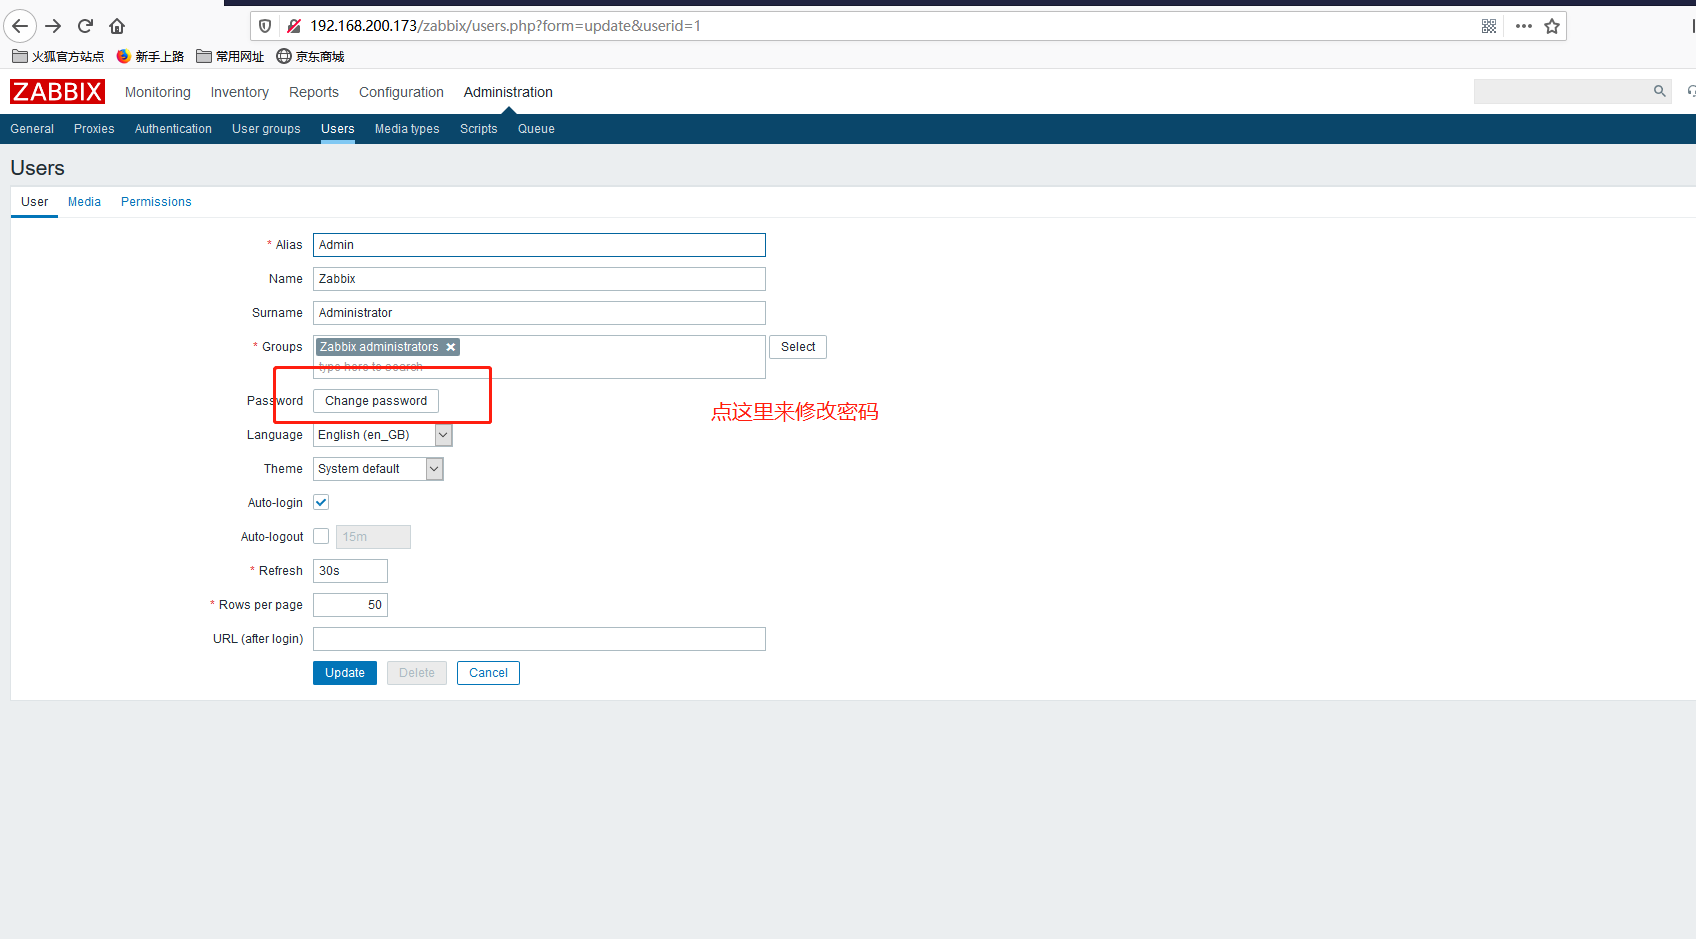
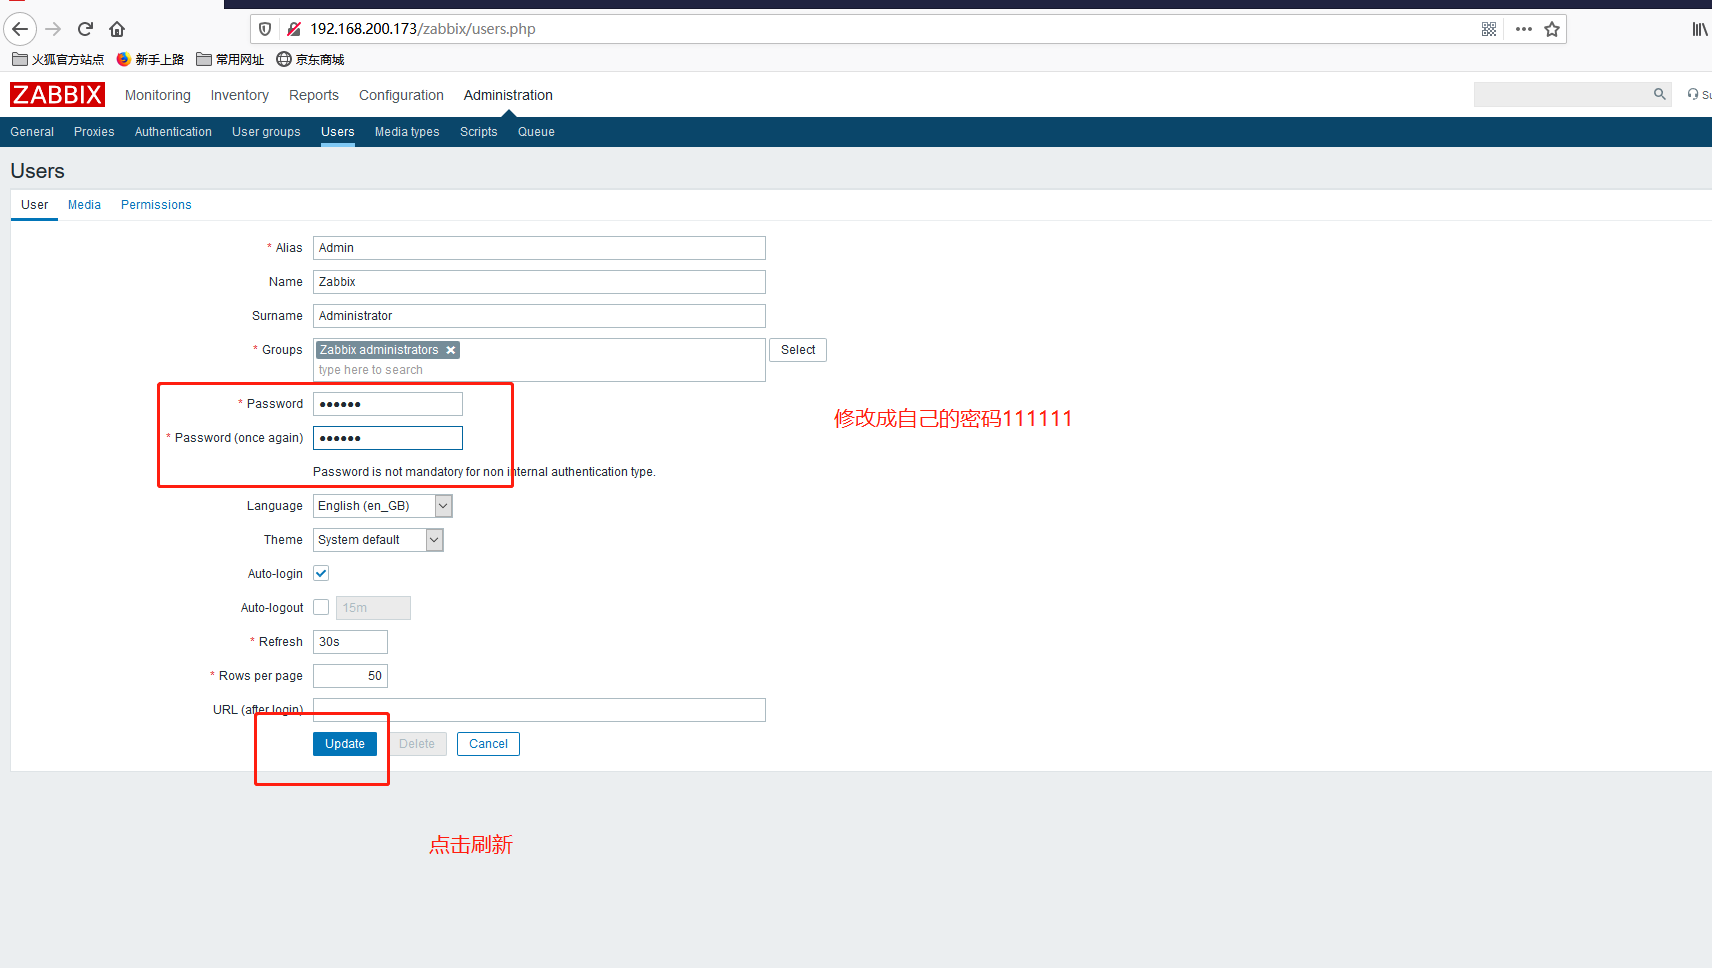
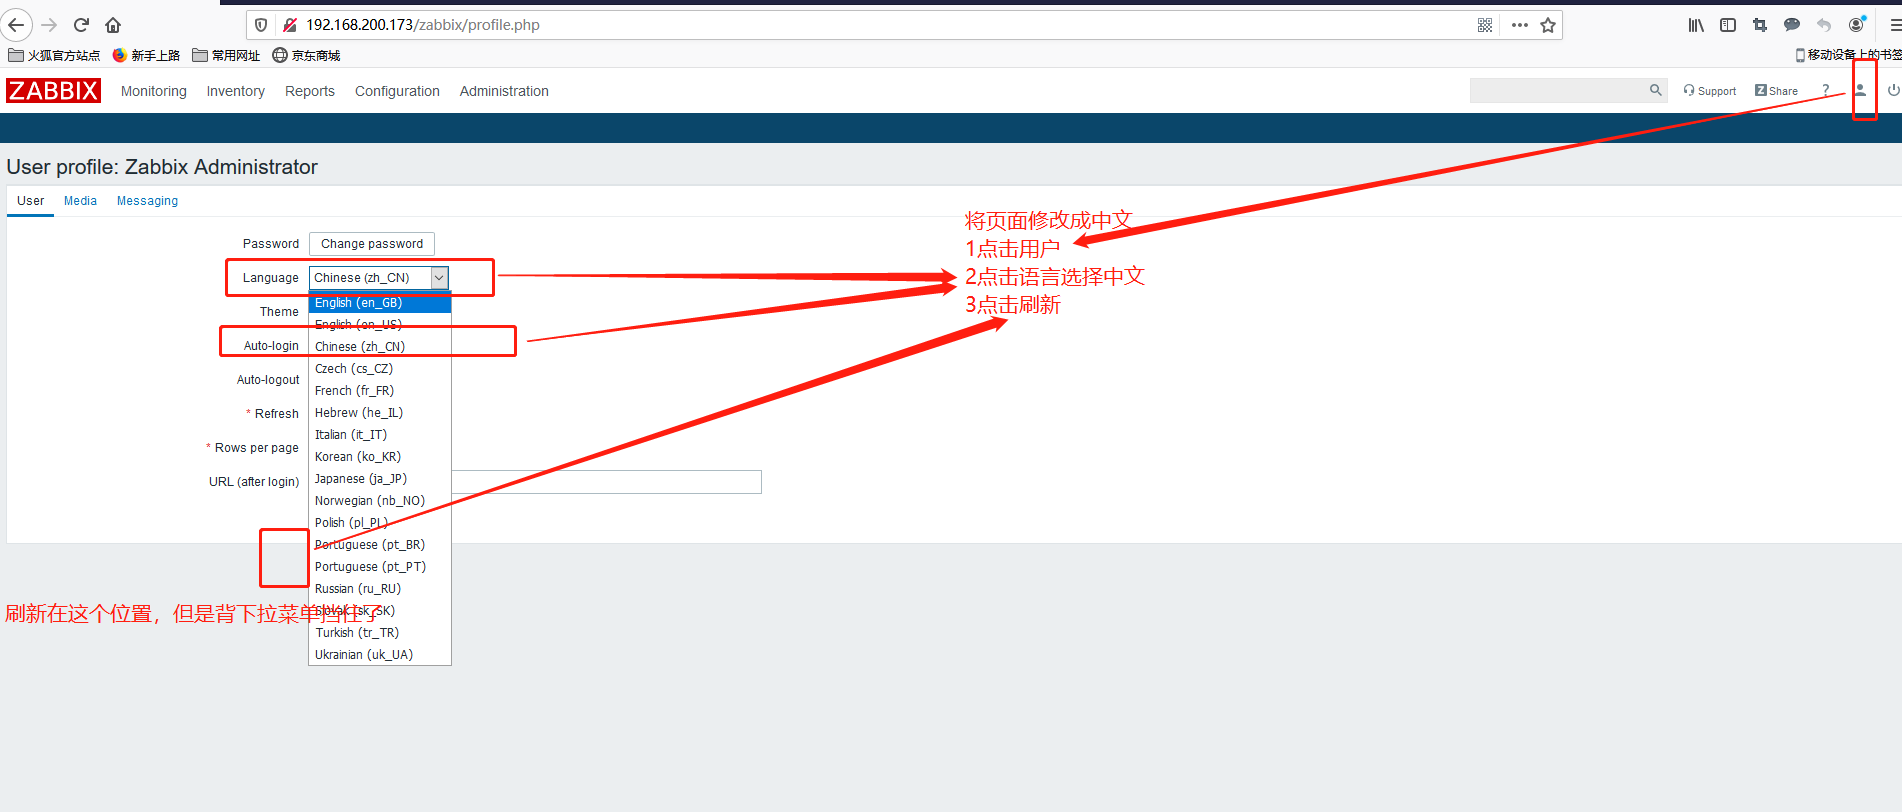
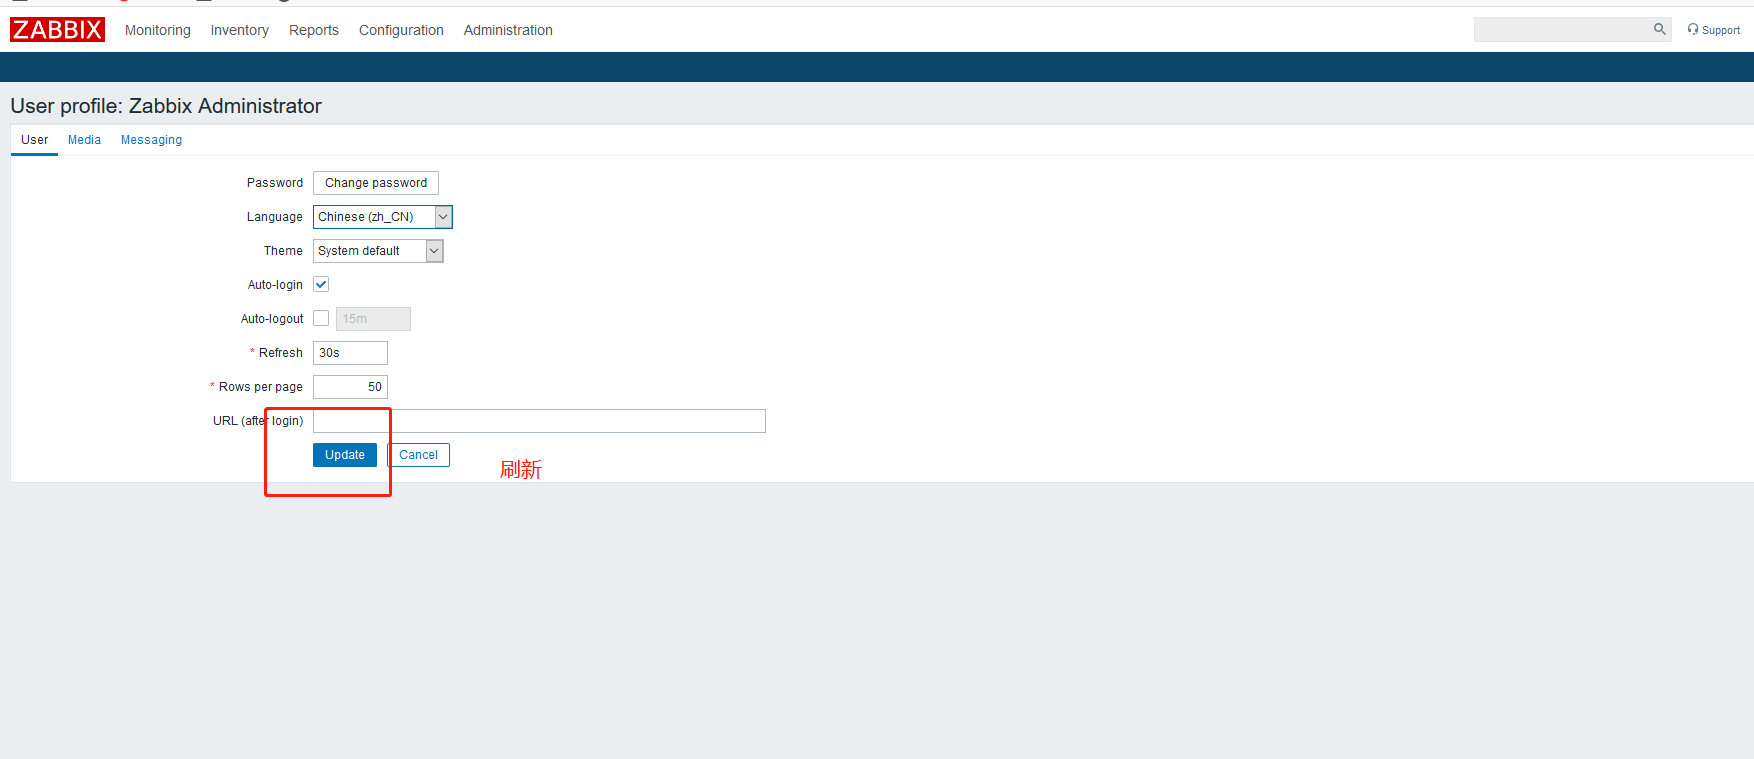

4.6zabbix网页汉化补丁包
[root@zabbix ~]# ls /usr/local/nginx/html/zabbix/fonts/ #这个目录里放着的就是zabbix的字体,但是没有中文字体所以会出现乱码,我们的解决方法就是下载个字体覆盖到这DejaVuSans.ttf[root@zabbix ~]# wget https://raw.githubusercontent.com/chenqing/ng-mini/master/font/msyh.ttf #下载字体的网址。[root@zabbix ~]# lsanaconda-ks.cfg msyh.ttf mysql-5.6.39.tar.gz nginx-1.16.1.tar.gz php-5.6.40.tar.gz zabbix-4.0.3.tar.gz[root@zabbix ~]# mv msyh.ttf /usr/local/nginx/html/zabbix/fonts/[root@zabbix ~]# ls /usr/local/nginx/html/zabbix/fonts/DejaVuSans.ttf msyh.ttf[root@zabbix ~]# vim /usr/local/nginx/html/zabbix/include/defines.inc.php #修改php文件里的默认,将DejaVuSans字体,改成msyh微软雅黑字体65 define('ZBX_GRAPH_FONT_NAME', 'msyh'); // font file name110 define('ZBX_FONT_NAME', 'msyh'); #将65行和110行替换成这个样子。#php插入的不像java之类的需要编译类文件等,直接就可以使用。
4.7汉化完成



 浙公网安备 33010602011771号