

iOS绘图教程(个人学习总结)
iOS绘图教程:http://www.cocoachina.com/applenews/devnews/2014/0115/7703.html
本篇博文是为了梳理学习过程中得框架,上边链接是cocoachina的教程,更详细一些
iOS支持两套图形API族:Core Graphics/QuartZ 2D 和OpenGL ES
路径用于描述由一序列线和Bézier曲线构成的2D几何形状
Core Graphics中也有一些用于创建简单路径(比如矩形和椭圆形)的便利函数。对于更为复杂的路径,必须用Core Graphics框架提供的函数自行创建
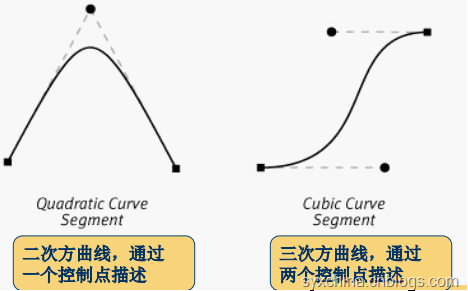
Bézier曲线是法国数学家“贝塞尔”在工作中发现,任何一条曲线都可以通过与它相切的控制线两端的点的位置来定义。
Bézier曲线
两种方法创建弧度 第一种
第二种
- - (void) drawRect: (CGRect) rect {
- UIBezierPath* p = [UIBezierPathbezierPathWithOvalInRect:CGRectMake(0,0,100,100)];
- [[UIColor blueColor] setFill];
- [p fill];
- }
第二种绘图形式:使用Core Graphics实现绘制蓝色圆。
- - (void) drawRect: (CGRect) rect {
- CGContextRef con = UIGraphicsGetCurrentContext();
- CGContextAddEllipseInRect(con, CGRectMake(0,0,100,100));
- CGContextSetFillColorWithColor(con, [UIColor blueColor].CGColor);
- CGContextFillPath(con);
- }
上边两种方法对比 第一种是使用UIBezierPath 这个方法 自动的在当前view中画出图形
第二种方法 是使用core Graphics 是获得上下文之后进行绘图 CGContextRef
第三种绘图形式:我将在UIView子类的drawLayer:inContext:方法中实现绘图任务。drawLayer:inContext:方法是一个绘制图层内容的代理方法。为了能够调用drawLayer:inContext:方法,我们需要设定图层的代理对象。但要注意,不应该将UIView对象设置为显示层的委托对象,这是因为UIView对象已经是隐式层的代理对象,再将它设置为另一个层的委托对象就会出问题。轻量级的做法是:编写负责绘图形的代理类。在MyView.h文件中声明如下代码:
- @interface MyLayerDelegate : NSObject
- @end
然后MyView.m文件中实现接口代码:
- @implementation MyLayerDelegate
- - (void)drawLayer:(CALayer*)layer inContext:(CGContextRef)ctx {
- UIGraphicsPushContext(ctx);
- UIBezierPath* p = [UIBezierPath bezierPathWithOvalInRect:CGRectMake(0,0,100,100)];
- [[UIColor blueColor] setFill];
- [p fill];
- UIGraphicsPopContext();
- }
- @end
- @interface MyView () {
- MyLayerDelegate* _layerDeleagete;
- }
- @end
- MyView *myView = [[MyView alloc] initWithFrame: CGRectMake(0, 0, 320, 480)];
- CALayer *myLayer = [CALayer layer];
- _layerDelegate = [[MyLayerDelegate alloc] init];
- myLayer.delegate = _layerDelegate;
- [myView.layer addSublayer:myLayer];
- [myView setNeedsDisplay]; // 调用此方法,drawLayer: inContext:方法才会被调用。
- - (void)drawLayer:(CALayer*)lay inContext:(CGContextRef)con {
- CGContextAddEllipseInRect(con, CGRectMake(0,0,100,100));
- CGContextSetFillColorWithColor(con, [UIColor blueColor].CGColor);
- CGContextFillPath(con);
- }
- UIGraphicsBeginImageContextWithOptions(CGSizeMake(100,100), NO, 0);
- UIBezierPath* p = [UIBezierPath bezierPathWithOvalInRect:CGRectMake(0,0,100,100)];
- [[UIColor blueColor] setFill];
- [p fill];
- UIImage* im = UIGraphicsGetImageFromCurrentImageContext();
- UIGraphicsEndImageContext();
解释一下UIGraphicsBeginImageContextWithOptions函数参数的含义:第一个参数表示所要创建的图片的尺寸;第二个参数用来指定所生成图片的背景是否为不透明,如上我们使用YES而不是NO,则我们得到的图片背景将会是黑色,显然这不是我想要的;第三个参数指定生成图片的缩放因子,这个缩放因子与UIImage的scale属性所指的含义是一致的。传入0则表示让图片的缩放因子根据屏幕的分辨率而变化,所以我们得到的图片不管是在单分辨率还是视网膜屏上看起来都会很好。
- UIGraphicsBeginImageContextWithOptions(CGSizeMake(100,100), NO, 0);
- CGContextRef con = UIGraphicsGetCurrentContext();
- CGContextAddEllipseInRect(con, CGRectMake(0,0,100,100));
- CGContextSetFillColorWithColor(con, [UIColor blueColor].CGColor);
- CGContextFillPath(con);
- UIImage* im = UIGraphicsGetImageFromCurrentImageContext();
- UIGraphicsEndImageContext();

 浙公网安备 33010602011771号