CommonAPI-SomeIP相关
【生活经历分享】华师国培 华师伴学 合同都是坑 消费者付款后无法退款
和华师国培签合同需小心,合同中都是保护华师的条款,没有保护消费者的条款。
收到钱,就算你因对培训质量不满意,也不能退款。因合同消费者维权肯定十分艰难。
华师伴学的授课方式是看录制的视频,不是真人现场教学。是否是您和孩子想要的学习方式?
各位打算报名的,交费要谨慎!
其他人在小红书上发的,转:
深圳市华师国培教育科技有限公司,黑心机构,大家擦亮眼睛,别被骗了,消费欺诈,虚假承诺,签合同各种坑,收到钱了不履行承诺不退款,乱扣费,维权艰难! - 小红书
【工作要用到的技术,之前记录在云笔记中,因时间太久已经不记得出处。如果有问题请联系我,会及时配合处理】
大致有以下内容:
- 一、选择应该CommonAPI还是VSomeIP呢
- 二、版本信息:项目使用的 CommonAPI 和最新开源库
- 三、交叉编译(QNX)
- 四、CommonAPI-SomeIP
- 五、Ubuntu、QNX/Arm 交叉编译,及Windows编译
- 六、GDB 时是否加载 VSomeIP 相关库的路径对BT命令的影响
- 七、10分钟搞定fidl语法与FIDL&FDEPL 生成
- 八、commonapi-generator-windows & commonapi-someip-generator-windows
一、 应该选择CommonAPI还是VSomeIP呢?
(1) 用VSomeIP的话,依赖的东西少,Payload的打包和解析要自己写,工作量大,自由发挥的空间也大;
(2) 用CommonAPI的话,依赖的东西多,环境搭建相对复杂,接口可以用IDL描述,这在SOA中非常有用,很多代码由工具生成,基本通信几乎不需要联调,主要的开发工作是实现服务的接口,相当于填充业务逻辑,工作量少,同时可以发挥的空间也小。很多事都是这样吧,获得便利的同时也会损失一些自由,如何选择还是要具体分析。
二、 C603项目使用的 CommonAPI 库路径及相关版本信息:
一)、C603版本下载:
- C603/hscd_idd/toolchain/repository/common-api-c++/lib/libCommonAPI.so
- ---CommonAPI_runtime libCommonAPI.so.3.1.12 https://github.com/COVESA/capicxx-core-runtime
- C603/hscd_idd/toolchain/repository/common-api-c++-someip/lib/libCommonAPI-SomeIP.so
- ---CommonAPI_SOMEIP libCommonAPI-SomeIP.so.3.1.12 https://github.com/COVESA/capicxx-someip-runtime/releases
- C603/hscd_idd/toolchain/repository/vsomeip/lib/libvsomeip.so
- ---vsomeip libvsomeip.so.2.10.21 https://github.com/COVESA/vsomeip/releases?page=2
- dlt-daemon 2.18.8
二)、最新版本下载:
- CommonAPI_runtime: git clone https://github.com/GENIVI/capicxx-core-runtime.git
- dlt-daemon: git clone https://github.com/COVESA/dlt-daemon.git
- CommonAPI_SOMEIP: git clone https://github.com/GENIVI/capicxx-someip-runtime.git
- vsomeip: git clone https://github.com/COVESA/vsomeip.git
- boost: wget https://sourceforge.net/projects/boost/files/boost/1.73.0/boost_1_73_0.tar.gz/download -O boost_1_73_0.tar.gz
- CommonAPI_generator:
- (1) wget https://github.com/COVESA/capicxx-core-tools/releases/download/3.2.14/commonapi_core_generator.zip / commonapi-core-generator-linux-x86_64
- (2) wget https://github.com/COVESA/capicxx-someip-tools/releases/download/3.2.14/commonapi_someip_generator.zip / commonapi-someip-generator-linux-x86_64
三、 C603 交叉编译(QNX)
source /opt/qnx/qnx700/qnxsdp-env.sh —— QNX: C603
- /opt/qnx/qnx700/host/linux/x86_64/usr/bin/ntoaarch64-gcc -> aarch64-unknown-nto-qnx7.0.0-gcc-5.4.0
一)、 dlt-daemon 编译成功!——正确的 cmake 指令在 v2.18.8 编译失败信息一处(2025/03/31)
export hqx_toolchain=/opt/qnx/qnx700
source /opt/qnx/qnx700/qnxsdp-env.sh
cd build
cmake .. -DCMAKE_INSTALL_PREFIX=install -DCMAKE_TOOLCHAIN_FILE=../../../toolchain.cmake
- 编译出 dlt-adaptor-stdin 的 cmake 命令行: cmake -DWITH_DLT_ADAPTOR=ON -DWITH_DLT_CXX11_EXT=ON -DDLT_IPC=UNIX_SOCKET -DCMAKE_TOOLCHAIN_FILE=../../../toolchain.cmake -DCMAKE_INSTALL_PREFIX=install ..
- V2.18.10 不要使用参数: -DWITH_DLT_QNX_SYSTEM=ON,否则报错,错误信息如下失败信息三。
- 但 V2.18.8 版本如下命令行编译通过: cmake -DWITH_DLT_ADAPTOR=ON -DWITH_DLT_QNX_SYSTEM=ON -DWITH_DLT_CXX11_EXT=ON -DDLT_IPC=UNIX_SOCKET -DCMAKE_TOOLCHAIN_FILE=../../../toolchain.cmake -DCMAKE_INSTALL_PREFIX=install ..
make
make install
V2.18.10 失败信息一,cmake 执行时:
- CMake Error at /home/User/Tools/cmake-3.31.2/share/cmake-3.31/Modules/CMakeTestCCompiler.cmake:67 (message):
- The C compiler
- "/opt/qnx/qnx700/host/linux/x86_64/usr/bin/ntoaarch64-gcc"
- is not able to compile a simple test program.
- It fails with the following output:
- Change Dir: '/home/User/C603/vsomeip/dlt-daemon/dlt-daemon/build/CMakeFiles/CMakeScratch/TryCompile-zwiAH6'
- Run Build Command(s): /home/User/Tools/cmake-3.31.2/bin/cmake -E env VERBOSE=1 /usr/bin/make -f Makefile cmTC_81981/fast
- /usr/bin/make -f CMakeFiles/cmTC_81981.dir/build.make CMakeFiles/cmTC_81981.dir/build
- make[1]: Entering directory '/home/User/C603/vsomeip/dlt-daemon/dlt-daemon/build/CMakeFiles/CMakeScratch/TryCompile-zwiAH6'
- Building C object CMakeFiles/cmTC_81981.dir/testCCompiler.c.o
- /opt/qnx/qnx700/host/linux/x86_64/usr/bin/ntoaarch64-gcc -Vgcc_ntoaarch64le_gpp -D_QNX_SOURCE -D_HQX_ -D_QNX_ -o CMakeFiles/cmTC_81981.dir/testCCompiler.c.o -c /home/User/C603/vsomeip/dlt-daemon/dlt-daemon/build/CMakeFiles/CMakeScratch/TryCompile-zwiAH6/testCCompiler.c
- ntoaarch64-gcc: error: unrecognized command line option '-Vgcc_ntoaarch64le_gpp'
将 toolchain.cmake 文件如下两行修改回之前的设置。
# C++ compiler
SET(CMAKE_CXX_COMPILER /opt/qnx/qnx700/host/linux/x86_64/usr/bin/ntoaarch64-g++)
# C compiler
SET(CMAKE_C_COMPILER /opt/qnx/qnx700/host/linux/x86_64/usr/bin/ntoaarch64-gcc)
修改前:
修改后:
# C++ compiler
SET(CMAKE_CXX_COMPILER /opt/qnx/qnx700/host/linux/x86_64/usr/bin/QCC)
# C compiler
SET(CMAKE_C_COMPILER /opt/qnx/qnx700/host/linux/x86_64/usr/bin/qcc)
cmake 通过!
V2.18.8 失败信息一,cmake 执行时:cmake .. -DWITH_DLT_ADAPTOR=ON -DWITH_DLT_QNX_SYSTEM=ON -DWITH_DLT_CXX11_EXT=ON -DDLT_IPC=UNIX_SOCKET -DWITH_DLT_USE_IPv6=OFF -DCMAKE_INSTALL_PREFIX=install -DCMAKE_TOOLCHAIN_FILE=../../toolchain.cmake
- CMake Error at src/tests/CMakeLists.txt:48 (add_executable):
- add_executable cannot create target "dlt-test-cpp-extension" because
- another target with the same name already exists. The existing target is
- an executable created in source directory
解决方法:注释掉 src/tests/CMakeLists.txt P38行 - #set(TARGET_LIST ${TARGET_LIST} dlt-test-cpp-extension)
———————— 修改后 make install 成功,没有报下面 make 时的错误!!!
—————— 之前报如下的错误,是因为 cmake 指令为:cmake .. -DCMAKE_INSTALL_PREFIX=install -DCMAKE_TOOLCHAIN_FILE=../../../toolchain.cmake
失败信息二,make 时:
- CMakeFiles/dlt-daemon.dir/dlt-daemon.c.o: In function `file_read_field':
- dlt-daemon.c:(.text+0x32f8): undefined reference to `getline'
之前在 C603 开发过程中也遇到过类似的错误,getline 属于 QNX7.1【后面的 strndup 同样属于 QNX7.1】,当前版本(7.0)不支持。所以,此模块使用标准的代码,无法在 QNX7.0 编译通过。
此库源代码中,有使用 std::getline 并没有报错。自定义 get_line 函数代替
注: dlt-daemon V2.18.8 版本源代码中没有函数 file_read_field,V2.18.10 版本有。
失败信息三,在 cmake 命令中增加参数 “ -DWITH_DLT_QNX_SYSTEM=ON”(参考 dlt 仓库 add dlt-adaptor-stdin 提交) 后 make 时
- CMakeFiles/dlt-qnx-system.dir/dlt-qnx-system.c.o: In function `read_configuration_file':
- /home/User/C603/vsomeip/dlt-daemon/dlt-daemon-2.18.10/src/dlt-qnx-system/dlt-qnx-system.c:294: undefined reference to `strndup'
- /home/User/C603/vsomeip/dlt-daemon/dlt-daemon-2.18.10/src/dlt-qnx-system/dlt-qnx-system.c:301: undefined reference to `strndup'
- /home/User/C603/vsomeip/dlt-daemon/dlt-daemon-2.18.10/src/dlt-qnx-system/dlt-qnx-system.c:314: undefined reference to `strndup'
- cc: /opt/qnx/qnx700/host/linux/x86_64/usr/bin/aarch64-unknown-nto-qnx7.0.0-ld error 1
- src/dlt-qnx-system/CMakeFiles/dlt-qnx-system.dir/build.make:99: recipe for target 'src/dlt-qnx-system/dlt-qnx-system' failed
- make[2]: *** [src/dlt-qnx-system/dlt-qnx-system] Error 1
- CMakeFiles/Makefile2:1434: recipe for target 'src/dlt-qnx-system/CMakeFiles/dlt-qnx-system.dir/all' failed
- make[1]: *** [src/dlt-qnx-system/CMakeFiles/dlt-qnx-system.dir/all] Error 2
- Makefile:129: recipe for target 'all' failed
- make: *** [all] Error 2
V2.18.10 版本 cmake 时不增加参数 “ -DWITH_DLT_QNX_SYSTEM=ON”,则 make 编译通过;增加则会报上述错误。
二)、 CommonAPI_runtime 编译通过!
cd CommonAPI_runtime/capicxx-core-runtime/
mkdir -p build/install
cd build/
cmake .. -DCMAKE_INSTALL_PREFIX=install -DCMAKE_TOOLCHAIN_FILE=../../../toolchain.cmake
make
make install
(1) make 错误1
/opt/qnx/qnx700/host/linux/x86_64/usr/bin/aarch64-unknown-nto-qnx7.0.0-ld: cannot find -lrt
/opt/qnx/qnx700/host/linux/x86_64/usr/bin/aarch64-unknown-nto-qnx7.0.0-ld: cannot find -lpthread
(2) make 错误1
/opt/qnx/qnx700/host/linux/x86_64/usr/bin/aarch64-unknown-nto-qnx7.0.0-ld: cannot find -ldl
按编译 dlt-daemon 的方法修改 toolchain.cmake 文件后,编译通过!!!
三)、 boost 编译失败 ——————第四种方法:——成功,但存在问题:生成库的版本不对!!!第五种方法:V1.66.0版本手动删除不支持的编译选项尝试——成功。
(1) cannot find -lrt (librt.so 找不到): 在 project-config.jam 中增加 --withnot-rt 选项
(2) ./boost/python/detail/wrap_python.hpp:57:11: fatal error: pyconfig.h: No such file or directory
pyconfig.h 是 Python 的一个内部头文件,它包含了编译Python C扩展时需要的配置宏定义。
查询编译系统,在 SDK 的目录中有找到 pyconfig.h 文件的路径有以下:
- /opt/qnx/qnx700/target/qnx7/aarch64le/usr/include/python2.7/pyconfig.h
- /opt/qnx/qnx700/target/qnx7/x86/usr/include/python2.7/pyconfig.h
- /opt/qnx/qnx700/target/qnx7/x86_64/usr/include/python2.7/pyconfig.h
- /opt/qnx/qnx700/target/qnx7/armle-v7/usr/include/python2.7/pyconfig.h
还有其它路径,如:
- /usr/include/x86_64-linux-gnu/python2.7/pyconfig.h
- /usr/include/x86_64-linux-gnu/python3.6m/pyconfig.h
- /usr/include/python2.7/pyconfig.h
- /usr/include/python3.6m/pyconfig.h
究竟使用的是哪个版本???
网上给出的解决方法: 修改 python.jam, 该脚本在 boost_1_73_0/tools/build/src/tools/python.jam.具体根据自己版本 - includes ?= $(prefix)/include/python$(version)
编译脚本中:-I"/opt/qnx/qnx700/host/linux/x86_64/usr/include/python2.7",此路径不对!!!
开源代码脚本没有问题,问题的原因在于解决(1)中的问题时,增加的选项后多了一个分号(这是写C/C++语言的习惯):
libraries = --with-filesystem --with-system --with-thread --withnot-rt;
修改为:
libraries = --with-filesystem --with-system --with-thread --withnot-rt
修改后,b2 编译成功。
(3) 重新按以下命令和顺序操作
- ./bootstrap.sh --show-libraries
- ./bootstrap.sh --without-libraries=atomic,chrono ### 此命令会改 project-config.jam 文件内容
- 编辑 project-config.jam 文件
将 using gcc ; 修改为: using gcc : : /opt/qnx/qnx700/host/linux/x86_64/usr/bin/ntoaarch64-gcc ;
using python : 2.7 : "/opt/qnx/qnx700/host/linux/x86_64/usr" ;
其它配置方法:
using gcc : arm : arm-none-linux-gnueabi-g++ ;
b2 toolset=gcc-arm
b2 toolset=gcc-arm target-os=linux
或者指定配置 jam 文件
Build boost:
b2 toolset=gcc-arm target-os=linux --user-config=user-config.jam
- ./b2
./b2 -q link=shared toolset=qcc target-os=qnxnto variant=release cxxflags="-Vgcc_ntoaarch64le -Y_gpp" --without-context --without-coroutine --without-python --prefix=${QNX_TARGET}/usr
(4) 按第 (6) 步修改后,执行 ./b2 出现错误: /opt/qnx/qnx700/host/linux/x86_64/usr/bin/aarch64-unknown-nto-qnx7.0.0-ld: cannot find -lrt
如第 (1) 步: 在 project-config.jam 中增加 --withnot-rt 选项 ### 第 (1) 步这之前有效可能是编译器被修改为默认的 gcc,而不是交叉编译器
加在此处无效: libraries = --without-atomic --without-chrono --withnot-rt ;
交叉编译器确认,设定为: ntoaarch64-xxx, 而实际执行为: aarch64-unknown-nto-qnx7.0.0-xxx。查对应的目录发现:ntoaarch64-gcc -> aarch64-unknown-nto-qnx7.0.0-gcc-5.4.0
网上另一种方法:
1) 假如 QNX 7.0 SDP 的路径为 /opt/qnx/qnx700,使用 source 命令让 qnx 环境变量生效: source /opt/qnx/qnx700/qnxsdp-env.sh
2) 将 qcc 添加到 $PATH 环境变量:export PATH=$PATH:/opt/qnx/qnx700/host/linux/x86_64/usr/bin
3) 修改 boost_1_xx_0/tools/build/src/tools/qcc.jam 文件第 40 行,将 QCC 修改成 qcc
- 原文: local command = [ common.get-invocation-command qcc : QCC : $(command) ] ;
- 修改为: local command = [ common.get-invocation-command qcc : qcc : $(command) ] ;
4) ./bootstrap.sh
5) ./b2 toolset=qcc target-os=qnxnto threadapi=pthread link=shared -l240 --layout=system --without-python --without-mpi --without-graph_parallel \
cxxflags="-Vgcc/5.4.0,gcc_ntoaarch64le -Y_cxx -Wc,-std=gnu++17 -D_LITTLE_ENDIAN" linkflags="-Vgcc/5.4.0,gcc_ntoaarch64le -Y_cxx -lang-c++"
运行出错:
bin.v2/libs/container/build/qcc/release/visibility-hidden/alloc_lib.o: error adding symbols: File in wrong format
cc: /opt/qnx/qnx700/host/linux/x86_64/usr/bin/aarch64-unknown-nto-qnx7.0.0-ld error 1
......
./boost/asio/impl/executor.hpp:233:36: error: 'boost::asio::executor::impl >::allocator_type {aka struct std::__1::allocator_traits >::rebind_alloc > >}' has no member named 'allocate'
ptr_(allocator_.allocate(1))
第三种方法:
build.sh 的内容
#!/bin/sh

echo "###*** clean all - b2 --clean"
./b2 --clean

# 编译工具路径
echo "###*** dir for compile tools - QL_CROSSTOOLS=/opt/qnx/qnx700/host/linux/x86_64/usr/bin"
QL_CROSSTOOLS=/opt/qnx/qnx700/host/linux/x86_64/usr/bin

# SYSROOT路径
echo "###*** set SYSROOT"
QL_SYSROOT=/opt/qnx/qnx700/target/qnx7/aarch64le
COMPILER_SYSROOT="--sysroot=$QL_SYSROOT"
echo "###*** set sysroot to ${COMPILER_SYSROOT}"

# 编译工具
echo "###*** set gcc compile tools"
COMPILER_CC=$QL_CROSSTOOLS/ntoaarch64-gcc
# /opt/qnx/qnx700/host/linux/x86_64/usr/bin/ntoaarch64-gcc

# 编译选项
# COMPILER_FLAGS="-march=aarch64 -marm -mfpu=neon -mfloat-abi=hard"
COMPILER_FLAGS=""

# 安装位置
# COMPILER_PREFIX=$(pwd)/../target_cross

rm -rf project-config.jam*
echo "###*** bootstrap.sh --with-libraries=all"
./bootstrap.sh --with-libraries=all

# 将gcc替换成交叉编译工具的gcc并添加编译选项和sysroot路径
sed -i "/using gcc/c using gcc : : $COMPILER_CC $COMPILER_FLAGS $COMPILER_SYSROOT ;" project-config.jam

echo "###*** b2 variant=release abi=aapcs address-model=32 architecture=arm binary-format=elf threading=multi toolset=gcc --without-mpi"
./b2 variant=release abi=aapcs address-model=32 architecture=arm binary-format=elf threading=multi toolset=gcc --without-mpi
第四种方法:——成功! 但存在生成库的版本不对的问题!!!
1) 解压 boost_1_73_0.tar.gz 后
./bootstrap.sh --show-libraries
./bootstrap.sh --with-toolset=gcc # 会修改 project-config.jam 文件
修改 qcc.jam: modified QCC to q++ 和增加编译选项【boost_1_73_0/tools/build/src/tools/qcc.jam 】

2) 修改 project-config.jam: using gcc : : /opt/qnx/qnx700/host/linux/x86_64/usr/bin/ntoaarch64-g++ ;
3) 命令行执行:
source /opt/qnx/qnx700/qnxsdp-env.sh
分两种情况,带 -Vgcc_ntoaarch64le 和不带 -Vgcc_ntoaarch64le (先不带任何 --without- 参数,如: --without-context --without-coroutine --without-python )
(1) 不带 -Vgcc_ntoaarch64le
./b2 -q link=shared toolset=qcc target-os=qnxnto variant=release cxxflags="-Y_gpp" --prefix=install
需要配置 python,所以先 without python:
./b2 -q link=shared toolset=qcc target-os=qnxnto variant=release cxxflags="-Y_gpp" --without-python --prefix=install
./b2 install -q link=shared toolset=qcc target-os=qnxnto variant=release cxxflags="-Y_gpp" --without-python --prefix=install ——成功!
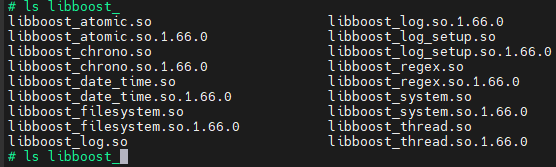
但通过查看 lib 目录中文件属性,如: file install/lib/libboost_atomic.so.1.73.0
得到: install/lib/libboost_atomic.so.1.73.0: ELF 32-bit LSB shared object, Intel 80386, version 1 (SYSV), dynamically linked, BuildID[md5/uuid]=b12d28b35e71ced77a0b2eab53ef4ed0, with debug_info, not stripped
却是不对的!
将指令行修改为: ./b2 install --prefix=install link=shared variant=release --without-python cxxflags="-std=gnu++17 -D_LITTLE_ENDIAN"
——执行后提示 address-model 和 architecture 正确,但编译时报错。

错误信息1: cannot find -lrt
cannot find -ldl
cannot find -lpthread
错误信息2: ./boost/asio/detail/resolve_endpoint_op.hpp:83:22: error: 'NI_MAXHOST' was not declared in this scope
./boost/asio/detail/resolver_service.hpp:110:20: error: 'NI_MAXHOST' was not declared in this scope
等与宏 NI_MAXHOST 和 NI_MAXSERV 未定义错误。boost/asio 库还有其它错误,不再列出。
——修改1:删除文件 ./tools/build/src/tools/gcc.jam 中 rt 相关的 linkflags 设置,即将 : -pthreads : rt ; 修改为 : -pthreads ;【先无论 target-os 一律修改】
——修改2:删除文件 ./libs/chrono/build/Jamfile.v2 中 rt 和 pthread 相关的 linkflags 设置
——修改3:注释文件 ./libs/stacktrace/build/Jamfile.v2 中此语句 linux:dl
以上 3 处修改后,不再报错 cannot find xxx 的错误了!!!
——修改4:vi boost/asio/detail/resolve_endpoint_op.hpp,增加以下宏定义
// Leo
#ifndef NI_MAXHOST
#define NI_MAXHOST 1025
#endif
#ifndef NI_MAXSERV
#define NI_MAXSERV 32
#endif
其它编译代码的错误先不处理,指定需要哪些库。注意:error: both --with- and --without- specified
./b2 install --prefix=install link=shared variant=release cxxflags="-std=gnu++17 -D_LITTLE_ENDIAN -fPIC" cflags="-fPIC" --with-atomic --with-chrono --with-date_time --with-filesystem --with-log --with-regex --with-system --with-thread
错误信息3: asio 库编译报错,原因待查。
——修改1:尝试不编译 log 库,则编译通过。
./b2 install --prefix=_boostBuild/install link=shared variant=release cxxflags="-std=gnu++17 -D_LITTLE_ENDIAN -fPIC" cflags="-fPIC" --with-atomic --with-chrono --with-date_time --with-filesystem --with-regex --with-system --with-thread --build-dir=_boostBuild
使用如下两项编译都通过:
- using gcc : arm : ntoaarch64-gcc ;
- using gcc : arm : /opt/qnx/qnx700/host/linux/x86_64/usr/bin/ntoaarch64-g++ ;
(2) 带 -Vgcc_ntoaarch64le
./b2 -q link=shared toolset=qcc target-os=qnxnto variant=release cxxflags="-Vgcc_ntoaarch64le -Y_gpp" --without-python --prefix=install
报如下的错误一:
- bin.v2/libs/system/build/qcc/release/visibility-hidden/error_code.o: file not recognized: File format not recognized
- cc: /opt/qnx/qnx700/host/linux/x86_64/usr/bin/i586-pc-nto-qnx7.0.0-ld error 1
- ...
- bin.v2/libs/date_time/build/qcc/release/visibility-hidden/gregorian/greg_month.o: file not recognized: File format not recognized
- cc: /opt/qnx/qnx700/host/linux/x86_64/usr/bin/i586-pc-nto-qnx7.0.0-ld error 1
- ...
修改编译选项后,报如下的错误二:
- qcc.link.dll bin.v2/libs/container/build/qcc/release/visibility-hidden/libboost_container.so.1.73.0
- /opt/qnx/qnx700/host/linux/x86_64/usr/bin/aarch64-unknown-nto-qnx7.0.0-ld: bin.v2/libs/container/build/qcc/release/visibility-hidden/alloc_lib.o: Relocations in generic ELF (EM: 3)
- /opt/qnx/qnx700/host/linux/x86_64/usr/bin/aarch64-unknown-nto-qnx7.0.0-ld: bin.v2/libs/container/build/qcc/release/visibility-hidden/alloc_lib.o: Relocations in generic ELF (EM: 3)
- bin.v2/libs/container/build/qcc/release/visibility-hidden/alloc_lib.o: error adding symbols: File in wrong format
- cc: /opt/qnx/qnx700/host/linux/x86_64/usr/bin/aarch64-unknown-nto-qnx7.0.0-ld error 1
boost V1.66 使用上面的方法:
source /opt/qnx/qnx700/qnxsdp-env.sh
./bootstrap.sh --with-toolset=gcc
修改 project-config.jam 文件的 using gcc ; 行为: using gcc : : /opt/qnx/qnx700/host/linux/x86_64/usr/bin/ntoaarch64-g++ ;
修改 qcc.jam: modified QCC to q++ 【tools/build/src/tools/qcc.jam 】
修改此行: local command = [ common.get-invocation-command qcc : QCC : $(command) ] ;
./b2 install -a --prefix=install --without-python --without-log --without-fiber --without-mpi --without-graph_parallel link=shared cxxflags=" -std=gnu++11 -D_LITTLE_ENDIAN"
编译时报如下错误
- libs/filesystem/src/operations.cpp:1548:11: error: '::fchmodat' has not been declared
- if (::fchmodat(AT_FDCWD, p.c_str(), mode_cast(prms),
- ^
- cc: /opt/qnx/qnx700/host/linux/x86_64/usr/lib/gcc/i586-pc-nto-qnx7.0.0/5.4.0/cc1plus error 1
原因:源代码适配问题,QNX 系统适配慢导致编译错误。参考高版本 boost 源代码直接修改源代码后,不再报 fchmodat 未定义的错误。
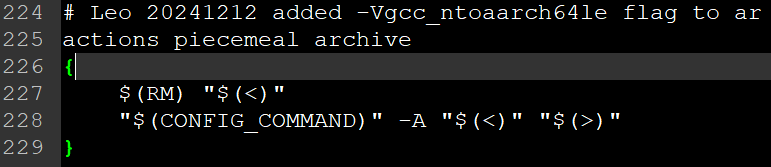
boost_1_66_0\libs\filesystem\src\operations.cpp 修改如下:&& !(defined(__QNX__) && (_NTO_VERSION < = 700))
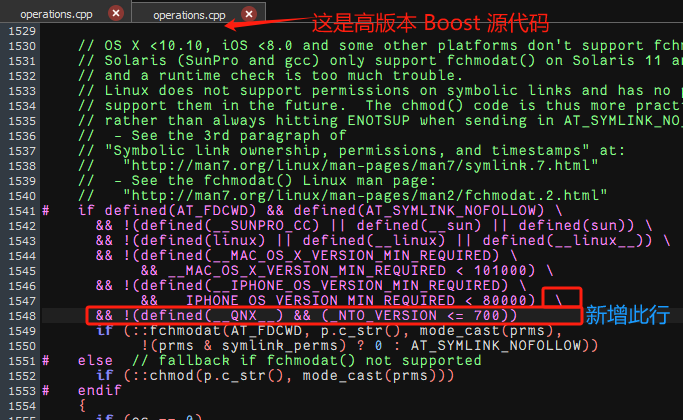
但是修改后,编译还是失败。报错信息有两处分别为:
- In file included from libs/stacktrace/build/../src/basic.cpp:14:0:
- ./boost/stacktrace/detail/frame_unwind.ipp: In member function 'std::__cxx11::string boost::stacktrace::frame::name() const':
- ./boost/stacktrace/detail/frame_unwind.ipp:87:35: error: invalid conversion from 'boost::stacktrace::frame::native_frame_ptr_t {aka const void*}' to 'void*' [-fpermissive]
- const bool dl_ok = !!::dladdr(addr_, &dli);
和
- ./boost/stacktrace/detail/location_from_symbol.hpp: In constructor 'boost::stacktrace::detail::location_from_symbol::location_from_symbol(const void*)':
- ./boost/stacktrace/detail/location_from_symbol.hpp:31:34: error: invalid conversion from 'const void*' to 'void*' [-fpermissive]
- if (!::dladdr(addr, &dli_)) {
同样,参考高版本 Boost源代码,在出错处加上强制类型转换(frame_unwind.ipp:87):
const bool dl_ok = !!::dladdr(addr_, &dli);
修改为:
const bool dl_ok = !!::dladdr(const_cast(addr_), &dli);
和(location_from_symbol.hpp:31)
if (!::dladdr(addr, &dli_)) {
修改为:
if (!::dladdr(const_cast(addr), &dli_)) {
后编译通过! 但存在与最新版本编译同样的问题,库的版本不对!!!
如果交叉编译报如下错误(但桌面编译通过),可以尝试包含头文件 string —— #include
error: return type ‘std::string’ {aka ‘class std::__cxx11::basic_string’} is incomplete
五、重新尝试编译
用最简单的操作,发现至少 CPU 和 64位 的信息是对的。
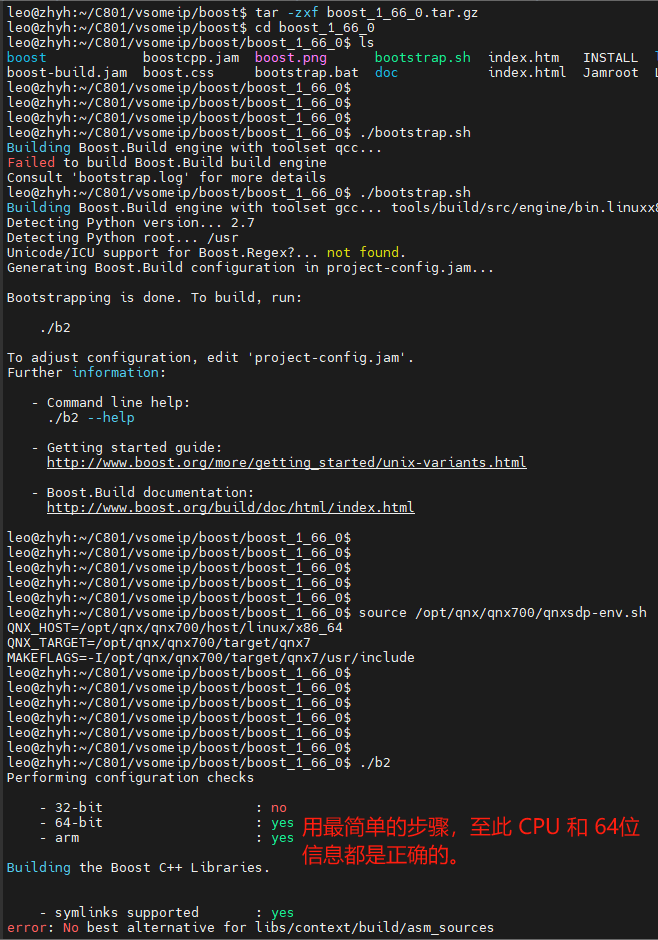
source /opt/qnx/qnx700/qnxsdp-env.sh
./b2 --prefix=install --without-python threadapi=pthread link=shared --layout=system --without-mpi --without-graph_parallel cxxflags=" -std=gnu++11 -D_LITTLE_ENDIAN" linkflags=" -lang-c++"
错误与刚刚开始编译 boost 相同,错误信息为: /opt/qnx/qnx700/host/linux/x86_64/usr/bin/aarch64-unknown-nto-qnx7.0.0-ld: cannot find -lrt
/opt/qnx/qnx700/host/linux/x86_64/usr/bin/aarch64-unknown-nto-qnx7.0.0-ld: cannot find -ldl
删除配置文件中所有编译选项 -lrt/-ldl/-lpthread,然后使用如下的配置编译指令【编译成功备份压缩包:boost_1_66_0-qnx-comile-ok.tar.gz】:
bootstrap.sh --without-libraries=fiber,log --prefix=install
./b2 install -a --prefix=install --without-python --without-log --without-fiber link=shared --without-mpi --without-graph_parallel cxxflags=" -std=gnu++11 -D_LITTLE_ENDIAN"
将以上编译成功的备份后,重新解压一份 boost_1_66_0 的源代码,尝试最小修改解决编译选项 -lrt/-ldl/-lpthread 的问题。
- --layout=system 此选项会影响对 CPU 和 32/64 位系统的设置???
- toolset=qcc 此选项会影响对 CPU 和 32/64 位系统的设置???
- cxxflags="-Vgcc_ntoaarch64le -Y_gpp" 此选项会影响对 CPU 和 32/64 位系统的设置???
为了解决编译选项 -lrt/-ldl/-lpthread 等不支持的问题,修改了以下文件:
- tools/build/src/tools/gcc.jam —— V1.66
将 case * : option ?= -pthread ; libs = rt ; 此行修改为:case * : # Leo
- ./libs/chrono/build/Jamfile.v2
注释掉以下三行:
#freebsd:"-lrt" # Leo
#linux:"-lrt -lpthread" # Leo
#pgi:"-lrt" # Leo
- ./libs/stacktrace/test/Jamfile.v2
- /libs/stacktrace/build/Jamfile.v2
删除 linux:rt 和 linux:dl 相关内容。
- /libs/log/build/Jamfile.v2
注释 # linux:rt
locale 库编译出错,因为不需要 locale 库,尝试使用 --without-locale 参数编译 —— 编译通过。
因为需要 log 库,所以增加对 log 库的支持【删除编译选项 --without-log】,同时按上面的尝试去掉编译会出错的 locale 库。修改后的指令如下:
./b2 install -a --prefix=install --without-python --without-fiber --without-mpi --without-graph_parallel --without-locale link=shared cxxflags="-std=gnu++11 -D_LITTLE_ENDIAN -D__EXT_QNX -D__EXT_BSD"
—— 增加这两个宏 -D__EXT_QNX -D__EXT_BSD 后问题仍然存在。
编译 log 库时出错,错误信息如下图【./boost/asio/detail/resolve_endpoint_op.hpp】

查寻得到 QNX 中有 NI_MAXHOST/NI_MAXSERV 的定义:
qnx700/target/qnx7/usr/include/netdb.h
#if defined(__EXT_BSD)
#define NI_MAXHOST 1025
#define NI_MAXSERV 32
#endif
头文件包含没有问题,因为没有报错说找不到 netdb.h 文件(在 ./asio/detail/socket_types.hpp 和 ./asio/error.hpp 中有包含)。
在报错的头文件【./boost/asio/detail/resolve_endpoint_op.hpp】中增加如下代码后,编译通过:
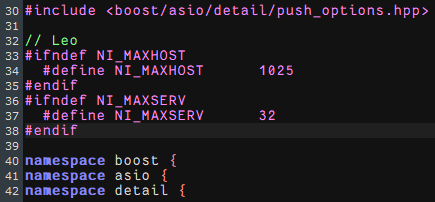
// Leo
#ifndef NI_MAXHOST
#define NI_MAXHOST 1025
#endif
#ifndef NI_MAXSERV
#define NI_MAXSERV 32
#endif
查看生成的库文件信息如下:

查看 QNX 机器内 boost 库的信息如下:
./bootstrap.sh --with-toolset=gcc
——修改 using gcc : arm : /opt/qnx/qnx700/host/linux/x86_64/usr/bin/ntoaarch64-g++ ;
source /opt/qnx/qnx700/qnxsdp-env.sh
export BOOST_ROOT=/home/User/C603/vsomeip-qnx/boost_1_66_0
export BOOST_LIBRARYDIR=/home/User/C603/vsomeip-qnx/boost_1_66_0/install-dbg/lib
./b2 install --prefix=install --build-dir=install/stage --without-container --without-context --without-coroutine --without-exception --without-fiber --without-graph --without-graph_parallel --without-iostreams --without-locale --without-math --without-mpi --without-program_options --without-python --without-random --without-serialization --without-signals --without-stacktrace --without-test --without-timer --without-type_erasure --without-wave cxxflags="-std=gnu++11 -D_LITTLE_ENDIAN -fPIC" cflags="-fPIC" threading=multi
export BOOST_ROOT=/home/User/C603/vsomeip-qnx/boost_1_66_0
export BOOST_LIBRARYDIR=/home/User/C603/vsomeip-qnx/boost_1_66_0/install-rel/lib
./b2 install --prefix=install --build-dir=install/stage --without-container --without-context --without-coroutine --without-exception --without-fiber --without-graph --without-graph_parallel --without-iostreams --without-locale --without-math --without-mpi --without-program_options --without-python --without-random --without-serialization --without-signals --without-stacktrace --without-test --without-timer --without-type_erasure --without-wave link=static cxxflags="-std=gnu++11 -D_LITTLE_ENDIAN -fPIC" cflags="-fPIC" runtime-link=static threading=multi
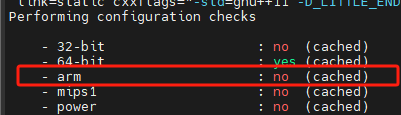
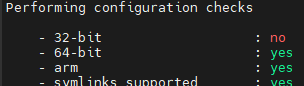
—— b2 时不能使用参数 --toolset=gcc,否则会 - arm 为 no。生成的库为 x86-64【正确的为 yes,如右图;生成的库为 ARM aarch64】。
boost_1_55_0 不包含模块: container \ fiber \ stacktrace \ type_erasure
./b2 install --prefix=install --build-dir=install/stage --without-context --without-coroutine --without-exception --without-graph --without-graph_parallel --without-iostreams --without-locale --without-math --without-mpi --without-program_options --without-python --without-random --without-serialization --without-signals --without-test --without-timer --without-wave cxxflags="-std=gnu++11"
增加选项 cxxflags="-std=gnu++11" ,以避免类似的信息:warning: variadic templates only available with -std=c++11 or -std=gnu++11
Boost V1.66 编译后,在 install/lib 目录中没有 cmake 目录生成!!!此目录在编译 vsomeip 时需要。
——静态库编译通过,动态库编译会报错: cannot find -lrt
解决方法:(1)修改 libs/chrono/build/Jamfile.v2 文件,注释此行 linux:"-lrt -lpthread"
(2)libs/log 库有类似的报错,修改 libs/log/build/Jamfile.v2 文件,注释 lib rt ; 和 linux:rt 两行。
修改后动态库编译成功。
./b2 install --prefix=install --build-dir=install/stage --without-python cxxflags="-std=gnu++14 -D_LITTLE_ENDIAN -fPIC" cflags="-fPIC" threading=multi
./b2 install --prefix=install --build-dir=install/stage --without-python cxxflags="-std=gnu++14 -D_LITTLE_ENDIAN -fPIC" cflags="-fPIC" threading=multi runtime-link=static link=static
Boost v1.73
将 -std=gnu++11 修改为 -std=gnu++17,VSomeIP 需要静态 boost 库:
./b2 install --prefix=_boostBuild/install --build-dir=_boostBuild/boost --toolset=gcc --without-container --without-context --without-coroutine --without-exception --without-fiber --without-graph --without-graph_parallel --without-iostreams --without-locale --without-math --without-mpi --without-program_options --without-python --without-random --without-serialization --without-log --without-stacktrace --without-test --without-timer --without-type_erasure --without-wave link=shared cxxflags="-std=gnu++14 -D_LITTLE_ENDIAN"
取消 --without-log 选项后上面的指令执行失败!
./b2 install --prefix=_boostBuild/install --build-dir=_boostBuild/boost --toolset=gcc --without-container --without-context --without-coroutine --without-exception --without-fiber --without-graph --without-graph_parallel --without-iostreams --without-locale --without-math --without-mpi --without-program_options --without-python --without-random --without-serialization --without-log --without-stacktrace --without-test --without-timer --without-type_erasure --without-wave link=static cxxflags="-std=gnu++14 -D_LITTLE_ENDIAN -fPIC" cflags="-fPIC" runtime-link=static threading=multi
—— error: Cannot use --layout=system with --build-type complete.
四)、 vsomeip编译失败【v3.5.3】 - vsomeip-2.10.21
source /opt/qnx/qnx700/qnxsdp-env.sh
mkdir -p build/install
cd build
(1) cmake -DENABLE_SIGNAL_HANDLING=1 -DCMAKE_INSTALL_PREFIX=install -DCMAKE_CXX_STANDARD=1z -DCMAKE_TOOLCHAIN_FILE=../../../toolchain-vsomeip.cmake -DBoost_DIR=../../boost/boost_1_73_0/_boostBuild/install/lib/cmake/Boost-1.73.0 -DBoost_INCLUDE_DIR=../../boost/boost_1_73_0/_boostBuild/install/ ..
// Boost 1.66 在生成的目标路径中并没有 install/lib/cmake 生成,但是 v1.73 是有的
cmake -DENABLE_SIGNAL_HANDLING=1 -DCMAKE_INSTALL_PREFIX=install -DCMAKE_TOOLCHAIN_FILE=/home/User/C603/vsomeip/toolchain-vsomeip.cmake -DBoost_DIR=/home/User/C603/vsomeip/boost/boost_1_66_0/install DBOOST_LIBRARY_DIR=/home/User/C603/vsomeip/boost/boost_1_66_0/install/lib -DBOOST_INCLUDE_DIR=/home/User/C603/vsomeip/boost/boost_1_66_0/install/include ..
CMake Error at CMakeLists.txt:6 (cmake_minimum_required):
CMake 3.13 or higher is required. You are running version 3.10.2【C603使用的 CMake 版本为: CMake < 3.10】
(2) 换成 CMake 3.13.5 和 3.31.2 后,cmake 出现如下错误(关闭终端, 因为终端保存了之前使用 toolchain.cmake 时的环境变量):
vsomeip-2.10.21
cmake -DCMAKE_INSTALL_PREFIX=/home/User/C603/vsomeip-qnx/vsomeip-2.10.21/build/someipsdk \
-DCMAKE_TOOLCHAIN_FILE=/home/User/C603/vsomeip-qnx/toolchain4vsomeip.cmake \
-DBOOST_ROOT=/home/User/C603/vsomeip-qnx/boost_1_55_0 \
-DBoost_LIBRARY_DIR=/home/User/C603/vsomeip-qnx/boost_1_55_0/install/lib \
-DBoost_INCLUDE_DIR=/home/User/C603/vsomeip-qnx/boost_1_55_0/install/include \
-DENABLE_SIGNAL_HANDLING=1 ...
make
make install
错误信息一:
leo@zhyh:~/C603/vsomeip/vsomeip/vsomeip/build$ ./build.sh
- CMake Error at /home/User/Tools/cmake-3.13.5/share/cmake-3.13/Modules/FindBoost.cmake:1357 (file):
- file STRINGS file
- "/home/User/C603/vsomeip/boost/boost_1_66_0/install/lib/include/boost/boost/version.hpp"
- cannot be read.
查看发现 boost 编译未在 install/lib 目录中生成 install/lib/include/boost/boost/version.hpp,生成的文件在 install/include/boost/version.hpp
解决方法:修正 build.sh 中 DBoost_INCLUDE_DIR 的路径。
错误信息二【使用 -std=gnu++11 和 -std=gnu++17 都报同样的错误】:
./vsomeip/interface/vsomeip/constants.hpp:16:34: error: 'vsomeip_v3::DEFAULT_MAJOR' declared as an 'inline' variable
inline constexpr major_version_t DEFAULT_MAJOR = 0x00;
——Variable declared as an 'inline' field in c++14
——Ubuntu16.04版本自带的GCC版本为5.4.0,可支持C++ 14标准,但基本不支持C++ 17标准【QNX 的 gcc 版本为 5.4.0,不支持 C++ 17?】。
错误信息二:
- endpoint_manager_impl.cpp:1412:22: error: decomposition declaration only available with -std=c++1z or -std=gnu++1z [-Werror]
- for (const auto& [its_address, ports] : its_client_endpoints) {
- ^
四、 CommonAPI-SomeIP(V2.10.21,hscd_idd/toolchain/repository/vsomeip/lib):
GENIVI 的 CommonAPI C++ 是基于 vsomeip 实现的 RPC 框架。
搭建CommonAPI的开发环境,有点费劲的,除了依赖于boost和vsomeip,还有CommonAPI和CommonAPI-SomeIP,以及C++代码生成工具。
接口定义将使用Franca IDL创建(*.fild文件)
各项部署根据部署文件定义(*.fdepl文件)
五、Ubuntu、QNX/Arm 交叉编译,及Windows编译——共4部分
—————————————第一部分:以下是Ubuntu+QNX平台的编译记录()—————————————
参见第三部分: C603 交叉编译(QNX)
—————————————第二部分:以下是Ubuntu+arm平台的编译记录()—————————————
例如: source /opt/fsl-imx-wayland/4.14-sumo/environment-setup-aarch64-poky-linux —— Linux: 64MM
- /opt/fsl-imx-wayland/4.14-sumo/sysroots/x86_64-pokysdk-linux/usr/bin/aarch64-poky-linux/aarch64-poky-linux-gcc
1 boost —— 编译 boost 前请不要 source 交叉编译环境,否则 b2 会被生成为嵌入式环境运行的格式
# ./bootstrap.sh --show-libraries ————成功!
# ./bootstrap.sh ### 此命令会改为 project-config.jam 文件内容 ————成功!
./bootstrap.sh --prefix=/home/leo/src/boost/boost_1_66_Lib
./bootstrap.sh --without-libraries=atomic,chrono ###C603
./bootstrap.sh --with-python=python3 # 指定 Python 的版本
# 打开 project-config.jam 文件,修改其中的编译器
将 using gcc 修改为交叉编译器,如: using aarch64-poky-linux-gcc
例如 64MM SDK 修改为: using gcc : arm : /opt/fsl-imx-wayland/4.14-sumo/sysroots/x86_64-pokysdk-linux/usr/bin/aarch64-poky-linux/aarch64-poky-linux-gcc ;

# 配置的命令示例如下:
./b2 --layout=tagged -sHAVE_ICU=1 variant=debug,release link=static runtime-link=shared threading=multi ————失败1!
sHAVE_ICU=1 代表支持 Unicode/ICU。
# 编译
./b2 或者 ./b2 toolset=gcc-arm —— 对应 64MM 示例 project-config.jam 中 gcc 的配置
./b2 toolset=gcc-arm -threading=multi --without-context --without-coroutine --without-fiber --without-python --address-model=32
# 安装
./b2 installtoooot
失败1的Log:
- gcc.compile.c++ bin.v2/libs/filesystem/build/gcc-7.3.0/release/threading-multi/visibility-hidden/codecvt_error_category.o
- In file included from ./boost/config.hpp:39:0,
- from ./boost/filesystem/config.hpp:28,
- from libs/filesystem/src/codecvt_error_category.cpp:18:
- ./boost/config/compiler/gcc.hpp:165:10: fatal error: cstddef: No such file or directory
- #include
- ^~~~~~~~~
- compilation terminated.
查找文件 cstddef,找到三处:
./boost/compatibility/cpp_c_headers/cstddef
/opt/fsl-imx-wayland/4.14-sumo/sysroots/aarch64-poky-linux/usr/include/boost/compatibility/cpp_c_headers/cstddef
/opt/fsl-imx-wayland/4.14-sumo/sysroots/aarch64-poky-linux/usr/include/c++/7.3.0/cstddef
所以,失败的原因可能是没有包含相应的路径。
—————————————第三部分:以下是Ubuntu平台的编译记录(成功)—————————————
git clone https://github.com/COVESA/vsomeip.git
git clone https://gitee.com/mirrors/vsomeip.git
「2023-11-14 Leo」V3.4.9 版本,从两个网站下载的内容是相同的。
V2.10.21 版本下载: https://github.com/netgroup-polito/secure-vsomeip
git clone https://github.com/netgroup-polito/secure-vsomeip.git
git checkout 2.10.21 --- 切 tag
Linux 查看 boost 版本
find / -name libboost_random.so*
或者: cat /usr/include/boost/version.hpp
QNX 下 VSomeIP 使用的 boost 版本是: V1.66(https://boostorg.jfrog.io/artifactory/main/release/1.66.0/source/)
sudo dpkg --configure -a
sudo apt-get --fix-broken install
leo@leo-sony:~$ sudo dpkg --configure -a
正在设置 mysql-server-5.7 (5.7.42-0ubuntu0.18.04.1) ...
/var/lib/mysql/ibdata1: 2578
ERROR: Database files are locked. Daemon already running?
Warning: Unable to start the server. Please restart MySQL and run mysql_upgrade to ensure the database is ready for use.
/var/lib/mysql/ibdata1: 2578
ERROR: Database files are locked. Daemon already running?
Warning: Unable to start the server.
(1) sudo apt-get install libboost-system-dev libboost-thread-dev libboost-log-dev
此安装过程中,会出现如下提示: 正在设置 mysql-server-5.7 (5.7.42-0ubuntu0.18.04.1) ...
接下来出错: /var/lib/mysql/ibdata1: 2578
ERROR: Database files are locked. Daemon already running?
尝试: 一、彻底卸载 mysql-server
1) sudo apt purge mysql-*
2) sudo rm -rf /etc/mysql/ /var/lib/mysql
3) sudo apt autoremove
4) sudo apt autoclean
****卸载后不用安装 mysql-server,再运行 sudo apt-get install,会提示完成,所有组件都是最新版本。
二、安装 mysql-server
1) sudo apt-get install mysql-server -y #mysql 服务端
#sudo apt install mysql-client -y #mysql 客户端
#sudo apt install libmysqlclient-dev -y #mysql 开发包
三、检查mysql服务是否成功启动
1) sudo netstat -tap | grep mysql
2) sudo service mysql status
四、 mysql服务启动
1) sudo service mysql start
apt-get purge 与 apt-get remove是不同的,简单来说:
1) purge 可以将包以及软件的配置文件全部删除
2) remove 仅可以删除包,但不会删除配置文件
(2) sudo apt-get install asciidoc source-highlight doxygen graphviz
同上,一样的错误
(3) sudo apt-get install gcc g++ make
编译 VSomeIP
mkdir build
cd build
cmake .. 或者
cmake -DCMAKE_INSTALL_PREFIX:PATH=/home/leo/src/vsomeip/vsomeip-V2.10.21/secure-vsomeip-X86lib ..
错误提示1: CMake 3.13 or higher is required. You are running version 3.10.2
https://github.com/Kitware/CMake/releases 下载: 3.28.0-rc4
make & make install
错误提示2: V3.4.9 版本编译错误信息:
/home/leo/src/vsomeip/vsomeip-github-v3.4.9/implementation/endpoints/src/server_endpoint_impl.cpp:841:57: error: ‘stream_protocol’ is not a member of ‘boost::asio::local’
template class server_endpoint_impl;
错误原因: libboost 的版本太老(目前版本: libboost1.65-dev)
错误提示3: V2.6.2 版本编译错误信息:
/home/leo/src/vsomeip/vsomeip-github-v3.4.9/implementation/endpoints/src/../include/netlink_connector.hpp:101:28: error: no match for ‘operator==’ (operand types are ‘const sockaddr_nl’ and ‘const sockaddr_nl’)
return e1.sockaddr == e2.sockaddr;
————————————第四部分:以下是Windows平台的编译记录(未成功)————————————
git clone https://github.com/COVESA/vsomeip.git (https://github.com/COVESA/vsomeip)
或者:
git clone https://gitee.com/shawn_lee/vsomeip.git
Boost 版本: https://www.boost.org/users/history/
VSomeIP 工程源码编译方法,参考源码中的README文档。
VSomeIP 使用到了C++11/C++14(取决于版本),需要 gcc 4.8 及以上版本。
Windows环境下 Boost 编译(需要是大于等于1.55小于等于1.74):
1) 运行 bootstrap.bat 会生成 b2.exe 和 bjam.exe 文件;
2) 创建一个新的目录,主要用于存放编译 boost 后的库文件和导出的头文件
3) b2.exe toolset=msvc-14.0 runtime-link=shared address-model=32 threading=multi --build-dir=build\x86 install --build-type=complete --prefix="D:\boost_lib" -j8 ---- 注意x86/x64选项
注: VS2015 对应 toolset=msvc-14.0
如下是个人工作PC按3)中命令格式配置的命令(VS2017 对应 toolset=msvc-14.1):
boost_1_65_1_rc2:
(1) x86 版本:
(a) vsomeip-gitee
b2.exe toolset=msvc-14.1 runtime-link=shared address-model=32 threading=multi --build-dir=build\x86 install --build-type=complete --prefix="F:\openSource\vsomeip-gitee-prj\boost_1_65_1-x86lib" -j2
(b) vsomeip-github
b2.exe toolset=msvc-14.1 runtime-link=shared address-model=32 threading=multi --build-dir=build\x86 install --build-type=complete --prefix="F:\openSource\vsomeip-github-prj\boost_1_65_1-x86lib" -j2
(2) x64 版本:
(a) vsomeip-gitee
b2.exe toolset=msvc-14.1 runtime-link=shared address-model=64 threading=multi --build-dir=build\x64 install --build-type=complete --prefix="F:\openSource\vsomeip-gitee-prj\boost_1_65_1-x64lib" -j2
(b) vsomeip-github
---生成的库带 lib 前缀,这是 Linux 平台的特色命名,不是 Windows 的。
注意:
1. b2 与 CMake 中 static/shared 的选择必须匹配!
2. b2 后最好重新生成 CMake 工程!!!
以“管理员”权限打开“VS 2017的开发人员命令提示符”,执行:
boost_1_74_0_rc2:
b2.exe --toolset=msvc-14.1 link=static runtime-link=shared address-model=32 threading=multi debug release --build-dir=build\x86 install --build-type=complete --prefix="F:\openSource\vsomeip-github-prj\boost_1_74_0-x86"
编译所有版本 --build-type=complete 相当于:variant=release,threading=multi;link=shared|static;runtime-link=shared
variant=:设置生成的库是调试版本还是发布版本。默认值为release debug即两者都编译。
- debug:调试版本/release:发布版本
link=:设置生成的库是动态库还是静态库。默认值为static。
- static:静态链接库/shared:动态链接库
threading=:设置是否支持多线程(线程安全)。默认值为multi。
- single:单线程/multi:多线程
runtime-link=:设置运行时库的链接方式。默认shared。
- static:静态链接/shared:动态链接
address-model=:设置生成的库地址模式,是32位还是64位。默认两者都编译。
- 32:32位/64:64位
--project-config=:加载指定项目配置文件。默认值为project-config.jam。
install: 表示附带安装功能,会生成包含头文件的include目录
boost 所生成的库文件名称是包含一定规则的,例如: libboost_chrono-vc140-mt-gd-1_65.lib
如果库以 libboost 开头,则表示为静态库,如果以 boost 开头则表示为动态库;chrono 表示库的功能名称,vc140表示vs的版本,mt表示为多线程实现,如果没有mt则表示为单线程实现,gd表示debug版本,如果没有gd则表示release版本。
Windows环境下 编译 VSomeIP:
1) 在 VSomeIP 源代码目录下创建 build 目录;
2) 进入 build 目录,执行如下命令:
"e:\CMake 2.8\bin\cmake.exe" -G "Visual Studio 15 2017 Win64" .. -DBOOST_ROOT=F:\openSource\boost_1_65_1_rc2\boost_1_65_1_Ins -DBoost_USE_STATIC_LIBS=ON
执行成功后在build目录下便生成了相应的vs工程。
错误一:CMake Error: Could not create named generator Visual Studio 15 2017
原因:CMake 版本太低(CMake 2.8)
解决方法:升级 CMake 到最新的版本(cmake-3.27.6)
E:\cmake-3.27.6\bin\cmake.exe -G "Visual Studio 15 2017 Win64" .. -DBOOST_ROOT=F:\openSource\boost_1_65_1_rc2\boost_1_65_1_Ins -DBoost_USE_STATIC_LIBS=ON
E:\cmake-3.27.6\bin\cmake.exe -G "Visual Studio 15 2017 Win64" .. -DBOOST_ROOT=F:\openSource\boost_1_74_0_rc2\boost_1_74_0_Ins -DBoost_USE_STATIC_LIBS=ON
将 CMake 路径增加到系统环境 Path 中后,再次试着生成 VSomeIP 工程。
(1) vsomeip-gitee
(a) X86 - VS 编译成功
cmake.exe -G "Visual Studio 15 2017" .. -DBOOST_ROOT=F:\openSource\vsomeip-gitee-prj\boost_1_65_1-x86lib -DBoost_USE_STATIC_LIBS=ON
(b) X64
cmake.exe -G "Visual Studio 15 2017 Win64" .. -DBOOST_ROOT=F:\openSource\vsomeip-gitee-prj\boost_1_65_1-x64lib -DBoost_USE_STATIC_LIBS=ON
(2) vsomeip-github
(a) X86
cmake.exe -G "Visual Studio 15 2017" .. -DBOOST_ROOT=F:\openSource\vsomeip-github-prj\boost_1_65_1-x86lib -DBoost_USE_STATIC_LIBS=ON
(b) X64
cmake.exe -G "Visual Studio 15 2017 Win64" .. -DBOOST_ROOT=F:\openSource\vsomeip-github-prj\boost_1_65_1-x64lib -DBoost_USE_STATIC_LIBS=ON
(c) boots1.74.0-X86
cmake.exe -G "Visual Studio 15 2017" .. -DBOOST_ROOT=F:\openSource\vsomeip-github-prj\boost_1_74_0-x86 -DBoost_USE_STATIC_LIBS=ON
点击 vsomeip.sln 打开工程,右键 ALL_BUILD->生成,等待编译完成。编译完成后,在build\debug中已经生成了相应的库文件。
七、 10分钟搞定fidl语法
此部分内容为网上转的,不给出详细的内容了。
八、commonapi-generator-windows & commonapi-someip-generator-windows
COVESA/capicxx-core-tools
https://github.com/COVESA/capicxx-core-tools
https://github.com/COVESA/capicxx-someip-tools
commonapi-generator-windows-x86_64.exe -sk .\ipc_data_server.fidl
commonapi-someip-generator-windows-x86_64.exe .\ipc_data_server.fdepl

 浙公网安备 33010602011771号