Nginx模块拓展
一、虚拟主机
虚拟主机的方式
- 基于多ip的方式
- 基于多端口的方式
- 基于多域名的方式
基于多ip的方式
操作步骤(以两个小游戏为例)
① 修改配置文件 vim /etc/nginx/conf.d/game.conf
# 小游戏1配置
server {
    listen 80;
    server_name 192.168.1.7;
    location / {
        root /code/mario;
        index index.html;
    }
}
# 小游戏2配置
server {
    listen 80;
    server_name 172.16.1.7;
    location / {
        root /code/chess;
        index index.html;
    }
}
② 测试配置文件是否成功 nginx -t
③ 重启nginx服务 systemctl restart nginx
基于多端口的方式
① 修改配置文件 vim /etc/nginx/conf.d/game.conf
# 小游戏1配置
server {
    listen 80;
    server_name 192.168.1.7;
    location / {
        root /code/mario;
        index index.html;
    }
}
# 小游戏2配置
server {
    listen 81;
    server_name 192.168.1.7;
    location / {
        root /code/chess;
        index index.html;
    }
}
② 测试配置文件是否成功 nginx -t
③ 重启nginx服务 systemctl restart nginx
基于多域名的方式
① 修改配置文件 vim /etc/nginx/conf.d/game.conf
# 小游戏1配置
server {
    listen 80;
    server_name test.game1.com;
    location / {
        root /code/mario;
        index index.html;
    }
}
# 小游戏2配置
server {
    listen 80;
    server_name test.game2.com;
    location / {
        root /code/chess;
        index index.html;
    }
}
② 测试配置文件是否成功 nginx -t
③ 重启nginx服务 systemctl restart nginx
④ 在Windows的hosts文件里解析域名
总结
在nginx的虚拟主机类型中,使用域名的虚拟主机应用最为广泛
二、Nginx日志配置
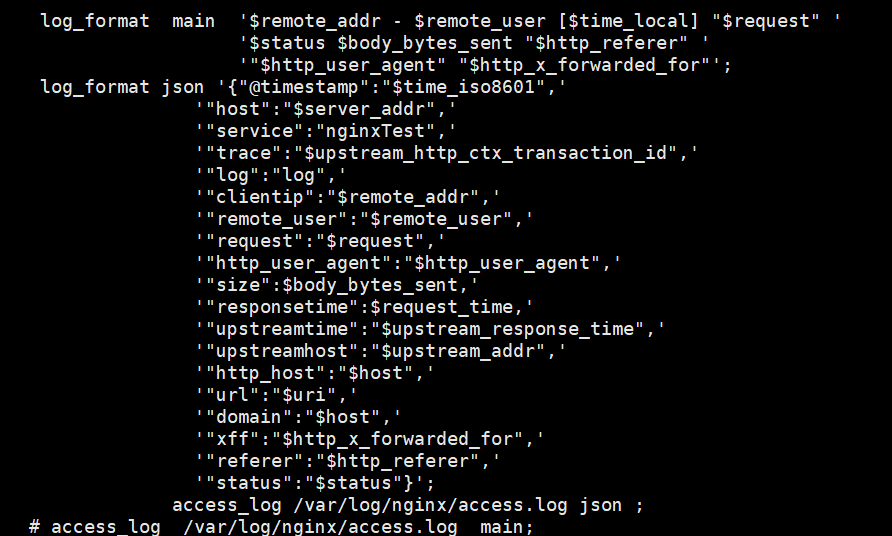
日志常用变量
$remote_addr (客户端ip)
$remote_user (客户端用户名)
$time_local (记录通用的本地时间)
$request (记录请求的方法以及请求的http协议)
$status (记录请求状态码(用于定位错误信息))
$body_bytes_sent (发送给客户端的资源字节数,不包括响应头的大小)
$http_referer (访问的域名)
$http_user_agent (记录客户端浏览器相关信息)
$http_x_forwarded_for (真实的客户端ip,需要在反向代理中生效)
三、Nginx访问控制模块
ngx_http_access_module (允许或者拒绝某些ip访问)
指令
allow :允许
dent:拒绝
适用范围
http(整个nginx),server(某个网站),location(当前路径),limit_except
案例1 允许本机Windows IP(192.168.15.1)访问,其他拒绝
① 修改配置文件 vim /etc/nginx/conf.d/game/conf
server {
    listen 80;
    server_name test.mario.com;
    allow 192.168.15.1;
    deny all;
    location / {
        root /code/mario;
        index index.html;
    }
}
② 测试nginx nginx -t,重启nginx服务 systemctl restart nginx
③ 使用Windows访问测试

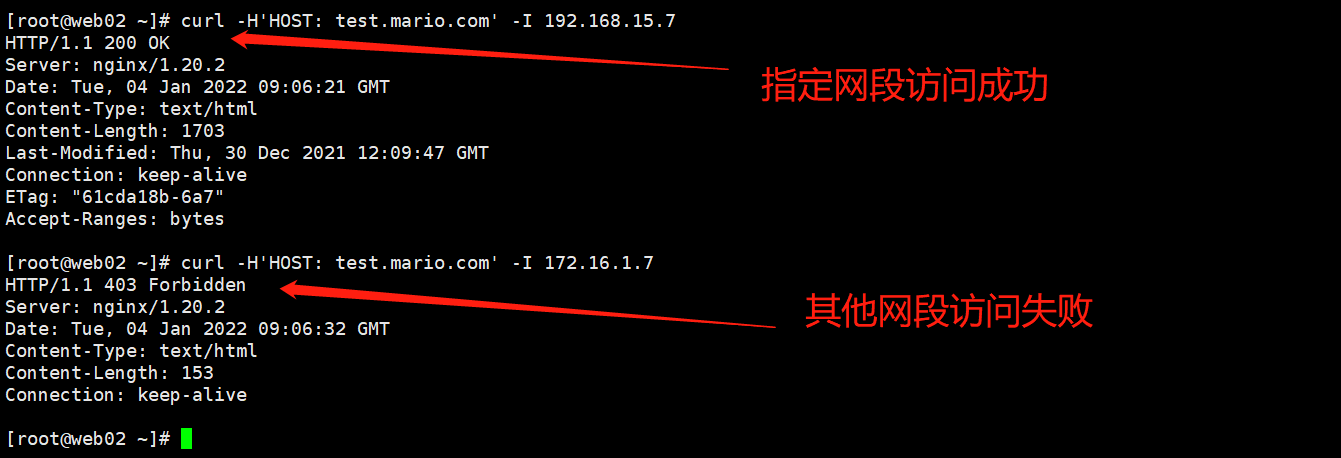
④ 使用其他ip例如web02访问测试
curl -H'HOST: test.mario.com' -I 192.168.15.7

案例2 允许192.168.15.0/24 该网段允许访问 其他拒绝
① 修改配置文件 vim /etc/nginx/conf.d/game/conf
server {
    listen 80;
    server_name 192.168.15.7;
    allow 192.168.15.0/24;
    deny all;
    location / {
        root /code/mario;
        index index.html;
    }
}
② 测试并重启nginx
nginx -t
systemctl restart nginx
③ 使用指定网段和非指定网段测试

ngx_http_auth_basic_moudle(访问前需要登录认证)
设置登录认证模块
① 安装httpd-tools
yum install httpd-tools -y
② 生成用用户密码文件
htpasswd -c /etc/nginx/auth 用户名

③ 修改配置文件
vim /etc/nginx/conf.d/game.conf
server {
    listen 80;
    server_name test.mario.com;
    auth_basic "Welcome To Login";
    auth_basic_user_file /etc/nginx/auth;
    location / {
        root /code/mario;
        index index.html;
    }
}
④ 测试并重启nginx服务
nginx -t
systemctl restart nginx
⑤ 登陆测试

ngx_http_autoindex_module(展示索引目录)
指令
autoindex on | off (自动索引开启或者关闭)
autoindex_exact_size on | off (启用或禁用目录列表输出)
autoindex_fomat html | xml | json | jsonp (设置目录列表的格式)
autoindex_localtime on | off (指定目录列表中是以本地时间还是UTC时间输出)
使用范围
http,server,location
示例配置
vim /etc/nginx/conf.d/game.conf
server {
    listen 80;
    server_name test.mario.com;
    autoindex on;
    autoindex_exact_size on;
    autoindex_format html;
    autoindex_localtime on;
    location / {
        root /tmp/a/;
        index index.html;
    }
}

四、Nginx状态监控模块
ngx_http_stub_status_moudle(提供各种状态信息的访问)
vim /etc/nginx/conf.d/game.conf
server {
    listen 80;
    server_name test.mario.com;
    location / {
        stub_status;
    }
}

Active connections (当前活动客户端连接数,包括Waiting连接数)
accepts (接受的客户端连接总数)
handled (处理的连接总数。通常,accepts 除非达到某些资源限制(例如,worker_connections限制),否则 该参数值是相同的)
requests (客户端请求的总数)
Reading (nginx 正在读取请求头的当前连接数)
Writing (nginx 将响应写回客户端的当前连接数)
Waiting (当前等待请求的空闲客户端连接数)
五、访问连接控制模块
ngx_http_limit_conn_module (限制访问的连接数,当超过设置的限制时,服务器将返回错误请求)
① 修改配置文件 vim /etc/nginx/conf.d/game.conf
② 设置连接池 (必须要在想要限制的所在范围的上一级,例如想在server里设置,连接池必须在server的上级)
limit_conn_zone $remote_addr zone=addr:10m;  # zone是连接池的名字,10m是连接池的大小
server {
    listen 80;
    server_name 192.168.15.7;
    limit_conn addr 1;  # 将前面定义的addr进行配置,并且限制同一IP并发连接数为1
    location / {
        root /code/html5-mario;
        index index.html;
    }
}
③ 测试并重启nginx
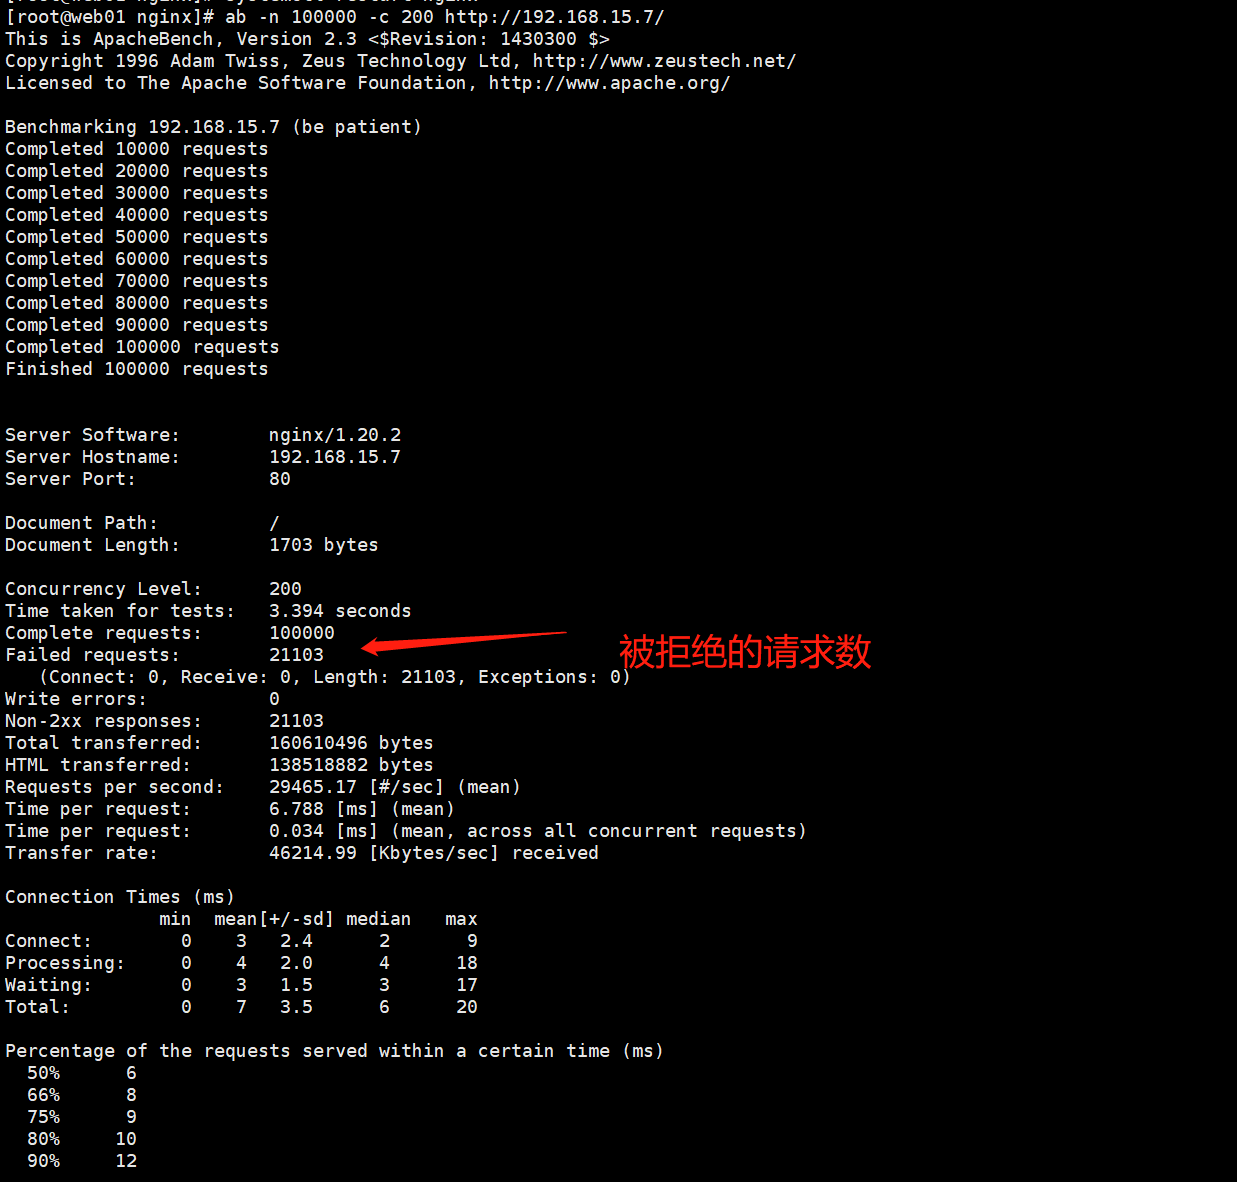
④ 使用压力测试测试
ab -n 100000 -c 200 http://192.168.15.7/ (测试十万次,每次访问量200)

nginx_http_limit_req_moudle(用于限制每个定义的键的请求处理率)
① 修改配置文件 vim /etc/nginx/conf.d/game.conf
② 设置连接池
limit_req_zone $remote_addr zone=one:10m rate=1r/s; # rate是设置连接池每秒通过速率为一个请求每秒
server {
    listen 80;
    server_name 192.168.15.7;
    limit_req zone=one burst=5;  # burst是每秒最大通过请求为5个,超过这个数量就直接拒绝了
    location / {
        root /code/html5-mario;
        index index.html;
    }
}
③ 测试并重启nginx服务
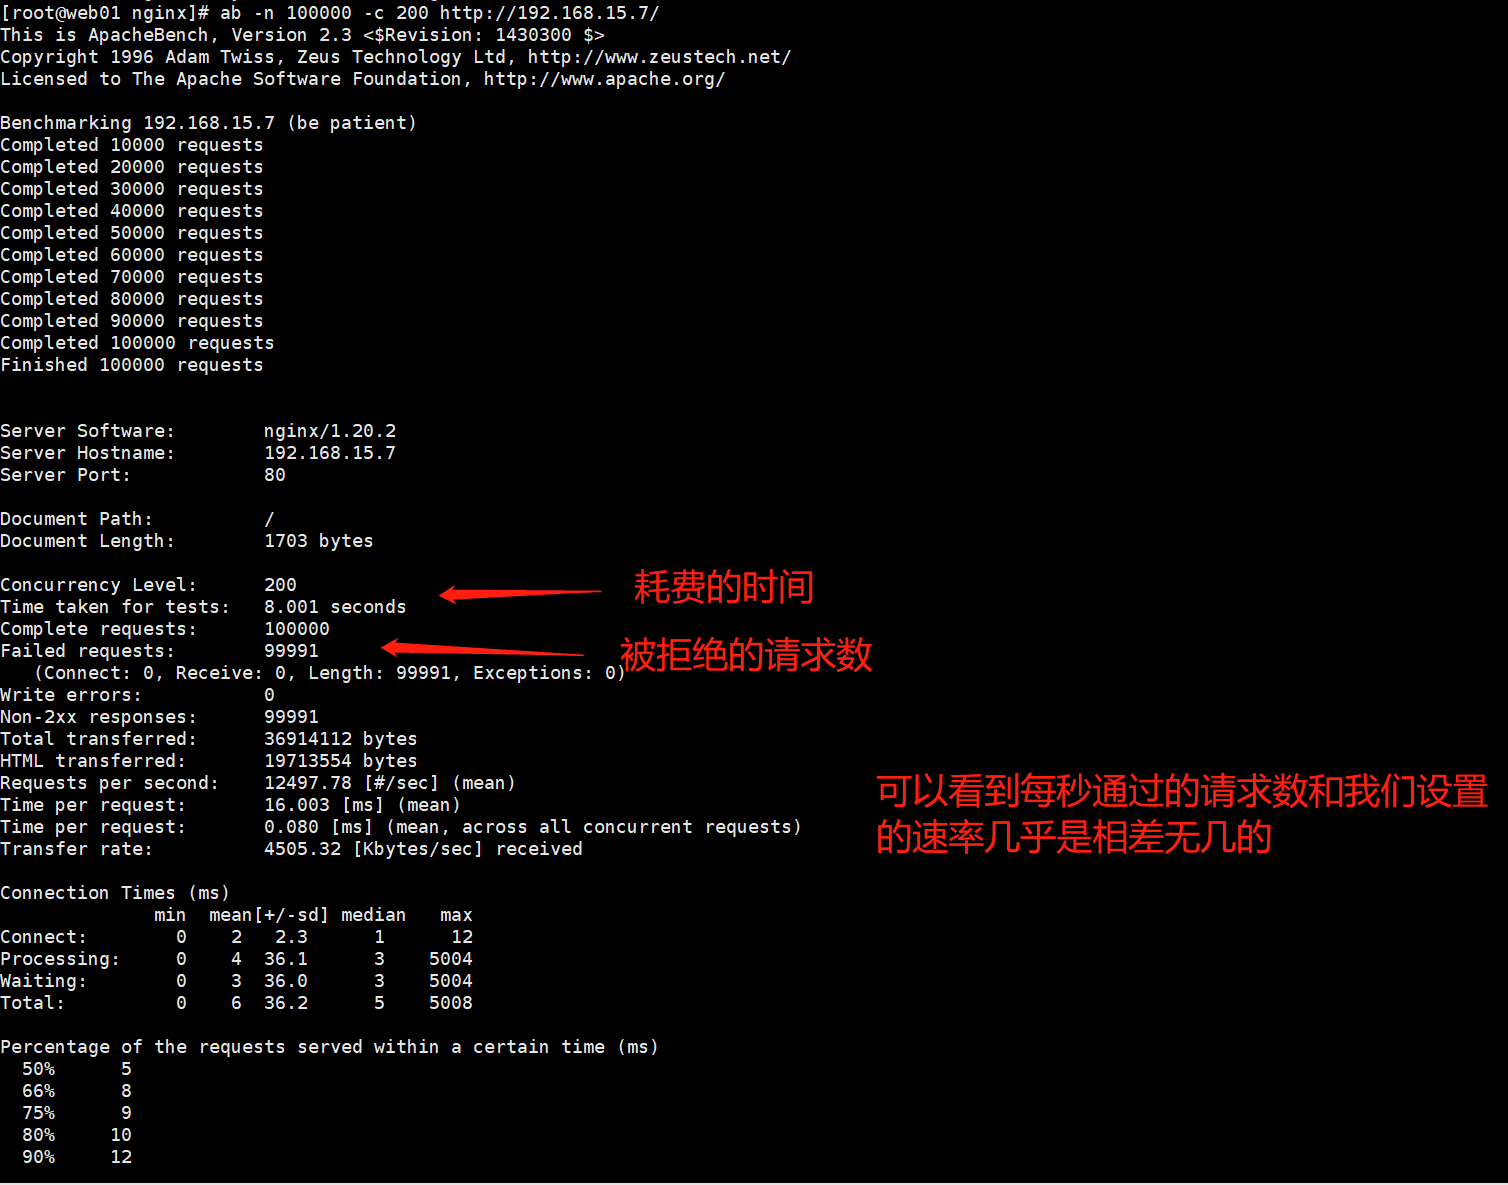
④ 使用压力测试
ab -n 100000 -c 200 http://192.168.15.7/


 浙公网安备 33010602011771号