Spring Boot demo系列(八):Redis缓存
1 概述
本文演示了如何在Spring Boot中将Redis作为缓存使用,具体的内容包括:
- 环境说明
- 项目搭建
- 测试
Kotlin相关事项
2 环境
Redis 7.0.0+(Docker)MySQL 8.0.29+(Docker)MyBatis Plus 3.5.1+lettuce 6.1.8+
3 新建项目
新建项目,加入如下依赖:
Maven:
<dependency>
    <groupId>org.springframework.boot</groupId>
    <artifactId>spring-boot-starter-data-redis</artifactId>
</dependency>
<dependency>
    <groupId>mysql</groupId>
    <artifactId>mysql-connector-java</artifactId>
    <scope>runtime</scope>
</dependency>
<dependency>
    <groupId>org.projectlombok</groupId>
    <artifactId>lombok</artifactId>
    <optional>true</optional>
</dependency>
<dependency>
    <groupId>com.baomidou</groupId>
    <artifactId>mybatis-plus-boot-starter</artifactId>
    <version>3.5.1</version>
</dependency>
Gradle:
implementation("com.baomidou:mybatis-plus-boot-starter:3.5.1")
implementation("mysql:mysql-connector-java:8.0.29")
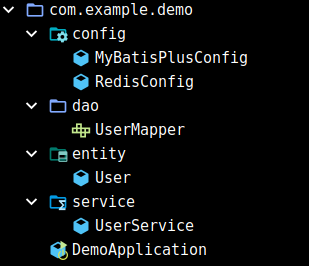
项目结构:
4 配置类
MyBatis Plus+Redis配置类:
@Configuration
@MapperScan("com.example.demo.dao")
public class MyBatisPlusConfig {
}
@Configuration
@EnableCaching
public class RedisConfig {
    @Value("${spring.redis.host:127.0.0.1}")
    private String host;

    @Value("${spring.redis.port:6379}")
    private Integer port;

    @Bean
    public LettuceConnectionFactory redisConnectionFactory() {
        return new LettuceConnectionFactory(new RedisStandaloneConfiguration(host, port));
    }

    @Bean
    public RedisTemplate<String, User> redisTemplate(LettuceConnectionFactory factory) {
        RedisTemplate<String, User> template = new RedisTemplate<>();
        template.setKeySerializer(new StringRedisSerializer());
        template.setValueSerializer(new GenericJackson2JsonRedisSerializer());
        template.setConnectionFactory(factory);
        return template;
    }

    @Bean
    public CacheManager cacheManager(RedisConnectionFactory factory) {
        RedisCacheConfiguration configuration = RedisCacheConfiguration.defaultCacheConfig()
                .serializeKeysWith(
                        RedisSerializationContext.SerializationPair.fromSerializer(new StringRedisSerializer())
                ).serializeValuesWith(
                        RedisSerializationContext.SerializationPair.fromSerializer(new GenericJackson2JsonRedisSerializer())
                );
        return RedisCacheManager.builder(factory).cacheDefaults(configuration).build();
    }
}
重点说一下Redis配置类主要生成三个Bean:
RedisConnectionFactoryRedisTemplateCacheManager
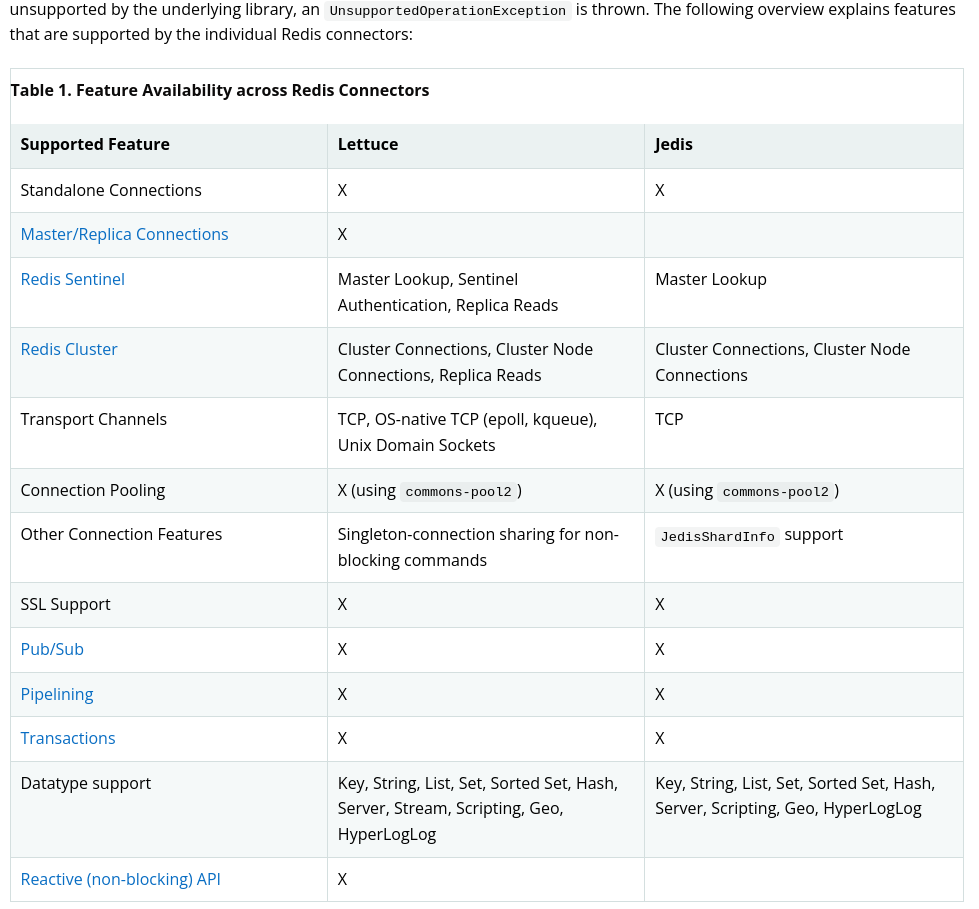
RedisConnectionFactory用于创建RedisConnection,RedisConnection用于与Redis进行通信。官方文档列举了两个Connector,这里采用Lettuce作为Connector,Lettuce与Jedis比较如下(截取自官方文档):
RedisTemplate是简化Redis操作的数据访问类,一个模板类,第一个参数的类型是该template使用的键的类型,通常是String,第二个参数的类型是该template使用的值的类型。
setKeySerializer和setValueSerializer分别设置键值的序列化器。键一般为String类型,可以使用自带的StringRedisSerializer。对于值,可以使用自带的GenericJackson2RedisSerializer。
CacheManager是Spring的中央缓存管理器,配置与RedisTemplate类似。
5 实体类
@Getter
@Setter
@ToString
@NoArgsConstructor
@AllArgsConstructor
public class User {
    private Long id;
    private String name;
}
6 持久层
public interface UserMapper extends BaseMapper<User> {
}
7 业务层
@Service
@Transactional
@RequiredArgsConstructor(onConstructor = @__(@Autowired))
public class UserService {
    private final UserMapper mapper;

    @CachePut(value = "user", key = "#user.id")
    public User save(User user) {
        User oldUser = mapper.selectById(user.getId());
        if (oldUser == null) {
            mapper.insert(user);
            return user;
        }
        return mapper.updateById(user) == 1 ? user : oldUser;
    }

    @CacheEvict(value = "user", key = "#id")
    public boolean delete(Long id) {
        return mapper.deleteById(id) == 1;
    }

    @Cacheable(value = "user", key = "#id")
    public User select(Long id) {
        return mapper.selectById(id);
    }

	//root.target是目标类,这里是com.example.demo.Service,root.methodName是方法名,这里是selectAll
    @Cacheable(value = "allUser", key = "#root.target+#root.methodName")
    public List<User> selectAll() {
        return mapper.selectList(null);
    }
}
注解说明如下:
@CachePut:执行方法体再将返回值缓存,一般用于更新数据@CacheEvict:删除缓存,一般用于删除数据@Cacheable:查询缓存,如果有缓存就直接返回,没有缓存的话执行方法体并将返回值存入缓存,一般用于查询数据
三个注解都涉及到了key以及value属性,实际上,真正的存入Redis的key是两者的组合,比如:
@Cacheable(value="user",key="#id")
则存入的Redis中的key为:

而存入对应的值为方法返回值序列化后的结果,比如如果返回值为User,则会被序列化为:

8 配置
spring:
  datasource:
    url: jdbc:mysql://localhost:3306/test
    username: root
    password: 123456
mybatis-plus:
  configuration:
    log-impl: org.apache.ibatis.logging.stdout.StdOutImpl # MyBatisPlus日志输出,不需要可以删除
Redis相关配置均采用默认值:
host:localhostport:6379database:0
如果需要特定配置请自行修改,比如timeout、lettuce相关连接配置等等。
9 启动Redis
docker pull redis # 拉取
docker run -itd -p 6379:6379 --name redis redis # 创建并运行容器
运行之后,通过docker exec访问redis:
docker exec -it redis /bin/bash
redis-cli # 进入容器后
基本操作:
keys *:查询所有键(生产环境慎用)get key:查询key所对应的值flushall:清空所有键

10 测试
@SpringBootTest
@RequiredArgsConstructor(onConstructor = @__(@Autowired))
class UserServiceTest {
    private final UserService service;

    @Test
    public void select() {
        System.out.println(service.select(1L));
        System.out.println(service.select(1L));
    }

    @Test
    public void selectAll() {
        System.out.println(service.selectAll());
        System.out.println(service.selectAll());
    }

    @Test
    public void delete() {
        System.out.println(service.delete(1L));
        System.out.println(service.delete(1L));
    }

    @Test
    public void save() {
        User user = new User(1L, "name1");
        System.out.println(service.save(user));
        System.out.println(service.select(user.getId()));
        user.setName("name2");
        System.out.println(service.save(user));
        System.out.println(service.select(user.getId()));
    }
}
执行其中的select,会发现MyBatis Plus只有一次select的输出,证明缓存生效了:

而把缓存注解去掉后,会有两次select输出:

其它测试方法就不截图了,还有一个RedisTest的测试类,使用RedisTemplate进行测试,输出类似,不截图了,具体可以查看文末源码。
11 附录:Kotlin中的一些细节
11.1 String数组
其实@Cacheable/@CacheEvict/@CachePut中的value都是String [],在Java中可以直接写上value,在Kotlin中需要[value]。
11.2 @class
序列化到Redis时,实体类会被加上一个@class字段:
这个标识供Jackson反序列化时使用,笔者一开始的实体类实现是:
data class User(var id:Int?=null, var name:String="")
但是序列化后不携带@class字段:

在反序列化时直接报错:
Could not read JSON: Missing type id when trying to resolve subtype of [simple type, class java.lang.Object]: missing type id property '@class'
 at [Source: (byte[])"{"id":1,"name":"name2"}"; line: 1, column: 23]; nested exception is com.fasterxml.jackson.databind.exc.InvalidTypeIdException: Missing type id when trying to resolve subtype of [simple type, class java.lang.Object]: missing type id property '@class'
 at [Source: (byte[])"{"id":1,"name":"name2"}"; line: 1, column: 23]
解决方法有两个:
- 手动添加
@class字段 - 将实体类设为
open
11.2.1 手动添加@class
准确来说并不是手动添加,而是让注解添加,需要添加一个类注解@JsonTypeInfo:
@JsonTypeInfo(use = JsonTypeInfo.Id.CLASS)
data class User(var id:Int?=null, var name:String="")
该注解的use用于指定类型标识码,该值只能为JsonTypeInfo.Id.CLASS。
11.2.2 将实体类设置为open
在Java中,实体类没有任何额外配置,Redis序列化/反序列化一样没有问题,是因为值序列化器GenericJackson2JsonRedisSerializer,该类会自动添加一个@class字段,因此不会出现上面的问题。
但是在Kotlin中,类默认不是open的,也就是无法添加@class字段,因此便会反序列化失败,解决方案是将实体类设置为open:
open class User(var id:Int?=null, var name:String="")
但是缺点是不能使用data class了。
12 参考源码
Java版:
Kotlin版:

 浙公网安备 33010602011771号