JavaScript--DOM
DOM: 文档对象模型:
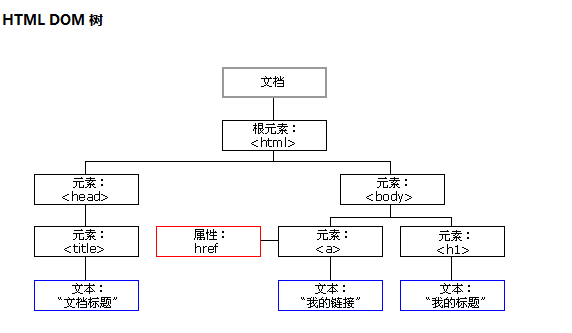
DOM 节点 HTML文档中所有内容都是节点(对象):
- 整个文档是一个文档节点 文档对象:document
- 每个HTML元素是元素节点 标签对象: Element
- HTML元素内的文本是文本节点 文本对象: Text
- 每个HTML属性是属性节点 属性对象: Attr
- 注释是注释节点 注释对象:Comment
DOM:
- dom-core: document对象
- Html-dom: 标签,属性,文本对象
- Css-dom: 操作css样式
Element对象: 对标签的操作
通过层次关系获取标签: 父元素, 子元素, 后面的兄弟元素, 前面的兄弟元素
父元素:
- parentNode 返回元素的父节点
子元素:
- childNodes 返回子节点的NodeList
- firstChild 返回元素的首个子节点
- lastChild 返回元素的最后一个子节点
兄弟元素:
- nextSibling 返回元素之后紧跟的节点
- previousSibling 返回元素之前紧随的节点
*兼容写法(浏览器兼容问题,建议使用):
- oNext = oParent.nextElementSibling || oParent.nextSibling
- oPre = oParent.previousElementSibling II oParent.previousSibling
- oFirst = oParent. firstElementChild |I oParent.firstChild
- oLast = oParent.lastElementChild II oParent.lastChild
节点的信息
innerHTML属性 获取元素内容
1)nodeName属性规定节点名称
- nodeName属性是只读属性
- 元素节点的nodeName与标签名称相同
- 属性节点的nodeName与属性名称相同
- 文本节点的nodeName始终是#text
- 文档节点的nodeName始终是#document
- nodeName始终包含HTML元素的大写字母标签名称
2)nodeType属性返回节点类型,只读属性
元素类型 nodeType
元素 1
属性 2
文本 3
注释 8
文档 9
3)nodeValue属性规定节点值
- 元素节点的nodeValue是undefined或null
- 文本节点的nodeValue是文本本身
- 属性节点的nodeValue是属性值
代码


  <p id="myid1" style="color:blue">我的文档内容1</p>
  <p id="myid2" style="color:blue">我的文档内容2</p>

    <script type="text/javascript">
        var node=document.getElementById("myid1"); //通过id号获取元素节点
        document.write(node.innerHTML+"<br>"); //输出元素节点的文本内容
        node.innerHTML="更新文档内容 via innerHTML"; //更新元素节点的文本内容
        document.getElementById("myid2").firstChild.nodeValue="更新文档内容via nodeValue";//更新元素节点的文本内容
        document.write(node.nodeName+"\t"+node.nodeValue+"<br>");
        document.write(node.firstChild.nodeName+"\t"+node.firstChild.nodeValue+"<br>"); //输出文本节点和值
    </script>
对标签属性的操作
1) hasAttributes() 判断这个标签是否有属性: 返回值 boolean
2) 获取属性对象
getAttributeNode() 以Attribute对象返回属性节点
getAttribute() 返回属性的值
3) 设置属性
setAttribute(name,value) 修改指定属性的属性值
标签的创建,添加, 删除
createElement(标签名) : 创建一个标签的对象 *
A.appendChild(B): 把B添加到A元素所有的子元素的最后一个位置 *
父元素.insertBefore(新添加的元素, 已存在的子元素): 把A插入到B元素所有的子元素的第一个位置 *
 //往页面添加一个img标签
        function addBook(index) {
            /*
            //1.创建这个img标签
            var newImgEle = document.createElement("img");
            //2.给img标签设置一个src属性
            newImgEle.setAttribute("src", "./images/" + index + ".jpg");
            newImgEle.setAttribute("width", "300px");
            newImgEle.setAttribute("height", "300px");
            //3.把这个创建的标签添加到html页面中
             var boxEle = document.getElementById("box");


            // boxEle.appendChild(newImgEle);

            //insertBefore(新添加的元素, 已存在的元素)
            //父元素.insertBefore(新添加的元素, 已存在的子元素)
            // 把新添加的元素添加到父元素内部, 但是在已存在的子元素的前面
            // 把新添加的元素 插入到已存在元素的前面

            var img2Ele = document.getElementById("img1");

            boxEle.insertBefore(newImgEle,img2Ele);
            */
cloneNode(deep): 复制某个指定的节点
父元素.removeChild(子元素对象):删除子元素
replaceChild(newNode, oldNode) 属性attr : 用其他的节点替换指定的节点
<script>
        //删除元素  removeChild()
        function del() {
            //1.获取要删除的元素对象
            var phone1Ele = document.getElementById("phone1");
            phone1Ele.parentNode.removeChild(phone1Ele);
        }

        function change() {
            //1. 修改的元素, 标签没有变, 修改的是属性  setAttribute()
            //var phone2Ele = document.getElementById("phone2");
            //phone2Ele.setAttribute("src","./images/phone-4.png");

            //使用replaceChild()
            // var phone2Ele = document.getElementById("phone2");
            // var newEle = document.createElement("img");
            // newEle.setAttribute("src","./images/phone-4.png");
            // phone2Ele.parentNode.replaceChild(newEle,phone2Ele);
            //2. 修改元素, 跟标签也修改  使用replaceChild()
             var phone2Ele = document.getElementById("phone2");
             var newEle = document.createElement("p");
             //<p>这是p标签</p>
             newEle.innerHTML="这是p标签";
             phone2Ele.parentNode.replaceChild(newEle,phone2Ele);
        }
    </script>
操作css样式
一、使用行内样式: <div style=”width:700px;”> </div>
获取/设置标签的属性:
1) getAttribute() setAttribute()
2) HTML中, 获取/设置标签的属性: 简写:
标签对象.属性名 = 值; 添加/修改属性
例如:document.querySelector(".post").style.display = "none";
标签对象.属性名 获取属性的值
添加行内样式 标签对象.style.样式属性名=值;
js的样式属性: 采用的驼峰命名法: font-size(css) --> fontSize(js)
background-color --> backgroundColor;
注意: 标签对象.style.样式属性名添加行内样式,不会把之前的行内样式清除
这个标签没有样式属性,不会覆盖,
标签有样式属性, 使用style添加, 覆盖
<!--行内样式-->
    <div id="box" style="width:300px;height:300px ;border: 1px solid red;"></div>
    <button type="button" onclick="change()">按钮</button>
    <script>
        function change() {
            //style 作为标签的属性
            //获取属性   getAttribute()
            //console.log(document.getElementById("box").getAttribute("style"));
            //设置style的值:  setAttribute()
            //document.getElementById("box").setAttribute("style", "width:300px;height:300px;background:red;");


            //获取标签的属性:
            //标签的对象.属性名
            var boxEle = document.getElementById("box");
            // console.log(boxEle.id);
            // //标签对象.style  得到标签行内样式style对象
            // console.log(boxEle.style) //{name1:值1;name2:值2}

            //添加行内样式     标签对象.style.样式属性名=值;
            // js的样式属性名与css的样式属性名有一点区别:
            // css中样式属性 多个单词组成, 单词与单词之间使用-分隔;  font-size,  background-color
            // js的样式属性: 采用的驼峰命名法:   font-size(css) --> fontSize(js)

            //添加行内样式
            boxEle.style.backgroundColor="#ABCDEF";
            boxEle.style.border="1px solid yellow";

        }
    </script>
在js中, 也可以使用css中的选择器获取标签 *
elemen = document.querySelector(selectors); 返回css选择器的第一元素
elementList = document.querySelectorAll(selectors); 返回所有元素节点列表
使用js代码给标签绑定事件:
之前:<input type=”button” onclick=”fun()”>在标签上绑定事件
1) 第一种方式: 标签对象.事件=函数;
document.body.onload=function(){
}
2) Js提供一个绑定事件的函数
addEventListener(“事件类型”,事件触发的函数);
注意: 事件类型: 之前写的事件把on去掉:
Onclick --> addEventListener(“click”)
Onload --> addEventListener(“load”)
document.querySelector(".bbs header span").addEventListener("click",function() {
});
注意: addEventListener()不能绑定onload事件
对于下拉框, 通过js选中指定选项
options[] 返回包含下拉列表的所有选项的一个数组
selectedIndex 设置或返回下拉列表中被选中项目的索引号
论坛发帖小案例
<!DOCTYPE html>
<html>

<head lang="en">
    <meta charset="UTF-8">
    <title>课工场论坛列表</title>
    <link href="css/bbs.css" rel="stylesheet">
</head>

<body>
    <div class="bbs">
        <header><span>我要发帖</span></header>
        <section>
            <ul>

            </ul>
        </section>
        <div class="post">
            <input class="title" placeholder="请输入标题(1-50个字符)">
            所属版块:<select>
                <option>请选择版块</option>
                <option>电子书籍</option>
                <option>新课来了</option>
                <option>新手报到</option>
                <option>职业规划</option>
            </select>
            <textarea class="content"></textarea>
            <input class="btn" value="发布">
        </div>

        <script>

            //把头像图片的路径使用一个数组存放
            var imgPathArr = ["./images/tou01.jpg","./images/tou02.jpg","./images/tou03.jpg","./images/tou04.jpg"];

            //body绑定onload事件
            //console.log(document.body);
            //第一种绑定事件
            document.body.onload = function () {
                //给span标签绑定点击事件
                document.querySelector(".bbs header span").addEventListener("click", function () {
                    //表单div显示
                    document.querySelector(".post").style.display = "block";
                });

                //给发布的按钮绑定点击事件
                document.querySelector(".btn").addEventListener("click", function () {
                    /*
                    <li>
                        <div>
                            <img src="./images/tou01.jpg" />
                        </div>
                        <h1>sasasa</h1>
                        <p>阿萨德撒多多多多多多多多多多多多多阿达啊啊啊啊啊啊啊阿阿萨德大多多多多多多多多多多多多<span>2020-3-27</span></p>
                    </li>
                    */


                    //让这个表单div再隐藏
                    document.querySelector(".post").style.display = "none";

                    //创建标签方式    使用innerHTML的方式实现
                    var liEle = document.createElement("li");
                    var divEle = document.createElement("div");
                    var imgEle = document.createElement("img");
                    var h1Ele = document.createElement("h1");
                    var pEle = document.createElement("p");
                    var spanEle = document.createElement("span");

                    //参数一个[0-4): 0,1,2,3
                   var index =  parseInt(Math.random()*4);
                   //imgEle.setAttribute()
                   imgEle.src= imgPathArr[index];


                   //给h1添加内容,
                   h1Ele.innerHTML = document.querySelector(".title").value;

                   //给span添加内容
                   spanEle.innerHTML = document.querySelector(".content").value;


                   //把标签添加进入
                   divEle.appendChild(imgEle);
                   liEle.appendChild(divEle);
                   liEle.appendChild(h1Ele);

                   pEle.appendChild(spanEle);
                   liEle.appendChild(pEle);


                   //把创建li添加到ul
                   document.querySelector(".bbs section ul").appendChild(liEle);


                    //让表单内容还原初始状态
                    document.querySelector(".title").value="";
                    document.querySelector(".content").value="";
                    //让下拉框默认选中第一项
                    document.querySelector(".post select").selectedIndex = 0;
                });

            }

            //第二种绑定事件:
            // document.body.addEventListener("load",function(){
            //     alert(1);
            // });

            //根据选择器匹配第一个元素
            //querySelector() 返回的是标签对象
            // document.querySelector(".bbs header span").addEventListener("click",function(){
            //     alert("ss");
            // });
        </script>
    </div>
</body>

</html>
css
*{margin: 0; padding: 0; font-family: "Arial", "���ź�";} ul,li{list-style: none;} .bbs{margin: 0 auto; width: 600px; position: relative;} header{padding: 5px 0; border-bottom: 1px solid #cecece;} header span{display:inline-block; width: 220px; height: 50px; color: #fff; background: #009966; font-size: 18px; font-weight: bold; text-align: center;line-height: 50px; border-radius: 8px; cursor: pointer;} .post{position: absolute; background: #ffffff; border: 1px #cccccc solid; width: 500px; left: 65px; top:70px; padding: 10px; font-size: 14px; z-index: 999999; display: none;} .post .title{width: 450px; height:30px; line-height: 30px; display: block; border: 1px #cecece solid; margin-bottom: 10px;} .post select{width: 200px; height: 30px;} .post .content{width: 450px; height: 200px; display: block; margin: 10px 0;border: 1px #cecece solid;} .post .btn{width: 160px; height: 35px; color: #fff; background: #009966; border: none; font-size: 14px; font-weight: bold; text-align: center; line-height: 35px; border-radius: 8px; cursor: pointer;} .bbs section ul li{padding: 10px 0; border-bottom: 1px #999999 dashed; overflow: hidden;} .bbs section ul li div{float: left; width: 60px; margin-right: 10px;} .bbs section ul li div img{ border-radius:50%; width: 60px;} .bbs section ul li h1{float: left; width: 520px; font-size: 16px; line-height: 35px;} .bbs section ul li p{color: #666666; line-height: 25px; font-size: 12px; } .bbs section ul li p span{padding-right:20px;}

 浙公网安备 33010602011771号