

yum 安装mysql
步骤:
1、sudo rpm -Uvh http://dev.mysql.com/get/mysql-community-release-el7-5.noarch.rpm
2、yum install mysql mysql-server mysql-libs
这两个步骤可能会遇到的错误。
第一个步骤可能出现这样的错误:
Retrieving http://dev.mysql.com/get/mysql-community-release-el7-5.noarch.rpm
curl: (35) SSL connect error
error: skipping http://dev.mysql.com/get/mysql-community-release-el7-5.noarch.rpm - transfer failed
解决方法:
yum -y update nss
第二个步骤可能出现这样的错误:
Error: Package: mysql-community-client-5.6.35-2.el7.i686 (mysql56-community)
Requires: libc.so.6(GLIBC_2.17)
Error: Package: 2:postfix-2.6.6-8.el6.i686 (base)
Requires: libmysqlclient.so.16(libmysqlclient_16)
Removing: mysql-libs-5.1.71-1.el6.i686 (@anaconda-CentOS-201311271240.i386/6.5)
libmysqlclient.so.16(libmysqlclient_16)
Obsoleted By: mysql-community-libs-5.6.35-2.el7.i686 (mysql56-community)
Not found
Updated By: mysql-libs-5.1.73-8.el6_8.i686 (base)
libmysqlclient.so.16(libmysqlclient_16)
Error: Package: mysql-community-libs-5.6.35-2.el7.i686 (mysql56-community)
Requires: libc.so.6(GLIBC_2.17)
Error: Package: mysql-community-server-5.6.35-2.el7.i686 (mysql56-community)
Requires: systemd
Error: Package: mysql-community-server-5.6.35-2.el7.i686 (mysql56-community)
Requires: libstdc++.so.6(GLIBCXX_3.4.15)
Error: Package: mysql-community-server-5.6.35-2.el7.i686 (mysql56-community)
Requires: libc.so.6(GLIBC_2.17)
Error: Package: 2:postfix-2.6.6-8.el6.i686 (base)
Requires: libmysqlclient.so.16
Removing: mysql-libs-5.1.71-1.el6.i686 (@anaconda-CentOS-201311271240.i386/6.5)
libmysqlclient.so.16
Obsoleted By: mysql-community-libs-5.6.35-2.el7.i686 (mysql56-community)
Not found
Updated By: mysql-libs-5.1.73-8.el6_8.i686 (base)
libmysqlclient.so.16
You could try using --skip-broken to work around the problem
You could try running: rpm -Va --nofiles --nodigest
解决的办法:
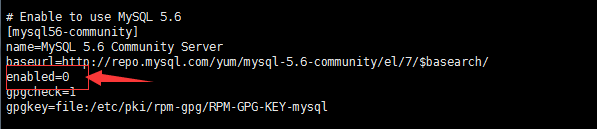
vi /etc/yum.repos.d/mysql-community.repo
在其中:
找到mysql-56-community
将enable置为0 enable=0
如下图。
安装完成过后,我们可以使用命令:service mysqld status
来查看mysql的运行情况,一般刚安完后,得到的结果为:
mysqld is stopped
那么我们就要启动mysql:service mysqld start
然后我们在查看一下mysql的运行状态。
得到一下结果,代表启动成功。
mysqld (pid 2641) is running...
到这里mysql就算是安装成功了。
利用命令登录mysql: mysql -u root -p
[root@node1 ~]# mysql -u root -p
Enter password:
Welcome to the MySQL monitor. Commands end with ; or \g.
Your MySQL connection id is 2
Server version: 5.1.73 Source distribution
Copyright (c) 2000, 2013, Oracle and/or its affiliates. All rights reserved.
Oracle is a registered trademark of Oracle Corporation and/or its
affiliates. Other names may be trademarks of their respective
owners.
Type 'help;' or '\h' for help. Type '\c' to clear the current input statement.
mysql>
结束!!!

 浙公网安备 33010602011771号