使用XHProf分析PHP性能瓶颈(二)
上一篇文章里,我们介绍了如何基于xhprof扩展来分析PHP性能,并记录到日志里,最后使用xhprof扩展自带的UI在web里展示出来。本篇文章将讲述2个知识点:
- 使用xhgui代替xhprof的默认UI界面,更便于分析
- 使用tideways扩展替换xhprof扩展
使用更漂亮的UI: xhgui
xhgui支持 XHProf, Uprofiler或者Tideways 扩展,也就是说,只要安装了这几种扩展中的一种即可。
本次测试中,实际使用了tideways扩展(切换为XHProf扩展后web里看不到数据,原因未知。切换为Uprofiler也没有数据。)。
xhprof虽然来自facebook但已经很久不更新,官方源已经显示This package is abandoned and no longer maintained(此包已废弃,不再维护)。tideways恰好相反,一直有商业公司在维护,并且积极的支持了PHP7。两个扩展都是开源的,综上所述我建议大家选择tideways来分析代码。
安装tideways扩展:
wget https://github.com/tideways/php-xhprof-extension/archive/v4.1.5.tar.gz -O php-xhprof-extension-4.1.5.tar.gz
tar xzf /php-xhprof-extension-4.1.5.tar.gz
cd php-xhprof-extension-4.1.5
phpize
./configure
make && make install
安装xhgui
cd  /work/
git clone https://github.com/perftools/xhgui.git xhgui
如果需要安装中文界面的,可以:
git clone https://github.com/laynefyc/xhgui-branch.git xhgui
然后安装xhgui依赖:
cd xhgui
php install.php
安装需要等待几分钟,请耐心等待。
设置缓存目录的权限,允许nginx创建文件:
chmod -R 777
xhgui已经把注入入口文件都写好了,位于external/header.php,无需我们手动去写类似上一篇的xhprof.inc.php注入文件。
安装MongoDB及客户端
xhgui 把日志写到了MongoDB,所以使用xhgui需要安装MongoDB服务端。此处省略安装、启动MongoDB服务端过程。
为提高 MongoDB 的性能,你可以运行以下指令以添加索引:
$ /usr/local/mongodb/bin/mongo
> use xhprof
db.results.ensureIndex( { 'meta.SERVER.REQUEST_TIME' : -1 } )
db.results.ensureIndex( { 'profile.main().wt' : -1 } )
db.results.ensureIndex( { 'profile.main().mu' : -1 } )
db.results.ensureIndex( { 'profile.main().cpu' : -1 } )
db.results.ensureIndex( { 'meta.url' : 1 } )
同理,由于xhgui是PHP写的,还需要读取MongoDB里的数据,需要安装MongoDB php 客户端:
pecl install mongodb
然后在php.ini文件添加配置:
[mongo]
extension=mongo.so
查看扩展是否安装成功:
php -m | grep mongo
然后重启php-fpm服务。
配置xhgui
xhgui的config目录有一个config.default.php,复制为config.php,如果mongodb地址不是默认的,修改:
'db.host' => 'mongodb://127.0.0.1:27017',
还有修改采样频率,默认是1/100,测试的话改为true:
    'profiler.enable' => function() {
        //return rand(1, 100) === 42;
        return true;
    },
配置项目注入
上一篇文章中,我们介绍到,注入的入口文件可以写到php.ini或者nginx,我建议写在nginx配置,这样只会影响该nginx对应的项目,而不是所有使用该php环境的项目。入口文件使用xhgui自带的注入文件:
jifen.cc.conf
location ~ \.php$ {
	fastcgi_pass   127.0.0.1:9000;
	fastcgi_index  index.php;
	fastcgi_param  SCRIPT_FILENAME  $document_root$fastcgi_script_name;
	fastcgi_param PHP_VALUE "auto_prepend_file=/work/xhgui/external/header.php";
	include        fastcgi_params;
}
配置xhgui web
我们修改xhprof.test.com.conf为:
server {
    listen       80;
    server_name  xhprof.test.com;

	#root /work/xhprof/xhprof_html;
	root /work/xhgui/webroot/;
	index index.php index.html;

	location / {
       if (!-e $request_filename) {
            rewrite . /index.php last;
        }
    }

    location ~ \.php$ {

        fastcgi_pass   127.0.0.1:9000;
        fastcgi_index  index.php;
        fastcgi_param  SCRIPT_FILENAME  $document_root$fastcgi_script_name;
        include        fastcgi_params;
    }

}
重启nginx服务。
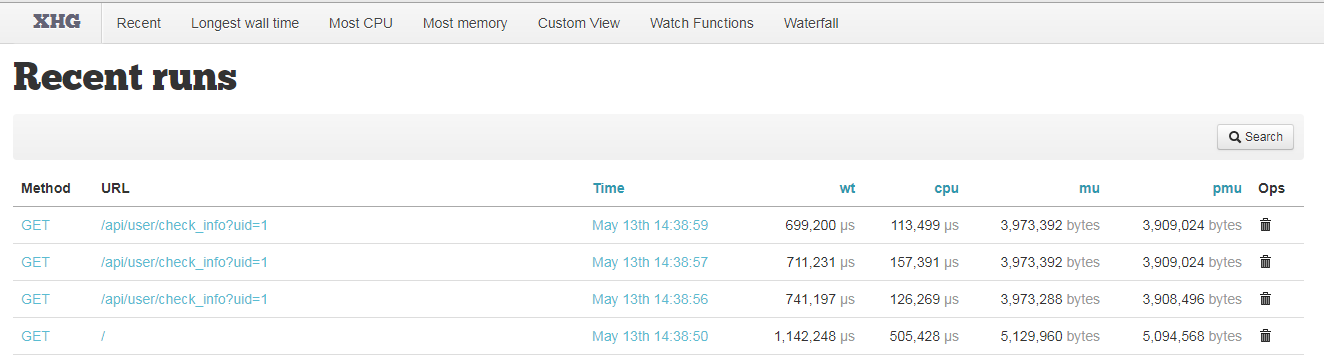
我们请求几次应用的接口,打开浏览器输入 http://xhprof.test.com/ ,可以看到:
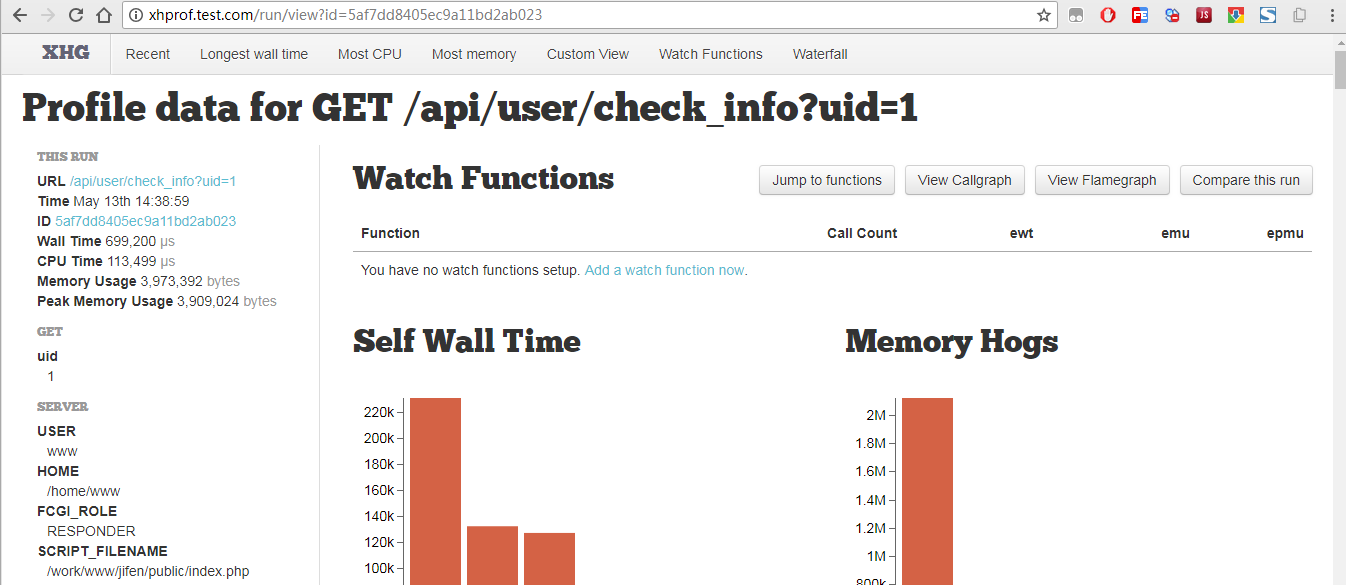
点击某次请求进去看详情:
参考
1、PHP性能追踪及分析工具xhprof的安装与使用 - 马新才的技术博客 - SegmentFault 思否
https://segmentfault.com/a/1190000007288664#articleHeader4
2、Tideways和xhgui打造PHP非侵入式监控平台 | 我是大熊
http://blog.it2048.cn/article-tideways-xhgui/
欢迎关注公众号"飞鸿影记(fhyblog)",探寻物件背后的逻辑,记录生活真实的影子。

作者:飞鸿影
出处:http://52fhy.cnblogs.com/
版权申明:没有标明转载或特殊申明均为作者原创。本文采用以下协议进行授权,自由转载 - 非商用 - 非衍生 - 保持署名 | Creative Commons BY-NC-ND 3.0,转载请注明作者及出处。


 浙公网安备 33010602011771号