
python 文件上传本地服务器
1:python之上传文件
1.1.url代码


 1 """untitled1222 URL Configuration
 2
 3 The `urlpatterns` list routes URLs to views. For more information please see:
 4     https://docs.djangoproject.com/en/2.1/topics/http/urls/
 5 Examples:
 6 Function views
 7     1. Add an import:  from my_app import views
 8     2. Add a URL to urlpatterns:  path('', views.home, name='home')
 9 Class-based views
10     1. Add an import:  from other_app.views import Home
11     2. Add a URL to urlpatterns:  path('', Home.as_view(), name='home')
12 Including another URLconf
13     1. Import the include() function: from django.urls import include, path
14     2. Add a URL to urlpatterns:  path('blog/', include('blog.urls'))
15 """
16 from django.contrib import admin
17 from django.urls import path
18 from app01 import views
19 urlpatterns = [
20     path('admin/', admin.site.urls),
21     path('upload/',views.upload),
22 ]
1.2.views代码
 1 from django.shortcuts import render
 2 from django.shortcuts import HttpResponse
 3
 4 # Create your views here.
 5 def upload(request):
 6     if request.method=='GET':
 7         return render(request,'upload.html')
 8     else:
 9         user=request.POST.get('user')
10         print(user)
11         #img是一个对象,包含文件名,文件大小、内容....
12         img=request.FILES.get('img')
13         print(img)
14         print(img.name)
15         print(img.size)
16
17         #上传到本地服务器
18         f=open(img.name,'wb')
19         for line in img.chunks():
20             f.write(line)
21         f.close()
22
23         return HttpResponse('OK')
1.3.templates中upload.html
 1 <!DOCTYPE html>
 2 <html lang="en">
 3 <head>
 4     <meta charset="UTF-8">
 5     <title>Title</title>
 6 </head>
 7 <body>
 8 <form action="/upload/" method="post" enctype="multipart/form-data">
 9     <input type="text" name="user">
10     <input type="file" name="img">
11     <input type="submit" value="提交">
12 </form>
13 </body>
14 </html>
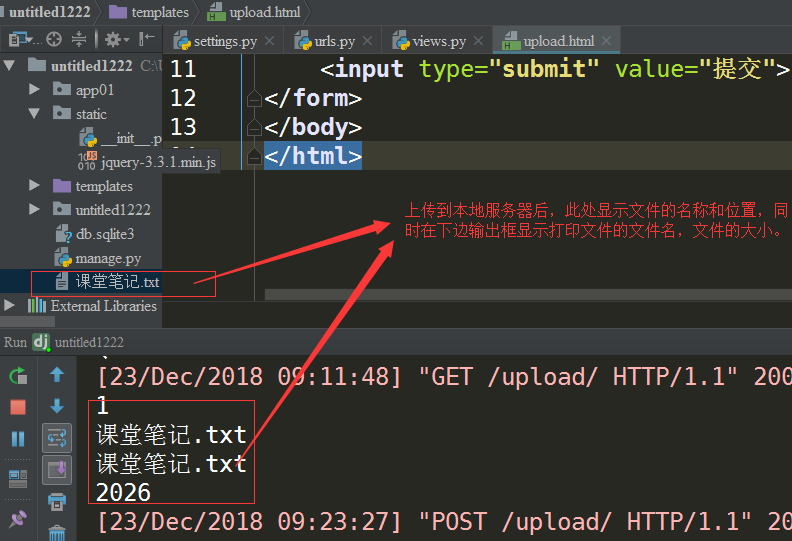
1.4.效果显示
2.上传文件按钮优化
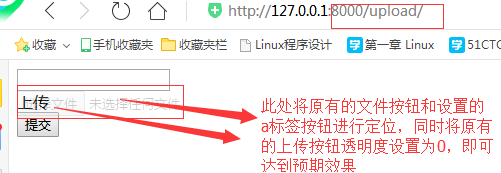
2.1按钮优化只需在原有upload.html文件中进行相关样式设置即可,重点设置透明度:opacity:0
 1 <!DOCTYPE html>
 2 <html lang="en">
 3 <head>
 4     <meta charset="UTF-8">
 5     <title>Title</title>
 6 </head>
 7 <body>
 8 <form action="/upload/" method="post" enctype="multipart/form-data">
 9     <input type="text" name="user">
10     <div style="position: relative;">
11         <a>上传</a>
12     <input type="file" name="img" style="opacity: 0.2;position:absolute; top:0;left: 0;">
13     </div>
14     <input type="submit" value="提交">
15 </form>
16 <script src="/static/jquery-3.3.1.min.js"></script>
17 </body>
18 </html>
2.2.优化后的效果显示:
3.python之Form组件文件上传(与上述自定义上传文件的区别在:form上传文件多了验证功能)
 1 from django.shortcuts import render
 2 from django.shortcuts import HttpResponse
 3
 4
 5 # Create your views here.
 6 from django import forms
 7 from django.forms import fields
 8 #from组件形式的文件上传
 9 class UploadImg(forms.Form):
10     user=fields.CharField()
11     img=fields.FileField()
12
13
14 def upload(request):
15     if request.method=='GET':
16         return render(request,'upload.html')
17     else:
18         OBJ=UploadImg(request.POST,request.FILES)
19         if OBJ.is_valid():
20             user=OBJ.cleaned_data['user']
21             img=OBJ.cleaned_data['img']
22             f = open(img.name, 'wb')
23             for line in img.chunks():
24                 f.write(line)
25             f.close()
26         #自定义形式文件上传
27         # def upload(request):
28         #     if request.method == 'GET':
29         #         return render(request, 'upload.html')
30         #     else:
31         #         user=request.POST.get('user')
32         #         print(user)
33         #         #img是一个对象,包含文件名,文件大小、内容....
34         #         img=request.FILES.get('img')
35         #         print(img)
36         #         print(img.name)
37         #         print(size)
38         #         f = open(img.name, 'wb')
39         #         for line in img.chunks():
40         #             f.write(line)
41         #         f.close()
42         #         return HttpResponse('OK')
43         return HttpResponse('OK')

 浙公网安备 33010602011771号