动静分离、Rewirte、HTTPS
 Nginx反向代理实现动静分离技术,Rewrite重定向URL,负载均衡使用HTTPS自签证书,这篇文章都有👆
Nginx动静分离技术

这里的代理服务器其实就是静态资源处理服务器,图示为了区分动静分离所以分开,静态服务器中;
存放的资源主要是源代码文件、图片、属性、样式以及其它所有非动态的资源文件;
动静分离也是为了提高网站的性能,如果静态请求直接使用代理服务器处理,动态请求再流量分配到客户动态资源处理服务器;
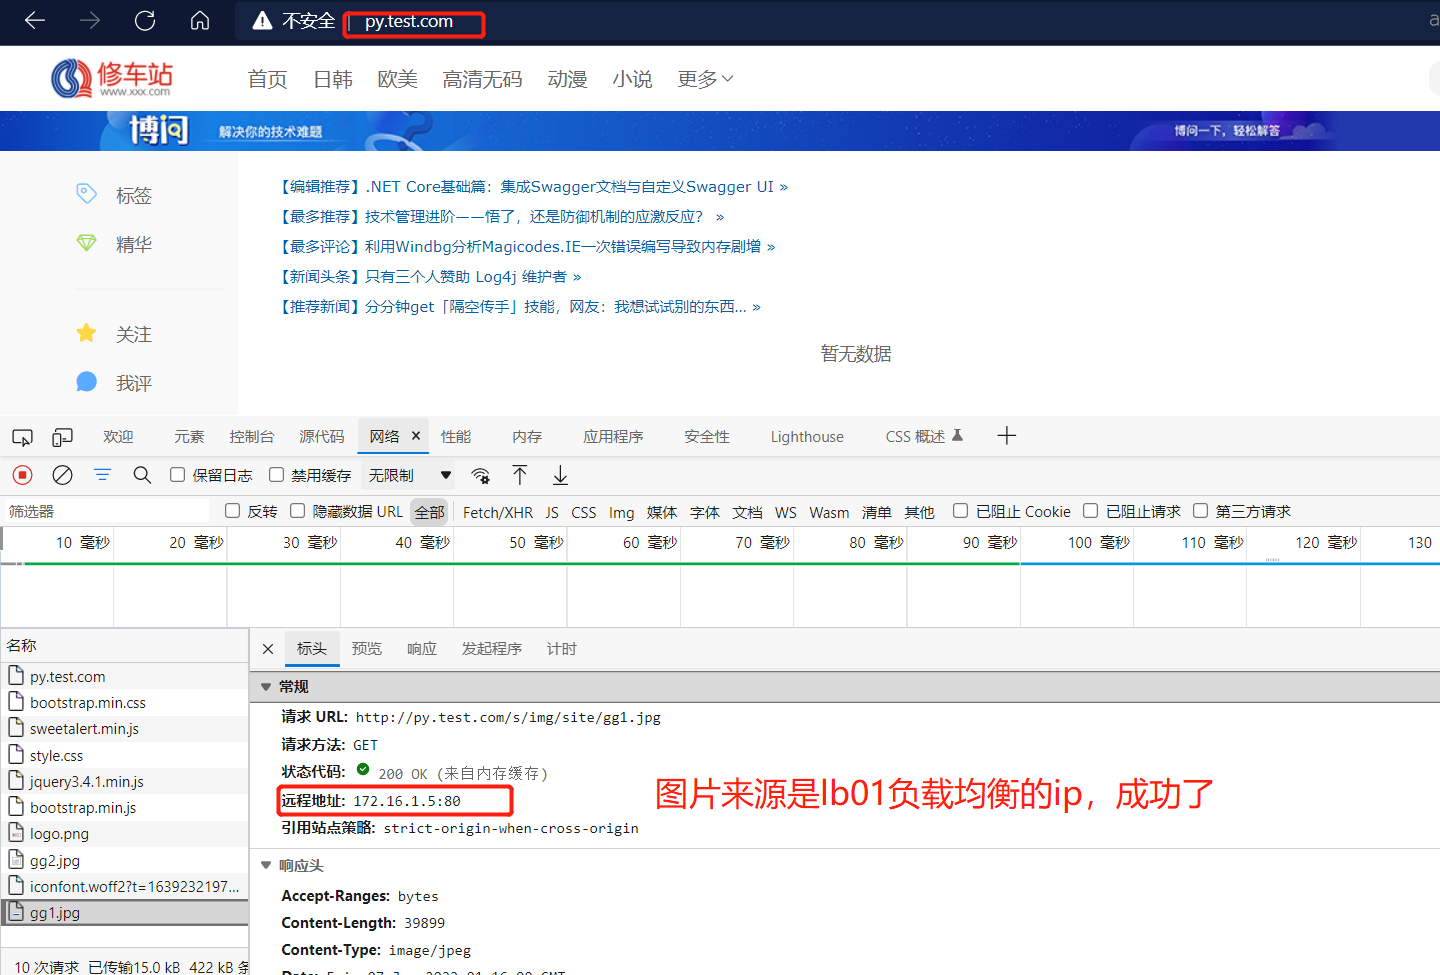
下面以上文的BBS项目演示,将BBS图片分离演示静态请求~
示例搭建步骤
部署NFS
通过部署NFS实现静态文件共享
1、创建NFS挂载点
[root@nfs ~]# mkdir /static
2、配置挂载点
[root@nfs static]# vim /etc/exports
/static   172.16.1.0/20(rw,sync,all_squash,anonuid=666,anongid=666)
3、启动服务
[root@nfs static]# systemctl restart nfs rpcbind
4、检查是否正常
[root@nfs static]# showmount -e
Export list for nfs:
/static     172.16.1.0/20
5、授权
[root@nfs /]# chown -R www.www /static/
静态资源共享
实现图片文件共享挂载
1、所有客户端创建挂载点
[root@web01 /]# mkdir -p /opt/static/s

2、所有客户端挂载
[root@web01 opt]# mount -t nfs 172.16.1.31:/static /opt/static/

3、查看
[root@web01 opt]# df -h
172.16.1.31:/static       20G  3.1G   17G  16% /opt/static

4、静态资源共享
[root@web01 static]# cp -r /opt/bbs/static/* /opt/static/s/
[root@web01 static]# ll /opt/static/s/
total 0
drwxr-xr-x 5 www www  40 Jan  7 15:36 bootstrap
drwxr-xr-x 2 www www  23 Jan  7 15:36 css
drwxr-xr-x 2 www www 168 Jan  7 15:36 font
drwxr-xr-x 4 www www  30 Jan  7 15:36 img
部署代理服务器
1、安装nfs工具包
[root@lb01 ~]# yum install nfs-utils -y
2、创建挂载点
[root@lb01 ~]# mkdir /opt/static/
3、挂载
[root@lb01 ~]# mount -t nfs 172.16.1.31:/static /opt/static/
[root@lb01 ~]# df -h
172.16.1.31:/static       20G  3.1G   17G  16% /opt/static
4、修改配置文件
# 增加location匹配规则,匹配静态资源
upstream bbs {
    server 172.16.1.7:80 max_fails=3 fail_timeout=3s;
    server 172.16.1.8:80 max_fails=3 fail_timeout=3s;
    server 172.16.1.9:80 max_fails=3 fail_timeout=3s;
}

server {
    listen 80;
    server_name py.test.com;
    location / {
        proxy_pass http://bbs;
        proxy_next_upstream error timeout invalid_header http_500 http_502 http_503 http_404;
        include /etc/nginx/proxy_params;
    }
    location ~ \.(jpg|png|gif|js|css|woff|ttf|woff2)$ {
        root /opt/static;
    }
}
测试
Rewrite(重点)
Rewrite主要实现url地址重写,以及重定向,就是把传入web的请求重定向到其他url的过程。案例:京东就重定向了URL
Rewrite基本概述
- 地址跳转,用户访问www.linux.com这个URL是,将其定向至一个新的域名www.baidu.com。
- 协议跳转,用户通过http协议请求网站时,将其重新跳转至https协议方式。
- 伪静态,将动态页面显示为静态页面方式的一种技术,便于搜索引擎的录入,同时建上动态URL地址对外暴露过多的参数,提升更高的安全性。
- 搜索引擎,SEO优化依赖于url路径,好记的url便于搜索引擎录入。(应用:百度热词,广告等)
rewrite语法
# 语法和范围
Syntax: rewrite regex replacement [flag];
Default:    —
Context:    server, location, if

# 名称解释
rewrite         # 模块命令
regex           # 请求的链接(支持正则表达式)
replacement     # 跳转的链接
[flag];         # 标签

 # 格式示例
location /download/ {
    rewrite ^(/download/.*)/media/(.*)\..*$ $1/mp3/$2.mp3 break;
    rewrite ^(/download/.*)/audio/(.*)\..*$ $1/mp3/$2.ra  break;
    return  403;
}
rewrite标记Flag
rewrite指令根据表达式来重定向URL,或者修改字符串,可以应用于server,location,if环境下,每行rewrite指令最后跟一个flag标记,支持的flag标记有如下表格所示:
| flag | 作用 |
|---|---|
| last | 本条规则匹配完成后,停止匹配,不再匹配后面的规则 |
| break | 本条规则匹配完成后,停止匹配,不再匹配后面的规则 |
| redirect | 返回302临时重定向,地址栏会显示跳转后的地址 |
| permanent | 返回301永久重定向,地址栏会显示跳转后的地址 |
last和break的区别
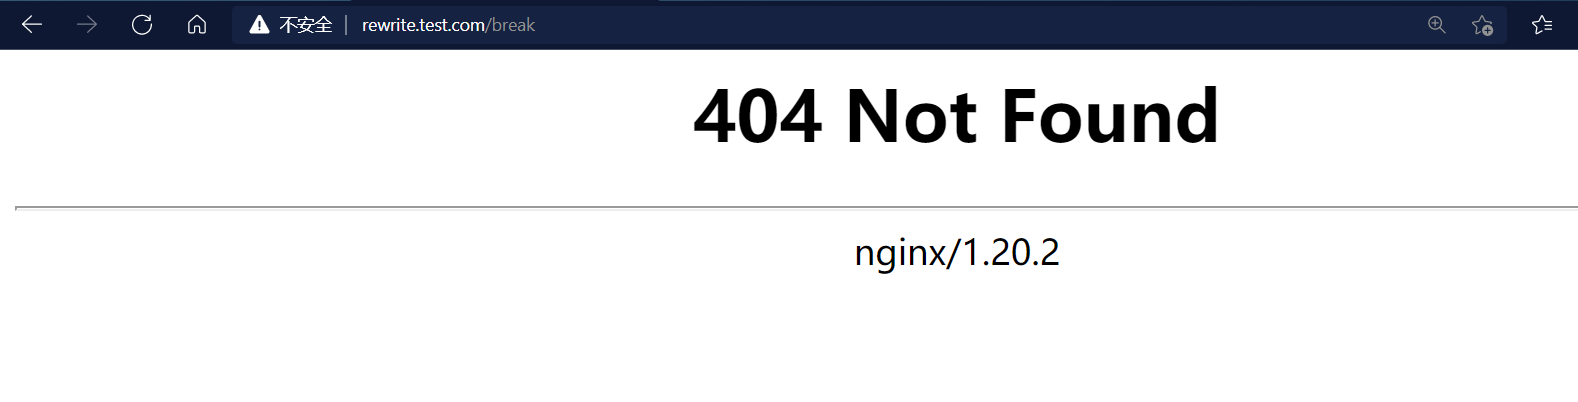
- break请求:
- 请求linux.rewrite.com/break
- 匹配 location ~ ^/break 会跳转到 linux.rewrite.com/test
- 请求跳转后,回去查找本地站点目录下的 /test
- 如果找到了,则返回/code/test/index.html的内容;
- 如果没找到该目录则报错404,如果找到该目录没找到对应的文件则403
- last请求:
- 请求linux.rewrite.com/last
- 匹配 location ~ ^/last 会跳转到 linux.rewrite.com/test
- 如果找到了,则返回/code/test/index.html的内容;
- 如果没有找到,会重新对当前server发起请求,这个时候访问地址就变成 linux.rewrite.com/test
- 重新请求server会匹配到 location /test/ 直接返回该location的内容
- 如果也没有location匹配,再返回404;
示例如下:
[root@lb01 conf.d]# vim /etc/nginx/conf.d/flag.conf
server {
    server_name rewrite.test.com;
    listen 80;
    location ~ ^/break {
        rewrite (.*) /test break;
    }

    location ~ ^/last {
        rewrite (.*) /test last;  #
    }

    location /test {
        default_type text/html;
        return 200 "test";
    }
}
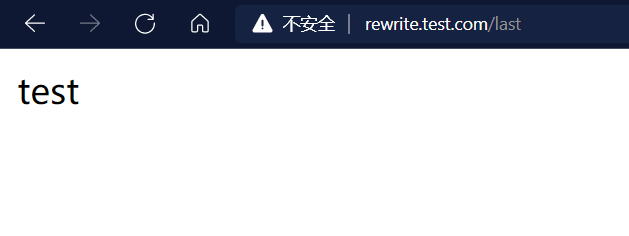
last:访问的过程是匹配last没有匹配成功,重新发起请求匹配到test打印返回值test
break:访问过程是去网站根目录找test,没有找到就不会重新发起请求,所以404
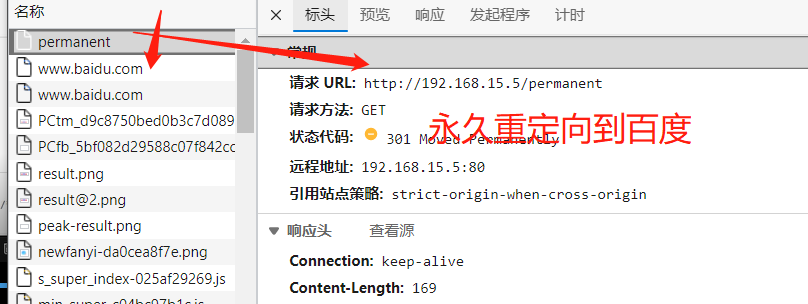
redirect和permanent的区别
- redirect: 每次请求都会询问服务器,如果当服务器不可用时,则会跳转失败。
- permanent: 第一次请求会询问,浏览器会记录跳转的地址,第二次则不再询问服务器,直接通过浏览器缓存的地址跳转。
重定向格式
location /redirect {
	rewrite (.*) http://www.baidu.com redirect;
}
location /permanent {
    rewrite (.*) http://www.baidu.com permanent;
}


# 示例
server {
    server_name rewrite.test.com;
    listen 80;
    location ~ ^/break {
        rewrite (.*) /test break;
    }

    location ~ ^/last {
        rewrite (.*) /test last;
    }

    location /test {
        default_type text/html;
        return 200 "test";
    }
    location /redirect {
        rewrite (.*) http://www.baidu.com redirect;
    }
    location /permanent {
        rewrite (.*) http://www.baidu.com permanent;
    }
}

redirect和permanent是重定向,跳转域名,而last和break不会改名访问的域名
HTTPS

为什么需要使用HTTPS,因为HTTP不安全,当我们使用http网站时,会遭到劫持和篡改,如果采用https协议,那么数据在传输过程中是加密的,所以黑客无法窃取或者篡改数据报文信息,同时也避免网站传输时信息泄露。
那么我们在实现https时,需要了解ssl协议,但我们现在使用的更多的是TLS加密协议。
那么TLS是怎么保证明文消息被加密的呢?在OSI七层模型中,应用层是http协议,那么在应用层协议之下,我们的表示层,是ssl协议所发挥作用的一层,他通过(握手、交换秘钥、告警、加密)等方式,是应用层http协议没有感知的情况下做到了数据的安全加密
模拟网站劫持
正常的页面
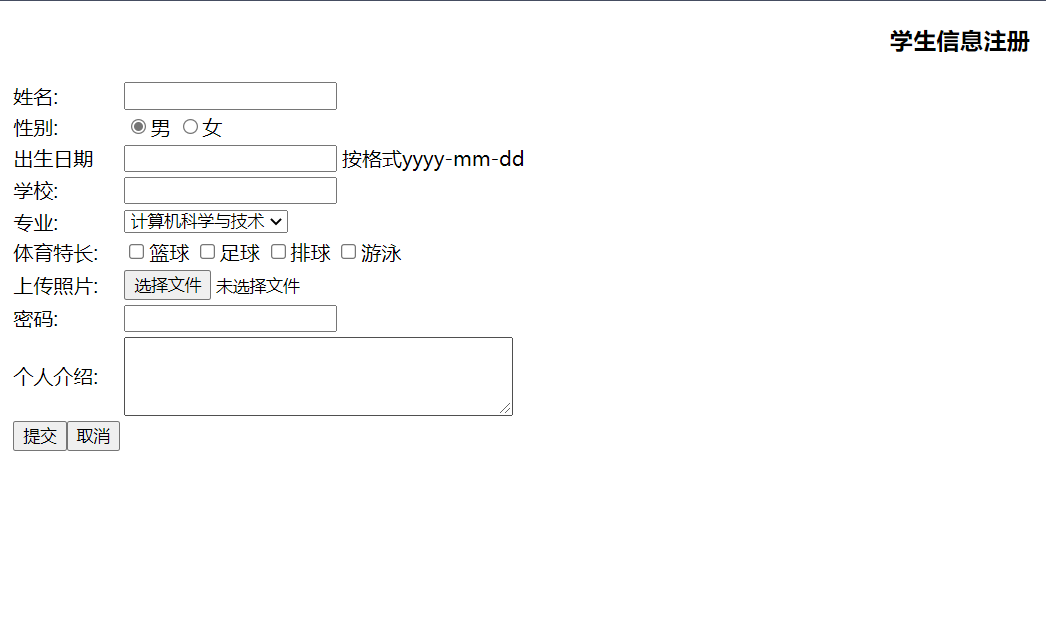
[root@web01 opt]# mkdir code
[root@web01 opt]# vim /code/index.html
<!DOCTYPE html PUBLIC "-//W3C//DTD XHTML 1.0 Transitional//EN" "http://www.w3.org/TR/xhtml1/DTD/xhtml1-transitional.dtd">
<html xmlns="http://www.w3.org/1999/xhtml">
<head>
<meta http-equiv="Content-Type" content="text/html; charset=utf-8" />
<title>学生信息注册页面</title>
</head>
<body>
<h3 align="center">学生信息注册</h3>
<form  name="stu"action="">
<table>
  <tr><td>姓名:</td><td><input type="text"name="stuName"/></td></tr>
  <tr><td>性别:</td>
      <td><input type="radio"name="stuSex"checked="checked">男
          <input type="radio"name="stuSex">女
          </td>
          </tr>
   <tr><td>出生日期</td>
       <td><input type="text"name="stuBirthday"></td>
       <td>按格式yyyy-mm-dd</td>
       </tr>
       <tr><td>学校:</td><td><input type="text"name="stuSchool"></td></tr>
       <tr><td>专业:</td>
           <td><select name="stuSelect2">
               <option selected>计算机科学与技术</option>
               <option>网络工程</option>
               <option>物联网工程</option>
               <option>应用数学</option>
               </select>
               </td>
               </tr>
               <tr><td>体育特长:</td>
                   <td colspan="2">
                      <input type="checkbox"name="stuCheck" >篮球
                      <input type="checkbox"name="stuCheck" >足球
                      <input type="checkbox"name="stuCheck" >排球
                      <input type="checkbox"name="stuCheck" >游泳
                   </td>
               </tr>
               <tr><td>上传照片:</td><td colspan="2"><input type="file" ></td></tr>
               <tr><td>密码:</td><td><input type="password"name="stuPwd" ></td></tr>
               <tr><td>个人介绍:</td>
                   <td colspan="2"><textarea name="Letter"rows="4"cols="40"></textarea></td>
               </tr>
               <tr>
                 <td><input type="submit"value="提交" ><input type="reset"value="取消" ></td>
                 </tr>
                 </table>
                 </form>
</body>
</html>

# 配置文件
[root@web01 conf.d]# vim https.conf
server{
    listen 80;
    server_name https.test.com;
    location / {
        root /opt/code;
        index index.html;
    }
}
# 域名解析 hosts
正常页面
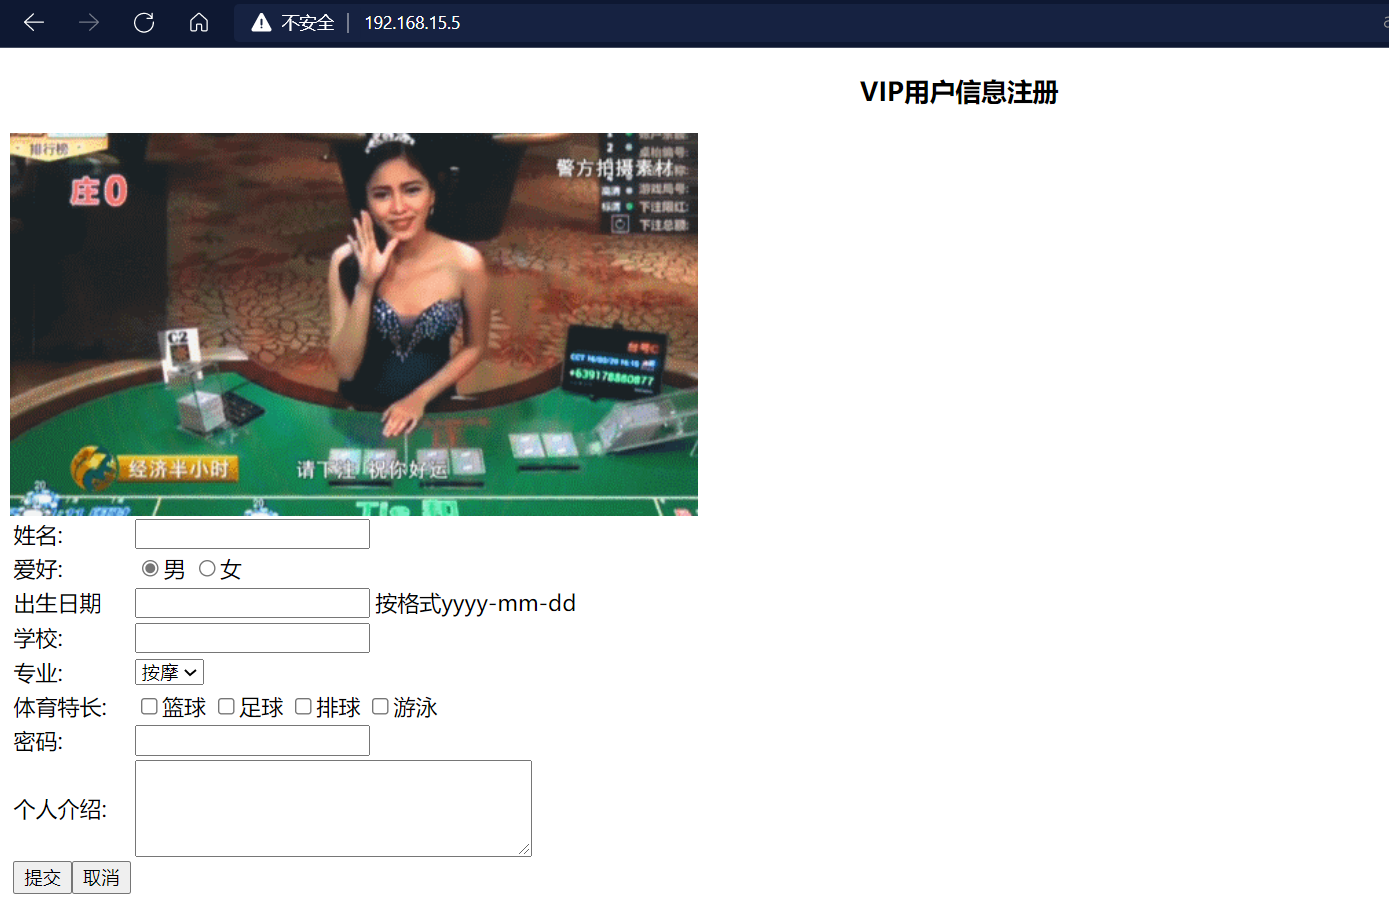
网站劫持
1、安装缺少的模块
# 删除原来的nginx
[root@lb01 ~]# rm -rf nginx-1.20.2
[root@lb01 ~]# tar -xf nginx-1.20.2.tar.gz
[root@lb01 nginx-1.20.2]# ./configure  --help | grep sub
  --with-http_sub_module             enable ngx_http_sub_module

[root@lb01 nginx-1.20.2]# ./configure --with-http_gzip_static_module --with-stream --with-http_ssl_module   --with-http_sub_module
[root@lb01 nginx-1.20.2]# make && make install

# 将原来的nginx删除,移动新更新的nginx
[root@lb01 sbin]# cd /usr/local/nginx/sbin/
[root@lb01 sbin]# ll
total 13888
-rwxr-xr-x 1 root root 7110376 Jan  7 21:29 nginx
[root@lb01 sbin]# rm -rf /usr/sbin/nginx
[root@lb01 sbin]# mv nginx /usr/sbin/nginx

# 配置文件
[root@lb01 ~]# vim /etc/nginx/conf.d/https.conf
server {
    listen 80;
    server_name https.test.com;

    location / {
        proxy_pass http://192.168.15.7;

        sub_filter '<title>学生信息注册页面</title>' '<title>澳门首家线上赌场</title>';
        sub_filter '<h3 align="center">学生信息注册</h3>' '<h3 align="center">VIP用户信息注册</h3>';
        sub_filter '<tr><td>性别:</td>' '<tr><td>爱好:</td>';
        sub_filter '<option selected>计算机科学与技术</option>' '<option selected>按摩</option>';
        sub_filter '<option>网络工程</option>' '<option>抽烟</option>';
        sub_filter '<option>物联网工程</option>' '<option>喝酒</option>';
        sub_filter '<option>应用数学</option>' '<option>烫头</option>';
        sub_filter '<tr><td>上传照片:</td><td colspan="2"><input type="file" ></td></tr>' '<img src="https://blog.driverzeng.com/zenglaoshi/xingganheguan.gif">';
    }
}
[root@lb01 ~]# nginx -t
nginx: the configuration file /usr/local/nginx/conf/nginx.conf syntax is ok
nginx: configuration file /usr/local/nginx/conf/nginx.conf test is successful

[root@lb01 ~]# systemctl restart nginx
这样在负载均衡中就劫持了
加密流程
1、浏览器发起往服务器的443端口发起请求,请求携带了浏览器支持的加密算法和哈希算法。
2、服务器收到请求,选择浏览器支持的加密算法和哈希算法。
3、服务器下将数字证书返回给浏览器,这里的数字证书可以是向某个可靠机构申请的,也可以是自制的。
4、浏览器进入数字证书认证环节,这一部分是浏览器内置的TLS完成的:
    4.1 首先浏览器会从内置的证书列表中索引,找到服务器下发证书对应的机构,如果没有找到,此时就会提示用户该证书是不是由权威机构颁发,是不可信任的。如果查到了对应的机构,则取出该机构颁发的公钥。
    4.2 用机构的证书公钥解密得到证书的内容和证书签名,内容包括网站的网址、网站的公钥、证书的有效期等。浏览器会先验证证书签名的合法性(验证过程类似上面Bob和Susan的通信)。签名通过后,浏览器验证证书记录的网址是否和当前网址是一致的,不一致会提示用户。如果网址一致会检查证书有效期,证书过期了也会提示用户。这些都通过认证时,浏览器就可以安全使用证书中的网站公钥了。
    4.3 浏览器生成一个随机数R,并使用网站公钥对R进行加密。
5、浏览器将加密的R传送给服务器。
6、服务器用自己的私钥解密得到R。
7、服务器以R为密钥使用了对称加密算法加密网页内容并传输给浏览器。
8、浏览器以R为密钥使用之前约定好的解密算法获取网页内容。
证书对比
| 对比 | 域名型 DV | 企业型 OV | 增强型 EV |
|---|---|---|---|
| 绿色地址栏 |  小锁标记+https 小锁标记+https |
 小锁标记+https 小锁标记+https |
 小锁标记+企业名称+https 小锁标记+企业名称+https |
| 一般用途 | 个人站点和应用; 简单的https加密需求 | 电子商务站点和应用; 中小型企业站点 | 大型金融平台; 大型企业和政府机构站点 |
| 审核内容 | 域名所有权验证 | 全面的企业身份验证; 域名所有权验证 | 最高等级的企业身份验证; 域名所有权验证 |
| 颁发时长 | 10分钟-24小时 | 3-5个工作日 | 5-7个工作日 |
| 单次申请年限 | 1年 | 1-2年 | 1-2年 |
| 赔付保障金 | —— | 125-175万美金 | 150-175万美金 |
自签证书
# 使用openssl命令充当CA权威机构创建证书(生产不使用此方式生成证书,不被互联网认可的黑户证书)
[root@web01 conf.d]# cd /etc/nginx/
[root@web01 nginx]# mkdir ssl
[root@web01 ssl]# openssl genrsa -idea -out server.key 2048
Generating RSA private key, 2048 bit long modulus
................................................................................+++
...........................................+++
e is 65537 (0x10001)
Enter pass phrase for server.key:123456
Verifying - Enter pass phrase for server.key:123456

[root@web01 ssl]# ll
total 4
-rw-r--r-- 1 root root 1739 Jan  7 21:48 server.key

# 生成自签证书(公钥),同时去掉私钥的密码
[root@web01 ssl]# openssl req -days 36500 -x509 -sha256 -nodes -newkey rsa:2048 -keyout server.key -out server.crt
Generating a 2048 bit RSA private key
........................................................................................................+++
...........................+++
writing new private key to 'server.key'
-----
You are about to be asked to enter information that will be incorporated
into your certificate request.
What you are about to enter is what is called a Distinguished Name or a DN.
There are quite a few fields but you can leave some blank
For some fields there will be a default value,
If you enter '.', the field will be left blank.
-----
Country Name (2 letter code) [XX]:
State or Province Name (full name) []:
Locality Name (eg, city) [Default City]:
Organization Name (eg, company) [Default Company Ltd]:
Organizational Unit Name (eg, section) []:
Common Name (eg, your name or your server's hostname) []:


# req  --> 用于创建新的证书
# new  --> 表示创建的是新证书
# x509 --> 表示定义证书的格式为标准格式
# key  --> 表示调用的私钥文件信息
# out  --> 表示输出证书文件信息
# days --> 表示证书的有效期
# sha256 --> 加密方式

# 浏览器加载证书的配置
#1.开启证书
Syntax: ssl on | off;
Default:    ssl off;
Context:    http, server

#2.指定证书文件
Syntax: ssl_certificate file;
Default:    —
Context:    http, server

#3.指定私钥文件
Syntax: ssl_certificate_key file;
Default:    —
Context:    http, server

# web01单个服务器增加证书
server{
    # listen 80;
    listen 443 ssl;
    # server_name https.test.com;
    ssl_certificate /etc/nginx/ssl/server.crt;
    ssl_certificate_key /etc/nginx/ssl/server.key;
    location / {
        root /opt/code;
        index index.html;
    }
}

# 负载均衡增加证书步骤,这样所有的服务器都有了
# 同步证书文件
[root@web01 nginx]# scp -r /etc/nginx/ssl 192.168.15.5:/etc/nginx/
root@192.168.15.5's password:
server.key                                       100% 1704     1.9MB/s   00:00
server.crt                                       100% 1220   921.7KB/s   00:00

[root@lb01 conf.d]# vim https.conf
upstream ssl {
    server 172.16.1.7;
    server 172.16.1.8;
    server 172.16.1.9;
}

server {
    listen 443 ssl;
    server_name _;

    ssl_certificate /etc/nginx/ssl/server.crt;
    ssl_certificate_key /etc/nginx/ssl/server.key;

    location / {
        proxy_pass http://ssl;
        include /etc/nginx/proxy_params;
    }
}
# 80端口的重定向
server {
    listen 80;
    server_name _;
    rewrite (.*) https://192.168.15.5 permanent;
}

# 修改完成web01就不用自签证书了
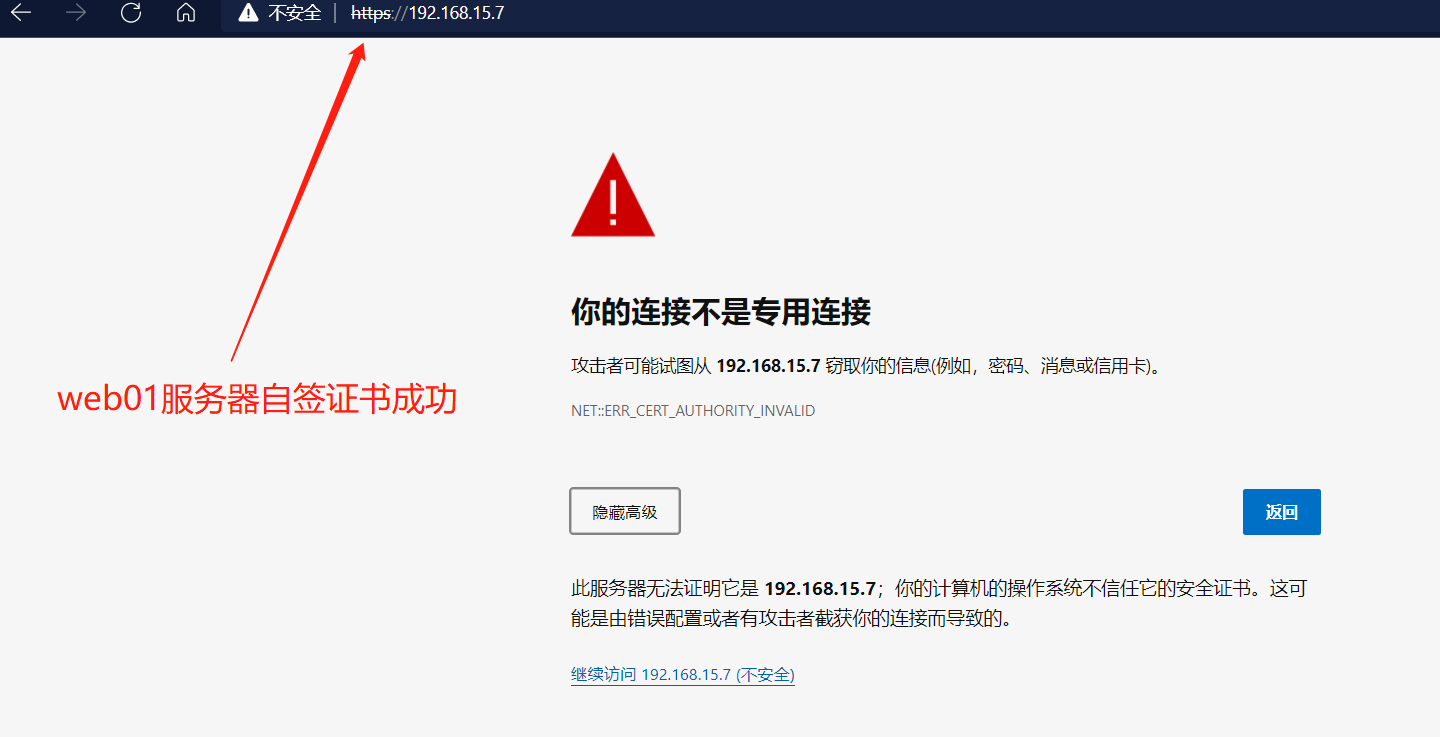
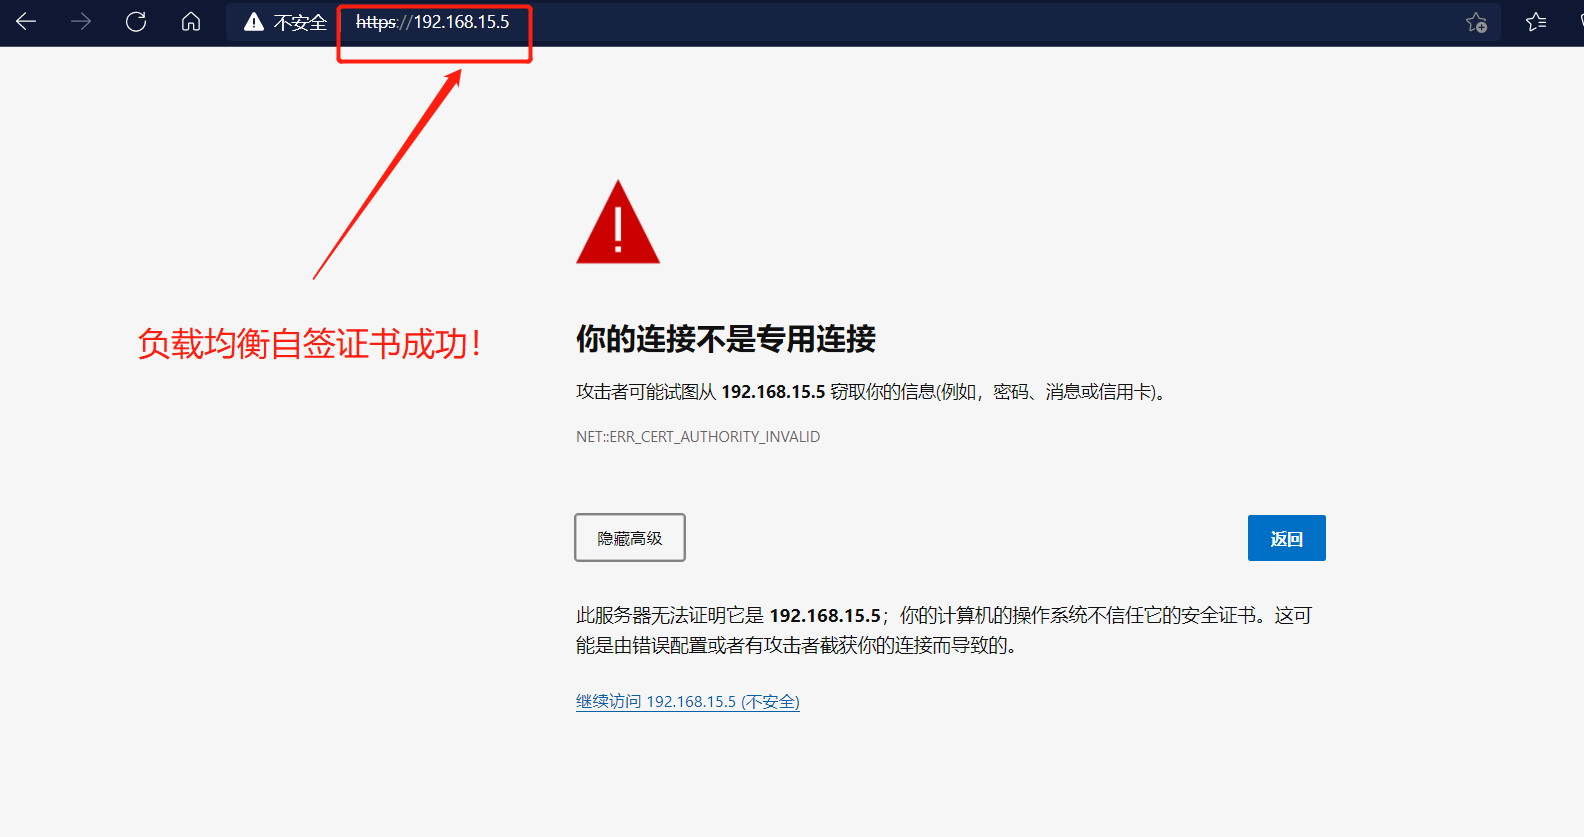
测试自签证书
【菜鸟进步中,如有错请指正,感谢~】

 浙公网安备 33010602011771号