


Django-CMS系列 (2) - 利用aldryn库实现Django CMS 博客系统
前言
前一文介绍了如何用Clean Blog来美化自己的博客,本文开始介绍用Aldryn News来创建自己的博客内容。
本文环境:
Python 2.7.10
Djangocms 3.5
aldryn-newsblog
安装
查看 https://github.com/aldryn/aldryn-newsblog/blob/master/setup.py ,可以看到它的依赖库如下。
REQUIREMENTS = [
    'Django>=1.8,<1.11',
    'python-dateutil',
    'aldryn-apphooks-config>=0.2.4',
    'aldryn-boilerplates>=0.7.2',
    'aldryn-categories>=1.1.0',
    'aldryn-common>=0.1.3',
    'aldryn-people>=1.1.0',
    'aldryn-translation-tools>=0.2.0',
    'backport_collections==0.1',
    'django-appdata>=0.1.4',
    'django-cms>=3.2',
    'djangocms-text-ckeditor',
    'django-filer>=0.9.9',
    'django-parler>=1.4',
    'django-sortedm2m>=1.2.2,!=1.3.0,!=1.3.1',
    'django-taggit',
    'lxml',
    'pytz',
    'six',
    'python-dateutil',
]
执行pip安装
pip install aldryn-newsblog
最新版本的aldryn-newblog (aldryn-newsblog-2.0.0)不支持django-1.11.11,安装时django版本会退回到django-1.10.8
安装djangocms-comments,后面在博客页面添加评论时会用到
pip install djangocms-comments
安装其他的一些aldryn的库,能实现博客的增强效果
pip install aldryn_background_image
pip install aldryn_bootstrap3
配置
在settings里面填加INSTALLED_APPS,放在'cms'之后
添加下列APPS
INSTALLED_APPS = (

    # you will probably need to add these
    'aldryn_apphooks_config',
    'aldryn_categories',
    'aldryn_common',
    'aldryn_newsblog',
    'aldryn_people',
    'aldryn_translation_tools',
    'parler',
    'sortedm2m',
    'taggit',

)
确认下面APPS已安装
INSTALLED_APPS = (

    # you'll almost certainly have these installed already
    'djangocms_text_ckeditor',
    'easy_thumbnails',
    'filer',
)
下面是为了增强效果添加的APPS
INSTALLED_APPS = (

    'djangocms_comments',
    'aldryn_background_image',
    'aldryn_bootstrap3',
    'bootstrap3',
)
添加boilerplates支持 (可选)
INSTALLED_APPS = (
    'aldryn_boilerplates',
)
STATICFILES_FINDERS = (
    'django.contrib.staticfiles.finders.FileSystemFinder',
    'aldryn_boilerplates.staticfile_finders.AppDirectoriesFinder',
    'django.contrib.staticfiles.finders.AppDirectoriesFinder',
)
TEMPLATES = [
    {
        'BACKEND': 'django.template.backends.django.DjangoTemplates',
        'OPTIONS': {
            'context_processors': [
                'django.contrib.auth.context_processors.auth',
                'django.contrib.messages.context_processors.messages',
                'django.template.context_processors.i18n',
                'django.template.context_processors.debug',
                'django.template.context_processors.request',
                'django.template.context_processors.media',
                'django.template.context_processors.csrf',
                'django.template.context_processors.tz',
                'sekizai.context_processors.sekizai',
                'django.template.context_processors.static',
                'cms.context_processors.cms_settings',
                'aldryn_boilerplates.context_processors.boilerplate',
            ],
            'loaders': [
                'django.template.loaders.filesystem.Loader',
                'aldryn_boilerplates.template_loaders.AppDirectoriesLoader',
                'django.template.loaders.app_directories.Loader',
            ],
        },
    },
]
Django Filer
aldryn News&Blog处理Easy Thumb会用到Django Filer,所以需要添加THUMBNAIL_PROCESSORS元组到setting里
注: 这些在django CMS安装时其实已完成。在aldryn里又强调了一次,再次检查确认一下。
THUMBNAIL_PROCESSORS = (
    'easy_thumbnails.processors.colorspace',
    'easy_thumbnails.processors.autocrop',
    'filer.thumbnail_processors.scale_and_crop_with_subject_location',
    'easy_thumbnails.processors.filters',
    'easy_thumbnails.processors.background',
)
安装完成后需执行python manage.py migrate进行数据库同步
查看效果
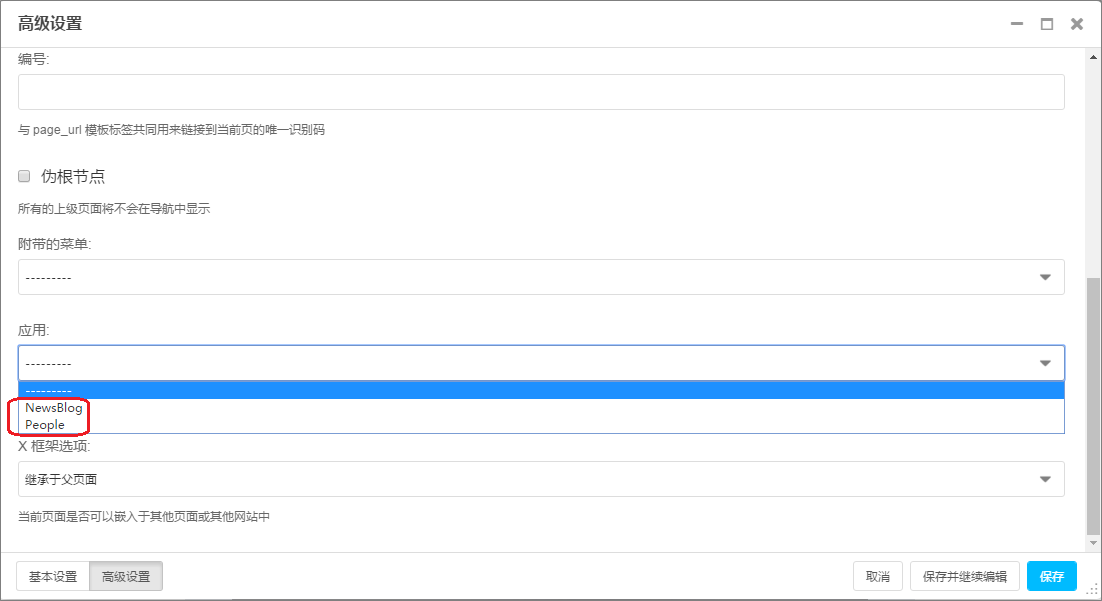
进入菜单『页』-『高级设置』,点击应用下拉菜单,如果能看到NewsBlog,说明安装成功。
添加文章
添加应用
进入blog页面,进入菜单『页』-『高级设置』,在『应用』菜单里选择『Newsblog』保存,那么在工具栏会添加『News & Blog』菜单

添加文章
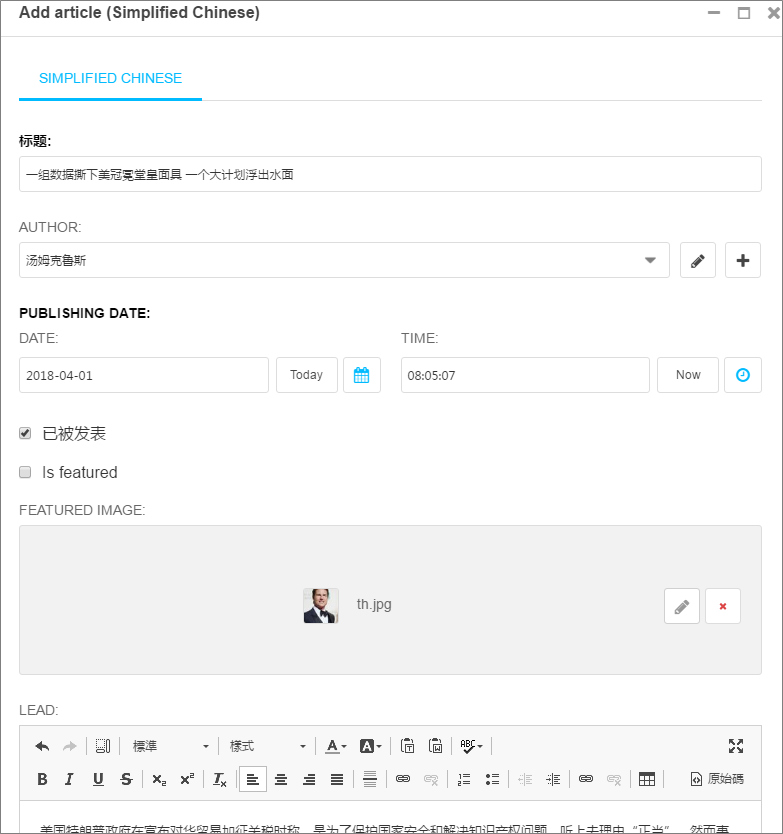
从『News & Blog』下拉菜单里选择『add new articles』开始添加文章
具体安装页面要求的内容添加就可以了
一些字段做简单介绍
『已被发布』:发布的文章才能被浏览
『Is Feature』:精选博客。
『LEAD』:文章摘要。
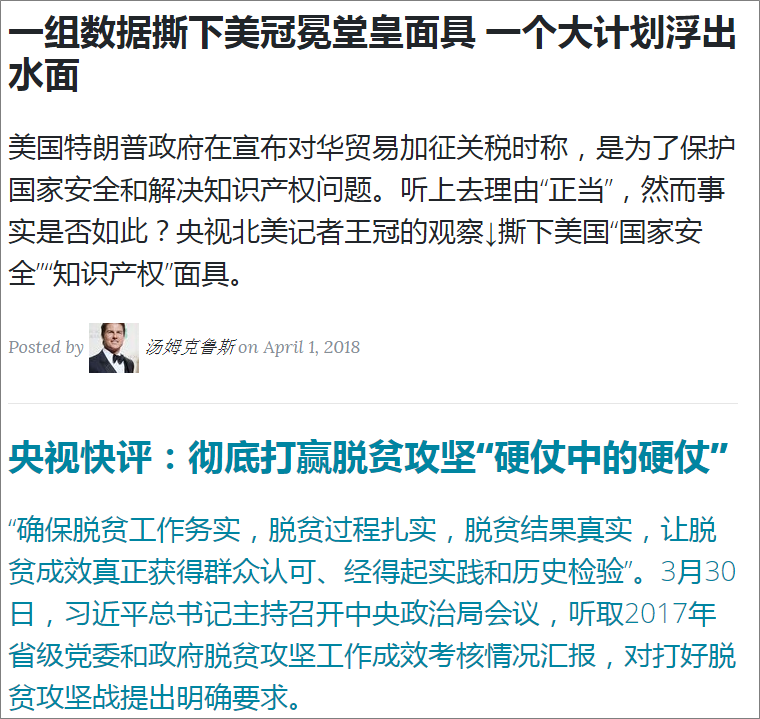
下面是博客详情效果图

下面是文章列表效果图

添加分类和标签
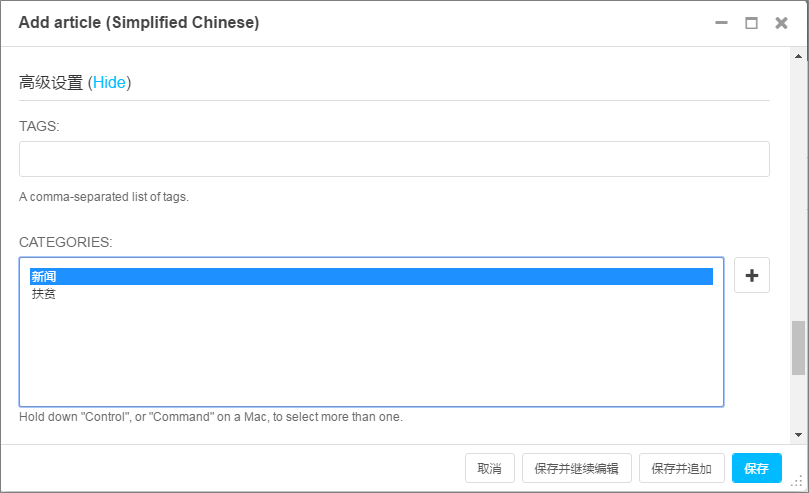
在前面文章创建时,如果打开高级设置可以看到,每篇博客都有对应的『标签』和『分类』,通过设置这些值能够方便浏览寻找博客文章。
除了在博客页面处添加外,在主页点击创建按钮弹出的创建对话框也可以创建分类

『分类』创建页面如下:

添加People
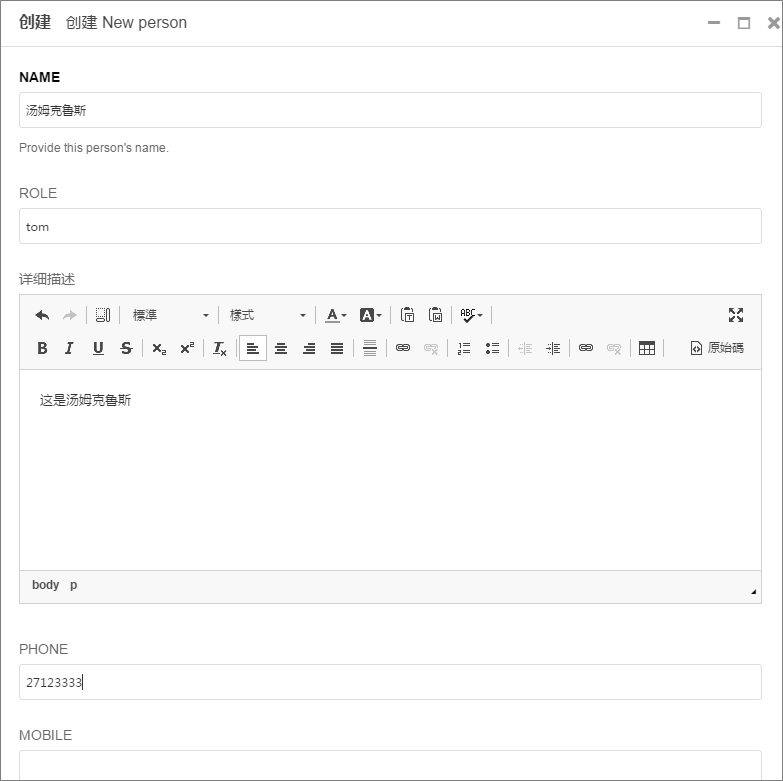
创建People
在博客创建页面已经有入口可以创建People,如果不创建,它会默认创建一个名为1的People
同样在工具栏创建入口,也可以直接创建People。
安装成功后,再次点击创建,可以看到两个新的菜单增加了『New person』『New category』,这是aldryn-newsblog添加的两个插件。

选中『New person』下一步进入
添加应用
跟Newsblog,People也能直接附着在页面上,选择页面『联系人』,进入菜单『页』-『高级设置』,在『应用』菜单里选择『People』保存即可。
下面是我的实现效果图,这儿主要改了一些css的东西,就不详述了。

不支持中文
点击"Download Vcard"下载people vcard时会有如下报错:
format 'ascii' codec can't encode characters in position 0-1: ordinal not in range(128)
https://www.saltycrane.com/blog/2008/11/python-unicodeencodeerror-ascii-codec-cant-encode-character/
http://www.cnblogs.com/ajianbeyourself/p/4883487.html
修改下面两个文件可支持中文
aldryn_people/models.py
    def get_vcard(self, request=None):

        return six.b('{}'.format(smart_unicode(vcard)))
aldryn_people/vcard.py
class Vcard(object):

    def add_line(self, key, value, **params):

        line = '{0}:{1}'.format(key_and_params, smart_str(value))
        self.lines.append(line)
博客及样式
接下来继续用Clean Blog的样式进行美化
博客内容
参考clean blog内容,并将aldryn newsblog的信息嵌入进去。
templates\aldryn_newsblog\includes\article.html
    <div class="post-preview">
        <a href="{% namespace_url 'article-detail' article.slug namespace=namespace default='' %}">
            <h2 class="post-title">
                {% render_model article "title" %}
            </h2>
            {% if article.lead_in %}
            <h3 class="post-subtitle">
                {% if not detail_view %}
                    {% render_model article "lead_in" "" "" "truncatewords:'20'" %}
                {% else %}
                    {% render_model article "lead_in" %}
                {% endif %}
            </h3>
            {% endif %}
        </a>
        <p class="post-meta">Posted by {% include "aldryn_newsblog/includes/author.html" with author=article.author %} on {{ article.publishing_date|date }}    </p>
</div>
注意:这儿用truncatechars代替了truncatewords以支持中文。
aldryn_newsblog\includes\author.html
{% if author %}
    {% if author.visual %}
        {% thumbnail author.visual "50x50" crop upscale subject_location=author.visual.subject_location as author_image %}
        <img src="{{ author_image.url }}" width="50" height="50" alt="{{ author.name }}">
    {% endif %}
	<a href="{% namespace_url "article-list-by-author" author.slug namespace=namespace default='' %}">
        {{ author.name }}
    </a>

    {% comment %}
    <p>
        <a href="{% namespace_url "article-list-by-author" author.slug namespace=namespace default='' %}">
            {% if author.visual %}
                {% thumbnail author.visual "50x50" crop upscale subject_location=author.visual.subject_location as author_image %}
                <img src="{{ author_image.url }}" width="50" height="50" alt="{{ author.name }}">
            {% endif %}
            {{ author.name }}
        </a>
    </p>
    {% if author.function %}<p>{{ author.function }}</p>{% endif %}
    {% if author.article_count %}<p>{{ author.article_count }}</p>{% endif %}
    {% endcomment %}
{% endif %}
aldryn_newsblog\includes\pagination.html
给ul添加pagination类
{% if is_paginated %}
    <ul class="pagination">
aldryn_newsblog\article_detail.html
给ul添加class "paginitaion",给li添加class "page-item"以及给a添加class "page-link"
    <ul class="pagination">
        {% if prev_article %}
            <li class="page-item"><a class="page-link" href="{{ prev_article.get_absolute_url }}">{% trans "Previous Article" %}</a></li>
        {% endif %}
        <li class="page-item"><a class="page-link" href="{% namespace_url "article-list" %}">{% trans "Back to Overview" %}</a></li>
        {% if next_article %}
            <li class="page-item"><a class="page-link" href="{{ next_article.get_absolute_url }}">{% trans "Next Article" %}</a></li>
        {% endif %}
    </ul>
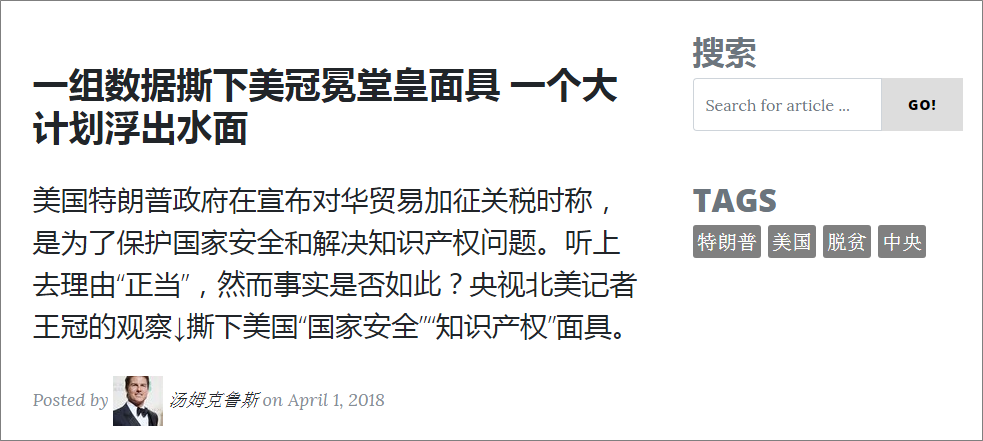
效果如下:
文章列表:
文章内容:

插件栏
在博客页面,我们想添加一个侧栏提供一些额外的功能,比如标签,搜索等
首先修改templates\aldryn_newsblog\base.html文件,添加sidebar plugin,增加css,将页面设为2栏,左边为content,右边为sidebar。
{% extends CMS_TEMPLATE %}
{% load cms_tags %}

{% block content %}

<div class="row plugin-bar">
  <div class="content col-lg-8 col-md-8 mx-auto">
    {% block newsblog_content %}
        {# article_list.html and article_detail.html extend this template #}
    {% endblock %}
  </div>

  <div class="sidebar col-lg-4 col-md-4">
    {% placeholder "sidebar" %}
  </div>
</div>
{% endblock content %}
添加搜索功能
修改aldryn_newsblog\plugins\article_search.html, {% comment%}内部为原内容,新增form改用group样式。
标题也从html中删除了,后面直接通过插件在页面添加。
{% load i18n %}

{% comment %}
<form action="{{ query_url }}" method="get">
    <label for="search-plugin-{{ instance.pk }}">{% trans "Keyword search" %}</label>
    <input type="text" name="q" id="search-plugin-{{ instance.pk }}" placeholder="{% trans 'Keyword' %}">

    <input type="hidden" name="max_articles" value="{{ instance.max_articles }}">
    <button type="submit" class="btn btn-primary">{% trans "Go" %}</button>
</form>
{% endcomment %}

<form action="{{ query_url }}" method="get">
    <div class="row">
      <div class="col-sm-12">
        <div class="input-group">
          <input type="text" name="q" id="search-plugin-{{ instance.pk }}" class="form-control" placeholder="Search for article ..." required>
          <span class="input-group-btn">
            <button class="btn btn-default" type="submit">Go!</button>
          </span>
        </div><!-- /input-group -->
      </div><!-- /.col-sm-12 -->
    </div><!-- /.row -->
</form>
在aldryn_newsblog\includes\search_results.html修改结果显示,基本参考博客列表的样子做了修改。
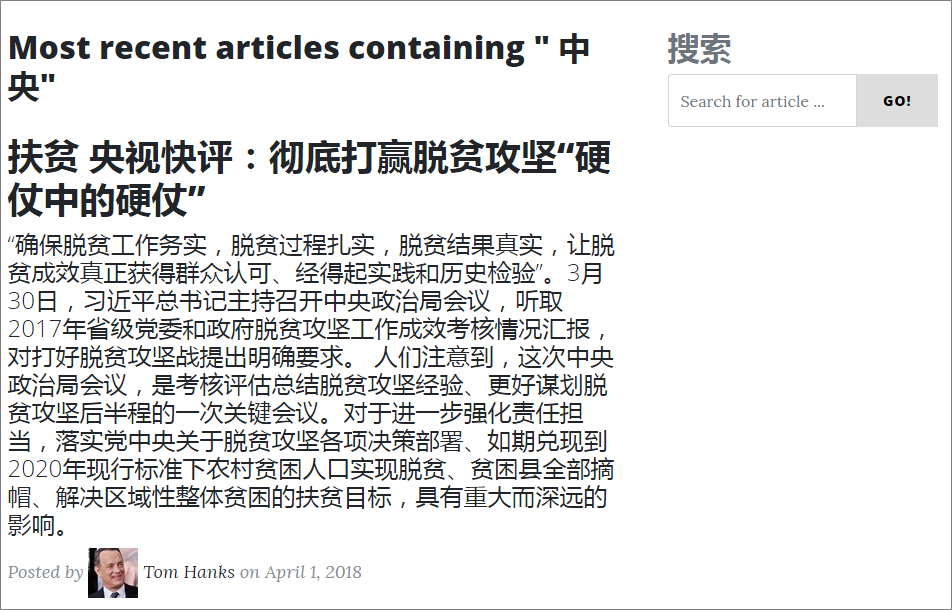
    <h2>{% trans "Most recent articles containing" %} "{% blocktrans with query=query %} <strong>{{ query }}</strong>"{% endblocktrans %}</h2>
    {% for article in object_list %}
    <div class="post-preview">
        <a href="{% namespace_url "article-detail" article.slug namespace=view.app_config.namespace default='' %}">
            <h3 class="post-title">
                <strong>
                    {% for category in article.categories.all %}
                        {{ category.name }}{% if not forloop.last %}, {% endif %}
                    {% endfor %}
                </strong>
                {% render_model article "title" %}
            </h3>
            {% if article.lead_in %}
            <h4 class="post-subtitle">
                {{ article.lead_in|striptags|truncatewords:"10"|safe }}
            </h4>
            {% endif %}
        </a>
        <p class="post-meta">Posted by {% include "aldryn_newsblog/includes/author.html" with author=article.author %} on {{ article.publishing_date|date }}    </p>
    </div>
    {% endfor %}
    <hr>
效果图如下
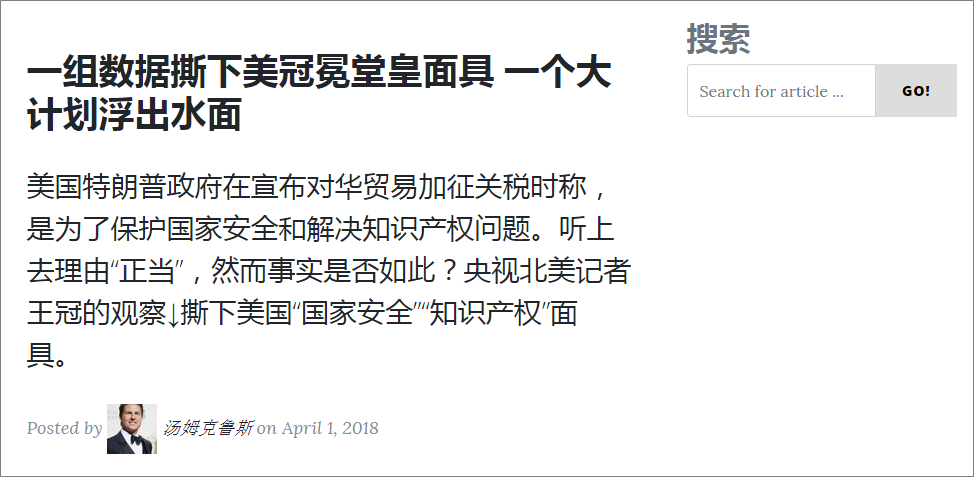
下面是搜索结果
添加标签功能
在templates\aldryn_newsblog\plugins\tags.html,实现非常简单,因为我打算把一些css相关内容直接在plugin操作。
{% load i18n apphooks_config_tags %}

<ul>
    {% comment %}
    <li{% if not newsblog_tag %} class="active"{% endif %}>
        <a href="{% namespace_url "article-list" namespace=instance.app_config.namespace default='' %}">{% trans "All" %}</a>
    </li>
    {% endcomment %}

    {% for tag in tags %}
        {% comment %}
        <li{% if newsblog_tag.id == tag.id %} class="active"{% endif %}>
            <a href="{% namespace_url "article-list-by-tag" tag.slug namespace=instance.app_config.namespace default='' %}">
                {{ tag.name }}
                <span>{{ tag.article_count }}</span>
            </a>
        </li>
        {% endcomment %}
        <a href="{% namespace_url "article-list-by-tag" tag.slug namespace=instance.app_config.namespace default='' %}"><span class="label label-primary" style="background-color: grey;color:white;padding:4px; margin-right: 2px;border-radius: 3px;">{{ tag.name }}</span></a>
    {% endfor %}
</ul>
最终我要在插件实现下面的css结构
<div class="text-left text-uppercase text-secondary mb-0" style="margin-top: 50px; margin-left: 20px;">
 <h2>Tags</h2>
  <div class="text-left">
   Plugin
  </div>
</div>
首先添加样式plugin实现 <div class="text-left text-uppercase text-secondary mb-0" style="margin-top: 50px; margin-left: 20px;">
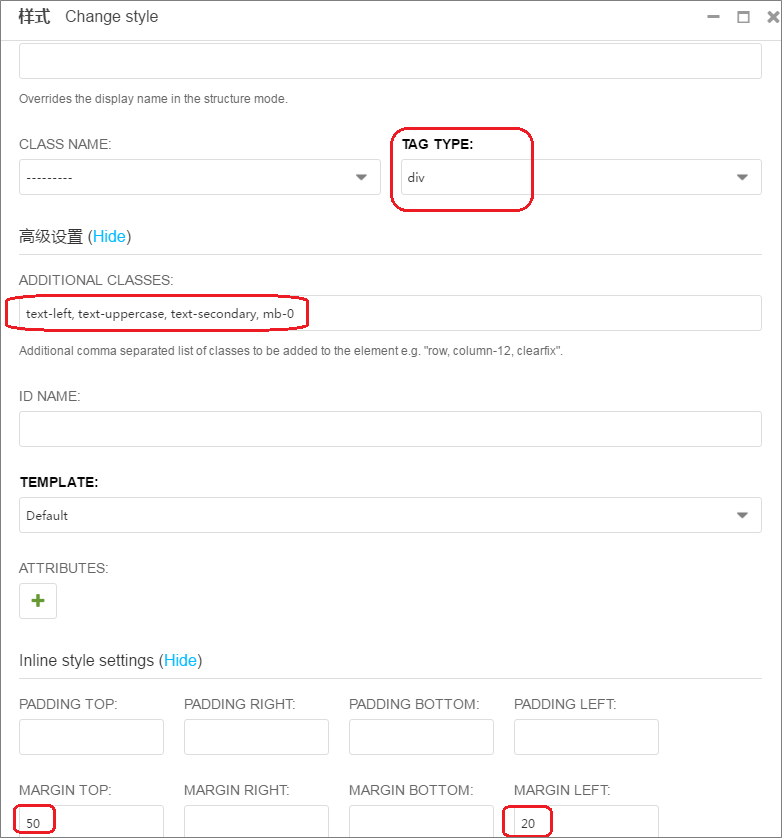
实现<h2>Tags</h2>比较简单,直接添加文本,设为H2
然后嵌套方式在里面加入标签插件
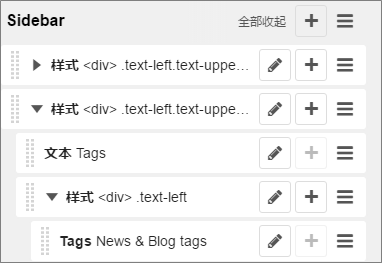
最终效果图如下
添加分类功能
基本方法同标签
修改aldryn_newsblog\plugins\categories.html文件,保留内容显示的部分,其他的留在plugin操作。
<ul>
    {% comment %}
    <li{% if not newsblog_category %} class="active"{% endif %}>
        <a href="{% namespace_url "article-list" namespace=instance.app_config.namespace default='' %}">{% trans "All" %}</a>
    </li>
    {% endcomment %}
    {% for category in categories %}
        {% comment %}
        <li{% if newsblog_category.id == category.id %} class="active"{% endif %}>
            <a href="{% namespace_url "article-list-by-category" category.slug namespace=instance.app_config.namespace default='' %}">{{ category.name }}</a>
            <span>{{ category.article_count }}</span>
        </li>
        {% endcomment %}
        <a href="{% namespace_url "article-list-by-category" category.slug namespace=instance.app_config.namespace default='' %}" style="background-color: grey;color:white;padding:4px; margin-right: 2px;border-radius: 3px;">{{ category.name }}</a>
    {% endfor %}
</ul>
其他插件
Cms还提供了其他的插件,比如『精选文章』,『最近文章』,『相关文章』等

最近文章
templates\aldryn_newsblog\plugins\latest_articles.html
参考index.html,添加post-preview class及添加Pager
{% load i18n %}
{% load i18n apphooks_config_tags %}

{% for article in article_list %}
<div class="post-preview">
    {% include "aldryn_newsblog/includes/article.html" with namespace=instance.app_config.namespace %}
</div>
{% empty %}
    <p>{% trans "No items available" %}</p>
{% endfor %}

<!-- Pager -->
<div class="clearfix">
<a class="btn btn-primary float-right" href="{% namespace_url "article-list" namespace=instance.app_config.namespace default='' %}">Older Posts →</a>
</div>
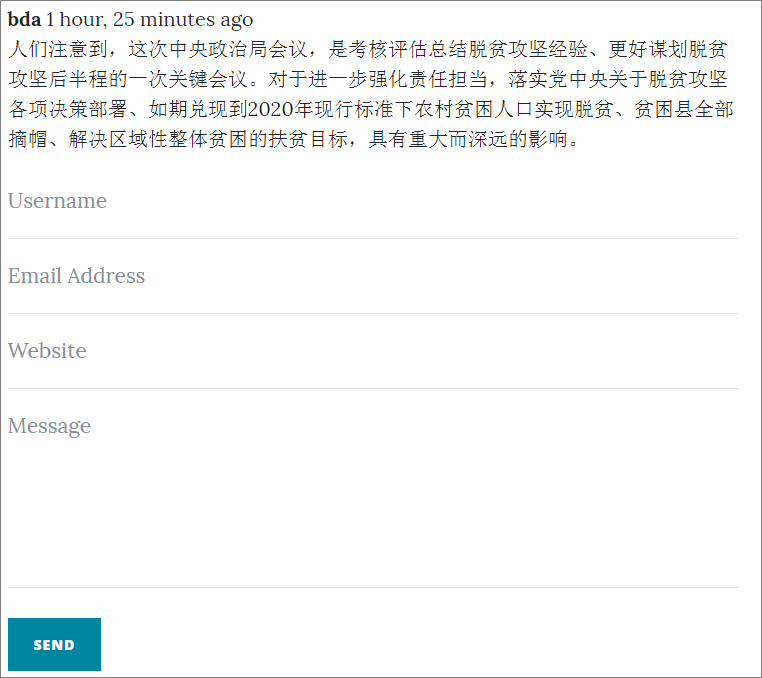
添加评论
安装app djagnocms-comments
pip install djagnocms-comments
在INSTALLED_APPS里添加 'djangocms_comments', 并执行migrate
在urls里引入djangocms-comments
urlpatterns += i18n_patterns(
    url(r'^djangocms_comments/', include('djangocms_comments.urls')),
)
当前的djangocms-comments版本为djangocms-comments==0.2.2,比较老,有些内容需要适配最新的django版本
djangocms-comments\urls.py,修改urlpatters从元组改为数组
urlpatterns = [
    # url(r'^$', 'main_view', name='app_main'),
    url(r'^ajax/save_comment$', SaveComment.as_view(), name='djangocms_comments_save_comment'),
]
原始的djangocms-comments css效果比较差,可以根据自己的需求进行调整,这儿就不进行具体讲解了。
另外有个插件djangocms_inline_comment,试下来效果不好,没有继续研究
效果图如下:
关注下方公众号获取更多文章

参考文档
https://github.com/aldryn/aldryn-newsblog
http://aldryn-newsblog.readthedocs.io/en/latest/introduction.html

 浙公网安备 33010602011771号