
实验初始配置:所有主机关闭防火墙与selinux
[root@localhost ~]# iptables -F
[root@localhost ~]# systemctl stop firewalld
[root@localhost ~]# systemctl disable firewalld
[root@localhost ~]# setenforce 0
[root@localhost ~]# sed -i '/SELINUX/ s/enforcing/disabled/g' /etc/selinux/config
基于NFS共享存储实现KVM虚拟主机动态迁移
在KVM中可以将运行中的虚拟机从一个KVM主机迁移到另一个KVM主机中运行,而不需要任何停机时间。如果两个KVM主机都能够访问相同的存储池,那么实时迁移工作就很好了。要使存储池在KVM主机上都可访问,您需要使用NFS或GFS2文件系统(集群文件系统)。在本例中,我使用NFS文件系统来存储VM映像文件。在迁移过程中,VM的“内存”内容将被复制到目标KVM主机,而在某个时间点上,将发生迁移VM。注意,当您在KVM主机上共享文件系统时,将不会在网络上传输VM的磁盘映像,因为两个KVM主机都可以访问相同的存储池。
迁移介绍:迁移是指将在KVM上运行的虚拟机系统转移到其他物理机的KVM上运行
静态迁移:在虚拟机关机的情况迁移
动态迁移:在虚拟机上服务正常运行的情况下迁移,要基于共享存储
动态迁移特点:
不会对最终用户造成明显影响
仅有非常短暂的停机时间
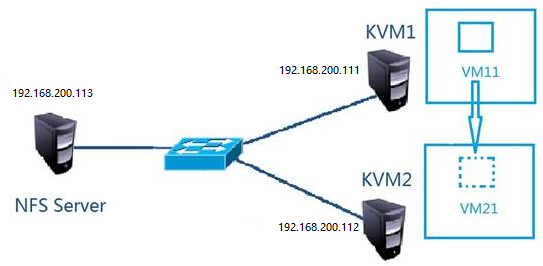
动态迁移拓扑图
1、 设置3台服务器主机名、配置 /etc/hosts 保证网络连接
2、 两台主机的KVM连接NFS共享存储
3、 在源主机的KVM中新建虚拟机并安装系统
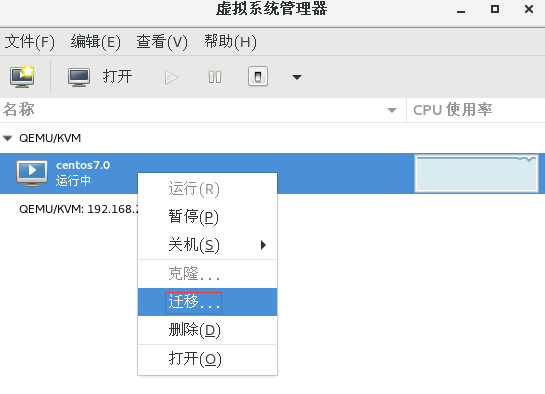
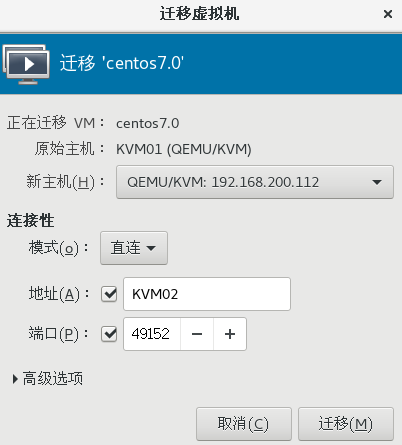
4、 连接KVM、并进行迁移
动态迁移演示
源主机 KVM01 192.168.200.111
目的主机 KVM02 192.168.200.112
NFS共享存储 192.168.200.213 共享目录 /kvm-share
KVM01与KVM02主机都需安装KVM软件并调整网络模式, 所有服务器确保关闭iptables与selinux。
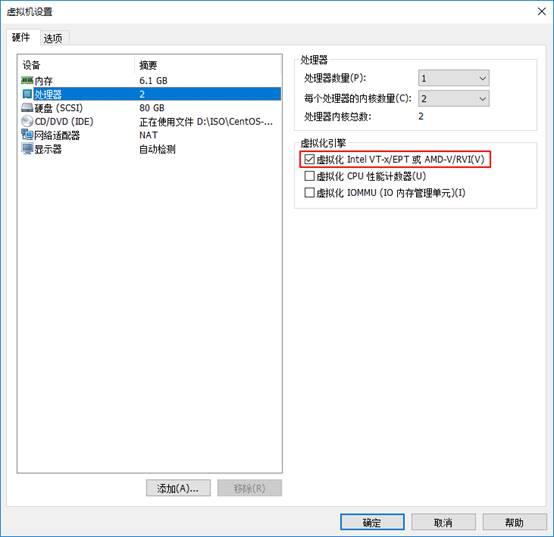
VMware 虚拟机中 linux 开机前需要勾选Inter VT-x/EPT 或 AMD/RVI(v)
[root@localhost ~]# cat /proc/cpuinfo |grep vmx --color=auto
flags : fpu vme de pse tsc msr pae mce cx8 apic sep mtrr pge mca cmov pat pse36 clflush mmx fxsr sse sse2 ss ht syscall nxpdpe1gb rdtscp lm constant_tsc arch_perfmon nopl xtopology tsc_reliable nonstop_tsc eagerfpu pni pclmulqdq vmx ssse3 fma cx16 pcid sse4_1 sse4_2 x2apic movbe popcnt tsc_deadline_timer aes xsave avx f16c rdrand hypervisor lahf_lm abm 3dnowprefetch tpr_shadow vnmi ept vpid fsgsbase tsc_adjust bmi1 avx2 smep bmi2 invpcid rdseed adx smap xsaveopt aratflags : fpu vme de pse tsc msr pae mce cx8 apic sep mtrr pge mca cmov pat pse36 clflush mmx fxsr sse sse2 ss ht syscall nxpdpe1gb rdtscp lm constant_tsc arch_perfmon nopl xtopology tsc_reliable nonstop_tsc eagerfpu pni pclmulqdq vmx ssse3 fma cx16 pcid sse4_1 sse4_2 x2apic movbe popcnt tsc_deadline_timer aes xsave avx f16c rdrand hypervisor lahf_lm abm 3dnowprefetch tpr_shadow vnmi ept vpid fsgsbase tsc_adjust bmi1 avx2 smep bmi2 invpcid rdseed adx smap xsaveopt arat
在CentOS7的系统光盘镜像中,已经提供了安装KVM所需软件,通过部署基于光盘镜像的本地yum源,直接使用yum安装所需软件即可。
[root@localhost ~]# yum -y groupinstall -y "GNOME Desktop" #安装GNOME桌面环境
[root@localhost ~]# yum -y install qemu-kvm #KVM模块
[root@localhost ~]# yum -y install qemu-kvm-tools #KVM调试工具,可不安装
[root@localhost ~]# yum -y install qemu-img #qemu组件,创建磁盘,启动虚拟机
[root@localhost ~]# yum -y install bridge-utils #网络支持工具
[root@localhost ~]# yum -y install libvirt #虚拟机管理工具
[root@localhost ~]# yum -y install virt-manager #图形界面管理虚拟机
[root@localhost ~]# yum -y install qemu-kvm qemu-kvm-tools virt-install qemu-img bridge-utils libvirt virt-manager
检测KVM模块安装是否成功
[root@localhost ~]# lsmod | grep kvm
kvm_intel 174841 0
kvm 578518 1 kvm_intel
irqbypass 13503 1 kvm
注意:使用yum安装完桌面后,将系统默认的运行target修改为graphical.target。重启系统后进入图形界面,若不修改系统的默认运行target,重启时可能会出错。
开启服务,安装完成后还需要开启libvirtd服务
[root@localhost ~]# systemctl start libvirtd
[root@localhost ~]# systemctl enable libvirtd
设置KVM网络
宿主服务器安装完成KVM,首先要设定网络,在libvirt中运行KVM网络有两种方法,NAT和Bridge,默认是NAT。
1、用户模式,即NAT方式,这种方式是默认网络,数据包由NAT方式通过主机接口进行传送,可以访问外网,但是无法从外部访问虚拟机网络
2、桥接模式,这种模式允许虚拟机像一台独立的主机一样拥有网络,外部机器可以直接访问到虚拟机内部,但需要网卡支持,并编辑网卡参数文件以支持桥接。
Bridge案例:
[root@localhost ~]# cp /etc/sysconfig/network-scripts/ifcfg-ens32 /etc/sysconfig/network-scripts/ifcfg-br0
[root@localhost ~]# vim /etc/sysconfig/network-scripts/ifcfg-br0
TYPE=Bridge
PROXY_METHOD=none
BROWSER_ONLY=no
BOOTPROTO=static
DEFROUTE=yes
IPV4_FAILURE_FATAL=no
IPV6INIT=no
IPV6_AUTOCONF=no
IPV6_DEFROUTE=no
IPV6_FAILURE_FATAL=no
IPV6_ADDR_GEN_MODE=stable-privacy
NAME=br0
DEVICE=br0
ONBOOT=yes
IPADDR=192.168.200.111
PREFIX=24
GATEWAY=192.168.200.1
DNS1=202.106.0.20
IPV6_PRIVACY=no
[root@localhost ~]# vim /etc/sysconfig/network-scripts/ifcfg-ens32
TYPE=Ethernet
PROXY_METHOD=none
BROWSER_ONLY=no
BOOTPROTO=static
DEFROUTE=yes
IPV4_FAILURE_FATAL=no
IPV6INIT=no
IPV6_AUTOCONF=no
IPV6_DEFROUTE=no
IPV6_FAILURE_FATAL=no
IPV6_ADDR_GEN_MODE=stable-privacy
NAME=ens32
UUID=b194e583-21c3-4109-a160-3d2a9876a30b
DEVICE=ens32
ONBOOT=yes
IPV6_PRIVACY=no
BRIDGE=br0
重启network服务
[root@localhost ~]# systemctl restart network
[root@localhost ~]# ifconfig
br0: flags=4163<UP,BROADCAST,RUNNING,MULTICAST> mtu 1500
inet 192.168.200.111 netmask 255.255.255.0 broadcast 192.168.200.255
inet6 fe80::20c:29ff:feb6:933c prefixlen 64 scopeid 0x20<link>
ether 00:0c:29:b6:93:3c txqueuelen 1000 (Ethernet)
RX packets 111 bytes 7746 (7.5 KiB)
RX errors 0 dropped 0 overruns 0 frame 0
TX packets 63 bytes 7098 (6.9 KiB)
TX errors 0 dropped 0 overruns 0 carrier 0 collisions 0
ens32: flags=4163<UP,BROADCAST,RUNNING,MULTICAST> mtu 1500
inet6 fe80::20c:29ff:feb6:933c prefixlen 64 scopeid 0x20<link>
ether 00:0c:29:b6:93:3c txqueuelen 1000 (Ethernet)
RX packets 1776 bytes 142918 (139.5 KiB)
RX errors 0 dropped 0 overruns 0 frame 0
TX packets 1739 bytes 1109674 (1.0 MiB)
TX errors 0 dropped 0 overruns 0 carrier 0 collisions 0
lo: flags=73<UP,LOOPBACK,RUNNING> mtu 65536
inet 127.0.0.1 netmask 255.0.0.0
inet6 ::1 prefixlen 128 scopeid 0x10<host>
loop txqueuelen 1000 (Local Loopback)
RX packets 64 bytes 5568 (5.4 KiB)
RX errors 0 dropped 0 overruns 0 frame 0
TX packets 64 bytes 5568 (5.4 KiB)
TX errors 0 dropped 0 overruns 0 carrier 0 collisions 0
virbr0: flags=4099<UP,BROADCAST,MULTICAST> mtu 1500
inet 192.168.122.1 netmask 255.255.255.0 broadcast 192.168.122.255
ether 52:54:00:b3:df:0e txqueuelen 1000 (Ethernet)
RX packets 0 bytes 0 (0.0 B)
RX errors 0 dropped 0 overruns 0 frame 0
TX packets 0 bytes 0 (0.0 B)
TX errors 0 dropped 0 overruns 0 carrier 0 collisions 0
出现以上信息说明网卡桥接成功。
[root@KVM01 ~]# tail -3 /etc/hosts
192.168.200.111 KVM01
192.168.200.112 KVM02
192.168.200.113 NFS
[root@KVM01 ~]# scp /etc/hosts 192.168.200.112:/etc
[root@KVM01 ~]# scp /etc/hosts 192.168.200.113:/etc
NFS SERVER:配置共享目录 /kvm-share
[root@NFS ~]# cat /etc/exports
/kvm-share 192.168.200.111(rw,sync,no_root_squash)
/kvm-share 192.168.200.112(rw,sync,no_root_squash)
[root@NFS ~]# mkdir /kvm-share
[root@NFS ~]# systemctl start nfs
两台KVM主机上的操作:
[root@KVM01 ~]# showmount -e 192.168.200.113
Export list for 192.168.200.113:
/kvm-share 192.168.200.112,192.168.200.111
[root@KVM02 ~]# showmount -e 192.168.200.113
Export list for 192.168.200.113:
/kvm-share 192.168.200.112,192.168.200.111
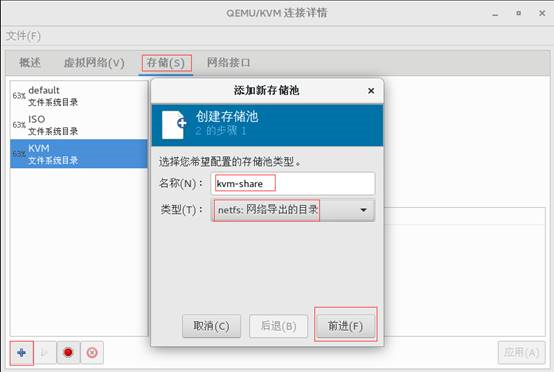
两台KVM连接共享存储:双击localhost(qemu) 点击 存储 点击 加号


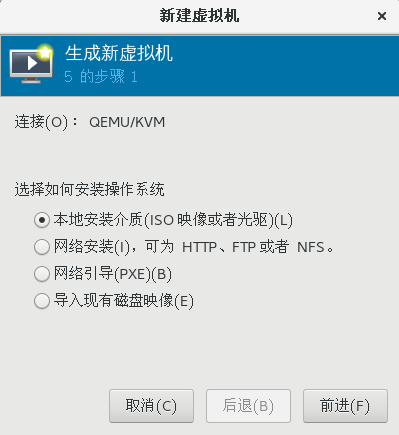
源主机:192.168.200.111 在共享存储上创建虚拟机
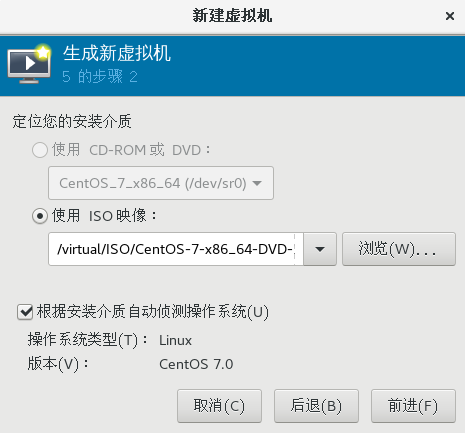

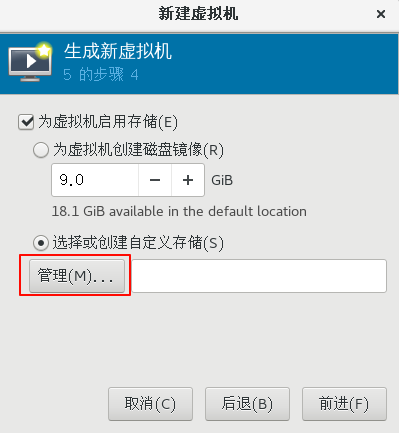

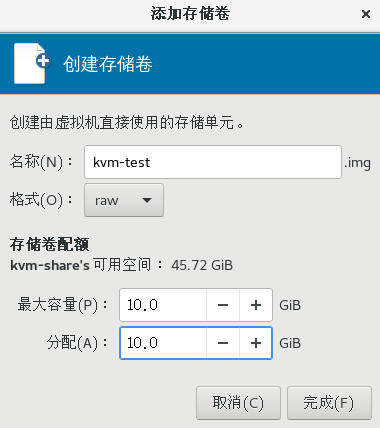
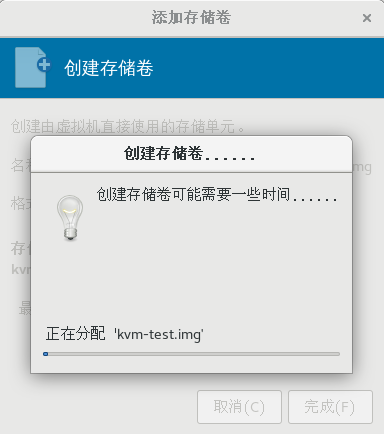
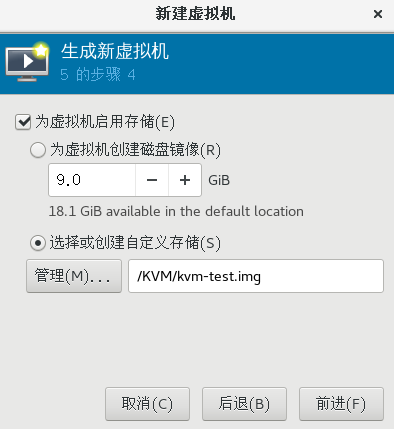


过程比较慢,需要耐心等待。
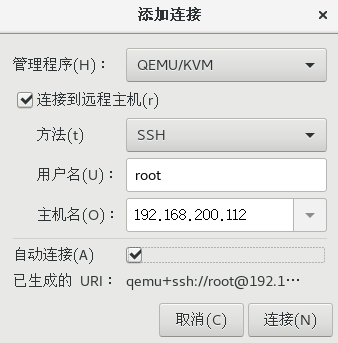
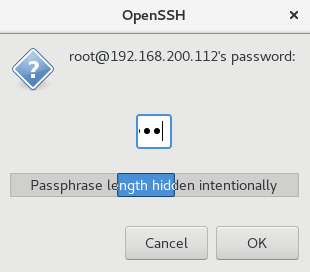
KVM迁移:打开virt-manager 选择文件 选择Add Connection
源主机连接目标主机


[root@KVM01 ~]# yum -y install openssh-askpass
[root@KVM02 ~]# yum -y install openssh-askpass

[root@KVM01 ~]# virsh shutdown centos7.0
域 centos7.0 被关闭
[root@KVM01 ~]# virsh edit centos7.0
<driver name='qemu' type='raw' cache='none'/>
[root@KVM01 ~]# virsh start centos7.0
域 centos7.0 已开始
[root@KVM01 ~]# virsh list --all
Id 名称 状态
----------------------------------------------------
2 centos7.0 running


 浙公网安备 33010602011771号