
redis cluster 集群
cluster 集群【高可用集群,分区、扩容集群】不需要ruby,需要使用5.0以上版本
C/C++连接时,需要使用 使用了crc16.c文件中的uint16_t crc16(const char *buf, int len)函数。
https://blog.csdn.net/sxy_qjj/article/details/98872731
文件源码:
#include "server.h"

/*
 * Copyright 2001-2010 Georges Menie (www.menie.org)
 * Copyright 2010-2012 Salvatore Sanfilippo (adapted to Redis coding style)
 * All rights reserved.
 *
 * Redistribution and use in source and binary forms, with or without
 * modification, are permitted provided that the following conditions are met:
 *
 *     * Redistributions of source code must retain the above copyright
 *       notice, this list of conditions and the following disclaimer.
 *     * Redistributions in binary form must reproduce the above copyright
 *       notice, this list of conditions and the following disclaimer in the
 *       documentation and/or other materials provided with the distribution.
 *     * Neither the name of the University of California, Berkeley nor the
 *       names of its contributors may be used to endorse or promote products
 *       derived from this software without specific prior written permission.
 *
 * THIS SOFTWARE IS PROVIDED BY THE REGENTS AND CONTRIBUTORS ``AS IS'' AND ANY
 * EXPRESS OR IMPLIED WARRANTIES, INCLUDING, BUT NOT LIMITED TO, THE IMPLIED
 * WARRANTIES OF MERCHANTABILITY AND FITNESS FOR A PARTICULAR PURPOSE ARE
 * DISCLAIMED. IN NO EVENT SHALL THE REGENTS AND CONTRIBUTORS BE LIABLE FOR ANY
 * DIRECT, INDIRECT, INCIDENTAL, SPECIAL, EXEMPLARY, OR CONSEQUENTIAL DAMAGES
 * (INCLUDING, BUT NOT LIMITED TO, PROCUREMENT OF SUBSTITUTE GOODS OR SERVICES;
 * LOSS OF USE, DATA, OR PROFITS; OR BUSINESS INTERRUPTION) HOWEVER CAUSED AND
 * ON ANY THEORY OF LIABILITY, WHETHER IN CONTRACT, STRICT LIABILITY, OR TORT
 * (INCLUDING NEGLIGENCE OR OTHERWISE) ARISING IN ANY WAY OUT OF THE USE OF THIS
 * SOFTWARE, EVEN IF ADVISED OF THE POSSIBILITY OF SUCH DAMAGE.
 */

/* CRC16 implementation according to CCITT standards.
 *
 * Note by @antirez: this is actually the XMODEM CRC 16 algorithm, using the
 * following parameters:
 *
 * Name                       : "XMODEM", also known as "ZMODEM", "CRC-16/ACORN"
 * Width                      : 16 bit
 * Poly                       : 1021 (That is actually x^16 + x^12 + x^5 + 1)
 * Initialization             : 0000
 * Reflect Input byte         : False
 * Reflect Output CRC         : False
 * Xor constant to output CRC : 0000
 * Output for "123456789"     : 31C3
 */

static const uint16_t crc16tab[256]= {
    0x0000,0x1021,0x2042,0x3063,0x4084,0x50a5,0x60c6,0x70e7,
    0x8108,0x9129,0xa14a,0xb16b,0xc18c,0xd1ad,0xe1ce,0xf1ef,
    0x1231,0x0210,0x3273,0x2252,0x52b5,0x4294,0x72f7,0x62d6,
    0x9339,0x8318,0xb37b,0xa35a,0xd3bd,0xc39c,0xf3ff,0xe3de,
    0x2462,0x3443,0x0420,0x1401,0x64e6,0x74c7,0x44a4,0x5485,
    0xa56a,0xb54b,0x8528,0x9509,0xe5ee,0xf5cf,0xc5ac,0xd58d,
    0x3653,0x2672,0x1611,0x0630,0x76d7,0x66f6,0x5695,0x46b4,
    0xb75b,0xa77a,0x9719,0x8738,0xf7df,0xe7fe,0xd79d,0xc7bc,
    0x48c4,0x58e5,0x6886,0x78a7,0x0840,0x1861,0x2802,0x3823,
    0xc9cc,0xd9ed,0xe98e,0xf9af,0x8948,0x9969,0xa90a,0xb92b,
    0x5af5,0x4ad4,0x7ab7,0x6a96,0x1a71,0x0a50,0x3a33,0x2a12,
    0xdbfd,0xcbdc,0xfbbf,0xeb9e,0x9b79,0x8b58,0xbb3b,0xab1a,
    0x6ca6,0x7c87,0x4ce4,0x5cc5,0x2c22,0x3c03,0x0c60,0x1c41,
    0xedae,0xfd8f,0xcdec,0xddcd,0xad2a,0xbd0b,0x8d68,0x9d49,
    0x7e97,0x6eb6,0x5ed5,0x4ef4,0x3e13,0x2e32,0x1e51,0x0e70,
    0xff9f,0xefbe,0xdfdd,0xcffc,0xbf1b,0xaf3a,0x9f59,0x8f78,
    0x9188,0x81a9,0xb1ca,0xa1eb,0xd10c,0xc12d,0xf14e,0xe16f,
    0x1080,0x00a1,0x30c2,0x20e3,0x5004,0x4025,0x7046,0x6067,
    0x83b9,0x9398,0xa3fb,0xb3da,0xc33d,0xd31c,0xe37f,0xf35e,
    0x02b1,0x1290,0x22f3,0x32d2,0x4235,0x5214,0x6277,0x7256,
    0xb5ea,0xa5cb,0x95a8,0x8589,0xf56e,0xe54f,0xd52c,0xc50d,
    0x34e2,0x24c3,0x14a0,0x0481,0x7466,0x6447,0x5424,0x4405,
    0xa7db,0xb7fa,0x8799,0x97b8,0xe75f,0xf77e,0xc71d,0xd73c,
    0x26d3,0x36f2,0x0691,0x16b0,0x6657,0x7676,0x4615,0x5634,
    0xd94c,0xc96d,0xf90e,0xe92f,0x99c8,0x89e9,0xb98a,0xa9ab,
    0x5844,0x4865,0x7806,0x6827,0x18c0,0x08e1,0x3882,0x28a3,
    0xcb7d,0xdb5c,0xeb3f,0xfb1e,0x8bf9,0x9bd8,0xabbb,0xbb9a,
    0x4a75,0x5a54,0x6a37,0x7a16,0x0af1,0x1ad0,0x2ab3,0x3a92,
    0xfd2e,0xed0f,0xdd6c,0xcd4d,0xbdaa,0xad8b,0x9de8,0x8dc9,
    0x7c26,0x6c07,0x5c64,0x4c45,0x3ca2,0x2c83,0x1ce0,0x0cc1,
    0xef1f,0xff3e,0xcf5d,0xdf7c,0xaf9b,0xbfba,0x8fd9,0x9ff8,
    0x6e17,0x7e36,0x4e55,0x5e74,0x2e93,0x3eb2,0x0ed1,0x1ef0
};

uint16_t crc16(const char *buf, int len) {
    int counter;
    uint16_t crc = 0;
    for (counter = 0; counter < len; counter++)
            crc = (crc<<8) ^ crc16tab[((crc>>8) ^ *buf++)&0x00FF];
    return crc;
}
【搭建集群】
搭建3住3从的集群
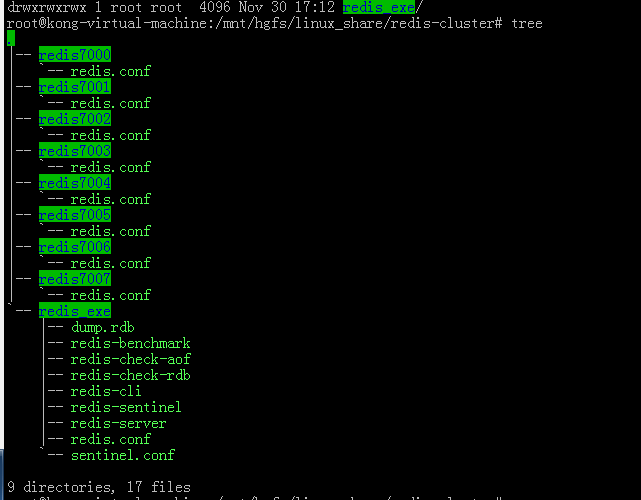
1. 创建配置文件目录:
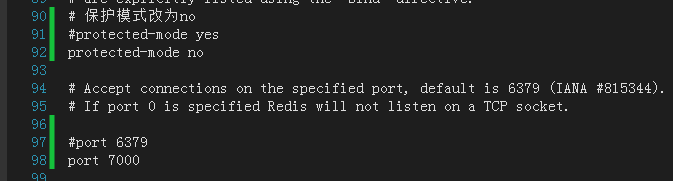
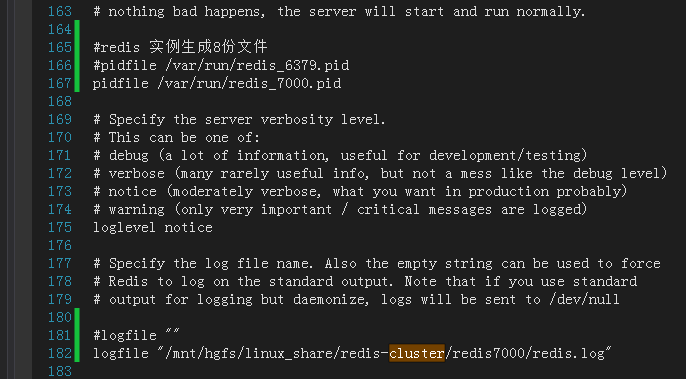
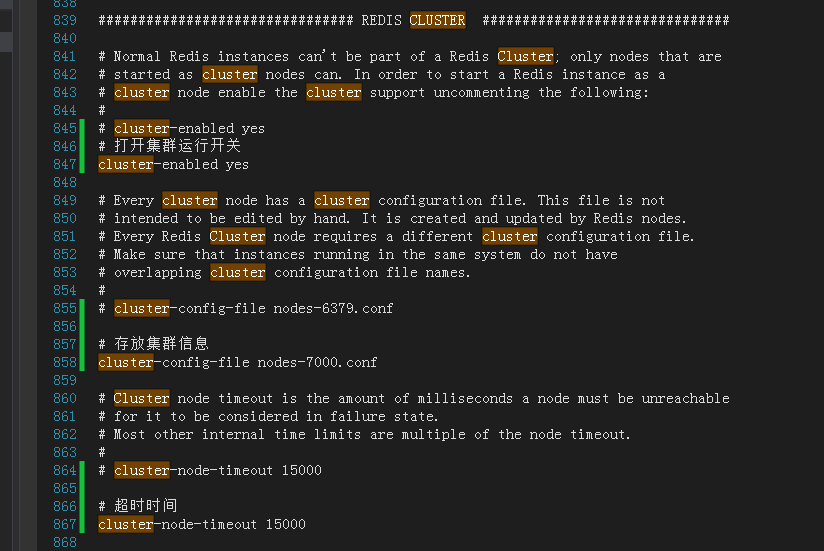
2. 配置文件的修改:


3. 配置文件复制:
sed 's/7000/7001/g' redis7000/redis.conf > redis7001/redis.conf
sed 's/7000/7002/g' redis7000/redis.conf > redis7002/redis.conf
sed 's/7000/7003/g' redis7000/redis.conf > redis7003/redis.conf
sed 's/7000/7004/g' redis7000/redis.conf > redis7004/redis.conf
sed 's/7000/7005/g' redis7000/redis.conf > redis7005/redis.conf
sed 's/7000/7006/g' redis7000/redis.conf > redis7006/redis.conf
sed 's/7000/7007/g' redis7000/redis.conf > redis7007/redis.conf

4. 启动redis
./redis_exe/redis-server ./redis7000/redis.conf
./redis_exe/redis-server ./redis7001/redis.conf
./redis_exe/redis-server ./redis7002/redis.conf
./redis_exe/redis-server ./redis7003/redis.conf
./redis_exe/redis-server ./redis7004/redis.conf
./redis_exe/redis-server ./redis7005/redis.conf

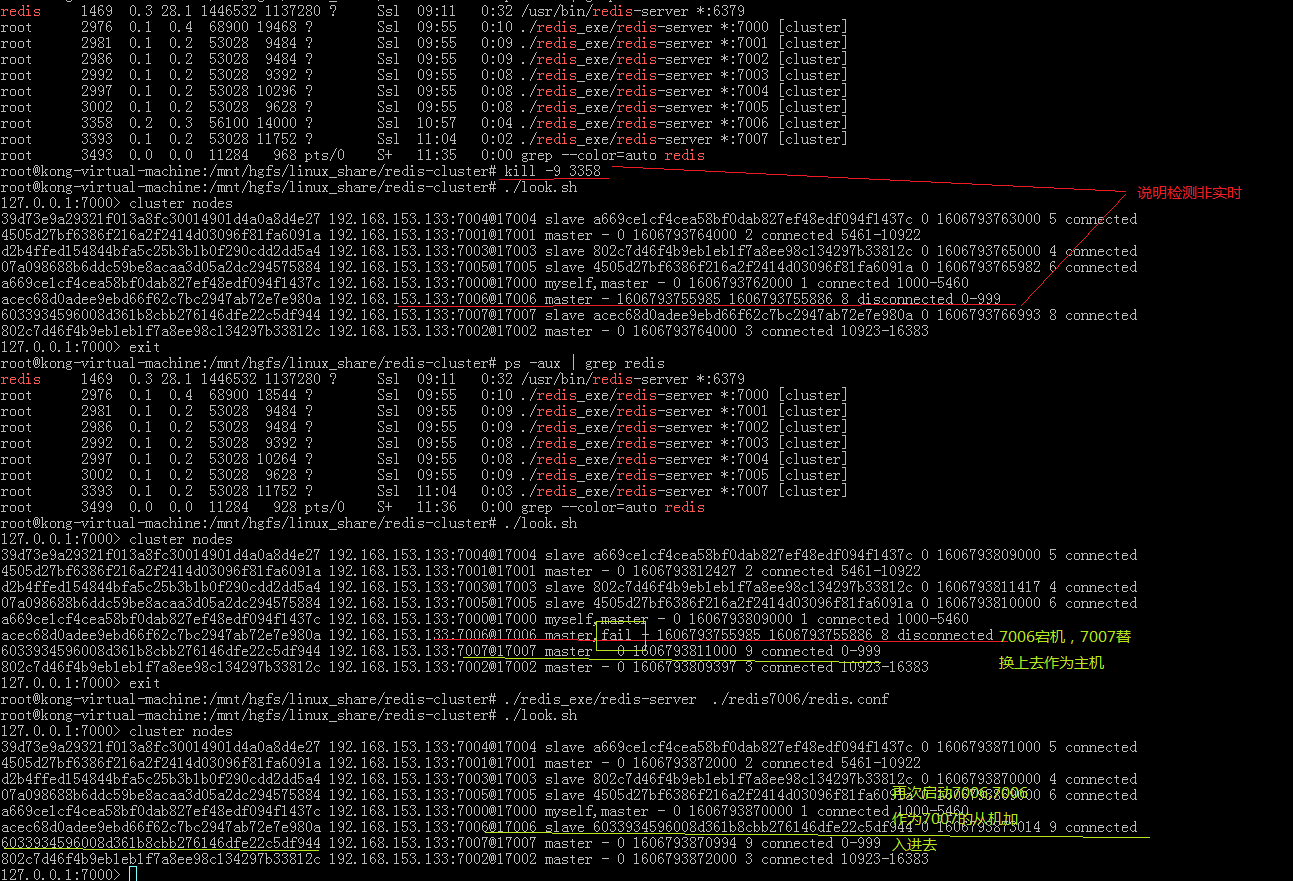
5. 查看进程:
ps -aux | grep redis

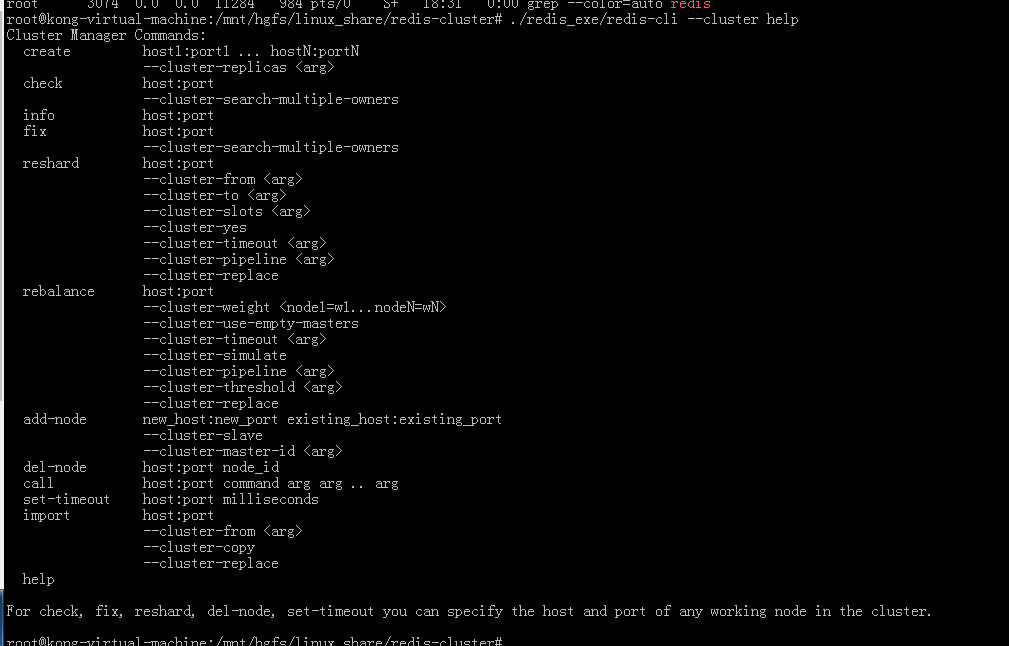
6. 使用 redis-cli --cluster 搭建集群
./redis_exe/redis-cli --cluster help
* 设置一个从节点
./redis_exe/redis-cli --cluster create 192.168.153.133:7000 192.168.153.133:7001 192.168.153.133:7002 192.168.153.133:7003 192.168.153.133:7004 192.168.153.133:7005 --cluster-replicas 1
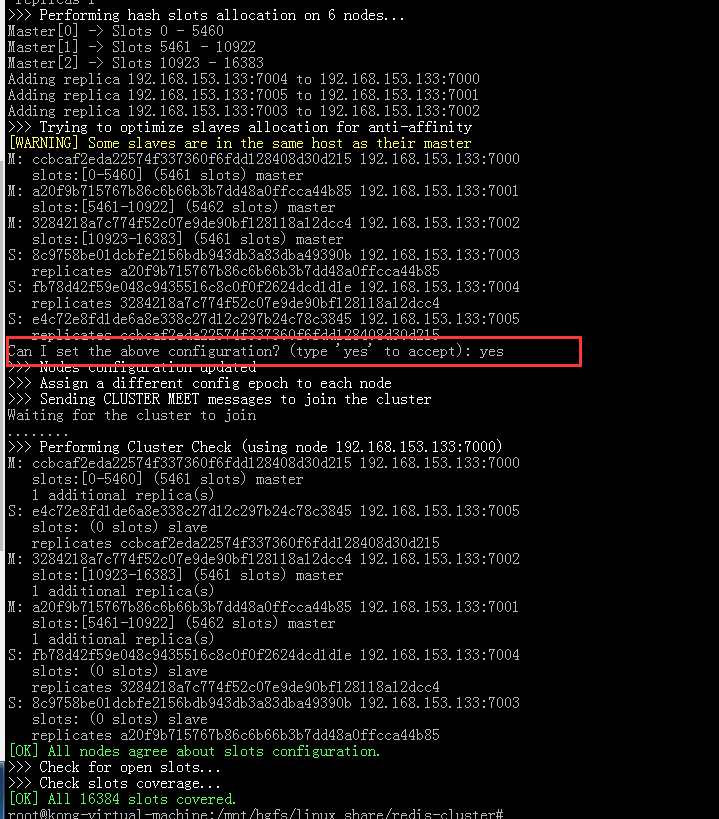
* 查看信息:
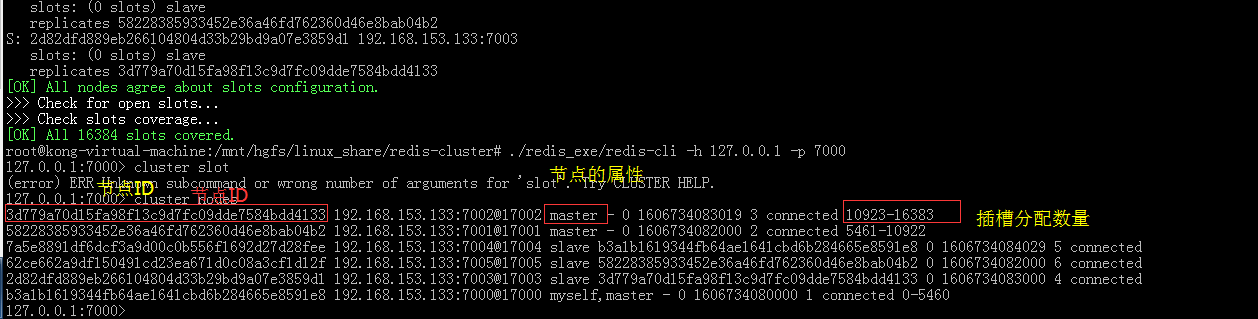
./redis_exe/redis-cli -h 127.0.0.1 -p 7000 或者【./redis_exe/redis-cli -h 127.0.0.1 -p 7000 -c】
cluster nodes
如果出错,这删除 redis7000-70007配置文件中,运行生成的文件,使用如下命令删除。
find . -name '*.rdb' -type f -print | xargs rm -f
find . -regex ".*\nodes.*\.conf\|.*\redis.log" -type f -print | xargs rm -f
* 查询数据

* 增加节点/扩容:
增加主节点:
启动7006
./redis_exe/redis-server ./redis7006/redis.conf

查看节点信息:
./redis_exe/redis-cli -h 127.0.0.1 -p 7006
>cluster nodes

将节点追加到集群:
./redis_exe/redis-cli --cluster add-node 192.168.153.133:7006 192.168.153.133:7000
追加从节点:
./redis_exe/redis-server ./redis7007/redis.conf
./redis_exe/redis-cli --cluster add-node 192.168.153.133:7007 192.168.153.133:7000 --cluster-slave --cluster-master-id acec68d0adee9ebd66f62c7bc2947ab72e7e980a
【解释-->acec68d0adee9ebd66f62c7bc2947ab72e7e980a 节点为 7006 的节点ID,因为7007作为7006的从机】
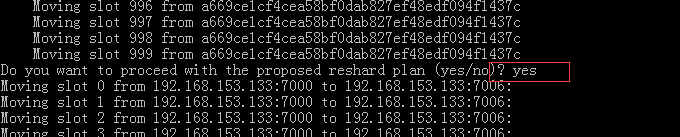
【分配槽位】:
./redis_exe/redis-cli --cluster reshard 192.168.153.133:7000
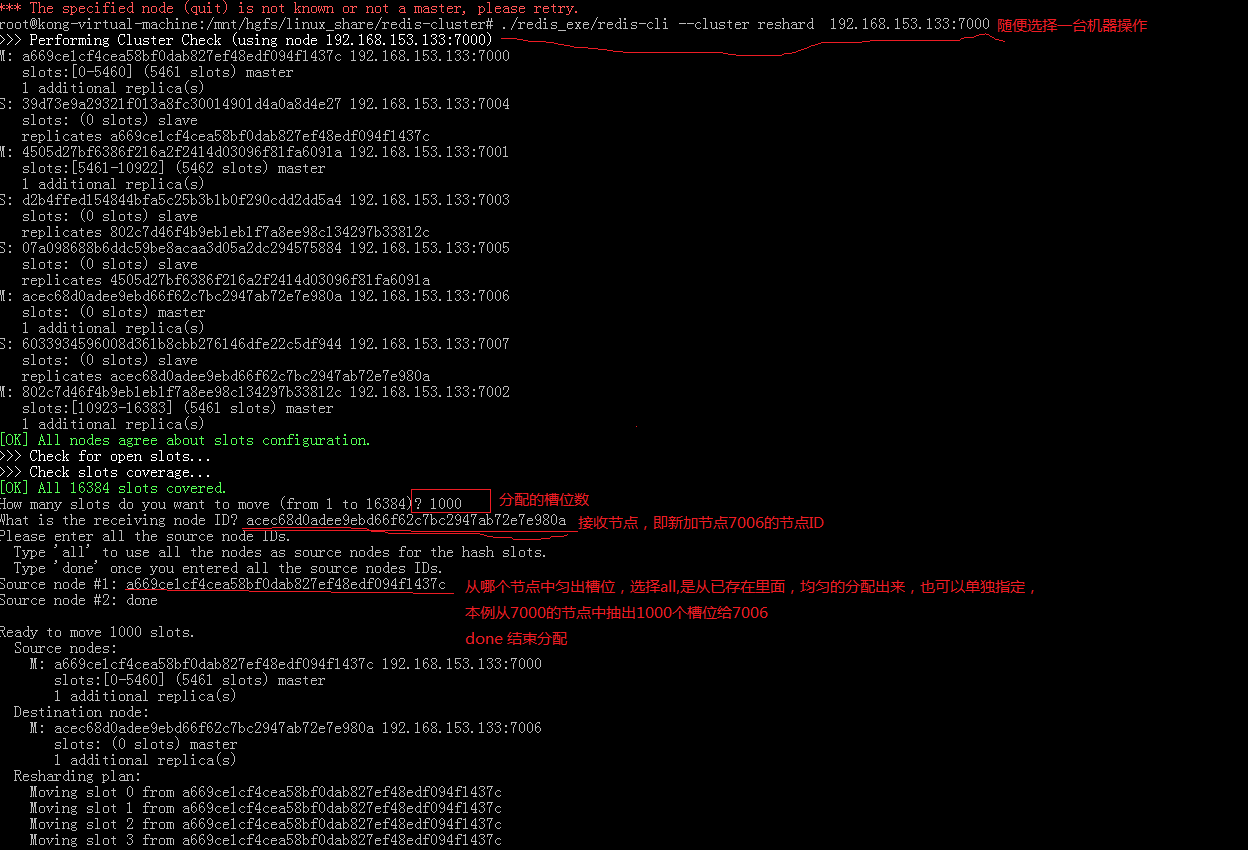
** 分配完,进行数据转移。
模拟宕机:【重启后,最好使用命令重新加入集群】
配置文件修改:
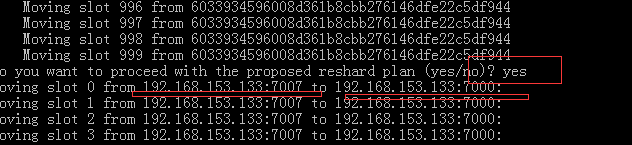
【删除节点/缩容】
* 迁移槽位
./redis_exe/redis-cli --cluster reshard 192.168.153.133:7000 --cluster-from 6033934596008d361b8cbb276146dfe22c5df944 --cluster-to a669ce1cf4cea58bf0dab827ef48edf094f1437c --cluster-slots 1000

* 删除节点,先删除从节点7006,再删除主节点7007(因为上一步的模拟宕机,7007已经变为主节点)
./redis_exe/redis-cli --cluster del-node 192.168.153.133:7000 3c9b75300b85bbc9e0b341c0dde8166fc36a18bf
./redis_exe/redis-cli --cluster del-node 192.168.153.133:7000 6033934596008d361b8cbb276146dfe22c5df944

查看删除情况:


 浙公网安备 33010602011771号