

Vuex的使用
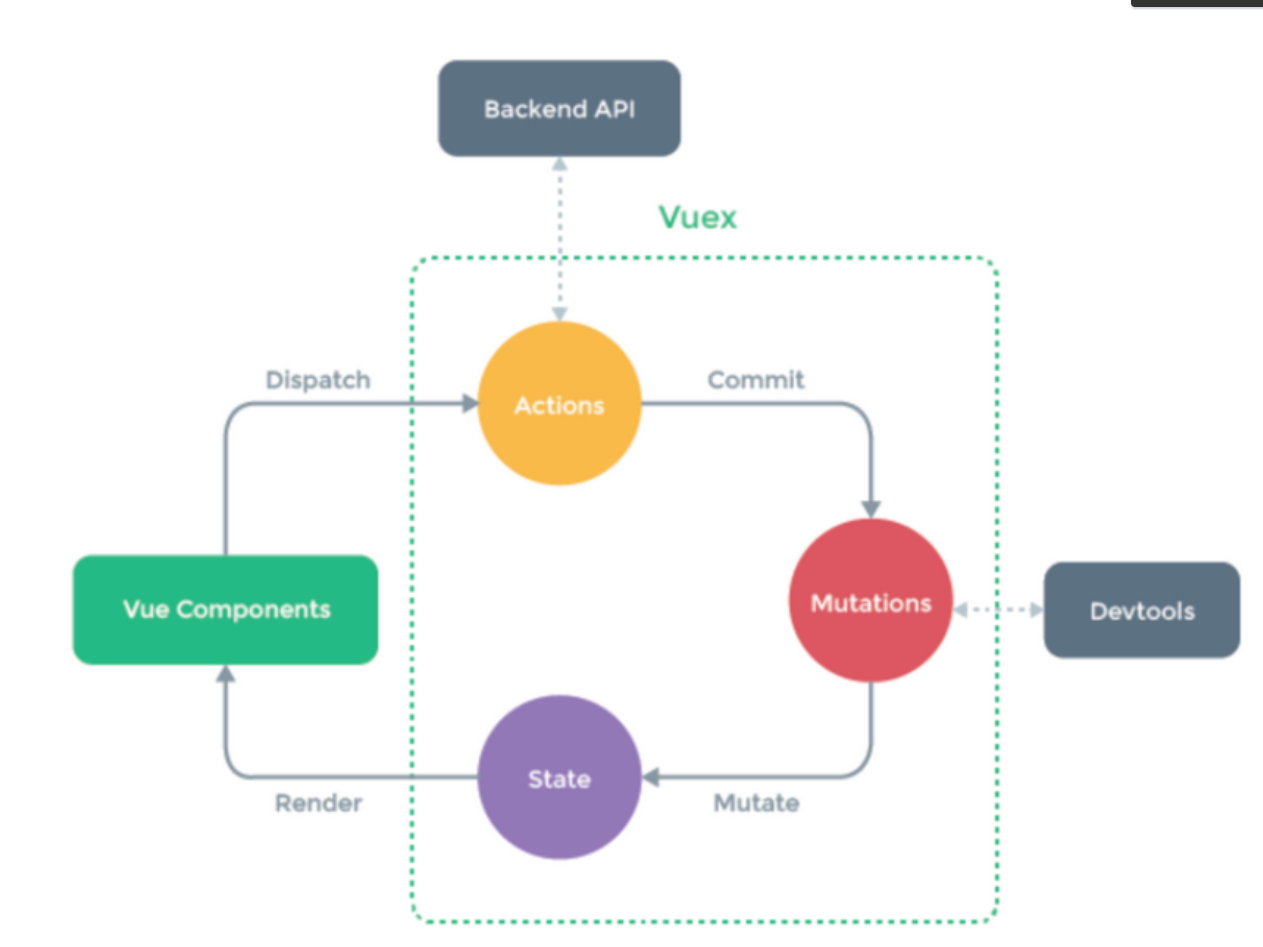
1.Vuex:Vue的插件 增强vue的功能
在Vue中实现集中式状态(数据)管理的一个Vue插件,对vue应用中多个组件的共享状态进行集中式的管理(读/写),也是一种组件间通信的方式,且适用于任意组件间通信
2.Vuex的使用流程
2.1 state:存数据的地址
2.2 actions:服务员,中转站
2.3 mutations:厨师,真正改state数据的地方
3.使用步骤
3.1 在state中定义变量
3.2 在组件中通过this.$store.dispatch('actions中定义的函数'),触发actions中得函数执行
3.3 在actions中得函数中,调用 context.commit('mutations中定义的函数')
3.4 在mutations中定义的函数实现真正的修改state中得数据
3.5 页面中只要使用$store.state.变量,变量变化,页面就变化 实现了组件间通信
3.6 注意:
在组件中可以直接调用commit触发【mutations中定义的函数】
在组件中可以直接修改state中定义变量
Vue-router的使用
基本使用
1.Vue-router:官方提供的用来实现SPA 的vue 插件:有了它以后,我们可以写很多页面组件,通过地址栏不同的路径显示不同的页面组件
2.网址:https://router.vuejs.org/zh/index.html
3.基本使用:
3.1 新建router/index.js
const routes = [配置路由1,配置路由2]
3.2 main.js中使用:之前已经写好了
import router from './router'
new Vue({
...
router,
...
}).$mount('#app')
3.3 只需要写页面组件,配置路由即可
3.4 在App.vue中加入
<router-view>
</router-view>
3.5 在浏览器访问const routes中配置的路径,就能看到对应的页面组件了
4.代码:
4.1 router/index.js:
const routes = [
{
path: '/',
name: 'home',
component:Home
},
{
path: '/login',
name: 'login',
component: Logins
},
]
4.2 App.vue:
<template>
<div id="app">
<router-view>
</router-view>
</div>
</template>
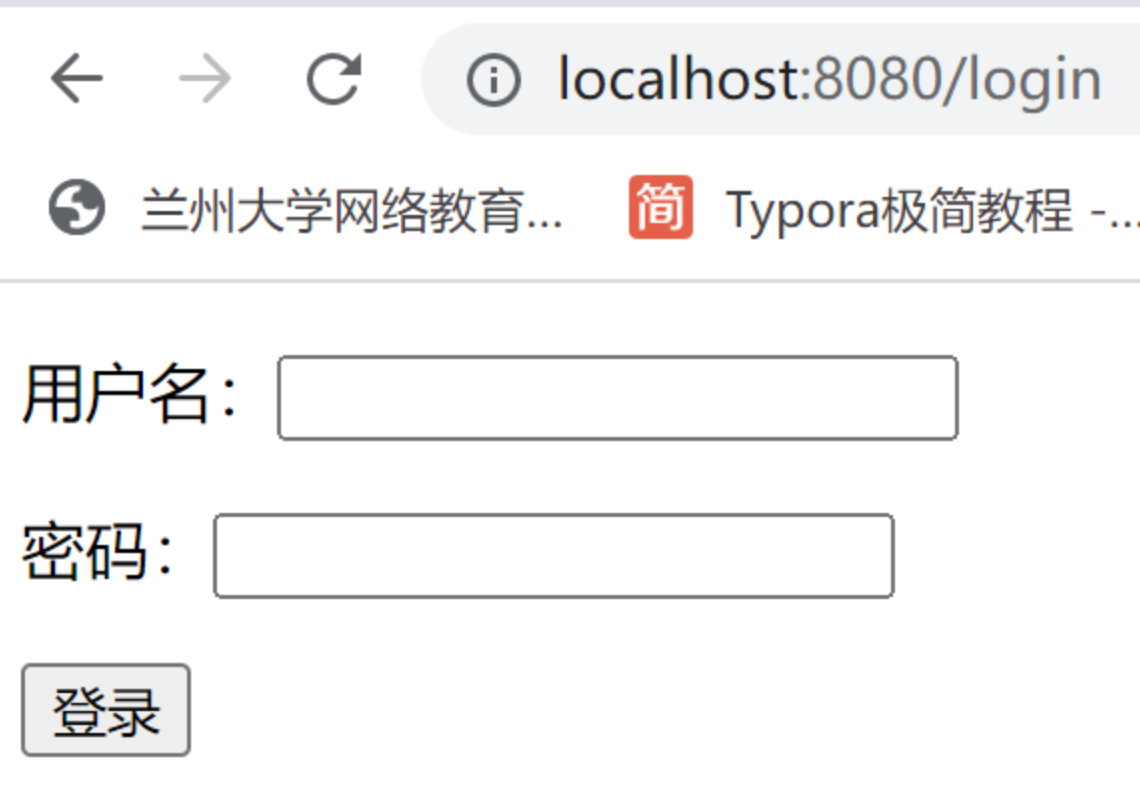
4.3 插件
<template>
<div>
<p>用户名:<input type="text" v-model="username"></p>
<p>密码:<input type="password" v-model="password"></p>
<p><button @click="handleClick">登录</button></p>{{res}}
</div>
</template>
<script>
import axios from "axios"
export default {
name: "login",
data(){
return{
res:'',
username:'',
password:'',
}},
methods:{
handleClick(){
axios.post('http://127.0.0.1:8000/user/login/', {
username:this.username,
password:this.password
}).then(res=>{
this.res = res.data
})}}}
</script>
路由跳转
1.在页面的html页面使用:
  <router-link to="booklist">去登录</router-link>  //js中不用操作
  <th><button @click="handleClick">查看图书列表</button></th>
  <router-link :to="path">查看图书列表</router-link>
2.在js中:
  2.1 methods:{
      handleClick(){
      this.$router.push('booklists')}},
  2.2   data(){
        return{
        path:'booklists'}},
3.router文件夹下的index.js:
    const routes = [
          {
        path: '/booklists',
        name: 'booklists',
        component: BookList
      },
    ]
路由带参数跳转
1.路由带参数
  1.1 请求地址中带参数:?name=lili&age=18
  1.2 在地址中类似于django的分组  /books/1/
2.步骤:
  2.1 请求地址中带参数
    1.html:<router-link to="/login/?name=lili&age=18">去登录</router-link>
      组件中获取数据:this.$route.query
    2.html:<router-link :to="path">去登录</router-link>
      js:data(){
        return{
        path:{
            query:{
                name:lili,
                age:19
            }
        }}},
      组件中获取数据:this.$route.query
 2.2 在地址中类似于django的分组
     1.html:<router-link to="/login/lili">去登录</router-link>
       组件中获取数据:this.$route.params
     2.html:<router-link :to="path">去登录</router-link>
         js:data(){
        return{
        path:{
            params:lili
        }}},
        组件中获取数据:this.$route.params
3.router文件夹下的index.js:
    const routes = [
          {
        path: '/login/1',
        name: 'booklist',
        component: BookList
      },
    ]
路由嵌套
1.使用步骤:
  1.1 router/index.js 相应的路由中
        const routes = [
          {
            path: '/',
            name: 'home',
            component:Home,
            children:[
                    {
            path: '/booklist',
            name: 'booklist',
            component: BookList
          },
            ]
          },]
     1.2 在显示该组件的位置,写<router-view></router-view>占取位置
     1.3 在跳转组件中使用router-link标签跳转
        <router-link to="booklist">查看图书列表</router-link>
     1.4 只会变更Book下router-view包裹的位置
路由守卫
1.路由守卫:对路由进行权限控制
  1.1 前置路由守卫
        router.beforeEach((to, from, next) => {
            console.log('前置路由守卫', to, from)
            if (to.name == 'shoppingcart') {
                let name = localStorage.getItem('name')
                if (name) {
                    next()
                } else {
                    alert('不好意思没有权限')
                }
            } else {
                next()
            }
        })
 1.2 后置路由守卫
    router.afterEach((to,from)=>{
        console.log('后置路由守卫',to,from)
        document.title = to.name
    })
 posted on

 浙公网安备 33010602011771号