CentOS 8 实现mariadb的多实例
一、提前准备
*centos8主机,关闭SElinux、关闭防火墙、时间同步、
二、安装mariadb
>yum -y install mariadb-server
三、准备三个实列的目录
mkdir -pv /mysql/{3306,3307,3308}/{data,etc,socket,log,bin,pid}
chown -R mysql.mysql /mysql
四、生成数据库文件
mysql_install_db --datadir=/mysql/3306/data --user=mysql
mysql_install_db --datadir=/mysql/3307/data --user=mysql
mysql_install_db --datadir=/mysql/3308/data --user=mysql
五、准备配置文件
[root@centos8 ~]#vim /mysql/3306/etc/my.cnf
[mysqld]
port=3306
datadir=/mysql/3306/data
socket=/mysql/3306/socket/mysql.sock
log-error=/mysql/3306/log/mysql.log
pid-file=/mysql/3306/pid/mysql.pid
#重复上面步骤设置3307,3308
六、准备启动脚本
[root@centos8 ~]#vim /mysql/3306/bin/mysqld
#!/bin/bash
port=3306
mysql_user="root"
mysql_pwd="magedu"
cmd_path="/usr/bin"
mysql_basedir="/mysql"
mysql_sock="${mysql_basedir}/${port}/socket/mysql.sock"
function_start_mysql()
{
if [ ! -e "$mysql_sock" ];then
printf "Starting MySQL...\n"
${cmd_path}/mysqld_safe --defaults
file=${mysql_basedir}/${port}/etc/my.cnf &> /dev/null &
else
printf "MySQL is running...\n"
exit
fi
}
function_stop_mysql()
{
if [ ! -e "$mysql_sock" ];then
printf "MySQL is stopped...\n"
exit
else
printf "Stoping MySQL...\n"
${cmd_path}/mysqladmin -u ${mysql_user} -p${mysql_pwd} -S ${mysql_sock}
shutdown
fi
}
function_restart_mysql()
{
printf "Restarting MySQL...\n"
function_stop_mysql
sleep 2
function_start_mysql
}
case $1 in
start)
function_start_mysql
;;
stop)
function_stop_mysql
;;
restart)
function_restart_mysql
;;
*)
printf "Usage: ${mysql_basedir}/${port}/bin/mysqld {start|stop|restart}\n"
esac
[root@centos8 ~]#chmod +x /mysql/3306/bin/mysqld
#重复上述过程,分别建立3307,3308的启动脚本
七、启动服务
[root@centos8 ~]#/mysql/3306/bin/mysqld start
[root@centos8 ~]#/mysql/3307/bin/mysqld start
[root@centos8 ~]#/mysql/3308/bin/mysqld start
[root@centos8 ~]#ss -ntl
#查看3306、3307、3308端口是否打开
八、登陆示例
[root@centos8 ~]#/mysql/3308/bin/mysqld start
#两种连接方法
[root@centos8 ~]#mysql -h127.0.0.1 -P3308
[root@centos8 ~]#mysql -uroot -S /mysqldb/3306/socket/mysql.sock
#确认连接的端口
MariaDB [(none)]> show variables like 'port';
+---------------+-------+
| Variable_name | Value |
+---------------+-------+
| port | 3308 |
+---------------+-------+
1 row in set (0.001 sec)
MariaDB [(none)]>
#关闭数据库,需要手动输入root的密码
[root@centos8 ~]#/mysql/3308/bin/mysqld stop
Stoping MySQL...
Enter password:
[root@centos8 ~]#/mysql/3308/bin/mysqld start
Starting MySQL...
九、修改root密码
#加上root的口令
[root@centos8 ~]#mysqladmin -uroot -S /mysql/3306/socket/mysql.sock password
'magedu'
[root@centos8 ~]#mysqladmin -uroot -S /mysql/3307/socket/mysql.sock password
'magedu'
[root@centos8 ~]#mysqladmin -uroot -S /mysql/3308/socket/mysql.sock password
'magedu'
#或者登录mysql,执行下面也可以
Mariadb>update mysql.user set password=password(“centos”) where user=’root’;
Mariadb>flush privileges;
#重复步骤,分别修改别外两个实例3307,3308对应root口令
十、测试连接
[root@centos8 ~]#mysql -uroot -p -S /mysql/3306/socket/mysql.sock
#提示输入口令才能登录
十一、编写service文件,使用service进行开启、关闭mariadb服务
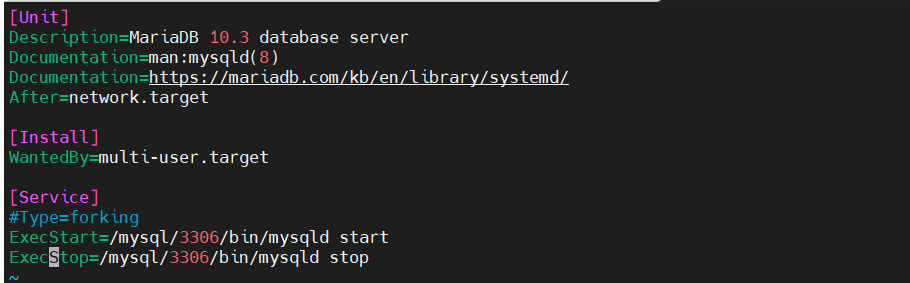
[root@centos8-6 ~]# vim /lib/systemd/system/mysqld3306.service
[root@centos8-6 ~]# cat /lib/systemd/system/mysqld3306.service
[Unit]
Description=MariaDB 10.3 database server
Documentation=man:mysqld(8)
Documentation=https://mariadb.com/kb/en/library/systemd/
After=network.target
[Install]
WantedBy=multi-user.target
[Service]
#Type=forking
ExecStart=/mysql/3306/bin/mysqld start
ExecStop=/mysql/3306/bin/mysqld stop
#写好文件后使用systemctl daemon-reload重新加载服务
#另两个实例分别写两个service文件
Systemctl start mysqld3306
Systemctl start mysqld3306 mysqld3307 mysqld3308
Systemctl stop mysqld3306
Systemctl enable mysqld3306

 浙公网安备 33010602011771号