ip netns 的相关使用
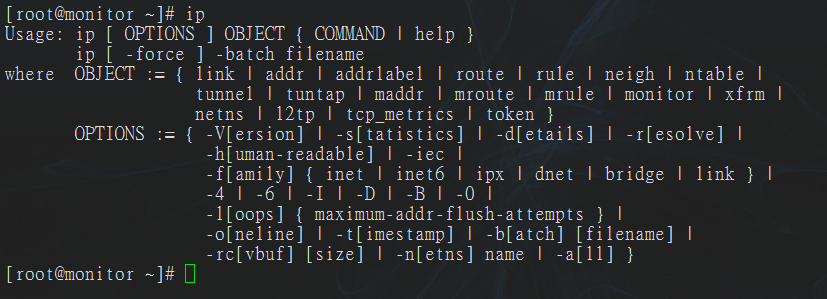
ip命令
linux 的强大的网络配置命令‘ip’。
netns可以让一台机器上模拟多个网络设备,是网络虚拟化的重要组成,将不同类型的网络应用隔离。
一个net namespace有自己独立的路由表,iptables策略,设备管理。说来说去,它就是用来隔离的。比如将eth0加入了netns 1,那么netns 2中的应用程序就找不到eth0了。netns 1中的iptables策略,不会去影响netns 2中的iptables策略。
netns的用法
[root@monitor ~]# ip netns help list
Usage: ip netns list
ip netns add NAME
ip netns set NAME NETNSID
ip [-all] netns delete [NAME]
ip netns identify [PID]
ip netns pids NAME
ip [-all] netns exec [NAME] cmd ...
ip netns monitor
ip netns list-id
先打开内核的网络转发功能。
[root@localhost ~]# vim /etc/sysctl.conf
[root@localhost ~]# sysctl -p
net.ipv4.ip_forward = 1
添加两个namespace
[root@monitor ~]# ip netns add r1
[root@monitor ~]# ip netns add r2
[root@monitor ~]# ip netns list
r2
r1
查看r1的网络。
[root@monitor ~]# ip netns exec r1 ifconfig -a
lo: flags=8<LOOPBACK> mtu 65536
loop txqueuelen 0 (Local Loopback)
RX packets 0 bytes 0 (0.0 B)
RX errors 0 dropped 0 overruns 0 frame 0
TX packets 0 bytes 0 (0.0 B)
TX errors 0 dropped 0 overruns 0 carrier 0 collisions 0
为r1的回环接口添加一个ip地址。
[root@monitor ~]# ip netns exec r1 ifconfig lo 127.0.0.1 up
[root@monitor ~]# ip netns exec r1 ifconfig -a
lo: flags=73<UP,LOOPBACK,RUNNING> mtu 65536
inet 127.0.0.1 netmask 255.0.0.0
inet6 ::1 prefixlen 128 scopeid 0x10<host>
loop txqueuelen 0 (Local Loopback)
RX packets 0 bytes 0 (0.0 B)
RX errors 0 dropped 0 overruns 0 frame 0
TX packets 0 bytes 0 (0.0 B)
TX errors 0 dropped 0 overruns 0 carrier 0 collisions 0
此时的r2并没有地址,因为他们是被隔离的
在网络名称空间上添加一对网卡,一个在r1,一个在r2.
[root@localhost ~]# ip link add veth1.1 type veth peer name veth1.2
[root@localhost ~]# ip link show
1: lo: <LOOPBACK,UP,LOWER_UP> mtu 65536 qdisc noqueue state UNKNOWN mode DEFAULT
link/loopback 00:00:00:00:00:00 brd 00:00:00:00:00:00
2: eno16777736: <BROADCAST,MULTICAST,UP,LOWER_UP> mtu 1500 qdisc pfifo_fast master br-ex state UP mode DEFAULT qlen 1000
link/ether 00:0c:29:4b:bb:d0 brd ff:ff:ff:ff:ff:ff
3: br-ex: <BROADCAST,MULTICAST,UP,LOWER_UP> mtu 1500 qdisc noqueue state UP mode DEFAULT
link/ether 00:0c:29:4b:bb:d0 brd ff:ff:ff:ff:ff:ff
4: br-in: <BROADCAST,MULTICAST,UP,LOWER_UP> mtu 1500 qdisc noqueue state UNKNOWN mode DEFAULT
link/ether 56:8d:9f:d2:96:21 brd ff:ff:ff:ff:ff:ff
5: veth1.2@veth1.1: <BROADCAST,MULTICAST,M-DOWN> mtu 1500 qdisc noop state DOWN mode DEFAULT qlen 1000
link/ether 7e:ea:fe:98:30:cd brd ff:ff:ff:ff:ff:ff
6: veth1.1@veth1.2: <BROADCAST,MULTICAST,M-DOWN> mtu 1500 qdisc noop state DOWN mode DEFAULT qlen 1000
link/ether a2:48:54:92:c2:ed brd ff:ff:ff:ff:ff:ff
将一对网卡分别添加给2个名称空间。
[root@localhost ~]# ip link set veth1.1 netns r1
[root@localhost ~]# ip link set veth1.2 netns r2
查看r1的网络信息
[root@localhost ~]# ip netns exec r1 ifconfig -a
lo: flags=73<UP,LOOPBACK,RUNNING> mtu 65536
inet 127.0.0.1 netmask 255.0.0.0
inet6 ::1 prefixlen 128 scopeid 0x10<host>
loop txqueuelen 0 (Local Loopback)
RX packets 0 bytes 0 (0.0 B)
RX errors 0 dropped 0 overruns 0 frame 0
TX packets 0 bytes 0 (0.0 B)
TX errors 0 dropped 0 overruns 0 carrier 0 collisions 0

veth1.1: flags=4098<BROADCAST,MULTICAST> mtu 1500
ether a2:48:54:92:c2:ed txqueuelen 1000 (Ethernet)
RX packets 0 bytes 0 (0.0 B)
RX errors 0 dropped 0 overruns 0 frame 0
TX packets 0 bytes 0 (0.0 B)
TX errors 0 dropped 0 overruns 0 carrier 0 collisions 0
给r1的veth1.1改个名字,为eth0
[root@localhost ~]# ip netns exec r1 ip link set veth1.1 name eth0
为两个网卡添加ip地址。
[root@localhost ~]# ip netns exec r1 ifconfig eth0 10.0.1.1/24 up
[root@localhost ~]# ip netns exec r2 ifconfig eth0 10.0.1.2/24 up
ping功能
[root@localhost ~]# ip netns exec r1 ping 10.0.1.2
PING 10.0.1.2 (10.0.1.2) 56(84) bytes of data.
64 bytes from 10.0.1.2: icmp_seq=1 ttl=64 time=0.042 ms
64 bytes from 10.0.1.2: icmp_seq=2 ttl=64 time=0.036 ms
64 bytes from 10.0.1.2: icmp_seq=3 ttl=64 time=0.043 ms
^C
--- 10.0.1.2 ping statistics ---
3 packets transmitted, 3 received, 0% packet loss, time 1999ms
rtt min/avg/max/mdev = 0.036/0.040/0.043/0.006 ms
到目前为止,看吧,此时就好像创建了两个虚拟机一样。两个网络是互相独立的。但是在一个网段内的时候,又可以互相联通。
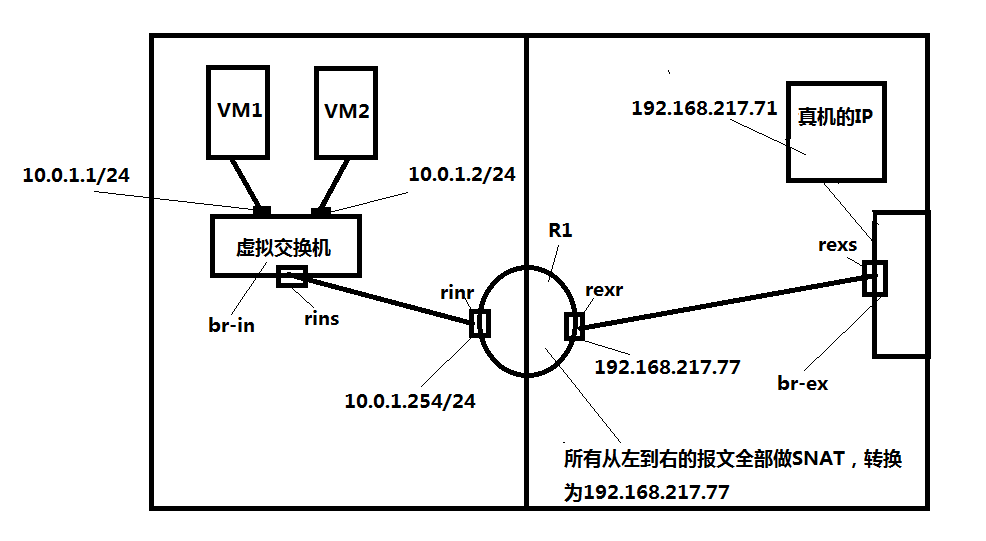
现在利用netns来创建1个虚拟网络空间。大致内容如下图。
创建桥接
[root@localhost ~]# brctl addbr br-ex
[root@localhost ~]# ip link set br-ex up
[root@localhost ~]# ifconfig
br-ex: flags=4163<UP,BROADCAST,RUNNING,MULTICAST> mtu 1500
ether 1e:d6:fd:9b:2a:fc txqueuelen 0 (Ethernet)
RX packets 0 bytes 0 (0.0 B)
RX errors 0 dropped 0 overruns 0 frame 0
TX packets 0 bytes 0 (0.0 B)
TX errors 0 dropped 0 overruns 0 carrier 0 collisions 0
给桥设备添加IP地址。
# ip addr del 192.168.217.71/24 dev eno16777736
# ip addr add 192.168.217.71/24 dev br-ex
# brctl addif br-ex eno16777736
再添加一个桥
[root@localhost ~]# brctl addbr br-in
[root@localhost ~]# ip link set br-in up
测试两个虚拟机之间的网络互通性。
首先先写一个脚本,自动桥接的。(/etc/qemu-ifup)
#!/bin/bash

bridge=br-in

if [ -n "$1" ];then
ip link set $1 up
brctl addif $bridge $1
[ $? -eq 0 ] && exit 0 || exit 1
else
echo 'Error: no interface specified'
exit 1
fi
启动一个虚拟机实例(cirros)
[root@localhost ~]# qemu-kvm -m 256 -smp 1 -name vm2 \
> -drive file=/images/cirros/test2.qcow2,if=virtio,media=disk \
> -net nic,macaddr=52:54:00:aa:bb:dd \
> -net tap,ifname=vif2.0,script=/etc/qemu-ifup \
> --nographic
再启动一个 vm1.
在真机上查看桥接状态。
[root@localhost ~]# brctl show
bridge name    bridge id    STP enabled    interfaces
br-ex    8000.000c294bbbd0    no    eno16777736
br-in    8000.0e1d0f339fc2    no    vif1.0
vif2.0
vif1.0 和vif2.0都是桥接在br-in上了。
好了,现在的情况相当于是vm1,vm2在一个交换机上。这个交换机就是br-in。为了这两个vm虚拟机可以和外界通信,必须要再创建一个虚拟的路由器。删去刚才的r1,r2。
添加路由器R1.
[root@localhost ~]# ip netns add r1
为路由器R1添加一对网卡并且启动。
[root@localhost ~]# ip link add rinr type veth peer name rins
[root@localhost ~]# ip link set rinr up
[root@localhost ~]# ip link set rins up
将网卡添加到桥上去。
[root@localhost ~]# brctl addif br-in rins
[root@localhost ~]# brctl show
bridge name    bridge id    STP enabled    interfaces
br-ex    8000.000c294bbbd0    no    eno16777736
br-in    8000.0e1d0f339fc2    no    rins
vif1.0
vif2.0
给rinr改个名字,并且启动
[root@localhost ~]# ip link set rinr netns r1 #将网卡rinr添加至r1
[root@localhost ~]# ip netns exec r1 ip link set rinr name eth0
[root@localhost ~]# ip netns exec r1 ip link set eth0 up
添加一个IP,作为网关。
[root@localhost ~]# ip netns exec r1 ifconfig eth0 10.0.1.254/24 up
[root@localhost ~]# ip netns exec r1 ifconfig
eth0: flags=4163<UP,BROADCAST,RUNNING,MULTICAST> mtu 1500
inet 10.0.1.254 netmask 255.255.255.0 broadcast 10.0.1.255
inet6 fe80::f8b4:bff:fee4:b12d prefixlen 64 scopeid 0x20<link>
ether fa:b4:0b:e4:b1:2d txqueuelen 1000 (Ethernet)
RX packets 8 bytes 648 (648.0 B)
RX errors 0 dropped 0 overruns 0 frame 0
TX packets 16 bytes 1296 (1.2 KiB)
TX errors 0 dropped 0 overruns 0 carrier 0 collisions 0
两个虚拟机的网关都指向10.0.1.254
$ sudo su -
# ifconfig eth0 10.0.1.2/24 up
# route add default gw 10.0.1.254
目前来说整幅图的左半边完全好了。
开始右半边。
添加一对网卡,再把其中一个桥接
[root@localhost ~]# ip link add rexr type veth peer name rexs
[root@localhost ~]# brctl addif br-ex rexs
[root@localhost ~]# ip link set rexs up
[root@localhost ~]# brctl show
bridge name    bridge id    STP enabled    interfaces
br-ex    8000.000c294bbbd0    no    eno16777736
rexs
br-in    8000.0e1d0f339fc2    no    rins
vif1.0
vif2.0
将另一个网卡添加到路由器的另一边,且给个另一个网络的地址
[root@localhost ~]# ip link set rexr netns r1
[root@localhost ~]# ip netns exec r1 ip link set rexr name eth1
[root@localhost ~]# ip netns exec r1 ifconfig eth1 192.168.217.77/24 up
利用防火墙的源地址转换,实现将内网中的地址转换。
[root@localhost ~]# ip netns exec r1 iptables -t nat -A POSTROUTING -s 10.0.1.0/24 ! -d 10.0.1.0/24 -j SNAT --to-source 192.168.217.77
[root@localhost ~]# ip netns exec r1 iptables -t nat -nL
Chain PREROUTING (policy ACCEPT)
target prot opt source destination

Chain INPUT (policy ACCEPT)
target prot opt source destination

Chain OUTPUT (policy ACCEPT)
target prot opt source destination

Chain POSTROUTING (policy ACCEPT)
测试。vm1可以ping同vm2.vm1可以访问真机所在局域网的主机。
# hostname
cirros
# ping 10.0.1.1
PING 10.0.1.1 (10.0.1.1): 56 data bytes
64 bytes from 10.0.1.1: seq=0 ttl=64 time=4.612 ms
# ping 192.168.217.2
PING 192.168.217.2 (192.168.217.2): 56 data bytes
64 bytes from 192.168.217.2: seq=0 ttl=127 time=4.742 ms

target prot opt source destination SNAT all -- 10.0.1.0/24 !10.0.1.0/24 to:192.168.217.77
当然。在左边那个网络中,还可以运行一个dhcp服务器,并且将网关自动指向10.0.1.254。
[root@localhost ~]# yum -y install dnsmasq
执行命令
[root@localhost ~]# ip netns exec r1 dnsmasq -F 10.0.1.1,10.0.1.30 --dhcp-option=option:router,10.0.1.254

 浙公网安备 33010602011771号