Linux常识02
第9章 Linux磁盘管理
学习Linux请加QQ群: 群1(163262181) 群2(148412746) 群3(246401509) 群4(173884211)
跟阿铭学Linux邀请函 (http://www.aminglinux.com),猿课已上线,请加微信aminglinux84索要配套视频教程。
在日常的Linux管理工作中,这部分内容使用还是比较多的。
查看磁盘或者目录的容量
命令 : df
“df” 查看已挂载磁盘的总容量、使用容量、剩余容量等,可以不加任何参数,默认是按k为单位显示的。
[root@localhost ~]# df
文件系统                 1K-块      已用      可用 已用% 挂载点
/dev/sda3             14347632   1490876  12127924  11% /
tmpfs                   163308         0    163308   0% /dev/shm
/dev/sda1                99150     26808     67222  29% /boot
“df” 常用选项有 “-i” “-h” “-k” “-m”等
“-i” 查看inodes使用状况
文件系统              Inode  已用(I)  可用(I) 已用(I)%% 挂载点
/dev/sda3             912128   66195  845933    8% /
tmpfs                  40827       1   40826    1% /dev/shm
/dev/sda1              25688      38   25650    1% /boot
“-h” 使用合适的单位显示,例如 ‘G’
文件系统              容量  已用  可用 已用%% 挂载点
/dev/sda3              14G  1.5G   12G  11% /
tmpfs                 160M     0  160M   0% /dev/shm
/dev/sda1              97M   27M   66M  29% /boot
“-k”, “-m” 分别以K, M 为单位显示
[root@localhost ~]# df -k
文件系统                 1K-块      已用      可用 已用% 挂载点
/dev/sda3             14347632   1490880  12127920  11% /
tmpfs                   163308         0    163308   0% /dev/shm
/dev/sda1                99150     26808     67222  29% /boot
[root@localhost ~]# df -m
文件系统                 1M-块      已用      可用 已用% 挂载点
/dev/sda3                14012      1456     11844  11% /
tmpfs                      160         0       160   0% /dev/shm
/dev/sda1                   97        27        66  29% /boot
简单介绍一下各列所表示的含义,其实如果你的Linux和阿铭的虚拟机一样也是中文显示的话,那么不用说太多,看字面意思就明白了。第一列是分区的名字,第二列为该分区总共的容量,第三列为已经使用了多少,第四列为还剩下多少,第五列为已经使用百分比,如果这个数值到达90%以上,那么你就应该关注了,磁盘分区满了可不是什么好事情,会引起系统崩溃的。最后一列为挂载点,你是否还记得,阿铭在装系统的时候,有说到这个词,”/dev/shm” 为内存挂载点,如果你想把文件放到内存里,就可以放到/dev/shm/目录下。
命令 : du
“du” 用来查看某个目录或文件所占空间大小.
语法 : du [-abckmsh] [文件或者目录名] 常用的参数有:
“-a” 全部文件与目录大小都列出来。如果不加任何选项和参数只列出目录(包含子目录)大小。
[root@localhost ~]# du dirb
4       dirb/dirc
12      dirb
[root@localhost ~]# du -a dirb
4       dirb/filee
4       dirb/dirc
12      dirb
如果du不指定单位的话,默认显示单位为K.
“-b” 列出的值以bytes为单位输出。
“-k” 以KB为单位输出,和默认不加任何选项的输出值是一样的。
“-m” 以MB为单位输出
“-h” 系统自动调节单位,例如文件太小可能就几K,那么就以K为单位显示,如果大到几G,则就以G为单位显示。
[root@localhost ~]# du -b /etc/passwd
1181    /etc/passwd
[root@localhost ~]# du -k /etc/passwd
4       /etc/passwd
[root@localhost ~]# du -m /etc/passwd
1       /etc/passwd
[root@localhost ~]# du -h /etc/passwd
4.0K    /etc/passwd
“-c” 最后加总
[root@localhost ~]# du -c dirb
4       dirb/dirc
12      dirb
12      总用量
[root@localhost ~]# du dirb
4       dirb/dirc
12      dirb
“-s” 只列出总和
[root@localhost ~]# du -s dirb
12      dirb
阿铭习惯用 du -sh filename 这样的形式。
磁盘的分区和格式化
阿铭经常做的事情就是拿一个全新的磁盘来分区并格式化。这也说明了作为一个linux系统管理员,对于磁盘的操作必须要熟练。所以请你认真学习该部分内容。在正式介绍Linux下分区工具之前,阿铭需要先给虚拟机添加一块磁盘,以便于我们做后续的实验,如果你也是使用vmware 虚拟机,请跟着阿铭一起来做吧。
- 先关闭正在运行的Linux系统
init 0. - 到vmware的Linux虚拟机界面,点 “Edit virtual machine settings”, 点一下左侧靠下面的 “Add...” 按钮。
- 在左侧选中 “Hard Disk” 默认就是这一行,点右下角的 “Next”, 继续点 “Next”.
- “Virtual disk type” 选择 IDE, 点 “Next”
- 继续点 “Next”, “Disk size” 默认即可,最后点 “Finish”.
命令 : fdisk
fdisk 是Linux下硬盘的分区工具,是一个非常实用的命令,但是fdisk只能划分小于2T的分区。
语法 : fdisk [-l ] [设备名称] 选项只有一个。
“-l” 后边不跟设备名会直接列出系统中所有的磁盘设备以及分区表,加上设备名会列出该设备的分区表。
[root@localhost ~]# fdisk -l

Disk /dev/sda: 17.2 GB, 17179869184 bytes
255 heads, 63 sectors/track, 2088 cylinders
Units = cylinders of 16065 * 512 = 8225280 bytes
Sector size (logical/physical): 512 bytes / 512 bytes
I/O size (minimum/optimal): 512 bytes / 512 bytes
Disk identifier: 0x00018d63

   Device Boot      Start         End      Blocks   Id  System
/dev/sda1   *           1          13      102400   83  Linux
Partition 1 does not end on cylinder boundary.
/dev/sda2              13         274     2097152   82  Linux swap / Solaris
Partition 2 does not end on cylinder boundary.
/dev/sda3             274        2089    14576640   83  Linux

Disk /dev/sdb: 8589 MB, 8589934592 bytes
255 heads, 63 sectors/track, 1044 cylinders
Units = cylinders of 16065 * 512 = 8225280 bytes
Sector size (logical/physical): 512 bytes / 512 bytes
I/O size (minimum/optimal): 512 bytes / 512 bytes
Disk identifier: 0x00000000

[root@localhost ~]# fdisk -l /dev/sda

Disk /dev/sda: 17.2 GB, 17179869184 bytes
255 heads, 63 sectors/track, 2088 cylinders
Units = cylinders of 16065 * 512 = 8225280 bytes
Sector size (logical/physical): 512 bytes / 512 bytes
I/O size (minimum/optimal): 512 bytes / 512 bytes
Disk identifier: 0x00018d63

   Device Boot      Start         End      Blocks   Id  System
/dev/sda1   *           1          13      102400   83  Linux
Partition 1 does not end on cylinder boundary.
/dev/sda2              13         274     2097152   82  Linux swap / Solaris
Partition 2 does not end on cylinder boundary.
/dev/sda3             274        2089    14576640   83  Linux
可以看到刚才阿铭加的一块磁盘 /dev/sdb 的信息。
“fdisk” 如果不加 “-l” 则进入另一个模式,在该模式下,可以对磁盘进行分区操作。
[root@localhost ~]# fdisk /dev/sda

WARNING: DOS-compatible mode is deprecated. It's strongly recommended to
         switch off the mode (command 'c') and change display units to
         sectors (command 'u').

Command (m for help):
如果你输入 ‘m’ 会列出常用的命令:
Command action
   a   toggle a bootable flag
   b   edit bsd disklabel
   c   toggle the dos compatibility flag
   d   delete a partition
   l   list known partition types
   m   print this menu
   n   add a new partition
   o   create a new empty DOS partition table
   p   print the partition table
   q   quit without saving changes
   s   create a new empty Sun disklabel
   t   change a partition's system id
   u   change display/entry units
   v   verify the partition table
   w   write table to disk and exit
   x   extra functionality (experts only)
如果你的英文好,我想你不难理解这些字母的功能。阿铭常用的有’p’, ‘n’, ‘d’, ‘w’, ‘q’.
“p” 打印当前磁盘的分区情况。
Command (m for help): p

Disk /dev/sda: 17.2 GB, 17179869184 bytes
255 heads, 63 sectors/track, 2088 cylinders
Units = cylinders of 16065 * 512 = 8225280 bytes
Sector size (logical/physical): 512 bytes / 512 bytes
I/O size (minimum/optimal): 512 bytes / 512 bytes
Disk identifier: 0x00018d63

   Device Boot      Start         End      Blocks   Id  System
/dev/sda1   *           1          13      102400   83  Linux
Partition 1 does not end on cylinder boundary.
/dev/sda2              13         274     2097152   82  Linux swap / Solaris
Partition 2 does not end on cylinder boundary.
/dev/sda3             274        2089    14576640   83  Linux
‘n’ 建立一个新的分区。
‘w’ 保存操作。
‘q’ 退出。
‘d’ 删除一个分区
下面阿铭会把刚才增加的磁盘/dev/sdb进行分区操作。先使用 ‘p’ 命令看一下/dev/sdb的分区状况:
[root@localhost ~]# fdisk /dev/sdb
Device contains neither a valid DOS partition table, nor Sun, SGI or OSF disklabel
Building a new DOS disklabel with disk identifier 0xf4121235.
Changes will remain in memory only, until you decide to write them.
After that, of course, the previous content won't be recoverable.

Warning: invalid flag 0x0000 of partition table 4 will be corrected by w(rite)

WARNING: DOS-compatible mode is deprecated. It's strongly recommended to
         switch off the mode (command 'c') and change display units to
         sectors (command 'u').

Command (m for help): p

Disk /dev/sdb: 8589 MB, 8589934592 bytes
255 heads, 63 sectors/track, 1044 cylinders
Units = cylinders of 16065 * 512 = 8225280 bytes
Sector size (logical/physical): 512 bytes / 512 bytes
I/O size (minimum/optimal): 512 bytes / 512 bytes
Disk identifier: 0xf4121235

   Device Boot      Start         End      Blocks   Id  System

Command (m for help):
可以看到目前/dev/sdb没有任何分区,下面阿铭给它建立第一个分区:
Command (m for help): n
Command action
   e   extended
   p   primary partition (1-4)
使用 ‘n’ 命令新建分区,它会提示是要 ‘e’ (扩展分区) 还是 ‘p’ (主分区) [1] 阿铭的选择是 ‘p’, 于是输入 ‘p’ 然后回车
Command action
   e   extended
   p   primary partition (1-4)
p
Partition number (1-4): 1
First cylinder (1-1044, default 1): 1
Last cylinder, +cylinders or +size{K,M,G} (1-1044, default 1044): +1000M
输入 ‘p’ 后,会提示分区数,这里阿铭写 ‘1’, 因为是第一个分区,当然你也可以写 ‘2’ 或 ‘3’, 如果你直接回车的话,会继续提示你必须输入一个数字,接着又提示第一个柱面从哪里开始,默认是 ‘1’, 你可以写一个其他的数字,不过这样就浪费了空间,所以还是写 ‘1’ 吧,或者你直接回车也会按 ‘1’ 处理,接着是让输入最后一个柱面的数值,也就是说你需要给这个分区分多大空间,关于柱面是多大阿铭不再细究,你只需要掌握阿铭教给你的方法即可,即写 “+1000M”, 这样即方便又不容易出错。用 ‘p’ 查看已经多出了一个分区:
Command (m for help): p

Disk /dev/sdb: 8589 MB, 8589934592 bytes
255 heads, 63 sectors/track, 1044 cylinders
Units = cylinders of 16065 * 512 = 8225280 bytes
Sector size (logical/physical): 512 bytes / 512 bytes
I/O size (minimum/optimal): 512 bytes / 512 bytes
Disk identifier: 0x0600660a

   Device Boot      Start         End      Blocks   Id  System
/dev/sdb1               1         128     1028128+  83  Linux
继续上面的操作,一直创建主分区到4, 然后再一次创建分区的时候则会提示:
Command (m for help): n
You must delete some partition and add an extended partition first
这是因为,在linux中最多只能创建4个主分区,那如果你想多创建几个分区如何做?很容易,在创建完第三个分区后,创建第四个分区时选择扩展分区。
Command (m for help): n
Command action
   e   extended
   p   primary partition (1-4)
e
Selected partition 4
First cylinder (385-1044, default 385):
Using default value 385
Last cylinder, +cylinders or +size{K,M,G} (385-1044, default 1044):
Using default value 1044

Command (m for help): p

Disk /dev/sdb: 8589 MB, 8589934592 bytes
255 heads, 63 sectors/track, 1044 cylinders
Units = cylinders of 16065 * 512 = 8225280 bytes
Sector size (logical/physical): 512 bytes / 512 bytes
I/O size (minimum/optimal): 512 bytes / 512 bytes
Disk identifier: 0xef267349

   Device Boot      Start         End      Blocks   Id  System
/dev/sdb1               1         128     1028128+  83  Linux
/dev/sdb2             129         256     1028160   83  Linux
/dev/sdb3             257         384     1028160   83  Linux
/dev/sdb4             385        1044     5301450    5  Extended
扩展分区,在最后一列显示为 “Extended”, 接下来继续创建分区:
Command (m for help): n
First cylinder (385-1044, default 385):
Using default value 385
Last cylinder, +cylinders or +size{K,M,G} (385-1044, default 1044): +1000M

Command (m for help): p

Disk /dev/sdb: 8589 MB, 8589934592 bytes
255 heads, 63 sectors/track, 1044 cylinders
Units = cylinders of 16065 * 512 = 8225280 bytes
Sector size (logical/physical): 512 bytes / 512 bytes
I/O size (minimum/optimal): 512 bytes / 512 bytes
Disk identifier: 0xef267349

   Device Boot      Start         End      Blocks   Id  System
/dev/sdb1               1         128     1028128+  83  Linux
/dev/sdb2             129         256     1028160   83  Linux
/dev/sdb3             257         384     1028160   83  Linux
/dev/sdb4             385        1044     5301450    5  Extended
/dev/sdb5             385         512     1028128+  83  Linux
这时候再分区和以前有区别了,不再选择是主分区还是扩展分区了,而是直接定义大小。有一点阿铭要讲一下,当分完三个主分区后,第四个扩展分区需要把剩余的磁盘空间全部划分给扩展分区,不然的话剩余的空间会浪费,因为分完扩展分区后,再划分新的分区时是在已经划分的扩展分区里来分的。其中/dev/sdb4为扩展分区,这个分区是不可以格式化的,你可以把它看成是一个空壳子,能使用的为/dev/sdb5, 其中/dev/sdb5为/dev/sdb4的子分区,这个子分区叫做逻辑分区。如果你发现分区分的不合适,想删除掉某个分区怎么办?这就用到了 ‘d’ 命令:
Command (m for help): d
Partition number (1-5): 1

Command (m for help): p

Disk /dev/sdb: 8589 MB, 8589934592 bytes
255 heads, 63 sectors/track, 1044 cylinders
Units = cylinders of 16065 * 512 = 8225280 bytes
Sector size (logical/physical): 512 bytes / 512 bytes
I/O size (minimum/optimal): 512 bytes / 512 bytes
Disk identifier: 0x7b9a6af3

   Device Boot      Start         End      Blocks   Id  System
/dev/sdb2             129         256     1028160   83  Linux
/dev/sdb3             257         384     1028160   83  Linux
/dev/sdb4             385        1044     5301450    5  Extended
/dev/sdb5             385         512     1028128+  83  Linux

Command (m for help): d
Partition number (1-5): 5

Command (m for help): p

Disk /dev/sdb: 8589 MB, 8589934592 bytes
255 heads, 63 sectors/track, 1044 cylinders
Units = cylinders of 16065 * 512 = 8225280 bytes
Sector size (logical/physical): 512 bytes / 512 bytes
I/O size (minimum/optimal): 512 bytes / 512 bytes
Disk identifier: 0x7b9a6af3

   Device Boot      Start         End      Blocks   Id  System
/dev/sdb2             129         256     1028160   83  Linux
/dev/sdb3             257         384     1028160   83  Linux
/dev/sdb4             385        1044     5301450    5  Extended

Command (m for help): n
Command action
   l   logical (5 or over)
   p   primary partition (1-4)
l
First cylinder (385-1044, default 385):
Using default value 385
Last cylinder, +cylinders or +size{K,M,G} (385-1044, default 1044): +1000M

Command (m for help): p

Disk /dev/sdb: 8589 MB, 8589934592 bytes
255 heads, 63 sectors/track, 1044 cylinders
Units = cylinders of 16065 * 512 = 8225280 bytes
Sector size (logical/physical): 512 bytes / 512 bytes
I/O size (minimum/optimal): 512 bytes / 512 bytes
Disk identifier: 0x7b9a6af3

   Device Boot      Start         End      Blocks   Id  System
/dev/sdb2             129         256     1028160   83  Linux
/dev/sdb3             257         384     1028160   83  Linux
/dev/sdb4             385        1044     5301450    5  Extended
/dev/sdb5             385         512     1028128+  83  Linux

Command (m for help): d
Partition number (1-5): 4

Command (m for help): p

Disk /dev/sdb: 8589 MB, 8589934592 bytes
255 heads, 63 sectors/track, 1044 cylinders
Units = cylinders of 16065 * 512 = 8225280 bytes
Sector size (logical/physical): 512 bytes / 512 bytes
I/O size (minimum/optimal): 512 bytes / 512 bytes
Disk identifier: 0x7b9a6af3

   Device Boot      Start         End      Blocks   Id  System
/dev/sdb2             129         256     1028160   83  Linux
/dev/sdb3             257         384     1028160   83  Linux
输入 ‘d’ 会提示要删除哪个分区,可以选择从 1-5 其中1-3是主分区(sdb1, sdb2, sdb3),4是扩展分区(sdb4),5是逻辑分区 [1] (sdb5),如果输入5,则直接把逻辑分区sdb5删除掉,但是如果输入4的话,会把整个扩展分区sdb4干掉,当然也包含扩展分区里面的逻辑分区sdb5。在刚才的分区界面直接 Ctrl + C 退出来,这样刚刚的分区全部都取消了,咱们重新来做分区:
[root@localhost ~]# fdisk /dev/sdb

WARNING: DOS-compatible mode is deprecated. It's strongly recommended to
         switch off the mode (command 'c') and change display units to
         sectors (command 'u').

Command (m for help): p

Disk /dev/sdb: 8589 MB, 8589934592 bytes
255 heads, 63 sectors/track, 1044 cylinders
Units = cylinders of 16065 * 512 = 8225280 bytes
Sector size (logical/physical): 512 bytes / 512 bytes
I/O size (minimum/optimal): 512 bytes / 512 bytes
Disk identifier: 0x7b9a6af3

   Device Boot      Start         End      Blocks   Id  System

Command (m for help): n
Command action
   e   extended
   p   primary partition (1-4)
e
Partition number (1-4): 1
First cylinder (1-1044, default 1): 1
Last cylinder, +cylinders or +size{K,M,G} (1-1044, default 1044): 1044

Command (m for help): p

Disk /dev/sdb: 8589 MB, 8589934592 bytes
255 heads, 63 sectors/track, 1044 cylinders
Units = cylinders of 16065 * 512 = 8225280 bytes
Sector size (logical/physical): 512 bytes / 512 bytes
I/O size (minimum/optimal): 512 bytes / 512 bytes
Disk identifier: 0x7b9a6af3

   Device Boot      Start         End      Blocks   Id  System
/dev/sdb1               1        1044     8385898+   5  Extended

Command (m for help): n
Command action
   l   logical (5 or over)
   p   primary partition (1-4)
如果把第一个分区分为扩展分区,并且把全部空间都分给扩展分区的话,再继续分区的话,会提示的分区类型为主分区还是逻辑分区(logical), 用 ‘l’ 表示逻辑分区,逻辑分区的id是从5开始的,因为前四个id为主分区或者扩展分区。既然阿铭把所有磁盘空间都分为了扩展分区,如果你在这里选择 ‘p’ 则会报错:
Command action
   l   logical (5 or over)
   p   primary partition (1-4)
p
Partition number (1-4): 2
No free sectors available
这是因为没有足够空间分给主分区了,那我们就分逻辑分区:
Command (m for help): n
Command action
   l   logical (5 or over)
   p   primary partition (1-4)
l
First cylinder (1-1044, default 1): 1
Last cylinder, +cylinders or +size{K,M,G} (1-1044, default 1044): +1000M

Command (m for help): p

Disk /dev/sdb: 8589 MB, 8589934592 bytes
255 heads, 63 sectors/track, 1044 cylinders
Units = cylinders of 16065 * 512 = 8225280 bytes
Sector size (logical/physical): 512 bytes / 512 bytes
I/O size (minimum/optimal): 512 bytes / 512 bytes
Disk identifier: 0x7b9a6af3

   Device Boot      Start         End      Blocks   Id  System
/dev/sdb1               1        1044     8385898+   5  Extended
/dev/sdb5               1         128     1028097   83  Linux

Command (m for help): n
Command action
   l   logical (5 or over)
   p   primary partition (1-4)
l
First cylinder (129-1044, default 129): 129
Last cylinder, +cylinders or +size{K,M,G} (129-1044, default 1044): +1000M

Command (m for help): p

Disk /dev/sdb: 8589 MB, 8589934592 bytes
255 heads, 63 sectors/track, 1044 cylinders
Units = cylinders of 16065 * 512 = 8225280 bytes
Sector size (logical/physical): 512 bytes / 512 bytes
I/O size (minimum/optimal): 512 bytes / 512 bytes
Disk identifier: 0x7b9a6af3

   Device Boot      Start         End      Blocks   Id  System
/dev/sdb1               1        1044     8385898+   5  Extended
/dev/sdb5               1         128     1028097   83  Linux
/dev/sdb6             129         256     1028128+  83  Linux
分区完后,需要输入 ‘w’ 命令来保存我们的配置:
Command (m for help): w
The partition table has been altered!

Calling ioctl() to re-read partition table.
Syncing disks.
再使用 fdisk -l /dev/sdb 查看分区情况:
[root@localhost ~]# fdisk -l /dev/sdb

Disk /dev/sdb: 8589 MB, 8589934592 bytes
255 heads, 63 sectors/track, 1044 cylinders
Units = cylinders of 16065 * 512 = 8225280 bytes
Sector size (logical/physical): 512 bytes / 512 bytes
I/O size (minimum/optimal): 512 bytes / 512 bytes
Disk identifier: 0x7b9a6af3

   Device Boot      Start         End      Blocks   Id  System
/dev/sdb1               1        1044     8385898+   5  Extended
/dev/sdb5               1         128     1028097   83  Linux
/dev/sdb6             129         256     1028128+  83  Linux
通过以上操作,相信你也学会了用fdisk来分区了吧。但阿铭要提醒你,不要闲着没事分区玩儿,这操作的危险性是很高的,一不留神就把服务器上的数据全部给分没有了。所以在你执行分区操作的时候,请保持百分之二百的细心,切记切记!
格式化磁盘分区
命令 : mke2fs, mkfs.ext2, mkfs.ext3, mkfs.ext4
当用man查询这四个命令的帮助文档时,你会发现我们看到了同一个帮助文档,这说明四个命令是一样的。mke2fs常用的选项有:
‘-b’ 分区时设定每个数据区块占用空间大小,目前支持1024, 2048 以及4096 bytes每个块。
‘-i’ 设定inode的大小
‘-N’ 设定inode数量,有时使用默认的inode数不够用,所以要自定设定inode数量。
‘-c’ 在格式化前先检测一下磁盘是否有问题,加上这个选项后会非常慢
‘-L’ 预设该分区的标签label
‘-j’ 建立ext3格式的分区,如果使用mkfs.ext3 就不用加这个选项了
‘-t’ 用来指定什么类型的文件系统,可以是ext2, ext3 也可以是 ext4.
[root@localhost ~]# mke2fs -t ext4 /dev/sdb5
mke2fs 1.41.12 (17-May-2010)
文件系统标签=
操作系统:Linux
块大小=4096 (log=2)
分块大小=4096 (log=2)
Stride=0 blocks, Stripe width=0 blocks
64256 inodes, 257024 blocks
12851 blocks (5.00%) reserved for the super user
第一个数据块=0
Maximum filesystem blocks=264241152
8 block groups
32768 blocks per group, 32768 fragments per group
8032 inodes per group
Superblock backups stored on blocks:
        32768, 98304, 163840, 229376

正在写入inode表: 完成
Creating journal (4096 blocks): 完成
Writing superblocks and filesystem accounting information: 完成

This filesystem will be automatically checked every 24 mounts or
180 days, whichever comes first.  Use tune2fs -c or -i to override.
指定文件系统格式为ext4, 该命令等同于 mkfs.ext4 /dev/sdb5. 目前CentOS 6 默认文件系统格式为ext4, 所以以后你遇到需要格式磁盘分区的时候,直接指定格式为ext4即可,但早期的版本CentOS 5 是使用ext3作为默认的文件系统的,所以你可以根据操作系统的版本来决定格式化什么格式的文件系统。在上面的例子中,你是否有注意到一些指标呢?其中一个指标是 “块大小=4096” 这里涉及到一个 “块” 的概念,磁盘在被格式化的时候会预先规定好每一个块的大小,然后再把所有的空间分割成一个一个的小块,存数据的时候也是一个块一个块的去写入。所以如果你的磁盘存的都是特别小特别小的文件,比如说1k或者2k,那么建议在格式化磁盘的时候指定块数值小一点。ext文件系统默认块大小为4096也就是4k. 在格式化的时候,可以指定块大小为1024, 2048, 4096(它们是成倍增加的),虽然格式化的时候可以指定块大小超过4096,但是一旦超过4096则不能正常挂载,如何指定块大小?
[root@localhost ~]# mke2fs -t ext4 -b 8192 /dev/sdb5
Warning: blocksize 8192 not usable on most systems.
mke2fs 1.41.12 (17-May-2010)
mke2fs: 8192-byte blocks too big for system (max 4096)
无论如何也要继续? (y,n) y
Warning: 8192-byte blocks too big for system (max 4096), forced to continue
文件系统标签=
操作系统:Linux
块大小=8192 (log=3)
分块大小=8192 (log=3)
Stride=0 blocks, Stripe width=0 blocks
64256 inodes, 128512 blocks
6425 blocks (5.00%) reserved for the super user
第一个数据块=0
Maximum filesystem blocks=134201344
2 block groups
65528 blocks per group, 65528 fragments per group
32128 inodes per group
Superblock backups stored on blocks:
        65528

正在写入inode表: 完成
Creating journal (4096 blocks): 完成
Writing superblocks and filesystem accounting information: 完成

This filesystem will be automatically checked every 28 mounts or
180 days, whichever comes first.  Use tune2fs -c or -i to override.
指定块大小为8192会提示,块值设置太大了,我们直接输入 ‘y’ 强制格式化,你还可以尝试指定更大的数字。
[root@localhost ~]# mke2fs -t ext4 -L TEST -b 8192 /dev/sdb5
可以使用 ‘-L’ 来指定标签。标签会在挂载磁盘的时候使用,另外也可以写到配置文件里,稍后阿铭介绍。关于格式化的这一部分,阿铭建议你除非有需求,否则不需要指定块大小,也就是说,你只需要记住这两个选项: ‘-t’ 和 ‘-L’ 即可。
命令 : e2label
用来查看或修改分区的标签,阿铭很少使用,你只要了解一下即可。
[root@localhost ~]# e2label /dev/sdb5
TEST
[root@localhost ~]# e2label /dev/sdb5 TEST123
[root@localhost ~]# e2label /dev/sdb5
TEST123
挂载/卸载磁盘
在上面的内容中讲到了磁盘的分区和格式化,那么格式化完了后,如何去用它呢?这就涉及到了挂载这块磁盘。格式化后的磁盘其实是一个块设备文件,类型为b,也许你会想,既然这个块文件就是那个分区,那么直接在那个文件中写数据不就写到了那个分区中么?当然不行。
在挂载某个分区前需要先建立一个挂载点,这个挂载点是以目录的形式出现的。一旦把某一个分区挂载到了这个挂载点(目录)下,那么再往这个目录写数据使,则都会写到该分区中。这就需要你注意一下,在挂载该分区前,挂载点(目录)下必须是个空目录。其实目录不为空并不影响所挂载分区的使用,但是一旦挂载上了,那么该目录下以前的东西就不能看到了。只有卸载掉该分区后才能看到。
命令 : mount
如果不加任何选项,直接运行 “mount” 命令,会显示如下信息:
[root@localhost ~]# mount
/dev/sda3 on / type ext4 (rw)
proc on /proc type proc (rw)
sysfs on /sys type sysfs (rw)
devpts on /dev/pts type devpts (rw,gid=5,mode=620)
tmpfs on /dev/shm type tmpfs (rw)
/dev/sda1 on /boot type ext4 (rw)
none on /proc/sys/fs/binfmt_misc type binfmt_misc (rw)
这个命令可以查看当前系统已经挂载的所有分区,以及分区文件系统的类型,挂载点和一些选项等信息,所以你如果想知道某个分区的文件系统类型直接用该命令查看即可。下面我们先建立一个空目录,然后在目录里建一个空白文档。
[root@localhost ~]# mkdir /newdir
[root@localhost ~]# touch /newdir/newfile.txt
[root@localhost ~]# ls /newdir/newfile.txt
/newdir/newfile.txt
然后把刚才格式化的 /dev/sdb5 挂载到 /newdir 上。
[root@localhost ~]# mount /dev/sdb5 /newdir/
mount: wrong fs type, bad option, bad superblock on /dev/sdb5,
       missing codepage or helper program, or other error
       In some cases useful info is found in syslog - try
       dmesg | tail  or so
不能完成挂载,根据提示可以查看一下错误信息:
[root@localhost ~]# dmesg |tail
eth0: no IPv6 routers present
 sdb: sdb1 < sdb5 >
 sdb:
 sdb: sdb1 < sdb5 sdb6 >
EXT4-fs (sdb5): bad block size 8192
EXT4-fs (sdb5): bad block size 8192
EXT4-fs (sdb5): bad block size 8192
EXT4-fs (sdb5): bad block size 8192
EXT4-fs (sdb5): mounted filesystem with ordered data mode. Opts:
EXT4-fs (sdb5): bad block size 8192
可以看到,我的/dev/sdb5指定的块值8192不合法,所以只能重新格式化磁盘。
[root@localhost ~]# mke2fs -t ext4 -L TEST /dev/sdb5
使用默认块值即可。我们继续挂载sdb5:
[root@localhost ~]# mount /dev/sdb5 /newdir/
[root@localhost ~]# ls /newdir/
lost+found
[root@localhost ~]# df -h
文件系统              容量  已用  可用 已用%% 挂载点
/dev/sda3              14G  1.5G   12G  11% /
tmpfs                 160M     0  160M   0% /dev/shm
/dev/sda1              97M   27M   66M  29% /boot
/dev/sdb5             989M   18M  921M   2% /newdir
把 /dev/sdb5 挂载到 /newdir 后,原来在 /newdir 下的 newfile.txt 被覆盖了,通过 df -h 可以看到刚刚挂载的分区,我们也可以使用LABEL的方式挂载分区:
[root@localhost ~]# umount /newdir/
[root@localhost ~]# df -h
文件系统              容量  已用  可用 已用%% 挂载点
/dev/sda3              14G  1.5G   12G  11% /
tmpfs                 160M     0  160M   0% /dev/shm
/dev/sda1              97M   27M   66M  29% /boot
[root@localhost ~]# mount LABEL=TEST /newdir
[root@localhost ~]# df -h
文件系统              容量  已用  可用 已用%% 挂载点
/dev/sda3              14G  1.5G   12G  11% /
tmpfs                 160M     0  160M   0% /dev/shm
/dev/sda1              97M   27M   66M  29% /boot
/dev/sdb5             989M   18M  921M   2% /newdir
本例中用到了 “umount” 命令,这个是用来卸载磁盘分区的,稍后阿铭介绍。mount 命令常用的选项有:’-a’, ‘-t’, ‘-o’. 在讲 ‘-a’ 选项前,我们有必要先了解一下这个文件 /etc/fstab.
[root@localhost ~]# cat /etc/fstab

#
# /etc/fstab
# Created by anaconda on Tue May  7 17:51:27 2013
#
# Accessible filesystems, by reference, are maintained under '/dev/disk'
# See man pages fstab(5), findfs(8), mount(8) and/or blkid(8) for more info
#
UUID=95297b81-538d-4d96-870a-de90255b74f5 /                       ext4    defaults        1 1
UUID=a593ff68-2db7-4371-8d8c-d936898e9ac9 /boot                   ext4    defaults        1 2
UUID=ff042a91-b68f-4d64-9759-050c51dc9e8b swap                    swap    defaults        0 0
tmpfs                   /dev/shm                tmpfs   defaults        0 0
devpts                  /dev/pts                devpts  gid=5,mode=620  0 0
sysfs                   /sys                    sysfs   defaults        0 0
proc                    /proc                   proc    defaults        0 0
这个文件是系统启动时,需要挂载的各个分区。第一列就是分区的标识,可以写分区的LABEL,也可以写分区的UUID(等会阿铭会着重讲一下这个概念),当然也可以写分区名(/dev/sda1);第二列是挂载点;第三列是分区的格式;第四列则是mount的一些挂载参数,等下会详细介绍一下有哪些参数,一般情况下,直接写defaults即可;第五列的数字表示是否被dump备份,是的话这里就是1,否则就是0;第六列是开机时是否自检磁盘。1,2都表示检测,0表示不检测,在Redhat/CentOS中,这个1,2还有个说法,/ 分区必须设为1,而且整个fstab中只允许出现一个1,这里有一个优先级的说法。1比2优先级高,所以先检测1,然后再检测2,如果有多个分区需要开机检测那么都设置成2吧,1检测完了后会同时去检测2。下面该说说第四列中常用到的参数了。
“async/sync” : async表示和磁盘和内存不同步,系统每隔一段时间把内存数据写入磁盘中,而sync则会时时同步内存和磁盘中数据;
“auto/noauto” : 开机自动挂载/不自动挂载;
“default” : 按照大多数永久文件系统的缺省值设置挂载定义,它包含了rw, suid, dev, exec, auto, nouser, async
“ro” : 按只读权限挂载 ;
“rw” : 按可读可写权限挂载 ;
“exec/noexec” : 允许/不允许可执行文件执行,但千万不要把根分区挂载为noexec,那就无法使用系统了,连mount命令都无法使用了,这时只有重新做系统了;
“user/nouser” : 允许/不允许root外的其他用户挂载分区,为了安全考虑,请用nouser ;
“suid/nosuid” : 允许/不允许分区有suid属性,一般设置nosuid ;
“usrquota” : 启动使用者磁盘配额模式,磁盘配额相关内容在后续章节会做介绍;
“grquota” : 启动群组磁盘配额模式;
学完这个/etc/fstab后,我们就可以自己修改这个文件,增加一行来挂载新增分区。例如,阿铭增加了这样一行:
LABEL=TEST /newdir ext4 defaults 0 0
然后卸载掉刚才我们已经挂载的/dev/sdb5
[root@localhost ~]# umount /dev/sdb5
[root@localhost ~]# df -h
文件系统              容量  已用  可用 已用%% 挂载点
/dev/sda3              14G  1.5G   12G  11% /
tmpfs                 160M     0  160M   0% /dev/shm
/dev/sda1              97M   27M   66M  29% /boot
使用 df -h 查看已经成功卸载 /dev/sdb5 下面执行命令 mount -a
[root@localhost ~]# mount -a
[root@localhost ~]# df -h
文件系统              容量  已用  可用 已用%% 挂载点
/dev/sda3              14G  1.5G   12G  11% /
tmpfs                 160M     0  160M   0% /dev/shm
/dev/sda1              97M   27M   66M  29% /boot
/dev/sdb5             989M   18M  921M   2% /newdir
此时,多出来一个 /dev/sdb5 挂载到了 /newfir 下。这就是 mount -a 命令执行的结果,这个 ‘-a’ 选项会把/etc/fstab中出现的所有磁盘分区挂载上。
[root@localhost ~]# umount /newdir
[root@localhost ~]# mount -t ext4 /dev/sdb5 /newdir
[root@localhost ~]# df -h
文件系统              容量  已用  可用 已用%% 挂载点
/dev/sda3              14G  1.5G   12G  11% /
tmpfs                 160M     0  160M   0% /dev/shm
/dev/sda1              97M   27M   66M  29% /boot
/dev/sdb5             989M   18M  921M   2% /newdir
‘-t’ 选项用来指定挂载的分区类型,默认不指定会自动识别。
‘-o’ 选项用来指定挂载的分区有哪些特性,即上面 “/etc/fatab” 配置文件中第四列的那些。阿铭经常这样使用这个 ‘-o’ 选项:
[root@localhost ~]# mkdir /newdir/dir1
[root@localhost ~]# mount -o remount,ro,sync,noauto /dev/sdb5 /newdir
[root@localhost ~]# mkdir /newdir/dir2
mkdir: 无法创建目录 "/newdir/dir2": 只读文件系统
由于指定了 ‘ro’ 参数,所以该分区只读了。通过 mount 命令也可以看到 /dev/sdb5 有 ‘ro’ 选项
[root@localhost ~]# mount
/dev/sda3 on / type ext4 (rw)
proc on /proc type proc (rw)
sysfs on /sys type sysfs (rw)
devpts on /dev/pts type devpts (rw,gid=5,mode=620)
tmpfs on /dev/shm type tmpfs (rw)
/dev/sda1 on /boot type ext4 (rw)
none on /proc/sys/fs/binfmt_misc type binfmt_misc (rw)
/dev/sdb5 on /newdir type ext4 (ro,sync)
下面阿铭重新挂载,让它恢复读写。
[root@localhost ~]# mount -o remount /dev/sdb5 /newdir
[root@localhost ~]# mkdir /newdir/dir2
[root@localhost ~]# ls /newdir/
dir1  dir2  lost+found
命令 : blkid
阿铭在日常的运维工作中遇到过这样的情况,一台服务器上新装了两块磁盘,磁盘a(在服务器上显示为sdc)和磁盘b(在服务器上显示为sdd),有一次把这两块磁盘都拔掉了,然后再重新插上,重启机器,结果磁盘编号调换了,a变成了sdd,b变成了sdc(这是因为把磁盘插错了插槽),问题来了。通过上边的学习,你挂载磁盘是通过/dev/hdb1 这样的分区名字来挂载的,如果先前加入到了/etc/fstab 中,结果系统启动后则会挂载错分区。那么怎么样避免这样的情况发生?
这就用到了UUID,可以通过 blkid 命令获取各分区的UUID:
/dev/sda1: UUID="a593ff68-2db7-4371-8d8c-d936898e9ac9" TYPE="ext4"
/dev/sda2: UUID="ff042a91-b68f-4d64-9759-050c51dc9e8b" TYPE="swap"
/dev/sda3: UUID="95297b81-538d-4d96-870a-de90255b74f5" TYPE="ext4"
/dev/sdb5: LABEL="TEST" UUID="c61117ca-9176-4d0b-be4d-1b0f434359a7" TYPE="ext4"
/dev/sdb6: UUID="c271cb5a-cb46-42f4-9eb4-d2b1a5028e18" SEC_TYPE="ext2" TYPE="ext3"
这样可以获得全部磁盘分区的UUID,如果格式化的时候指定了 LABEL 则该命令也会显示LABEL值,甚至连文件系统类型也会显示。当然这个命令后面也可以指定哪个分区:
[root@localhost ~]# blkid /dev/sdb5
/dev/sdb5: LABEL="TEST" UUID="c61117ca-9176-4d0b-be4d-1b0f434359a7" TYPE="ext4"
获得UUID后,如何使用它呢?
[root@localhost ~]# umount /newdir
[root@localhost ~]# mount UUID="c61117ca-9176-4d0b-be4d-1b0f434359a7" /newdir
[root@localhost ~]# df -h
文件系统              容量  已用  可用 已用%% 挂载点
/dev/sda3              14G  1.5G   12G  11% /
tmpfs                 160M     0  160M   0% /dev/shm
/dev/sda1              97M   27M   66M  29% /boot
/dev/sdb5             989M   18M  921M   2% /newdir
也可以把下面这行写到 /etc/fstab 中
UUID=c61117ca-9176-4d0b-be4d-1b0f434359a7 /newdir ext4 defaults 0 0
如果想让某个分区开机后就自动挂载,有两个办法可以实现:
- 在 /etc/fstab 中添加一行,如上例中那行;
- 把挂载命令写到 /etc/rc.d/rc.local 文件中去,阿铭会经常把想要开机启动的命令加到这个文件中。系统启动完后会执行这个文件中的命令,所以只要你想开机后运行什么命令统统写入到这个文件下面吧,直接放到最后面即可,阿铭把挂载的命令放到该文件的最后一行了:
[root@localhost ~]# cat /etc/rc.d/rc.local
#!/bin/sh
#
# This script will be executed *after* all the other init scripts.
# You can put your own initialization stuff in here if you don't
# want to do the full Sys V style init stuff.

touch /var/lock/subsys/local
mount UUID="c61117ca-9176-4d0b-be4d-1b0f434359a7" /newdir
以上两种方法,任选其一,阿铭介绍第二种方法其实也是教给你一个小知识,如何让一些操作行为随系统启动而自动执行。另外,阿铭需要给你一个小建议,那就是挂载磁盘分区的时候,尽量使用UUID或者LABEL这两种方法。
命令 : umount
在上面的小实验中,阿铭多次用到这个命令,这个命令也简单的很,后边可以跟挂载点,也可以跟分区名(/dev/hdb1), 但是不可以跟LABEL和UUID.
[root@localhost ~]# umount /dev/sdb5
[root@localhost ~]# mount UUID="c61117ca-9176-4d0b-be4d-1b0f434359a7" /newdir
[root@localhost ~]# umount /newdir
[root@localhost ~]# mount UUID="c61117ca-9176-4d0b-be4d-1b0f434359a7" /newdir
umount 命令有一个非常有用的选项那就是 ‘-l’, 有时候你会遇到不能卸载的情况:
[root@localhost newdir]# umount /newdir
umount: /newdir: device is busy.
        (In some cases useful info about processes that use
         the device is found by lsof(8) or fuser(1))
这是因为当前目录为要卸载的分区上,解决办法有两种,一是到其他目录,二是使用 ‘-l’ 选项:
[root@localhost newdir]# umount -l /newdir
[root@localhost newdir]# df -h
文件系统              容量  已用  可用 已用%% 挂载点
/dev/sda3              14G  1.5G   12G  11% /
tmpfs                 160M     0  160M   0% /dev/shm
/dev/sda1              97M   27M   66M  29% /boot
建立一个swap文件增加虚拟内存
从装系统时就接触过这个swap了,它类似与windows的虚拟内存,分区的时候一般大小为内存的2倍,如果你的内存超过8G,那么你分16G似乎是没有必要了。分16G足够日常交换了。然而,还会有虚拟内存不够用的情况发生。如果真遇到了,莫非还要重新给磁盘分区?当然不能,那我们就增加一个虚拟的磁盘出来。基本的思路就是:建立swapfile -> 格式化为swap格式 -> 启用该虚拟磁盘。
[root@localhost ~]# dd if=/dev/zero of=/tmp/newdisk bs=4k count=102400
记录了102400+0 的读入
记录了102400+0 的写出
419430400字节(419 MB)已复制,2.59193 秒,162 MB/秒
“dd” 这个命令阿铭经常用到,所以请你也要掌握它的使用方法,其实也不难,用 “if” 指定源,基本上除了 “/dev/zero” 外基本上不会写别的,而/dev/zero 是UNIX系统特有的一个文件,它可以提供源源不断的 “0”, 关于它的其他信息请你在网上查一下资料。 “of” 指定目标文件, “bs” 定义块的大小, “count” 定义块的数量,这两个参数的多少决定了目标文件的大小,目标文件大小 = bs x count. 阿铭用dd建了一个大小为400M的文件,然后格式化成swap格式:
[root@localhost ~]# mkswap -f /tmp/newdisk
Setting up swapspace version 1, size = 409596 KiB
no label, UUID=29832cab-04b9-4083-a667-9a5795a5d490
格式化完后,就可以挂载上使用了:
[root@localhost ~]# free -m
          total       used       free     shared    buffers     cached
Mem:           318        314          4          0          5        278
-/+ buffers/cache:         30        288
Swap:         2047          0       2047
[root@localhost ~]# swapon /tmp/newdisk
[root@localhost ~]# free -m
             total       used       free     shared    buffers     cached
Mem:           318        314          4          0          5        278
-/+ buffers/cache:         31        287
Swap:         2447          0       2447
前后对比swap分区多了400M空间。其中 “free” 这个命令用来查看内存使用情况, “-m” 表示以M为单位显示,阿铭会在后面介绍该命令。
磁盘配额
磁盘配合其实就是给每个用户分配一定的磁盘额度,只允许他使用这个额度范围内的磁盘空间。在linux系统中,是多用户多任务的环境,所以会有很多人共用一个磁盘的情况。针对每个用户去限定一定量的磁盘空间是有必要的,这样才显得公平。随着硬件成本的降低,服务器上的磁盘资源似乎不再刻意的去限制了,所以磁盘配额也就可有可无了,但是你也需要了解一下这部分内容,用到时必须会操作。
在linux中,用来管理磁盘配额的东西就是quota了。如果你的linux上没有quota,则需要你安装这个软件包 quota-3.13-5.el5.RPM (其实版本是多少无所谓了,关键是这个软件包)。quota在实际应用中是针对整个分区进行限制的。比如,如果我们限制了/dev/sdb1这个分区,而/dev/sdb1 是挂载在/home 目录下的,那么/home 所有目录都会受到限制。
quota 这个模块主要分为quota quotacheck quotaoff quotaon quotastats edquota setquota warnquota repquota这几个命令,下面就分别介绍这些命令。
命令 : quota
“quota” 用来显示某个组或者某个使用者的限额。
语法:quota [-guvs] [user,group]
“-g” 显示某个组的限额
“-u” 显示某个用户的限额
“-v” 显示的意思
“-s” 选择inod或硬盘空间来显示
命令 : quotacheck
“quotacheck” 用来扫描某一个磁盘的quota空间。
语法:quotacheck [-auvg] /path
“-a” 扫描所有已经mount的具有quota支持的磁盘
“-u” 扫描某个使用者的文件以及目录
“-g” 扫描某个组的文件以及目录
“-v” 显示扫描过程
“-m” 强制进行扫描
命令 : edquota
“edquota” 用来编辑某个用户或者组的quota值。
语法:edquota [-u user] [-g group] [-t]
“-u” 编辑某个用户的quota
“-g” 编辑某个组的quota
“-t” 编辑宽限时间
“-p” 拷贝某个用户或组的quota到另一个用户或组
当运行 edquota -u user 时,系统会打开一个文件,你会看到这个文件中有7列,它们分别代表的含义是:
“Filesystem” 磁盘分区,如/dev/sdb5
“blocks” 当前用户在当前的Filesystem中所占用的磁盘容量,单位是Kb。该值请不要修改。
“soft/hard” 当前用户在该Filesystem内的quota值,soft指的是最低限额,可以超过这个值,但必须要在宽限时间内将磁盘容量降低到这个值以下。hard指的是最高限额,即不能超过这个值。当用户的磁盘使用量高于soft值时,系统会警告用户,提示其要在宽限时间内把使用空间降低到soft值之下。
“inodes” 目前使用掉的inode的状态,不用修改。
命令 : quotaon
“quotaon” 用来启动quota,在编辑好quota后,需要启动才能是quota生效
语法:quotaon [-a] [-uvg directory]
“-a” 全部设定的quota启动
“-u” 启动某个用户的quota
“-g” 启动某个组的quota
“-s” 显示相关信息
命令 : quotaoff
“quotaoff” 用来关闭quota, 该命令常用只有一种情况 quotaoff -a 关闭全部的quota.
以上讲了很多quota的相关命令,那么接下来阿铭教你如何在实践应用中去做这个磁盘配额。整个执行过程如下:
首先先确认一下,你的/home目录是不是单独的挂载在一个分区下,用df 查看即可。如果不是则需要你跟我一起做。否则这一步即可省略。
文件系统                 1K-块      已用      可用 已用% 挂载点
/dev/sda3             14347632   1899376  11719424  14% /
tmpfs                   163308         0    163308   0% /dev/shm
/dev/sda1                99150     26808     67222  29% /boot
阿铭的linux系统中,/home并没有单独占用一个分区。所以需要把/home目录挂载在一个单独的分区下,因为quota是针对分区来限额的。下面阿铭把 /dev/sdb5 挂载到/home 目录下, 编辑 /etc/fstab 把刚才添加的那行修改为:
UUID=c61117ca-9176-4d0b-be4d-1b0f434359a7 /home ext4 defaults 0 0
保存 /etc/fstab 后,运行 mount -a 命令挂载全部的分区。
[root@localhost ~]# mount -a
[root@localhost ~]# df -h
文件系统              容量  已用  可用 已用%% 挂载点
/dev/sda3              14G  1.9G   12G  14% /
tmpfs                 160M     0  160M   0% /dev/shm
/dev/sda1              97M   27M   66M  29% /boot
/dev/sdb5             989M   18M  921M   2% /home
此时的 /home 为一个单独分区了。
- 建立测试账户
首先建立一个test用户,则同时建立了一个test组。其中uid和gid都为511 ,然后又建立一个test1账号,使其加入test组,查看/etc/passwd文件发现test和test1用户的gid都为511.
[root@localhost ~]# useradd test
[root@localhost ~]# grep test /etc/passwd
test:x:511:511::/home/test:/bin/bash
[root@localhost ~]# useradd -g 511 test1
[root@localhost ~]# grep test1 /etc/passwd
test1:x:512:511::/home/test1:/bin/bash
- 打开磁盘的quota功能
默认linux并没有对任何分区做quota的支持,所以需要我们手动打开磁盘的quota功能,你是否记得,在前面内容中分析/etc/fstab文件的第四列时讲过这个quota选项(usrquota, grpquota),没错,要想打开这个磁盘的quota支持就是需要修改这个第四列的。用vi编辑/etc/fstab 编辑刚才加的那一行,如下:
UUID=c61117ca-9176-4d0b-be4d-1b0f434359a7 /home ext4 defaults,usrquota,grpquota 0 0
保存 /etc/fstab 后,重新挂载/home分区。
[root@localhost ~]# umount /home/
[root@localhost ~]# mount -a
[root@localhost ~]# mount
/dev/sda3 on / type ext4 (rw)
proc on /proc type proc (rw)
sysfs on /sys type sysfs (rw)
devpts on /dev/pts type devpts (rw,gid=5,mode=620)
tmpfs on /dev/shm type tmpfs (rw)
/dev/sda1 on /boot type ext4 (rw)
none on /proc/sys/fs/binfmt_misc type binfmt_misc (rw)
/dev/sdb5 on /home type ext4 (rw,usrquota,grpquota)
使用 mount 命令可以查看到 /home 分区已经加上了 “usrquota,grpquota” 两个配额相关的参数。
- 扫描磁盘的使用者使用状况,并产生重要的aquota.group与aquota.user
这一步就需要用到quotacheck了,aquota.group与aqouta.user分别是组以及用户磁盘配额需要的配置文件。如果没有这两个文件,则磁盘配额是不会生效的。
[root@localhost ~]# quotacheck -augv
可能会有一些错误信息,不要管它。看一看你的/home分区下是否多了两个文件(aquota.group, aquota.user)
[root@localhost ~]# ll /home/
总用量 44
-rw------- 1 root  root  7168 5月  12 02:07 aquota.group
-rw------- 1 root  root  8192 5月  12 02:07 aquota.user
drwxr-xr-x 2 root  root  4096 5月  12 00:11 dir1
drwx------ 2 root  root 16384 5月  11 23:18 lost+found
drwx------ 3 test  test  4096 5月  12 01:59 test
drwx------ 3 test1 test  4096 5月  12 02:00 test1
如果有了,则可以进入下一步了。
- 启动quota配额
[root@localhost ~]# quotaon -av
/dev/sdb5 [/home]: group quotas turned on
/dev/sdb5 [/home]: user quotas turned on
- 编辑用户磁盘配额
先来设定test账户的配额,然后直接把test的配额拷贝给test1即可。这里就需要用到edquota了。
[root@localhost ~]# edquota -u test
将下面内容
/dev/sdb5 20 0 0 5 0 0
修改为:
/dev/sdb5 20 20000 30000 5 0 0
其中单位是Kb,所以soft 值大约为20Mb,hard值为30Mb,保存这个文件,保存的方式跟vi一个文件的方式一样的。下面将test的配额复制给test1.
[root@localhost ~]# edquota -p test test1
下面继续设定宽限时间:
[root@localhost ~]# edquota -t
将7days 改为 1days
/dev/sdb5 1days 1days
下面查看一下test以及test1用户的配额吧。
[root@localhost ~]# quota -uv test test1
Disk quotas for user test (uid 511):
     Filesystem  blocks   quota   limit   grace   files   quota   limit   grace
      /dev/sdb5      20   20000   30000               5       0       0
Disk quotas for user test1 (uid 512):
     Filesystem  blocks   quota   limit   grace   files   quota   limit   grace
      /dev/sdb5      20   20000   30000               5       0       0
- 编辑组磁盘配额
[root@localhost ~]# edquota -g test
修改为:
/dev/sdb5 40 40000 50000 10 0 0
设定组test的soft配额值为40M,hard值为50M。下面查看组test的配额。
[root@localhost ~]# quota -gv test
Disk quotas for group test (gid 511):
     Filesystem  blocks   quota   limit   grace   files   quota   limit   grace
      /dev/sdb5      40   40000   50000              10       0       0
- 设定开机启动
前面已经讲到启动磁盘配额的命令是 quotaon -aug 所以要想开机启动,只需将这条命令加入到 /etc/rc.d/rc.local文件即可。
[root@localhost ~]# echo "quotaon -aug" >> /etc/rc.d/rc.local
阿铭建议你最好再扩展学习一下: http://www.aminglinux.com/bbs/thread-5424-1-1.html
教程答疑: 请移步这里.
欢迎你加入 阿铭学院 和阿铭一起学习Linux,让阿铭成为你Linux生涯中永远的朋友吧!
| [1] | (1, 2) 磁盘分区有三种形式:主分区、扩展分区和逻辑分区。主分区最多可以有四个,如果想再多分分区,则需要先分三个主分区,然后第四个分为扩展分区,然后再把扩展分区分成若干个逻辑分区,逻辑分区最多可以分多少个?之前阿铭使用ide接口的磁盘尝试过(hda, hdb这样的磁盘),最多可以分10个,至于scsi接口的磁盘(sda, sdb)最多可以分多少个,阿铭没有做实验,这留给你来做吧。 |
第10章 文本编辑工具vim
学习Linux请加QQ群: 群1(163262181) 群2(148412746) 群3(246401509) 群4(173884211)
跟阿铭学Linux邀请函 (http://www.aminglinux.com),猿课已上线,请加微信aminglinux84索要配套视频教程。
前面多次提到过vi这个命令,它是linux中必不可少的一个工具。没有它很多工作都无法完成。早期的Unix都是使用的vi作为系统默认的编辑器的。你也许会有疑问,vi与vim有什么区别?可以这样简单理解,vim是vi的升级版。很多linux系统管理员都习惯用vi,那是因为他们接触linux的时候用的就是vi,vim后来才比较流行。所以,无所谓用vi和vim,只要你能达到你想要的目的即可。
在阿铭看来vi 和vim最大的区别就是编辑一个文本时,vi不会显示颜色,而vim会显示颜色。显示颜色更易于用户进行编辑。其他功能没有什么区别。所以在linux系统下,使用vi还是vim完全取决你的个人爱好而已。阿铭从一开始学linux就一直使用vim,所以也会一直以vim的角色来教授给你。
也许你刚刚安装的CentOS系统上没有这个命令,请这样安装它 yum install -y vim-enhanced
vim的三种模式:一般模式、编辑模式、命令模式。这需要你牢记的,因为以前阿铭刚刚从事linux工作的时候去面试,很多单位的笔试题就有这个知识点。
- 一般模式: 当你vim filename 编辑一个文件时,一进入该文件就是一般模式了。在这个模式下,你可以做的操作有,上下移动光标;删除某个字符;删除某行;复制、粘贴一行或者多行。
- 编辑模式:一般模式下,是不可以修改某一个字符的,只能到编辑模式了。从一般模式进入编辑模式,只需你按一个键即可(i, I, a, A, o, O, r, R)。当进入编辑模式时,会在屏幕的最下一行出现“INSERT或REPLACE”的字样。从编辑模式回到一般模式只需要按一下键盘左上方的ESC键即可。
- 命令模式:在一般模式下,输入 ”:” 或者 “/” 即可进入命令模式。在该模式下,你可以搜索某个字符或者字符串,也可以保存、替换、退出、显示行号等等。
下面阿铭教你如何在一个空白文档中写入一段文字,然后保存。
[root@localhost ~]# vim test.txt
输入vim test.txt直接回车进入一般模式。然后按 “i” 字母进入编辑模式,在窗口的左下角会显示 “– 插入 –” 或者 “– INSERT –” 这说明进入插入模式,可以编辑文档。下面阿铭随便写一段文字:
This is a test file.
And this is the first time to using "vim".
It's easy to use "vim".
I like to using it, do you like it?
如果你编辑完了,想保存的话,需要先按一下键盘左上角的 “Esc” 键,此时 “– 插入 –” 或者 “– INSERT –” 消失,然后输入 ”:wq” 回车就会保存刚才的文字了。
This is a test file.
And this is the first time to using "vim".
It's easy to use "vim".
I like to using it, do you like it?
~
~
:wq
这时,看一下test.txt文档的内容吧:
[root@localhost ~]# cat test.txt
This is a test file.
And this is the first time to using "vim".
It's easy to use "vim".
I like to using it, do you like it?
其实 “vim” 为全键盘操作的编辑器,所以在各个模式下都有很多功能键。下面列举一下,其中阿铭认为常用的会用红色标出,需要你多加练习,另外不常用的你也需要知道。
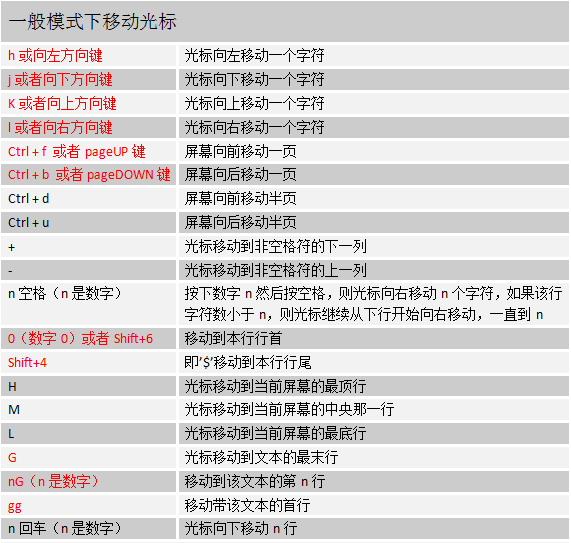

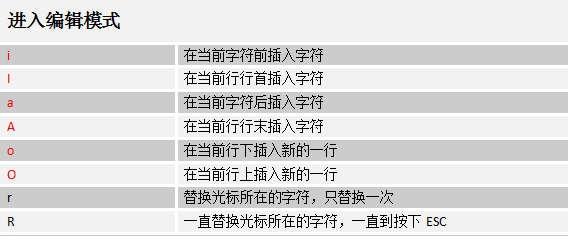
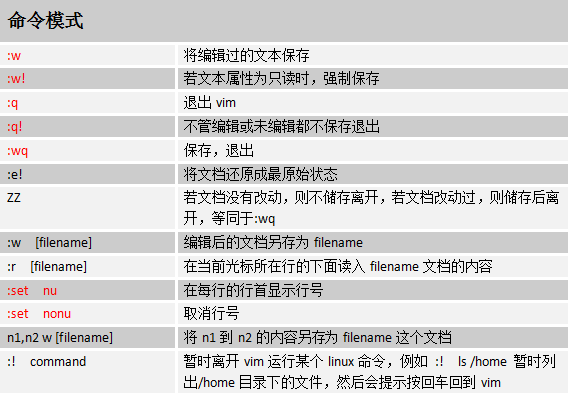
暂时就讲这么多了。如果你能全部掌握,那你一定是vim高手啦。如果你觉得太多,只要记住阿铭标红部分即可,其他的用时再过来查就ok啦。下面阿铭给你留一个小作业,希望你能认真完成!
- 请把/etc/init.d/iptables 复制到/root/目录下,并重命名为test.txt
- 用vim打开test.txt并设置行号
- 分别向下、向右、向左、向右移动5个字符
- 分别向下、向上翻两页
- 把光标移动到第49行
- 让光标移动到行末,再移动到行首
- 移动到test.txt文件的最后一行
- 移动到文件的首行
- 搜索文件中出现的 iptables 并数一下一共出现多少个
- 把从第一行到第三行出现的iptables 替换成iptable
- 还原上一步操作
- 把整个文件中所有的iptables替换成iptable
- 把光标移动到25行,删除字符 “$”
- 还原上一步操作
- 删除第50行
- 还原上一步操作
- 删除从37行到42行的所有内容
- 还原上一步操作
- 复制48行并粘贴到52行下面
- 还原上一步操作(按两次u)
- 复制从37行到42行的内容并粘贴到44行上面
- 还原上一步操作(按两次u)
- 把37行到42行的内容移动到19行下面
- 还原上一步操作(按两次u)
- 光标移动到首行,把/bin/sh 改成 /bin/bash
- 在第一行下面插入新的一行,并输入”# Hello!”
- 保存文档并退出
阿铭建议你最好再扩展学习一下: http://www.aminglinux.com/bbs/thread-5434-1-1.html
教程答疑: 请移步这里.
欢迎你加入 阿铭学院 和阿铭一起学习Linux,让阿铭成为你Linux生涯中永远的朋友吧!
第11章 文档的压缩与打包
学习Linux请加QQ群: 群1(163262181) 群2(148412746) 群3(246401509) 群4(173884211)
跟阿铭学Linux邀请函 (http://www.aminglinux.com),猿课已上线,请加微信aminglinux84索要配套视频教程。
在windows下我们接触最多的压缩文件就是.rar格式的了。但在linux下这样的格式是不能识别的,它有自己所特有的压缩工具。但有一种文件在windows和linux下都能使用那就是.zip格式的文件了。压缩的好处不用阿铭介绍相信你也晓得吧,它不仅能节省磁盘空间而且在传输的时候还能节省网络带宽呢。
在linux下最常见的压缩文件通常都是以.tar.gz 为结尾的,除此之外还有.tar, .gz, .bz2, .zip等等。以前也介绍过linux系统中的后缀名其实要不要无所谓,但是对于压缩文件来讲必须要带上。这是为了判断压缩文件是由哪种压缩工具所压缩,而后才能去正确的解压缩这个文件。以下介绍常见的后缀名所对应的压缩工具。
.gz gzip 压缩工具压缩的文件
.bz2 bzip2 压缩工具压缩的文件
.tar tar 打包程序打包的文件(tar并没有压缩功能,只是把一个目录合并成一个文件)
.tar.gz 可以理解为先用tar打包,然后再gzip压缩
.tar.bz2 同上,先用tar打包,然后再bzip2压缩
gzip压缩工具
语法: gzip [-d#] filename 其中#为1-9的数字
“-d” : 解压缩时使用
“-#” : 压缩等级,1压缩最差,9压缩最好,6为默认
[root@localhost ~]# [ -d test ] && rm -rf test
[root@localhost ~]# mkdir test
[root@localhost ~]# mv test.txt test
[root@localhost ~]# cd test
[root@localhost test]# ls
test.txt
[root@localhost test]# gzip test.txt
[root@localhost test]# ls
test.txt.gz
你对第一条命令也许很陌生,其实这是两条命令,[ ] 内是一个判断,”-d test” 判断test目录是否存在,’&&’ 为一个连接命令符号,当前面的命令执行成功后,后面的命令才执行。关于这两块内容阿铭会在后面详细讲解。gzip 后面直接跟文件名,就在当前目录下把该文件压缩了,而原文件也会消失。
[root@localhost test]# gzip -d test.txt.gz
[root@localhost test]# ls
test.txt
“gzip -d” 后面跟压缩文件,会解压压缩文件。gzip 是不支持压缩目录的。
[root@localhost ~]# gzip test
gzip: test is a directory -- ignored
[root@localhost ~]# ls test
test/  test1  test2/ test3
[root@localhost ~]# ls test
test.txt
至于 “-#” 选项,平时很少用,使用默认压缩级别足够了。
bzip2压缩工具
语法: bzip2 [-dz] filename
bzip2 只有两个选项需要你掌握。
“-d” : 解压缩
“-z” : 压缩
压缩时,可以加 “-z” 也可以不加,都可以压缩文件,”-d” 则为解压的选项:
[root@localhost ~]# cd test
[root@localhost test]# bzip2 test.txt
[root@localhost test]# ls
test.txt.bz2
[root@localhost test]# bzip2 -d test.txt.bz2
[root@localhost test]# bzip2 -z test.txt
[root@localhost test]# ls
test.txt.bz2
bzip2 同样也不可以压缩目录:
[root@localhost test]# cd ..
[root@localhost ~]# bzip2 test
bzip2: Input file test is a directory.
tar压缩工具
tar 本身为一个打包工具,可以把目录打包成一个文件,它的好处是它把所有文件整合成一个大文件整体,方便拷贝或者移动。
语法:tar [-zjxcvfpP] filename tar 命令有多个选项,其中不常用的阿铭做了标注。
“-z” : 同时用gzip压缩
“-j” : 同时用bzip2压缩
“-x” : 解包或者解压缩
“-t” : 查看tar包里面的文件
“-c” : 建立一个tar包或者压缩文件包
“-v” : 可视化
“-f” : 后面跟文件名,压缩时跟 “-f 文件名”,意思是压缩后的文件名为filename, 解压时跟 “-f 文件名”,意思是解压filename. 请注意,如果是多个参数组合的情况下带有 “-f”,请把 “-f” 写到最后面。
“-p” : 使用原文件的属性,压缩前什么属性压缩后还什么属性。(不常用)
“-P” : 可以使用绝对路径。(不常用)
--exclude filename : 在打包或者压缩时,不要将filename文件包括在内。(不常用)
[root@localhost ~]# cd test
[root@localhost test]# mkdir test111
[root@localhost test]# touch test111/test2.txt
[root@localhost test]# echo "nihao" > !$
echo "nihao" > test111/test2.txt
[root@localhost test]# ls
test111  test.txt.bz2
[root@localhost test]# tar -cvf test111.tar test111
test111/
test111/test2.txt
[root@localhost test]# ls
test111  test111.tar  test.txt.bz2
首先在test目录下建立test111目录,然后在test111目录下建立test2.txt, 并写入 “nihao” 到test2.txt中,接着是用tar把test111打包成test111.tar. 请记住 “-f” 参数后跟的是打包后的文件名, 然后再是要打包的目录或者文件。tar 打包后,原文件不会消失,而依旧存在。在上例中,阿铭使用一个特殊的符号 ”!$” 它表示上一条命令的最后一个参数,比如在本例中,它表示”test111/test2.txt”. tar 不仅可以打包目录也可以打包文件,打包的时候也可以不加 “-v” 选项表示,表示不可视化。
[root@localhost test]# rm -f test111.tar
[root@localhost test]# tar -cf test.tar test111 test.txt.bz2
[root@localhost test]# ls
test111  test.tar  test.txt.bz2
删除原来的test111目录,然后解包test.tar,不管是打包还是解包,原来的文件是不会删除的,而且它会覆盖当前已经存在的文件或者目录。
[root@localhost test]# rm -rf test111
[root@localhost test]# ls
test.tar  test.txt.bz2
[root@localhost test]# tar -xvf test.tar
test111/
test111/test2.txt
test.txt.bz2
打包的同时使用gzip压缩
tar命令非常好用的一个功能就是可以在打包的时候直接压缩,它支持gzip压缩和bzip2压缩。
[root@localhost test]# tar -czvf  test111.tar.gz test111
test111/
test111/test2.txt
[root@localhost test]# ls
test111  test111.tar.gz   test.tar  test.txt.bz2
“-tf” 可以查看包或者压缩包的文件列表:
[root@localhost test]# tar -tf test111.tar.gz
test111/
test111/test2.txt
[root@localhost test]# tar -tf test.tar
test111/
test111/test2.txt
test.txt.bz2
“-zxvf” 用来解压.tar.gz的压缩包
[root@localhost test]# rm -rf test111
[root@localhost test]# ls
test111.tar.gz  test.tar  test.txt.bz2
[root@localhost test]# tar -zxvf test111.tar.gz
test111/
test111/test2.txt
[root@localhost test]# ls
test111  test111.tar.gz  test.tar  test.txt.bz2
打包的同时使用bzip2压缩
和gzip压缩不同的是,这里使用 “-cjvf” 选项来压缩
[root@localhost test]# tar -cjvf test111.tar.bz2 test111
test111/
test111/test2.txt
[root@localhost test]# ls
test111  test111.tar.bz2  test111.tar.gz  test.tar  test.txt.bz2
同样可以使用 “-tf” 来查看压缩包文件列表
[root@localhost test]# tar -tf test111.tar.bz2
test111/
test111/test2.txt
解压.tar.bz2 的压缩包也很简单
[root@localhost test]# tar -jxvf test111.tar.bz2
test111/
test111/test2.txt
下面介绍一下 --exclude 这个选项的使用,因为在日常的管理工作中你也许会用到它。
[root@localhost test]# tar -cvf test111.tar --exclude test3.txt test111
test111/
test111/test4.txt
test111/test2.txt
test111/test5/
请注意上条命令中,test111.tar 是放到了 --exclude 选项的前面。除了可以排除文件,也可以排除目录:
[root@localhost test]# rm -f test111.tar
[root@localhost test]# tar -cvf test111.tar --exclude test5 test111
test111/
test111/test4.txt
test111/test3.txt
test111/test2.txt
第12章 安装RPM包或者安装源码包
学习Linux请加QQ群: 群1(163262181) 群2(148412746) 群3(246401509) 群4(173884211)
跟阿铭学Linux邀请函 (http://www.aminglinux.com),猿课已上线,请加微信aminglinux84索要配套视频教程。
在windows下安装一个软件很轻松,只要双击.exe的文件,安装提示连续 “下一步” 即可,然而linux系统下安装一个软件似乎并不那么轻松了,因为我们不是在图形界面下。所以你要学会如何在linux下安装一个软件。
在前面的内容中多次提到的yum, 这个yum是Redhat所特有的安装RPM程序包的工具,使用起来相当方便。因为使用RPM安装某一个程序包有可能会因为该程序包依赖另一个程序包而无法安装。而使用yum工具就可以连同依赖的程序包一起安装。当然CentOS同样可以使用yum工具,而且在CentOS中你可以免费使用yum,但Redhat中只有当你付费后才能使用yum,默认是无法使用yum的。在介绍yum之前先说一说RPM相关的东西。
RPM工具
RPM是 “Redhat Package Manager” 的缩写,根据名字也能猜到这是Redhat公司开发出来的。RPM 是以一种数据库记录的方式来将你所需要的套件安装到你的Linux 主机的一套管理程序。也就是说,你的linux系统中存在着一个关于RPM的数据库,它记录了安装的包以及包与包之间依赖相关性。RPM包是预先在linux机器上编译好并打包好的文件,安装起来非常快捷。但是也有一些缺点,比如安装的环境必须与编译时的环境一致或者相当;包与包之间存在着相互依赖的情况;卸载包时需要先把依赖的包卸载掉,如果依赖的包是系统所必须的,那就不能卸载这个包,否则会造成系统崩溃。
如果你的光驱中还有系统安装盘的话,我们可以通过 mount /dev/cdrom /mnt 命令把光驱挂载到/mnt目录下,那么你会在/mnt/Packages目录下看到很多.rpm的文件,这就是RPM包了。
[root@localhost ~]# mount /dev/cdrom /mnt/
mount: block device /dev/sr0 is write-protected, mounting read-only
[root@localhost ~]# ls /mnt/
CentOS_BuildTag  Packages                    RPM-GPG-KEY-CentOS-Security-6
EULA             RELEASE-NOTES-en-US.html    RPM-GPG-KEY-CentOS-Testing-6
GPL              repodata                    TRANS.TBL
images           RPM-GPG-KEY-CentOS-6
isolinux         RPM-GPG-KEY-CentOS-Debug-6
[root@localhost ~]# ls /mnt/Packages/|head
389-ds-base-1.2.11.15-11.el6.i686.rpm
389-ds-base-libs-1.2.11.15-11.el6.i686.rpm
abrt-2.0.8-15.el6.centos.i686.rpm
abrt-addon-ccpp-2.0.8-15.el6.centos.i686.rpm
abrt-addon-kerneloops-2.0.8-15.el6.centos.i686.rpm
abrt-addon-python-2.0.8-15.el6.centos.i686.rpm
abrt-cli-2.0.8-15.el6.centos.i686.rpm
abrt-desktop-2.0.8-15.el6.centos.i686.rpm
abrt-gui-2.0.8-15.el6.centos.i686.rpm
abrt-libs-2.0.8-15.el6.centos.i686.rpm
每一个rpm包的名称都由 - 和 . 分成了若干部分。就拿 “abrt-cli-2.0.8-15.el6.centos.i686.rpm” 这个包来解释一下, “abrt-cli” 为包名, “2.0.8” 则为版本信息, “15.el6.centos” 为发布版本号, “i686” 为运行平台。其中运行平台常见的有i386, i586, i686, x86_64 ,需要你注意的是cpu目前是分32位和64位的,i386,i586和i686都为32位平台,x86_64则代表为64位的平台。另外有些rpm包并没有写具体的平台而是noarch,这代表这个rpm包没有硬件平台限制。例如 “alacarte-0.10.0-1.fc6.noarch.rpm”. 下面介绍一下rpm常用的命令。
- 安装一个rpm包
[root@localhost ~]# rpm -ivh /mnt/Packages/libjpeg-turbo-devel-1.2.1-1.el6.i686.rpm
Preparing...                ########################################### [100%]
   1:libjpeg-turbo-devel    ########################################### [100%]
“-i” : 安装的意思
“-v” : 可视化
“-h” : 显示安装进度
另外在安装一个rpm包时常用的附带参数有:
--force : 强制安装,即使覆盖属于其他包的文件也要安装
--nodeps : 当要安装的rpm包依赖其他包时,即使其他包没有安装,也要安装这个包
- 升级一个rpm包
命令 rpm -Uvh filename
“-U” : 即升级的意思
- 卸载一个rpm包
命令 rpm -e filename
这里的filename是通过rpm的查询功能所查询到的,稍后会作介绍。
[root@localhost ~]# rpm -qa |grep libjpeg-turbo-devel
libjpeg-turbo-devel-1.2.1-1.el6.i686
[root@localhost ~]# rpm -e libjpeg-turbo-devel
卸载时后边跟的filename和安装时的是有区别的,安装时是把一个存在的文件作为参数,而卸载时只需要包名即可。
- 查询一个包是否安装
命令 rpm -q rpm包名 (这里的包名,是不带有平台信息以及后缀名的)
[root@localhost ~]# rpm -q libjpeg-turbo-devel
package libjpeg-turbo-devel is not installed
[root@localhost ~]# rpm -ivh /mnt/Packages/libjpeg-turbo-devel-1.2.1-1.el6.i686.rpm
Preparing...                ########################################### [100%]
   1:libjpeg-turbo-devel    ########################################### [100%]
[root@localhost ~]# rpm -q libjpeg-turbo-devel
libjpeg-turbo-devel-1.2.1-1.el6.i686
我们可以使用 rpm -qa 查询当前系统所有安装过的rpm包,限于篇幅,阿铭只列出前十个。
[root@localhost ~]# rpm -qa |head
plymouth-core-libs-0.8.3-27.el6.centos.i686
xml-common-0.6.3-32.el6.noarch
sgpio-1.2.0.10-5.el6.i686
iso-codes-3.16-2.el6.noarch
gnome-vfs2.2.27.2-6.el6.i686
libX11-common-1.5.0-4.el6.noarch
curl-7.19.7-35.el6.i686
ca-certificates-2010.63-3.el6_1.5.noarch
cups-libs-1.4.2-48.el6_3.3.i686
kbd-misc-1.15-11.el6.noarch
- 得到一个已安装rpm包的相关信息
命令 rpm -qi 包名 (同样不需要加平台信息与后缀名)
[root@localhost ~]# rpm -qi libjpeg-turbo-devel
Name        : libjpeg-turbo-devel          Relocations: (not relocatable)
Version     : 1.2.1                             Vendor: CentOS
Release     : 1.el6                         Build Date: 2013年02月22日 星期五 06时49分08秒
Install Date: 2013年05月13日 星期一 01时37分48秒      Build Host: c6b9.bsys.dev.centos.org
Group       : Development/Libraries         Source RPM: libjpeg-turbo-1.2.1-1.el6.src.rpm
Size        : 321085                           License: wxWidgets
Signature   : RSA/SHA1, 2013年02月24日 星期日 01时53分55秒, Key ID 0946fca2c105b9de
Packager    : CentOS BuildSystem <http://bugs.centos.org>
URL         : http://sourceforge.net/projects/libjpeg-turbo
Summary     : Headers for the libjpeg-turbo library
Description :
This package contains header files necessary for developing programs which
will manipulate JPEG files using the libjpeg-turbo library.
- 列出一个rpm包安装的文件
命令 rpm -ql 包名
[root@localhost ~]# rpm -ql libjpeg-turbo-devel
/usr/include/jconfig.h
/usr/include/jerror.h
/usr/include/jmorecfg.h
/usr/include/jpeglib.h
/usr/lib/libjpeg.so
/usr/share/doc/libjpeg-turbo-devel-1.2.1
/usr/share/doc/libjpeg-turbo-devel-1.2.1/coderules.txt
/usr/share/doc/libjpeg-turbo-devel-1.2.1/example.c
/usr/share/doc/libjpeg-turbo-devel-1.2.1/jconfig.txt
/usr/share/doc/libjpeg-turbo-devel-1.2.1/libjpeg.txt
/usr/share/doc/libjpeg-turbo-devel-1.2.1/structure.txt
通过上面的命令可以看出文件 “/usr/lib/libjpeg.so” 是通过安装 “libjpeg-turbo-devel” 这个rpm包得来的。那么反过来如何通过一个文件去查找是由安装哪个rpm包得来的?
- 列出某一个文件属于哪个rpm包
命令 rpm -qf 文件的绝对路径
[root@localhost ~]# rpm -qf /usr/lib/libjpeg.so
libjpeg-turbo-devel-1.2.1-1.el6.i686
yum工具
在前面的章节中,阿铭多次提到yum工具,今天终于该讲它了。这个工具比rpm工具好用多了,当然前提是你使用的linux系统是支持yum的。yum最大的优势在于可以联网去下载所需要的rpm包,然后自动安装,在这个工程中如果要安装的rpm包有依赖关系,yum会帮你解决掉这些依赖关系依次安装所有rpm包。下面阿铭介绍常用的yum 命令。
- 列出所有可用的rpm包 “yum list”
[root@localhost ~]# yum list |head -n 20
Loaded plugins: fastestmirror, security
Loading mirror speeds from cached hostfile
 * base: mirrors.btte.net
 * extras: mirrors.btte.net
 * updates: mirrors.btte.net
Installed Packages
ConsoleKit.i686                         0.4.1-3.el6                @anaconda-CentOS-201303020136.i386/6.4
ConsoleKit-libs.i686                    0.4.1-3.el6                @anaconda-CentOS-201303020136.i386/6.4
ConsoleKit-x11.i686                     0.4.1-3.el6                @anaconda-CentOS-201303020136.i386/6.4
GConf2.i686                             2.28.0-6.el6               @anaconda-CentOS-201303020136.i386/6.4
MAKEDEV.i686                            3.24-6.el6                 @anaconda-CentOS-201303020136.i386/6.4
ORBit2.i686                             2.14.17-3.2.el6_3          @anaconda-CentOS-201303020136.i386/6.4
abrt.i686                               2.0.8-15.el6.cento         @anaconda-CentOS-201303020136.i386/6.4
abrt-addon-ccpp.i686                    2.0.8-15.el6.cento         @anaconda-CentOS-201303020136.i386/6.4
abrt-addon-kerneloops.i686              2.0.8-15.el6.cento         @anaconda-CentOS-201303020136.i386/6.4
abrt-addon-python.i686                  2.0.8-15.el6.cento         @anaconda-CentOS-201303020136.i386/6.4
abrt-cli.i686                           2.0.8-15.el6.centos        @anaconda-CentOS-201303020136.i386/6.4
abrt-libs.i686                          2.0.8-15.el6.centos        @anaconda-CentOS-201303020136.i386/6.4
abrt-tui.i686                           2.0.8-15.el6.centos        @anaconda-CentOS-201303020136.i386/6.4
acl.i686                                2.2.49-6.el6               @anaconda-CentOS-201303020136.i386/6.4
限于篇幅,阿铭只列举出来前14个包信息。从上例中可以看到有 “mirrors.btte.net” 信息出现,这是在告诉用户,它是从mirrors.btte.net这里下载到的rpm包资源。从上面的例子中你还可以看到最左侧是rpm包名字,中间是版本信息,最右侧是安装信息,如果安装了就显示类似 “@anaconda-CentOS”, “@base” 或者 “@extras”, 他们前面都会有一个 “@” 符号,这很好区分。未安装则显示base或者extras, 如果是该rpm包已安装但需要升级则显示updates. 如果你看的仔细会发现,”yum list” 会先列出已经安装的包(Installed Packages) 然后再列出可以安装的包(Available Packages)
- 搜索一个rpm包
命令 yum search [相关关键词]
[root@localhost ~]# yum search vim
Loaded plugins: fastestmirror, security
Loading mirror speeds from cached hostfile
 * base: mirrors.btte.net
 * extras: mirrors.btte.net
 * updates: mirrors.btte.net
=========================================== N/S Matched: vim ======================================
vim-X11.i686 : The VIM version of the vi editor for the X Window System
vim-common.i686 : The common files needed by any version of the VIM editor
vim-enhanced.i686 : A version of the VIM editor which includes recent enhancements
vim-minimal.i686 : A minimal version of the VIM editor

  Name and summary matches only, use "search all" for everything.
除了这样搜索外,阿铭常用的是利用grep来过滤
[root@localhost ~]# yum list |grep 'vim'
vim-common.i686                    2:7.2.411-1.8.el6          @anaconda-CentOS-201303020136.i386/6.4
vim-enhanced.i686                  2:7.2.411-1.8.el6          @anaconda-CentOS-201303020136.i386/6.4
vim-minimal.i686                   2:7.2.411-1.8.el6          @anaconda-CentOS-201303020136.i386/6.4
vim-X11.i686                       2:7.2.411-1.8.el6          base
我们同样可以找到相应的rpm包。
- 安装一个rpm包
命令 yum install [-y] [rpm包名]
如果不加 “-y” 选项,则会以与用户交互的方式安装,首先是列出需要安装的rpm包信息,然后会问用户是否需要安装,输入y则安装,输入n则不安装。而阿铭嫌这样太麻烦,所以直接加上 “-y” 选项,这样就省略掉了问用户是否安装的那一步。
[root@localhost ~]# yum install vim-X11
Loaded plugins: fastestmirror, security
Loading mirror speeds from cached hostfile
 * base: mirrors.btte.net
 * extras: mirrors.btte.net
 * updates: mirrors.btte.net
Setting up Install Process
Resolving Dependencies
--> Running transaction check
---> Package vim-X11.i686 2:7.2.411-1.8.el6 will be installed
--> Finished Dependency Resolution

Dependencies Resolved

================================================================================
 Package          Arch          Version                     Repository     Size
================================================================================
Installing:
 vim-X11          i686          2:7.2.411-1.8.el6           base          975 k

Transaction Summary
================================================================================
Install       1 Package(s)

Total download size: 975 k
Installed size: 2.1 M
Is this ok [y/N]: y
Downloading Packages:
vim-X11-7.2.411-1.8.el6.i686.rpm                         | 975 kB     00:03
Running rpm_check_debug
Running Transaction Test
Transaction Test Succeeded
Running Transaction
  Installing : 2:vim-X11-7.2.411-1.8.el6.i686                               1/1
  Verifying  : 2:vim-X11-7.2.411-1.8.el6.i686                               1/1

Installed:
  vim-X11.i686 2:7.2.411-1.8.el6

Complete!
- 卸载一个rpm包
命令 yum remove [-y] [rpm包名]
[root@localhost ~]# yum remove vim-X11
Loaded plugins: fastestmirror, security
Setting up Remove Process
Resolving Dependencies
--> Running transaction check
---> Package vim-X11.i686 2:7.2.411-1.8.el6 will be erased
--> Finished Dependency Resolution

Dependencies Resolved

================================================================================
 Package          Arch          Version                    Repository      Size
================================================================================
Removing:
 vim-X11          i686          2:7.2.411-1.8.el6          @base          2.1 M

Transaction Summary
================================================================================
Remove        1 Package(s)

Installed size: 2.1 M
Is this ok [y/N]: y
Downloading Packages:
Running rpm_check_debug
Running Transaction Test
Transaction Test Succeeded
Running Transaction
  Erasing    : 2:vim-X11-7.2.411-1.8.el6.i686                               1/1
  Verifying  : 2:vim-X11-7.2.411-1.8.el6.i686                               1/1

Removed:
  vim-X11.i686 2:7.2.411-1.8.el6

Complete!
卸载和安装一样,也可以直接加上 “-y” 选项来省略掉和用户交互的步骤。在这里阿铭要提醒一下,卸载某个rpm包一定要看清楚了,不要连其他重要的rpm包一起卸载了,以免影响正常的业务。
- 升级一个rpm包
命令 yum update [-y] [rpm包]
[root@localhost ~]# yum update libselinux
Loaded plugins: fastestmirror, security
Loading mirror speeds from cached hostfile
 * base: mirrors.btte.net
 * extras: mirrors.btte.net
 * updates: mirrors.btte.net
Setting up Update Process
Resolving Dependencies
--> Running transaction check
---> Package libselinux.i686 0:2.0.94-5.3.el6 will be updated
--> Processing Dependency: libselinux = 2.0.94-5.3.el6 for package: libselinux-utils-2.0.94-5.3.el6.i686
---> Package libselinux.i686 0:2.0.94-5.3.el6_4.1 will be an update
--> Running transaction check
---> Package libselinux-utils.i686 0:2.0.94-5.3.el6 will be updated
---> Package libselinux-utils.i686 0:2.0.94-5.3.el6_4.1 will be an update
--> Finished Dependency Resolution

Dependencies Resolved

================================================================================
 Package                Arch       Version                  Repository     Size
================================================================================
Updating:
 libselinux             i686       2.0.94-5.3.el6_4.1       updates       108 k
Updating for dependencies:
 libselinux-utils       i686       2.0.94-5.3.el6_4.1       updates        81 k

Transaction Summary
================================================================================
Upgrade       2 Package(s)

Total download size: 189 k
Is this ok [y/N]: y
Downloading Packages:
(1/2): libselinux-2.0.94-5.3.el6_4.1.i686.rpm            | 108 kB     00:00
(2/2): libselinux-utils-2.0.94-5.3.el6_4.1.i686.rpm      |  81 kB     00:00
--------------------------------------------------------------------------------
Total                                           1.0 MB/s | 189 kB     00:00
Running rpm_check_debug
Running Transaction Test
Transaction Test Succeeded
Running Transaction
  Updating   : libselinux-2.0.94-5.3.el6_4.1.i686                           1/4
  Updating   : libselinux-utils-2.0.94-5.3.el6_4.1.i686                     2/4
  Cleanup    : libselinux-utils-2.0.94-5.3.el6.i686                         3/4
  Cleanup    : libselinux-2.0.94-5.3.el6.i686                               4/4
  Verifying  : libselinux-utils-2.0.94-5.3.el6_4.1.i686                     1/4
  Verifying  : libselinux-2.0.94-5.3.el6_4.1.i686                           2/4
  Verifying  : libselinux-2.0.94-5.3.el6.i686                               3/4
  Verifying  : libselinux-utils-2.0.94-5.3.el6.i686                         4/4

Updated:
  libselinux.i686 0:2.0.94-5.3.el6_4.1

Dependency Updated:
  libselinux-utils.i686 0:2.0.94-5.3.el6_4.1

Complete!
以上介绍了如何使用yum搜索、安装、卸载以及升级一个rpm包,如果你掌握了这些那么你就已经可以解决日常工作中遇到的与rpm包相关问题了。当然yum工具还有好多其他好用的命令,阿铭不再列举出来,如果你感兴趣就去man 一下吧。除此之外,阿铭还会教你一些关于yum的小应用。
使用本地的光盘来制作一个yum源
有时候你的linux系统不能联网,当然就不能很便捷的使用联网的yum源了,这时候就需要你自己会利用linux系统光盘制作一个yum源。具体步骤如下:
a)挂载光盘
[root@localhost ~]# mount /dev/cdrom /mnt
b)删除/etc/yum.repos.d目录所有的repo文件
[root@localhost ~]# rm -rf /etc/yum.repos.d/*
c) 创建新文件dvd.repo
[root@localhost ~]# vim /etc/yum.repos.d/dvd.repo
加入以下内容:
[dvd]
name=install dvd
baseurl=file:///mnt
enabled=1
gpgcheck=0
d) 刷新 repos 生成缓存
[root@localhost ~]# yum makecache
然后就可以使用yum命令安装你所需要的软件包了
利用yum工具下载一个rpm包
有时,我们需要下载一个rpm包,只是下载下来,拷贝给其他机器使用,前面也介绍过yum安装rpm包的时候,首先得下载这个rpm包然后再去安装,所以使用yum完全可以做到只下载而不安装。
a)首先要安装 yum-downloadonly
[root@localhost ~]# yum install -y yum-plugin-downloadonly.noarch
如果你的CentOS是5.x版本,则需要安装yum-downloadonly.noarch这个包。
b)下载一个rpm包而不安装
[root@localhost ~]# yum install 包名 -y --downloadonly
这样虽然下载了,但是并没有保存到我们想要的目录下,那么如何指定目录呢?
c)下载到指定目录
[root@localhost ~]# yum install 包名 -y --downloadonly --downloaddir=/usr/local/src
下面阿铭下载一个rpm包:
[root@localhost ~]# yum install -y yum-presto.noarch  --downloadonly --downloaddir=/usr/local/src/
Loaded plugins: downloadonly, fastestmirror, security
Loading mirror speeds from cached hostfile
 * base: mirrors.btte.net
 * extras: mirrors.btte.net
 * updates: mirrors.btte.net
Setting up Install Process
Resolving Dependencies
--> Running transaction check
---> Package yum-presto.noarch 0:0.6.2-1.el6 will be installed
--> Processing Dependency: deltarpm >= 3.4-2 for package: yum-presto-0.6.2-1.el6.noarch
--> Running transaction check
---> Package deltarpm.i686 0:3.5-0.5.20090913git.el6 will be installed
--> Finished Dependency Resolution

Dependencies Resolved

================================================================================
 Package          Arch         Version                         Repository  Size
================================================================================
Installing:
 yum-presto       noarch       0.6.2-1.el6                     base        32 k
Installing for dependencies:
 deltarpm         i686         3.5-0.5.20090913git.el6         base        73 k

Transaction Summary
================================================================================
Install       2 Package(s)

Total download size: 105 k
Installed size: 257 k
Downloading Packages:
--------------------------------------------------------------------------------
Total                                            43 MB/s | 105 kB     00:00


exiting because --downloadonly specified
[root@localhost ~]# ls /usr/local/src/
deltarpm-3.5-0.5.20090913git.el6.i686.rpm  yum-presto-0.6.2-1.el6.noarch.rpm
安装源码包
其实,在linux下面安装一个源码包是最常用的,阿铭在日常的管理工作中,大部分软件都是通过源码安装的。安装一个源码包,是需要我们自己把源代码编译成二进制的可执行文件。如果你读得懂这些源代码,那么你就可以去修改这些源代码自定义功能,然后再去编译成你想要的。使用源码包的好处除了可以自定义修改源代码外还可以定制相关的功能,因为源码包在编译的时候是可以附加额外的选项的。
源码包的编译用到了linux系统里的编译器,常见的源码包一般都是用C语言开发的,这也是因为C语言为linux上最标准的程序语言。Linux上的C语言编译器叫做gcc,利用它就可以把C语言变成可执行的二进制文件。所以如果你的机器上没有安装gcc就没有办法去编译源码。你可以使用 yum install -y gcc 来完成安装。
安装一个源码包,通常需要三个步骤:
1)./configure
在这一步可以定制功能,加上相应的选项即可,具有有什么选项可以通过 ./configure --help 命令来查看。在这一步会自动检测你的linux系统与相关的套件是否有编译该源码包时需要的库,因为一旦缺少某个库就不能完成编译。只有检测通过后才会生成一个Makefile文件。
2) make
使用这个命令会根据Makefile文件中预设的参数进行编译,这一步其实就是gcc在工作了。
3) make install
安装步骤,生成相关的软件存放目录和配置文件的过程。
上面介绍的3步并不是所有的源码包软件都一样的,阿铭以前也曾经遇到过,安装步骤并不是这样,也就是说源码包的安装并非具有一定的标准安装步骤。这就需要你拿到源码包解压后,然后进入到目录找相关的帮助文档,通常会以INSTALL或者README为文件名。所以,你一定要去看一下。下面阿铭会编译安装一个源码包来帮你更深刻的去理解如何安装源码包。
- 下载一个源码包
下载源码包一定要去官方站点去下载,不要在网上随便下载,那样很不安全。因为你下载到的源码包很有可能是被人修改过的。
[root@localhost src]# cd /usr/local/src/
[root@localhost src]# wget http://mirrors.hust.edu.cn/apache/httpd/httpd-2.2.27.tar.bz2
阿铭提供的下载地址为apache官方网站上提供的一个镜像,下载速度还可以。在下载之前,阿铭进入到了 “/usr/local/src” 目录,这是因为阿铭习惯把源码包都放到这个目录下,这样做的好处是,方便自己和其他管理员维护,所以阿铭给你一个建议,以后下载的源码包都统一放到这个目录下吧。
- 解压源码包
[root@localhost src]# tar jxvf httpd-2.2.27.tar.bz2
- 配置相关的选项,并生成Makefile
[root@localhost src]# cd httpd-2.2.27
[root@localhost httpd-2.2.27]# ./configure --help |less
`configure' configures this package to adapt to many kinds of systems.

Usage: ./configure [OPTION]... [VAR=VALUE]...

To assign environment variables (e.g., CC, CFLAGS...), specify them as
VAR=VALUE.  See below for descriptions of some of the useful variables.

Defaults for the options are specified in brackets.

Configuration:
  -h, --help              display this help and exit
      --help=short        display options specific to this package
      --help=recursive    display the short help of all the included packages
  -V, --version           display version information and exit
  -q, --quiet, --silent   do not print `checking ...' messages
      --cache-file=FILE   cache test results in FILE [disabled]
  -C, --config-cache      alias for `--cache-file=config.cache'
  -n, --no-create         do not create output files
      --srcdir=DIR        find the sources in DIR [configure dir or `..']
后面的内容阿铭省略掉了,阿铭使用 ./configure --help 命令查看可以使用的选项。一般常用的有 --prefix=PREFIX 这个选项的意思是定义软件包安装到哪里。到这里,阿铭再提一个小小的建议,通常源码包都是安装在/usr/local/目录下的。比如,我们把apache安装在/usr/local/apache2下,那么这里就应该这样写--prefix=/usr/local/apache2 其他还有好多选项,如果你有耐心可以挨个去看一看都有什么作用。
[root@localhost httpd-2.2.27]# ./configure --prefix=/usr/local/apache2
checking for chosen layout... Apache
checking for working mkdir -p... yes
checking build system type... i686-pc-linux-gnu
checking host system type... i686-pc-linux-gnu
checking target system type... i686-pc-linux-gnu

Configuring Apache Portable Runtime library ...

checking for APR... reconfig
configuring package in srclib/apr now
checking build system type... i686-pc-linux-gnu
checking host system type... i686-pc-linux-gnu
checking target system type... i686-pc-linux-gnu
Configuring APR library
Platform: i686-pc-linux-gnu
checking for working mkdir -p... yes
APR Version: 1.4.6
checking for chosen layout... apr
checking for gcc... no
checking for cc... no
checking for cl.exe... no
configure: error: in `/usr/local/src/httpd-2.2.27/srclib/apr':
configure: error: no acceptable C compiler found in $PATH
See `config.log' for more details
configure failed for srclib/apr
不幸的是,阿铭一开始就报错了,因为没有gcc编译器,需要先安装一下。
[root@localhost httpd-2.2.27]# yum install -y gcc
由于gcc依赖的包很多,所以安装时间会长一些。安装完后,再继续上面的步骤。
tcode:
[root@localhost httpd-2.2.27]# ./configure --prefix=/usr/local/apache2
验证这一步是否成功的命令是:
[root@localhost httpd-2.2.27]# echo $?
0
返回值如果是 “0” 则执行成功,否则就是没有成功。此时就成功生成 Makefile 了。
[root@localhost httpd-2.2.27]# ls -l Makefile
-rw-r--r-- 1 root root 8954 5月  13 12:02 Makefile
- 进行编译
[root@localhost httpd-2.2.27]# make
-bash: make: command not found
又发生错误了,提示 “make” 命令没有发现,解决办法是安装make工具。
[root@localhost httpd-2.2.27]# yum install -y make
继续make
[root@localhost httpd-2.2.27]# make
Making all in srclib
make[1]: Entering directory `/usr/local/src/httpd-2.2.27/srclib'
Making all in apr
make[2]: Entering directory `/usr/local/src/httpd-2.2.27/srclib/apr'
make[3]: Entering directory `/usr/local/src/httpd-2.2.27/srclib/apr'
/bin/sh /usr/local/src/httpd-2.2.27/srclib/apr/libtool --silent --mode=compile gcc -g -O2 -pthread   -DHAVE_CONFIG_H -DLINUX=2 -D_REENTRANT -D_GNU_SOURCE -D_LARGEFILE64_SOURCE   -I./include -I/usr/local/src/httpd-2.2.27/srclib/apr/include/arch/unix -I./include/arch/unix -I/usr/local/src/httpd-2.2.27/srclib/apr/include/arch/unix -I/usr/local/src/httpd-2.2.27/srclib/apr/include  -o passwd/apr_getpass.lo -c passwd/apr_getpass.c && touch passwd/apr_getpass.lo
编译的时候,就会出现类似这么多乱七八糟的信息,编译的时间比较长,CPU使用率会很高,这是因为CPU高速计算,编译完后,再使用 echo $? 验证一下是否正常成功。
[root@localhost httpd-2.2.27]# echo $?
0
如果是0的话,就可以执行最后一步了。
- 安装
[root@localhost httpd-2.2.27]# make install
Making install in srclib
make[1]: Entering directory `/usr/local/src/httpd-2.2.27/srclib'
Making install in apr
make[2]: Entering directory `/usr/local/src/httpd-2.2.27/srclib/apr'
make[3]: Entering directory `/usr/local/src/httpd-2.2.27/srclib/apr'
make[3]: Nothing to be done for `local-all'.
make[3]: Leaving directory `/usr/local/src/httpd-2.2.27/srclib/apr'
当然你也可以使用 echo $? 看看有没有正确安装,执行完这一步,则会在 “/usr/local/apache2” 目录下增加了很多目录。
[root@localhost httpd-2.2.27]# ls /usr/local/apache2/
bin    cgi-bin  error   icons    lib   man     modules
build  conf     htdocs  include  logs  manual
到此,apache源码的安装就完成了,其实在日常的源码安装工作中,并不是谁都像阿铭这样顺利完成安装的,遇到错误不能完成安装的情况是很多的。通常都是因为缺少某一个库文件导致的。这就需要你仔细琢磨报错信息或者查看当前目录下的 “config.log” 去得到相关的信息。另外,如果自己不能解决那就去网上google一下吧,通常你会得到想要的答案。
第13章 学习 shell脚本之前的基础知识
学习Linux请加QQ群: 群1(163262181) 群2(148412746) 群3(246401509) 群4(173884211)
跟阿铭学Linux邀请函 (http://www.aminglinux.com),猿课已上线,请加微信aminglinux84索要配套视频教程。
日常的linux系统管理工作中必不可少的就是shell脚本,如果不会写shell脚本,那么你就不算一个合格的管理员。目前很多单位在招聘linux系统管理员时,shell脚本的编写是必考的项目。有的单位甚至用shell脚本的编写能力来衡量这个linux系统管理员的经验是否丰富。阿铭讲这些的目的只有一个,那就是让你认真对待shell脚本,从一开始就要把基础知识掌握牢固,然后要不断的练习,只要你shell脚本写的好,相信你的linux求职路就会轻松的多。阿铭在这一章中并不会多么详细的介绍shell脚本,而只是带你进入shell脚本的世界,如果你很感兴趣那么请到网上下载相关的资料或者到书店购买相关书籍吧。
在学习shell 脚本之前,需要你了解很多关于shell的知识,这些知识是编写shell脚本的基础,所以希望你能够熟练的掌握。
什么是shell
简单点理解,就是系统跟计算机硬件交互时使用的中间介质,它只是系统的一个工具。实际上,在shell和计算机硬件之间还有一层东西那就是系统内核了。打个比方,如果把计算机硬件比作一个人的躯体,而系统内核则是人的大脑,至于shell,把它比作人的五官似乎更加贴切些。回到计算机上来,用户直接面对的不是计算机硬件而是shell,用户把指令告诉shell,然后shell再传输给系统内核,接着内核再去支配计算机硬件去执行各种操作。
阿铭接触的linux发布版本(Redhat/CentOS)系统默认安装的shell叫做bash,即Bourne Again Shell,它是sh(Bourne Shell)的增强版本。Bourn Shell 是最早行起来的一个shell,创始人叫Steven Bourne,为了纪念他所以叫做Bourn Shell,检称sh。那么这个bash有什么特点呢?
- 记录命令历史
我们敲过的命令,linux是会有记录的,预设可以记录1000条历史命令。这些命令保存在用户的家目录中的.bash_history文件中。有一点需要你知道的是,只有当用户正常退出当前shell时,在当前shell中运行的命令才会保存至.bash_history文件中。
与命令历史有关的有一个有意思的字符那就是 ‘!’ 了。常用的有这么几个应用:
1) !! 连续两个 ‘!’, 表示执行上一条指令;
[root@localhost ~]# pwd
/root
[root@localhost ~]# !!
pwd
/root
2) !n 这里的n是数字,表示执行命令历史中第n条指令,例如 !1002 表示执行命令历史中第1002个命令;
[root@localhost ~]# history |grep 1002
 1002  pwd
 1015  history |grep 1002
[root@localhost ~]# !1002
pwd
/root
history 命令如果未改动过环境变量,默认可以把最近1000条命令历史打印出来。
3) !字符串 (字符串大于等于1),例如 !pw 表示执行命令历史中最近一次以 ‘pw’ 为开头的指令。
[root@localhost ~]# !pw
pwd
/root
- 指令和文件名补全
最开始阿铭就介绍过这个功能了,记得吗?它就是按tab键,它可以帮你补全一个指令,也可以帮你补全一个路径或者一个文件名。连续按两次tab键,系统则会把所有的指令或者文件名都列出来。
- 别名
前面也出现过alias的介绍,这个就是bash所特有的功能之一了。我们可以通过alias把一个常用的并且很长的指令别名一个简洁易记的指令。如果不想用了,还可以用unalias解除别名功能。直接敲alias会看到目前系统预设的alias.
系统预设的alias指令也就这几个而已,你也可以自定义你想要的指令别名。alias语法很简单, alias [命令别名]=['具体的命令']
[root@localhost ~]# alias aming='pwd'
[root@localhost ~]# aming
/root
[root@localhost ~]# unalias aming
[root@localhost ~]# aming
bash: aming: command not found
使用 unalias 命令别名 就可以把设置的别名给解除了。
- 通配符
在bash下,可以使用 * 来匹配零个或多个字符,而用 ? 匹配一个字符。
[root@localhost ~]# ls -d test*
test1.txt  test2  test3  test.pl  test.txt
[root@localhost ~]# ls -d test?
test2  test3
- 输入输出重定向
输入重定向用于改变命令的输入,输出重定向用于改变命令的输出。输出重定向更为常用,它经常用于将命令的结果输入到文件中,而不是屏幕上。输入重定向的命令是<,输出重定向的命令是>,另外还有错误重定向2>,以及追加重定向>>,稍后会详细介绍。
- 管道符
前面已经提过过管道符 “|”, 就是把前面的命令运行的结果丢给后面的命令。
- 作业控制
当运行一个进程时,你可以使它暂停(按Ctrl+z),然后使用fg命令恢复它,利用bg命令使他到后台运行,你也可以使它终止(按Ctrl+c)。
[root@localhost ~]# vi test1.txt
testtestsstststst
阿铭使用 “vi” 编辑test1.txt, 随便输入一些内容,按 “ESC” 后, 使用 “Ctrl + z” 使任务暂停:
[root@localhost ~]# vi test1.txt

[1]+  Stopped                 vi test1.txt
可以看到提示 “vi test1.txt” 已经停止了,然后使用fg命令恢复它,此时又进入刚才的 “vi” 窗口了。再次使其暂停,然后输入 jobs, 可以看到在被暂停或者在后台运行的任务:
[root@localhost ~]# jobs
[1]+  Stopped                 vi test1.txt
如果想把暂停的任务丢在后台跑起来,就使用bg命令:
[root@localhost ~]# bg
[1]+ vi test1.txt &

[1]+  Stopped                 vi test1.txt
但是 vi 似乎并不支持在后台运行,那阿铭换一个其他的命令:
[root@localhost ~]# vmstat 1 > /tmp/1.log
^Z
[2]+  Stopped                 vmstat 1 > /tmp/1.log
[root@localhost ~]# jobs
[1]-  Stopped                 vi test1.txt
[2]+  Stopped                 vmstat 1 > /tmp/1.log
[root@localhost ~]# bg 2
[2]+ vmstat 1 > /tmp/1.log &
在上面的例子中,又有一个新的知识点需要你知道,那就是多个被暂停的任务会有编号,使用 jobs 命令可以看到两个任务,那么使用bg或者fg的时候,就需要在后面加一个编号了,阿铭使用 bg 2 把第二个被暂停的任务丢到后台跑起来了,丢入后台需要使用在命令后边加一个 & 符号,中间有个空格。本例中的 vmstat 1 这个是用来观察系统状态的一个命令,后面章节阿铭再介绍。
丢到后台的任务如何关掉呢?如果你没有退出刚才的shell, 那么先使用 fg 编号 把任务调到前台,然后使用 “Ctrl + c” 结束任务:
[root@localhost ~]# fg 2
vmstat 1 > /tmp/1.log
^C
另一种情况则是,关闭到当前的shell, 再次打开另一个shell时,使用jobs命令并不会显示在后台运行或者被暂停的任务,要想停掉它的话,则需要先知道其pid, 然后使用kill命令杀死那个进程。
[root@localhost ~]# vmstat 1 > /tmp/1.log &
[1] 9433
[root@localhost ~]# ps aux |grep vmstat
root      9433  0.0  0.0   6180   516 pts/2    S    09:57   0:00 vmstat 1
root      9435  0.0  0.0 103308   848 pts/2    S+   09:58   0:00 grep vmstat
使用 & 把任务丢入后台运行,它会显示pid信息,如果忘记这个pid,我们还可以使用 ps aux 命令找到那个进程,关于 ps 这个命令阿铭会在后面讲解的。想结束掉该进程,需要使用 kill 命令:
[root@localhost ~]# kill 9433
[1]+  已终止               vmstat 1 > /tmp/1.log
kill命令语法很简单,直接在后面加pid即可,如果遇到杀不死的进程时,可以在kill 后面加一个选项: kill-9 [pid]
变量
前面章节中阿铭曾经介绍过环境变量PATH,这个环境变量就是shell预设的一个变量,通常shell预设的变量都是大写的。变量,说简单点就是使用一个较简单的字符串来替代某些具有特殊意义的设定以及数据。就拿PATH来讲,这个PATH就代替了所有常用命令的绝对路径的设定。因为有了PATH这个变量,所以我们运行某个命令时不再去输入全局路径,直接敲命令名即可。你可以使用echo命令显示变量的值。
[root@localhost ~]# echo $PATH
/usr/local/sbin:/usr/local/bin:/sbin:/bin:/usr/sbin:/usr/bin:/root/bin
[root@localhost ~]# echo $HOME
/root
[root@localhost ~]# echo $PWD
/root
[root@localhost ~]# echo $LOGNAME
root
除了PATH, HOME, LOGNAME外,系统预设的环境变量还有哪些呢?
[root@localhost ~]# env
HOSTNAME=localhost.localdomain
TERM=xterm
SHELL=/bin/bash
HISTSIZE=1000
SSH_CLIENT=10.72.137.107 50947 22
SSH_TTY=/dev/pts/0
USER=root
LS_COLORS=rs=0:di=01;34:ln=01;36:mh=00:pi=40;33:so=01;35:do=01;35:bd=40;33;01:cd=40;33;01:or=40;31;01:mi=01;05;37;41:su=37;41:sg=30;43:ca=30;41:tw=30;42:ow=34;42:st=37;44:ex=01;32:*.tar=01;31:*.tgz=01;31:*.arj=01;31:*.taz=01;31:*.lzh=01;31:*.lzma=01;31:*.tlz=01;31:*.txz=01;31:*.zip=01;31:*.z=01;31:*.Z=01;31:*.dz=01;31:*.gz=01;31:*.lz=01;31:*.xz=01;31:*.bz2=01;31:*.tbz=01;31:*.tbz2=01;31:*.bz=01;31:*.tz=01;31:*.deb=01;31:*.rpm=01;31:*.jar=01;31:*.rar=01;31:*.ace=01;31:*.zoo=01;31:*.cpio=01;31:*.7z=01;31:*.rz=01;31:*.jpg=01;35:*.jpeg=01;35:*.gif=01;35:*.bmp=01;35:*.pbm=01;35:*.pgm=01;35:*.ppm=01;35:*.tga=01;35:*.xbm=01;35:*.xpm=01;35:*.tif=01;35:*.tiff=01;35:*.png=01;35:*.svg=01;35:*.svgz=01;35:*.mng=01;35:*.pcx=01;35:*.mov=01;35:*.mpg=01;35:*.mpeg=01;35:*.m2v=01;35:*.mkv=01;35:*.ogm=01;35:*.mp4=01;35:*.m4v=01;35:*.mp4v=01;35:*.vob=01;35:*.qt=01;35:*.nuv=01;35:*.wmv=01;35:*.asf=01;35:*.rm=01;35:*.rmvb=01;35:*.flc=01;35:*.avi=01;35:*.fli=01;35:*.flv=01;35:*.gl=01;35:*.dl=01;35:*.xcf=01;35:*.xwd=01;35:*.yuv=01;35:*.cgm=01;35:*.emf=01;35:*.axv=01;35:*.anx=01;35:*.ogv=01;35:*.ogx=01;35:*.aac=01;36:*.au=01;36:*.flac=01;36:*.mid=01;36:*.midi=01;36:*.mka=01;36:*.mp3=01;36:*.mpc=01;36:*.ogg=01;36:*.ra=01;36:*.wav=01;36:*.axa=01;36:*.oga=01;36:*.spx=01;36:*.xspf=01;36:
MAIL=/var/spool/mail/root
PATH=/usr/local/sbin:/usr/local/bin:/sbin:/bin:/usr/sbin:/usr/bin:/root/bin
PWD=/root
LANG=zh_CN.UTF-8
HISTCONTROL=ignoredups
SHLVL=1
HOME=/root
LOGNAME=root
SSH_CONNECTION=10.72.137.107 50947 10.72.137.159 22
LESSOPEN=|/usr/bin/lesspipe.sh %s
G_BROKEN_FILENAMES=1
_=/bin/env
使用 env 命令即可全部列出系统预设的全部系统变量了。不过登录的用户不一样这些环境变量的值也不一样。当前显示的就是root这个账户的环境变量了。下面阿铭简单介绍一下常见的环境变量:
PATH 决定了shell将到哪些目录中寻找命令或程序 HOME 当前用户主目录 HISTSIZE 历史记录数 LOGNAME 当前用户的登录名 HOSTNAME 指主机的名称 SHELL 前用户Shell类型 LANG 语言相关的环境变量,多语言可以修改此环境变量 MAIL 当前用户的邮件存放目录 PWD 当前目录
env命令显示的变量只是环境变量,系统预设的变量其实还有很多,你可以使用set命令把系统预设的全部变量都显示出来。
[root@localhost ~]# set
BASH=/bin/bash
BASHOPTS=checkwinsize:cmdhist:expand_aliases:extquote:force_fignore:hostcomplete:interactive_comments:login_shell:progcomp:promptvars:sourcepath
BASH_ALIASES=()
BASH_ARGC=()
BASH_ARGV=()
BASH_CMDS=()
BASH_LINENO=()
BASH_SOURCE=()
BASH_VERSINFO=([0]="4" [1]="1" [2]="2" [3]="1" [4]="release" [5]="i386-redhat-linux-gnu")
BASH_VERSION='4.1.2(1)-release'
COLORS=/etc/DIR_COLORS
COLUMNS=168
DIRSTACK=()
EUID=0
GROUPS=()
G_BROKEN_FILENAMES=1
HISTCONTROL=ignoredups
HISTFILE=/root/.bash_history
HISTFILESIZE=1000
HISTSIZE=1000
HOME=/root
HOSTNAME=localhost.localdomain
HOSTTYPE=i386
ID=0
IFS=$' \t\n'
LANG=zh_CN.UTF-8
LESSOPEN='|/usr/bin/lesspipe.sh %s'
LINES=44
LOGNAME=root
LS_COLORS='rs=0:di=01;34:ln=01;36:mh=00:pi=40;33:so=01;35:do=01;35:bd=40;33;01:cd=40;33;01:or=40;31;01:mi=01;05;37;41:su=37;41:sg=30;43:ca=30;41:tw=30;42:ow=34;42:st=37;44:ex=01;32:*.tar=01;31:*.tgz=01;31:*.arj=01;31:*.taz=01;31:*.lzh=01;31:*.lzma=01;31:*.tlz=01;31:*.txz=01;31:*.zip=01;31:*.z=01;31:*.Z=01;31:*.dz=01;31:*.gz=01;31:*.lz=01;31:*.xz=01;31:*.bz2=01;31:*.tbz=01;31:*.tbz2=01;31:*.bz=01;31:*.tz=01;31:*.deb=01;31:*.rpm=01;31:*.jar=01;31:*.rar=01;31:*.ace=01;31:*.zoo=01;31:*.cpio=01;31:*.7z=01;31:*.rz=01;31:*.jpg=01;35:*.jpeg=01;35:*.gif=01;35:*.bmp=01;35:*.pbm=01;35:*.pgm=01;35:*.ppm=01;35:*.tga=01;35:*.xbm=01;35:*.xpm=01;35:*.tif=01;35:*.tiff=01;35:*.png=01;35:*.svg=01;35:*.svgz=01;35:*.mng=01;35:*.pcx=01;35:*.mov=01;35:*.mpg=01;35:*.mpeg=01;35:*.m2v=01;35:*.mkv=01;35:*.ogm=01;35:*.mp4=01;35:*.m4v=01;35:*.mp4v=01;35:*.vob=01;35:*.qt=01;35:*.nuv=01;35:*.wmv=01;35:*.asf=01;35:*.rm=01;35:*.rmvb=01;35:*.flc=01;35:*.avi=01;35:*.fli=01;35:*.flv=01;35:*.gl=01;35:*.dl=01;35:*.xcf=01;35:*.xwd=01;35:*.yuv=01;35:*.cgm=01;35:*.emf=01;35:*.axv=01;35:*.anx=01;35:*.ogv=01;35:*.ogx=01;35:*.aac=01;36:*.au=01;36:*.flac=01;36:*.mid=01;36:*.midi=01;36:*.mka=01;36:*.mp3=01;36:*.mpc=01;36:*.ogg=01;36:*.ra=01;36:*.wav=01;36:*.axa=01;36:*.oga=01;36:*.spx=01;36:*.xspf=01;36:'
MACHTYPE=i386-redhat-linux-gnu
MAIL=/var/spool/mail/root
MAILCHECK=60
OLDPWD=/root
OPTERR=1
OPTIND=1
OSTYPE=linux-gnu
PATH=/usr/local/sbin:/usr/local/bin:/sbin:/bin:/usr/sbin:/usr/bin:/root/bin
PIPESTATUS=([0]="0")
PPID=27377
PROMPT_COMMAND='printf "\033]0;%s@%s:%s\007" "${USER}" "${HOSTNAME%%.*}" "${PWD/#$HOME/~}"'
PS1='[\u@\h \W]\$ '
PS2='> '
PS4='+ '
PWD=/root
SHELL=/bin/bash
SHELLOPTS=braceexpand:emacs:hashall:histexpand:history:interactive-comments:monitor
SHLVL=1
SSH_CLIENT='10.72.137.107 50947 22'
SSH_CONNECTION='10.72.137.107 50947 10.72.137.159 22'
SSH_TTY=/dev/pts/0
TERM=xterm
UID=0
USER=root
_=-
colors=/etc/DIR_COLORS
set不仅可以显示系统预设的变量,也可以连同用户自定义的变量显示出来。
[root@localhost ~]# myname=Aming
[root@localhost ~]# echo $myname
Aming
[root@localhost ~]# set |grep myname
myname=Aming
虽然你可以自定义变量,但是该变量只能在当前shell中生效。
[root@localhost ~]# echo $myname
Aming
[root@localhost ~]# bash
[root@localhost ~]# echo $myname

[root@localhost ~]# exit
exit
[root@localhost ~]# echo $myname
Aming
使用 bash 命令即可再打开一个shell,此时先前设置的 “myname” 变量已经不存在了,退出当前shell回到原来的shell, “myname” 变量还在。那要想设置的变量一直生效怎么办?有两种情况:
1) 要想系统内所有用户登录后都能使用该变量
需要在 “/etc/profile” 文件最末行加入 export myname=Aming 然后运行 source /etc/profile 就可以生效了。此时再运行bash命令或者直接 su - test 账户可以看到效果。
[root@localhost ~]# echo "export myname=Aming" >> /etc/profile
[root@localhost ~]# source !$
source /etc/profile
[root@localhost ~]# bash
[root@localhost ~]# echo $myname
Aming
[root@localhost ~]# exit
exit
[root@localhost ~]# su - test
[test@localhost ~]$ echo $myname
Aming
2)只想让当前用户使用该变量
需要在用户主目录下的 .bashrc 文件最后一行加入 export myname=Aming 然后运行 source .bashrc 就可以生效了。这时候再登录test账户,myname变量则不会生效了。上面用的source命令的作用是,将目前设定的配置刷新,即不用注销再登录也能生效。
阿铭在上例中使用 myname=Aming 来设置变量myname,那么在linux下设置自定义变量有哪些规则呢?
- 设定变量的格式为 “a=b”, 其中a为变量名,b为变量的内容,等号两边不能有空格;
- 变量名只能由英、数字以及下划线组成,而且不能以数字开头;
- 当变量内容带有特殊字符(如空格)时,需要加上单引号;
[root@localhost ~]# myname='Aming Li'
[root@localhost ~]# echo $myname
Aming Li
有一种情况,需要你注意,就是变量内容中本身带有单引号,这就需要用到双引号了。
[root@localhost ~]# myname="Aming's"
[root@localhost ~]# echo $myname
Aming's
- 如果变量内容中需要用到其他命令运行结果则可以使用反引号;
[root@localhost ~]# myname=`pwd`
[root@localhost ~]# echo $myname
/root
- 变量内容可以累加其他变量的内容,需要加双引号;
[root@localhost ~]# myname="$LOGNAME"Aming
[root@localhost ~]# echo $myname
rootAming
在这里如果你不小心把双引号加错为单引号,将得不到你想要的结果
[root@localhost ~]# myname='$LOGNAME'Aming
[root@localhost ~]# echo $myname
$LOGNAMEAming
通过上面几个例子也许你能看得出,单引号和双引号的区别,用双引号时不会取消掉里面出现的特殊字符的本身作用(这里的$),而使用单引号则里面的特殊字符全部失去它本身的作用。
在前面的例子中阿铭多次使用了 bash 命令,如果在当前shell中运行bash指令后,则会进入一个新的shell,这个shell就是原来shell的子shell了,不妨你用pstree指令来查看一下。
[root@localhost ~]# pstree |grep bash
     |-login---bash
     |-sshd---sshd---bash-+-grep
[root@localhost ~]# bash
[root@localhost ~]# pstree |grep bash
     |-login---bash
     |-sshd---sshd---bash---bash-+-grep
pstree 这个指令会把linux系统中所有进程通过树形结构打印出来。限于篇幅阿铭没有全部列出,你可以直接输入pstree查看即可。在父shell中设定一个变量后,进入子shell后该变量是不会生效的,如果想让这个变量在子shell中生效则要用到export指令。
[root@localhost ~]# abc=123
[root@localhost ~]# echo $abc
123
[root@localhost ~]# bash
[root@localhost ~]# echo $abc

[root@localhost ~]# exit
exit
[root@localhost ~]# export abc
[root@localhost ~]# echo $abc
123
[root@localhost ~]# bash
[root@localhost ~]# echo $abc
123
export其实就是声明一下这个变量的意思,让该shell的子shell也知道变量abc的值是123.如果export后面不加任何变量名,则它会声明所有的变量。
[root@localhost ~]# export
declare -x G_BROKEN_FILENAMES="1"
declare -x HISTCONTROL="ignoredups"
declare -x HISTSIZE="1000"
declare -x HOME="/root"
declare -x HOSTNAME="localhost.localdomain"
declare -x LANG="zh_CN.UTF-8"
declare -x LESSOPEN="|/usr/bin/lesspipe.sh %s"
declare -x LOGNAME="root"
declare -x LS_COLORS="rs=0:di=01;34:ln=01;36:mh=00:pi=40;33:so=01;35:do=01;35:bd=40;33;01:cd=40;33;01:or=40;31;01:mi=01;05;37;41:su=37;41:sg=30;43:ca=30;41:tw=30;42:ow=34;42:st=37;44:ex=01;32:*.tar=01;31:*.tgz=01;31:*.arj=01;31:*.taz=01;31:*.lzh=01;31:*.lzma=01;31:*.tlz=01;31:*.txz=01;31:*.zip=01;31:*.z=01;31:*.Z=01;31:*.dz=01;31:*.gz=01;31:*.lz=01;31:*.xz=01;31:*.bz2=01;31:*.tbz=01;31:*.tbz2=01;31:*.bz=01;31:*.tz=01;31:*.deb=01;31:*.rpm=01;31:*.jar=01;31:*.rar=01;31:*.ace=01;31:*.zoo=01;31:*.cpio=01;31:*.7z=01;31:*.rz=01;31:*.jpg=01;35:*.jpeg=01;35:*.gif=01;35:*.bmp=01;35:*.pbm=01;35:*.pgm=01;35:*.ppm=01;35:*.tga=01;35:*.xbm=01;35:*.xpm=01;35:*.tif=01;35:*.tiff=01;35:*.png=01;35:*.svg=01;35:*.svgz=01;35:*.mng=01;35:*.pcx=01;35:*.mov=01;35:*.mpg=01;35:*.mpeg=01;35:*.m2v=01;35:*.mkv=01;35:*.ogm=01;35:*.mp4=01;35:*.m4v=01;35:*.mp4v=01;35:*.vob=01;35:*.qt=01;35:*.nuv=01;35:*.wmv=01;35:*.asf=01;35:*.rm=01;35:*.rmvb=01;35:*.flc=01;35:*.avi=01;35:*.fli=01;35:*.flv=01;35:*.gl=01;35:*.dl=01;35:*.xcf=01;35:*.xwd=01;35:*.yuv=01;35:*.cgm=01;35:*.emf=01;35:*.axv=01;35:*.anx=01;35:*.ogv=01;35:*.ogx=01;35:*.aac=01;36:*.au=01;36:*.flac=01;36:*.mid=01;36:*.midi=01;36:*.mka=01;36:*.mp3=01;36:*.mpc=01;36:*.ogg=01;36:*.ra=01;36:*.wav=01;36:*.axa=01;36:*.oga=01;36:*.spx=01;36:*.xspf=01;36:"
declare -x MAIL="/var/spool/mail/root"
declare -x OLDPWD
declare -x PATH="/usr/local/sbin:/usr/local/bin:/sbin:/bin:/usr/sbin:/usr/bin:/root/bin"
declare -x PWD="/root"
declare -x SHELL="/bin/bash"
declare -x SHLVL="3"
declare -x SSH_CLIENT="10.72.137.107 50947 22"
declare -x SSH_CONNECTION="10.72.137.107 50947 10.72.137.159 22"
declare -x SSH_TTY="/dev/pts/0"
declare -x TERM="xterm"
declare -x USER="root"
declare -x abc="123"
declare -x myname="\$LOGNAMEAming"
在最后面连同我们自定义的变量都被声明了。
前面光讲如何设置变量,如果想取消某个变量怎么办?只要输入 unset 变量名 即可。
[root@localhost ~]# echo $abc
123
[root@localhost ~]# unset abc
[root@localhost ~]# echo $abc
系统环境变量与个人环境变量的配置文件
上面讲了很多系统的变量,那么在linux系统中,这些变量被存到了哪里呢,为什么用户一登陆shell就自动有了这些变量呢?
/etc/profile :这个文件预设了几个重要的变量,例如PATH, USER, LOGNAME, MAIL, INPUTRC, HOSTNAME, HISTSIZE, umask等等。
/etc/bashrc :这个文件主要预设umask以及PS1。这个PS1就是我们在敲命令时,前面那串字符了,例如阿铭的linux系统PS1就是 [root@localhost ~]#, 我们不妨看一下PS1的值:
[root@localhost ~]# echo $PS1
[\u@\h \W]\$
\u 就是用户, \h 主机名, \W 则是当前目录,\$ 就是那个 ‘#’ 了,如果是普通用户则显示为 ‘$’.
除了两个系统级别的配置文件外,每个用户的主目录下还有几个这样的隐藏文件:
.bash_profile :定义了用户的个人化路径与环境变量的文件名称。每个用户都可使用该文件输入专用于自己使用的shell信息,当用户登录时,该文件仅仅执行一次。
.bashrc :该文件包含专用于你的shell的bash信息,当登录时以及每次打开新的shell时,该该文件被读取。例如你可以将用户自定义的alias或者自定义变量写到这个文件中。
.bash_history :记录命令历史用的。
.bash_logout :当退出shell时,会执行该文件。可以把一些清理的工作放到这个文件中。
linux shell中的特殊符号
你在学习linux的过程中,也许你已经接触过某个特殊符号,例如”*”,它是一个通配符号,代表零个或多个字符或数字。下面阿铭就说一说常用到的特殊字符。
*代表零个或多个任意字符。
[root@localhost ~]# ls -d test*
test  test1  test2  test3
?只代表一个任意的字符
[root@localhost ~]# touch testa
[root@localhost ~]# touch testb.txt
[root@localhost ~]# ls -d test?
test1  test2  test3  testa
不管是数字还是字母,只要是一个都能匹配出来。
#这个符号在linux中表示注释说明的意思,即#后面的内容linux忽略掉。
[root@localhost ~]# abc=123 #aaaaa
[root@localhost ~]# echo $abc
123
\脱意字符,将后面的特殊符号(例如”*” )还原为普通字符。
[root@localhost ~]# ls -d test\*
ls: 无法访问test*: 没有那个文件或目录
|管道符,前面多次出现过,它的作用在于将符号前面命令的结果丢给符号后面的命令。这里提到的后面的命令,并不是所有的命令都可以的,一般针对文档操作的命令比较常用,例如cat, less, head, tail, grep, cut, sort, wc, uniq, tee, tr, split, sed, awk等等,其中grep, sed, awk为正则表达式必须掌握的工具,在后续内容中详细介绍。
[root@localhost ~]# cat testb.txt |wc -l
0
wc -l 用来计算一个文档有多少行。在这里阿铭一下子列出来很多对你陌生的命令,其实这些命令在日常的处理文档工作中非常实用,所以阿铭需要先简单介绍一下它们,如果你记不住没有关系,以后用到的时候再过来查或者直接用man来查询帮助文档。
命令 : cut
用来截取某一个字段
语法: cut -d '分隔字符' [-cf] n 这里的n是数字
-d :后面跟分隔字符,分隔字符要用单引号括起来
-c :后面接的是第几个字符
-f :后面接的是第几个区块
[root@localhost ~]# cat /etc/passwd |cut -d ':' -f 1 |head -n5
root
bin
daemon
adm
lp
-d 后面跟分隔字符,这里使用冒号作为分割字符,-f 1 就是截取第一段,-f和1之间的空格可有可无。
[root@localhost ~]# head -n2 /etc/passwd|cut -c2
o
i
[root@localhost ~]# head -n2 /etc/passwd|cut -c1
r
b
[root@localhost ~]# head -n2 /etc/passwd|cut -c1-10
root:x:0:0
bin:x:1:1:
[root@localhost ~]# head -n2 /etc/passwd|cut -c5-10
:x:0:0
x:1:1:
-c 后面可以是1个数字n,也可以是一个区间n1-n2,还可以是多个数字n1,n2,n3
[root@localhost ~]# head -n2 /etc/passwd|cut -c1,3,10
ro0
bn:
命令 : sort
sort 用做排序
语法: sort [-t 分隔符] [-kn1,n2] [-nru] 这里的n1 < n2
-t 分隔符 :作用跟cut的-d一个意思
-n :使用纯数字排序
-r :反向排序
-u :去重复
-kn1,n2 :由n1区间排序到n2区间,可以只写-kn1,即对n1字段排序
[root@localhost ~]# head -n5 /etc/passwd |sort
adm:x:3:4:adm:/var/adm:/sbin/nologin
bin:x:1:1:bin:/bin:/sbin/nologin
daemon:x:2:2:daemon:/sbin:/sbin/nologin
lp:x:4:7:lp:/var/spool/lpd:/sbin/nologin
root:x:0:0:root:/root:/bin/bash
如果sort不加任何选项,则从首字符向后,依次按ASCII码值进行比较,最后将他们按升序输出。
[root@localhost ~]# head -n5 /etc/passwd |sort -t: -k3 -n
root:x:0:0:root:/root:/bin/bash
bin:x:1:1:bin:/bin:/sbin/nologin
daemon:x:2:2:daemon:/sbin:/sbin/nologin
adm:x:3:4:adm:/var/adm:/sbin/nologin
lp:x:4:7:lp:/var/spool/lpd:/sbin/nologin
-t 后面跟分隔符,-k后面跟数字,表示对第几个区域的字符串排序,-n 则表示使用纯数字排序
[root@localhost ~]# head -n5 /etc/passwd |sort -t: -k3,5 -r
lp:x:4:7:lp:/var/spool/lpd:/sbin/nologin
adm:x:3:4:adm:/var/adm:/sbin/nologin
daemon:x:2:2:daemon:/sbin:/sbin/nologin
bin:x:1:1:bin:/bin:/sbin/nologin
root:x:0:0:root:/root:/bin/bash
-k3,5 表示从第3到第5区域间的字符串排序,-r表示反向排序
命令 : wc
用于统计文档的行数、字符数、词数,常用的选项为:
-l :统计行数
-m :统计字符数
-w :统计词数
[root@localhost ~]# wc /etc/passwd
  27   37 1220 /etc/passwd
[root@localhost ~]# wc -l /etc/passwd
27 /etc/passwd
[root@localhost ~]# wc -m /etc/passwd
1220 /etc/passwd
[root@localhost ~]# wc -w /etc/passwd
37 /etc/passwd
wc 不跟任何选项,直接跟文档,则会把行数、词数、字符数依次输出。
命令 : uniq
去重复的行,阿铭最常用的选项只有一个:
-c :统计重复的行数,并把行数写在前面
[root@localhost ~]# vim testb.txt
把下面的内容写入testb.txt, 保存。
111
222
111
333
使用uniq 的前提是需要先给文件排序,否则不管用。
[root@localhost ~]# uniq testb.txt
111
222
111
333
[root@localhost ~]# sort testb.txt |uniq
111
222
333
[root@localhost ~]# sort testb.txt |uniq -c
      2 111
      1 222
      1 333
命令 : tee
后跟文件名,类似与重定向 “>”, 但是比重定向多了一个功能,在把文件写入后面所跟的文件中的同时,还显示在屏幕上。
[root@localhost ~]# echo "aaaaaaaaaaaaaaaaaaaaaaaaaaa" |tee testb.txt
aaaaaaaaaaaaaaaaaaaaaaaaaaa
[root@localhost ~]# cat testb.txt
aaaaaaaaaaaaaaaaaaaaaaaaaaa
tee 常用语管道符 “|” 后。
命令 : tr
替换字符,常用来处理文档中出现的特殊符号,如DOS文档中出现的^M符号。常用的选项有两个:
-d :删除某个字符,-d 后面跟要删除的字符
-s :把重复的字符去掉
最常用的就是把小写变大写: tr ‘[a-z]’ ‘[A-Z]’
[root@localhost ~]# head -n2 /etc/passwd |tr '[a-z]' '[A-Z]'
ROOT:X:0:0:ROOT:/ROOT:/BIN/BASH
BIN:X:1:1:BIN:/BIN:/SBIN/NOLOGIN
当然替换一个字符也是可以的。
[root@localhost ~]# grep 'root' /etc/passwd |tr 'r' 'R'
Root:x:0:0:Root:/Root:/bin/bash
opeRatoR:x:11:0:opeRatoR:/Root:/sbin/nologin
不过替换、删除以及去重复都是针对一个字符来讲的,有一定局限性。如果是针对一个字符串就不再管用了,所以阿铭建议你只需简单了解这个tr即可,以后你还会学到更多可以实现针对字符串操作的工具。
命令 : split
切割文档,常用选项:
-b :依据大小来分割文档,单位为byte
[root@localhost ~]# mkdir split_dir
[root@localhost ~]# cd !$
cd split_dir
[root@localhost split_dir]# cp /etc/passwd ./
[root@localhost split_dir]# split -b500 passwd
[root@localhost split_dir]# ls
passwd  xaa  xab  xac
如果split不指定目标文件名,则会以xaa xab... 这样的文件名来存取切割后的文件。当然我们也可以指定目标文件名:
[root@localhost split_dir]# split  -b500 passwd  123
[root@localhost split_dir]# ls
123aa  123ab  123ac  passwd
-l :依据行数来分割文档
[root@localhost split_dir]# rm -f 123a*
[root@localhost split_dir]# split -l10 passwd
[root@localhost split_dir]# wc -l *
  27 passwd
  10 xaa
  10 xab
  7 xac
  54 总用量
$除了用于变量前面的标识符外,还有一个妙用,就是和 ‘!’ 结合起来使用。
[root@localhost ~]# ls testb.txt
testb.txt
[root@localhost ~]# ls !$
ls testb.txt
testb.txt
‘!$’ 表示上条命中中最后一个变量(总之就是上条命令中最后出现的那个东西)例如上边命令最后是testb.txt那么在当前命令下输入!$则代表testb.txt.
;: 分号。平时我们都是在一行中敲一个命令,然后回车就运行了,那么想在一行中运行两个或两个以上的命令如何呢?则需要在命令之间加一个 ”;” 了。
[root@localhost ~]# ls -d test*;  touch test111; ls -d test*
test  test1  test2  test3  testa  testb.txt
test  test1  test111  test2  test3  testa  testb.txt
~: 用户的家目录,如果是root则是 /root ,普通用户则是 /home/username
[root@localhost ~]# cd ~
[root@localhost ~]# pwd
/root
[root@localhost ~]# su test
[test@localhost root]$ cd ~
[test@localhost ~]$ pwd
/home/test
&: 如果想把一条命令放到后台执行的话,则需要加上这个符号。通常用于命令运行时间非常长的情况。
[root@localhost ~]# sleep 30 &
[1] 3260
[root@localhost ~]# jobs
[1]+  Running                 sleep 30 &
- >, >>, 2>, 2>> 前面讲过重定向符号> 以及>> 分别表示取代和追加的意思,然后还有两个符号就是这里的2> 和 2>> 分别表示错误重定向和错误追加重定向,当我们运行一个命令报错时,报错信息会输出到当前的屏幕,如果想重定向到一个文本里,则要用2>或者2>>
[root@localhost ~]# ls aaaa
ls: 无法访问aaaa: 没有那个文件或目录
[1]+  Done                    sleep 30
[root@localhost ~]# ls aaaa
ls: 无法访问aaaa: 没有那个文件或目录
[root@localhost ~]# ls aaaa 2> /tmp/error
[root@localhost ~]# cat /tmp/error
ls: 无法访问aaaa: 没有那个文件或目录
[root@localhost ~]# ls aaaa 2>> /tmp/error
[root@localhost ~]# cat /tmp/error
ls: 无法访问aaaa: 没有那个文件或目录
ls: 无法访问aaaa: 没有那个文件或目录
- [ ] 中括号,中间为字符组合,代表中间字符中的任意一个。
[root@localhost ~]# ls -d test*
test  test1  test111  test2  test3  testa  testb.txt
[root@localhost ~]# ls -d test[1-3]
test1  test2  test3
[root@localhost ~]# ls -d test[1a3]
test1  test3  testa
[root@localhost ~]# ls -d test[0-9]
test1  test2  test3
[root@localhost ~]# ls -d test[0-9a-z]
test1  test2  test3  testa
- && 与 ||
在上面刚刚提到了分号,用于多条命令间的分隔符。另外还有两个可以用于多条命令中间的特殊符号,那就是 “&&” 和 “||” 下面阿铭把这几种情况全列出:
- command1 ; command2
- command1 && command2
- command1 || command2
使用 ”;” 时,不管command1是否执行成功都会执行command2;
使用 “&&” 时,只有command1执行成功后,command2才会执行,否则command2不执行;
使用 “||” 时,command1执行成功后command2 不执行,否则去执行command2,总之command1和command2总有一条命令会执行。
在做实验前,阿铭想把所有的 test* 删除掉,可是删除的时候,却提示说权限不够,下面是阿铭排除问题的过程:
[root@localhost ~]# rm -rf test*
rm: 无法删除"test2/test1": 权限不够
rm: 无法删除"test2/test3": 权限不够
rm: 无法删除"test2/test4": 权限不够
[root@localhost ~]# ls test*
test1  test3  test4
[root@localhost ~]# lsattr test*
-----a-------e- test2/test1
----i--------e- test2/test3
-------------e- test2/test4
[root@localhost ~]# chattr -a test2/test1
[root@localhost ~]# chattr -i test2/test3
[root@localhost ~]# rm -rf test*
rm: 无法删除"test2/test1": 权限不够
rm: 无法删除"test2/test3": 权限不够
rm: 无法删除"test2/test4": 权限不够
[root@localhost ~]# ls test*
test1  test3  test4
[root@localhost ~]# ls -ld test*
drwxrwxr-x 2 root root 4096 5月  10 10:12 test2
[root@localhost ~]# ls -l test2/*
-rw-r--r-- 1 root root 6 5月  10 10:20 test2/test1
-rw-r--r-- 1 root root 0 5月  10 10:11 test2/test3
-rw-r--r-- 1 root root 0 5月  10 10:12 test2/test4
[root@localhost ~]# lsattr test2/*
-------------e- test2/test1
-------------e- test2/test3
-------------e- test2/test4
[root@localhost ~]# lsattr test2
-------------e- test2/test1
-------------e- test2/test3
-------------e- test2/test4
[root@localhost ~]# lsattr -d test2
----i--------e- test2
[root@localhost ~]# chattr -i test2/
[root@localhost ~]# rm -rf test2/
如果你之前跟着阿铭做过同样的实验,相信你也会出现同样的问题的。接下来阿铭要通过做实验来说明 “&&” 与 “||” 这两个特殊符号的作用:
[root@localhost ~]# touch test1 test3
[root@localhost ~]# ls test2 && touch test2
ls: 无法访问test2: 没有那个文件或目录
[root@localhost ~]# ls test2
ls: 无法访问test2: 没有那个文件或目录
[root@localhost ~]# ls test2 || touch test2
ls: 无法访问test2: 没有那个文件或目录
[root@localhost ~]# ls test*
test1  test2  test3
第14章 正则表达式
学习Linux请加QQ群: 群1(163262181) 群2(148412746) 群3(246401509) 群4(173884211)
跟阿铭学Linux邀请函 (http://www.aminglinux.com),猿课已上线,请加微信aminglinux84索要配套视频教程。
这部分内容可以说是学习shell脚本之前必学的内容。如果你这部分内容学的越好,那么你的shell脚本编写能力就会越强。所以不要嫌这部分内容啰嗦,也不要怕麻烦,要用心学习。一定要多加练习,练习多了就能熟练掌握了。
在计算机科学中,正则表达式是这样解释的:它是指一个用来描述或者匹配一系列符合某个句法规则的字符串的单个字符串。在很多文本编辑器或其他工具里,正则表达式通常被用来检索和/或替换那些符合某个模式的文本内容。许多程序设计语言都支持利用正则表达式进行字符串操作。对于系统管理员来讲,正则表达式贯穿在我们的日常运维工作中,无论是查找某个文档,抑或查询某个日志文件分析其内容,都会用到正则表达式。
其实正则表达式,只是一种思想,一种表示方法。只要我们使用的工具支持表示这种思想那么这个工具就可以处理正则表达式的字符串。常用的工具有grep, sed, awk 等,下面阿铭就分别介绍一下这三种工具的使用方法。
grep / egrep
阿铭在前面的内容中多次提到并用到grep命令,可见它的重要性。所以好好学习一下这个重要的命令吧。你要知道的是grep连同下面讲的sed, awk都是针对文本的行才操作的。
语法: grep [-cinvABC] 'word' filename
-c :打印符合要求的行数
-i :忽略大小写
-n :在输出符合要求的行的同时连同行号一起输出
-v :打印不符合要求的行
-A :后跟一个数字(有无空格都可以),例如 –A2则表示打印符合要求的行以及下面两行
-B :后跟一个数字,例如 –B2 则表示打印符合要求的行以及上面两行
-C :后跟一个数字,例如 –C2 则表示打印符合要求的行以及上下各两行
[root@localhost ~]# grep -A2 'halt' /etc/passwd
halt:x:7:0:halt:/sbin:/sbin/halt
mail:x:8:12:mail:/var/spool/mail:/sbin/nologin
uucp:x:10:14:uucp:/var/spool/uucp:/sbin/nologin
把包含 ‘halt’ 的行以及这行下面的两行都打印出。
[root@localhost ~]# grep -B2 'halt' /etc/passwd
sync:x:5:0:sync:/sbin:/bin/sync
shutdown:x:6:0:shutdown:/sbin:/sbin/shutdown
halt:x:7:0:halt:/sbin:/sbin/halt
把包含 ‘halt’ 的行以及这行上面的两行都打印出。
[root@localhost ~]# grep -C2 'halt' /etc/passwd
sync:x:5:0:sync:/sbin:/bin/sync
shutdown:x:6:0:shutdown:/sbin:/sbin/shutdown
halt:x:7:0:halt:/sbin:/sbin/halt
mail:x:8:12:mail:/var/spool/mail:/sbin/nologin
uucp:x:10:14:uucp:/var/spool/uucp:/sbin/nologin
把包含 ‘halt’ 的行以及这行上面和下面的各两行都打印出。
下面阿铭举几个典型实例帮你更深刻的理解grep.
- 过滤出带有某个关键词的行并输出行号
[root@localhost ~]# grep -n 'root' /etc/passwd
1:root:x:0:0:root:/root:/bin/bash
11:operator:x:11:0:operator:/root:/sbin/nologin
- 过滤不带有某个关键词的行,并输出行号
[root@localhost ~]# grep -nv 'nologin' /etc/passwd
1:root:x:0:0:root:/root:/bin/bash
6:sync:x:5:0:sync:/sbin:/bin/sync
7:shutdown:x:6:0:shutdown:/sbin:/sbin/shutdown
8:halt:x:7:0:halt:/sbin:/sbin/halt
26:test:x:511:511::/home/test:/bin/bash
27:test1:x:512:511::/home/test1:/bin/bash
- 过滤出所有包含数字的行
[root@localhost ~]# grep '[0-9]' /etc/inittab
# upstart works, see init(5), init(8), and initctl(8).
#   0 - halt (Do NOT set initdefault to this)
#   1 - Single user mode
#   2 - Multiuser, without NFS (The same as 3, if you do not have networking)
#   3 - Full multiuser mode
#   4 - unused
#   5 - X11
#   6 - reboot (Do NOT set initdefault to this)
id:3:initdefault:
- 过滤出所有不包含数字的行
[root@localhost ~]# grep -v '[0-9]' /etc/inittab
# inittab is only used by upstart for the default runlevel.
#
# ADDING OTHER CONFIGURATION HERE WILL HAVE NO EFFECT ON YOUR SYSTEM.
#
# System initialization is started by /etc/init/rcS.conf
#
# Individual runlevels are started by /etc/init/rc.conf
#
# Ctrl-Alt-Delete is handled by /etc/init/control-alt-delete.conf
#
# Terminal gettys are handled by /etc/init/tty.conf and /etc/init/serial.conf,
# with configuration in /etc/sysconfig/init.
#
# For information on how to write upstart event handlers, or how
#
# Default runlevel. The runlevels used are:
#
- 把所有以 ‘#’ 开头的行去除
[root@localhost ~]# grep -v '^#' /etc/inittab
id:3:initdefault:
- 去除所有空行和以 ‘#’ 开头的行
[root@localhost ~]# grep -v '^#' /etc/crontab |grep -v '^$'
SHELL=/bin/bash
PATH=/sbin:/bin:/usr/sbin:/usr/bin
MAILTO=root
HOME=/
在正则表达式中, “^” 表示行的开始, “$” 表示行的结尾,那么空行则可以用 “^$” 表示,如何打印出不以英文字母开头的行呢?
[root@localhost ~]# vim test.txt
[root@localhost ~]# cat test.txt
123
abc
456

abc2323
#laksdjf
Alllllllll
阿铭先在test.txt中写几行字符串,用来做实验。
[root@localhost ~]# grep '^[^a-zA-Z]' test.txt
123
456
#laksdjf
[root@localhost ~]# grep '[^a-zA-Z]' test.txt
123
456
abc2323
#laksdjf
在前面阿铭也提到过这个 ‘[ ]’ 的应用,如果是数字的话就用[0-9]这样的形式,当然有时候也可以用这样的形式[15]即只含有1或者5,注意,它不会认为是15。如果要过滤出数字以及大小写字母则要这样写[0-9a-zA-Z]。另外[ ]还有一种形式,就是[^字符] 表示除[ ]内的字符之外的字符。
- 过滤任意一个字符与重复字符
[root@localhost ~]# grep 'r..o' /etc/passwd
operator:x:11:0:operator:/root:/sbin/nologin
gopher:x:13:30:gopher:/var/gopher:/sbin/nologin
vcsa:x:69:69:virtual console memory owner:/dev:/sbin/nologin
. 表示任意一个字符,上例中,就是把符合r与o之间有两个任意字符的行过滤出来, * 表示零个或多个前面的字符。
[root@localhost ~]# grep 'ooo*' /etc/passwd
root:x:0:0:root:/root:/bin/bash
lp:x:4:7:lp:/var/spool/lpd:/sbin/nologin
mail:x:8:12:mail:/var/spool/mail:/sbin/nologin
uucp:x:10:14:uucp:/var/spool/uucp:/sbin/nologin
operator:x:11:0:operator:/root:/sbin/nologin
postfix:x:89:89::/var/spool/postfix:/sbin/nologin
‘ooo*’ 表示oo, ooo, oooo ... 或者更多的 ‘o’ 现在你是否想到了 ‘.*’ 这个组合表示什么意义?
[root@localhost ~]# grep '.*' /etc/passwd |wc -l
27
[root@localhost ~]# wc -l /etc/passwd
27 /etc/passwd
‘.*’ 表示零个或多个任意字符,空行也包含在内。
- 指定要过滤字符出现的次数
[root@localhost ~]# grep 'o\{2\}' /etc/passwd
root:x:0:0:root:/root:/bin/bash
lp:x:4:7:lp:/var/spool/lpd:/sbin/nologin
mail:x:8:12:mail:/var/spool/mail:/sbin/nologin
uucp:x:10:14:uucp:/var/spool/uucp:/sbin/nologin
operator:x:11:0:operator:/root:/sbin/nologin
postfix:x:89:89::/var/spool/postfix:/sbin/nologin
这里用到了{ },其内部为数字,表示前面的字符要重复的次数。上例中表示包含有两个o 即 ‘oo’ 的行。注意,{ }左右都需要加上脱意字符 ‘\’, 另外,使用{ }我们还可以表示一个范围的,具体格式是 ‘{n1,n2}’ 其中n1<n2,表示重复n1到n2次前面的字符,n2还可以为空,则表示大于等于n1次。
上面部分讲的grep,另外阿铭常常用到egrep这个工具,简单点讲,后者是前者的扩展版本,我们可以用egrep完成grep不能完成的工作,当然了grep能完成的egrep完全可以完成。如果你嫌麻烦,egrep了解一下即可,因为grep的功能已经足够可以胜任你的日常工作了。下面阿铭介绍egrep不用于grep的几个用法。为了试验方便,阿铭把test.txt 编辑成如下内容:
rot:x:0:0:/rot:/bin/bash
operator:x:11:0:operator:/root:/sbin/nologin
operator:x:11:0:operator:/rooot:/sbin/nologin
roooot:x:0:0:/rooooot:/bin/bash
1111111111111111111111111111111
aaaaaaaaaaaaaaaaaaaaaaaaaaaaaaa
- 筛选一个或一个以上前面的字符
[root@localhost ~]# egrep 'o+' test.txt
rot:x:0:0:/rot:/bin/bash
operator:x:11:0:operator:/root:/sbin/nologin
operator:x:11:0:operator:/rooot:/sbin/nologin
roooot:x:0:0:/rooooot:/bin/bash
[root@localhost ~]# egrep 'oo+' test.txt
operator:x:11:0:operator:/root:/sbin/nologin
operator:x:11:0:operator:/rooot:/sbin/nologin
roooot:x:0:0:/rooooot:/bin/bash
[root@localhost ~]# egrep 'ooo+' test.txt
operator:x:11:0:operator:/rooot:/sbin/nologin
roooot:x:0:0:/rooooot:/bin/bash
和grep 不同的是,egrep这里是使用’+’的。
- 筛选零个或一个前面的字符
[root@localhost ~]# egrep 'o?' test.txt
rot:x:0:0:/rot:/bin/bash
operator:x:11:0:operator:/root:/sbin/nologin
operator:x:11:0:operator:/rooot:/sbin/nologin
roooot:x:0:0:/rooooot:/bin/bash
1111111111111111111111111111111
aaaaaaaaaaaaaaaaaaaaaaaaaaaaaaa
[root@localhost ~]# egrep 'ooo?' test.txt
operator:x:11:0:operator:/root:/sbin/nologin
operator:x:11:0:operator:/rooot:/sbin/nologin
roooot:x:0:0:/rooooot:/bin/bash
[root@localhost ~]# egrep 'oooo?' test.txt
operator:x:11:0:operator:/rooot:/sbin/nologin
roooot:x:0:0:/rooooot:/bin/bash
- 筛选字符串1或者字符串2
[root@localhost ~]# egrep 'aaa|111|ooo' test.txt
operator:x:11:0:operator:/rooot:/sbin/nologin
roooot:x:0:0:/rooooot:/bin/bash
1111111111111111111111111111111
aaaaaaaaaaaaaaaaaaaaaaaaaaaaaaa
- egrep中( )的应用
[root@localhost ~]# egrep 'r(oo)|(at)o' test.txt
operator:x:11:0:operator:/root:/sbin/nologin
operator:x:11:0:operator:/rooot:/sbin/nologin
roooot:x:0:0:/rooooot:/bin/bash
用( )表示一个整体,例如(oo)+就表示1个 ‘oo’ 或者多个 ‘oo’
[root@localhost ~]# egrep '(oo)+' test.txt
operator:x:11:0:operator:/root:/sbin/nologin
operator:x:11:0:operator:/rooot:/sbin/nologin
roooot:x:0:0:/rooooot:/bin/bash
sed工具的使用
grep工具的功能其实还不够强大,grep实现的只是查找功能,而它却不能实现把查找的内容替换掉。以前用vim的时候,可以查找也可以替换,但是只局限于在文本内部来操作,而不能输出到屏幕上。sed工具以及下面要讲的awk工具就能实现把替换的文本输出到屏幕上的功能了,而且还有其他更丰富的功能。sed和awk都是流式编辑器,是针对文档的行来操作的。
- 打印某行
sed -n 'n'p filename 单引号内的n是一个数字,表示第几行:
[root@localhost ~]# sed -n '2'p /etc/passwd
bin:x:1:1:bin:/bin:/sbin/nologin
要想把所有行都打印出来可以使用 sed -n '1,$'p filename
[root@localhost ~]# sed -n '1,$'p test.txt
rot:x:0:0:/rot:/bin/bash
operator:x:11:0:operator:/root:/sbin/nologin
operator:x:11:0:operator:/rooot:/sbin/nologin
roooot:x:0:0:/rooooot:/bin/bash
1111111111111111111111111111111
aaaaaaaaaaaaaaaaaaaaaaaaaaaaaaa
也可以指定一个区间:
[root@localhost ~]# sed -n '1,3'p test.txt
rot:x:0:0:/rot:/bin/bash
operator:x:11:0:operator:/root:/sbin/nologin
operator:x:11:0:operator:/rooot:/sbin/nologin
- 打印包含某个字符串的行
[root@localhost ~]# sed -n '/root/'p test.txt
operator:x:11:0:operator:/root:/sbin/nologin
grep中使用的特殊字符,如 ^ $ . * 等同样也能在sed中使用
[root@localhost ~]# sed -n '/^1/'p test.txt
1111111111111111111111111111111
[root@localhost ~]# sed -n '/in$/'p test.txt
operator:x:11:0:operator:/root:/sbin/nologin
operator:x:11:0:operator:/rooot:/sbin/nologin
[root@localhost ~]# sed -n '/r..o/'p test.txt
operator:x:11:0:operator:/root:/sbin/nologin
operator:x:11:0:operator:/rooot:/sbin/nologin
roooot:x:0:0:/rooooot:/bin/bash
[root@localhost ~]# sed -n '/ooo*/'p test.txt
operator:x:11:0:operator:/root:/sbin/nologin
operator:x:11:0:operator:/rooot:/sbin/nologin
roooot:x:0:0:/rooooot:/bin/bash
- -e可以实现多个行为
[root@localhost ~]# sed -e '1'p -e '/111/'p -n test.txt
rot:x:0:0:/rot:/bin/bash
1111111111111111111111111111111
- 删除某行或者多行
[root@localhost ~]# sed '1'd test.txt
operator:x:11:0:operator:/root:/sbin/nologin
operator:x:11:0:operator:/rooot:/sbin/nologin
roooot:x:0:0:/rooooot:/bin/bash
1111111111111111111111111111111
aaaaaaaaaaaaaaaaaaaaaaaaaaaaaaa
[root@localhost ~]# sed '1,3'd test.txt
roooot:x:0:0:/rooooot:/bin/bash
1111111111111111111111111111111
aaaaaaaaaaaaaaaaaaaaaaaaaaaaaaa
[root@localhost ~]# sed '/oot/'d test.txt
rot:x:0:0:/rot:/bin/bash
1111111111111111111111111111111
aaaaaaaaaaaaaaaaaaaaaaaaaaaaaaa
‘d’ 这个字符就是删除的动作了,不仅可以删除指定的单行以及多行,而且还可以删除匹配某个字符的行,另外还可以删除从某一行一直到文档末行。
- 替换字符或字符串
[root@localhost ~]# sed '1,2s/ot/to/g' test.txt
rto:x:0:0:/rto:/bin/bash
operator:x:11:0:operator:/roto:/sbin/nologin
operator:x:11:0:operator:/rooot:/sbin/nologin
roooot:x:0:0:/rooooot:/bin/bash
1111111111111111111111111111111
aaaaaaaaaaaaaaaaaaaaaaaaaaaaaaa
上例中的 ‘s’ 就是替换的命令, ‘g’ 为本行中全局替换,如果不加 ‘g’ 只换该行中出现的第一个。除了可以使用 ‘/’ 作为分隔符外,还可以使用其他特殊字符例如 ‘#’ 或者 ‘@’ 都没有问题。
[root@localhost ~]# sed 's#ot#to#g' test.txt
rto:x:0:0:/rto:/bin/bash
operator:x:11:0:operator:/roto:/sbin/nologin
operator:x:11:0:operator:/rooto:/sbin/nologin
roooto:x:0:0:/rooooto:/bin/bash
1111111111111111111111111111111
aaaaaaaaaaaaaaaaaaaaaaaaaaaaaaa
[root@localhost ~]# sed 's@ot@to@g' test.txt
rto:x:0:0:/rto:/bin/bash
operator:x:11:0:operator:/roto:/sbin/nologin
operator:x:11:0:operator:/rooto:/sbin/nologin
roooto:x:0:0:/rooooto:/bin/bash
1111111111111111111111111111111
aaaaaaaaaaaaaaaaaaaaaaaaaaaaaaa
现在思考一下,如何删除文档中的所有数字或者字母?
[root@localhost ~]# sed 's/[0-9]//g' test.txt
rot:x:::/rot:/bin/bash
operator:x:::operator:/root:/sbin/nologin
operator:x:::operator:/rooot:/sbin/nologin
roooot:x:::/rooooot:/bin/bash

aaaaaaaaaaaaaaaaaaaaaaaaaaaaaaa
[0-9]表示任意的数字。这里你也可以写成[a-zA-Z]甚至[0-9a-zA-Z]
[root@localhost ~]# sed 's/[a-zA-Z]//g' test.txt
::0:0:/://
::11:0::/://
::11:0::/://
::0:0:/://
1111111111111111111111111111111
- 调换两个字符串的位置
[root@localhost ~]# sed 's/\(rot\)\(.*\)\(bash\)/\3\2\1/' test.txt
bash:x:0:0:/rot:/bin/rot
operator:x:11:0:operator:/root:/sbin/nologin
operator:x:11:0:operator:/rooot:/sbin/nologin
roooot:x:0:0:/rooooot:/bin/bash
1111111111111111111111111111111
aaaaaaaaaaaaaaaaaaaaaaaaaaaaaaa
这个就需要解释一下了,上例中用 () 把所想要替换的字符括起来成为一个整体,因为括号在sed中属于特殊符号,所以需要在前面加脱意字符 ‘’, 替换时则写成 ‘1’, ‘‘2’, ‘‘3’ 的形式。除了调换两个字符串的位置外,阿铭还常常用到在某一行前或者后增加指定内容。
[root@localhost ~]# sed 's/^.*$/123&/' test.txt
123rot:x:0:0:/rot:/bin/bash
123operator:x:11:0:operator:/root:/sbin/nologin
123operator:x:11:0:operator:/rooot:/sbin/nologin
123roooot:x:0:0:/rooooot:/bin/bash
1231111111111111111111111111111111
123aaaaaaaaaaaaaaaaaaaaaaaaaaaaaaa
- 直接修改文件的内容
[root@localhost ~]# sed -i 's/ot/to/g' test.txt
[root@localhost ~]# cat test.txt
rto:x:0:0:/rto:/bin/bash
operator:x:11:0:operator:/roto:/sbin/nologin
operator:x:11:0:operator:/rooto:/sbin/nologin
roooto:x:0:0:/rooooto:/bin/bash
1111111111111111111111111111111
aaaaaaaaaaaaaaaaaaaaaaaaaaaaaaa
这样就可以直接更改test.txt文件中的内容了。由于这个命令可以直接把文件修改,所以在修改前最好先复制一下文件以免改错。
sed常用到的也就上面这些了,只要你多加练习就能熟悉它了。为了能让你更加牢固的掌握sed的应用,阿铭留几个练习题,希望你能认真完成。
- 把/etc/passwd 复制到/root/test.txt,用sed打印所有行
- 打印test.txt的3到10行
- 打印test.txt 中包含 ‘root’ 的行
- 删除test.txt 的15行以及以后所有行
- 删除test.txt中包含 ‘bash’ 的行
- 替换test.txt 中 ‘root’ 为 ‘toor’
- 替换test.txt中 ‘/sbin/nologin’ 为 ‘/bin/login’
- 删除test.txt中5到10行中所有的数字
- 删除test.txt 中所有特殊字符(除了数字以及大小写字母)
- 把test.txt中第一个单词和最后一个单词调换位置
- 把test.txt中出现的第一个数字和最后一个单词替换位置
- 把test.txt 中第一个数字移动到行末尾
- 在test.txt 20行到末行最前面加 ‘aaa:’
阿铭希望你能尽量多想一想,答案只是用来作为参考的。
sed习题答案
1.  /bin/cp /etc/passwd  /root/test.txt ;  sed -n '1,$'p test.txt
2.  sed -n '3,10'p test.txt
3.  sed -n '/root/'p test.txt
4.  sed '15,$'d  test.txt
5.  sed '/bash/'d test.txt
6.  sed 's/root/toor/g' test.txt
7.  sed 's#sbin/nologin#bin/login#g' test.txt
8.  sed '5,10s/[0-9]//g' test.txt
9.  sed 's/[^0-9a-zA-Z]//g' test.txt
10.  sed 's/\(^[a-zA-Z][a-zA-Z]*\)\([^a-zA-Z].*\)\([^a-zA-Z]\)\([a-zA-Z][a-zA-Z]*$\)/\4\2\3\1/' test.txt
11.  sed 's#\([^0-9][^0-9]*\)\([0-9][0-9]*\)\([^0-9].*\)\([^a-zA-Z]\)\([a-zA-Z][a-zA-Z]*$\)#\1\5\3\4\2#' test.txt
12.  sed 's#\([^0-9][^0-9]*\)\([0-9][0-9]*\)\([^0-9].*$\)#\1\3\2#' test.txt
13.  sed '20,$s/^.*$/aaa:&/' test.txt
awk工具的使用
上面也提到了awk和sed一样是流式编辑器,它也是针对文档中的行来操作的,一行一行的去执行。awk比sed更加强大,它能做到sed能做到的,同样也能做到sed不能做到的。awk工具其实是很复杂的,有专门的书籍来介绍它的应用,但是阿铭认为学那么复杂没有必要,只要能处理日常管理工作中的问题即可。何必让自己的脑袋装那么东西来为难自己?毕竟用的也不多,即使现在教会了你很多,你也学会了,如果很久不用肯定就忘记了。鉴于此,阿铭仅介绍比较常见的awk应用,如果你感兴趣的话,再去深入研究吧。
- 截取文档中的某个段
[root@localhost ~]# head -n2 /etc/passwd |awk -F ':' '{print $1}'
root
bin
解释一下,-F 选项的作用是指定分隔符,如果不加-F指定,则以空格或者tab为分隔符。 Print为打印的动作,用来打印出某个字段。$1为第一个字段,$2为第二个字段,依次类推,有一个特殊的那就是$0,它表示整行。
[root@localhost ~]# head -n2 test.txt |awk -F':' '{print $0}'
rto:x:0:0:/rto:/bin/bash
operator:x:11:0:operator:/roto:/sbin/nologin
注意awk的格式,-F后紧跟单引号,然后里面为分隔符,print的动作要用 { } 括起来,否则会报错。print还可以打印自定义的内容,但是自定义的内容要用双引号括起来。
[root@localhost ~]# head -n2 test.txt |awk -F':' '{print $1"#"$2"#"$3"#"$4}'
rto#x#0#0
operator#x#11#0
- 匹配字符或字符串
[root@localhost ~]# awk '/oo/' test.txt
operator:x:11:0:operator:/rooto:/sbin/nologin
roooto:x:0:0:/rooooto:/bin/bash
跟sed很类似吧,不过还有比sed更强大的匹配。
[root@localhost ~]# awk -F ':' '$1 ~/oo/' test.txt
roooto:x:0:0:/rooooto:/bin/bash
可以让某个段去匹配,这里的’~’就是匹配的意思,继续往下看
[root@localhost ~]# awk -F ':' '/root/ {print $1,$3} /test/ {print $1,$3}' /etc/passwd
root 0
operator 11
test 511
test1 512
awk还可以多次匹配,如上例中匹配完root,再匹配test,它还可以只打印所匹配的段。
- 条件操作符
[root@localhost ~]# awk -F ':' '$3=="0"' /etc/passwd
root:x:0:0:root:/root:/bin/bash
awk中是可以用逻辑符号判断的,比如 ‘==’ 就是等于,也可以理解为 ‘精确匹配’ 另外也有 >, ‘>=, ‘<, ‘<=, ‘!= 等等,值得注意的是,在和数字比较时,若把比较的数字用双引号引起来后,那么awk不会认为是数字,而认为是字符,不加双引号则认为是数字。
[root@localhost ~]# awk -F ':' '$3>="500"' /etc/passwd
shutdown:x:6:0:shutdown:/sbin:/sbin/shutdown
halt:x:7:0:halt:/sbin:/sbin/halt
mail:x:8:12:mail:/var/spool/mail:/sbin/nologin
nobody:x:99:99:Nobody:/:/sbin/nologin
dbus:x:81:81:System message bus:/:/sbin/nologin
vcsa:x:69:69:virtual console memory owner:/dev:/sbin/nologin
haldaemon:x:68:68:HAL daemon:/:/sbin/nologin
postfix:x:89:89::/var/spool/postfix:/sbin/nologin
sshd:x:74:74:Privilege-separated SSH:/var/empty/sshd:/sbin/nologin
tcpdump:x:72:72::/:/sbin/nologin
user11:x:510:502:user11,user11's office,12345678,123456789:/home/user11:/sbin/nologin
test:x:511:511::/home/test:/bin/bash
test1:x:512:511::/home/test1:/bin/bash
在上面的例子中,阿铭本想把uid大于等于500的行打印出,但是结果并不是我们的预期,这是因为awk把所有的数字当作字符来对待了,就跟上一章中提到的 sort 排序原理一样。
[root@localhost ~]# awk -F ':' '$7!="/sbin/nologin"' /etc/passwd
root:x:0:0:root:/root:/bin/bash
sync:x:5:0:sync:/sbin:/bin/sync
shutdown:x:6:0:shutdown:/sbin:/sbin/shutdown
halt:x:7:0:halt:/sbin:/sbin/halt
test:x:511:511::/home/test:/bin/bash
test1:x:512:511::/home/test1:/bin/bash
!= 为不匹配,除了针对某一个段的字符进行逻辑比较外,还可以两个段之间进行逻辑比较。
[root@localhost ~]# awk -F ':' '$3<$4' /etc/passwd
adm:x:3:4:adm:/var/adm:/sbin/nologin
lp:x:4:7:lp:/var/spool/lpd:/sbin/nologin
mail:x:8:12:mail:/var/spool/mail:/sbin/nologin
uucp:x:10:14:uucp:/var/spool/uucp:/sbin/nologin
games:x:12:100:games:/usr/games:/sbin/nologin
gopher:x:13:30:gopher:/var/gopher:/sbin/nologin
ftp:x:14:50:FTP User:/var/ftp:/sbin/nologin
另外还可以使用 && 和 || 表示 “并且” 和 “或者” 的意思。
[root@localhost ~]# awk -F ':' '$3>"5" && $3<"7"' /etc/passwd
shutdown:x:6:0:shutdown:/sbin:/sbin/shutdown
vcsa:x:69:69:virtual console memory owner:/dev:/sbin/nologin
haldaemon:x:68:68:HAL daemon:/:/sbin/nologin
user11:x:510:502:user11,user11's office,12345678,123456789:/home/user11:/sbin/nologin
test:x:511:511::/home/test:/bin/bash
test1:x:512:511::/home/test1:/bin/bash
也可以是或者
[root@localhost ~]# awk -F ':' '$3>"5" || $7=="/bin/bash"' /etc/passwd
root:x:0:0:root:/root:/bin/bash
shutdown:x:6:0:shutdown:/sbin:/sbin/shutdown
halt:x:7:0:halt:/sbin:/sbin/halt
mail:x:8:12:mail:/var/spool/mail:/sbin/nologin
nobody:x:99:99:Nobody:/:/sbin/nologin
dbus:x:81:81:System message bus:/:/sbin/nologin
vcsa:x:69:69:virtual console memory owner:/dev:/sbin/nologin
haldaemon:x:68:68:HAL daemon:/:/sbin/nologin
postfix:x:89:89::/var/spool/postfix:/sbin/nologin
sshd:x:74:74:Privilege-separated SSH:/var/empty/sshd:/sbin/nologin
tcpdump:x:72:72::/:/sbin/nologin
user11:x:510:502:user11,user11's office,12345678,123456789:/home/user11:/sbin/nologin
test:x:511:511::/home/test:/bin/bash
test1:x:512:511::/home/test1:/bin/bash
- awk的内置变量
awk常用的变量有:
NF :用分隔符分隔后一共有多少段
NR :行数
[root@localhost ~]# head -n3 /etc/passwd | awk -F ':' '{print NF}'
7
7
7
[root@localhost ~]# head -n3 /etc/passwd | awk -F ':' '{print $NF}'
/bin/bash
/sbin/nologin
/sbin/nologin
NF 是多少段,而$NF是最后一段的值, 而NR则是行号。
[root@localhost ~]# head -n3 /etc/passwd | awk -F ':' '{print NR}'
1
2
3
我们可以使用行号作为判断条件:
[root@localhost ~]# awk 'NR>20' /etc/passwd
postfix:x:89:89::/var/spool/postfix:/sbin/nologin
abrt:x:173:173::/etc/abrt:/sbin/nologin
sshd:x:74:74:Privilege-separated SSH:/var/empty/sshd:/sbin/nologin
tcpdump:x:72:72::/:/sbin/nologin
user11:x:510:502:user11,user11's office,12345678,123456789:/home/user11:/sbin/nologin
test:x:511:511::/home/test:/bin/bash
test1:x:512:511::/home/test1:/bin/bash
也可以配合段匹配一起使用:
[root@localhost ~]# awk -F ':' 'NR>20 && $1 ~ /ssh/' /etc/passwd
sshd:x:74:74:Privilege-separated SSH:/var/empty/sshd:/sbin/nologin
- awk中的数学运算
awk可以把段值更改:
[root@localhost ~]# head -n 3 /etc/passwd |awk -F ':' '$1="root"'
root x 0 0 root /root /bin/bash
root x 1 1 bin /bin /sbin/nologin
root x 2 2 daemon /sbin /sbin/nologin
awk还可以对各个段的值进行数学运算:
[root@localhost ~]# head -n2 /etc/passwd
root:x:0:0:root:/root:/bin/bash
bin:x:1:1:bin:/bin:/sbin/nologin
[root@localhost ~]# head -n2 /etc/passwd |awk -F ':' '{$7=$3+$4}'
[root@localhost ~]# head -n2 /etc/passwd |awk -F ':' '{$7=$3+$4; print $0}'
root x 0 0 root /root 0
bin x 1 1 bin /bin 2
当然还可以计算某个段的总和
[root@localhost ~]# awk -F ':' '{(tot=tot+$3)}; END {print tot}' /etc/passwd
2891
这里的END要注意一下,表示所有的行都已经执行,这是awk特有的语法,其实awk连同sed都可以写成一个脚本文件,而且有他们特有的语法,在awk中使用if判断、for循环都是可以的,只是阿铭认为日常管理工作中没有必要使用那么复杂的语句而已。
[root@localhost ~]# awk -F ':' '{if ($1=="root") print $0}' /etc/passwd
root:x:0:0:root:/root:/bin/bash
基本上,正则表达的内容就这些了。但是阿铭要提醒你一下,阿铭介绍的这些仅仅是最基本的东西,并没有提啊深入的去讲sed和awk,但是完全可以满足日常工作的需要,有时候也许你会碰到比较复杂的需求,如果真遇到了就去请教一下google吧。下面出几道关于awk的练习题,希望你要认真完成。
- 用awk 打印整个test.txt (以下操作都是用awk工具实现,针对test.txt)
- 查找所有包含 ‘bash’ 的行
- 用 ‘:’ 作为分隔符,查找第三段等于0的行
- 用 ‘:’ 作为分隔符,查找第一段为 ‘root’ 的行,并把该段的 ‘root’ 换成 ‘toor’ (可以连同sed一起使用)
- 用 ‘:’ 作为分隔符,打印最后一段
- 打印行数大于20的所有行
- 用 ‘:’ 作为分隔符,打印所有第三段小于第四段的行
- 用 ‘:’ 作为分隔符,打印第一段以及最后一段,并且中间用 ‘@’ 连接 (例如,第一行应该是这样的形式 'root@/bin/bash‘ )
- 用 ‘:’ 作为分隔符,把整个文档的第四段相加,求和
awk习题答案
1. awk '{print $0}' test.txt
2. awk '/bash/' test.txt
3. awk -F':' '$3=="0"' test.txt
4. awk -F':' '$1=="root"' test.txt |sed 's/root/toor/'
5. awk -F':' '{print $NF}' test.txt
6. awk -F':' 'NR>20' test.txt
7. awk -F':' '$3<$4' test.txt
8. awk -F':' '{print $1"@"$NF}' test.txt
9. awk -F':' '{(sum+=$4)}; END {print sum}' test.txt
第15章 shell脚本
学习Linux请加QQ群: 群1(163262181) 群2(148412746) 群3(246401509) 群4(173884211)
跟阿铭学Linux邀请函 (http://www.aminglinux.com),猿课已上线,请加微信aminglinux84索要配套视频教程。
终于到shell 脚本这章了,在以前阿铭卖了好多关子说shell脚本怎么怎么重要,确实shell脚本在linux系统管理员的运维工作中非常非常重要。下面阿铭就带你正式进入shell脚本的世界吧。
到现在为止,你明白什么是shell脚本吗?如果明白最好了,不明白也没有关系,相信随着学习的深入你就会越来越了解到底什么是shell脚本。首先它是一个脚本,并不能作为正式的编程语言。因为是跑在linux的shell中,所以叫shell脚本。说白了,shell脚本就是一些命令的集合。举个例子,我想实现这样的操作:
1)进入到/tmp/目录;
2)列出当前目录中所有的文件名;
3)把所有当前的文件拷贝到/root/目录下;
4)删除当前目录下所有的文件。
简单的4步在shell窗口中需要你敲4次命令,按4次回车。这样是不是很麻烦?当然这4步操作非常简单,如果是更加复杂的命令设置需要几十次操作呢?那样的话一次一次敲键盘会很麻烦。所以不妨把所有的操作都记录到一个文档中,然后去调用文档中的命令,这样一步操作就可以完成。其实这个文档呢就是shell脚本了,只是这个shell脚本有它特殊的格式。
Shell脚本能帮助我们很方便的去管理服务器,因为我们可以指定一个任务计划定时去执行某一个shell脚本实现我们想要需求。这对于linux系统管理员来说是一件非常值得自豪的事情。现在的139邮箱很好用,发邮件的同时还可以发一条邮件通知的短信给用户,利用这点,我们就可以在我们的linux服务器上部署监控的shell脚本,比如网卡流量有异常了或者服务器web服务器停止了就可以发一封邮件给管理员,同时发送给管理员一个报警短信这样可以让我们及时的知道服务器出问题了。
在正式写shell脚本之前阿铭先给你一条建议:凡是自定义的脚本建议放到/usr/local/sbin/目录下,这样做的目的是,一来可以更好的管理文档;二来以后接管你的管理员都知道自定义脚本放在哪里,方便维护。
shell脚本的基本结构以及如何执行
下面请跟着阿铭写第一个你的shell脚本吧:
[root@localhost ~]# cd /usr/local/sbin/
[root@localhost sbin]# vim first.sh
#! /bin/bash
## This is my first shell script.
## Writen by Aming 2013-05-24.
date
echo "Hello world!"
Shell脚本通常都是以.sh 为后缀名的,这个并不是说不带.sh这个脚本就不能执行,只是大家的一个习惯而已。所以,以后你发现了.sh为后缀的文件那么它可能是一个shell脚本了。test.sh中第一行要以 “#! /bin/bash” 开头,它代表的意思是,该文件使用的是bash语法。如果不设置该行,虽然你的shell脚本也可以执行,但是这不符合规范。 # 表示注释,在前面讲过的。后面跟一些该脚本的相关注释内容以及作者和创建日期或者版本等等。当然这些注释并非必须的,如果你懒的很,可以省略掉,但是阿铭不建议省略。因为随着工作时间的逐渐过渡,你写的shell脚本也会越来越多,如果有一天你回头查看自己写过的某个脚本时,很有可能忘记该脚本是用来干什么的以及什么时候写的。所以写上注释是有必要的。另外系统管理员并非只有你一个,如果是其他管理员查看你的脚本,他看不懂岂不是很郁闷。下面该运行一下这个脚本了:
[root@localhost sbin]# sh first.sh
2013年 05月 24日 星期五 18:58:02 CST
Hello world!
其实shell脚本还有一种执行方法就是:
[root@localhost sbin]# ./first.sh
-bash: ./first.sh: 权限不够
[root@localhost sbin]# chmod +x first.sh
[root@localhost sbin]# ./first.sh
2013年 05月 24日 星期五 18:58:51 CST
Hello world!
要想使用该种方法运行shell脚本,前提是脚本本身有执行权限,所以需要给脚本加一个 ‘x’ 权限。另外使用sh命令去执行一个shell脚本的时候是可以加-x选项来查看这个脚本执行过程的,这样有利于我们调试这个脚本哪里出了问题:
[root@localhost sbin]# sh -x first.sh
+ date
2013年 05月 24日 星期五 20:00:11 CST
+ echo 'Hello world!'
Hello world!
本例中有一个命令 date 之前阿铭从未介绍过,这个命令在shell脚本中使用非常频繁,阿铭有必要向你介绍一下它的用法。
命令 : date
阿铭举几个比较实用的例子来带你掌握它的用法:
[root@localhost sbin]# date +"%Y-%m-%d %H:%M:%S"
2013-05-24 19:41:01
date在脚本中最常用的几个用法:
data +%Y 以四位数字格式打印年份
date +%y 以两位数字格式打印年份
date +%m 月份
date +%d 日期
date +%H 小时
date +%M 分钟
date +%S 秒
date +%w 星期,如果结果显示0 则表示周日
有时在脚本中会用到一天前的日期:
[root@localhost sbin]# date -d "-1 day" +%d
23
或者一小时前:
[root@localhost sbin]# date -d "-1 hour" +%H
18
甚至1分钟前:
[root@localhost sbin]# date -d "-1 min" +%M
50
shell脚本中的变量
在shell脚本中使用变量显得我们的脚本更加专业更像是一门语言,变量的作用当然不是为了专业。如果你写了一个长达1000行的shell脚本,并且脚本中出现了某一个命令或者路径几百次。突然你觉得路径不对想换一下,那岂不是要更改几百次?你固然可以使用批量替换的命令,但也是很麻烦,并且脚本显得臃肿了很多。变量的作用就是用来解决这个问题的。
[root@localhost sbin]# cat variable.sh
#! /bin/bash
## In this script we will use variables.
## Writen by Aming 2013-05-24.
d=`date +%H:%M:%S`
echo "The script begin at $d."
echo "Now we'll sleep 2 seconds."
sleep 2
d1=`date +%H:%M:%S`
echo "The script end at $d1."
脚本中使用到了反引号,你是否还记得它的作用? ‘d’ 和 ‘d1’ 在脚本中作为变量出现,定义变量的格式为 变量名=变量的值 当在脚本中引用变量时需要加上 ‘$’ 符号,这跟前面讲的在shell中自定义变量是一致的。下面看看脚本执行结果吧:
[root@localhost sbin]# sh variable.sh
The script begin at 20:16:57.
Now we'll sleep 2 seconds.
The script end at 20:16:59.
下面我们用shell计算两个数的和:
[root@localhost sbin]# cat sum.sh
#! /bin/bash
## For get the sum of tow numbers.
## Aming 2013-05-24.
a=1
b=2
sum=$[$a+$b]
echo "$a+$b=$sum"
数学计算要用[ ]括起来并且外头要带一个 ‘$’ 脚本结果为:
[root@localhost sbin]# sh sum.sh
1+2=3
Shell脚本还可以和用户交互:
[root@localhost sbin]# cat read.sh
#! /bin/bash
## Using 'read' in shell script.
## Aming 2013-05-24.
read -p "Please input a number: " x
read -p "Please input another number: " y
sum=$[$x+$y]
echo "The sum of the two numbers is: $sum"
read 命令就是用在这样的地方,用于和用户交互,把用户输入的字符串作为变量值。脚本执行过程如下:
[root@localhost sbin]# sh read.sh
Please input a number: 2
Please input another number: 10
The sum of the two numbers is: 12
我们不妨加上 -x 选项再来看看这个执行过程:
[root@localhost sbin]# sh -x read.sh
+ read -p 'Please input a number: ' x
Please input a number: 22
+ read -p 'Please input another number: ' y
Please input another number: 13
+ sum=35
+ echo 'The sum of the two numbers is: 35'
The sum of the two numbers is: 35
有时候我们会用到这样的命令 /etc/init.d/iptables restart 前面的/etc/init.d/iptables文件其实就是一个shell脚本,为什么后面可以跟一个 “restart”? 这里就涉及到了shell脚本的预设变量。实际上,shell脚本在执行的时候后边是可以跟参数的,而且还可以跟多个。
[root@localhost sbin]# cat option.sh
#! /bin/bash
sum=$[$1+$2]
echo "sum=$sum"
执行结果为:
[root@localhost sbin]# sh -x option.sh 1 2
+ sum=3
+ echo sum=3
sum=3
在脚本中,你会不会奇怪,哪里来的$1和$2,这其实就是shell脚本的预设变量,其中$1的值就是在执行的时候输入的1,而$2的值就是执行的时候输入的$2,当然一个shell脚本的预设变量是没有限制的,这回你明白了吧。另外还有一个$0,不过它代表的是脚本本身的名字。不妨把脚本修改一下:
[root@localhost sbin]# cat option.sh
#! /bin/bash
echo "$1 $2 $0"
执行结果:
[root@localhost sbin]# sh option.sh 1 2
1 2 option.sh
shell脚本中的逻辑判断
如果你学过C或者其他语言,相信你不会对 if 陌生,在shell脚本中我们同样可以使用 if 逻辑判断。在shell中if判断的基本语法为:
1)不带else
if 判断语句; then
command
fi
例如:
[root@localhost sbin]# cat if1.sh
#! /bin/bash
read -p "Please input your score: " a
if (($a<60)); then
echo "You didn't pass the exam."
fi
在if1.sh中出现了 (($a<60)) 这样的形式,这是shell脚本中特有的格式,用一个小括号或者不用都会报错,请记住这个格式。执行结果为:
[root@localhost sbin]# sh if1.sh
Please input your score: 90
[root@localhost sbin]# sh if1.sh
Please input your score: 33
You didn't pass the exam.
2)带有else
if 判断语句 ; then
command
else
command
fi
例如:
[root@localhost sbin]# cat if2.sh
#! /bin/bash
read -p "Please input your score: " a
if (($a<60)); then
echo "You didn't pass the exam."
else
echo "Good! You passed the exam."
fi
执行结果:
[root@localhost sbin]# sh if2.sh
Please input your score: 80
Good! You passed the exam.
[root@localhost sbin]# sh if2.sh
Please input your score: 25
You didn't pass the exam.
和上一例唯一区别的地方是,如果输入大于等于60的数字会有所提示。
3)带有elif
if 判断语句一 ; then
command
elif 判断语句二; then
command
else
command
fi
例如:
[root@localhost sbin]# cat if3.sh
#! /bin/bash
read -p "Please input your score: " a
if (($a<60)); then
echo "You didn't pass the exam."
elif (($a>=60)) && (($a<85)); then
echo "Good! You pass the exam."
else
echo "very good! Your socre is very high!"
fi
这里的 && 表示 “并且” 的意思,当然也可以使用 || 表示 “或者” 执行结果为:
[root@localhost sbin]# sh if3.sh
Please input your score: 90
very good! Your socre is very high!
[root@localhost sbin]# sh if3.sh
Please input your score: 60
Good! You pass the exam.
以上只是简单的介绍了if语句的结构。在判断数值大小除了可以用 (( )) 的形式外,还可以使用 [ ] 但是就不能使用>, < , = 这样的符号了,要使用 -lt (小于),-gt (大于),-le (小于等于),-ge (大于等于),-eq (等于),-ne (不等于)。下面阿铭就以命令行的形式简单比较一下,不再写shell脚本了。
[root@localhost sbin]# a=10; if [ $a -lt 5 ]; then echo ok; fi
[root@localhost sbin]# a=10; if [ $a -gt 5 ]; then echo ok; fi
ok
[root@localhost sbin]# a=10; if [ $a -ge 10 ]; then echo ok; fi
ok
[root@localhost sbin]# a=10; if [ $a -eq 10 ]; then echo ok; fi
ok
[root@localhost sbin]# a=10; if [ $a -ne 10 ]; then echo ok; fi
再看看if中使用 && 和 ||的情况:
[root@localhost sbin]# a=10; if [ $a -lt 1 ] || [ $a -gt 5 ]; then echo ok; fi
ok
[root@localhost sbin]# a=10; if [ $a -gt 1 ] || [ $a -lt 10 ]; then echo ok; fi
ok
shell 脚本中if还经常判断关于档案属性,比如判断是普通文件还是目录,判断文件是否有读写执行权限等。常用的也就几个选项:
-e :判断文件或目录是否存在
-d :判断是不是目录,并是否存在
-f :判断是否是普通文件,并存在
-r :判断文档是否有读权限
-w :判断是否有写权限
-x :判断是否可执行
使用if判断时,具体格式为:
if [ -e filename ] ; then
例子:
[root@localhost sbin]# if [ -d /home/ ]; then echo ok; fi
ok
[root@localhost sbin]# if [ -f /home/ ]; then echo ok; fi
因为 /home/ 为目录为非文件,所以并不会显示 “ok” .
[root@localhost sbin]# if [ -f /root/test.txt ]; then echo ok; fi
ok
[root@localhost sbin]# if [ -r /root/test.txt ]; then echo ok; fi
ok
[root@localhost sbin]# if [ -w /root/test.txt ]; then echo ok; fi
ok
[root@localhost sbin]# if [ -x /root/test.txt ]; then echo ok; fi
[root@localhost sbin]# if [ -e /root/test1.txt ]; then echo ok; fi
在shell 脚本中,除了用if来判断逻辑外,还有一种常用的方式,那就是case了。具体格式为:
case 变量 in
value1)
command
;;
value2)
command
;;
value3)
command
;;
*)
command
;;
esac
上面的结构中,不限制value的个数, * 则代表除了上面的value外的其他值。下面阿铭写一个判断输入数值是奇数或者偶数的脚本:
[root@localhost sbin]# cat case.sh
#! /bin/bash
read -p "Input a number: " n
a=$[$n%2]
case $a in
1)
echo "The number is odd."
;;
0)
echo "The number is even."
;;
*)
echo "It's not a number!"
;;
esac
$a 的值或为1或为0,执行结果为:
[root@localhost sbin]# sh case.sh
Input a number: 100
The number is even.
[root@localhost sbin]# sh case.sh
Input a number: 101
The number is odd.
case脚本常用于编写系统服务的启动脚本,例如/etc/init.d/iptables中就用到了,你不妨去查看一下。
shell脚本中的循环
Shell脚本中也算是一门简易的编程语言了,当然循环是不能缺少的。常用到的循环有for循环和while循环。下面就分别介绍一下两种循环的结构。
- for循环
[root@localhost sbin]# cat for.sh
#! /bin/bash
for i in `seq 1 5`; do
echo $i
done
脚本中的 seq 1 5 表示从1到5的一个序列。你可以直接运行这个命令试下。脚本执行结果为:
[root@localhost sbin]# sh for.sh
1
2
3
4
5
通过这个脚本就可以看到for循环的基本结构:
for 变量名 in 循环的条件; do
command
done
这里的 “循环的条件” 可以写成一组字符串或者数字(用1个或者多个空格隔开), 也可以是一条命令的执行结果:
[root@localhost sbin]# for i in 1 2 3 a b; do echo $i; done
1
2
3
a
b
也可以写引用系统命令的执行结果,就像那个 seq 1 5 但是需要用反引号括起来:
[root@localhost sbin]# for file in `ls`; do echo $file; done
case.sh
first.sh
for.sh
if1.sh
if2.sh
if3.sh
option.sh
read.sh
sum.sh
variable.sh
- while循环
[root@localhost sbin]# cat while.sh
#! /bin/bash
a=5
while [ $a -ge 1 ]; do
echo $a
a=$[$a-1]
done
while 循环格式也很简单:
while 条件; do
command
done
上例脚本的执行结果为:
[root@localhost sbin]# sh while.sh
5
4
3
2
1
另外你可以把循环条件拿一个冒号替代,这样可以做到死循环,阿铭常常这样写监控脚本:
while :; do
command
sleep 3
done
shell脚本中的函数
如果你学过开发,肯定知道函数的作用。如果你是刚刚接触到这个概念的话,也没有关系,其实很好理解的。函数就是把一段代码整理到了一个小单元中,并给这个小单元起一个名字,当用到这段代码时直接调用这个小单元的名字即可。有时候脚本中的某段代总是重复使用,如果写成函数,每次用到时直接用函数名代替即可,这样就节省了时间还节省了空间。
下面阿铭写一个简单的带有函数功能的shell脚本:
[root@localhost sbin]# cat func.sh
#! /bin/bash
function sum()
{
sum=$[$1+$2]
echo $sum
}
sum $1 $2
执行结果如下:
[root@localhost sbin]# sh func.sh 1 2
3
func.sh中的 sum() 为自定义的函数,在shell脚本函数的格式为:
function 函数名() {
command
}
有一点阿铭要提醒你一下,在shell脚本中,函数一定要写在最前面,不能出现在中间或者最后,因为函数是要被调用的,如果还没有出现就被调用,肯定是会出错的。
shll脚本练习题
Shell脚本大体上就介绍这么多了,阿铭所举的例子都是最基础的,所以即使你把所有例子完全掌握也不代表你的shell脚本编写能力有多么好。所以剩下的日子里请你尽量要多练习,多写脚本,写的脚本越多,你的shell脚本能力就越强。希望你能够找专门介绍shell脚本的书籍深入的去研究一下它。随后阿铭将留几个shell脚本的练习题,你最好不要偷懒。
- 编写shell脚本,计算1-100的和;
- 编写shell脚本,要求输入一个数字,然后计算出从1到输入数字的和,要求,如果输入的数字小于1,则重新输入,直到输入正确的数字为止;
- 编写shell脚本,把/root/目录下的所有目录(只需要一级)拷贝到/tmp/目录下;
- 编写shell脚本,批量建立用户user_00, user_01, ... user_100并且所有用户同属于users组;
- 编写shell脚本,截取文件test.log中包含关键词 ‘abc’ 的行中的第一列(假设分隔符为 ”:” ),然后把截取的数字排序(假设第一列为数字),然后打印出重复次数超过10次的列;
- 编写shell脚本,判断输入的IP是否正确(IP的规则是,n1.n2.n3.n4,其中1<n1<255, 0<n2<255, 0<n3<255, 0<n4<255)。
习题答案:
1. #! /bin/bash
sum=0
for i in `seq 1 100`; do
sum=$[$i+$sum]
done
echo $sum
2. #! /bin/bash
n=0
while [ $n -lt "1" ]; do
read -p "Please input a number, it must greater than "1":" n
done
sum=0
for i in `seq 1 $n`; do
sum=$[$i+$sum]
done
echo $sum
3. #! /bin/bash
cd /root
for f in `ls `; do
if [ -d $f ] ; then
cp -r $f /tmp/
fi
done
4. #! /bin/bash
groupadd users
for i in `seq 0 9`; do
useradd -g users user_0$i
done
for j in `seq 10 100`; do
useradd -g users user_$j
done
5. #! /bin/bash
awk -F':' '$0~/abc/ {print $1}' test.log >/tmp/n.txt
sort -n n.txt |uniq -c |sort -n >/tmp/n2.txt
awk '$1>10 {print $2}' /tmp/n2.txt
6. #! /bin/bash
checkip() {
if echo $1 |egrep -q '^[0-9]{1,3}\.[0-9]{1,3}\.[0-9]{1,3}\.[0-9]{1,3}$' ; then
a=`echo $1 | awk -F. '{print $1}'`
b=`echo $1 | awk -F. '{print $2}'`
c=`echo $1 | awk -F. '{print $3}'`
d=`echo $1 | awk -F. '{print $4}'`
for n in $a $b $c $d; do
if [ $n -ge 255 ] || [ $n -le 0 ]; then
echo "the number of the IP should less than 255 and greate than 0"
return 2
fi
done
else
echo "The IP you input is something wrong, the format is like 192.168.100.1"
return 1
fi
}
rs=1
while [ $rs -gt 0 ]; do
read -p "Please input the ip:" ip
checkip $ip
rs=`echo $?`
done
echo "The IP is right!"
第16章 linux系统日常管理
学习Linux请加QQ群: 群1(163262181) 群2(148412746) 群3(246401509) 群4(173884211)
跟阿铭学Linux邀请函 (http://www.aminglinux.com),猿课已上线,请加微信aminglinux84索要配套视频教程。
阿铭在前面介绍的内容都为linux系统基础类的,如果你现在把前面的内容全部很好的掌握了,那最好了。不过阿铭要说的是,即使你完全掌握了,你现在还是不能作为一名合格的linux系统管理员的,毕竟系统管理员要会做的事情太多了。本章以及后面章节阿铭会陆续教给你作为linux系统管理员所必备的知识。只要你熟练掌握那绝对可以胜任一个最初级的管理员职位,不过只是初级的,因为你还需要在日常的管理工作中获得成长。
监控系统的状态
1. w查看当前系统的负载
[root@localhost sbin]# w
15:23:46 up 3:34, 2 users, load average: 0.03, 0.05, 0.00
USER TTY FROM LOGIN@ IDLE JCPU PCPU WHAT
root tty1 - 12:26 2:55m 0.11s 0.11s -bash
root pts/0 10.72.137.53 12:28 1:17m 1:32 1:32 -bash
相信所有的linux管理员最常用的命令就是这个 w 了,该命令显示的信息还是蛮丰富的。第一行从左面开始显示的信息依次为:时间,系统运行时间,登录用户数,平均负载。第二行开始以及下面所有的行,告诉我们的信息是,当前登录的都有哪些用户,以及他们是从哪里登录的等等。其实,在这些信息当中,阿铭认为我们最应该关注的应该是第一行中的 ‘load average:’ 后面的三个数值。
第一个数值表示1分钟内系统的平均负载值;第二个数值表示5分钟内系统的平均负载值;第三个数值表示15分钟系统的平均负载值。这个值的意义是,单位时间段内CPU活动进程数。当然这个值越大就说明你的服务器压力越大。一般情况下这个值只要不超过服务器的cpu数量就没有关系,如果服务器cpu数量为8,那么这个值若小于8,就说明当前服务器没有压力,否则就要关注一下了。到这里你肯定会问,如何查看服务器有几个cpu?
[root@localhost sbin]# cat /proc/cpuinfo
processor : 0
vendor_id : AuthenticAMD
cpu family : 16
model : 6
model name : AMD Phenom(tm) II N660 Dual-Core Processor
stepping : 3
cpu MHz : 3000.000
cache size : 1024 KB
fdiv_bug : no
hlt_bug : no
f00f_bug : no
coma_bug : no
fpu : yes
fpu_exception : yes
cpuid level : 5
wp : yes
flags : fpu vme de pse tsc msr pae mce cx8 apic sep mtrr pge mca cmov pat pse36 clflush mmx fxsr sse sse2 syscall nx mmxext fxsr_opt rdtscp lm 3dnowext 3dnow constant_tsc up tsc_reliable nonstop_tsc extd_apicid pni cx16 popcnt lahf_lm abm sse4a misalignsse 3dnowprefetch
bogomips : 6000.00
clflush size : 64
cache_alignment : 64
address sizes : 36 bits physical, 48 bits virtual
power management: ts ttp tm stc 100mhzsteps hwpstate
‘/proc/cpuinfo’ 这个文件记录了cpu的详细信息。目前市面上的服务器通常都是2颗4核cpu,在linux看来,它就是8个cpu。查看这个文件时则会显示8段类似的信息,而最后一段信息中processor : 后面跟的是 ‘7’ 所以查看当前系统有几个cpu,我们可以使用这个命令: grep -c 'processor' /proc/cpuinfo 而如何看几颗物理cpu呢,需要查看关键字 “physical id”, 由于阿铭的虚拟机只有一个cpu所以并未显示关于 “physical id” 的信息。
2. vmstat 监控系统的状态
[root@localhost ~]# vmstat
procs -----------memory---------- ---swap-- -----io---- --system-- -----cpu-----
r b swpd free buff cache si so bi bo in cs us sy id wa st
0 0 512 5392 37460 213276 0 0 100 549 153 59 1 4 93 1 0
上面讲的 w 查看的是系统整体上的负载,通过看那个数值可以知道当前系统有没有压力,但是具体是哪里(CPU, 内存,磁盘等)有压力就无法判断了。通过 vmstat 就可以知道具体是哪里有压力。vmstat命令打印的结果共分为6部分:procs, memory, swap, io, system, cpu. 请重点关注一下r b si so bi bo几列。
1)procs 显示进程相关信息
r :表示运行和等待cpu时间片的进程数,如果长期大于服务器cpu的个数,则说明cpu不够用了;
b :表示等待资源的进程数,比如等待I/O, 内存等,这列的值如果长时间大于1,则需要关注一下了;
2)memory 内存相关信息
swpd :表示切换到交换分区中的内存数量 ;
free :当前空闲的内存数量;
buff :缓冲大小,(即将写入磁盘的);
cache :缓存大小,(从磁盘中读取的);
3)swap 内存交换情况
si :由交换区写入到内存的数据量;
so :由内存写入到交换区的数据量;
4)io 磁盘使用情况
bi :从块设备读取数据的量(读磁盘);
bo: 从块设备写入数据的量(写磁盘);
5)system 显示采集间隔内发生的中断次数
in :表示在某一时间间隔中观测到的每秒设备中断数;
cs :表示每秒产生的上下文切换次数;
6)CPU 显示cpu的使用状态
us :显示了用户下所花费 cpu 时间的百分比;
sy :显示系统花费cpu时间百分比;
id :表示cpu处于空闲状态的时间百分比;
wa :表示I/O等待所占用cpu时间百分比;
st :表示被偷走的cpu所占百分比(一般都为0,不用关注);
以上所介绍的各个参数中,阿铭经常会关注r列,b列,和wa列,三列代表的含义在上边说得已经很清楚。IO部分的bi以及bo也是要经常参考的对象。如果磁盘io压力很大时,这两列的数值会比较高。另外当si, so两列的数值比较高,并且在不断变化时,说明内存不够了,内存中的数据频繁交换到交换分区中,这往往对系统性能影响极大。
我们使用 vmstat 查看系统状态的时候,通常都是使用这样的形式来看的:
[root@localhost ~]# vmstat 1 5
或者:
[root@localhost ~]# vmstat 1
前面表示,每隔一秒钟打印一次状态,共打印5次,而后面的表示每隔1秒打印一次状态,一直打印,除非我们按 Ctrl + c 结束
3. top 显示进程所占系统资源
[root@localhost ~]# top
top - 16:31:49 up 4:42, 3 users, load average: 0.02, 0.05, 0.00
Tasks: 74 total, 1 running, 73 sleeping, 0 stopped, 0 zombie
Cpu(s): 1.4%us, 7.8%sy, 0.0%ni, 89.2%id, 1.0%wa, 0.3%hi, 0.3%si, 0.0%st
Mem: 326616k total, 321172k used, 5444k free, 23664k buffers
Swap: 2097144k total, 588k used, 2096556k free, 227416k cached
PID USER PR NI VIRT RES SHR S %CPU %MEM TIME+ COMMAND
11194 root 20 0 43936 36m 1128 S 3.8 11.3 2:38.95 perl
5373 root 20 0 2572 1072 860 R 0.6 0.3 0:00.05 top
24160 root 20 0 12412 2124 1376 S 0.3 0.7 0:01.12 sshd
1 root 20 0 2900 800 652 S 0.0 0.2 0:01.52 init
2 root 20 0 0 0 0 S 0.0 0.0 0:00.00 kthreadd
这个命令用于动态监控进程所占系统资源,每隔3秒变一次。这个命令的特点是把占用系统资源(CPU,内存,磁盘IO等)最高的进程放到最前面。top命令打印出了很多信息,包括系统负载(loadaverage)、进程数(Tasks)、cpu使用情况、内存使用情况以及交换分区使用情况。其实上面这些内容可以通过其他命令来查看,所以用top重点查看的还是下面的进程使用系统资源详细状况。这部分东西反映的东西还是比较多的,不过需要你关注的也就是几项:%CPU, %MEM, COMMAND 这些项目所代表的意义,不用阿铭介绍相信你也能看懂吧,RES 这一项为进程所占内存大小,而 %MEM 为使用内存百分比。在 top 状态下,按 “shift + m”, 可以按照内存使用大小排序。按数字 ‘1’ 可以列出各颗cpu的使用状态。
另外,阿铭经常用的一个命令 top -bn1 它表示非动态打印系统资源使用情况,可以用在shell脚本中:
[root@localhost ~]# top -bn1
top - 16:44:12 up 4:54, 3 users, load average: 0.54, 0.18, 0.05
Tasks: 78 total, 1 running, 77 sleeping, 0 stopped, 0 zombie
Cpu(s): 1.4%us, 3.3%sy, 0.0%ni, 93.3%id, 1.4%wa, 0.1%hi, 0.5%si, 0.0%st
Mem: 326616k total, 318672k used, 7944k free, 62704k buffers
Swap: 2097144k total, 588k used, 2096556k free, 177848k cached
PID USER PR NI VIRT RES SHR S %CPU %MEM TIME+ COMMAND
7236 root 20 0 2936 1220 624 D 7.8 0.4 0:03.22 ls
7237 root 20 0 2568 956 760 R 1.9 0.3 0:00.03 top
1 root 20 0 2900 800 652 S 0.0 0.2 0:01.52 init
2 root 20 0 0 0 0 S 0.0 0.0 0:00.00 kthreadd
3 root RT 0 0 0 0 S 0.0 0.0 0:00.00 migration/0
4 root 20 0 0 0 0 S 0.0 0.0 0:11.08 ksoftirqd/0
5 root RT 0 0 0 0 S 0.0 0.0 0:00.00 migration/0
6 root RT 0 0 0 0 S 0.0 0.0 0:00.94 watchdog/0
7 root 20 0 0 0 0 S 0.0 0.0 0:04.38 events/0
和 top 命令唯一的区别就是,它一次性全部把所有信息输出出来而非动态显示。
4. sar监控系统状态
sar 命令很强大,它可以监控系统所有资源状态,比如平均负载、网卡流量、磁盘状态、内存使用等等。它不同于其他系统状态监控工具的地方在于,它可以打印历史信息,可以显示当天从零点开始到当前时刻的系统状态信息。如果你系统没有安装这个命令,请使用 yum install -y sysstat 命令安装。初次使用sar命令会报错,那是因为sar工具还没有生成相应的数据库文件(时时监控就不会了,因为不用去查询那个库文件)。它的数据库文件在 “/var/log/sa/” 目录下,默认保存一个月。因为这个命令太过复杂,所以阿铭只介绍几个。
1)查看网卡流量 sar -n DEV
[root@localhost ~]# sar -n DEV
Linux 2.6.32-358.el6.i686 (localhost.localdomain) 2013年05月25日 _i686_ (1 CPU)
00时00分01秒 IFACE rxpck/s txpck/s rxkB/s txkB/s rxcmp/s txcmp/s rxmcst/s
00时10分01秒 lo 0.00 0.00 0.00 0.00 0.00 0.00 0.00
00时10分01秒 eth0 31.94 0.09 3.89 0.02 0.00 0.00 0.00
00时20分01秒 lo 0.00 0.00 0.00 0.00 0.00 0.00 0.00
00时20分01秒 eth0 32.40 0.04 3.96 0.01 0.00 0.00 0.00
00时30分01秒 lo 0.00 0.00 0.00 0.00 0.00 0.00 0.00
00时30分01秒 eth0 31.18 0.06 3.76 0.02 0.00 0.00 0.00
阿铭并没有把全部信息贴出来,因为太多了。 IFACE这列表示设备名称,rxpck/s 表示每秒进入收取的包的数量,txpck/s 表示每秒发送出去的包的数量,rxbyt/s 表示每秒收取的数据量(单位Byte),txbyt/s表示每秒发送的数据量。后面几列不需要关注。如果有一天你所管理的服务器丢包非常严重,那么你就应该看一看这个网卡流量是否异常了,如果rxpck/s 那一列的数值大于4000,或者rxbyt/s那列大于5,000,000则很有可能是被攻击了,正常的服务器网卡流量不会高于这么多,除非是你自己在拷贝数据。上面的命令是查看网卡流量历史的,如何时时查看网卡流量呢?
[root@localhost ~]# sar -n DEV 1 5
Linux 2.6.32-358.el6.i686 (localhost.localdomain) 2013年05月25日 _i686_ (1 CPU)
16时46分55秒 IFACE rxpck/s txpck/s rxkB/s txkB/s rxcmp/s txcmp/s rxmcst/s
16时46分56秒 lo 0.00 0.00 0.00 0.00 0.00 0.00 0.00
16时46分56秒 eth0 36.36 0.00 4.16 0.00 0.00 0.00 0.00
16时46分56秒 IFACE rxpck/s txpck/s rxkB/s txkB/s rxcmp/s txcmp/s rxmcst/s
16时46分57秒 lo 0.00 0.00 0.00 0.00 0.00 0.00 0.00
16时46分57秒 eth0 69.39 1.02 10.66 0.39 0.00 0.00 0.00
16时46分57秒 IFACE rxpck/s txpck/s rxkB/s txkB/s rxcmp/s txcmp/s rxmcst/s
16时46分58秒 lo 0.00 0.00 0.00 0.00 0.00 0.00 0.00
16时46分58秒 eth0 42.00 1.00 7.56 0.38 0.00 0.00 0.00
16时46分58秒 IFACE rxpck/s txpck/s rxkB/s txkB/s rxcmp/s txcmp/s rxmcst/s
16时46分59秒 lo 0.00 0.00 0.00 0.00 0.00 0.00 0.00
16时46分59秒 eth0 51.52 1.01 7.73 0.39 0.00 0.00 0.00
16时46分59秒 IFACE rxpck/s txpck/s rxkB/s txkB/s rxcmp/s txcmp/s rxmcst/s
16时47分00秒 lo 0.00 0.00 0.00 0.00 0.00 0.00 0.00
16时47分00秒 eth0 60.00 1.00 5.51 0.38 0.00 0.00 0.00
平均时间: IFACE rxpck/s txpck/s rxkB/s txkB/s rxcmp/s txcmp/s rxmcst/s
平均时间: lo 0.00 0.00 0.00 0.00 0.00 0.00 0.00
平均时间: eth0 51.81 0.81 7.11 0.31 0.00 0.00 0.00
另外也可以查看某一天的网卡流量历史,使用-f选项,后面跟文件名,如果你的系统格式Redhat或者CentOS那么sar的库文件一定是在/var/log/sa/目录下的。:
[root@localhost ~]# sar -n DEV -f /var/log/sa/sa24
Linux 2.6.32-358.el6.i686 (localhost.localdomain) 2013年05月24日 _i686_ (1 CPU)
10时49分36秒 LINUX RESTART
10时50分01秒 IFACE rxpck/s txpck/s rxkB/s txkB/s rxcmp/s txcmp/s rxmcst/s
11时00分01秒 lo 0.00 0.00 0.00 0.00 0.00 0.00 0.00
11时00分01秒 eth0 58.96 0.02 7.87 0.01 0.00 0.00 0.00
11时10分01秒 lo 0.00 0.00 0.00 0.00 0.00 0.00 0.00
11时10分01秒 eth0 61.36 0.34 8.29 0.05 0.00 0.00 0.00
11时20分01秒 lo 0.00 0.00 0.00 0.00 0.00 0.00 0.00
11时20分01秒 eth0 57.17 0.22 7.65 0.03 0.00 0.00 0.00
11时30分01秒 lo 0.00 0.00 0.00 0.00 0.00 0.00 0.00
11时30分01秒 eth0 54.99 0.05 7.03 0.01 0.00 0.00 0.00
11时40分01秒 lo 0.00 0.00 0.00 0.00 0.00 0.00 0.00
2)查看历史负载 sar -q
[root@localhost ~]# sar -q
Linux 2.6.32-358.el6.i686 (localhost.localdomain) 2013年05月25日 _i686_ (1 CPU)
00时00分01秒 runq-sz plist-sz ldavg-1 ldavg-5 ldavg-15
00时10分01秒 0 142 0.00 0.00 0.00
00时20分01秒 0 143 0.00 0.00 0.00
00时30分01秒 0 143 0.00 0.01 0.00
00时40分01秒 0 143 0.05 0.01 0.00
00时50分01秒 0 143 0.00 0.00 0.00
01时00分01秒 0 143 0.00 0.00 0.00
01时10分01秒 0 143 0.08 0.03 0.00
这个命令有助于我们查看服务器在过去的某个时间的负载状况。关于sar的介绍阿铭不愿写太多,毕竟介绍太多会给你带来更多的压力,其实阿铭介绍这个命令的目的只是让你学会查看网卡流量(这是非常有用的)。如果你很感兴趣那就man一下吧,它的用法太多了。
5. free查看内存使用状况
[root@localhost ~]# free
total used free shared buffers cached
Mem: 326616 137332 189284 0 34480 73336
-/+ buffers/cache: 29516 297100
Swap: 2097144 1144 2096000
只需要敲一个 free 然后回车就可以当前系统的总内存大小以及使用内存的情况。从上例中可看到当前系统内存总大小为326616(单位是k)已经使用137332, 剩余189284. 其实真正剩余并不是这个189284, 而是第二行的297100, 真正使用的也是第二行的29516, 这是因为系统初始化时,就已经分配出很大一部分内存给缓存,这部分缓存用来随时提供给程序使用,如果程序不用,那这部分内存就空闲。所以,查看内存使用多少,剩余多少请看第二行的数据。另外我们还可以加-m 或者-g选项分别以M或G为单位打印内存使用状况:
[root@localhost ~]# free -m
total used free shared buffers cached
Mem: 318 135 183 0 34 72
-/+ buffers/cache: 28 290
Swap: 2047 1 2046
6. ps 查看系统进程
作为系统管理员,一定要知道你所管理的系统都有那些进程在运行,在windows下只要打开任务管理器即可查看。在linux下呢?其实在上面介绍的top命令就可以,但是不容易看,当然还有专门显示系统进程的命令:
[root@localhost ~]# ps aux
USER PID %CPU %MEM VSZ RSS TTY STAT START TIME COMMAND
root 1 0.0 0.2 2900 852 ? Ss 11:49 0:01 /sbin/init
root 2 0.0 0.0 0 0 ? S 11:49 0:00 [kthreadd]
root 3 0.0 0.0 0 0 ? S 11:49 0:00 [migration/0]
root 4 0.0 0.0 0 0 ? S 11:49 0:11 [ksoftirqd/0]
root 5 0.0 0.0 0 0 ? S 11:49 0:00 [migration/0]
root 6 0.0 0.0 0 0 ? S 11:49 0:00 [watchdog/0]
root 7 0.0 0.0 0 0 ? S 11:49 0:04 [events/0]
root 8 0.0 0.0 0 0 ? S 11:49 0:00 [cgroup]
root 9 0.0 0.0 0 0 ? S 11:49 0:00 [khelper]
阿铭也经常看到有的人喜欢用 ps -elf 大同小异,显示的信息基本上是一样的。ps命令还有更多的用法,阿铭不再做介绍,因为你只要会用这个命令就足够了,请man一下。下面介绍几个参数的意义。
PID :进程的id,这个id很有用,在linux中内核管理进程就得靠pid来识别和管理某一个程,比如我想终止某一个进程,则用 ‘kill 进程的pid 有时并不能杀掉,则需要加一个-9选项了 kill -9 进程pid
STAT :表示进程的状态,进程状态分为以下几种(不要求记住,但要了解)
D 不能中断的进程(通常为IO)
R 正在运行中的进程
S 已经中断的进程,通常情况下,系统中大部分进程都是这个状态
T 已经停止或者暂停的进程,如果我们正在运行一个命令,比如说 sleep 10 如果我们按一下ctrl -z 让他暂停,那么我们用ps查看就会显示T这个状态
W 这个好像是说,从内核2.6xx 以后,表示为没有足够的内存页分配
X 已经死掉的进程(这个好像从来不会出现)
Z 僵尸进程,杀不掉,打不死的垃圾进程,占系统一小点资源,不过没有关系。如果太多,就有问题了。一般不会出现。
< 高优先级进程
N 低优先级进程
L 在内存中被锁了内存分页
s 主进程
l 多线程进程
+ 代表在前台运行的进程
这个ps命令是阿铭在工作中用的非常多的命令之一,所以请记住它吧。关于ps命令的使用,阿铭经常会连同管道符一起使用,用来查看某个进程或者它的数量。
[root@localhost ~]# ps aux |grep -c mingetty
6
[root@localhost ~]# ps aux |grep mingetty
root 952 0.0 0.1 2008 440 tty2 Ss+ 11:49 0:00 /sbin/mingetty /dev/tty2
root 954 0.0 0.1 2008 440 tty3 Ss+ 11:49 0:00 /sbin/mingetty /dev/tty3
root 956 0.0 0.1 2008 440 tty4 Ss+ 11:49 0:00 /sbin/mingetty /dev/tty4
root 958 0.0 0.1 2008 436 tty5 Ss+ 11:49 0:00 /sbin/mingetty /dev/tty5
root 960 0.0 0.1 2008 444 tty6 Ss+ 11:49 0:00 /sbin/mingetty /dev/tty6
root 8440 0.0 0.2 5984 732 pts/3 S+ 17:12 0:00 grep mingetty
上面的6不对,需要减掉1,因为使用grep命令时,grep命令本身也算作了一个。
7. netstat 查看网络状况
[root@localhost ~]# netstat -lnp
Active Internet connections (only servers)
Proto Recv-Q Send-Q Local Address Foreign Address State PID/Program name
tcp 0 0 0.0.0.0:22 0.0.0.0:* LISTEN 929/sshd
tcp 0 0 :::80 :::* LISTEN 25005/httpd
tcp 0 0 :::22 :::* LISTEN 929/sshd
udp 0 0 0.0.0.0:68 0.0.0.0:* 1597/dhclient
Active UNIX domain sockets (only servers)
Proto RefCnt Flags Type State I-Node PID/Program name Path
unix 2 [ ACC ] STREAM LISTENING 6783 1/init @/com/ubuntu/upstart
netstat命令用来打印网络连接状况、系统所开放端口、路由表等信息。阿铭最常用的关于netstat的命令就是这个 netstat -lnp (打印当前系统启动哪些端口)以及 netstat -an (打印网络连接状况)这两个命令非常有用,请一定要记住。
[root@localhost ~]# netstat -an
Active Internet connections (servers and established)
Proto Recv-Q Send-Q Local Address Foreign Address State
tcp 0 0 0.0.0.0:22 0.0.0.0:* LISTEN
tcp 0 0 10.72.137.159:22 10.72.137.53:50507 ESTABLISHED
tcp 0 52 10.72.137.159:22 10.72.137.53:50827 ESTABLISHED
tcp 0 0 :::80 :::* LISTEN
tcp 0 0 :::22 :::* LISTEN
udp 0 0 0.0.0.0:68 0.0.0.0:*
Active UNIX domain sockets (servers and established)
Proto RefCnt Flags Type State I-Node Path
unix 2 [ ACC ] STREAM LISTENING 6783 @/com/ubuntu/upstart
unix 2 [ ] DGRAM 6953 @/org/kernel/udev/udevd
unix 3 [ ] DGRAM 6973
unix 3 [ ] DGRAM 6972
如果你所管理的服务器是一台提供web服务(80端口)的服务器,那么你就可以使用 netstat -an |grep 80 查看当前连接web服务的有哪些IP了。
抓包工具tcpdump
有时候,也许你会有这样的需求,想看一下某个网卡上都有哪些数据包,尤其是当你初步判定你的服务器上有流量攻击。这时,使用抓包工具来抓一下数据包,就可以知道有哪些IP在攻击你了。
[root@localhost ~]# tcpdump -nn -i eth0
tcpdump: verbose output suppressed, use -v or -vv for full protocol decode
listening on eth0, link-type EN10MB (Ethernet), capture size 65535 bytes
19:13:56.689147 IP 10.72.137.159.22 > 10.72.137.53.50827: Flags [P.], seq 2793829986:2793830182, ack 1384443306, win 1067, length 196
19:13:56.691389 IP 10.72.137.159.22 > 10.72.137.53.50827: Flags [P.], seq 196:376, ack 1, win 1067, length 180
19:13:56.691541 IP 10.72.137.53.50827 > 10.72.137.159.22: Flags [.], ack 376, win 16266, length 0
19:13:56.694499 IP 10.72.137.159.22 > 10.72.137.53.50827: Flags [P.], seq 376:636, ack 1, win 1067, length 260
19:13:56.695659 IP 10.72.137.159.22 > 10.72.137.53.50827: Flags [P.], seq 636:800, ack 1, win 1067, length 164
19:13:56.695793 IP 10.72.137.53.50827 > 10.72.137.159.22: Flags [.], ack 800, win 16160, length 0
19:13:56.698429 IP 10.72.137.159.22 > 10.72.137.53.50827: Flags [P.], seq 800:1060, ack 1, win 1067, length 260
19:13:56.700332 IP 10.72.137.159.22 > 10.72.137.53.50827: Flags [P.], seq 1060:1224, ack 1, win 1067, length 164
19:13:56.700419 IP 10.72.137.53.50827 > 10.72.137.159.22: Flags [.], ack 1224, win 16425, length 0
如果没有tcpdump 这个命令,需要用 yum install -y tcpdump 命令去安装一下。上例中第三列和第四列显示的信息为哪一个IP+port在连接哪一个IP+port,后面的信息是该数据包的相关信息,如果不懂也没有关系,毕竟我们不是专门搞网络的,而这里需要关注的只是第三列以及第四列。-i 选项后面跟设备名称,如果你想抓eth1网卡的包,后面则要跟eth1.至于-nn选项的作用是让第三列和第四列显示成IP+端口号的形式,如果不加-nn则显示的是主机名+服务名称。
Linux网络相关
1. ifconfig 查看网卡IP
ifconfig类似与windows的ipconfig,不加任何选项和参数只打印当前网卡的IP相关信息(子网掩码、网关等)在之前的章节中阿铭曾经介绍过它。在windows下设置IP非常简单,然而在命令窗口下如何设置?这就需要去修改配置文件/etc/sysconfig/network-scripts/ifcfg-eth0了,如果是eth1那么配置文件是/etc/sysconfig/network-scripts/ifcfg-eth1.
如果Linux上有多个网卡,而只想重启某一个网卡的话,可以使用这个命令:
[root@localhost ~]# ifdown eth0; ifup eth0
ifdown 即停掉网卡,ifup即启动网卡。有一点要提醒你的是,如果我们远程登录服务器,当使用ifdown eth0这个命令的时候,很有可能后面的命令ifup eth0不会被运行,这样导致我们断网而无法连接服务器,所以请尽量使用 service network restart 这个命令来重启网卡。
2. 给一个网卡设定多个IP
在linux系统中,网卡是可以设定多重IP的,阿铭曾经管理的一台服务器的eth1就设定了5个IP,实在是够变态的。
[root@localhost ~]# cd /etc/sysconfig/network-scripts/
[root@localhost network-scripts]# cp ifcfg-eth0 ifcfg-eth0\:1
然后编辑ifcfg-eth0:1 这个配置文件,内容如下,一定要注意 DEVICE 这里要写成 “eth0:1”
[root@localhost network-scripts]# cat ifcfg-eth0\:1
DEVICE=eth0:1
HWADDR=00:0C:29:D9:F0:52
TYPE=Ethernet
UUID=a5442526-0329-421d-86cf-8d7f16d01374
ONBOOT=yes
BOOTPROTO=none
IPADDR=192.168.80.5
NETMASK=255.255.255.0
GATEWAY=192.168.80.2
NM_CONTROLLED=yes
编辑好后,重启网卡:
[root@localhost network-scripts]# ifdown eth0 && ifup eth0
之后再查看网卡ip:
[root@localhost network-scripts]# ifconfig
eth0 Link encap:Ethernet HWaddr 00:0C:29:D9:F0:52
inet addr:10.72.137.159 Bcast:10.72.137.255 Mask:255.255.255.0
inet6 addr: fe80::20c:29ff:fed9:f052/64 Scope:Link
UP BROADCAST RUNNING MULTICAST MTU:1500 Metric:1
RX packets:2587605 errors:2 dropped:0 overruns:0 frame:0
TX packets:773070 errors:0 dropped:0 overruns:0 carrier:0
collisions:0 txqueuelen:1000
RX bytes:1934306928 (1.8 GiB) TX bytes:54602387 (52.0 MiB)
Interrupt:18 Base address:0x1080
eth0:1 Link encap:Ethernet HWaddr 00:0C:29:D9:F0:52
inet addr:192.168.80.5 Bcast:192.168.80.255 Mask:255.255.255.0
UP BROADCAST RUNNING MULTICAST MTU:1500 Metric:1
Interrupt:18 Base address:0x1080
lo Link encap:Local Loopback
inet addr:127.0.0.1 Mask:255.0.0.0
inet6 addr: ::1/128 Scope:Host
UP LOOPBACK RUNNING MTU:16436 Metric:1
RX packets:39 errors:0 dropped:0 overruns:0 frame:0
TX packets:39 errors:0 dropped:0 overruns:0 carrier:0
collisions:0 txqueuelen:0
RX bytes:16066 (15.6 KiB) TX bytes:16066 (15.6 KiB)
可以看到多了一个ip.
3. 查看网卡连接状态
[root@localhost ~]# mii-tool eth0
SIOCGMIIPHY on 'eth0' failed: Operation not supported
如果是在服务器上不会显示成这样的,由于是虚拟机所以显示 “not supported”, 如果是真机应该显示如下内容:
[root@db-dd sphinx]# mii-tool eth0
eth0: negotiated 100baseTx-FD, link ok
只要看到 “link ok” 就说明网卡为连接状态,如果显示 “no link” 说明网卡坏掉了或者没有连接网线。
4. 更改主机名
当装完系统后,默认主机名为localhost,使用hostname就可以知道你的linux的主机名是什么:
[root@localhost ~]# hostname
localhost.localdomain
同样使用hostname可以更改你的主机名:
[root@localhost ~]# hostname Aming
[root@localhost ~]# hostname
Aming
下次登录时就会把命令提示符 [root@localhost ~] 中的 localhost 更改成 Aming 不过这样修改只是保存在内存中,下次重启还会变成未改之前的主机名,所以需要你还要去更改相关的配置文件 “/etc/sysconfig/network”
[root@localhost ~]# vim /etc/sysconfig/network
NETWORKING=yes
HOSTNAME=Aming.localdomain
5. 设置DNS
DNS是用来解析域名用的,平时我们访问网站都是直接输入一个网址,而dns把这个网址解析到一个IP。关于dns的概念,如果你很陌生的话,那就去网上查一下吧。在linux下面设置dns非常简单,只要把dns地址写到一个配置文件中即可。这个配置文件就是/etc/resolv.conf
[root@localhost ~]# vim /etc/resolv.conf
; generated by /sbin/dhclient-script
nameserver 202.106.46.151
resolv.conf有它固有的格式,一定要写成 “nameserver IP” 的格式,上面那行以 ‘;’ 为开头的行是一行注释,没有实际意义,建议写两个或多个namserver ,默认会用第一个namserver去解析域名,当第一个解析不到时会使用第二个。在linux下面有一个特殊的文件/etc/hosts也能解析域名,不过是需要我们手动在里面添加IP+域名这些内容,它的作用是临时解析某个域名,非常有用。
[root@localhost ~]# vim /etc/hosts
127.0.0.1 localhost localhost.localdomain localhost4 localhost4.localdomain4
::1 localhost localhost.localdomain localhost6 localhost6.localdomain6
192.168.1.111 www.baidu.com
保存后,再ping一下 www.baidu.com 就会到 192.168.1.111 了:
[root@localhost ~]# ping www.baidu.com
PING www.baidu.com (192.168.1.111) 56(84) bytes of data.
/etc/hosts 的格式很简单,每一行作为一条记录,分成两部分,第一部分是IP,第二部分是域名。关于hosts文件,有几点需要你注意:
1)一个IP后面可以跟多个域名,可以是几十个甚至上百个;
2)每行只能有一个IP,也就是说一个域名不能对应多个IP;
3)如果有多行中出现相同的域名(前面IP不一样),会按最前面出现的记录来解析。
Linux的防火墙
1. selinux
Selinux是Redhat/CentOS系统特有的安全机制。不过因为这个东西限制太多,配置也特别繁琐所以几乎没有人去真正应用它。所以装完系统,我们一般都要把selinux关闭,以免引起不必要的麻烦。关闭selinux的方法为,使 “SELINUX=disabled”, 默认为 enforcing
[root@localhost ~]# vim /etc/selinux/config
# This file controls the state of SELinux on the system.
# SELINUX= can take one of these three values:
# enforcing - SELinux security policy is enforced.
# permissive - SELinux prints warnings instead of enforcing.
# disabled - No SELinux policy is loaded.
SELINUX=disabled
# SELINUXTYPE= can take one of these two values:
# targeted - Targeted processes are protected,
# mls - Multi Level Security protection.
SELINUXTYPE=targeted
保存该配置文件后,重启机器方可生效,临时关闭selinux的命令为:
[root@localhost ~]# setenforce 0
我们可以使用 getenforce 命令获得当前selinux的状态:
[root@localhost ~]# getenforce
Disabled
阿铭的selinux早就关闭了,默认会输出 “enforcing” , 当使用 setenforce 0 这个命令后,再 getenforce 会输出 “permissive”
2. iptables
Iptables是linux上特有的防火墙机制,其功能非常强大,然而阿铭在日常的管理工作中仅仅用到了一两个应用,这并不代表iptables不重要。作为一个网络管理员,iptables是必要要熟练掌握的。但是作为系统管理员,我们也应该会最基本的iptables操作,认识iptables的基本规则。
CentOS上默认是设有iptables规则的,这个规则虽然很安全,但是对于我们来说没有用,反而会造成某些影响,所以阿铭建议你先清除规则,然后把清除后的规则保存一下:
[root@localhost ~]# iptables -nvL
Chain INPUT (policy ACCEPT 0 packets, 0 bytes)
pkts bytes target prot opt in out source
destination
400 176K ACCEPT all -- * * 0.0.0.0/0 0.0.0.0/0
state RELATED,ESTABLISHED
0 0 ACCEPT icmp -- * * 0.0.0.0/0 0.0.0.0/0
0 0 ACCEPT all -- lo * 0.0.0.0/0 0.0.0.0/0
1 52 ACCEPT tcp -- * * 0.0.0.0/0 0.0.0.0/0
state NEW tcp dpt:22
3 234 REJECT all -- * * 0.0.0.0/0 0.0.0.0/0
reject-with icmp-host-prohibited
Chain FORWARD (policy ACCEPT 0 packets, 0 bytes)
pkts bytes target prot opt in out source
destination
0 0 REJECT all -- * * 0.0.0.0/0 0.0.0.0/0
reject-with icmp-host-prohibited
Chain OUTPUT (policy ACCEPT 167 packets, 16963 bytes)
pkts bytes target prot opt in out source
destination
[root@localhost ~]# iptables -F; /etc/init.d/iptables save
iptables:将防火墙规则保存到 /etc/sysconfig/iptables: [确定]
-nvL 就是查看规则, -F 是把当前规则清除,但这个只是临时的,重启系统或者重启 iptalbes 服务后还会加载已经保存的规则,所以需要使用 /etc/init.d/iptables save 保存一下规则,通过上边的命令输出我们也可以看到,防火墙规则保存在了/etc/sysconfig/iptables 你可以查看一下这个文件。
1)iptalbes的三个表
filter 这个表主要用于过滤包的,是系统预设的表,这个表也是阿铭用的最多的。内建三个链INPUT、OUTPUT以及FORWARD。INPUT作用于进入本机的包;OUTPUT作用于本机送出的包;FORWARD作用于那些跟本机无关的包。
nat 主要用处是网络地址转换,也有三个链。PREROUTING 链的作用是在包刚刚到达防火墙时改变它的目的地址,如果需要的话。OUTPUT链改变本地产生的包的目的地址。POSTROUTING链在包就要离开防火墙之前改变其源地址。该表阿铭用的不多,但有时候会用到。
mangle 这个表主要是用于给数据包打标记,然后根据标记去操作哪些包。这个表几乎不怎么用。除非你想成为一个高级网络工程师,否则你就没有必要花费很多心思在它上面。
2)iptables 基本语法
A. 查看规则以及清除规则
[root@localhost ~]# iptables -t nat -nvL
Chain PREROUTING (policy ACCEPT 0 packets, 0 bytes)
pkts bytes target prot opt in out source destination
Chain POSTROUTING (policy ACCEPT 0 packets, 0 bytes)
pkts bytes target prot opt in out source destination
Chain OUTPUT (policy ACCEPT 0 packets, 0 bytes)
pkts bytes target prot opt in out source destination
-t 后面跟表名,-nvL 即查看该表的规则,其中-n表示不针对IP反解析主机名;-L表示列出的意思;而-v表示列出的信息更加详细。如果不加-t ,则打印filter表的相关信息:
[root@localhost ~]# iptables -nvL
Chain INPUT (policy ACCEPT 0 packets, 0 bytes)
pkts bytes target prot opt in out source destination
Chain FORWARD (policy ACCEPT 0 packets, 0 bytes)
pkts bytes target prot opt in out source destination
Chain OUTPUT (policy ACCEPT 0 packets, 0 bytes)
pkts bytes target prot opt in out source destination
这个和-t filter 打印的信息是一样的。
关于清除规则的命令中,阿铭用的最多就是:
[root@localhost ~]# iptables -F
[root@localhost ~]# iptables -Z
不加-t默认是针对表filter来操作的,-F 表示把所有规则全部删除;-Z表示把包以及流量计数器置零(这个阿铭认为很有用)。
B. 增加/删除一条规则
# iptables -A INPUT -s 10.72.11.12 -p tcp --sport 1234 -d 10.72.137.159 --dport 80 -j DROP
这就是增加了一条规则,省略-t所以针对的是filter表。-A 表示增加一条规则,另外还有-I 表示插入一条规则,-D删除一条规则;后面的INPUT即链名称,还可以是OUTPUT或者FORWORD;-s 后跟源地址;-p 协议(tcp, udp, icmp); --sport/--dport 后跟源端口/目标端口;-d 后跟目的IP(主要针对内网或者外网);-j 后跟动作(DROP即把包丢掉,REJECT即包拒绝;ACCEPT即允许包)。这样讲可能很乱,那阿铭多举几个例子来帮你理解:
[root@localhost ~]# iptables -I INPUT -s 1.1.1.1 -j DROP
上例表示:插入一条规则,把来自1.1.1.1的所有数据包丢掉。
[root@localhost ~]# iptables -D INPUT -s 1.1.1.1 -j DROP
删除刚刚插入的规则。注意要删除一条规则时,必须和插入的规则一致,也就是说,两条iptables命令,除了-I 和-D不一样外,其他地方都一样。
[root@localhost ~]# iptables -I INPUT -s 2.2.2.2 -p tcp --dport 80 -j DROP
上例表示把来自2.2.2.2 并且是tcp协议到本机的80端口的数据包丢掉。这里要说的是,--dport/--sport 必须要和-p选项一起使用,否则会出错。
[root@localhost ~]# iptables -I OUTPUT -p tcp --dport 22 -d 10.0.2.34 -j DROP
这条规则表示,把发送到10.0.2.34的22端口的数据包丢掉。
至于FORWORD链的应用阿铭几乎没有用到过,所以不再举例。再总结一下各个选项的作用:
-A/-D :增加删除一条规则;
-I :插入一条规则,其实跟-A的效果一样;
-p :指定协议,可以是tcp,udp或者icmp;
--dport :跟-p一起使用,指定目标端口;
--sport :跟-p一起使用,指定源端口;
-s :指定源IP(可以是一个ip段);
-d :指定目的IP(可以是一个ip段);
-j :后跟动作,其中ACCEPT表示允许包,DROP表示丢掉包,REJECT表示拒绝包;
-i :指定网卡(不常用,但有时候能用到);
[root@localhost ~]# iptables -A INPUT -s 192.168.1.0/24 -i eth0 -j ACCEPT
[root@localhost ~]# iptables -nvL |grep '192.168.1.0/24'
0 0 ACCEPT all -- eth0 * 192.168.1.0/24 0.0.0.0/0
上例中表示,把来自192.168.1.0/24这个网段的并且作用在eth0上的包放行。有时候你的服务器上iptables过多了,想删除某一条规则时,又不容易掌握当时创建时的规则。其实有一种比较简单的方法:
[root@localhost ~]# iptables -nvL --line-numbers
Chain INPUT (policy ACCEPT 133 packets, 9740 bytes)
num pkts bytes target prot opt in out source destination
1 0 0 ACCEPT all -- eth0 * 192.168.1.0/24 0.0.0.0/0
删除某一条规则使用如下命令:
[root@localhost ~]# iptables -D INPUT 1
-D 后跟链名,然后是规则num,这个num就是查看iptables规则时第一列的值。再次查看刚才的规则,已经没有了:
[root@localhost ~]# iptables -nvL --line-numbers
iptables还有一个选项经常用到,-P(大写)选项,表示预设策略。用法如下:
[root@localhost ~]# iptables -P INPUT DROP
-P后面跟链名,策略内容或者为DROP或者为ACCEPT,默认是ACCEPT。注意:如果你在连接远程服务器,千万不要随便敲这个命令,因为一旦你敲完回车你就会断掉。
这个策略一旦设定后,只能使用 iptables -P INPUT ACCEPT 才能恢复成原始状态,而不能使用-F参数。下面阿铭针对一个小需求讲述一下这个iptables规则如何设定。
需求:只针对filter表,预设策略INPUT链DROP,其他两个链ACCEPT,然后针对192.168.137.0/24开通22端口,对所有网段开放80端口,对所有网段开放21端口。这个需求不算复杂,但是因为有多条规则,所以最好写成脚本的形式。脚本内容如下:
[root@localhost ~]# cat /usr/local/sbin/iptables.sh
#! /bin/bash
ipt="/sbin/iptables"
$ipt -F
$ipt -P INPUT DROP
$ipt -P OUTPUT ACCEPT
$ipt -P FORWARD ACCEPT
$ipt -A INPUT -s 192.168.137.0/24 -p tcp --dport 22 -j ACCEPT
$ipt -A INPUT -p tcp --dport 80 -j ACCEPT
$ipt -A INPUT -p tcp --dport 21 -j ACCEPT
完成脚本的编写后,直接运行 /bin/sh /usr/local/sbin/iptables.sh 即可。如果想开机启动时初始化防火墙规则,则需要在 /etc/rc.d/rc.local 中添加一行 “/bin/sh /usr/local/sbin/iptables.sh”
[root@localhost ~]# sh /usr/local/sbin/iptables.sh
[root@localhost ~]# iptables -nvL
Chain INPUT (policy DROP 0 packets, 0 bytes)
pkts bytes target prot opt in out source destination
20 1580 ACCEPT tcp -- * * 192.168.137.0/24 0.0.0.0/0 tcp dpt:22
0 0 ACCEPT tcp -- * * 0.0.0.0/0 0.0.0.0/0 tcp dpt:80
0 0 ACCEPT tcp -- * * 0.0.0.0/0 0.0.0.0/0 tcp dpt:21
运行脚本后,查看规则就是这样的,可以看到阿铭的第一条规则中已经有20个包(第一列)被放行过了。
关于icmp的包有一个比较常见的应用:
[root@localhost ~]# iptables -I INPUT -p icmp --icmp-type 8 -j DROP
--icmp-type 这个选项是要跟-p icmp 一起使用的,后面指定类型编号。这个8指的是能在本机ping通其他机器,而其他机器不能ping通本机。这个有必要记一下。
C. nat表的应用
其实,linux的iptables功能是十分强大的,阿铭曾经的一个老师这样形容linux的网络功能:只有想不到没有做不到!也就是说只要你能够想到的关于网络的应用,linux都能帮你实现。在日常生活中相信你接触过路由器吧,它的功能就是分享上网。本来一根网线过来(其实只有一个公网IP),通过路由器后,路由器分配了一个网段(私网IP),这样连接路由器的多台pc都能连接intnet而远端的设备认为你的IP就是那个连接路由器的公网IP。这个路由器的功能其实就是由linux的iptables实现的,而iptables又是通过nat表作用而实现的这个功能。
至于具体的原理以及过程,阿铭不阐述,请查看相关资料。在这里举一个例子来说明iptables如何实现的这个功能。假设你的机器上有两块网卡eth0和eth1,其中eth0的IP为10.0.2.68 ,eth1的IP为192.168.1.1 。eth0连接了intnet 但eth1没有连接,现在有另一台机器(192.168.1.2)和eth1是互通的,那么如何设置也能够让连接eth1的这台机器能够连接intnet(即能和10.0.2.68互通)?
[root@localhost ~]# echo "1" > /proc/sys/net/ipv4/ip_forward
[root@localhost ~]# iptables -t nat -A POSTROUTING -s 192.168.1.0/24 -o eth0 -j MASQUERADE
就是这样简单的两条命令就能实现上面的需求。第一个命令涉及到了内核参数相关的配置文件,它的目的是为了打开路由转发功能,否则无法实现我们的应用。第二个命令则是iptables对nat表做了一个IP转发的操作,-o 选项后跟设备名,表示出口的网卡,MASQUERADE表示伪装的意思。 关于nat表,阿铭不想讲太多内容,你只要学会这个路由转发即可。其他的东西交给网络工程师去学习吧,毕竟你将来可是要做linux系统工程师的。
D. 保存以及备份iptalbes规则
刚才在上面的内容中阿铭也提到了,咱们设定的防火墙规则只是保存在内存中,并没有保存到某一个文件中,也就说当系统重启后以前设定的规则就没有了,所以设定好规则后要先保存一下。
[root@localhost ~]# service iptables save
iptables:将防火墙规则保存到 /etc/sysconfig/iptables: [确定]
它会提示防火墙规则保存在了/etc/sysconfig/iptables文件内,这个文件就是iptables的配置文件了。所以日后,如果你遇到备份防火墙规则的任务,其实就是要拷贝一份这个文件的副本。
有时,我们会需要把防火墙所有规则都清除,使用 iptables -F 命令虽然可以,但是最好的办法是把防火墙服务停止:
[root@localhost ~]# service iptables stop
iptables:清除防火墙规则: [确定]
iptables:将链设置为政策 ACCEPT:nat filter [确定]
iptables:正在卸载模块: [确定]
这样防火墙就失效了,但是一旦重新设定规则后(哪怕只有一条),防火墙服务会自动开启。下面阿铭介绍给你一个用来备份防火墙规则的命令:
[root@localhost ~]# sh /usr/local/sbin/iptables.sh
[root@localhost ~]# iptables-save > myipt.rule
[root@localhost ~]# cat myipt.rule
# Generated by iptables-save v1.4.7 on Sat Jun 1 18:14:03 2013
*filter
:INPUT DROP [0:0]
:FORWARD ACCEPT [0:0]
:OUTPUT ACCEPT [50:4528]
-A INPUT -s 192.168.137.0/24 -p tcp -m tcp --dport 22 -j ACCEPT
-A INPUT -p tcp -m tcp --dport 80 -j ACCEPT
-A INPUT -p tcp -m tcp --dport 21 -j ACCEPT
COMMIT
# Completed on Sat Jun 1 18:14:03 2013
先执行一下刚才我们写的iptables脚本,使用 iptables-save 命令重定向到一个文件里。要想恢复这些规则使用下面的命令即可:
[root@localhost ~]# iptables-restore < myipt.rule
linux系统的任务计划
这部分内容太重要了,其实大部分系统管理工作都是通过定期自动执行某一个脚本来完成的,那么如何定期执行某一个脚本呢?这就要借助linux的cron功能了。
关于cron任务计划功能的操作都是通过crontab这个命令来完成的。其中常用的选项有:
-u :指定某个用户,不加-u选项则为当前用户;
-e :制定计划任务;
-l :列出计划任务;
-r :删除计划任务。
阿铭要创建第一个任务计划了:
[root@localhost ~]# crontab -e
no crontab for root - using an empty one
使用 crontab -e 来进行编写任务计划,这实际上是使用vim工具打开了crontab的配置文件,我们写下如下内容:
01 10 05 06 3 echo "ok" > /root/cron.log
每个字段的数字分表表示什么呢?从左到右,依次为:分,时,日,月,周,命令行。而上面的例子的含义是:在6月5日(这一天必须是星期3)的10点01分执行命令 echo "ok" > /root/cron.log
crontab -e 实际上是打开了 “/var/spool/cron/username” (如果是root则打开的是/var/spool/cron/root)这个文件。使用的是vim编辑器,所以要保存的话则在命令模式下输入:wq即可。但是,你千万不要直接去编辑那个文件,因为可能会出错,所以一定要使用 crontab -e 来编辑。查看已经设定的任务计划使用 crontab -l 命令:
[root@localhost ~]# crontab -l
01 10 05 06 3 echo "ok" > /root/cron.log
删除计划任务要用 crontab -r
[root@localhost ~]# crontab -r
[root@localhost ~]# crontab -l
no crontab for root
cron的内容不算太难,但是需要你牢固掌握,阿铭给出一些练习题,帮助你熟悉这个cron的应用。
- 每天凌晨1点20分清除/var/log/slow.log这个文件
- 每周日3点执行 “/bin/sh /usr/local/sbin/backup.sh”
- 每月14号4点10分执行 “/bin/sh /usr/local/sbin/backup_month.sh”
- 每隔8小时执行 “ntpdate time.windows.com”
- 每天的1点,12点,18点执行 “/bin/sh /usr/local/sbin/test.sh”
- 每天的9点到18点执行 “/bin/sh /usr/local/sbin/test2.sh”
习题答案:
1. 20 1 * * * echo "" >/var/log/slow.log
2. 0 3 * * 0 /bin/sh /usr/local/sbin/backup.sh
3. 10 4 14 * * /bin/sh /usr/local/sbin/backup_month.sh
4. 0 */8 * * * ntpdate time.windows.com
5. 0 1,12,18 * * * /bin/sh /usr/local/sbin/test.sh
6. 0 9-18 * * * /bin/sh /usr/local/sbin/test2.sh
练习完上面的题目,相信你会有一些小疑问,这里要简单说一下,每隔8小时,就是用全部小时(0-23)去除以8,仔细想一下结果,其实算出来应该是0,8,16三个数。当遇到多个数(分钟、小时、月、周)例如第5题,则需要用逗号隔开。而时间段是可以用 n-m 的方式表示的,比如第六题中的(9-18)。等设置好了所有的计划任务后需要查看一下crond服务是否启动:
[root@localhost ~]# service crond status
crond (pid 945) 正在运行...
如果是停止状态,则需要启动它:
[root@localhost ~]# service crond status
crond 已停
[root@localhost ~]# service crond start
正在启动 crond: [确定]
linux的系统服务管理
如果你对windows非常熟悉的话,相信你肯定配置过开机启动的服务,有些服务我们日常用不到则要把它停掉,一来可以节省资源,二来可以减少安全隐患。在linux上同样也有相关的工具来管理系统的服务。
1. ntsysv服务配置工具
用来配置哪些服务开启或者关闭,有点类似图形界面,不过是使用键盘来控制的。如果没有这个命令请使用yum install -y ntsysv 安装它。安装好后,直接运行命令 ntsysv 回车后弹出一个配置界面:
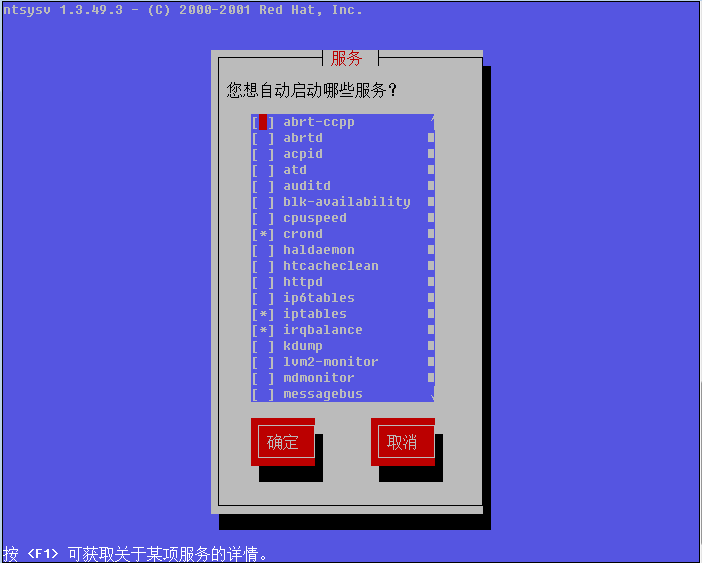
按键盘的上下方向键可以调节红色光标,按空格可以选择开启或者不开启,如果前面的中括号内显示有 * 则表示开启否则不开启。通过这个工具也可以看到目前系统中所有的服务。建议除 “crond, iptables, network, sshd, syslog, irqbalance, sendmail, microcode_ctl” 外其他服务全部停掉。选择好后,按 “tab” 键选择 “确定”, 然后回车,需要重启机器才能生效。
2. chkconfig服务管理工具
Linux系统所有的预设服务可以查看/etc/init.d/目录得到:
[root@localhost ~]# ls /etc/init.d/
abrt-ccpp cpuspeed ip6tables mdmonitor postfix sandbox
abrtd crond iptables messagebus psacct
saslauthd
abrt-oops functions irqbalance netconsole quota_nld single
acpid haldaemon kdump netfs rdisc smartd
atd halt killall network restorecond sshd
auditd htcacheclean lvm2-lvmetad ntpd rngd sysstat
blk-availability httpd lvm2-monitor ntpdate rsyslog udev-post
其实这就是系统所有的预设服务了。为什么这样讲,因为系统预设服务都是可以通过这样的命令实现service 服务名 start|stop|restart 这里的服务名就是/etc/init.d/目录下的这些文件了。除了可以使用service crond start 启动crond外,还可以使用 /etc/init.d/crond start 来启动。
言归正传,我们可以使用 chkconfig --list 列出所有的服务以及每个级别是否开启:
[root@localhost ~]# chkconfig --list
abrt-ccpp 0:关闭 1:关闭 2:关闭 3:关闭 4:关闭 5:启用 6:关闭
abrtd 0:关闭 1:关闭 2:关闭 3:关闭 4:关闭 5:启用 6:关闭
acpid 0:关闭 1:关闭 2:启用 3:关闭 4:启用 5:启用 6:关闭
atd 0:关闭 1:关闭 2:关闭 3:关闭 4:启用 5:启用 6:关闭
auditd 0:关闭 1:关闭 2:启用 3:关闭 4:启用 5:启用 6:关闭
blk-availability 0:关闭 1:启用 2:启用 3:关闭 4:启用 5:启用 6:关闭
cpuspeed 0:关闭 1:启用 2:启用 3:关闭 4:启用 5:启用 6:关闭
crond 0:关闭 1:关闭 2:启用 3:启用 4:启用 5:启用 6:关闭
haldaemon 0:关闭 1:关闭 2:关闭 3:关闭 4:启用 5:启用 6:关闭
htcacheclean 0:关闭 1:关闭 2:关闭 3:关闭 4:关闭 5:关闭 6:关闭
httpd 0:关闭 1:关闭 2:关闭 3:关闭 4:关闭 5:关闭 6:关闭
ip6tables 0:关闭 1:关闭 2:启用 3:关闭 4:启用 5:启用 6:关闭
iptables 0:关闭 1:关闭 2:启用 3:启用 4:启用 5:启用 6:关闭
irqbalance 0:关闭 1:关闭 2:关闭 3:启用 4:启用 5:启用 6:关闭
kdump 0:关闭 1:关闭 2:关闭 3:关闭 4:启用 5:启用 6:关闭
lvm2-monitor 0:关闭 1:启用 2:启用 3:关闭 4:启用 5:启用 6:关闭
mdmonitor 0:关闭 1:关闭 2:启用 3:关闭 4:启用 5:启用 6:关闭
messagebus 0:关闭 1:关闭 2:启用 3:关闭 4:启用 5:启用 6:关闭
netconsole 0:关闭 1:关闭 2:关闭 3:关闭 4:关闭 5:关闭 6:关闭
netfs 0:关闭 1:关闭 2:关闭 3:关闭 4:启用 5:启用 6:关闭
network 0:关闭 1:关闭 2:启用 3:启用 4:启用 5:启用 6:关闭
ntpd 0:关闭 1:关闭 2:关闭 3:关闭 4:关闭 5:关闭 6:关闭
ntpdate 0:关闭 1:关闭 2:关闭 3:关闭 4:关闭 5:关闭 6:关闭
postfix 0:关闭 1:关闭 2:启用 3:关闭 4:启用 5:启用 6:关闭
psacct 0:关闭 1:关闭 2:关闭 3:关闭 4:关闭 5:关闭 6:关闭
quota_nld 0:关闭 1:关闭 2:关闭 3:关闭 4:关闭 5:关闭 6:关闭
rdisc 0:关闭 1:关闭 2:关闭 3:关闭 4:关闭 5:关闭 6:关闭
restorecond 0:关闭 1:关闭 2:关闭 3:关闭 4:关闭 5:关闭 6:关闭
rngd 0:关闭 1:关闭 2:关闭 3:关闭 4:关闭 5:关闭 6:关闭
rsyslog 0:关闭 1:关闭 2:启用 3:关闭 4:启用 5:启用 6:关闭
saslauthd 0:关闭 1:关闭 2:关闭 3:关闭 4:关闭 5:关闭 6:关闭
smartd 0:关闭 1:关闭 2:关闭 3:关闭 4:关闭 5:关闭 6:关闭
sshd 0:关闭 1:关闭 2:启用 3:启用 4:启用 5:启用 6:关闭
sysstat 0:关闭 1:启用 2:启用 3:启用 4:启用 5:启用 6:关闭
udev-post 0:关闭 1:启用 2:启用 3:关闭 4:启用 5:启用 6:关闭
这里的级别(0,1,2,3,4,5,6)就是 /etc/inittab 里面的那几个启动级别了,0、1、6运行级别被系统保留:其中0作为shutdown动作,1作为重启至单用户模式,6为重启;在一般的Linux系统实现中,都使用了2、3、4、5几个级别,在CentOS系统中,2表示无NFS支持的多用户模式,3表示完全多用户模式(也是最常用的级别),4保留给用户自定义,5表示图形登录方式。我们可以使用grep命令把我们想要看的服务过滤出来:
[root@localhost ~]# chkconfig --list |grep cron
crond 0:关闭 1:关闭 2:启用 3:启用 4:启用 5:启用 6:关闭
现在我们只是看到了各服务在每个级别下是否开启,那么如何去更改哪个级别下是否开启呢?
[root@localhost ~]# chkconfig --level 3 crond off
[root@localhost ~]# chkconfig --list |grep cron
crond 0:关闭 1:关闭 2:启用 3:关闭 4:启用 5:启用 6:关闭
用 --level 指定级别,后面是服务名,然后是off或者on,`--level 后还可以跟多个级别:
[root@localhost ~]# chkconfig --level 345 crond off
[root@localhost ~]# chkconfig --list |grep cron
crond 0:关闭 1:关闭 2:启用 3:关闭 4:关闭 5:关闭 6:关闭
另外还可以省略级别,默认是针对2,3,4,5级别操作:
[root@localhost ~]# chkconfig crond on
[root@localhost ~]# chkconfig --list |grep cron
crond 0:关闭 1:关闭 2:启用 3:启用 4:启用 5:启用 6:关闭
chkconfig 还有一个功能就是可以把某个服务加入到系统服务,即可以使用 service 服务名 start 这样的形式,并且可以在 chkconfig --list 中查找到。当然也能删除掉。
[root@localhost ~]# chkconfig --del crond
[root@localhost ~]# chkconfig --list |grep cron
[root@localhost ~]# chkconfig --add crond
[root@localhost ~]# chkconfig --list |grep cron
crond 0:关闭 1:关闭 2:启用 3:启用 4:启用 5:启用 6:关闭
这个功能常用在把自定义的启动脚本加入到系统服务当中。关于系统服务就讲这些内容,其实还有很多内容阿铭没有介绍,道理很简单,一来讲多了你不能消化二来讲多了你也用不上。
linux下的数据备份工具rsync
数据备份,毫无疑问很重要。阿铭就曾经有过一次非常痛苦的经历,备份策略没有做好,结果磁盘坏掉数据丢失,简直是撕心裂肺的痛呀。还好数据重要性不是特别高,即使是不高也是丢失了数据,这是作为系统管理员最不应该出现的事故。所以,在你以后的系统维护工作中,一定要把数据备份当回事,认真对待。在linux系统下数据备份的工具很多,但阿铭就只用一种那就是rsync. 从字面上的意思你可以理解为remote sync (远程同步)这样可以让你理解的更深刻一些。Rsync不仅可以远程同步数据(类似于scp [1]),当然还可以本地同步数据(类似于cp),但不同于cp或scp的一点是,rsync不像cp/scp一样会覆盖以前的数据(如果数据已经存在),它会先判断已经存在的数据和新数据有什么不同,只有不同时才会把不同的部分覆盖掉。如果你的linux没有rsync命令请使用 yum install -y rsync 安装。
下面阿铭先举一个例子,然后再详细讲解rsync的用法:
[root@localhost ~]# rsync -av 123.txt /tmp/
sending incremental file list
123.txt
sent 71 bytes received 31 bytes 204.00 bytes/sec
total size is 0 speedup is 0.00
上面例子表示把当前目录下的123.txt同步到/tmp/目录下,也可以更改目标文件的名字, rsync -av 123.txt/tmp/234.txt 如果是远程拷贝的话就是这样的形式了: IP:path (如:10.0.2.34:/root/)
[root@localhost ~]# rsync -av 123.txt 192.168.0.101:/data/
The authenticity of host '192.168.0.101 (192.168.0.101)' can't be established.
RSA key fingerprint is b4:54:5f:73:ec:c2:60:5f:c3:79:c0:f9:51:e9:ac:e5.
Are you sure you want to continue connecting (yes/no)? yes
Warning: Permanently added '192.168.0.101' (RSA) to the list of known hosts.
root@192.168.0.101's password:
首次连接会提示是否要继续连接,我们输入yes继续,当建立连接后,需要输入密码。如果手动去执行这些操作还好,但若是写在脚本中怎么办?这就涉及到添加信任关系了,该部分内容稍后会详细介绍。
1. rsync的命令格式
rsync [OPTION]... SRC DEST
rsync [OPTION]... SRC [USER@]HOST:DEST
rsync [OPTION]... [USER@]HOST:SRC DEST
rsync [OPTION]... [USER@]HOST::SRC DEST
rsync [OPTION]... SRC [USER@]HOST::DEST
阿铭在一开始举的两个例子,第一个例子即为第一种格式,第二个例子即为第二种格式,但不同的是,阿铭并没有加user@host 如果不加默认指的是root. 第三种格式是从远程目录同步数据到本地。第四种以及第五种格式使用了两个冒号,这种方式和前面的方式的不同在于验证方式不同,稍后详细介绍。
2. rsync常用选项
-a 归档模式,表示以递归方式传输文件,并保持所有属性,等同于-rlptgoD, -a选项后面可以跟一个 --no-OPTION 这个表示关闭-rlptgoD中的某一个例如 -a--no-l 等同于-rptgoD
-r 对子目录以递归模式处理,主要是针对目录来说的,如果单独传一个文件不需要加-r,但是传输的是目录必须加-r选项
-v 打印一些信息出来,比如速率,文件数量等
-l 保留软链结
-L 向对待常规文件一样处理软链结,如果是SRC中有软连接文件,则加上该选项后将会把软连接指向的目标文件拷贝到DST
-p 保持文件权限
-o 保持文件属主信息
-g 保持文件属组信息
-D 保持设备文件信息
-t 保持文件时间信息
--delete 删除那些DST中SRC没有的文件
--exclude=PATTERN 指定排除不需要传输的文件,等号后面跟文件名,可以是万用字符模式(如*.txt)
--progress 在同步的过程中可以看到同步的过程状态,比如统计要同步的文件数量、同步的文件传输速度等等
-u 加上这个选项后将会把DST中比SRC还新的文件排除掉,不会覆盖
选项确实有点多,不过不用担心,阿铭工作这么多年,常用的选项页仅仅那么几个: (-a -v --delete --exclude), 请熟记他们吧。
下面阿铭将会针对这些选项做一些列小实验:
1) 建立目录以及文件:
[root@localhost ~]# mkdir rsync
[root@localhost ~]# cd rsync
[root@localhost rsync]# mkdir test1
[root@localhost rsync]# cd test1
[root@localhost test1]# touch 1 2 3
[root@localhost test1]# ln -s /root/123.txt ./123.txt
[root@localhost test1]# ls -l
总用量 0
-rw-r--r-- 1 root root 0 6月 10 12:58 1
lrwxrwxrwx 1 root root 13 6月 10 12:59 123.txt -> /root/123.txt
-rw-r--r-- 1 root root 0 6月 10 12:58 2
-rw-r--r-- 1 root root 0 6月 10 12:58 3
[root@localhost test1]# cd ..
阿铭建立这些文件的目的就是为做试验做一些准备工作。
2)使用 -a 选项
[root@localhost rsync]# rsync -a test1 test2
[root@localhost rsync]# ls test2
test1
[root@localhost rsync]# ls test2/test1/
1 123.txt 2 3
这里有一个问题,就是本来想把test1目录直接拷贝成test2目录,可结果rsync却新建了test2目录然后把test1放到test2当中。为了避免这样的情况发生,可以这样做:
[root@localhost rsync]# rm -rf test2
[root@localhost rsync]# rsync -a test1/ test2/
[root@localhost rsync]# ls -l test2/
总用量 0
-rw-r--r-- 1 root root 0 6月 10 12:58 1
lrwxrwxrwx 1 root root 13 6月 10 12:59 123.txt -> /root/123.txt
-rw-r--r-- 1 root root 0 6月 10 12:58 2
-rw-r--r-- 1 root root 0 6月 10 12:58 3
加一个斜杠就好了,所以阿铭建议你在使用rsync备份目录时要养成加斜杠的习惯。在上面讲了-a选项等同于-rlptgoD,而且 -a 还可以和 --no-OPTIN 一并使用。下面看看-l选项的作用:
[root@localhost rsync]# rsync -av --no-l test1/ test2/
sending incremental file list
created directory test2
./
1
skipping non-regular file "123.txt"
2
3
sent 200 bytes received 72 bytes 544.00 bytes/sec
total size is 13 speedup is 0.05
使用-v选项看来就是方便呀,上例告诉我们跳过了非普通文件123.txt,其实123.txt是一个软连接文件,如果不使用-l选项则不理会软连接文件的。虽然加上-l选项会把软连接文件给拷贝过去,但是软连接的目标文件却没有拷贝过去,有时候咱们指向拷贝软连接文件所指向的目标文件,那这时候该怎么办呢?
3)使用-L选项
[root@localhost rsync]# rsync -avL test1/ test2/
sending incremental file list
created directory test2
./
1
123.txt
2
3
sent 231 bytes received 91 bytes 644.00 bytes/sec
total size is 0 speedup is 0.00
[root@localhost rsync]# ls -l test2/
总用量 0
-rw-r--r-- 1 root root 0 6月 10 12:58 1
-rw-r--r-- 1 root root 0 6月 10 12:39 123.txt
-rw-r--r-- 1 root root 0 6月 10 12:58 2
-rw-r--r-- 1 root root 0 6月 10 12:58 3
加上 -L 选项就可以把SRC中软连接的目标文件给拷贝到DST.
4) 使用-u选项
首先查看一下test1/1 和test2/1的创建时间(肯定是一样的),然后使用touch修改一下test2/1的创建时间(此时test2/1要比test1/1的创建时间晚了一些),如果不加-u选项的话,会把test2/1的创建时间变成和test1/1的创建时间一样。这样讲也许你会迷糊,不妨看一看:
[root@localhost rsync]# ll test1/1 test2/1
-rw-r--r-- 1 root root 0 6月 10 12:58 test1/1
-rw-r--r-- 1 root root 0 6月 10 12:58 test2/1
两者之间的创建时间是一样的,下面修改test2/1 的创建时间,然后不加-u同步:
[root@localhost rsync]# touch test2/1
[root@localhost rsync]# ll test2/1
-rw-r--r-- 1 root root 0 6月 10 13:20 test2/1
[root@localhost rsync]# rsync -a test1/1 test2/
[root@localhost rsync]# ll test2/1
-rw-r--r-- 1 root root 0 6月 10 12:58 test2/1
test2/1 的创建时间又变成和test1/1的创建时间一样了。下面加上 -u 再看看结果是怎么样的:
[root@localhost rsync]# touch test2/1
[root@localhost rsync]# ll test2/1
-rw-r--r-- 1 root root 0 6月 10 13:31 test2/1
[root@localhost rsync]# rsync -avu test1/ test2/
sending incremental file list
./
123.txt -> /root/123.txt
sent 100 bytes received 18 bytes 236.00 bytes/sec
total size is 13 speedup is 0.11
[root@localhost rsync]# ll test2/1
-rw-r--r-- 1 root root 0 6月 10 13:31 test2/1
[root@localhost rsync]# ll test1/1
-rw-r--r-- 1 root root 0 6月 10 12:58 test1/1
加上-u 选项后,不会再把 test1/1 同步为 test2/1 了,现在你明白 -u 选项的妙用了吧。
5)使用 --delete 选项
首先删除test1/123.txt:
[root@localhost rsync]# rm -f test1/123.txt
[root@localhost rsync]# ls test1/
1 2 3
然后把test1/ 目录 同步到 test2/ 目录下:
[root@localhost rsync]# rsync -av test1/ test2/
sending incremental file list
./
1
sent 94 bytes received 34 bytes 256.00 bytes/sec
total size is 0 speedup is 0.00
[root@localhost rsync]# ls test2/
1 123.txt 2 3
test2/目录并没有删除掉123.txt, 下面加上 --delete 选项:
[root@localhost rsync]# rsync -av --delete test1/ test2/
sending incremental file list
deleting 123.txt
sent 52 bytes received 12 bytes 128.00 bytes/sec
total size is 0 speedup is 0.00
[root@localhost rsync]# ls test2/
1 2 3
test2/ 目录里的123.txt也被删除了,这就是 --delete 选项的用处。还有一种情况就是如果在DST增加文件了,而SRC当中没有这些文件,同步时加上 --delete 选项后同样会删除新增的文件:
[root@localhost rsync]# touch test2/4
[root@localhost rsync]# ls test1/
1 2 3
[root@localhost rsync]# ls test2/
1 2 3 4
[root@localhost rsync]# rsync -a --delete test1/ test2/
[root@localhost rsync]# ls test1/
1 2 3
[root@localhost rsync]# ls test2/
1 2 3
6)使用 --exclude 选项
[root@localhost rsync]# touch test1/4
[root@localhost rsync]# rsync -a --exclude="4" test1/ test2/
[root@localhost rsync]# ls test1/
1 2 3 4
[root@localhost rsync]# ls test2/
1 2 3
另外还可以使用匹配字符 *
[root@localhost rsync]# touch test1/1.txt test1/2.txt
[root@localhost rsync]# ls test1/
1 1.txt 2 2.txt 3 4
[root@localhost rsync]# rsync -a --progress --exclude="*.txt" test1/ test2/
sending incremental file list
./
4
0 100% 0.00kB/s 0:00:00 (xfer#1, to-check=0/5)
sent 104 bytes received 34 bytes 276.00 bytes/sec
total size is 0 speedup is 0.00
[root@localhost rsync]# ls test2/
1 2 3 4
上例中,阿铭也连带着使用了 --progress 选项,这个主要是用来观察rsync同步过程的状态的。最后简单总结一下,平时你使用rsync同步数据的时候,使用-a选项基本上就可以达到我们想要的效果了,只是有时候会有个别的需求,会用到 -a --no-OPTION, -u, -L, --delete, --exclude 以及 progress 这些选项,还有些选项阿铭都没有介绍,如果在以后的工作中遇到特殊需求了,就去查一下rsync的man文档吧。
3. rsync 应用实例
1)通过ssh的方式
最上面介绍的5种方式当中,第二、第三(1个冒号)就属于通过ssh的方式,这种方式其实就是让用户去登录到远程机器,然后执行rsync的任务。
[root@localhost rsync]# rsync -avL test1/ www@192.168.0.101:/tmp/test2/
www@192.168.0.101's password:
sending incremental file list
created directory /tmp/test2
./
1
1.txt
2
2.txt
3
4
sent 327 bytes received 129 bytes 182.40 bytes/sec
total size is 0 speedup is 0.00
这种方式就是前面介绍的第二种方式了,是通过ssh拷贝的数据,需要输入192.168.0.101 那台机器www 账户的密码。当然也可以使用第三种方式拷贝:
[root@localhost rsync]# rsync -avL www@192.168.0.101:/tmp/test2/ ./test3/
www@192.168.0.101's password:
receiving incremental file list
created directory ./test3
./
1
1.txt
2
2.txt
3
4
sent 128 bytes received 351 bytes 38.32 bytes/sec
total size is 0 speedup is 0.00
以上两种方式如果写到脚本里,备份起来就有麻烦了,因为要输入密码,脚本本来就是自动的,不可能做到的。但是不代表没有解决办法。那就是通过密钥验证,密钥不设立密码就ok了。还记得在前面阿铭曾经介绍过通过密钥登录远程主机吗,下面要讲的内容就是那些东西了。
在操作之前我们先讲明主机信息: 192.168.0.10 (主机名Aming-1)和 192.168.0.101 (主机名Aming)需要从Aming-1上拷贝数据到Aming上。
首先确认一下Aming-1上是否有这个文件 /root/.ssh/id_rsa.pub:
[root@Aming-1 ~]# ssh-keygen
Generating public/private rsa key pair.
阿铭之前生成过密钥对,所以这个文件已经存在了,如果你的Linux不存在这个文件,请按照如下方法生成:
[root@Aming-1 ~]# ssh-keygen
Generating public/private rsa key pair.
Enter file in which to save the key (/root/.ssh/id_rsa):
Enter passphrase (empty for no passphrase):
Enter same passphrase again:
Your identification has been saved in /root/.ssh/id_rsa.
Your public key has been saved in /root/.ssh/id_rsa.pub.
The key fingerprint is:
3b:74:af:e8:08:ac:99:30:3f:ef:84:7a:a0:a6:3d:89 root@Aming-1
在这个过程中会有一些交互的过程,它首先提示要输入这个密钥的密码,出于安全考虑应该定义个密码,但是我们的目的就是为了自动化同步数据,所以这里不输入任何密码,直接按回车,即密码为空。最后则生成了私钥(/root/.ssh/id_rsa)和公钥文件(/root/.ssh/id_rsa.pub)
把公钥文件的内容拷贝到目标机器上:
[root@Aming-1 ~]# cat .ssh/id_rsa.pub
ssh-rsa AAAAB3NzaC1yc2EAAAABIwAAAQEA5SPyJ/kliGTAMUan/GCN325VS8jMxvOn4uQoLU/NqBpCI3MrmvSucv6EAzxx1J2uOssW08el06LG+cUwXmm5mkqDRBV6C9qNnR/bVV5vr3QsUwbKPr7fdyJvruQWWR7cSL+mjP0SYmG2Qy2JcM3hl1IZArzC6yeUnq2Gwbax8LgbZE3XfRfOYdimwyh5Tfft7yLYipWc37k+oRUWkI3mW7PalsOlfQhxrLD/lS891y6RdSbGxMJWPoV0KMFbVh+uJgyAXpeuWl+F+/iuQPzb6w3h4pWI31bvbsE9BU82jSzHYEjpq3SN2MJN2vaLs5a0mVpm9zka/h4ITFB8Uy1iSQ== root@Aming-1
复制主机Aming-1的/root/.ssh/id_rsa.pub文件内容,并粘贴到主机Aming的/home/www/.ssh/authorized_keys中:
[root@Aming ~]# vim /home/www/.ssh/authorized_keys
在这一步也许你会遇到/home/www/.ssh目录不存在的问题,可以手动创建,并修改目录权限为700也可以执行ssh-keygen命令生成这个目录。保存/home/www/.ssh/authorized_keys文件后,再到主机Aming-1上执行:
[root@Aming-1 ~]# ssh www@192.168.0.101
Last login: Wed Jun 12 12:24:34 2013 from 192.168.0.10
[www@Aming ~]$
现在不用输入密码也可以登录主机Aming了。下面先从Aming主机退出来,再从主机Aming-1上执行一下rsync命令试试吧。
[root@Aming-1 ~]# rsync -av rsync/test1/ www@192.168.0.101:/tmp/test4/
sending incremental file list
created directory /tmp/test4
./
1
1.txt
2
2.txt
3
4
sent 327 bytes received 129 bytes 912.00 bytes/sec
total size is 0 speedup is 0.00
2) 通过后台服务的方式
这种方式可以理解成这样,在远程主机上建立一个rsync的服务器,在服务器上配置好rsync的各种应用,然后本机作为rsync的一个客户端去连接远程的rsync服务器。下面阿铭就介绍一下,如何去配置一台rsync服务器。
- 建立并配置rsync的配置文件 /etc/rsyncd.conf
[root@Aming-1 ~]# vim /etc/rsyncd.conf
#port=873
log file=/var/log/rsync.log
pid file=/var/run/rsyncd.pid
#address=192.168.0.10
[test]
path=/root/rsync
use chroot=true
max connections=4
read only=no
list=true
uid=root
gid=root
auth users=test
secrets file=/etc/rsyncd.passwd
hosts allow=192.168.0.101
其中配置文件分为两部分:全部配置部分和模块配置部分,全局部分就是几个参数而已,就像阿铭的rsyncd.conf中port, log file, pid file, address这些都属于全局配置,而[test]以下部分就是模块配置部分了。一个配置文件中可以有多个模块,模块名自定义,格式就像阿铭的rsyncd.conf中的这样。其实模块中的一些参数例如use chroot, max connections, udi, gid, auth users, secrets file以及hosts allow都可以配置成全局的参数。当然阿铭给出的参数并不是所有的,你可以通过man rsyncd.conf 获得更多信息。下面就简单解释一下这些参数的意义:
port 指定在哪个端口启动rsyncd服务,默认是873
log file 指定日志文件
pid file 指定pid文件,这个文件的作用涉及到服务的启动以及停止等进程管理操作
address 指定启动rsyncd服务的IP,假如你的机器有多个IP,就可以指定其中一个启动rsyncd服务,默认是在全部IP上启动
[test] 指定模块名,自定义
path 指定数据存放的路径
use chroot true|false 默认是true,意思是在传输文件以前首先chroot到path参数所指定的目录下。这样做的原因是实现额外的安全防护,但是缺点是需要以roots权限,并且不能备份指向外部的符号连接所指向的目录文件。默认情况下chroot值为true,如果你的数据当中有软连接文件的话建议设置成false。
max connections 指定最大的连接数,默认是0即没有限制
read only ture|false 如果为true则不能上传到该模块指定的路径下
list 指定当用户查询该服务器上的可用模块时,该模块是否被列出,设定为true则列出,false则隐藏
uid/gid 指定传输文件时,以哪个用户/组的身份传输
auth users 指定传输时要使用的用户名
secrets file 指定密码文件,该参数连同上面的参数如果不指定则不使用密码验证,注意该密码文件的权限一定要是600
hosts allow 指定被允许连接该模块的主机,可以是IP或者网段,如果是多个,之间用空格隔开
- 编辑secrets file,保存后要赋予600权限,如果权限不对,不能完成同步
[root@Aming-1 ~]# cat /etc/rsyncd.passwd
test:test123
[root@Aming-1 ~]# chmod 600 /etc/rsyncd.passwd
- 启动rsyncd服务
[root@Aming-1 ~]# rsync --daemon --config=/etc/rsyncd.conf
启动后,可以查看一下日志,并查看端口是否启动:
[root@Aming-1 ~]# cat /var/log/rsync.log
[root@Aming-1 ~]# netstat -lnp |grep 873
tcp 0 0 0.0.0.0:873 0.0.0.0:* LISTEN 12066/rsync
tcp 0 0 :::873 :::* LISTEN 12066/rsync
如果想开机启动,请把 rsync --daemon --confg=/etc/rsyncd.conf 写入到/etc/rc.d/rc.local文件。
- 到另一台机器上测试
[root@Aming ~]# rsync -avL test@192.168.0.10::test/test1/ /tmp/test5/
Password:
receiving incremental file list
created directory /tmp/test5
./
1
1.txt
2
2.txt
3
4
sent 143 bytes received 354 bytes 994.00 bytes/sec
total size is 0 speedup is 0.00
阿铭刚刚提到有一个选项叫做 “use chroot” 默认为true,如果是true,同步的文件中如果有软连接,则会有问题,首先在主机Aming-1的/root/rsync/test1/ 目录下创建一个软连接文件:
[root@Aming-1 ~]# ln -s /root/test.txt rsync/test1/test.txt
[root@Aming-1 ~]# ls -l rsync/test1/test.txt
lrwxrwxrwx 1 root root 14 6月 12 13:24 rsync/test1/test.txt -> /root/test.txt
然后再到主机Aming上,同步:
[root@Aming ~]# rsync -avL test@192.168.0.10::test/test1/ /tmp/test6/
Password:
receiving incremental file list
symlink has no referent: "/test1/test.txt" (in test)
created directory /tmp/test6
./
1
1.txt
2
2.txt
3
4
sent 143 bytes received 419 bytes 1124.00 bytes/sec
total size is 0 speedup is 0.00
rsync error: some files/attrs were not transferred (see previous errors) (code
23) at main.c(1532) [generator=3.0.6]
可以看到,如果设置 “use chroot” 为true则同步软连接文件会有问题,下面阿铭把主机Aming-1的rsync配置文件修改一下,把true改为false:
[root@Aming-1 ~]# sed -i 's/use chroot=true/use chroot=false/' /etc/rsyncd.conf
[root@Aming-1 ~]# grep 'use chroot' /etc/rsyncd.conf
use chroot=false
然后再到主机Aming上再次执行同步:
[root@Aming ~]# rsync -avL test@192.168.0.10::test/test1/ /tmp/test7/
Password:
receiving incremental file list
created directory /tmp/test7
./
1
1.txt
2
2.txt
3
4
test.txt
sent 162 bytes received 410 bytes 1144.00 bytes/sec
total size is 0 speedup is 0.00
这样就没有任何问题啦,你也许会奇怪,为什么阿铭修改完rsyncd.conf配置文件后,没有重启rsyncd服务呢?其实这是rsync的一个特定机制,配置文件时即时生效的,不用重启服务。
上面的例子中,阿铭都有输入密码,这样同样也不能写入脚本中自动执行,其实这种方式也是可以不用手动输入密码的,它有两种实现方式。
第一种,指定密码文件
在客户端上,也就是主机Aming上,编辑一个密码文件:
[root@Aming ~]# vim /etc/pass
加入test用户的密码:
[root@Aming ~]# cat /etc/pass
test123
修改密码文件的权限:
[root@Aming ~]# chmod 600 /etc/pass
在同步的时候,指定一下密码文件,就可以省去输入密码的步骤了:
[root@Aming ~]# rsync -avL test@192.168.0.10::test/test1/ /tmp/test8/ --password-file=/etc/pass
receiving incremental file list
created directory /tmp/test8
./
1
1.txt
2
2.txt
3
4
test.txt
sent 190 bytes received 451 bytes 1282.00 bytes/sec
total size is 0 speedup is 0.00
第二种:在rsync服务器端不指定用户
在服务端也就是主机Aming-1上修改配置文件rsyncd.conf, 去掉关于认证账户的配置项(auth user 和 secrets file这两行):
sed -i 's/auth users/#auth users/;s/secrets file/#secrets file/' /etc/rsyncd.conf
上面的这个命令是把 “auth users” 和 “secrets file” 两行的最前面加一个 “#”, 这样就把这两行注释掉,使其失去意义。在前面阿铭未曾讲过sed的这种用法,其实也不难弄明白,只是用分号把两个替换的子命令块给替换了而已。然后我们再到客户端主机Aming上测试:
[root@Aming ~]# rsync -avL 192.168.0.10::test/test1/ /tmp/test9/
receiving incremental file list
created directory /tmp/test9
./
1
1.txt
2
2.txt
3
4
test.txt
sent 162 bytes received 410 bytes 1144.00 bytes/sec
total size is 0 speedup is 0.00
注意,这里不用再加test这个用户了,默认是以root的身份拷贝的,现在已经不需要输入密码了。
linux系统日志
日志重要吗?必须的,没有日志我们怎么知道系统状况?没有日志如何排查一个trouble?日志记录了系统每天发生的各种各样的事情,你可以通过他来检查错误发生的原因,或者受到攻击时攻击者留下的痕迹。日志主要的功能有:审计和监测,还可以实时的监测系统状态,监测和追踪侵入者等等。
阿铭常查看的日志文件为/var/log/message, 它是核心系统日志文件,包含了系统启动时的引导消息,以及系统运行时的其他状态消息。IO错误、网络错误和其他系统错误都会记录到这个文件中。另外其他信息,比如某个人的身份切换为root以及用户自定义安装的软件(apache)的日志也会在这里列出。通常,/var/log/messages是在做故障诊断时首先要查看的文件。那你肯定会说了,这么多日志都记录到这个文件中,那如果服务器上有很多服务岂不是这个文件很快就会写的很大,没错,但是系统有一个日志轮询的机制,每星期切换一个日志,变成message.xxxxxxxx, message.xxxxxxxx, ... messages.xxxxxxxx 连同messages一共有5个这样的日志文件。这里的xxxxxxxx就是按照日期的格式生成的文件,在CentOS5里,这个后缀并不是日期而是数字1,2,3,4. 这是通过logrotate工具的控制来实现的,它的配置文件是/etc/logrotate.conf如果没有特殊需求请不要修改这个配置文件。
[root@localhost ~]# cat /etc/logrotate.conf
# see "man logrotate" for details
# rotate log files weekly
weekly
# keep 4 weeks worth of backlogs
rotate 4
# create new (empty) log files after rotating old ones
create
# use date as a suffix of the rotated file
dateext
# uncomment this if you want your log files compressed
#compress
# RPM packages drop log rotation information into this directory
include /etc/logrotate.d
# no packages own wtmp and btmp -- we'll rotate them here
/var/log/wtmp {
monthly
create 0664 root utmp
minsize 1M
rotate 1
}
/var/log/btmp {
missingok
monthly
create 0600 root utmp
rotate 1
}
# system-specific logs may be also be configured here.
/var/log/messages是由syslogd这个守护进程产生的,如果停掉这个服务则系统不会产生/var/log/messages,所以这个服务不要停。Syslogd服务的配置文件为/etc/syslog.conf这个文件定义了日志的级别,具体详细的东西阿铭不再阐述,因为若没有特殊需求是不需要修改这个配置文件的,请使用man syslog.conf 获得更多关于它的信息。
除了关注/var/log/messages外,你还应该多关注一下 dmesg 这个命令,它可以显示系统的启动信息,如果你的某个硬件有问题(比如说网卡)用这个命令也是可以看到的。
[root@localhost ~]# dmesg |less
Initializing cgroup subsys cpuset
Initializing cgroup subsys cpu
Linux version 2.6.32-220.el6.x86_64 (mockbuild@c6b18n3.bsys.dev.centos.org)
(gcc version 4.4.6 20110731 (Red Hat 4.4.6-3) (GCC) ) #1 SMP Tue Dec 6
19:48:22 GMT 2011
Command line: ro root=UUID=7912412b-3e66-401d-9ef5-3c2aba8dc737 rd_NO_LUKS
KEYBOARDTYPE=pc KEYTABLE=us rd_NO_MD quiet rhgb crashkernel=auto
LANG=zh_CN.UTF-8 rd_NO_LVM rd_NO_DM
KERNEL supported cpus:
Intel GenuineIntel
AMD AuthenticAMD
Centaur CentaurHauls
BIOS-provided physical RAM map:
BIOS-e820: 0000000000000000 - 000000000009a400 (usable)
BIOS-e820: 000000000009a400 - 00000000000a0000 (reserved)
BIOS-e820: 00000000000d2000 - 00000000000d4000 (reserved)
BIOS-e820: 00000000000e4000 - 0000000000100000 (reserved)
BIOS-e820: 0000000000100000 - 00000000cff60000 (usable)
BIOS-e820: 00000000cff60000 - 00000000cff69000 (ACPI data)
关于安全方面的日志,阿铭简单介绍几个命令或者日志。
命令 : last
[root@localhost ~]# last |head
root pts/0 192.168.0.207 Wed Jun 12 20:28 still logged in
root pts/1 192.168.0.207 Wed Jun 12 20:27 still logged in
root pts/0 192.168.0.161 Wed Jun 12 14:36 - 20:27 (05:50)
root pts/0 192.168.0.161 Wed Jun 12 14:36 - 14:36 (00:00)
root pts/0 192.168.0.207 Wed Jun 12 11:42 - 14:36 (02:54)
root pts/0 192.168.0.207 Mon Jun 10 12:23 - 14:23 (02:00)
root pts/0 192.168.0.70 Sat Jun 8 16:43 - 17:53 (01:09)
root pts/0 192.168.0.70 Fri Jun 7 16:43 - 17:27 (00:44)
root pts/0 192.168.0.70 Fri Jun 7 09:57 - 16:09 (06:11)
root pts/0 192.168.0.70 Thu Jun 6 13:40 - 17:50 (04:09)
last命令用来查看登录Linux历史信息,从左至右依次为账户名称、登录终端、登录客户端ip、登录日期及时长。last命令输出的信息实际上是读取了二进制日志文件/var/log/wtmp, 只是这个文件不能直接使用cat, vim, head, tail等工具查看。
另外一个和登陆信息有关的日志文件为/var/log/secure, 该日志文件记录验证和授权等方面的信息,比如ssh登陆系统成功或者失败,都会把相关信息记录在这个日志里。
这一小节就介绍这么多,在结束之前,阿铭给你一个小小的建议。以后在你日常的管理工总中要养成多看日志的习惯,尤其是一些应用软件的日志,比如apache, mysql, php等常用的软件,看它们的日志(错误日志)可以帮助你排查问题以及监控它们的运行状况是否良好。
xargs与exec
1. xargs应用
在前面的例子中阿铭曾经使用过这个命令,你是否有印象呢?现在就详细介绍一下它,平时阿铭使用xargs还是比较多的,很方便。
[root@localhost ~]# echo "121212121212" > 123.txt
[root@localhost ~]# ls 123.txt | xargs cat
121212121212
它的作用就是把管道符前面的输出作为xargs后面的命令的输入。它的好处在于可以把本来两步或者多步才能完成的任务简单一步就能完成。xargs常常和find命令一起使用,比如,查找当前目录创建时间大于10天的文件,然后再删除。
[root@localhost ~]# find . -mtime +10 |xargs rm
这种应用是最为常见的,xargs后面的rm 也可以加选项,当是目录时,就需要-r选项了。在阿铭看来xargs的这个功能不叫什么,它的另一个功能才叫神奇。现在我有一个这样的需求,查找当前目录下所有.txt的文件,然后把这些.txt的文件变成.txt_bak。正常情况下,我们不得不写脚本去实现,但是使用xargs就一步。
[root@localhost ~]# mkdir test
[root@localhost ~]# cd test
[root@localhost test]# touch 1.txt 2.txt 3.txt 4.txt 5.txt
[root@localhost test]# ls
1.txt 2.txt 3.txt 4.txt 5.txt
[root@localhost test]# ls *.txt |xargs -n1 -i{} mv {} {}_bak
[root@localhost test]# ls
1.txt_bak 2.txt_bak 3.txt_bak 4.txt_bak 5.txt_bak
xargs -n1 –i{} 类似for循环,-n1意思是一个一个对象的去处理,-i{}把前面的对象使用{}取代,mv {} {}_bak 相当于 mv 1.txt 1.txt_bak。你刚开始接触这个命令时也许有点难以理解,多练习一下你就会熟悉了,笔者建议你记住这个应用,很实用。
2. exec应用
使用find命令时,经常使用一个选项就是这个-exec了,可以达到和xargs同样的效果。比如,查找当前目录创建时间大于10天的文件并删除:
[root@localhost ~]# find . -mtime +10 -exec rm -rf {} \;
这个命令中也是把{}作为前面find出来的文件的替代符,后面的 \ 为 ; 的脱意符,不然shell会把分号作为该行命令的结尾。这个-exec有时候也挺实用的,它同样可以实现刚刚上面批量更改文件名的需求:
[root@localhost test]# ls
1.txt_bak 2.txt_bak 3.txt_bak 4.txt_bak 5.txt_bak
[root@localhost test]# find ./*_bak -exec mv {} {}_bak \;
[root@localhost test]# ls
1.txt_bak_bak 2.txt_bak_bak 3.txt_bak_bak 4.txt_bak_bak 5.txt_bak_bak
screen工具介绍
有时候,我们也许会有这样的需求,要执行一个命令或者脚本,但是需要几个小时甚至几天。这就要考虑一个问题,就是中途断网或出现其他意外情况,执行的任务中断了怎么办?你可以把命令或者脚本丢到后台运行,不过也不保险。阿铭下面就介绍两种方法来避免这样的问题发生。
1. 使用nohup
[root@localhost ~]# cat /usr/local/sbin/sleep.sh
#! /bin/bash
sleep 1000
[root@localhost ~]# nohup sh /usr/local/sbin/sleep.sh &
[1] 19997
[root@localhost ~]# nohup: 忽略输入并把输出追加到"nohup.out"
直接加一个 ‘&’ 虽然丢到后台了,但是当退出该终端时很有可能这个脚本也会退出的,而在前面加上 nohup 就没有问题了,nohup的作用就是不挂断地运行命令。
2. screen工具的使用
简单来说,screen是一个可以在多个进程之间多路复用一个物理终端的窗口管理器。screen中有会话的概念,用户可以在一个screen会话中创建多个screen窗口,在每一个screen窗口中就像操作一个真实的SSH连接窗口那样。下面阿铭介绍screen的一个简单应用。
1)打开一个会话,直接输入screen命令然后回车,进入screen会话窗口。如果你没有screen命令,请用yum install -y screen 安装。
[root@localhost ~]# screen
[root@localhost ~]#
2)screen -ls 查看已经打开的screen会话
[root@localhost ~]# screen -ls
There is a screen on:
20001.pts-0.localhost (Attached)
1 Socket in /var/run/screen/S-root.
3)Ctrl +a 再按d退出该screen会话,只是退出,并没有结束。结束的话输入Ctrl +d 或者输入exit
4)退出后还想再次登录某个screen会话,使用sreen -r [screen 编号],这个编号就是上例中那个20001. 当只有一个screen会话时,后面的编号是可以省略的。当你有某个需要长时间运行的命令或者脚本时就打开一个screen会话,然后运行该任务。按ctrl +a 再按d退出会话,不影响终端窗口上的任何操作。
阿铭建议你最好再扩展学习一下: http://www.aminglinux.com/bbs/thread-5440-1-1.html
教程答疑: 请移步这里.
欢迎你加入 阿铭学院 和阿铭一起学习Linux,让阿铭成为你Linux生涯中永远的朋友吧!
| [1] | scp 用来远程拷贝数据,通过ssh协议通信。它的语法很简单,类似于cp, 唯一不同的是,源地址或者目标地址需要使用远程主机的ip或者hostname. 例如要把本地的数据拷贝到远程一台主机(192.168.0.111)的/data/目录下,可以这样实现: scp /dir/filename root@192.168.0.111:/data/ 其中filename 可以是目录也可以是文件。或者也可以把远程的文件拷贝到本地: scp root@192.168.0.111:/data/filename /data/ |

 浙公网安备 33010602011771号