KInect AR沙盒制作的一点小经验
最近在微博上看到这样一条 微博 >点这看<
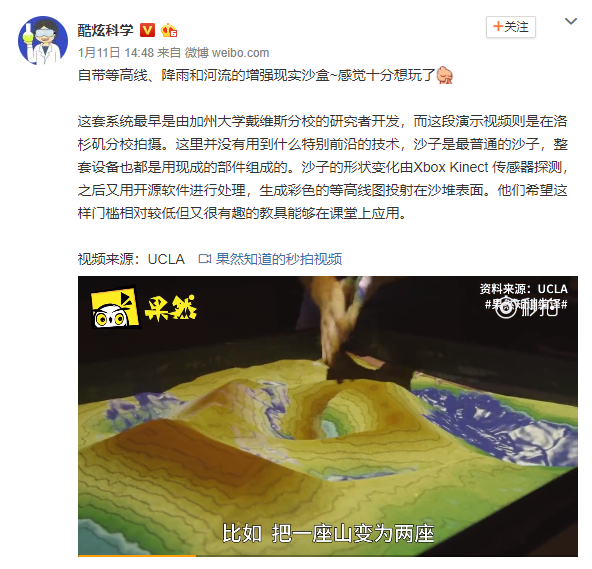
看起来非常有意思,就去Google了一下如何制作。
没想到这是一个开源项目,而且还告诉你如何安装
OK,接下来就说说我的制作过程。
首先,先放出这个开源项目所有教程、资源的网站
https://arsandbox.ucdavis.edu/instructions/
上面说了各种要求,大家可以自己去看,我这截个图吧

都是英文,我开着翻译一点点看,但是在校准那,都是英文而且没有字幕,所以看着头疼。
前期软件非常简单,只需要复制粘贴就可以了,难就难在校准,还有Kinect跟投影仪的架子不好做
Hardware Requirements
An AR Sandbox requires the following hardware components:
- A computer with a high-end graphics card (see the “Computer” section below for more specific hardware recommendations), running any version of Linux. The AR Sandbox software, in principle, also runs on Mac OS X, but we advise against it.
- A Microsoft Kinect 3D camera. The AR Sandbox software, or rather the underlying Kinect 3D Video Package as of version 3.3, supports Kinect-for-Xbox 1414 and 1473, Kinect for Windows, and Kinect for Xbox One. The first three are functionally identical, so get the cheapest model you can find. Note: The second-generation Kinect for Windows v2 is not yet supported by the AR Sandbox software.
- A digital video projector with a digital video interface, such as HDMI, DVI, or DisplayPort.
- A sandbox with a way to mount the Kinect camera and the projector above the sandbox.
- Sand.
这是人家的要求
其实也没多高配置,我GT840M都可以跑,英伟达的Linux显卡驱动你要到官网去下。
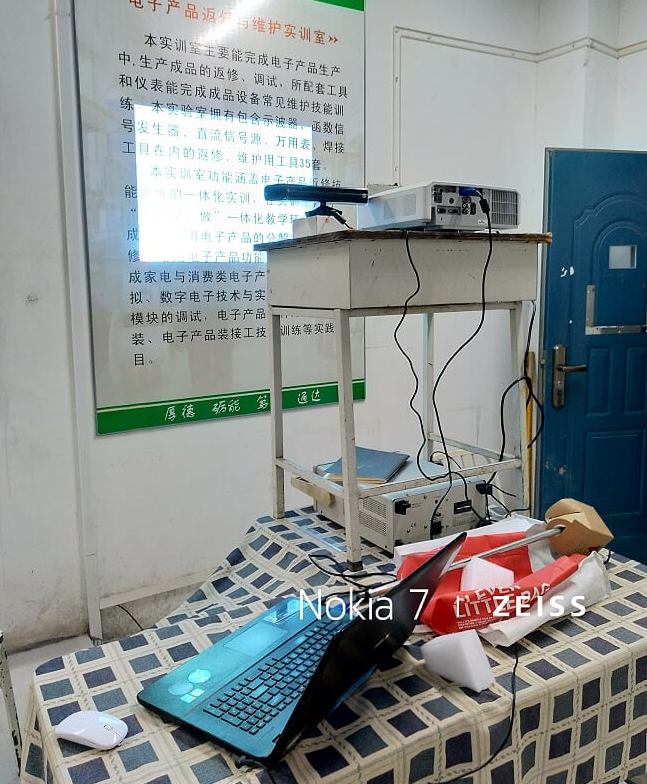
你还需要一个Kinect v1,我之前做项目时在淘宝上买了个v1,才400块左右。
最重要的还有个投影仪,我去找陈院长借了一个。
然后你得装个Linux系统,我装了个Ubuntu(双系统),用着挺好的
其他的像沙盘啊,沙啥的都可以后面调好了咱再弄。我们先看怎么把这个软件跑了
第一开发阶段就是 先把整个功能跑一下,管他对的准不准。
为了方便,我这样做的:
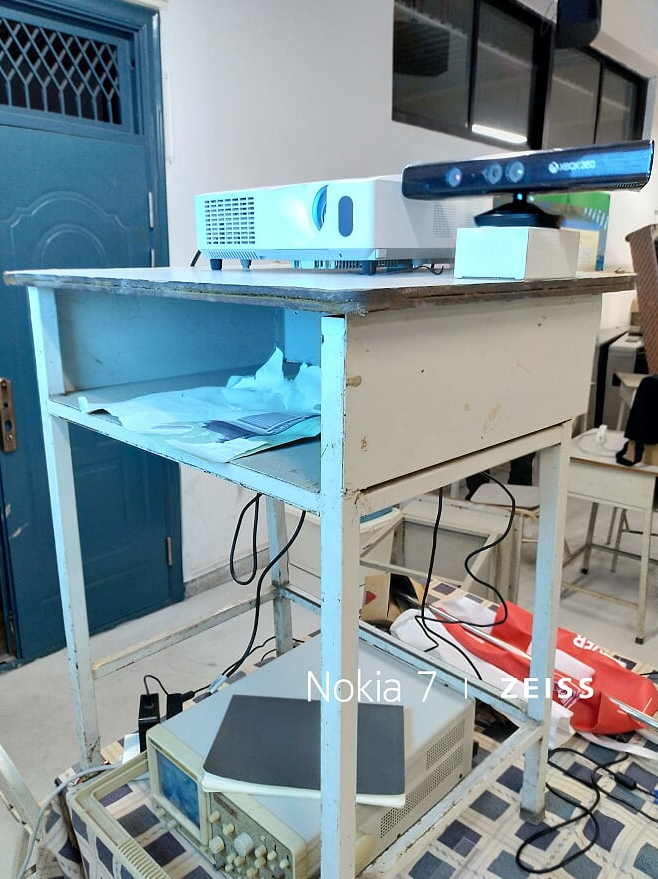
实际上应该是这样的,为了不费那么大功夫搭这个架子,我就竖着放了

好,给大家看看要怎么做
https://arsandbox.ucdavis.edu/forums/topic/complete-installation-instructions/
跟着这个教程走
实在看不懂就翻译,还不行就全部一步步复制粘贴。
(我就是这样的,也没报啥错)
Note: Please don’t comment on this thread; it’s gotten unwieldy. If you have any questions, concerns, or problems, please start a new thread.
Due to the currently surging interest in AR Sandbox installations, I am posting complete installation instructions, starting from a blank desktop PC with an Nvidia GeForce graphics card. Due to increasing weirdness in recent versions of Mac OS X (starting with 10.7), I can no longer recommend Mac computers and Mac OS X to drive AR Sandbox installations.
You can also watch a full walk-through video of steps 1-5.
- Install the current version of 64-bit Linux Mint with MATE desktop on a blank desktop computer. This needs to be a real computer; the AR Sandbox does not work from inside a virtual machine.
- Install vendor-supplied drivers for the Nvidia graphics card. Open the Control Center, select “Driver Manager,” wait for the panel to show up and the list of available drivers to be populated, and then select the recommended Nvidia binary driver and press “Apply Changes.” Then wait until the change is complete (might take a while), and reboot your computer.
- Open a terminal window and enter precisely the following commands (if in doubt, cut & paste directly from this web page, one line at a time). ~ is shorthand for the user’s home directory:
cd ~
wget http://idav.ucdavis.edu/~okreylos/ResDev/Vrui/Build-Ubuntu.sh
bash Build-Ubuntu.sh
The script run in the last command will ask you for your user’s password to install prerequisite libraries, and then build the Vrui VR toolkit. That will take a little while and produce lots of output, and at the end you’ll be greeted by a spinning globe in a window. Close that window and go back to the same terminal as before.
- To install the Kinect 3D video package, run in the same terminal:
cd ~/src
wget http://idav.ucdavis.edu/~okreylos/ResDev/Kinect/Kinect-3.2.tar.gz
tar xfz Kinect-3.2.tar.gz
cd Kinect-3.2
make
sudo make install
sudo make installudevrules
ls /usr/local/bin
Check that the list of names printed by the last command contains KinectUtil and RawKinectViewer.
- To install the AR Sandbox software itself, run in the same terminal:
cd ~/src
wget http://idav.ucdavis.edu/~okreylos/ResDev/SARndbox/SARndbox-2.3.tar.gz
tar xfz SARndbox-2.3.tar.gz
cd SARndbox-2.3
make
ls ./bin
Check that the list of names printed by the last command contains CalibrateProjector and SARndbox. The AR Sandbox calibration utility and main application are now in ~/src/SARndbox-2.3/bin.
- Plug in your first-generation Kinect device and download intrinsic calibration parameters directly from its firmware. In a terminal window, run:
sudo /usr/local/bin/KinectUtil getCalib 0
This might ask you for your password again; if so, enter it to continue.
- Align your camera so that its field of view covers the interior of your sandbox. Use RawKinectViewer to guide you during alignment. To start it, run in a terminal window:
cd ~/src/SARndbox-2.3 RawKinectViewer -compress 0- Calculate your sandbox’s base plane, by following the instructions in the AR Sandbox Calibration – Step 4 video, or this new video that shows all required calibration steps in one. You can use the already-running instance of RawKinectViewer.
You need to enter the base plane equation (and the 3D sand surface extents in the next step) into the BoxLayout.txt file in etc/SARndbox-<version> inside the SARndbox source directory. Under Linux Mint, the default text editor is called “pluma.” So to edit the file, run in a terminal window:
cd ~/src/SARndbox-2.3
pluma etc/SARndbox-2.3/BoxLayout.txt &
The ampersand at the end of the second command will keep the terminal window usable while the text editor is running. Now enter the base plane equation as described in the video. To copy text from a terminal window, highlight the desired text with the mouse, and then either right-click into the terminal window and select “Copy” from the pop-up menu that appears, or press Shift-Ctrl-c. To paste into the text editor, use the “Edit” menu, or press Ctrl-v.
Pro tip: The quickest way to copy&paste text from any window into any other window is: 1: Highlight text in source window with the mouse. 2: Move mouse to destination window and to the location where you want to paste the text, and click the middle mouse button.
- Measure the 3D extents of the sand surface. In the newly-released Kinect-3.2 package, this can be done inside RawKinectViewer as well by following the instructions in this video, starting at 4:10. Make sure to measure the box corners in the order lower-left, lower-right, upper-left, upper-right. After you have copied the box corner positions into the text editor as described in the video, save the file (via the “File” menu or by pressing Ctrl-s), and quit from the text editor (via the “File” menu or by pressing Ctrl-q).
- Align your projector such that its image fills the interior of your sandbox. You can use the calibration grid drawn by Vrui’s XBackground utility as a guide. In a terminal, run:
XBackground
After the window showing the calibration grid appears, press the “f” key to toggle it into full-screen mode. Ensure that the window really covers the entire screen, i.e., that there are no title bar, desktop panel, or other decorations left.
Press Esc to close XBackground’s window when you’re done.
- Calibrate the Kinect camera and the projector with respect to each other by running the CalibrateProjector utility:
cd ~/src/SARndbox-2.3
./bin/CalibrateProjector -s <width> <height>
where <width> <height> are the width and height of your projector’s image in pixels. For example, for an XGA projector like the recommended BenQ, the command would be:
./bin/CalibrateProjector -s 1024 768Very important: switch CalibrateProjector’s window to full-screen mode by pressing F11 before proceeding. Then follow the instructions in this video, starting at 10:10.
- Finally, run the main AR Sandbox application:
cd ~/src/SARndbox-2.3
./bin/SARndbox -uhm -fpv
Switch SARndbox’s window to full-screen mode by pressing F11, or the calibration created in the previous step will not line up.
- Read the “AR Sandbox post-installation setup” post for some additional automation and fine-tuning suggestions.
好,最后一步就是最难的校准了,先给大家看看,我到这一步的效果,是个视频
https://1drv.ms/v/s!AhyyHJSYB2g7itEyj8Rjlu3GoNXgmg
校准就得你们自己去弄了,我做到这里就收拾东西了,因为实在没钱做架子,校准也看不太懂,只知道要记录几个点的位置。还要用圆盘定位

 浙公网安备 33010602011771号