在windows平台下electron-builder实现前端程序的打包与自动更新
 electron-builder A complete solution to package and build a ready for distribution Electron app with “auto update” support out of the box
由于8月份上旬公司开发一款桌面应用程序,在前端开发程序打包更新时遇到一些困扰多日的问题,采用electron-builder最终还是得到解决~
以下是踩坑的过程及对electron打包与更新思路的梳理,electron打包与更新的正确姿势应该如下图所示
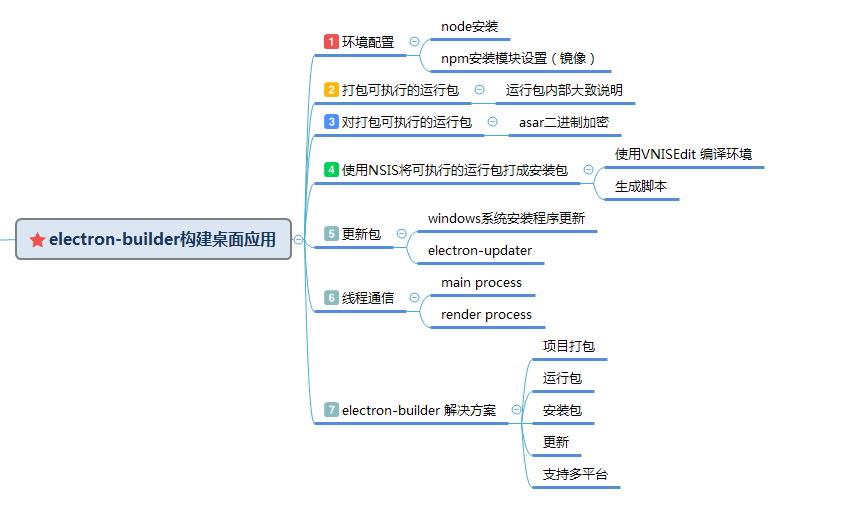
下面将逐一展开描述说明
一、windows系统下环境配置
NPM是随NodeJS一起安装的包管理工具,能解决NodeJS代码部署上的很多问题
- 允许用户从NPM服务器下载别人编写的第三方包到本地使用。
- 允许用户从NPM服务器下载并安装别人编写的命令行程序到本地使用。
- 允许用户将自己编写的包或命令行程序上传到NPM服务器供别人使用。
在windows平台系统下,使用cmd命令设置npm安装模块、electron打包所需环境
npm config set prefix "C:\Program Files (x86)\nodejs\npm_global" 设置全局模块安装路径
npm config set cache "C:\Program Files (x86)\nodejs\npm_cache" 设置缓存文件夹
npm config set registry "https://registry.npm.taobao.org" 设置淘宝镜像
electron npm config set electron_mirror "https://npm.taobao.org/mirrors/electron/"  electron可以通过设置淘宝镜像快速下载
npm config set arch ia32
npm config set target_arch ia32
npm config set disturl https://npm.taobao.org/mirrors/atom-shell
npm config set runtime electron
npm config set build_from_source true
二、打包成可执行的运行包
在electron-quick-start中,配置文件package.json中添加一句,通过npm包管理器npm install依赖模块与 npm install electron-packager --save
"scripts": {
    "package": "electron-packager ./ --overwrite -all"
}
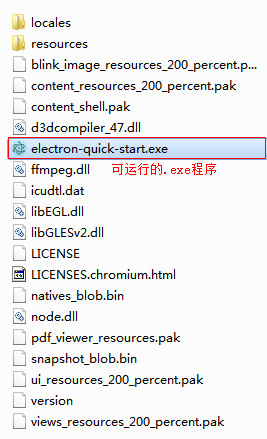
执行npm run package 命令,即可得到可执行运行包,可运行包内部大致说明如下图


由于"../electron-quick-start/electron-quick-start-win32-ia32/resources/app"路径下开发项目代码资源是裸露的,出于安全性和代码保护性考虑
所以需要asar对开发项目资源进行二进制加密,asar加密文件 可读不可写.
三、将打包成可执行的运行包进行asar二进制加密
安装 npm install --save-dev asar
安装完成以后,就可以使用asar命令将裸露程序文件打包了 asar pack ./app app.asar  后将app文件移除掉即可
四、使用NSIS将可执行的运行包打成安装包
在windows系统下采用NSIS将 打包成可安装程序
使用VNISEdit 编译环境具体教程请参考win7下nsis打包exe安装程序教程
生成脚本


  1 ; 该脚本使用 HM VNISEdit 脚本编辑器向导产生
  2
  3 ; 安装程序初始定义常量
  4 !define PRODUCT_NAME "My application"
  5 !define PRODUCT_VERSION "1.0"
  6 !define PRODUCT_PUBLISHER "My company, Inc."
  7 !define PRODUCT_WEB_SITE "http://www.mycompany.com"
  8 !define PRODUCT_DIR_REGKEY "Software\Microsoft\Windows\CurrentVersion\App Paths\electron-quick-start.exe"
  9 !define PRODUCT_UNINST_KEY "Software\Microsoft\Windows\CurrentVersion\Uninstall\${PRODUCT_NAME}"
 10 !define PRODUCT_UNINST_ROOT_KEY "HKLM"
 11
 12 SetCompressor lzma
 13
 14 ; ------ MUI 现代界面定义 (1.67 版本以上兼容) ------
 15 !include "MUI.nsh"
 16
 17 ; MUI 预定义常量
 18 !define MUI_ABORTWARNING
 19 !define MUI_ICON "app.ico"
 20 !define MUI_UNICON "${NSISDIR}\Contrib\Graphics\Icons\modern-uninstall.ico"
 21
 22 ; 欢迎页面
 23 !insertmacro MUI_PAGE_WELCOME
 24 ; 许可协议页面
 25 !insertmacro MUI_PAGE_LICENSE "..\YourSoftwareLicence.txt"
 26 ; 安装目录选择页面
 27 !insertmacro MUI_PAGE_DIRECTORY
 28 ; 安装过程页面
 29 !insertmacro MUI_PAGE_INSTFILES
 30 ; 安装完成页面
 31 !define MUI_FINISHPAGE_RUN "$INSTDIR\electron-quick-start.exe"
 32 !insertmacro MUI_PAGE_FINISH
 33
 34 ; 安装卸载过程页面
 35 !insertmacro MUI_UNPAGE_INSTFILES
 36
 37 ; 安装界面包含的语言设置
 38 !insertmacro MUI_LANGUAGE "SimpChinese"
 39
 40 ; 安装预释放文件
 41 !insertmacro MUI_RESERVEFILE_INSTALLOPTIONS
 42 ; ------ MUI 现代界面定义结束 ------
 43
 44 Name "${PRODUCT_NAME} ${PRODUCT_VERSION}"
 45 OutFile "Setup.exe"
 46 InstallDir "$PROGRAMFILES\My application"
 47 InstallDirRegKey HKLM "${PRODUCT_UNINST_KEY}" "UninstallString"
 48 ShowInstDetails show
 49 ShowUnInstDetails show
 50
 51 Section "MainSection" SEC01
 52   SetOutPath "$INSTDIR"
 53   SetOverwrite ifnewer
 54   File /r "*.*"
 55   CreateDirectory "$SMPROGRAMS\My application"
 56   CreateShortCut "$SMPROGRAMS\My application\My application.lnk" "$INSTDIR\electron-quick-start.exe"
 57   CreateShortCut "$DESKTOP\My application.lnk" "$INSTDIR\electron-quick-start.exe"
 58   File "electron-quick-start.exe"
 59 SectionEnd
 60
 61 Section -AdditionalIcons
 62   WriteIniStr "$INSTDIR\${PRODUCT_NAME}.url" "InternetShortcut" "URL" "${PRODUCT_WEB_SITE}"
 63   CreateShortCut "$SMPROGRAMS\My application\Website.lnk" "$INSTDIR\${PRODUCT_NAME}.url"
 64   CreateShortCut "$SMPROGRAMS\My application\Uninstall.lnk" "$INSTDIR\uninst.exe"
 65 SectionEnd
 66
 67 Section -Post
 68   WriteUninstaller "$INSTDIR\uninst.exe"
 69   WriteRegStr HKLM "${PRODUCT_DIR_REGKEY}" "" "$INSTDIR\electron-quick-start.exe"
 70   WriteRegStr ${PRODUCT_UNINST_ROOT_KEY} "${PRODUCT_UNINST_KEY}" "DisplayName" "$(^Name)"
 71   WriteRegStr ${PRODUCT_UNINST_ROOT_KEY} "${PRODUCT_UNINST_KEY}" "UninstallString" "$INSTDIR\uninst.exe"
 72   WriteRegStr ${PRODUCT_UNINST_ROOT_KEY} "${PRODUCT_UNINST_KEY}" "DisplayIcon" "$INSTDIR\electron-quick-start.exe"
 73   WriteRegStr ${PRODUCT_UNINST_ROOT_KEY} "${PRODUCT_UNINST_KEY}" "DisplayVersion" "${PRODUCT_VERSION}"
 74   WriteRegStr ${PRODUCT_UNINST_ROOT_KEY} "${PRODUCT_UNINST_KEY}" "URLInfoAbout" "${PRODUCT_WEB_SITE}"
 75   WriteRegStr ${PRODUCT_UNINST_ROOT_KEY} "${PRODUCT_UNINST_KEY}" "Publisher" "${PRODUCT_PUBLISHER}"
 76 SectionEnd
 77
 78 /******************************
 79  *  以下是安装程序的卸载部分  *
 80  ******************************/
 81
 82 Section Uninstall
 83   Delete "$INSTDIR\${PRODUCT_NAME}.url"
 84   Delete "$INSTDIR\uninst.exe"
 85   Delete "$INSTDIR\electron-quick-start.exe"
 86
 87   Delete "$SMPROGRAMS\My application\Uninstall.lnk"
 88   Delete "$SMPROGRAMS\My application\Website.lnk"
 89   Delete "$DESKTOP\My application.lnk"
 90   Delete "$SMPROGRAMS\My application\My application.lnk"
 91
 92   RMDir "$SMPROGRAMS\My application"
 93
 94   RMDir /r "$INSTDIR\resources"
 95   RMDir /r "$INSTDIR\locales"
 96
 97   RMDir "$INSTDIR"
 98
 99   DeleteRegKey ${PRODUCT_UNINST_ROOT_KEY} "${PRODUCT_UNINST_KEY}"
100   DeleteRegKey HKLM "${PRODUCT_DIR_REGKEY}"
101   SetAutoClose true
102 SectionEnd
103
104 #-- 根据 NSIS 脚本编辑规则,所有 Function 区段必须放置在 Section 区段之后编写,以避免安装程序出现未可预知的问题。--#
105
106 Function un.onInit
107   MessageBox MB_ICONQUESTION|MB_YESNO|MB_DEFBUTTON2 "您确实要完全移除 $(^Name) ,及其所有的组件?" IDYES +2
108   Abort
109 FunctionEnd
110
111 Function un.onUninstSuccess
112   HideWindow
113   MessageBox MB_ICONINFORMATION|MB_OK "$(^Name) 已成功地从您的计算机移除。"
114 FunctionEnd
五、windows系统安装程序更新
安装npm install electron-updater 在应用中触发更新检查, electron-updater 自动会通过对应url下的yml文件检查更新
在入口文件main.js中需注意
1 //if you don't use ES6: const autoUpdater = require("electron-updater").autoUpdater
2 const autoUpdater = require('electron-updater').autoUpdater
//ipcMain 主线程
const ipcMain = require('electron').ipcMain
autoUpdater
  1 // 检测更新,在你想要检查更新的时候执行,renderer事件触发后的操作自行编写
  2 function updateHandle(){
  3     //minimize
  4     ipcMain.on('hide-window', () => {
  5         mainWindow.minimize();
  6     });
  7     //maximize
  8     ipcMain.on('show-window', () => {
  9         mainWindow.maximize();
 10     });
 11     //unmaximize
 12     ipcMain.on('orignal-window', () => {
 13         mainWindow.unmaximize();
 14     });
 15     //打开默认浏览器
 16     ipcMain.on('open-office-website', function(event, arg){
 17         shell.openExternal(arg)
 18     })
 19
 20     ipcMain.on('check-for-update', function(event, arg) {
 21         let message={
 22             appName:'智卡桌面应用讨论',
 23             error:'检查更新出错, 请联系开发人员',
 24             checking:'正在检查更新……',
 25             updateAva:'检测到新版本,正在下载……',
 26             updateNotAva:'现在使用的就是最新版本,不用更新',
 27             downloaded: '最新版本已下载,将在重启程序后更新'
 28         };
 29         //设置检查更新的 url,并且初始化自动更新。这个 url 一旦设置就无法更改。
 30         const updateFeedUrl='http://www.baidu.com/updates/latest/win/';
 31         if(os.platform()==='darwin'){
 32             updateFeedUrl='http://www.baidu.com/updates/latest/mac/';
 33         }
 34         autoUpdater.setFeedURL(updateFeedUrl);
 35
 36         autoUpdater.on('error', function(error){
 37             return dialog.showMessageBox(mainWindow, {
 38                     type: 'info',
 39                     buttons: ['OK'],
 40                     title: message.appName,
 41                     message: message.errorTips,
 42                     detail: '\r' + message.error
 43                 });
 44
 45             sendUpdateMessage(message.error)
 46         });
 47
 48         //当开始检查更新的时候触发
 49         autoUpdater.on('checking-for-update', function() {
 50             sendUpdateMessage(message.checking)
 51             return dialog.showMessageBox(mainWindow, {
 52                     type: 'info',
 53                     buttons: ['OK'],
 54                     title: message.appName,
 55                     message: message.checking
 56                 });
 57         });
 58
 59         //当发现一个可用更新的时候触发,更新包下载会自动开始
 60         autoUpdater.on('update-available', function(info) {
 61             sendUpdateMessage(message.updateAva)
 62             var downloadConfirmation = dialog.showMessageBox(mainWindow, {
 63                 type: 'info',
 64                 buttons: ['OK'],
 65                 title: message.appName,
 66                 message: message.updateAva
 67             });
 68             if (downloadConfirmation === 0) {
 69                 return;
 70             }
 71         });
 72
 73         //当没有可用更新的时候触发
 74         autoUpdater.on('update-not-available', function(info) {
 75             return dialog.showMessageBox(mainWindow, {
 76                 type: 'info',
 77                 buttons: ['OK'],
 78                 title: message.appName,
 79                 message: message.updateNotAva
 80             });
 81             sendUpdateMessage(message.updateNotAva)
 82         });
 83
 84         // 更新下载进度事件
 85         autoUpdater.on('download-progress', function(progressObj) {
 86             mainWindow.webContents.send('downloadProgress', progressObj)
 87         })
 88         /**
 89          *  event Event
 90          *  releaseNotes String - 新版本更新公告
 91          *  releaseName String - 新的版本号
 92          *  releaseDate Date - 新版本发布的日期
 93          *  updateURL String - 更新地址
 94          * */
 95         autoUpdater.on('update-downloaded',  function (event, releaseNotes, releaseName, releaseDate, updateUrl, quitAndUpdate) {
 96             var index = dialog.showMessageBox(mainWindow, {
 97                 type: 'info',
 98                 buttons: ['现在重启', '稍后重启'],
 99                 title: message.appName,
100                 message: message.downloaded,
101                 //detail: releaseName + "\n\n" + releaseNotes
102             });
103             console.log(index);
104             if (index === 1) return;
105             //在下载完成后,重启当前的应用并且安装更新
106             autoUpdater.quitAndInstall();
107             //通过main进程发送事件给renderer进程,提示更新信息
108             //mainWindow.webContents.send('isUpdateNow')
109         });
110
111         //执行自动更新检查
112         autoUpdater.checkForUpdates();
113     });
114 }
Squirrel.Windows 是windows系统下electron-updater 检查更新lib库
关于Squirrel.Windows 更详细说明,请连接至 https://github.com/Squirrel/Squirrel.Windows
Squirrel is both a set of tools and a library, to completely manage both installation and updating your Desktop Windows application,
written in either C# or any other language (i.e., Squirrel can manage native C++ applications).

六、主线程与渲染线程之间通信
点击更新按钮后
1 //检查更新
2  $("#accLogin").find(".T-updateApp").on("click", function() {
3          setTimeout(function() {
4              //update 渲染进程
5              ipcr.send('check-for-update', 'event-update');
6          }, 20);
7 });
触发主线程(上述步骤五 updateHandle 方法中) ipcMain.on('check-for-update', function(event, arg) { //执行操作 }) 检查更新 autoUpdater各种状态
ipcMain.on('check-for-update', function(event, arg) {
        //设置检查更新的 url,并且初始化自动更新。这个 url 一旦设置就无法更改。
        const updateFeedUrl='http://www.baidu.com/updates/latest/win/';
        if(os.platform()==='darwin'){
            updateFeedUrl='http://www.baidu.com/updates/latest/mac/';
        }
        autoUpdater.setFeedURL(updateFeedUrl);

        autoUpdater.on('error', function(error){});

        //当开始检查更新的时候触发
        autoUpdater.on('checking-for-update', function() {});

        //当发现一个可用更新的时候触发,更新包下载会自动开始
        autoUpdater.on('update-available', function(info) {});

        //当没有可用更新的时候触发
        autoUpdater.on('update-not-available', function(info) {});

        // 更新下载进度事件
        autoUpdater.on('download-progress', function(progressObj) {})
        /**
         *  event Event
         *  releaseNotes String - 新版本更新公告
         *  releaseName String - 新的版本号
         *  releaseDate Date - 新版本发布的日期
         *  updateURL String - 更新地址
         * */
        autoUpdater.on('update-downloaded',  function (event, releaseNotes, releaseName, releaseDate, updateUrl, quitAndUpdate) {});

        //执行自动更新检查
        autoUpdater.checkForUpdates();
});
七、electron-builder 解决方案(项目打包、运行包、安装包、更新、支持多平台)
A complete solution to package and build a ready for distribution Electron app with “auto update” support out of the box
(大致意思 electron-builder一个完整的解决方案,打包和建立一个分发的electron程序与“auto update”支持开箱即用)
通过以上六点知识总结,不难理解electron-builder,这里附一package.json配置文件,后面博主将抽时间写一篇关于electron-builder打包、更新更详细文章
{
  "name": "electron-build",
  "version": "1.6.13",
  "main": "src/main.js",
  "description": "electron-build project",
  "author": "Avenstar",
  "license": "",
  "devDependencies": {
    "electron": "^1.4.15",
    "electron-builder": "^12.3.1"
  },
  "dependencies": {
    "electron-updater": "^1.4.2"
  },
  "scripts": {
    "pack": "electron-builder --dir",
    "build": "electron-builder",
    "dev": "electron src/main.js"
  },
  "keywords": [
    "electron",
    "updater",
    "update",
    "mac",
    "osx",
    "linux",
    "desktop"
  ],
  "build": {
    "appId": "com.cilent.app.electronbuild",
    "productName": "electron-build",
    "directories": {
      "output": "build"
    },
    "files": [
      "src/**/*",
      "node_modules/**/*",
      "package.json"
    ],
    "dmg": {
      "contents": [
        {
          "x": 410,
          "y": 150,
          "type": "link",
          "path": "/Applications"
        },
        {
          "x": 130,
          "y": 150,
          "type": "file"
        }
      ]
    },
    "mac": {
      "category": "your.app.category.type",
       "icon": "static/icons/app.icns",
      "target": [
        "zip",
        "dmg"
      ],
      "publish": [
        {
          "provider":"generic",
          "url":"http://www.baidu.com/updates/latest/mac/"
        }
      ]
    },
    "win": {
      "icon": "static/icons/icon.ico",
      "target": [
        "nsis",
        "zip"
      ],
      "publish": [
        {
          "provider":"generic",
          "url":"http://www.baidu.com/updates/latest/win/"
        }
      ]
    },
    "linux": {
      "icon": "static/icons"
    },
    "nsis":{
      "oneClick":true,
      "artifactName":"${productName}-setup-${version}.${ext}"
    }
  }
}
资料参考
https://simulatedgreg.gitbooks.io/electron-vue/content/en/using-electron-builder.html#auto-updating
https://simulatedgreg.gitbooks.io/electron-vue/content/en/using-electron-builder.html#auto-updating
https://changkun.us/archives/2017/03/217/?utm_source=tuicool&utm_medium=referral
https://github.com/amhoho/electron-cn-docs
https://segmentfault.com/a/1190000010271226
https://segmentfault.com/a/1190000004863646
https://github.com/electron-userland/electron-builder
https://github.com/Squirrel/Squirrel.Windows
https://segmentfault.com/a/1190000008287730

 浙公网安备 33010602011771号