【插件开发】—— 5 SWT控件以及布局使用
前文回顾:
1 插件学习篇
4 SWT编程须知
经过前几篇的介绍,多少对SWT又有了一些认识,那么这篇继续来看一下一些控件的组合使用。
首先是几种简单的控件,Label,Text,Button,Combo这些都是些常用的简单框架,但是为了能够构造出整齐的布局,还是要多花些心思的。
除了这些简单的控件外,还有点复杂的控件,比如Table和树、选项卡和菜单等等,这里就先不做介绍了。
为了整个这些控件,经常要使用两个组合控件以及多种布局。
1 【Group 组】,这个组可以为我们生成一个带有线的框,这样可以把杂乱的控件放到一个规整的容器内。
2 【Composite 组合控件】,它是为了拼接一些简单的控件,形成具有复杂功能的整合控件。
比如文件路径的浏览,往往就需要一个文件浏览的按钮,和一个文本框。
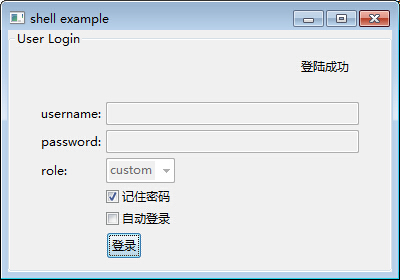
这里先放出一段代码,代码中使用到了简单的布局模型GridLayout(),以及组和组合控件,还有一些简单的控件。形成一个登陆界面,并且单击按钮可以出发响应事件。效果图如下:
登录前:

登陆后:
实现代码如下:
  1 package com.xingoo.plugin.swttest.test;
  2
  3 import org.eclipse.swt.SWT;
  4 import org.eclipse.swt.events.SelectionAdapter;
  5 import org.eclipse.swt.events.SelectionEvent;
  6 import org.eclipse.swt.layout.FillLayout;
  7 import org.eclipse.swt.layout.GridData;
  8 import org.eclipse.swt.layout.GridLayout;
  9 import org.eclipse.swt.widgets.Button;
 10 import org.eclipse.swt.widgets.Combo;
 11 import org.eclipse.swt.widgets.Composite;
 12 import org.eclipse.swt.widgets.Group;
 13 import org.eclipse.swt.widgets.Label;
 14 import org.eclipse.swt.widgets.MessageBox;
 15 import org.eclipse.swt.widgets.Shell;
 16 import org.eclipse.swt.widgets.Text;
 17
 18 import com.xingoo.plugin.swttest.Abstract.AbstractExample;
 19
 20 public class Test extends AbstractExample{
 21     private Label infoLabel;
 22     private Text usernameText;
 23     private Text passwordText;
 24     private Combo roleCombo;
 25
 26     public static void main(String[] args) {
 27         new Test().run();
 28     }
 29     public void todo(Shell shell) {
 30         Group testGroup = new Group(shell,SWT.NONE);
 31         testGroup.setText("User Login");
 32         GridLayout layout = new GridLayout();
 33         layout.numColumns = 2;
 34         layout.marginWidth = 30;
 35         layout.marginHeight = 10;
 36         testGroup.setLayout(layout);
 37         testGroup.setLayoutData(new GridData(GridData.FILL_HORIZONTAL));
 38         {
 39             Composite composite = new Composite(testGroup,SWT.NONE);
 40             GridLayout layoutComposite = new GridLayout();
 41             layoutComposite.numColumns = 2;
 42             layoutComposite.marginHeight = 1;
 43             composite.setLayout(layoutComposite);
 44             composite.setLayoutData(new GridData(SWT.FILL,SWT.FILL,true,true,2,2));
 45
 46             infoLabel = new Label(composite,SWT.NONE);
 47             infoLabel.setText("请输入用户名 密码");
 48             infoLabel.setLayoutData(new GridData(GridData.FILL_BOTH));
 49             infoLabel.setAlignment(SWT.RIGHT);
 50         }
 51         {
 52             Label usernameLabel = new Label(testGroup,SWT.NONE);
 53             usernameLabel.setText("username:");
 54
 55             usernameText = new Text(testGroup,SWT.BORDER);
 56             usernameText.setLayoutData(new GridData(GridData.FILL_HORIZONTAL));
 57         }
 58         {
 59             Label passwordLabel = new Label(testGroup,SWT.NONE);
 60             passwordLabel.setText("password:");
 61
 62             passwordText = new Text(testGroup,SWT.BORDER | SWT.PASSWORD);
 63             passwordText.setLayoutData(new GridData(GridData.FILL_HORIZONTAL));
 64         }
 65         {
 66             Label roleLabel = new Label(testGroup,SWT.NONE);
 67             roleLabel.setText("role:");
 68
 69             roleCombo = new Combo(testGroup,SWT.DROP_DOWN);
 70             roleCombo.setItems(new String[]{"Admin","custom"});
 71             roleCombo.select(1);
 72         }
 73         {
 74             new Label(testGroup,SWT.NONE);
 75
 76             Button rememberPWBtn = new Button(testGroup,SWT.CHECK);
 77             rememberPWBtn.setText("记住密码");
 78         }
 79         {
 80             new Label(testGroup,SWT.NONE);
 81
 82             Button autoLoginBtn = new Button(testGroup,SWT.CHECK);
 83             autoLoginBtn.setText("自动登录");
 84         }
 85         {
 86             new Label(testGroup,SWT.NONE);
 87
 88             Button loginBtn = new Button(testGroup,SWT.PUSH);
 89             loginBtn.setText("登录");
 90
 91             loginBtn.addSelectionListener(new SelectionAdapter() {
 92                 public void widgetSelected(SelectionEvent evt){
 93                     infoLabel.setText("登陆成功");
 94
 95                     usernameText.setText("");
 96                     usernameText.setEnabled(false);
 97
 98                     passwordText.setText("");
 99                     passwordText.setEnabled(false);
100
101                     roleCombo.setEnabled(false);
102                 }
103             });
104         }
105     }
106 }
注意其中的一些技巧:
30-36行:我们创建了一个组控件,并且使用了网格布局,设置每行有两列。并且设置了组内填充边界,marginWidth以及marginHeight。
39-49行:我们创建了一个组合对象,使他占有了两个列元素。并且设置组内为两列的网格布局。
关于事件的监听,之后也会搜集整理出一些常用的事件。
剩下的就比较好理解了,当没有空间元素填补的时候,为了防止布局错乱,创建了一个空的Label对象用来占位。
new Label(testGroup,SWT.NONE);
这里面使用到了一个前文提到的抽象类,这里再贴出来一次。
 1 package com.xingoo.plugin.swttest.Abstract;
 2
 3 import org.eclipse.swt.layout.FillLayout;
 4 import org.eclipse.swt.widgets.Display;
 5 import org.eclipse.swt.widgets.Shell;
 6
 7 public abstract class AbstractExample{
 8     public void run(){
 9         Display display = new Display();
10         Shell shell = new Shell(display);
11         shell.setText("shell example");
12         shell.setBounds(200,200,400,280);
13         shell.setLayout(new FillLayout());
14         todo(shell);
15         shell.open();
16
17         while(!shell.isDisposed()){
18             if(!display.readAndDispatch())
19                 display.sleep();
20         }
21         //dispose the resource
22         display.beep();
23         display.dispose();
24     }
25     public abstract void todo(Shell shell);//extension something here
26 }
后续将会更新,复杂控件以及布局模型的介绍。

 浙公网安备 33010602011771号