

Neutron VxLAN + Linux Bridge 环境中的网络 MTU
1. 基础知识
1.1 MTU
要增加一个网络接口 MTU 的常见原因是增加高速因特网的吞吐量。标准因特网 MTU 使用 1500byte是为了和 10M 和 100M 网络后向兼容,但是,在目前1G和 10G网络中远远不够。新式的网络设备可以处理更大的MTU,但是,MTU需要显式设置。这种更大MTU的帧叫做“巨帧”,通常 9000 byte 是比较普遍的。
- 满足另一个网络的MTU的需要(为了消除UDP分包,以及需要TCP PMTU discover )
- 满足 ATM cell 的要求
- 在搞出错率线路上提高吞吐量
MTU 不能和目前任何 Internet 网络协议混在一起,但是,可以使用一个路由器将不同 MTU 的网段连在一起。
修改配置网络接口 MTU 的方式:
- 自动的:通过 DHCP MTU 广告。注意,只有 DHCP 租期被续了以后,MTU 设置才会生效。你可以将网络接口 down 再 up 强制它马上生效。
- 手动临时性的:ifconfig eth0 mtu 9000
- 永久性的:修改 network interface 定义文件。以 Debian/Ubuntu 为例,
auto eth0
iface eth0 inet static
        address 192.168.0.2
        netmask 255.255.255.0
        mtu 9000
1.2 VxLAN 封包(Mac-in-UDP,以 ping 产生的 ICMP 包为例)和 MTU
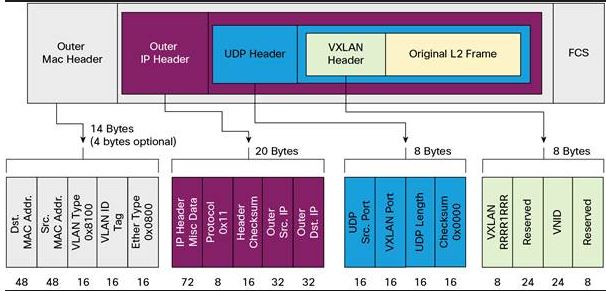
| 步骤 | 操作/封包 | 协议 | 长度 | MTU |
| 1 | ping -s 1422 | ICMP | 1430 = 1422 + 8 (ICMP header) | |
| 2 | L3 | IP | 1450 = 1430 + 20 (IP header) | VxLAN Interface 的 MTU |
| 3 | L2 | Ethernet | 1464 = 1450 + 14 (Ethernet header) | |
| 4 | VxLAN | UDP | 1480 = 1464 + 8 (VxLAN header) + 8 (UDP header) | |
| 5 | L3 | IP | 1500 = 1480 + 20 (IP header) | 物理网卡的(IP)MTU,它不包括 Ethernet header 的长度 |
| 6 | L2 | Ethernet | 1514 = 1500 + 14 (Ethernet header) | 最大可传输帧大小 |
因此,VxLAN 的 overhead 是1514- 1464 = 50 byte。
1.3 GRE 封包(IP-in-IP,以 ping 产生的 ICMP 包为例)和 MTU

| 步骤 | 操作/封包 | 协议 | 长度 | 备注 |
| 1 | ping -s 1448 | ICMP | 1456 = 1448 + 8 (ICMP header) | ICMP MSS |
| 2 | L3 | IP | 1476 = 1456 + 20 (IP header) | GRE Tunnel MTU |
| 3 | L2 | Ethernet | 1490 = 1476 + 14 (Ethernet header) | 经过 bridge 到达 GRE |
| 4 | GRE | IP | 1500 = 1476 + 4 (GRE header)+ 20 (IP header) | 物理网卡 (IP)MTU |
| 5 | L2 | Ethernet | 1514 = 1500 + 14 (Ethernet header) | 最大可传输帧大小 |
因此,GRE 的 overhead 是 1514 - 1490 = 24 byte(为啥 Neutron 中的 GRE overhead 是 42?)。
可见,使用 GRE 可以比使用 VxLAN 每次可以多传输 1448 - 1422 = 26 byte 的数据。
1.4 IP Fragmentation (分包) 和 Path Maximum Transmission Unit Discovery (PMTUD)
1.4.1 IP 分包
先谈几个要点:
- 分包是指将一个IP包分成多个传输,在接收端 IP 层重新组装
- 一个 IP 包能否分包,取决于它的 DF 标志位:DF bit (0 = "may fragment," 1 = "don't fragment")
- 分包后,每个分段有 MF 标志位:MF bit (0 = "last fragment," 1 = "more fragments")
分包示例:
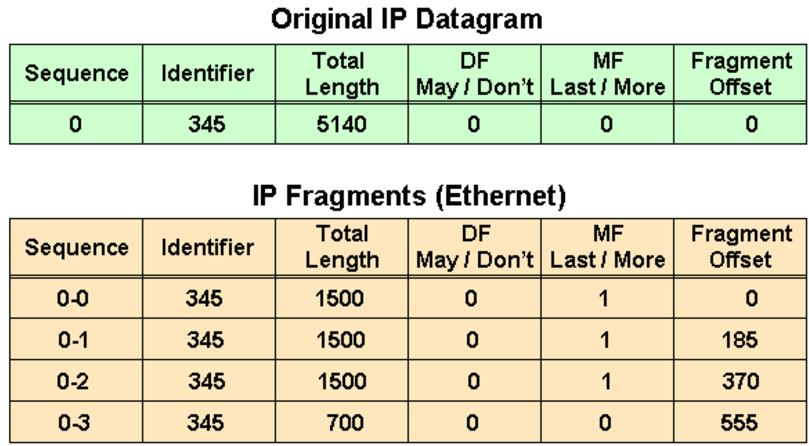
第一个表格中:
- IP 包长度 5140,包括 5120 bytes 的 payload
- DF = 0, 允许分包
- MF = 0, 这是未分包
第二个表格中:
- 0-0 第一个分包: 长度 1500 = 1480 (payload) + 20 (IP Header). Offset(起始偏移量): 0
- 0-1 第二个分包: 长度 1500 = 1480 (payload) + 20 (IP Header). Offset: 185 = 1480 / 8
- 0-2 第三个分包: 长度 1500 = 1480 (payload) + 20 (IP Header). Offset: 370 = 185 + 1480/8
- 0-3 第四个分包: 长度 700 = 680 (payload, = (5140 - 20) - 1480 * 3) + 20 (IP Header) . Offset: 555 = 370 + 1480/8
需要注意的是,只有第一个包带有原始包的完整 IPv4 + TCP/UDP 信息,后续的分包只有 IPv4 信息。
分包带来的问题:
- sender overhead:需要消耗 CPU 去分包,包括计算和数据拷贝。
- receiver overhead:重新组装多个分包。在路由器上组装非常低效率,因此组装往往在接收主机上进行。
- 重发 overhead:一个分包丢失,则整个包需要重传。
- 在多个分包出现顺序错开时,防火墙可能将分到当无效包处理而丢弃。
1.4.2 TCP MSS:TCP Maximum Segment Size (TCP 最大段长)
TCP MSS,是指一个接收方期望在一个 TCP/IP 报文里面接收的数据(payload)的长度。

MSS 的值受两个值的约束:发送方和接收方的用于存储一个 TCP/IP 报文中的TCP数据的buffer 的长度的小者,以及该值和整个传输路径的最小 MTU 减去40 的小者。而最小MTU 由 PMTU 确定。
1.4.3 PMTU 路径MTU发现
PMTU 的用途是动态的确定从发送端到接收端整个路径上的最小 MTU,从而避免分包。注意,PMTU 只支持 TCP,对其他协议比如 UDP 无效。而且,如果发送方已经开启了 PMTU,那么它发送的所有 TCP/IP 包的 DF 标志都被设置为 1 即不再允许分包。当网络路径上某个路由器发现发送者的包因为超过前面转发路径的 MTU 而无法发送时,它向发送者返回一个 ICMP "Destination Unreachable" 消息,其中包含了那个 MTU,然后发送者就会在它的路由表中将该mtu值保存下来,再使用较小的 MTU 重新发出新的较小的包。
在 Linux 系统上,可以打开或者关闭 PMTU:
/proc/sys/net/ipv4/ip_no_pmtu_disc #0,打开,默认值;1,关闭 (sysctl -w net.ipv4.ip_no_pmtu_disc=1)
Set this if you want to disable Path MTU discovery - a technique to determine the largest Maximum Transfer Unit possible on your path. See also the section on Path MTU discovery in the Cookbook chapter.
一个路由器作为主机包的转发者的通常做法:
- 检查 IP 包的 DF 标志位
- 检查 IP 包的 大小是否超过带转发端口的 MTU
- 如果超过,而且 DF = 0 ,则将它分成多个包再发送 (分包)
- 如果超过,而且 DF = 1,则向发生着返回一个 ICMP 消息,并将包丢弃 (PMTU)
- 如果不超过,则转发 (转发)
例子1:超过 MTU,DF = 0 => 路由器分包、发送,接收主机组装
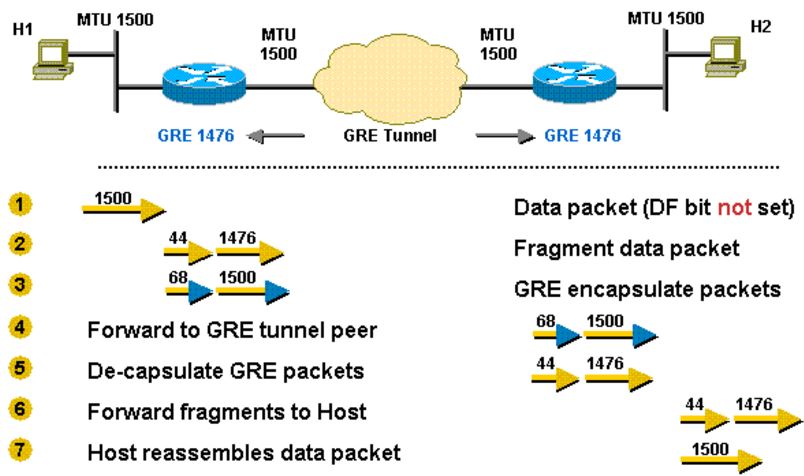
例子2:超过,DF = 1 => PMTU,发送者重新以小包发送

更多例子,请参考 Resolve IP Fragmentation, MTU, MSS, and PMTUD Issues with GRE and IPSEC
2. Linux vxlan + bridge 环境中的网络栈和 MTU
2.1 QEMU/KVM 计算节点上的网络栈
2.1.1 协议栈

- 红线:QEMU/KVM 主机网卡接收外部网络包并发给虚机
- 黑线:虚机上的应用发出网络包经过 QEMU/KVM 主机网卡发出
补充说明一下使用 virtio_net 时客户机网卡 eth0 和 主机上的 tap 设备之间的关系:
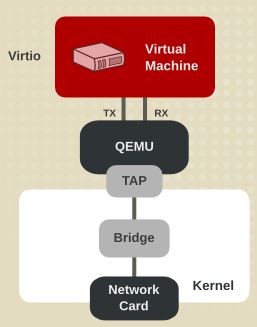
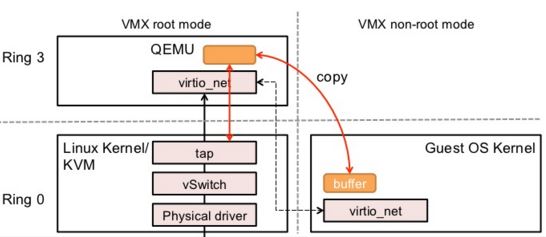
- 虚机的网络流量是通过 virtio_net queue 发到 QEMU/KVM 主机上的 QEMU 的
- QEMU 再交给主机上的 tap 设备
可见,eth0 和 tap 设备是不直接连接的,而是需要经过 QEMU。
2.1.2 各个 network interface 的 MTU
每个 network interface 都可以设置不同的 MTU,用来限制经过它的最大 IP payload 的长度。这些 network interface 包括:
- 虚机 eth0
- 主机 tap 设备
- 主机 vxlan interface
- 主机 网卡 eth1
| 网络接口 | MTU | 来源 | 说明 |
| 物理网卡 eth0 | 1500 | 安装系统时指定,未指定则使用默认值 1500 | 用于虚机的数据网络的物理网卡 |
| vxlan interface | 1450 | 由 linux vxlan 内核模块创建该interface对应的 ip 设备时指定,其 MTU 为绑定的网卡的MTU 值减去 50 | |
| tap 设备 | 1450 |
由 linux bridge 在添加 tap 到 linux bridge 时指定为该 bridge 所有 port 的最小 MTU。 |
和虚机 eth0 通过 QEMU virtio 连接 |
| 虚机 eth0 | 1450 | 当 Neutron DHCP 的 advertise_mtu 配置项有设置值时,由该值决定;否则,使用默认的 1500 | neutron 代码 |
从上图也可以看出,
- 主机网卡 eth1 的默认 MTU 是 1500 bytes,当然你可以修改
- 网络包经过 vxlan interface 到达 eth1 的过程中,Linux vxlan 内核模块会将网络包二层帧封装成 UDP 包,因此,vxlan interface 必须设置适当的 MTU 来限制通过它的网络包的大小(从 1.2 章节可以看出,vxlan interface 的 MTU 需要比它所绑定的物理网卡的 MTU 小 50),否则,封装后的包会被 eth1 丢弃。
- tap 设备和虚机 eth0 的 MTU 是相同的,因为 QEUM 只是转发,而没做封装之类的处理。而因为 vxlan interface MTU 需要缩小,因此它们的 MTU 也要相应缩小。因为 eth0 到 vxlan interface 之间没什么包封装,因此,它们的 MTU 可以一致。
2.2 Neutron 网络节点上的协议栈
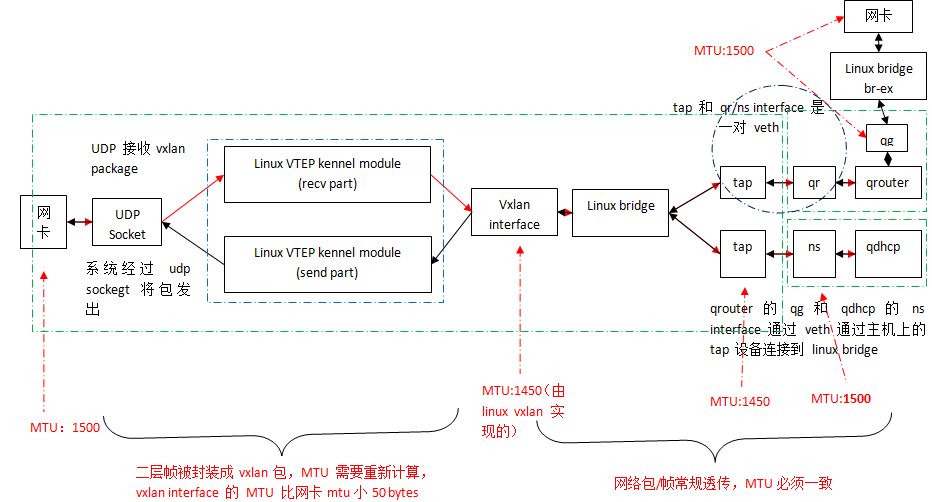
| 网络接口 | MTU | 来源 | 说明 |
| 物理网卡 eth0 | 1500 | 安装系统时指定,未指定则使用默认值 | 用于虚机的数据网络的物理网卡 |
| vxlan interface | 1450 |
由 linux vxlan 内核模块创建该interface对应的 ip 设备时指定,其 MTU 为绑定的网卡的MTU 值减去 50 |
tap 和 qr/ns/qg 是 veth 的两端 |
| tap 设备 | 1450 |
由 linux bridge 在添加 tap 到 linux bridge 时指定为该 bridge 所有 port 的最小 MTU。因为 vxlan interface 的 MTU 是 1450, 因此tap 设备的 MTU 也是 1450. |
|
| qr/ns/qg network interface 及对应的tap设备 | 1500 |
由 Neutorn 根据其配置项 conf.network_device_mtu 来设置:设置了其值时,设置MTU为该值;否则,不指定时,则使用默认值1500。 可见这里有个问题,这个 MTU 和 tap 的 MTU 应该一致,但是 conf.network_device_mtu 没有默认值,因此不配置该值的时候,其 MTU 为 1500,这将导致和 tap 的 MTU 不一致。后面会分析该不一致导致的问题。 |
neutron 代码 |
| 物理网卡 eth1 | 1500 | neutorn 有配置项时使用配置的值,具体见下面的分析;没有时,使用默认值 1500. | 用于访问外网的物理网卡 |
3. 实验和分析
3.1 Neutorn 网络节点的 eth1 使用默认 MTU 1500,其它设备使用 MTU 1450
(1)网络节点上:在 qdhcp network name 中执行 ping 命令:指定数据大小为 1422,加上 ICMP header 8 字节和 IP header 20 字节,共 1450 字节。
root@controller:~# ip netns exec qdhcp-18fc2ba1-057c-4c88-b523-8470fc31ecc1 ping -M do -i 1 -c 2 -s 1422 70.0.0.150
PING 70.0.0.150 (70.0.0.150) 1422(1450) bytes of data.
1430 bytes from 70.0.0.150: icmp_seq=1 ttl=64 time=1.89 ms
1430 bytes from 70.0.0.150: icmp_seq=2 ttl=64 time=1.47 ms
(2)网络节点上:tap 设备收到的 ethernet frame 长度为 1464 (IP 包总长 1450 字节 + ethernet header 14 字节)
17:21:22.327944 fa:16:3e:32:35:ef > fa:16:3e:85:06:8e, ethertype IPv4 (0x0800), length 1464: (tos 0x0, ttl 64, id 0, offset 0, flags [DF], proto ICMP (1), length 1450)
    70.0.0.100 > 70.0.0.150: ICMP echo request, id 18979, seq 1, length 1430
(3)网络节点上:vxlan interface 收到的frame 和 tap 设备收到的是一样的,长度 1464
17:23:44.027648 fa:16:3e:32:35:ef > fa:16:3e:85:06:8e, ethertype IPv4 (0x0800), length 1464: (tos 0x0, ttl 64, id 0, offset 0, flags [DF], proto ICMP (1), length 1450)
    70.0.0.100 > 70.0.0.150: ICMP echo request, id 19059, seq 1, length 1430
(4)网络节点上:用于虚机数据网络的网卡 eth1 收到的帧长 1514 (1464 + vxlan header 8 + udp header 8 + IP header 20 + ethernet header 14 = 1514 )
17:27:27.577163 52:54:00:7c:c0:79 > fa:80:13:21:6b:56, ethertype IPv4 (0x0800), length 1514: (tos 0x0, ttl 64, id 9573, offset 0, flags [none], proto UDP (17), length 1500) # vxlan 封包帧
    10.0.0.10.56309 > 10.0.0.13.8472: [no cksum] OTV, flags [I] (0x08), overlay 0, instance 1074
fa:16:3e:32:35:ef > fa:16:3e:85:06:8e, ethertype IPv4 (0x0800), length 1464: (tos 0x0, ttl 64, id 0, offset 0, flags [DF], proto ICMP (1), length 1450) #原始二层帧
    70.0.0.100 > 70.0.0.150: ICMP echo request, id 19163, seq 2, length 1430
注意:eth1 的 MTU 是 1500,但是 1500 是指 IP 包的最大长度,而不将 ethernet header 计算在内,因此,此帧可以被顺利发到物理网络。
(5)计算节点上:物理网卡 eth1 收到的帧长是 1514
17:46:42.039327 52:54:00:7c:c0:79 > 01:00:5e:00:00:01, ethertype IPv4 (0x0800), length 1514: (tos 0x0, ttl 1, id 61037, offset 0, flags [none], proto UDP (17), length 1500)
    10.0.0.10.56309 > 224.0.0.1.8472: [no cksum] OTV, flags [I] (0x08), overlay 0, instance 1074
fa:16:3e:32:35:ef > fa:16:3e:85:06:8e, ethertype IPv4 (0x0800), length 1464: (tos 0x0, ttl 64, id 0, offset 0, flags [DF], proto ICMP (1), length 1450)
    70.0.0.100 > 70.0.0.150: ICMP echo request, id 19375, seq 1, length 1430
(6)计算节点上:vxlan interface 收到的帧长为 1464。可见,它收到的包已经经过 linux vxlan 内核模块解包了。
17:48:27.051651 fa:16:3e:32:35:ef > fa:16:3e:85:06:8e, ethertype IPv4 (0x0800), length 1464: (tos 0x0, ttl 64, id 0, offset 0, flags [DF], proto ICMP (1), length 1450)
    70.0.0.100 > 70.0.0.150: ICMP echo request, id 19412, seq 1, length 1430
(7)计算节点上:包顺利到底 tap 和 虚机的 eth0,直至 ICMP 协议处理函数。
3.2 Neutorn 网络节点的 eth1 使用默认 MTU 1500,其它设备使用默认 MTU,其中 ns 的 MTU 为 1500。有诡异的问题。
(1)同样在 qdhcp namespace 中执行 ping 操作。考虑到其 MTU 为 1500,因此,最大的数据块长度可以为 1500 - 28 = 1472。但是没有收到回应包,失败。
root@controller:~# ip netns exec qdhcp-18fc2ba1-057c-4c88-b523-8470fc31ecc1 ping -M do -i 1 -c 2 -s 1472 70.0.0.150
PING 70.0.0.150 (70.0.0.150) 1472(1500) bytes of data.
而在对应的 tap 设备上,tcpdump 没有输出。因此可以看出,因为 tap 设备的 MTU 是 1450,导致长度为 1500 的包没法通过。
(2)同样在 qdhcp namespace 中执行 ping 操作,但是不设置数据长度,其 IP 包长度为 84。成功。这是因为 IP 包长度 84 是在 MTU 范围之内。
root@controller:~# ip netns exec qdhcp-18fc2ba1-057c-4c88-b523-8470fc31ecc1 ping -M want -i 1 -c 2 70.0.0.150
PING 70.0.0.150 (70.0.0.150) 56(84) bytes of data.
64 bytes from 70.0.0.150: icmp_seq=1 ttl=64 time=1.99 ms
64 bytes from 70.0.0.150: icmp_seq=2 ttl=64 time=1.37 ms
在 tap 设备上的帧长度为 98 = 84 + ethernet header 14 字节
17:47:42.335841 fa:16:3e:32:35:ef > fa:16:3e:85:06:8e, ethertype IPv4 (0x0800), length 98: (tos 0x0, ttl 64, id 26932, offset 0, flags [DF], proto ICMP (1), length 84)
    70.0.0.100 > 70.0.0.150: ICMP echo request, id 19734, seq 1, length 64
(3)从 qrouter 中使用 ssh 连接虚机(第一次连接一个新虚机),ssh 停留在 “debug1: SSH2_MSG_KEXINIT sent”,失败
root@controller:~/s1# ip netns exec qrouter-b94a203d-5317-4d0b-9833-5c65e01bd76f ssh -i ubuntu.pem ibmcloud@70.0.0.152 -vvv
OpenSSH_6.6.1, OpenSSL 1.0.1f 6 Jan 2014
debug1: Reading configuration data /etc/ssh/ssh_config
...
debug3: load_hostkeys: loading entries for host "70.0.0.152" from file "/root/.ssh/known_hosts"
debug3: load_hostkeys: loaded 0 keys
debug1: SSH2_MSG_KEXINIT sent
在 ns 端口对应的 tap 设备上做 tcpdump,看起来象是客户端的 ssh 有关数据在发往虚机的过程中被截断了:
18:40:35.405723 fa:16:3e:32:35:ef > fa:16:3e:3f:3b:2a, ethertype IPv4 (0x0800), length 96: (tos 0x0, ttl 64, id 29605, offset 0, flags [DF], proto UDP (17), length 82)
    70.0.0.100.53 > 70.0.0.152.58164: [bad udp cksum 0x8d4b -> 0x0ff4!] 397 Refused q: A? changelogs.ubuntu.com.openstacklocal. 0/0/0 (54)
18:40:35.406534 fa:16:3e:3f:3b:2a > fa:16:3e:32:35:ef, ethertype IPv4 (0x0800), length 96: (tos 0x0, ttl 64, id 43407, offset 0, flags [DF], proto UDP (17), length 82)
    70.0.0.152.58164 > 70.0.0.100.53: [udp sum ok] 41422+ AAAA? changelogs.ubuntu.com.openstacklocal. (54)
(4)将 qrouter 的 qr inteface 的 MTU 改为 1450,则 ssh 成功。查看成功连接过程中的数据包,只发现下面的包比较可疑,因为它达到了物理网络的 MTU:
18:51:58.539087 52:54:00:7c:c0:79 > fa:80:13:21:6b:56, ethertype IPv4 (0x0800), length 1514: (tos 0x0, ttl 64, id 31536, offset 0, flags [none], proto UDP (17), length 1500)
fa:16:3e:19:15:fe > fa:16:3e:3f:3b:2a, ethertype IPv4 (0x0800), length 1464: (tos 0x0, ttl 64, id 19222, offset 0, flags [DF], proto TCP (6), length 1450)
    70.0.0.1.56611 > 70.0.0.152.22: Flags [.], cksum 0xd128 (correct), seq 44:1442, ack 42, win 221, options [nop,nop,TS val 25021385 ecr 218717], length 1398
当 MTU 是 1500 的话,该帧的大小将会是 1564,它超过了其它网络接口的 MTU,因此,它应该无法到达虚机。但是,这只是猜测,具体原因未知,但是修改 MTU 为 1450 确实可以解决问题。
4. Neutron MTU 方案
Neutron 这个 ticket Linux Bridge MTU bug when the VXLAN tunneling is used 解释了这个问题,并给出了方案。再简单总结一下问题和原因:
- 默认地,物理网卡的 MTU 为 1500 字节。
- Linux vxlan 在创建 vxlan interface 时,设置其 MTU 为所绑定物理网卡 MTU 减去 50,即 1450.
- Linux bridge 上的其它 tap 设备,包括虚机的网卡、network namespace (包括 l3 和 dhcp)的 interface 相应的 tap 设备的 MTU 都是 1450.
- 默认情况下,虚机的网卡、network namespace (包括 l3 和 dhcp)的 interface 的 MTU 都是 1500。
- 因此,虚机和 network namespace 中的软件产生的数据包在通过这些 network interface 转发到 vxlan interface 时如果其数据帧超过 (1450 + 14 = 1464)字节时将会被丢弃,这将导致一些奇怪的问题,比如上面谈到的 ssh 无法连接等。
下面分别介绍两个workaround。
4.1 增加物理网卡和相关 linux bridge interface 的 MTU
在虚机网络接口使用默认 MTU 1500 时,
(1)需要设置物理网卡和相关 linux bridge interface 的 MTU 为 1550。
(2)OpenStack 的自动化配置工具 Juju 在做自动化配置物理网卡 MTU 的一些工作,有个 ticket Setting mtu of phy NICs and veth devices to support configuring VM's MTU>=1500 中有些介绍,但是该工作尚未完成(到2015/12月)。因此,使用这个 workaround 需要对物理网卡做手工配置。
(3)另外,如果你的物理网络已经使用巨帧(jumbo frame),那么虚机网络接口的 MTU 的问题自动被规避了。
4.2(Kilo版本中)降低虚拟网络接口(virtual network interface)的 MTU
虚拟网络接口包括两种,分别有不同的配置方法:
4.2.1 虚机网卡的 MTU 设置:使用 MTU selection and advertisement 机制
包括以下步骤:
(1)在 network 中增加 mtu 属性,目前该属性对于 Neutron API 只可见,不可以修改,默认值为 0 。ticket。
'mtu': {'allow_post': False, 'allow_put': False, 'is_visible': True}
(2)通过有关配置参数设置 network 的 mtu。目前在 /etc/neutron/plugins/ml2/ml2_conf.ini 中有如下几个相关参数。
# =========== items for MTU selection and advertisement =============
31 # (IntOpt) Path MTU. The maximum permissible size of an unfragmented
32 # packet travelling from and to addresses where encapsulated Neutron
33 # traffic is sent. Drivers calculate maximum viable MTU for
34 # validating tenant requests based on this value (typically,
35 # path_mtu - max encap header size). If <=0, the path MTU is
36 # indeterminate and no calculation takes place.
37 # path_mtu = 0
38
39 # (IntOpt) Segment MTU. The maximum permissible size of an
40 # unfragmented packet travelling a L2 network segment. If <=0,
41 # the segment MTU is indeterminate and no calculation takes place.
42 # segment_mtu = 0
43
44 # (ListOpt) Physical network MTUs. List of mappings of physical
45 # network to MTU value. The format of the mapping is
46 # <physnet>:<mtu val>. This mapping allows specifying a
47 # physical network MTU value that differs from the default
48 # segment_mtu value.
49 # physical_network_mtus =
50 # Example: physical_network_mtus = physnet1:1550, physnet2:1500
51 # ======== end of items for MTU selection and advertisement =========
physical_network_mtus : 对 provider network 使用,适用于 flat 和 vlan 类型的虚拟网络。
def get_mtu(self, physical_network):
        seg_mtu = super(FlatTypeDriver, self).get_mtu()
        mtu = []
        if seg_mtu > 0:
            mtu.append(seg_mtu)
        if physical_network in self.physnet_mtus:
            mtu.append(int(self.physnet_mtus[physical_network]))
        return min(mtu) if mtu else 0
path_mtu:设置租户网络的最大可能 MTU。
segment_mtu :租户网络的默认 MTU
三个配置参数结合不同的租户网络类型来确定其 MTU:
- Flat/VLAN:Minimum of (segment_mtu or physical_network_mtus)
- GRE: Minimum of (segment_mtu, path_mtu) 减去 42
- VXLAN: Minimum of (segment_mtu, path_mtu) 减去 50
配置这些 MTU 参数后,neutron net-show 命令就可以显示每个网络的 mtu 了。
注意:这些 MTU 设置不能仅对某一个租户网络使用,而是适合于同类型的所有网络。
(3)在 neutron.conf 中增加配置项 advertise_mtu,默认值为 false。在设置为 true 后,DHCP 将想申请/renew的固定地址的网卡广告 network 的 mtu。
# =========== items for MTU selection and advertisement =============
# Advertise MTU.  If True, effort is made to advertise MTU
# settings to VMs via network methods (ie. DHCP and RA MTU options)
# when the network's preferred MTU is known.
# advertise_mtu = False
# ======== end of items for MTU selection and advertisement =========
if cfg.CONF.advertise_mtu:
    mtu = self.network.mtu #network.mtu 由第(2)步确定
    # Do not advertise unknown mtu
    if mtu > 0:
        cmd.append('--dhcp-option-force=option:mtu,%d' % mtu)
4.2.2 设置 neutron 网络节点上 network namespace 的 qr/ns/qg 以及它们对应的 tap 设备等虚拟网络接口的 MTU
在 neutron.conf 中设置配置项 network_device_mtu 的值来指定这些网络节点的 MTU:
if self.conf.network_device_mtu:
            root_veth.link.set_mtu(self.conf.network_device_mtu)
            ns_veth.link.set_mtu(self.conf.network_device_mtu)
4.2.3 总结 VxLAN + Linux bridge 网络环境中的 MTU 配置
| 配置文件 | 配置项 | 默认值 | 需要修改为 | 生效的虚拟网络接口 | 生效步骤 |
| neutorn 控制节点上的 neutron.conf | network_device_mtu | none(此时 mtu 为 1500,这会带来诡异的问题,见上面 3.2 部分的描述) | 1450 |
neutron 网络节点上的 qdhcp 和 qrouter network namespace 的 qr,qg 和 ns 接口以及对应的 veth tap 设备; 还需要在 dhcp_agent.ini 和 l3_agent.ini 文件中设置 interface_driver = neutron.agent.linux.interface.BridgeInterfaceDriver |
对存在的 qdhcp 和 qrouter netns: 1. 修改 neutron.conf 文件 2. 确定 qrouter 的 interface 3. stop dhcp 和 l3 agent 4. 删除已有的 qdhcp 和 qrouter network name 5. 删除 qrouter 所有interface 对应的 veth 设备,其名称为 'tap' +interafce name 去掉前缀 6. 启动 dhcp 和 l3 agent 7. 检查 qdhcp 和 qrouter netns 中的 interface 的 mtu 对修改后新建的netns,自动生效。 |
| neutorn 控制节点上的 ml2_conf.ini | segment_mtu | 0 (使用默认 mtu) | 1500 |
对 GRE 和 VxLAN 类型的租户网络适用, 取 (segment_mtu 和 path_mtu)之间的小者减去 42 或者 50 |
|
| path_mtu | 0 (使用默认 mtu) | 1500 | 见下文示例2 | ||
| physical_network_mtus | 空 (使用默认 mtu) | 1500 | 对 flat 和 vlan 类型的 provider network 适用,取(segment_mtu 和 physical_network_mtus)之间的较小值 | 见下文示例1 | |
| neutorn 控制节点上的 neutron.conf | advertise_mtu | false (默认不广告 mtu 给客户机网卡) | true | 使得 DHCP 能对虚机的网卡广告所在网络 MTU 值 |
示例1:创建 mtu 为 1600 的 flat 类型的provider network:
(1)修改neutorn 控制节点上的 ml2_conf.ini配置文件:physical_network_mtus = physnet1:1600 flat_networks = external, physnet1
(2)重启neutron-server 服务
(3)创建 flat 类型网络:neutron net-create --provider:network_type flat --provider:physical_network physnet1 flatextnet2
root@controller:~# neutron net-create --provider:network_type flat --provider:physical_network physnet1 flatextnet2
Created a new network:
+---------------------------+--------------------------------------+
| Field                     | Value                                |
+---------------------------+--------------------------------------+
| admin_state_up            | True                                 |
| id                        | 9270a2bf-7e63-4001-884c-4c48e1b0f5e5 |
| mtu                       | 1600                                 |
| name                      | flatextnet2                          |
示例2:创建 mtu 为 1450 的 VxLAN 租户网络并启动虚机
(1)修改neutorn 控制节点上的 ml2_conf.ini配置文件:path_mtu = 9000 segment_mtu = 1500
(2)重启neutron-server 服务
(3)创建 vxlan 类型的租户网络:
root@controller:~# neutron net-create test111
Created a new network:
+---------------------------+--------------------------------------+
| Field                     | Value                                |
+---------------------------+--------------------------------------+
| admin_state_up            | True                                 |
| id                        | 901a5ba3-be92-440f-b7ca-ff277b527ea5 |
| mtu                       | 1450                                 |
| name                      | test111                              |
| provider:network_type     | vxlan                                |
(4)在该网络中创建启用 dhcp 的 subnet
(5)检查 dnsmasq,会发现它已经使用了 dhcp-option-force 参数,其中 mtu 的值就是该网络的 mtu 值
nobody 18930 1 0 10:45 ? 00:00:00 dnsmasq --no-hosts --no-resolv --strict-order --bind-interfaces --interface=ns-9022f50c-a8 --except-interface=lo --pid-file=/var/lib/neutron/dhcp/901a5ba3-be92-440f-b7ca-ff277b527ea5/pid --dhcp-hostsfile=/var/lib/neutron/dhcp/901a5ba3-be92-440f-b7ca-ff277b527ea5/host --addn-hosts=/var/lib/neutron/dhcp/901a5ba3-be92-440f-b7ca-ff277b527ea5/addn_hosts --dhcp-optsfile=/var/lib/neutron/dhcp/901a5ba3-be92-440f-b7ca-ff277b527ea5/opts --dhcp-leasefile=/var/lib/neutron/dhcp/901a5ba3-be92-440f-b7ca-ff277b527ea5/leases --dhcp-range=set:tag0,20.0.0.0,static,86400s --dhcp-option-force=option:mtu,1450 --dhcp-lease-max=256 --conf-file=/etc/neutron/dnsmasq.conf --domain=openstacklocal
(6)在该子网中创建虚机,其网卡的 mtu 值将是 1450.
(7)注意:目前(Kilo)版本中,网络的 mtu 值计算只在它被创建的时候,也就是说,对于已经存在的网络,无法再修改它的 mtu 值了。
4.3 (Kilo版本之前)设置客户机网卡的 MTU
Kilo 版本之前需要手工修改 dnsmasq 的配置来达到差不多同样的效果,通过下面的步骤:
- 编辑 /etc/neutron/dhcp_agent.ini 文件,在 [DEFAULT] 部分添加 dnsmasq_config_file = /etc/neutron/dnsmasq-neutron.conf
- 创建和编辑 /etc/neutron/dnsmasq-neutron.conf 文件,添加 dhcp-option-force=26,1450
- 杀掉当前 dnsmasq,重启 dhcp agent
和 4.2.1 的区别在于,Kilo 版本中可以计算不同虚机网络的 MTU,而 Kilo 版本之前使用的dnsmasq 配置文件中的配置项只能所有的网络使用同样的 mtu。
参考链接:
http://www.cubrid.org/blog/dev-platform/understanding-tcp-ip-network-stack/
http://git.kernel.org/cgit/linux/kernel/git/torvalds/linux.git/tree/net/bridge/br_if.c#n402
https://review.openstack.org/#/c/105989/8/specs/kilo/mtu-selection-and-advertisement.rst

 浙公网安备 33010602011771号