
ssm项目之web.xml,spring,springmvc,mybatis配置
本文地址:http://www.cnblogs.com/maplefighting/p/7482549.html
可以安装spring ide,有些自动补全简单多了,配置地址:
http://www.cnblogs.com/maplefighting/p/7481762.html
一、web.xml
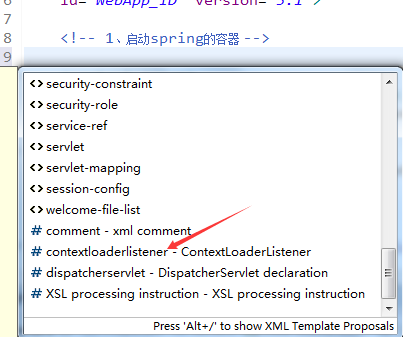
配置spring容器,前端控制器,字符过滤器
比如web.xml配置可以alt+/ ,然后点击就自动生成了
创建applicationContext.xml文件时可以右键new --> other找到spriing......然后直接创建

web.xml代码如下:


<?xml version="1.0" encoding="UTF-8"?>
<web-app xmlns:xsi="http://www.w3.org/2001/XMLSchema-instance"
xmlns="http://xmlns.jcp.org/xml/ns/javaee"
xsi:schemaLocation="http://xmlns.jcp.org/xml/ns/javaee
http://xmlns.jcp.org/xml/ns/javaee/web-app_3_1.xsd"
id="WebApp_ID" version="3.1">
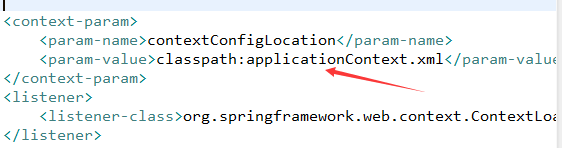
<!-- 1、启动spring的容器 -->
<context-param>
<param-name>contextConfigLocation</param-name>
<param-value>classpath:applicationContext.xml</param-value>
</context-param>
<listener>
<listener-class>org.springframework.web.context.ContextLoaderListener</listener-class>
</listener>
<!-- 2、springmvc前端控制器,拦截所有请求 -->
<!-- The front controller of this Spring Web application, responsible for
handling all application requests -->
<servlet>
<servlet-name>dispatcherServlet</servlet-name>
<servlet-class>org.springframework.web.servlet.DispatcherServlet</servlet-class>
<load-on-startup>1</load-on-startup>
</servlet>
<!-- Map all requests to the DispatcherServlet for handling -->
<servlet-mapping>
<servlet-name>dispatcherServlet</servlet-name>
<url-pattern>/</url-pattern>
</servlet-mapping>
<!-- 3、字符编码过滤器 -->
<filter>
<filter-name>CharacterEncodingFilter</filter-name>
<filter-class>org.springframework.web.filter.CharacterEncodingFilter</filter-class>
<init-param>
<param-name>encoding</param-name>
<param-value>utf-8</param-value>
</init-param>
<init-param>
<param-name>forceRequestEncoding</param-name>
<param-value>true</param-value>
</init-param>
<init-param>
<param-name>forceResponseEncoding</param-name>
<param-value>true</param-value>
</init-param>
</filter>
<filter-mapping>
<filter-name>CharacterEncodingFilter</filter-name>
<url-pattern>/*</url-pattern>
</filter-mapping>
<!-- 使用Rese风格的URI,将页面普通的post请求转为指定的delete或者put请求 -->
<filter>
<filter-name>HiddenHttpMethodFilter</filter-name>
<filter-class>org.springframework.web.filter.HiddenHttpMethodFilter</filter-class>
</filter>
<filter-mapping>
<filter-name>HiddenHttpMethodFilter</filter-name>
<url-pattern>/*</url-pattern>
</filter-mapping>
</web-app>
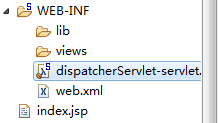
前端控制器这样配置需创建一个dispatcherServlet.xml在同级目录下,名字 dispatcherServlet-servlet.xml
二、springmvc配置
也就是配置dispatcherServlet-servlet.xml,包含网站跳转逻辑的控制配置,配置视图解析器
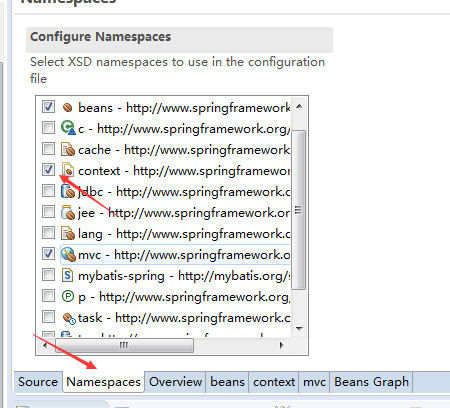
有一些补齐没显示的话可以按下图勾下
context:component-scan可以把context勾上
代码如下:
<?xml version="1.0" encoding="UTF-8"?>
<beans xmlns="http://www.springframework.org/schema/beans"
xmlns:xsi="http://www.w3.org/2001/XMLSchema-instance"
xmlns:context="http://www.springframework.org/schema/context"
xmlns:mvc="http://www.springframework.org/schema/mvc"
xsi:schemaLocation="http://www.springframework.org/schema/mvc http://www.springframework.org/schema/mvc/spring-mvc-4.3.xsd
http://www.springframework.org/schema/beans http://www.springframework.org/schema/beans/spring-beans.xsd
http://www.springframework.org/schema/context http://www.springframework.org/schema/context/spring-context-4.3.xsd">
<!-- SpringMVC的配置文件,包含网站跳转逻辑的控制配置 -->
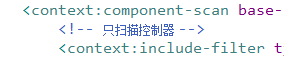
<context:component-scan base-package="com.sgd" use-default-filters="false">
<!-- 只扫描控制器 -->
<context:include-filter type="annotation" expression="org.springframework.stereotype.Controller"/>
</context:component-scan>
<!-- 配置试图解析器,方便页面返回 -->
<bean class="org.springframework.web.servlet.view.InternalResourceViewResolver">
<!-- 在web-inf下创建views文件,视图就放这里 -->
<property name="prefix" value="/WEB-INF/views/"></property>
<property name="suffix" value=".jsp"></property>
</bean>
<!-- 两个标准配置 -->
<!-- 将springmvc不能处理的请求交给tomcat -->
<mvc:default-servlet-handler/>
<!-- 能支持springmvc更高级的一些功能 ,JSR303校验,快捷的ajax-->
<mvc:annotation-driven/>
</beans>
一些类可以crtl+shift+t,然后搜索,之后复制名字,这样比较不容易敲错
三、spring的配置文件applicationContext.xml
配置数据源,与mybatis的整合,事务控制
<?xml version="1.0" encoding="UTF-8"?>
<beans xmlns="http://www.springframework.org/schema/beans"
    xmlns:xsi="http://www.w3.org/2001/XMLSchema-instance"
    xmlns:context="http://www.springframework.org/schema/context"
    xmlns:aop="http://www.springframework.org/schema/aop"
    xmlns:tx="http://www.springframework.org/schema/tx"
    xsi:schemaLocation="http://www.springframework.org/schema/beans http://www.springframework.org/schema/beans/spring-beans.xsd
        http://www.springframework.org/schema/context http://www.springframework.org/schema/context/spring-context-4.3.xsd
        http://www.springframework.org/schema/aop http://www.springframework.org/schema/aop/spring-aop-4.3.xsd
        http://www.springframework.org/schema/tx http://www.springframework.org/schema/tx/spring-tx-4.3.xsd">

    <context:component-scan base-package="com.sgd">
        <context:exclude-filter type="annotation" expression="org.springframework.stereotype.Controller"/>
    </context:component-scan>

    <!-- spring的配置文件,这里主要配置和业务逻辑有关的 -->
    <!-- ==============数据源,事务控制....=============== -->
    <context:property-placeholder location="classpath:dbconfig.properties"/>
    <bean id="pooledDataSource" class="com.mchange.v2.c3p0.ComboPooledDataSource">
        <property name="jdbcUrl" value="${jdbc.jdbcUrl}"></property>
        <property name="driverClass" value="${jdbc.driverClass}"></property>
        <property name="user" value="${jdbc.user}"></property>
        <property name="password" value="${jdbc.password}"></property>
    </bean>

    <!--=================配置和MyBatis的整合============== -->
    <bean id="SqlSessionFactory" class="org.mybatis.spring.SqlSessionFactoryBean">
        <!-- 配置MyBatis全局配置文件的位置 -->
        <property name="configLocation" value="classpath:mybatis-config.xml"></property>
        <property name="dataSource" ref="pooledDataSource"></property>
        <!-- 指定mybatis,mapper文件的位置 -->
        <property name="mapperLocations" value="classpath:mapper/*.xml"></property>
    </bean>

    <!-- 配置扫描器,将mybatis接口的实现加入到ioc容器 -->
    <bean class="org.mybatis.spring.mapper.MapperScannerConfigurer">
        <!-- 扫描所有dao接口的实现,加入到ioc容器中 -->
        <property name="basePackage" value="com.sgd.crud.dao"></property>
    </bean>
    <!-- ============================================ -->

    <!-- ==============事务控制的配置===================== -->
    <bean id="transactionManager" class="org.springframework.jdbc.datasource.DataSourceTransactionManager">
        <!-- 控制住数据源 -->
        <property name="dataSource" ref="pooledDataSource"></property>
    </bean>
    <!-- 开启基于注解的事务,使用xml配置形式的事务(必要主要的都是使用配置式) -->
    <aop:config>
    <!-- 切入点表达式 -->
        <aop:pointcut expression="execution(* com.sgd.crud.service..*(..))" id="txPoint"/>
        <!-- 配置事务增强 -->
        <aop:advisor advice-ref="txAdvice" pointcut-ref="txPoint"/>
    </aop:config>
    <!-- 配置事务增强,事务如何切入 可加可不加transaction-manager="transactionManager"-->
    <tx:advice id="txAdvice" >
        <tx:attributes>
            <!-- 所有方法都是事务方法 -->
            <tx:method name="*"/>
            <!-- 以get开始的所有方法 -->
            <tx:method name="get*" read-only="true"/>
        </tx:attributes>
    </tx:advice>

    <!-- spring配置文件的核心点(数据源,与mybatis的整合,事务控制) -->
</beans>
四、mybaits配置文件
mybatis-config.xml 相关配置可以到http://www.mybatis.org/mybatis-3/ 看看,根据需要配置,这个文件其实可以不要,直接配置到spring配置文件中
<?xml version="1.0" encoding="UTF-8" ?>
<!DOCTYPE configuration
  PUBLIC "-//mybatis.org//DTD Config 3.0//EN"
  "http://mybatis.org/dtd/mybatis-3-config.dtd">
 <configuration>
     <settings>
         <!-- 开启驼峰命名 -->
         <setting name="mapUnderscoreToCamelCase" value="true"/>
     </settings>
     <typeAliases>
         <package name="com.sgd.crud.bean"/>
     </typeAliases>
 </configuration>
接下来就是创建表了,上面的.xml文件后面差什么东西再加
本文版权归作者本人所有,欢迎转载,但未经作者同意必须保留此段声明,且在文章页面明显位置给出原文连接,否则保留追究法律责任的权利.
