
Hadoop学习笔记—15.HBase框架学习(基础实践篇)
 伪分布模式安装即在一台计算机上部署HBase的各个角色,HMaster、HRegionServer以及ZooKeeper都在一台计算机上来模拟。首先,准备好HBase的安装包,我这里使用的是HBase-0.94.7的版本,已经上传至百度网盘之中(URL:http://pan.baidu.com/s/1pJ3HTY7)。(1)通过FTP将hbase的安装包拷贝到虚拟机hadoop-master中,并执行一系列操作:解压缩、重命名、设置环境变量①解压缩:tar -zvxf hbase-0.94.7-security.tar.gz②重命名:mv hbase-94.7-security hbase③设置环境变量:vim /etc/profile,增加内容如下,修改后重新生效:source /etc/profi
一、HBase的安装配置
1.1 伪分布模式安装
伪分布模式安装即在一台计算机上部署HBase的各个角色,HMaster、HRegionServer以及ZooKeeper都在一台计算机上来模拟。
首先,准备好HBase的安装包,我这里使用的是HBase-0.94.7的版本,已经上传至百度网盘之中(URL:http://pan.baidu.com/s/1pJ3HTY7)
(1)通过FTP将hbase的安装包拷贝到虚拟机hadoop-master中,并执行一系列操作:解压缩、重命名、设置环境变量
①解压缩:tar -zvxf hbase-0.94.7-security.tar.gz
②重命名:mv hbase-94.7-security hbase
③设置环境变量:vim /etc/profile,增加内容如下,修改后重新生效:source /etc/profile
export HBASE_HOME=/usr/local/hbase
export PATH=.:$HADOOP_HOME/bin:$HBASE_HOME/bin:$ZOOKEEPER_HOME/bin:$JAVA_HOME/bin:$PATH
(2)进入hbase/conf目录下,修改hbase-env.sh文件:
export JAVA_HOME=/usr/local/jdk
export HBASE_MANAGES_ZK=true #告诉HBase使用它自己的zookeeper实例,分布式模式下需要设置为false
(3)在hbase/conf目录下,继续修改hbase-site.xml文件:
<property>
<name>hbase.rootdir</name>
<value>hdfs://hadoop-master:9000/hbase</value>
</property>
<property>
<name>hbase.cluster.distributed</name>
<value>true</value>
</property>
<property>
<name>hbase.zookeeper.quorum</name>
<value>hadoop-master</value>
</property>
<property>
<name>dfs.replication</name>
<value>1</value>
</property>
(4)【可选步凑】修改regionservers文件,将localhost改为主机名:hadoop-master
(5)启动HBase:start-hbase.sh
PS:由上一篇可知,HBase是建立在Hadoop HDFS之上的,因此在启动HBase之前要确保已经启动了Hadoop,启动Hadoop的命令是:start-all.sh
(6)验证是否启动HBase:jps

由上图发现,多了三个java进程:HMaster、HRegionServer以及HQuorumPeer。
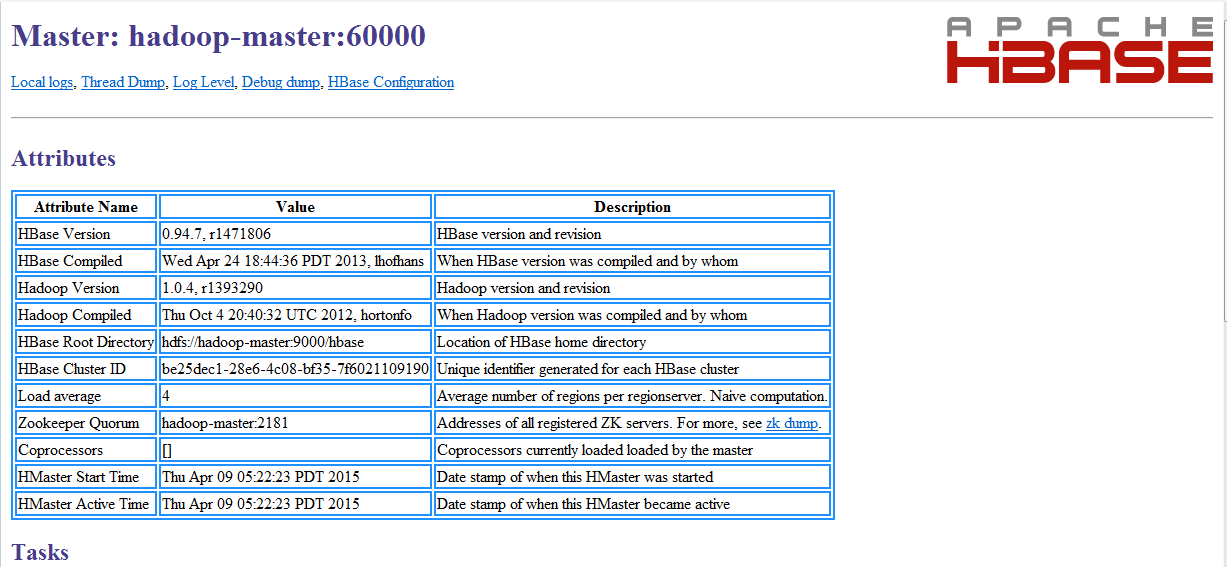
还可以通过访问HBase的Web接口查看:http://hadoop-master:60010
1.2 分布式模式安装
本次安装在1.1节的伪分布模式的基础上进行修改搭建分布式模式,本次的集群实验环境结构如下图所示:
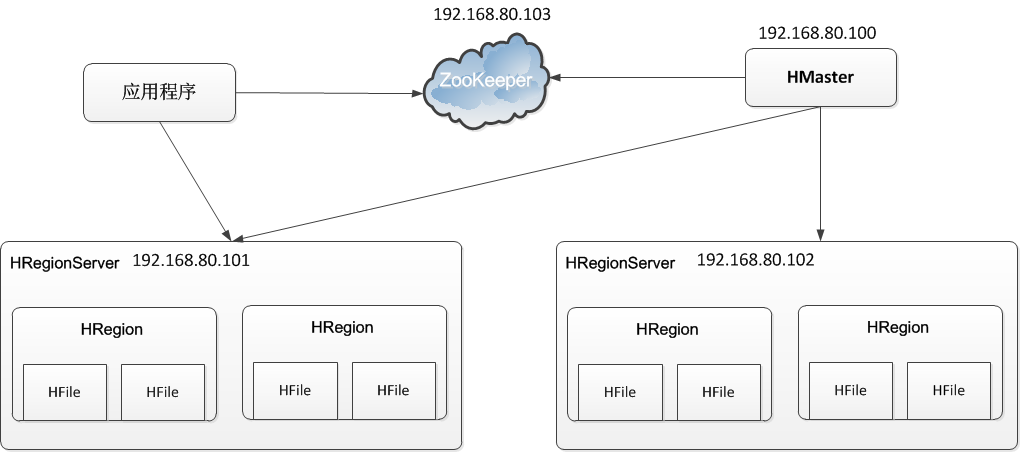
由上图可知,HMaster角色是192.168.80.100(主机名:hadoop-master),而两个HRegionServer角色则是两台192.168.80.101(主机名:hadoop-slave1)和192.168.80.102(主机名:hadoop-slave2)组成的。
(1)修改hadoop-master服务器上的的几个关键配置文件:
①修改hbase/conf/hbase-env.sh:将最后一行修改为如下内容
export HBASE_MANAGES_ZK=false #不使用HBase自带的zookeeper实例
②修改hbase/conf/regionservers:将原来的hadoop-master改为如下内容
hadoop-slave1
hadoop-slave2
(2)将hadoop-master上的hbase文件夹与/etc/profile配置文件整体复制到hadoop-slave1与hadoop-slave2中:
scp -r /usr/local/hbase hadoop-slave1:/usr/local/
scp -r /usr/local/hbase hadoop-slave2:/usr/local/
scp /etc/profile hadoop-slave1:/etc/
scp /etc/profile hadoop-slave2:/etc/
(3)在hadoop-slave1与hadoop-slave2中使配置文件生效:
source /etc/profile
(4)在hadoop-master中启动Hadoop、Zookeeper与HBase:(注意先后顺序)
start-all.sh
zkServer.sh start
start-hbase.sh
(5)在HBase的Web接口中查看Hbase集群状态:

二、HBase Shell基本命令
2.1 DDL:创建与删除表
(1)创建表:
>create 'users','user_id','address','info'
#这里创建了一张表users,有三个列族user_id,address,info
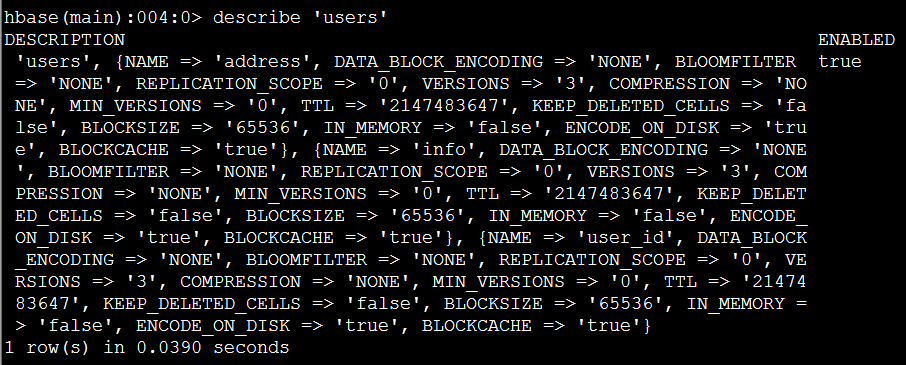
获取表users的具体描述:
>describe 'users'
(2)列出所有表:
>list

(3)删除表:在HBase中删除表需要两步,首先disable,其次drop
>disable 'users'
>drop 'users'
2.2 DML:增删查改
(1)增加记录:put
>put 'users','xiaoming','info:age','24';
>put 'users','xiaoming','info:birthday','1987-06-17';
>put 'users','xiaoming','info:company','alibaba';
>put 'users','xiaoming','address:contry','china';
>put 'users','xiaoming','address:province','zhejiang';
>put 'users','xiaoming','address:city','hangzhou';
(2)扫描users表的所有记录:scan
>scan 'users'

(3)获取一条记录
①取得一个id(row_key)的所有数据
>get 'users','xiaoming'
②获取一个id的一个列族的所有数据
>get 'users','xiaoming','info'
③获取一个id,一个列族中一个列的所有数据
>get 'users','xiaoming','info:age'
(4)更新一条记录:依然put
例如:更新users表中小明的年龄为29
>put 'users','xiaoming','info:age' ,'29'
>get 'users','xiaoming','info:age
(5)删除记录:delete与deleteall
①删除xiaoming的值的'info:age'字段
>delete 'users','xiaoming','info:age'
②删除xiaoming的整行信息
>deleteall 'users','xiaoming'
2.3 Other:其他几个比较有用的命令
(1)count:统计行数
>count 'users'
(2)truncate:清空指定表
>truncate 'users'
三、HBase Java API操作
3.1 预备工作
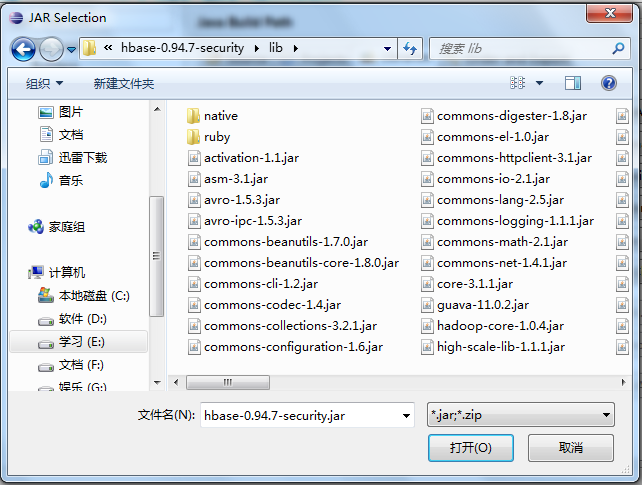
(1)导入HBase的项目jar包
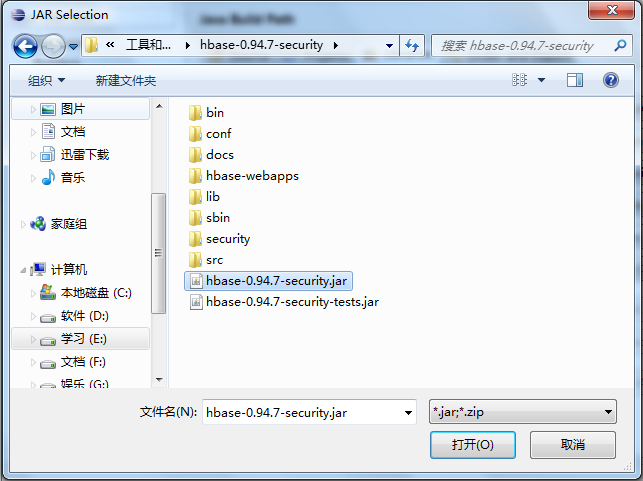
(2)导入HBase/lib下的所有依赖jar包
3.2 HBase Java开发必备:获取配置
    /*
     * 获取HBase配置
     */
    private static Configuration getConfiguration()
    {
        Configuration conf = HBaseConfiguration.create();
        conf.set("hbase.rootdir","hdfs://hadoop-master:9000/hbase");
        //使用eclipse时必须添加这个,否则无法定位
        conf.set("hbase.zookeeper.quorum","hadoop-master");

        return conf;
    }
3.3 使用HBaseAdmin进行DDL操作
(1)创建表
   /*
     * 创建表
     */
    private static void createTable()
            throws IOException {
        HBaseAdmin admin = new HBaseAdmin(getConfiguration());
        if (admin.tableExists(TABLE_NAME)) {
            System.out.println("The table is existed!");
        }else{
            HTableDescriptor tableDesc = new HTableDescriptor(TABLE_NAME);
            tableDesc.addFamily(new HColumnDescriptor(FAMILY_NAME));
            admin.createTable(tableDesc);
            System.out.println("Create table success!");
        }
    }
(2)删除表
    /*
     * 删除表
     */
    private static void dropTable(String tableName)
            throws IOException {
        HBaseAdmin admin = new HBaseAdmin(getConfiguration());
        if(admin.tableExists(tableName)){
            try {
              admin.disableTable(tableName);
              admin.deleteTable(tableName);
            } catch (IOException e) {
              e.printStackTrace();
              System.out.println("Delete "+tableName+" failed!");
            }
        }
        System.out.println("Delete "+tableName+" success!");
    }
3.4 使用HTable进行DML操作
(1)新增记录
    public static void putRecord(String tableName, String row,
            String columnFamily, String column, String data)
                    throws IOException{
        HTable table = new HTable(getConfiguration(), tableName);
        Put p1 = new Put(Bytes.toBytes(row));
        p1.add(Bytes.toBytes(columnFamily), Bytes.toBytes(column),     Bytes.toBytes(data));
        table.put(p1);
        System.out.println("put'"+row+"',"+columnFamily+":"+column+"','"+data+"'");
    }
(2)读取记录
    public static void getRecord(String tableName, String row) throws IOException{
        HTable table = new HTable(getConfiguration(), tableName);
        Get get = new Get(Bytes.toBytes(row));
        Result result = table.get(get);
        System.out.println("Get: "+result);
    }
(3)全表扫描
    public static void scan(String tableName) throws IOException{
      HTable table = new HTable(getConfiguration(), tableName);
      Scan scan = new Scan();
      ResultScanner scanner = table.getScanner(scan);
      for (Result result : scanner) {
          System.out.println("Scan: "+result);
      }
    }
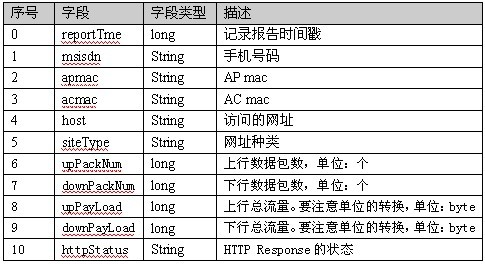
3.5 API实战:详单入库
结合本笔记第五篇《自定义类型处理手机上网日志》的手机上网日志为背景,我们要做的就是将日志通过MapReduce导入到HBase中进行存储。该日志的数据结构定义如下图所示:(该文件的下载地址为:http://pan.baidu.com/s/1dDzqHWX)
(1)在HBase中通过Shell创建一张表:wlan_log
> create 'wlan_log','cf'
这里为了简单定义,之定义了一个列族cf
(2)在ecplise中新建一个类:BatchImportJob,该类的代码如下所示:


package hbase;

import java.text.SimpleDateFormat;
import java.util.Date;

import org.apache.hadoop.conf.Configuration;
import org.apache.hadoop.hbase.client.Put;
import org.apache.hadoop.hbase.mapreduce.TableOutputFormat;
import org.apache.hadoop.hbase.mapreduce.TableReducer;
import org.apache.hadoop.hbase.util.Bytes;
import org.apache.hadoop.io.LongWritable;
import org.apache.hadoop.io.NullWritable;
import org.apache.hadoop.io.Text;
import org.apache.hadoop.mapreduce.Counter;
import org.apache.hadoop.mapreduce.Job;
import org.apache.hadoop.mapreduce.Mapper;
import org.apache.hadoop.mapreduce.lib.input.FileInputFormat;
import org.apache.hadoop.mapreduce.lib.input.TextInputFormat;

public class BatchImportJob {

    static class BatchImportMapper extends
            Mapper<LongWritable, Text, LongWritable, Text> {

        SimpleDateFormat dateformat1 = new SimpleDateFormat("yyyyMMddHHmmss");
        Text v2 = new Text();

        protected void map(LongWritable key, Text value, Context context)
                throws java.io.IOException, InterruptedException {
            final String[] splited = value.toString().split("\t");
            try {
                final Date date = new Date(Long.parseLong(splited[0].trim()));
                final String dateFormat = dateformat1.format(date);
                String rowKey = splited[1] + ":" + dateFormat;
                v2.set(rowKey + "\t" + value.toString());
                context.write(key, v2);
            } catch (NumberFormatException e) {
                final Counter counter = context.getCounter("BatchImportJob",
                        "ErrorFormat");
                counter.increment(1L);
                System.out.println("出错了" + splited[0] + " " + e.getMessage());
            }
        };
    }

    static class BatchImportReducer extends
            TableReducer<LongWritable, Text, NullWritable> {
        protected void reduce(LongWritable key,
                java.lang.Iterable<Text> values, Context context)
                throws java.io.IOException, InterruptedException {
            for (Text text : values) {
                final String[] splited = text.toString().split("\t");

                final Put put = new Put(Bytes.toBytes(splited[0]));
                put.add(Bytes.toBytes("cf"), Bytes.toBytes("date"),
                        Bytes.toBytes(splited[1]));
                put.add(Bytes.toBytes("cf"), Bytes.toBytes("msisdn"),
                        Bytes.toBytes(splited[2]));
                // 省略其他字段,调用put.add(....)即可
                context.write(NullWritable.get(), put);
            }
        };
    }

    public static void main(String[] args) throws Exception {
        final Configuration configuration = new Configuration();
        // 设置zookeeper
        configuration.set("hbase.zookeeper.quorum", "hadoop-master");
        // 设置hbase表名称
        configuration.set(TableOutputFormat.OUTPUT_TABLE, "wlan_log");
        // 将该值改大,防止hbase超时退出
        configuration.set("dfs.socket.timeout", "180000");

        final Job job = new Job(configuration, "HBaseBatchImportJob");

        job.setMapperClass(BatchImportMapper.class);
        job.setReducerClass(BatchImportReducer.class);
        // 设置map的输出,不设置reduce的输出类型
        job.setMapOutputKeyClass(LongWritable.class);
        job.setMapOutputValueClass(Text.class);

        job.setInputFormatClass(TextInputFormat.class);
        // 不再设置输出路径,而是设置输出格式类型
        job.setOutputFormatClass(TableOutputFormat.class);

        FileInputFormat.setInputPaths(job, "hdfs://hadoop-master:9000/testdir/input/HTTP_20130313143750.dat");

        boolean success = job.waitForCompletion(true);
        if (success) {
            System.out.println("Bath import to HBase success!");
            System.exit(0);
        } else {
            System.out.println("Batch import to HBase failed!");
            System.exit(1);
        }
    }

}
通过执行后,在HBase中通过Shell命令(list)查看导入结果:

(3)在eclipse中新建一个类:MobileLogQueryApp,对已经存储的wlan_log进行查询的Java开发,该类的代码如下所示:
package hbase;

import java.io.IOException;

import org.apache.hadoop.conf.Configuration;
import org.apache.hadoop.hbase.HBaseConfiguration;
import org.apache.hadoop.hbase.HColumnDescriptor;
import org.apache.hadoop.hbase.HTableDescriptor;
import org.apache.hadoop.hbase.client.Get;
import org.apache.hadoop.hbase.client.HBaseAdmin;
import org.apache.hadoop.hbase.client.HTable;
import org.apache.hadoop.hbase.client.Put;
import org.apache.hadoop.hbase.client.Result;
import org.apache.hadoop.hbase.client.ResultScanner;
import org.apache.hadoop.hbase.client.Scan;
import org.apache.hadoop.hbase.util.Bytes;

public class MobileLogQueryApp {

    private static final String TABLE_NAME = "wlan_log";
    private static final String FAMILY_NAME = "cf";

    /**
     * HBase Java API基本使用示例
     *
     * @throws Exception
     */
    public static void main(String[] args) throws Exception {
        scan(TABLE_NAME,"13600217502");
        System.out.println();
        scanPeriod(TABLE_NAME, "136");
    }

    /*
     * 查询手机13600217502的所有上网记录
     */
    public static void scan(String tableName, String mobileNum)
            throws IOException {
        HTable table = new HTable(getConfiguration(), tableName);
        Scan scan = new Scan();
        scan.setStartRow(Bytes.toBytes(mobileNum + ":/"));
        scan.setStopRow(Bytes.toBytes(mobileNum + "::"));
        ResultScanner scanner = table.getScanner(scan);
        int i = 0;
        for (Result result : scanner) {
            System.out.println("Scan: " + i + " " + result);
            i++;
        }
    }

    /*
     * 查询134号段的所有上网记录
     */
    public static void scanPeriod(String tableName, String period)
            throws IOException {
        HTable table = new HTable(getConfiguration(), tableName);
        Scan scan = new Scan();
        scan.setStartRow(Bytes.toBytes(period + "/"));
        scan.setStopRow(Bytes.toBytes(period + ":"));
        scan.setMaxVersions(1);
        ResultScanner scanner = table.getScanner(scan);
        int i = 0;
        for (Result result : scanner) {
            System.out.println("Scan: " + i + " " + result);
            i++;
        }
    }

    /*
     * 获取HBase配置
     */
    private static Configuration getConfiguration() {
        Configuration conf = HBaseConfiguration.create();
        conf.set("hbase.rootdir", "hdfs://hadoop-master:9000/hbase");
        // 使用eclipse时必须添加这个,否则无法定位
        conf.set("hbase.zookeeper.quorum", "hadoop-master");

        return conf;
    }

}
这里主要进行了两个查询操作:按指定手机号码查询 和 按指定手机号码网段区间查询,执行结果如下所示:

参考资料
(1)吴超,《Hadoop深入浅出》:http://www.superwu.cn
(2)新城主力唱好,《HBase Java API》:http://www.cnblogs.com/NicholasLee/archive/2012/09/13/2683432.html


 浙公网安备 33010602011771号