

你知道用AngularJs怎么定义指令吗?
angular.module("app",[]).directive("directiveName",function(){
    return{
     //通过设置项来定义
    };
})
其中return返回的对象包含很多参数,下面一一说明
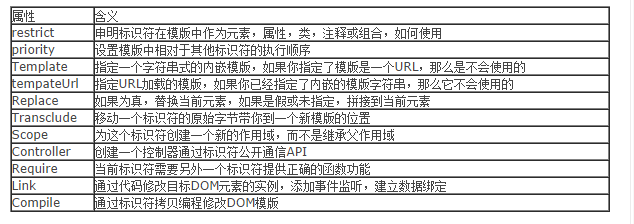
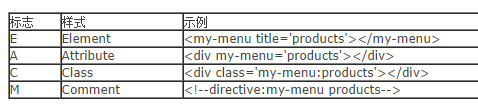
(字符串)可选参数,指明指令在DOM里面以什么形式被声明;
取值有:E(元素),A(属性),C(类),M(注释),其中默认值为A;
E(元素):<directiveName></directiveName>
A(属性):<div directiveName='expression'></div>
C(类): <div class='directiveName'></div>
M(注释):<--directive:directiveName expression-->
例如restrict:‘EA’ 则表示指令在DOM里面可用元素形式和属性形式被声明;
一般来说,当你创建一个有自己模板的组件的时候,需要使用元素名,如果仅仅是为为已有元素添加功能的话,就使用属性名
(数字),可选参数,指明指令的优先级,若在单个DOM上有多个指令,则优先级高的先执行;
设置指令的优先级算是不常用的
比较特殊的的例子是,angularjs内置指令的ng-repeat的优先级为1000,ng-init的优先级为450;
(布尔型),可选参数,可以被设置为true或false,若设置为true,则优先级低于此指令的其他指令则无效,不会被调用(优先级相同的还是会执行)
angular.module("app",[]).directive("hello",function(){
                return{
                 restrict:'EA',
                 template:"<div><h3>hello world</h3></div>"
                };
            })
HTML代码为:
<hello></hello>
结果渲染后的HTML为:
<hello>
   <div><h3>hello world</h3></div>
</hello>
其中tElement是指使用此指令的元素,而tAttrs则实例的属性,它是一个由元素上所有的属性组成的集合(对象)形如:
{
title:‘aaaa’,
name:'leifeng'
}
下面让我们看看template是一个函数时候的情况
angular.module("app",[]).directive("directitle",function(){
                return{
                 restrict:'EAC',
                 template: function(tElement,tAttrs){
                    var _html = '';
                    _html += '<div>'+tAttrs.title+'</div>';
                    return _html;
                 }
                };
            })
HTML代码:
<directitle title='biaoti'></directitle>
渲染之后的HTML:
<div>biaoti</div>
因为一段HTML文本,阅读跟维护起来都是很麻烦的,所用通常会使用templateUrl这个。
(1)一个代表HTML文件路径的字符串
(2)一个函数,可接受两个参数tElement和tAttrs(大致同上)
由于加载html模板是通过异步加载的,若加载大量的模板会拖慢网站的速度,这里有个技巧,就是先缓存模板
你可以再你的index页面加载好的,将下列代码作为你页面的一部分包含在里面。
<script type='text/ng-template' id='woshimuban.html'>
           <div>我是模板内容</div>
</script>
这里的id属性就是被设置在templateUrl上用的。
另一种办法缓存是:
angular.module("template.html", []).run(["$templateCache", function($templateCache) {
  $templateCache.put("template.html",
    "<div>wo shi mu ban</div>");
}]);
(布尔值),默认值为false,设置为true时候,我们再来看看下面的例子(对比下在template时候举的例子)
angular.module("app",[]).directive("hello",function(){
                return{
                 restrict:'EA',
                 replace:true,
                 template:"<div><h3>hello world</h3></div>"
                };
            })
HTML代码为:
<hello></hello>
渲染之后的代码:
<div><h3>hello world</h3></div>
对比下没有开启replace时候的渲染出来的HTML。发现<hello></hello>不见了。
另外当模板为纯文本(即template:"wo shi wen ben")的时候,渲染之后的html代码默认的为文本用span包含。
可选参数,(布尔值或者对象)默认值为false,可能取值:
(1)默认值false。
表示继承父作用域;
(2)true
表示继承父作用域,并创建自己的作用域(子作用域);
(3){}
表示创建一个全新的隔离作用域;
我们都知道ng-controller(内置指令)可以从父作用域中继承并且创建一个新的子作用域。如下:


<!doctype html>
<html ng-app="myApp">
<head>
  <script src="http://cdn.staticfile.org/angular.js/1.2.10/angular.min.js"></script>
</head>
<body>
  <div ng-init="aaa='父亲'">
    parentNode:{{aaa}}
    <div ng-controller="myController">
        chrildNode: {{aaa}}
    </div>
  </div>

  <script>
    angular.module('myApp', [])
    .controller('myController',function($scope){
       $scope.aaa = '儿子'
    })
  </script>
</body>
</html>
这时页面显示是
parentNode:父亲
若去掉
$scope.aaa = '儿子'
则显示
parentNode:父亲
1)若一个元素上有多个指令,使用了隔离作用域,则只有其中一个可以生效;
2)只有指令模板中的根元素才能获得一个新的作用域,这时候,scope就被设置为true了;
<!doctype html>
<html ng-app="myApp">
<head>
  <script src="http://cdn.staticfile.org/angular.js/1.2.10/angular.min.js"></script>
</head>
<body>
  <div ng-init="aaa='父亲'">
    parentNode:{{aaa}}
    <div class='one' ng-controller="myController">
        chrildNode: {{aaa}}
        <div class='two' ng-controller='myController2'>
          {{aaa}}
        </div>
    </div>
  </div>

  <script>
    angular.module('myApp', [])
    .controller('myController',function($scope){
      $scope.aaa = '儿子';
    })
    .controller('myController2',function($scope){
      $scope.aaa = '孙女';
    })
  </script>
</body>
</html>
页面显示为:
parentNode:父亲
上面中class为one那个div获得了指令ng-controller=’myController‘所创建的新的作用域;
而class为two那个div获得了指令ng-controller=’myController2‘所创建的新的作用域;
这就是“只有指令模板中的根元素才能获得一个新的作用域”;
接下来我们通过一个简单明了的例子来说明scope取值不同的差别
<!doctype html>
<html ng-app="myApp">
<head>
  <script src="http://cdn.staticfile.org/angular.js/1.2.10/angular.min.js"></script>
</head>
<body>

  <div ng-controller='MainController'>
        父亲: {{name}}
        <input ng-model="name" />
        <div my-directive></div>
  </div>

  <script>
    angular.module('myApp', [])
        .controller('MainController', function ($scope) {
           $scope.name = 'leifeng';
        })
        .directive('myDirective', function () {
            return {
                restrict: 'EA',
                scope:false,//改变此处的取值,看看有什么不同
                template: '<div>儿子:{{ name }}<input ng-model="name"/></div>'
            };
        });
  </script>

</body>
</html>
依次设置scope的值false,true,{},结果发现(大家别偷懒,动手试试哈)
当为false时候,儿子继承父亲的值,改变父亲的值,儿子的值也随之变化,反之亦如此。(继承不隔离)
当为true时候,儿子继承父亲的值,改变父亲的值,儿子的值随之变化,但是改变儿子的值,父亲的值不变。(继承隔离)
当为{}时候,没有继承父亲的值,所以儿子的值为空,改变任何一方的值均不能影响另一方的值。(不继承隔离)
下面看一个例子
<!doctype html>
<html ng-app="myApp">
<head>
  <script src="http://cdn.staticfile.org/angular.js/1.2.10/angular.min.js"></script>
</head>
<body>

  <div ng-controller='MainController'>
        <input type="text" ng-model="color" placeholder="Enter a color"/>
        <hello-world></hello-world>
  </div>

  <script>
    var app = angular.module('myApp',[]);
    app.controller('MainController',function(){});
    app.directive('helloWorld',function(){
     return {
        scope: false,
        restrict: 'AE',
        replace: true,
        template: '<p style="background-color:{{color}}">Hello World</p>'
     }
    });
  </script>

</body>
</html>
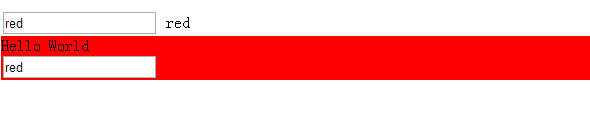
运行代码,并在input中输入颜色值,结果为

但是,但我们将scope设置为{}时候,再次运行上面的代码可以发现页面并不能成功完整显示!
原因在于,这里我们将scope设置为{},产生了隔离作用域。
所以在template模板中{{color}}变成了依赖于自己的作用域,而不是依赖于父作用域。
因此我们需要一些办法来让隔离作用域能读取父作用域的属性,就是绑定策略。
下面我们就来探索设置这种绑定的几种方法
<!doctype html>
<html ng-app="myApp">
<head>
  <script src="http://cdn.staticfile.org/angular.js/1.2.10/angular.min.js"></script>
</head>
<body>

  <div ng-controller='MainController'>
        <input type="text" ng-model="color" placeholder="Enter a color"/>
        <hello-world color-attr='{{color}}'></hello-world>   //注意这里设置了color-attr属性,绑定了{{color}}
  </div>

  <script>
    var app = angular.module('myApp',[]);
    app.controller('MainController',function(){});
    app.directive('helloWorld',function(){
     return {
        scope: {color:'@colorAttr'},  //指明了隔离作用域中的属性color应该绑定到属性colorAttr
        restrict: 'AE',
        replace: true,
        template: '<p style="background-color:{{color}}">Hello World</p>'
     }
    });
  </script>

</body>
</html>
这种办法只能单向,通过在运行的指令的那个html标签上设置color-attr属性,并且采用{{}}绑定某个模型值。
注意,你也可以再这里直接绑定字符串的颜色值,如:color-attr=“red”;
然后你可以看到表达式{{color}}被赋值给了color-attr。
当表达式的值发生变化时,属性color-attr也会发生变化,所以也改变了隔离作用域中的属性color。
tips:如果绑定的隔离作用域属性名与元素的属性名相同,则可以采取缺省写法。
html:
<hello-world color="{{color}}"/>

js定义指令的片段:
app.directive('helloWorld',function(){
    return {
        scope: {
            color: '@'
        },
        ...
        //配置的余下部分
    }
});
<!doctype html>
<html ng-app="myApp">
<head>
  <script src="http://cdn.staticfile.org/angular.js/1.2.10/angular.min.js"></script>
</head>
<body>

  <div ng-controller='MainController'>
        <input type="text" ng-model="color" placeholder="Enter a color"/>
        {{color}}
        <hello-world color='color'></hello-world>  //注意这里的写法
  </div>

  <script>
    var app = angular.module('myApp',[]);
    app.controller('MainController',function(){});
    app.directive('helloWorld',function(){
     return {
        scope:{color:'='},
        restrict: 'AE',
        replace: true,
        template: '<div style="background-color:{{color}}">Hello World<div><input type="text" ng-model="color"></div></div>'
     }
    });
  </script>

</body>
</html>
此处也类似上面采用了缺省的写法。
这里需要注意的是,我们要直接在指令运行的那个元素上设置属性时候,是直接将 实际的作用域模型 赋值给该属性(这里就是color)
这样一个双向绑定被建立了,改变任何一个input都会改变另一个值。
<!doctype html>
<html ng-app="myApp">
<head>
  <script src="http://cdn.staticfile.org/angular.js/1.2.10/angular.min.js"></script>
</head>
<body>

  <div ng-controller='MainController'>
        <input type="text" ng-model="name" placeholder="Enter a color"/>
        {{name}}
        <hello-world saysomething999="say();" name="liucunjie"></hello-world> //注意这里
  </div>

  <script>
    var app = angular.module('myApp',[]);
    app.controller('MainController',function($scope){
      $scope.say = function(){
        alert('hello');
      }
      $scope.name = 'leifeng';
    });
    app.directive('helloWorld',function(){
     return {
        scope:{
          saysomething:'&saysomething999',
          name:'@'
        },
        restrict: 'AE',
        replace: true,
        template: '<button type="button" ng-bind="name" ng-init="saysomething();"></button>'
     }
    });
  </script>

</body>
</html>
运行之后,弹出alert框。
(布尔值或者字符‘element’),默认值为false;
这个配置选项可以让我们提取包含在指令那个元素里面的内容,再将它放置在指令模板的特定位置。
当你开启transclude后,你就可以使用ng-transclude来指明了应该在什么地方放置transcluded内容
<!doctype html>
<html ng-app="myApp">
<head>
  <script src="http://cdn.staticfile.org/angular.js/1.2.10/angular.min.js"></script>
</head>
<body>

  <div ng-controller='MainController'>
        <div class='a'>
          <p>china</p>
          <hello-world>
            {{name}}
          </hello-world>
        </div>
  </div>

  <script>
    var app = angular.module('myApp',[]);
    app.controller('MainController',function($scope){
      $scope.name = 'leifeng';
    });
    app.directive('helloWorld',function(){
     return {
        scope:{},
        restrict: 'AE',
        transclude: true,
        template: '<div class="b"><div ng-transclude>你看不见我</div></div>'
     }
    });
  </script>

</body>
</html>
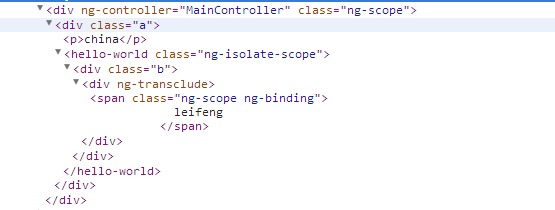
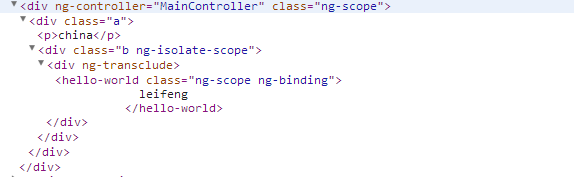
运行上面的代码,输出
china
leifeng
另外当开启transclude,会创建一个新的transclude空间,并且继承了父作用域(即使Scope设置为隔离作用域),
上面代码中的{{name}}是依赖于父作用域的,仍然能被渲染出来,就说明了这点。
我们再看看生成的html为下图所示,可以发现文本“你看不见我”消失了,这是因为被transclude内容替换掉了。
这里的transclude内容就是{{name}}
接下来再来看看transclude的另一个取值transclude:“element”
那transclude:“element”与transclude:true有什么区别呢?
区别在于嵌入的内容,以上面的例子来说,
当transclude:true时候,嵌入的内容为{{name}},
而当transclude:“element”时候,嵌入的内容为
<hello-world>
   {{name}}
</hello-world>
没错,此时嵌入的内容为整个元素。
将上面代码transclude:true换成transclude:true后,再运行,你会发现结果并不是和你想的一样
再次查看生成的html代码

你会发现指令绑定的元素被转换为了一个HTML注释
解决方案是加上replace: true,就正常了
这时再查看HTML代码
OK,那么现在问题来了,如果我们想把嵌入部分多次放入我们的模板中要怎么办?
则可以使用$transclude(后面再controller选项中会讲)
或者可以使用compile函数,里面有个transcludeFn参数(后面会讲)
或者使用link链接函数。。。
可以是一个字符串或者函数。
若是为字符串,则将字符串当做是控制器的名字,来查找注册在应用中的控制器的构造函数
angular.module('myApp', [])
.directive('myDirective', function() {
restrict: 'A', // 始终需要
controller: 'SomeController'
})
// 应用中其他的地方,可以是同一个文件或被index.html包含的另一个文件
angular.module('myApp')
.controller('SomeController', function($scope, $element, $attrs, $transclude) {
// 控制器逻辑放在这里
});
也可以直接在指令内部的定义为匿名函数,同样我们可以再这里注入任何服务($log,$timeout等等)
angular.module('myApp',[])
.directive('myDirective', function() {
restrict: 'A',
controller:
function($scope, $element, $attrs, $transclude) {
// 控制器逻辑放在这里
}
});
另外还有一些特殊的服务(参数)可以注入
(1)$scope,与指令元素相关联的作用域
(2)$element,当前指令对应的 元素
(3)$attrs,由当前元素的属性组成的对象
(4)$transclude,嵌入链接函数,实际被执行用来克隆元素和操作DOM的函数
指令的控制器和link函数(后面会讲)可以进行互换。区别在于,控制器主要是用来提供可在指令间复用的行为但link链接函数只能在当前内部指令中定义行为,且无法再指令间复用。
html代码:
  <my-site site="http://www.cnblogs.com/cunjieliu">雷锋叔叔的博客</my-site>

js代码:
  <script>
    angular.module('myApp',[]).directive('mySite', function () {
     return {
         restrict: 'EA',
         transclude: true, //注意此处必须设置为true
         controller:
         function ($scope, $element,$attrs,$transclude,$log) {  //在这里你可以注入你想注入的服务
             $transclude(function (clone) {
                 var a = angular.element('<a>');
                 a.attr('href', $attrs.site);
                 a.text(clone.text());
                 $element.append(a);
             });
             $log.info("hello everyone");
         }
     };
 });
  </script>
运行上面的代码就是
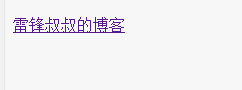
并且在控制台下输出hello everyone
让我们看看$transclude();在这里,它可以接收两个参数,第一个是$scope,作用域,第二个是带有参数clone的回调函数。
而这个clone实际上就是嵌入的内容(经过jquery包装),可以在它上做很多DOM操作。
View Code<script> angular.module('myApp',[]).directive('mySite', function () { return { restrict: 'EA', transclude: true, controller: function ($scope, $element,$attrs,$transclude,$log) { var a = $transclude(); //$transclude()就是嵌入的内容 $element.append(a); } }; }); </script>
默认情况下,如果我们简单实用$transclude(),那么默认的其作用域就是$transclude生成的作用域
但是如果我们实用$transclude($scope,function(clone){}),那么作用域就是directive的作用域了
那么问题又来了。如果我们想实用父作用域呢
可以使用$scope.$parent
<div ng-controller='parentctrl'>
        <div ng-controller='sonctrl'>
          <my-site site="http://www.cnblogs.com/cunjieliu"><div>雷锋叔叔的博客</div></my-site>
        </div>
  </div>
  <script>
    var app = angular.module('myApp',[]);
    app.controller('sonctrl',function($scope){
      $scope.title = 'hello son';
    });
    app.controller('parentctrl',function($scope){
      $scope.title = 'hello parent';
    });
    app.directive('mySite', function () {
     return {
         restrict: 'EA',
         transclude: true,
         controller:
         function ($scope, $element,$attrs,$transclude,$log) {
            var a = $transclude();
            $element.append(a);
            $log.info($scope.title);
            $log.info($scope.$parent.title);
         }
     };
 });
  </script>
这个选项的作用是可以设置你的控制器的别名
一般以前我们经常用这样方式来写代码:
angular.module("app",[])
  .controller("demoController",["$scope",function($scope){
    $scope.title = "angualr";
  }])

 <div ng-app="app" ng-controller="demoController">
      {{title}}
</div>
后来angularjs1.2给我们带来新语法糖,所以我们可以这样写
angular.module("app",[])
  .controller("demoController",[function(){
    this.title = "angualr";
  }])

  <div ng-app="app" ng-controller="demoController as demo">
       {{demo.title}}
  </div>
同样的我们也可以再指令里面也这样写
<script>
    angular.module('myApp',[]).directive('mySite', function () {
     return {
         restrict: 'EA',
         transclude: true,
         controller:'someController',
         controllerAs:'mainController'
         //..其他配置
     };
 });
 </script>
字符串代表另一个指令的名字,它将会作为link函数的第四个参数
具体用法我们可以举个例子说明
假设现在我们要编写两个指令,两个指令中的link链接函数中(link函数后面会讲)存在有很多重合的方法,
这时候我们就可以将这些重复的方法写在第三个指令的controller中(上面也讲到controller经常用来提供指令间的复用行为)
然后在这两个指令中,require这个拥有controller字段的的指令(第三个指令),
最后通过link链接函数的第四个参数就可以引用这些重合的方法了。
<!doctype html>
<html ng-app="myApp">
<head>
  <script src="http://cdn.staticfile.org/angular.js/1.2.10/angular.min.js"></script>
</head>
<body>


  <outer-directive>
     <inner-directive></inner-directive>
     <inner-directive2></inner-directive2>
  </outer-directive>
  <script>
    var app = angular.module('myApp', []);
    app.directive('outerDirective', function() {
          return {
               scope: {},
               restrict: 'AE',
               controller: function($scope) {
                  this.say = function(someDirective) {
                     console.log('Got:' + someDirective.message);
                  };
               }
           };
    });
    app.directive('innerDirective', function() {
          return {
               scope: {},
               restrict: 'AE',
               require: '^outerDirective',
               link: function(scope, elem, attrs, controllerInstance) {
                       scope.message = "Hi,leifeng";
                       controllerInstance.say(scope);
               }
          };
    });
    app.directive('innerDirective2', function() {
          return {
               scope: {},
               restrict: 'AE',
               require: '^outerDirective',
               link: function(scope, elem, attrs, controllerInstance) {
                       scope.message = "Hi,shushu";
                       controllerInstance.say(scope);
               }
          };
    });


  </script>

</body>
</html>
上面例子中的指令innerDirective和指令innerDirective2复用了定义在指令outerDirective的controller中的方法
也进一步说明了,指令中的controller是用来让不同指令间通信用的。
另外我们可以在require的参数值加上下面的某个前缀,这会改变查找控制器的行为:
(1)没有前缀,指令会在自身提供的控制器中进行查找,如果找不到任何控制器,则会抛出一个error
(2)?如果在当前的指令没有找到所需的控制器,则会将null传给link连接函数的第四个参数
(3)^如果在当前的指令没有找到所需的控制器,则会查找父元素的控制器
(4)?^组合
首先加载angularjs库,查找到ng-app指令,从而找到应用的边界,
根据ng-app划定的作用域来调用$compile服务进行编译,
angularjs会遍历整个HTML文档,并根据js中指令的定义来处理在页面上声明的各个指令
按照指令的优先级(priority)排列,根据指令中的配置参数(template,place,transclude等)转换DOM
然后就开始按顺序执行各指令的compile函数(如果指令上有定义compile函数)对模板自身进行转换
注意:此处的compile函数是我们指令中配置的,跟上面说的$compile服务不一样。
每个compile函数执行完后都会返回一个link函数,所有的link函数会合成一个大的link函数
然后这个大的link函数就会被执行,主要做数据绑定,通过在DOM上注册监听器来动态修改scope中的数据,
或者是使用$watchs监听 scope中的变量来修改DOM,从而建立双向绑定等等。
若我们的指令中没有配置compile函数,那我们配置的link函数就会运行,
她做的事情大致跟上面complie返回之后所有的link函数合成的的大的link函数差不多。
所以:在指令中compile与link选项是互斥的,如果同时设置了这两个选项,
那么就会把compile所返回的函数当做是链接函数,而link选项本身就会被忽略掉
compile选项可以返回一个对象或者函数
在这里我们可以在指令和实时数据被放到DOM中之前进行DOM操作,
比如我们可以在这里进行添加或者删除节点的DOM的操作。
所以编译函数是负责对模板的DOM进行转换,并且仅仅只会运行一次。
//compile函数的语法
compile:function compile(tElement,tAttrs,transclude){
      return{
        pre:function preLink(scope,iElement,iAttrs,controller){},
        post:function postLink(scope,iElement,iAttrs,controller){}
      }
    }
对于我们编写的大部分的指令来说,并不需要对模板进行转换,所以大部分情况只要编写link函数就可以了。
tips:preLink函数会在编译阶段之后,指令链接到子元素之前执行
类似的,postLink会在指令链接到子元素之后执行
这意味着,为了不破坏绑定过程,如果你需要修改DOM结构,你应该在postLink函数中来做这件事。
链接函数负责将作用域和DOM进行链接。
//link链接函数
link:function postLink(scope,iElement,iAttrs){}
若指令中定义有require选项,则link函数会有第四个参数,代表控制器或者所依赖的指令的控制器(上面require选项例子已有例子)
偷个懒,这个重要的东西就留着下次再讲吧。。。
如果你觉得文章对你有帮助,请点个推荐吧。

 浙公网安备 33010602011771号