

转载请注明出处:http://www.cnblogs.com/Joanna-Yan/p/7085268.html
前面讲到:Spring+SpringMVC+MyBatis深入学习及搭建(十五)——SpringMVC注解开发(基础篇)
本文主要内容:
(1)SpringMVC校验
(2)数据回显
(3)异常处理器
(4)图片上传
(5)Json数据交互
(6)支持RESTful
1.SpringMVC校验
1.1校验理解
项目中,通常使用较多的是前端的校验,比如页面中js校验。对于安全要求较高的建议在服务器进行校验。
服务器校验:
控制层controller:校验页面请求的参数的合法性。在服务端控制层controller校验,不区分客户端类型(浏览器、手机客户端、远程调用)
业务层service(使用较多):主要校验关键业务参数,仅限于service接口中使用的参数。
持久层dao:一般是不校验的。
1.2springmvc校验需求
springmvc使用hibernate的校验框架validation(和hibernate没有任何关系)。
校验思路:
页面提交请求的参数,请求到controller方法中,使用validation进行校验。如果校验出错,将错误信息展示Dao页面。
具体需求:
商品修改,添加校验(校验商品名称长度、生成日期的非空校验),如果校验出错,在商品修改页面显示错误信息。
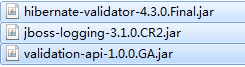
1.3环境准备
hibernate的校验框架validation所需要jar包:
1.4配置校验器
在classpath下springmvc.xml中配置:
    <!-- 校验器 -->
    <bean id="validator"
        class="org.springframework.validation.beanvalidation.LocalValidatorFactoryBean">
        <!-- Hibernate校验器-->
        <property name="providerClass" value="org.hibernate.validator.HibernateValidator" />
        <!-- 指定校验使用的资源文件,在文件中配置校验错误信息,如果不指定则默认使用classpath下的ValidationMessages.properties -->
        <property name="validationMessageSource" ref="messageSource" />
    </bean>
    <!-- 校验错误信息配置文件 -->
    <bean id="messageSource"
        class="org.springframework.context.support.ReloadableResourceBundleMessageSource">
        <!-- 资源文件名-->
        <property name="basenames">
            <list>
            <value>classpath:CustomValidationMessages</value>
            </list>
        </property>
        <!-- 资源文件编码格式 -->
        <property name="fileEncodings" value="utf-8" />
        <!-- 对资源文件内容缓存时间,单位秒 -->
        <property name="cacheSeconds" value="120" />
    </bean>
1.5将validator注入到处理器适配器中
在classpath下springmvc.xml中配置:
1.5.1配置方式1

1.5.2配置方式2
<!-- 自定义webBinder -->
    <bean id="customBinder"
        class="org.springframework.web.bind.support.ConfigurableWebBindingInitializer">
        <property name="validator" ref="validator" />
    </bean>

<!-- 注解适配器 -->
    <bean
        class="org.springframework.web.servlet.mvc.method.annotation.RequestMappingHandlerAdapter">
        <property name="webBindingInitializer" ref="customBinder"></property>
    </bean>
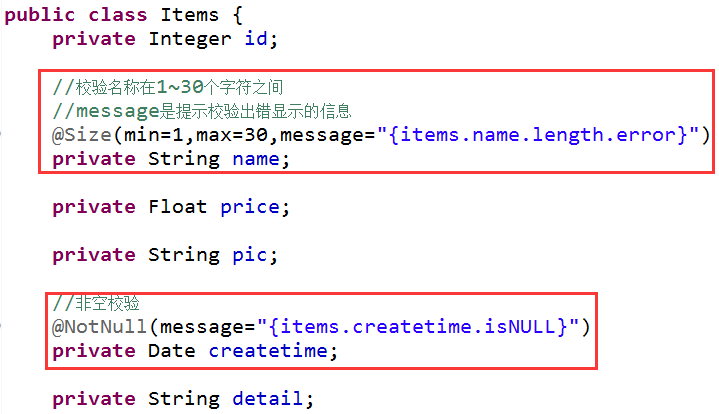
1.6在pojo中添加校验规则
在ItemsCustom.java中添加校验规则:
/**
 * 商品信息的扩展类
 * @author Joanna.Yan
 *
 */
public class ItemsCustom extends Items{
    //添加商品信息的扩展属性
}
这里ItemsCustom直接继承的是Items,所以我们在Items中添加:
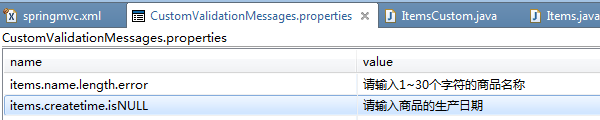
1.7CustomValidationMessages.properties
在classpath下新建CustomValidationMessages.properties文件,配置校验错误信息:
1.8捕获校验错误信息
一个BindingResult对应一个pojo。

1.9在页面显示校验错误信息
1.9.1方式一
在controller中将错误信息传到页面即可。
    //商品信息修改提交
    //在需要校验的pojo前添加@Validated,在需要校验的pojo后边添加BindingResult bindingResult接收校验出错信息
    //注意:@Validated和BindingResult bindingResult是配对出现,并且形参顺序是固定的(一前一后)。
    @RequestMapping("/editItemsSubmit")
    public String editItemsSubmit(Model model,HttpServletRequest request,Integer id,
            @Validated ItemsCustom itemsCustom,BindingResult bindingResult) throws Exception{

        //获取校验错误信息
        if(bindingResult.hasErrors()){
            List<ObjectError> allErrors=bindingResult.getAllErrors();
            for (ObjectError objectError : allErrors) {
                System.out.println(objectError.getDefaultMessage());
            }
            //将错误信息传到页面
            model.addAttribute("allErrors", allErrors);
            //出错,重新到商品页面
            return "items/editItems";
        }
        //调用service更新商品信息,页面需要将商品信息传到此方法
        itemsService.updateItems(id, itemsCustom);

        //重定向到商品的查询列表
//        return "redirect:queryItems.action";
        //页面转发
//        return "forward:queryItems.action";
        return "success";
    }
页面显示错误信息:
<c:if test="${allErrors!=null }">
    <c:forEach items="${allErrors }" var="error">
        ${error.defaultMessage }<br/>
    </c:forEach>
</c:if>
1.9.2方式二
修改Controller方法:
    //商品信息修改提交
    //在需要校验的pojo前添加@Validated,在需要校验的pojo后边添加BindingResult bindingResult接收校验出错信息
    //注意:@Validated和BindingResult bindingResult是配对出现,并且形参顺序是固定的(一前一后)。
    @RequestMapping("/editItemsSubmit")
    public String editItemsSubmit(Model model,HttpServletRequest request,Integer id,
            @Validated ItemsCustom itemsCustom,BindingResult bindingResult) throws Exception{

        //获取校验错误信息
        if(bindingResult.hasErrors()){
            List<ObjectError> allErrors=bindingResult.getAllErrors();
            for (ObjectError objectError : allErrors) {
                System.out.println(objectError.getDefaultMessage());
            }//出错,重新到商品页面
            return "items/editItems";
        }
        //调用service更新商品信息,页面需要将商品信息传到此方法
        itemsService.updateItems(id, itemsCustom);

        //重定向到商品的查询列表
//        return "redirect:queryItems.action";
        //页面转发
//        return "forward:queryItems.action";
        return "success";
    }
商品修改页面显示错误信息:
页头:
<%@ page language="java" contentType="text/html; charset=UTF-8"
    pageEncoding="UTF-8"%>
<%@ taglib uri="http://java.sun.com/jsp/jstl/core" prefix="c" %>
<%@ taglib uri="http://java.sun.com/jsp/jstl/fmt"
<%@ taglib prefix="spring" uri="http://www.springframework.org/tags" %>
在需要显示错误信息地方:
<spring:hasBindErrors name="item">
<c:forEach items="${errors.allErrors}" var="error">
    ${error.defaultMessage }<br/>
</c:forEach>
</spring:hasBindErrors>
<spring:hasBindErrors name="item">表示如果item参数绑定校验错误下边显示错误信息。
1.10分组校验
1.10.1需求
在pojo中定义校验规则,而pojo是被多个controller所共用,当不同的controller方法对同一个pojo进行校验,但是每个controller方法需要不同的校验。
解决方法:
定义多个校验分组(其实是一个java接口),分组中定义有哪些规则。
每个controller方法使用不同的校验分组。
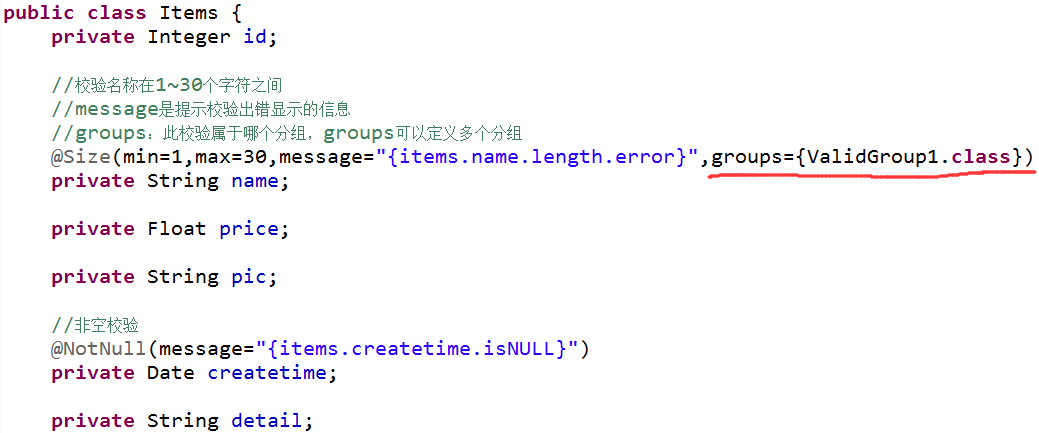
1.10.2校验分组
/**
 * 校验分组
 * @author Joanna.Yan
 *
 */
public interface ValidGroup1 {
    //接口中不需要定义任何方法,仅是对不同的校验规则进行分组
    //此分组只校验商品名称长度
}
/**
 * 校验分组
 * @author Joanna.Yan
 *
 */
public interface ValidGroup2 {
    //接口中不需要定义任何方法,仅是对不同的校验规则进行分组
}
1.10.3在校验规则中添加分组
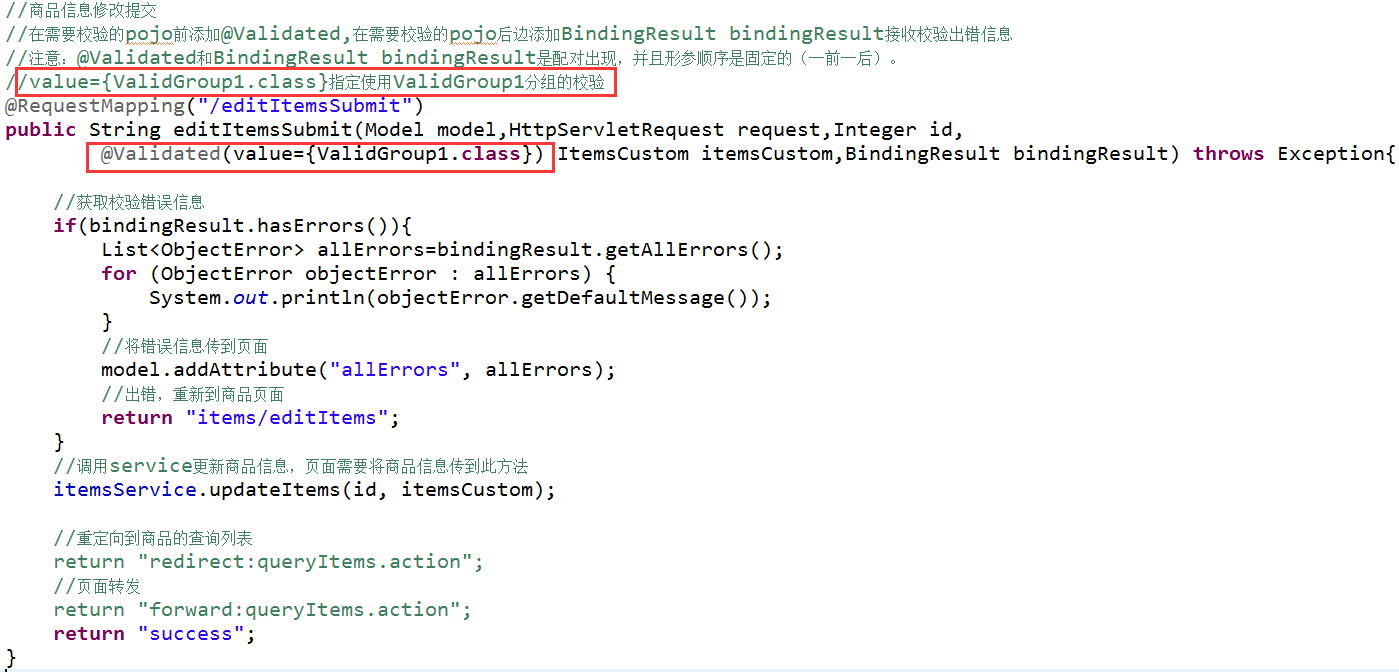
1.10.4在controller方法中使用指定分组的校验
1.10.4校验注解
@Null 被注释的元素必须为 null
@NotNull 被注释的元素必须不为 null
@AssertTrue 被注释的元素必须为 true
@AssertFalse 被注释的元素必须为 false
@Min(value) 被注释的元素必须是一个数字,其值必须大于等于指定的最小值
@Max(value) 被注释的元素必须是一个数字,其值必须小于等于指定的最大值
@DecimalMin(value) 被注释的元素必须是一个数字,其值必须大于等于指定的最小值
@DecimalMax(value) 被注释的元素必须是一个数字,其值必须小于等于指定的最大值
@Size(max=, min=) 被注释的元素的大小必须在指定的范围内
@Digits (integer, fraction) 被注释的元素必须是一个数字,其值必须在可接受的范围内
@Past 被注释的元素必须是一个过去的日期
@Future 被注释的元素必须是一个将来的日期
@Pattern(regex=,flag=) 被注释的元素必须符合指定的正则表达式
Hibernate Validator 附加的 constraint
@NotBlank(message =) 验证字符串非null,且长度必须大于0
@Email 被注释的元素必须是电子邮箱地址
@Length(min=,max=) 被注释的字符串的大小必须在指定的范围内
@NotEmpty 被注释的字符串的必须非空
@Range(min=,max=,message=) 被注释的元素必须在合适的范围内
2.数据回显
2.1什么是数据回显
提交后,如果出现错误,将刚才提交的数据回显到刚才的提交页面。
2.2pojo数据回显方法
springmvc默认对pojo数据进行回显,springmvc自动将形参中的pojo重新放回request域中,request的key为pojo的类名(首字母小写),如下:
controller方法:
    @RequestMapping("/editItemSubmit")
    public String editItemSubmit(Integer id,ItemsCustom itemsCustom)throws Exception{
springmvc自动将itemsCustom放回request,相当于调用下边的代码:
model.addAttribute("itemsCustom", itemsCustom);
jsp页面:

页面中的从“itemsCustom”中取数据。
如果key不是pojo的类名(首字母小写),可以使用@ModelAttribute完成数据回显。
@ModelAttribute作用如下:
(1)绑定请求参数到pojo并且暴露为模型数据传到视图页面。
此方法可实现数据回显效果。
// 商品修改提交
    @RequestMapping("/editItemSubmit")
    public String editItemSubmit(Model model,@ModelAttribute("item") ItemsCustom itemsCustom)
页面:
<tr>
    <td>商品名称</td>
    <td><input type="text" name="name" value="${item.name }"/></td>
</tr>
<tr>
    <td>商品价格</td>
    <td><input type="text" name="price" value="${item.price }"/></td>
</tr>
如果不用@ModelAttribute也可以使用model.addAttribute("item", itemsCustom)完成数据回显。
(2)将方法返回值暴露为模型数据传到视图页面
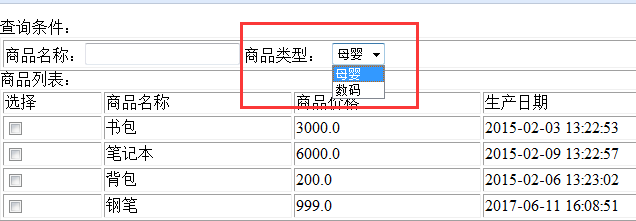
//商品分类
    @ModelAttribute("itemtypes")
    public Map<String, String> getItemTypes(){

        Map<String, String> itemTypes = new HashMap<String,String>();
        itemTypes.put("101", "数码");
        itemTypes.put("102", "母婴");

        return itemTypes;
    }
页面:
商品类型:
<select name="itemtype">
    <c:forEach items="${itemtypes }" var="itemtype">
        <option value="${itemtype.key }">${itemtype.value }</option>
    </c:forEach>
</select>
2.3简单类型数据回显
最简单方法使用model。
//简单数据类型回显
 model.addAttribute("id", id);
3.异常处理器
3.1异常处理思路
系统中异常包括两类:预期异常和运行时异常RuntimeException,前者通过捕获异常从而获取异常信息,后者主要通过规范代码开发、通过测试手段减少运行时异常的发生。
系统的dao、service、controller出现异常都通过throws Exception向上抛出,最后由springmvc前端控制器交由异常处理器进行异常处理,如下图:
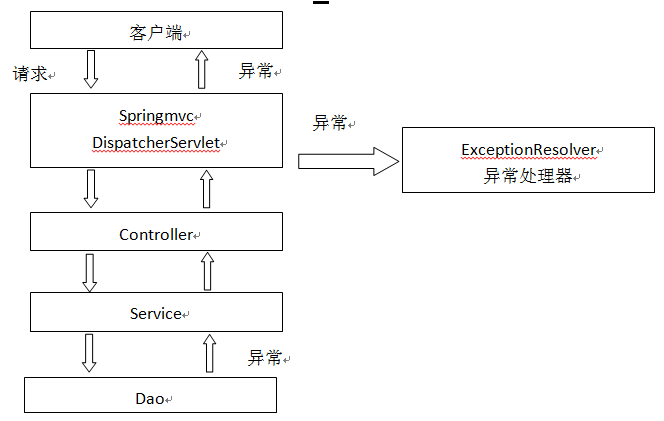
springmvc提供全局异常处理器(一个系统只有一个异常处理器)进行统一异常处理。
3.2自定义异常类
对不同的异常类型定义异常类,继承Exception。
package joanna.yan.ssm.exception;
/**
 * 系统自定义异常类,针对预期的异常。需要在程序中抛出此类异常。
 * @author Joanna.Yan
 *
 */
public class CustomException extends Exception{
    //异常信息
    public String message;

    public CustomException(String message) {
        super();
        this.message = message;
    }

    public String getMessage() {
        return message;
    }

    public void setMessage(String message) {
        this.message = message;
    }

}
3.3全局异常处理器
思路:
系统遇到异常,在程序中手动抛出,dao抛给service、service抛给controller、controller抛给前端控制器,前端控制器调用全局异常处理器。
全局异常处理器处理思路:
解析出异常类型
如果该异常类型是系统自定义的异常,直接取出异常信息,在错误页面展示
如果该异常类型不是系统自定义的异常,构造一个自定义的异常类型(信息为“未知错误”)
springmvc提供一个HandlerExceptionResolver接口。
package joanna.yan.ssm.exception;

import javax.servlet.http.HttpServletRequest;
import javax.servlet.http.HttpServletResponse;
import org.springframework.web.servlet.HandlerExceptionResolver;
import org.springframework.web.servlet.ModelAndView;

public class CustomExceptionResolver implements HandlerExceptionResolver{
    /*
     * ex:系统抛出的异常
     */
    @Override
    public ModelAndView resolveException(HttpServletRequest request,
            HttpServletResponse repsonse, Object handler, Exception ex) {
        //handler就是处理器适配器要执行的Handler对象(只有一个method)
        //1.解析出异常类型
        //2.如果该异常类型是系统自定义的异常,直接取出异常信息,在错误页面展示
        //3.如果该异常类型不是系统自定义的异常,构造一个自定义的异常类型(信息为“未知错误”)
        CustomException customException=null;
        if(ex instanceof CustomException){
            customException=(CustomException)ex;
        }else{
            customException=new CustomException("未知错误");
        }
        //错误信息
        String message=customException.getMessage();
        ModelAndView modelAndView=new ModelAndView();
        //将错误信息传到页面
        modelAndView.addObject("message", message);
        //指向错误页面
        modelAndView.setViewName("error");
        return modelAndView;
    }

}
3.4错误页面
<%@ page language="java" import="java.util.*" pageEncoding="UTF-8"%>
<%
String path = request.getContextPath();
String basePath = request.getScheme()+"://"+request.getServerName()+":"+request.getServerPort()+path+"/";
%>

<!DOCTYPE HTML PUBLIC "-//W3C//DTD HTML 4.01 Transitional//EN">
<html>
  <head>
    <base href="<%=basePath%>">
    <title>错误提示</title>

    <meta http-equiv="pragma" content="no-cache">
    <meta http-equiv="cache-control" content="no-cache">
    <meta http-equiv="expires" content="0">
    <meta http-equiv="keywords" content="keyword1,keyword2,keyword3">
    <meta http-equiv="description" content="This is my page">
    <!--
    <link rel="stylesheet" type="text/css" href="styles.css">
    -->

  </head>
3.5在springmvc.xml配置全局异常处理器
    <!-- 全局异常处理器
         只要实现HandlerExceptionResolver接口就是全局异常处理器
    -->
    <bean class="joanna.yan.ssm.exception.CustomExceptionResolver"></bean>
3.6异常测试
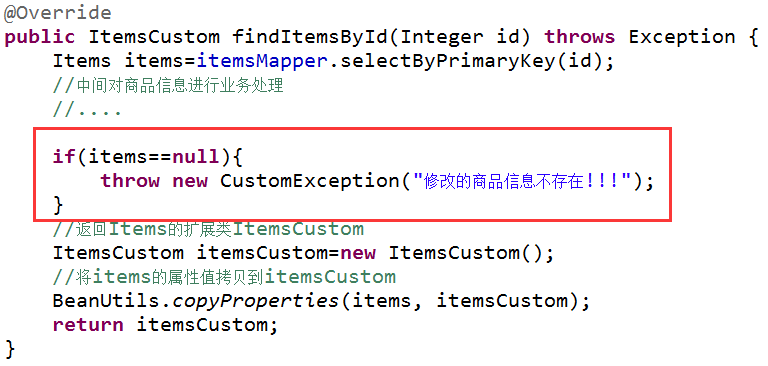
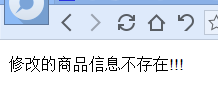
在controller、service、dao中任意一处需要手动抛出异常。
如果是程序中手动抛出的异常,在错误页面中显示自定义的异常信息,如果不是手动抛出异常说明是一个运行时异常,在错误页面只显示“未知错误”。
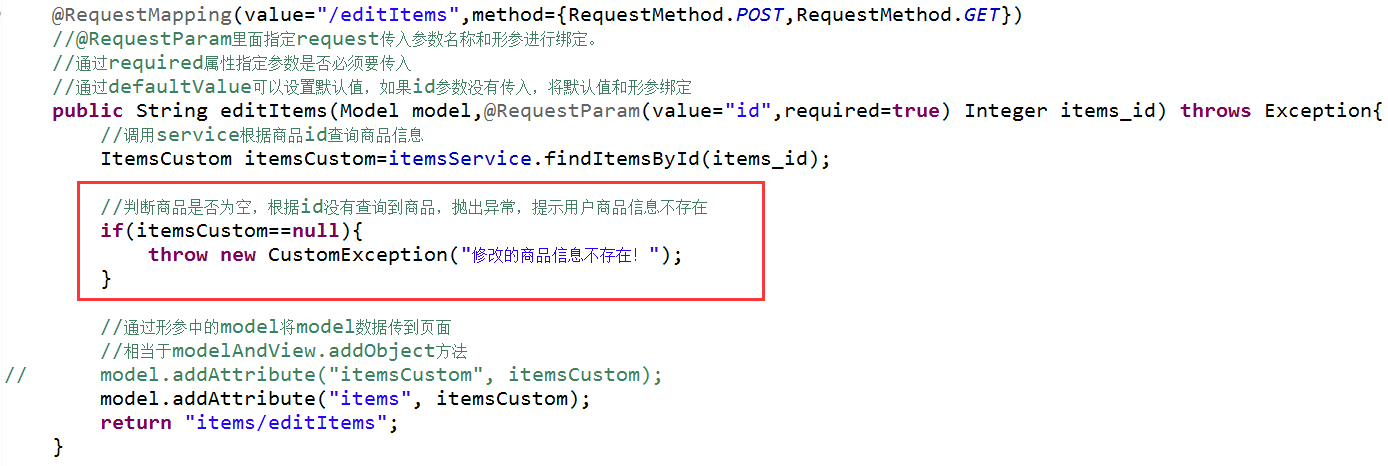
在商品修改的controller方法中抛出异常。
在service接口中抛出异常:
如果与业功能相关的异常,建议在service中抛出异常。
与业务功能没有关系的异常(比如形参校验),建议在controller中抛出。
上边的功能,建议在service中抛出异常。
4.图片上传
4.1配置虚拟目录
在Tomcat上配置图片虚拟目录,在tomcat下conf/server.xml中添加:
<Context docBase="F:\develop\upload\temp" path="/pic" reloadable="false"/>
访问http://localhost:8080/pic即可访问F:\develop\upload\temp下的图片。
注意:在图片虚拟目录中,一定要将图片目录分级创建(提高I/O性能),一般我们采用按日期(年、月、日)进行分级创建。
4.2配置解析器
springmvc中对多部件类型解析。
在页面form中提交enctype="multipart/form-data"的数据时,需要springmvc对multipart类型的数据进行解析。
在springmvc.xml中配置multipart类型解析器。
    <!-- 文件上传 -->
    <bean id="multipartResolver"
        class="org.springframework.web.multipart.commons.CommonsMultipartResolver">
        <!-- 设置上传文件的最大尺寸为5MB -->
        <property name="maxUploadSize">
            <value>5242880</value>
        </property>
    </bean>
4.3加入上传图片的jar
上边的解析器内部使用下边的jar进行图片上传。
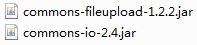
4.4上传图片
controller:
    @RequestMapping("/editItemsSubmit")
    public String editItemsSubmit(
            Model model,
            HttpServletRequest request,
            Integer id,
            @ModelAttribute("items") @Validated(value={ValidGroup1.class}) ItemsCustom itemsCustom,
            BindingResult bindingResult,
            MultipartFile items_pic//接收商品图片
            ) throws Exception{

        //获取校验错误信息
        if(bindingResult.hasErrors()){
            List<ObjectError> allErrors=bindingResult.getAllErrors();
            for (ObjectError objectError : allErrors) {
                System.out.println(objectError.getDefaultMessage());
            }
            //将错误信息传到页面
            model.addAttribute("allErrors", allErrors);
            //可以直接使用model将提交的pojo回显到页面
            model.addAttribute("items", itemsCustom);
            //简单数据类型回显
            model.addAttribute("id", id);
            //出错,重新到商品页面
            return "items/editItems";
        }

        //上传图片
        String originalFilename=items_pic.getOriginalFilename();
        if(items_pic!=null&&originalFilename!=null&&originalFilename.length()>0){
            //存储图片的物理路径
            String pic_path="F:\\develop\\upload\\temp\\";
            //新的图片名称
            String newFileName=UUID.randomUUID()+originalFilename.substring(originalFilename.lastIndexOf("."));
            //新图片
            File newFile=new File(pic_path+newFileName);
            //将内存中的数据写入磁盘
            items_pic.transferTo(newFile);
            //将新图片名称写到itemsCustom中
            itemsCustom.setPic(newFileName);
        }

        //调用service更新商品信息,页面需要将商品信息传到此方法
        itemsService.updateItems(id, itemsCustom);

        //重定向到商品的查询列表
//        return "redirect:queryItems.action";
        //页面转发
//        return "forward:queryItems.action";
        return "success";
    }
页面:
form添加enctype="multipart/form-data",file的name与controller形参一致:
<form id="itemForm" action="${pageContext.request.contextPath }/items/editItemsSubmit.action" method="post" enctype="multipart/form-data">
<input type="hidden" name="id" value="${items.id }"/>
修改商品信息:
<table width="100%" border=1>
<tr>
    <td>商品名称</td>
    <td><input type="text" name="name" value="${items.name }"/></td>
</tr>
<tr>
    <td>商品价格</td>
    <td><input type="text" name="price" value="${items.price }"/></td>
</tr>
<tr>
    <td>商品生产日期</td>
    <td><input type="text" name="createtime" value="<fmt:formatDate value="${items.createtime}" pattern="yyyy-MM-dd HH:mm:ss"/>"/></td>
</tr>
<tr>
    <td>商品图片</td>
    <td>
        <c:if test="${items.pic !=null}">
            <img src="/pic/${items.pic}" width=100 height=100/>
            <br/>
        </c:if>
        <input type="file"  name="items_pic"/>
    </td>
</tr>
<tr>
    <td>商品简介</td>
    <td>
    <textarea rows="3" cols="30" name="detail">${items.detail }</textarea>
    </td>
</tr>
<tr>
<td colspan="2" align="center"><input type="submit" value="提交"/>
</td>
</tr>
</table>

</form>
5.Json数据交互
5.1为什么要进行json数据交互
json数据格式在接口调用中、html页面中较常用,json格式比较简单,解析还比较方便。
比如:webserivce接口,传输json数据。
5.2springmvc进行json交互

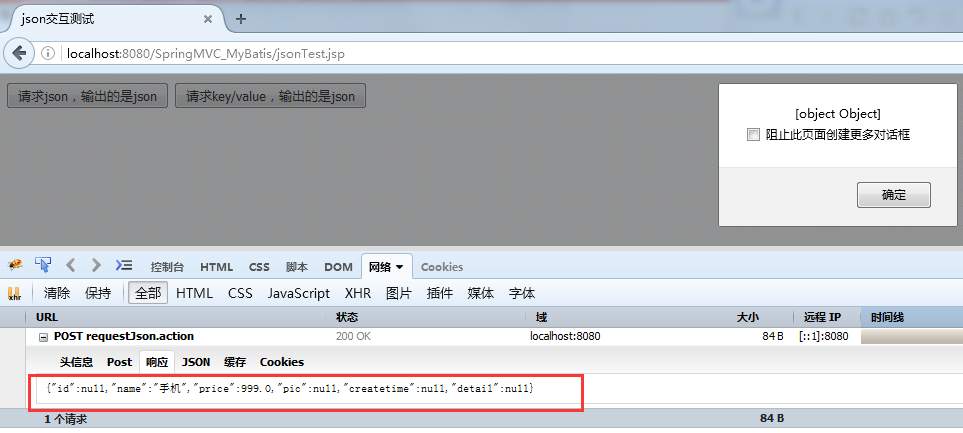
(1)请求json、输出json,要求请求的是json串,所以在前端页面中需要将请求的内容转成json,不太方便。
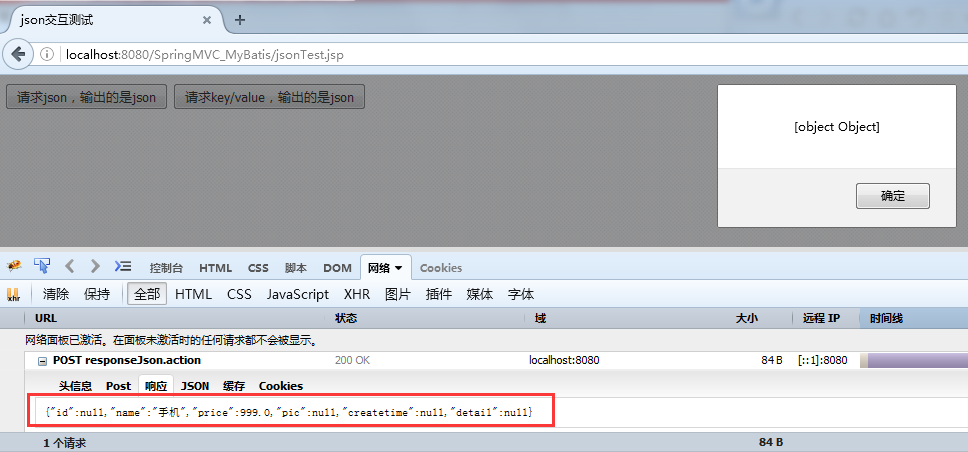
(2)请求key/value、输出json。次方法比较常用。
5.3环境准备
5.3.1加载json转换的jar包
springmvc中使用jackson的包进行json转换(@requestBody和@responseBody使用下边的包进行json转换),如下:

5.3.2配置json转换器
在classpath/springmvc.xml,注解适配器中加入messageConverters
!--注解适配器 -->
    <bean class="org.springframework.web.servlet.mvc.method.annotation.RequestMappingHandlerAdapter">
        <property name="messageConverters">
        <list>
        <bean class="org.springframework.http.converter.json.MappingJacksonHttpMessageConverter"></bean>
        </list>
        </property>
    </bean>
注意:如果使用<mvc:annotation-driven/>则不用定义上边的内容。
5.4json交互测试
这里分输入json串输出json串和输入key/value输出json两种情况进行测试。
新建jsonTest.jsp
<%@ page language="java" import="java.util.*" pageEncoding="UTF-8"%>
<%
String path = request.getContextPath();
String basePath = request.getScheme()+"://"+request.getServerName()+":"+request.getServerPort()+path+"/";
%>

<!DOCTYPE HTML PUBLIC "-//W3C//DTD HTML 4.01 Transitional//EN">
<html>
  <head>
    <base href="<%=basePath%>">
    <title>json交互测试</title>
    <meta http-equiv="pragma" content="no-cache">
    <meta http-equiv="cache-control" content="no-cache">
    <meta http-equiv="expires" content="0">
    <meta http-equiv="keywords" content="keyword1,keyword2,keyword3">
    <meta http-equiv="description" content="This is my page">
    <!--
    <link rel="stylesheet" type="text/css" href="styles.css">
    -->
    <script type="text/javascript" src="${pageContext.request.contextPath }/js/jquery-1.4.4.min.js"></script>
      <script type="text/javascript">
      //请求json,输出的是json
      function requestJson(){
          $.ajax({
              type:'post',
              url:'${pageContext.request.contextPath }/requestJson.action',
              contentType:'application/json;charset=utf-8',
              //数据格式是json串,商品信息
              data:'{"name":"手机","price":999}',
              success:function(data){//返回json结果
                  alert(data);
              }
          });
      }

      //请求key/value,输出的是json
      function responseJson(){
          $.ajax({
              type:'post',
              url:'${pageContext.request.contextPath }/responseJson.action',
              //请求是key/value这里不需要指定contentType,因为默认就是key/value类型
              //contentType:'application/json;charset=utf-8',
              //数据格式是json串,商品信息
              data:'name=手机&price=999',
              success:function(data){//返回json结果
                  alert(data);
              }
          });
      }
      </script>
  </head>

  <body>
    <input type="button" onclick="requestJson()" value="请求json,输出的是json"/>
     <input type="button" onclick="responseJson()" value="请求key/value,输出的是json"/>
  </body>
</html>
新建Controller:
package joanna.yan.ssm.controller;

import joanna.yan.ssm.po.ItemsCustom;
import org.springframework.stereotype.Controller;
import org.springframework.web.bind.annotation.RequestBody;
import org.springframework.web.bind.annotation.RequestMapping;
import org.springframework.web.bind.annotation.ResponseBody;

@Controller
public class JsonTest {
    //请求json串(商品信息),输出的竖json(商品信息)
    //@RequestBody将请求的商品信息的json串转成itemsCustom对象
    //@ResponseBody将itemsCustom转成json输出
    @RequestMapping("/requestJson")
    public @ResponseBody ItemsCustom requestJson(@RequestBody ItemsCustom itemsCustom){

        return itemsCustom;
    }

    //请求key/value,输出的竖json
    @RequestMapping("/responseJson")
    public @ResponseBody ItemsCustom responseJson(ItemsCustom itemsCustom){

        return itemsCustom;
    }
}
(1)测试输入json串输出是json串
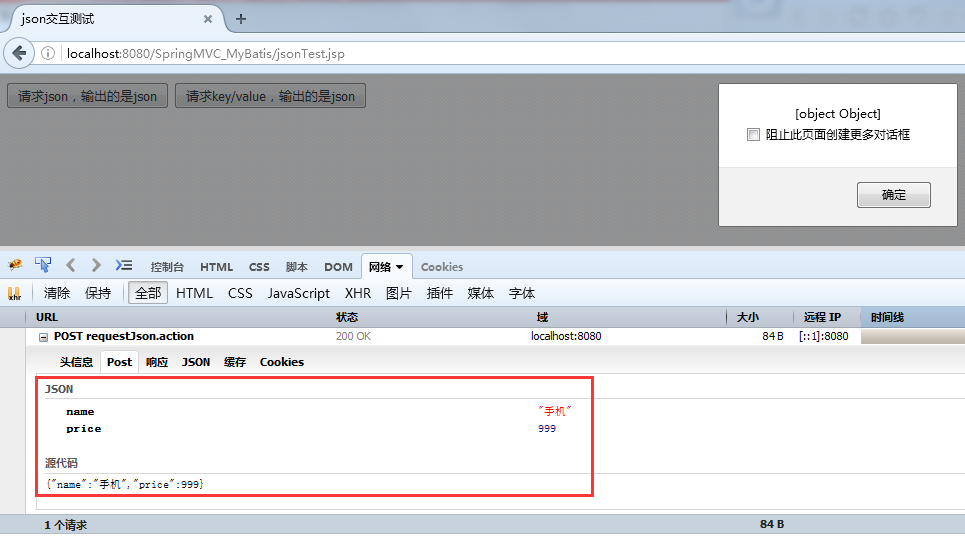
(2)测试输入key/value输出是json串

6.RESTful支持
6.1什么是RESTful
RESTful架构,是目前最流行的一种互联网软件架构。它结构清晰、符合标准、易于理解、扩展方便,所以得到越来越多网站的采用。
RESTful(即Representational State Transfer的缩写)其实是一个开发理念,是对http的很好的诠释。
(1)对url进行规范,写RESTful格式的url
非REST的url:http://...../queryItems.action?id=001&type=T01
REST的url风格:http://..../items/001
特点:url简洁,将参数通过url传到服务端
(2)对http的方法规范
不管是删除、添加、更新...使用url是一致的,如果进行删除,需要设置http的方法为delete,同理添加...
后台controller方法:判断http方法,如果是delete执行删除,如果是post执行添加。
(3)对http的contentType规范
请求时指定contentType,要json数据,设置成json格式的type...
目前完全实现RESTful的系统很少,一般只实现(1)、(3),对于(2)我们一个方法经常会同时存在增删改查,实现起来太费劲了。
下面举例实现(1)、(2)。
6.2REST的例子
6.2.1需求
查询商品信息,返回json数据。
6.2.2controller
定义方法,进行url映射使用REST风格的url,将查询商品信息的id传入controller。
输出json使用@ResponseBody将java对象输出json。
    //查询商品信息,输出json
    ///itemsView/{id}里面的{id}表示占位符,通过@PathVariable获取占位符中的参数
    //如果占位符中的名称和形参名一致,在@PathVariable可以不指定名称
    @RequestMapping("/itemsView/{id}")
    public @ResponseBody ItemsCustom itemsView(@PathVariable("id") Integer id) throws Exception{
        ItemsCustom itemsCustom=itemsService.findItemsById(id);
        return itemsCustom;
    }
6.2.3REST方法的前端控制器配置
在web.xml增加配置:
  <!-- springmvc前端控制器,rest配置  -->
  <servlet>
      <servlet-name>springmvc_rest</servlet-name>
      <servlet-class>org.springframework.web.servlet.DispatcherServlet</servlet-class>
      <init-param>
          <param-name>contextConfigLocation</param-name>
          <param-value>classpath:spring/springmvc.xml</param-value>
      </init-param>
      <load-on-startup>1</load-on-startup>
  </servlet>

  <servlet-mapping>
      <servlet-name>springmvc_rest</servlet-name>
      <url-pattern>/</url-pattern>
  </servlet-mapping>
6.3对静态资源的解析
配置前端控制器的url-parttern中指定/,对静态资源的解析出现问题:
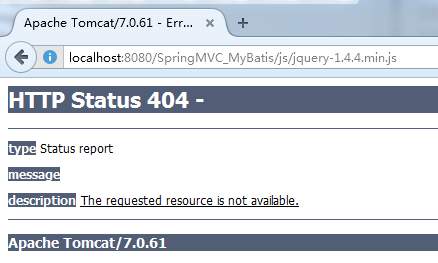
在springmvc.xml中添加静态资源解析方法。
    <!-- 静态资源的解析
         包括:js、css、img...
    -->
    <mvc:resources location="/js/" mapping="/js/**"/>
    <mvc:resources location="/img/" mapping="/img/**"/>
如果此文对您有帮助,微信打赏我一下吧~


作者:Joanna.Yan
出处:http://www.cnblogs.com/Joanna-Yan/
本文版权归作者所有,欢迎转载,但未经作者同意必须保留此段声明,且在文章页面明显位置给出原文链接,否则保留追究法律责任的权利。

 浙公网安备 33010602011771号