我的WCF4 Rest Service及Entity Framework with POCO之旅(一)——创建一个基本的RESTful Service
很久没有玩WCF了,年前和几个朋友做一个Restful的服务,惊讶于WCF4已经能如此完美实现REST(好吧,我承认不是完全完美)。期间遇到了许多难题,但还是一一解决,或者找到了workaround. 为了让以后想做同样事情的朋友不至于像我们这般抓狂,也为了给自己整理一下所学,我准备写一个系列,讲述如何从零开始创建一个完整的支持Token验证的REST服务,其内容将涉及如何控制返回内容格式,如何处理异常并返回自定义内容,如何建立基于token的身份验证,如何使用POCO,如何做service的单元测试……总之,总之,看了就知道了。鉴于文笔拙劣,技亦不精,不敢和大牛比肩,姑且自称为《我的WCF4 Rest Service及Entity Framework with POCO之旅》吧,还请各位高手多多指教。
照理说,首先应介绍什么是REST,它是怎么出现的,有什么优势,什么历史意义。不过我不多想讲,也讲不清楚。简而言之,REST最核心的概念是“资源”,一个uri代表一个特定的资源,而客户端通过HTTP method GET, POST, PUT, DELETE来和资源交互(同时导致状态转移)。至于资源的表现形式,则以XML和JSON为主。为什么要用REST? 自己想去吧。
创建项目
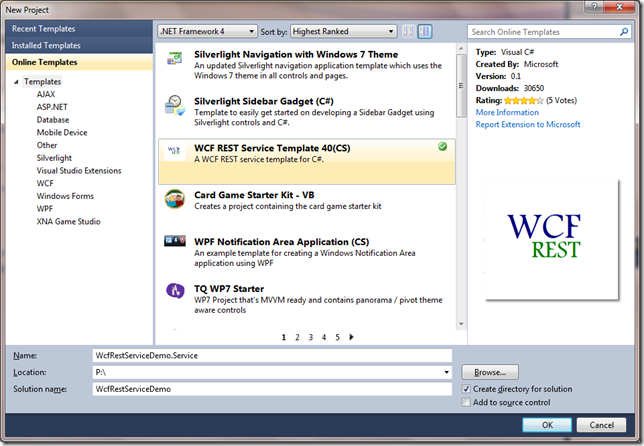
闲话说完,现在开始创建项目。使用Online Templates中的WCF REST Service Template是一个比较容易的方法:
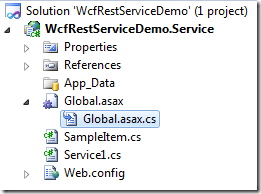
项目创建好后,我们可以看到项目中已经有下面这些文件:
Service1就是一个WCF Service,和以前的WCF Service不同,这里的Service既不是一个.svc文件,也没有专门定义一个接口作为ServiceContract。
SampleItem就是我们以往所知的DataContract,不过现在即使不加DataContract attribute,也没有关系。
比较特别的是Global.asax和Global.asax.cs。Global.asax.cs中定义了Routes:
private void RegisterRoutes()
{
    // Edit the base address of Service1 by replacing the "Service1" string below
    RouteTable.Routes.Add(new ServiceRoute("Service1", new WebServiceHostFactory(), typeof(Service1)));
}
表示所有访问HOST/Service1的请求都要由Service1这个类来处理。再看一下Service1的定义,其中有个方法是:
[WebGet(UriTemplate = "{id}")]
public SampleItem Get(string id)
{
    // TODO: Return the instance of SampleItem with the given id
    throw new NotImplementedException();
}
这表示对于HOST/Service1/123的GET请求,将会用这个Get(string)方法来处理。服务运行时,WCF根据uri中的“Service1”根据前面指定的Route找到Service1这个服务类,再根据UriTemplate,将“123”赋给名为id的参数,其结果就是Get方法以参数“123”被调用了。
现在我们修改一下这个方法,让它能够返回结果:
[WebGet(UriTemplate = "{id}")]
public SampleItem Get(string id)
{
    return new SampleItem
    {
        Id = int.Parse(id),
        StringValue = string.Format("The id is {0}.", id)
    };
}
然后启动这个服务。在浏览器地址栏中输入“http://localhost:6421/Service1/123”(端口号根据实际情况而定),结果如下:
如何,是不是很简单?
不过现在的RESTful服务还只能读取资源,WebGet只支持GET方法,要支持PUT, POST和DELETE,需要使用WebInvoke attribute。而且,现在的服务看不出任何实际意义。
既然掌握了基本技术,我们来创建一个稍微有点实际意义的服务
创建一个简易微博服务
(终于不是做图书管理系统示例了)
首先,我们的微博服务真的很简单,简单到只能有一个用户自娱自乐,而且还只能发文字,是不是有点无聊?不过不要急,一步一步来。
既然如此,所谓的微博服务,也就是一个微博管理系统了(…)。它应该有这些功能:
- 发布微博
- 查看已发布的微博
- 删除一条微博
照此删去原先那些示例代码,重新编写代码如下:
MicroblogService.cs
using System;
using System.Collections.Concurrent;
using System.Collections.Generic;
using System.Linq;
using System.ServiceModel;
using System.ServiceModel.Activation;
using System.ServiceModel.Web;
using System.Threading;
namespace WcfRestServiceDemo.Service
{
    [ServiceContract(Namespace = "WcfRestServiceDemo")]
    [AspNetCompatibilityRequirements(RequirementsMode = AspNetCompatibilityRequirementsMode.Allowed)]
    [ServiceBehavior(InstanceContextMode = InstanceContextMode.PerCall)]
    public class MicroblogService
    {
        private static int _currentId;
        private static readonly ConcurrentDictionary<int, Microblog> _microblogs =
            new ConcurrentDictionary<int, Microblog>();

        [WebGet(UriTemplate = "")]
        public List<Microblog> GetCollection()
        {
            return _microblogs.Values.ToList();
        }

        [WebInvoke(UriTemplate = "", Method = "POST")]
        public Microblog Create(Microblog microblog)
        {
            microblog.Id = Interlocked.Increment(ref _currentId);
            microblog.PublishTime = DateTime.Now;
            _microblogs.TryAdd(microblog.Id, microblog);
            return microblog;
        }

        [WebGet(UriTemplate = "{id}")]
        public Microblog Get(string id)
        {
            return _microblogs[int.Parse(id)];
        }

        [WebInvoke(UriTemplate = "{id}", Method = "DELETE")]
        public void Delete(string id)
        {
            Microblog microblog;
            _microblogs.TryRemove(int.Parse(id), out microblog);
        }
    }
}
Microblog.cs
using System;
using System.Runtime.Serialization;
namespace WcfRestServiceDemo.Service
{
    [DataContract(Namespace = "WcfRestServiceDemo")]
    public class Microblog
    {
        [DataMember]
        public int Id { get; set; }

        [DataMember]
        public string Content { get; set; }

        [DataMember]
        public DateTime PublishTime { get; set; }
    }
}
Global.asax.cs
using System;
using System.ServiceModel.Activation;
using System.Web;
using System.Web.Routing;
namespace WcfRestServiceDemo.Service
{
    public class Global : HttpApplication
    {
        private void Application_Start(object sender, EventArgs e)
        {
            RegisterRoutes();
        }

        private void RegisterRoutes()
        {
            RouteTable.Routes.Add(new ServiceRoute("microblogs", new WebServiceHostFactory(), typeof(MicroblogService)));
        }
    }
}
编译并运行。首先访问http://localhost:6421/microblogs/@all:

理所当然什么都没有,一条微博都还没发呢。为了方便的发送请求并查看结果,祭出神器Fiddler2:
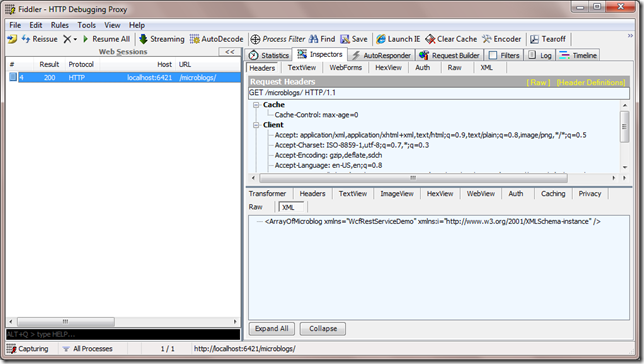
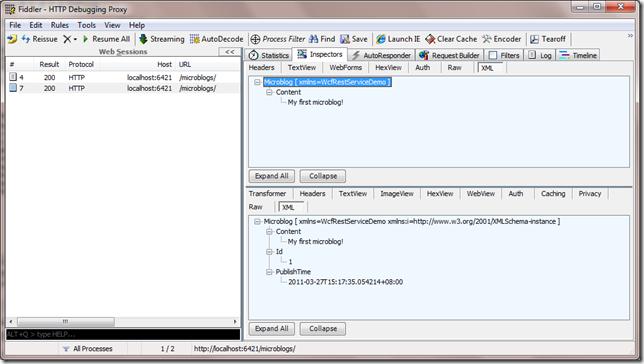
在右边窗口可以看到请求返回的XML。
接下来选择右边上面的Request Builder,来构造一个POST:
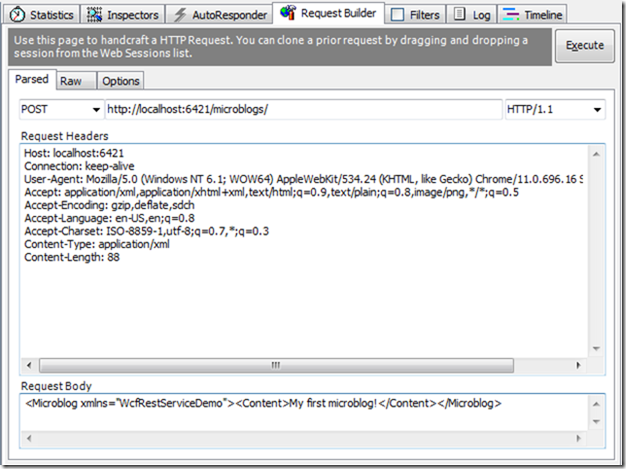
(可以把左边那个请求拖入编辑窗口快速复制一个请求。)
(注意要在上面的Headers窗口添加Content-Type: application/xml这一项,同时注意XML的namespace。)
服务返回HTTP 200 OK,并且可以从Response的内容中看到成功创建的Microblog的Id以及PublishTime的值。
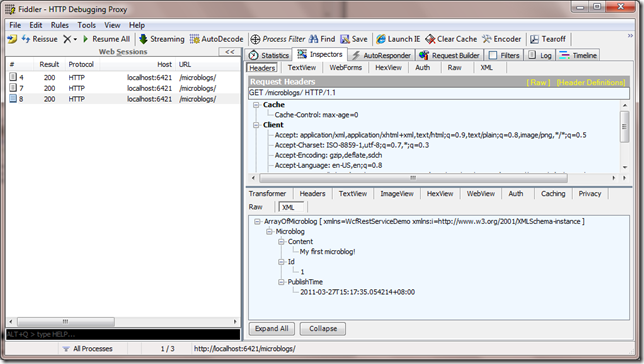
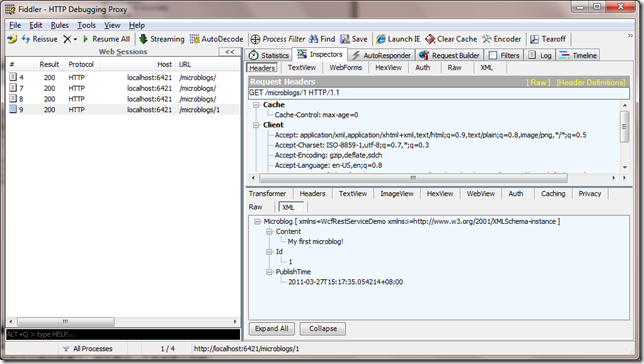
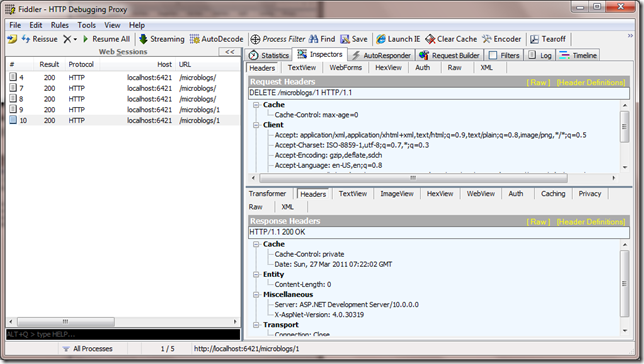
已经可以看到刚才创建的微博了。现在再试一下其他两个功能:
再次查询全部,结果又是空空如也了。到这里,一个超级简单的“微博”服务已经搭建起来了。
小结
本文从零开始,依次介绍了
- 什么是REST
- 如何创建一个基本的WCF REST Service
- (如何使用Fiddler2……)
To be continued…
下篇预告:我的WCF4 Rest Service及Entity Framework with POCO之旅(二)——选择请求/返回格式
参考:
我的WCF4 REST Service及Entity Framework with POCO之旅系列
- 我的WCF4 REST Service及Entity Framework with POCO之旅(一)——创建一个基本的RESTful Service
- 我的WCF4 REST Service及Entity Framework with POCO之旅(二)——选择请求/返回格式
- 我的WCF4 REST Service及Entity Framework with POCO之旅(三)——用Entity Framework和POCO Template实现数据模型及存储
- 我的WCF4 REST Service及Entity Framework with POCO之旅(四)——定制Entity
- 我的WCF4 REST Service及Entity Framework with POCO之旅(五)——身份验证
posted on 2011-03-28 09:11 Gildor Wang 阅读(4343) 评论(19) 编辑 收藏 举报
