爬虫大作业
数据来源:
我爬取的数据是博客园首页的新闻信息,选择的原因是因为博客园是开发者经常使用的博客网站,里面发布的信息当然是最前沿的信息,通过爬取博客园的新闻,我可以了解到IT行业最新的信息。
实现过程:
首先进入一个新闻的页面,通过观察,编写一个获取当页需要的信息的函数
def getNewsDetail(newsUrl):
    res = requests.get(newsUrl)
    res.encoding = 'utf-8'
    soup = BeautifulSoup(res.text, 'html.parser')
    news = {}
    news['title'] = soup.select('#news_title')[0].text
    content = soup.select('#news_body')[0].text
    writeFile(content)

    news['newsId'] = newsUrl.split('/')[-1]

    sourceEmpty = soup.select('#come_from')[0].text
    if len(sourceEmpty) == 1:
        news['source'] = 'none'
    else:
        news['source'] = soup.select('#come_from')[0].text.split()[1]

    news['time'] = soup.select('.time')[0].text[4:]

    countUrl ='https://news.cnblogs.com/NewsAjax/GetAjaxNewsInfo?contentId={}'.format(news['newsId'])
    res2 = requests.get(countUrl)
    res2.encoding = 'utf-8'
    soup2 = BeautifulSoup(res2.text, 'html.parser')

    countResponse = soup2.text
    news['readCount'] = re.search('"TotalView":\d*',countResponse).group(0).split(':')[1]
    news['newsUrl'] = newsUrl
    print(news)
    return news
其中要来将读取的新闻详情信息保存到文本的函数如下:
def writeFile(content):
    f = open('news.txt','a',encoding='utf-8')
    f.write(content)
    f.close()
我是通过博客园新闻页面中按照日期进行分页的页面进行爬取每一条新闻的,就写了这样一个获取一页所有新闻的url,并进去获取每条新闻的详情:
def getListPage(pageUrl):
    res = requests.get(pageUrl)
    res.encoding = 'utf-8'
    soup = BeautifulSoup(res.text, 'html.parser')
    newslist = []
    for news in soup.select('.news_tlist_block')[0].select(('.news_tlist_item')):
         if len(news.select('a')) > 0:
             a = news.select('a')[0].attrs['href']
             url = 'https://news.cnblogs.com{}'.format(a)[:-1] #URL
             newslist.append(getNewsDetail(url))
    return newslist
由于我是按照每一天爬取的新闻,所以我需要获取当天的日期,然后来通过当天的日期,来确定我爬取数据的结束点,然后开始点事有由我自己选择的,我选择爬取的是2018年至今的所有发布在博客园的数据,具体代码实现如下:
这个是获取今天日期的方法,并分别用年、月、日来保存
fun = lambda year, month: list(
    range(1, 1 + time.localtime(time.mktime((year, month + 1, 1, 0, 0, 0, 0, 0, 0)) - 86400).tm_mday))
todayYear = datetime.datetime.now().year
todayMonth = datetime.datetime.now().month
today = datetime.datetime.now().day
这是循环爬取所有我要信息的函数:
def getNewsByDate():
    total = [];
    for i in range(2018,2019):
        for j in range(1,13):
            monthDays = fun(i, j)
            for m in monthDays:
                print(str(i) + '年' + str(j) + '月' + str(m) + '日')
                if (i == todayYear) & (j == todayMonth) & (m == today):
                    return total
                listPageUrl='https://news.cnblogs.com/n/date?date={}/{}/{}'.format(i,j,m)
                total.extend(getListPage(listPageUrl))
最后就是代码的运行阶段啦!
#所有新闻的列表
newstotal = []
newstotal = getNewsByDate()

df = pandas.DataFrame(newstotal)
#保存到数据库
from sqlalchemy import create_engine
conn = create_engine('mysql+pymysql://root:123456@localhost:3306/test?charset=utf8')
pandas.io.sql.to_sql(df,'cnblogsnews',con=conn,if_exists='replace')
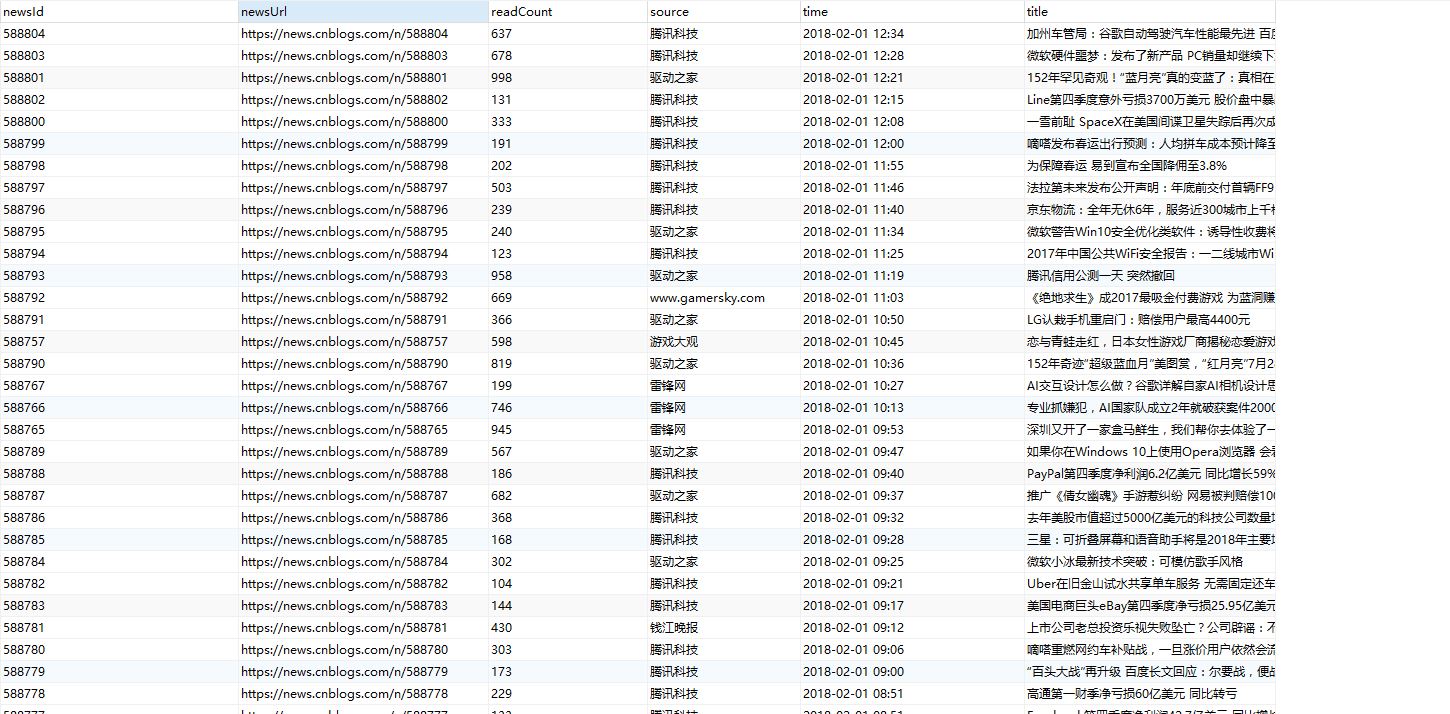
通过上面的代码就会把每一篇新闻的主要内容保存到文本中,然后将每一条新闻的大概信息保存到数据库中,运行的结果如下:
这是保存在数据库的信息:
这是保存在本地的文本文件

到这里了,整个对博客园2018年至今的近万条所有新闻就爬取完毕。
对数据的分析处理实现过程
对数据处理我的主要实现是先通过jieba这个导入包,来对刚刚爬取的文本new.txt进行文本切割,然后再将切割后的数据删除一些没有意义的词语,最后将数据结果按照出现次数生成一个字典,就比如 dic['区块链'] = 10,就代表区块链这个词在我爬取所有的信息中出现了10次。最后通过wordcloud这个包,进行一些参数的配置,利用刚刚生成的字典生成词云。具体实现过程如下:
首先是一个获取爬取下来新闻详情的方法:
def getNewsText():
    f = open('news.txt', 'r',encoding='utf-8')
    text = f.read()
    f.close()
    return text
下面就是整个对数据进行切割的代码:
jieba.add_word('区块链')
jieba.add_word('阿里巴巴')
# 不要的标点符号
punctuation =  ''',。‘’“”:;()!?、)( '''
# 获取所有的文本信息
text = getNewsText()
# 对文本信息进行去标点符号
for i in punctuation:
    text = text.replace(i, '')
# 用jieba对文本进行切割
tempwords = list(jieba.cut(text))
# 定义了一个获取所有切割完毕的一个字的列表
oneWord = []
for i in tempwords:
    if len(i) == 1:
        oneWord.append(i)

not_number = []
for i in range(1,101):
    not_number.append(str(i))

def makeNotWords():
    notWords = ['00','01','没有','if','比如','使用','因为','还有','包括','同时','虽然','但是','其他','作为'
        , '认为','一个','不是','达到','来说','on','oo','018','000','re','016','017','er','cb','le','al','be','可以','200','所以'
        ,'对于','为了','部分','ac','an','一些','方面','en','ro','es','表示','已经','他们','如果','时候','自己','这些','目前'
        , '这样','']
    return notWords

notWords = makeNotWords()

count = {}
# 确定关键词的集合
words = list(set(tempwords) - set(oneWord)-set(not_number) - set(notWords))

# 存放统计结果的字典的列表,主要用来存放进数据库
dictList = []
for i in range(0, len(words)):
    tempDict = {}
    count[words[i]] = text.count(str(words[i]))
    tempDict['word'] = words[i]
    tempDict['count'] = count[words[i]]
    dictList.append(tempDict)

# 对结果进行排序
countList = list(count.items())
countList.sort(key=lambda x: x[1], reverse=True)
print(countList)

# 写到文件中
f = open('zzzCount.txt', 'a',encoding='utf-8')
for i in range(20):
    f.write(countList[i][0] + '' + str(countList[i][1]) + '\n')
f.close()
最后通过导入词云的包,然后实现对词云的生成
import matplotlib.pyplot as plt
from wordcloud import WordCloud, STOPWORDS, ImageColorGenerator
d = path.dirname(__file__)
football = np.array(Image.open(path.join(d, "timg.jpg")))
wc = WordCloud(font_path="C:\\Windows\\Fonts\\STFANGSO.ttf",width=1000,height=600,min_font_size=20,
max_words=250,
max_font_size=80,mask=football,background_color='white')
wc.generate_from_frequencies(count)

plt.imshow(wc)
plt.axis("off")
plt.show()
我的背景图片是:

生成词云后的结果

至此,我对所有数据的处理就完成了。
实现过程中遇到的问题:
在爬取数据的过程中没有遇到什么大的问题,比较麻烦的就是要对网页一些空的信息进行判断,不然程序会在爬取一些没有信息的div的时候会出现报错,比如用下面方法解决:
    sourceEmpty = soup.select('#come_from')[0].text
    if len(sourceEmpty) == 1:
        news['source'] = 'none'
    else:
        news['source'] = soup.select('#come_from')[0].text.split()[1]
还有就是在导入wordcloud这个包的时候,会遇到很多问题,首先我是使用pip install wordcloud这个方法在全局进行包的下载,可是最后会报这个错误:
error: Microsoft Visual C++ 14.0 is required. Get it with “Microsoft Visual C++ Build Tools”: http://landinghub.visualstudio.com/visual-cpp-build-tools
这个主要是要我们去下载 Microsoft Visual C++ 14.0 里面的工具包,于是我去网上寻找别的安装方法,第二次我去了wordcloud再github上的项目,https://github.com/amueller/word_cloud,并把它clone下来,然后cd到这个包下面,执行
python setup.exe install
可是到最后还是会报和刚刚上面一样的错误,然后我去网上查,尝试使用whl安装,于是进入这个网站 https://www.lfd.uci.edu/~gohlke/pythonlibs/#wordcloud,下载python对应的wordcloud的whl文件,然后cd到下载好的目录,命令行执行:
pip install wordcloud‑1.4.1‑cp36‑cp36m‑win_amd64.whl
这样我的wordcloud就安装成功了,问题解决。
然后在使用wordcloud这个包生成词云的时候,中文会出现乱码的现象,这是没有设置字体的路径,在创建wordcloud对象的时候对他配置一下字体的路径:
wc = WordCloud(font_path="C:\\Windows\\Fonts\\STFANGSO.ttf",width=1000,height=600,min_font_size=20,
max_words=250,
max_font_size=80,mask=football,background_color='white')
这样问题就解决了
对数据结果的分析:
通过对词云的查看,我发现词云的大部分词语都是当今的各大互联网巨头,就比如:阿里、谷歌、FaceBook、京东等,以及了解到当今最流行的技术:区块链、AI、无人驾驶等,还有很多互联网行业:游戏、电商、手机等,还有很多的关键词,通过这些关键词,我了解到2018年以来,活跃于互联网行业的还是那几个大牛企业,以及FaceBook的词频很多,了解到是FaceBook的公司近期陷入了泄密丑闻,还有就使通过这些词频分析,企业、公司、服务的出现频率极高,可以了解到服务是每个企业必需做好的。
整个项目的所有代码:
# coding=utf-8

import requests
import re
import pandas
from bs4 import BeautifulSoup
import datetime
import time
import pymysql
import jieba
import wordcloud
import numpy as np
from PIL import Image
from os import path


fun = lambda year, month: list(
    range(1, 1 + time.localtime(time.mktime((year, month + 1, 1, 0, 0, 0, 0, 0, 0)) - 86400).tm_mday))
todayYear = datetime.datetime.now().year
todayMonth = datetime.datetime.now().month
today = datetime.datetime.now().day

def writeFile(content):
    f = open('news.txt','a',encoding='utf-8')
    f.write(content)
    f.close()

def getNewsDetail(newsUrl):
    res = requests.get(newsUrl)
    res.encoding = 'utf-8'
    soup = BeautifulSoup(res.text, 'html.parser')
    news = {}
    news['title'] = soup.select('#news_title')[0].text
    content = soup.select('#news_body')[0].text
    writeFile(content)

    news['newsId'] = newsUrl.split('/')[-1]

    sourceEmpty = soup.select('#come_from')[0].text
    if len(sourceEmpty) == 1:
        news['source'] = 'none'
    else:
        news['source'] = soup.select('#come_from')[0].text.split()[1]

    news['time'] = soup.select('.time')[0].text[4:]

    countUrl ='https://news.cnblogs.com/NewsAjax/GetAjaxNewsInfo?contentId={}'.format(news['newsId'])
    res2 = requests.get(countUrl)
    res2.encoding = 'utf-8'
    soup2 = BeautifulSoup(res2.text, 'html.parser')

    countResponse = soup2.text
    news['readCount'] = re.search('"TotalView":\d*',countResponse).group(0).split(':')[1]
    news['newsUrl'] = newsUrl
    print(news)
    return news


def getListPage(pageUrl):
    res = requests.get(pageUrl)
    res.encoding = 'utf-8'
    soup = BeautifulSoup(res.text, 'html.parser')
    newslist = []
    for news in soup.select('.news_tlist_block')[0].select(('.news_tlist_item')):
         if len(news.select('a')) > 0:
             a = news.select('a')[0].attrs['href']
             url = 'https://news.cnblogs.com{}'.format(a)[:-1] #URL
             newslist.append(getNewsDetail(url))
    return newslist

def getNewsByDate():
    total = [];
    for i in range(2018,2019):
        for j in range(1,13):
            monthDays = fun(i, j)
            for m in monthDays:
                print(str(i) + '年' + str(j) + '月' + str(m) + '日')
                if (i == todayYear) & (j == todayMonth) & (m == today):
                    return total
                listPageUrl='https://news.cnblogs.com/n/date?date={}/{}/{}'.format(i,j,m)
                total.extend(getListPage(listPageUrl))


#所有新闻的列表
newstotal = []
newstotal = getNewsByDate()

df = pandas.DataFrame(newstotal)
#保存到数据库
from sqlalchemy import create_engine
conn = create_engine('mysql+pymysql://root:123456@localhost:3306/test?charset=utf8')
pandas.io.sql.to_sql(df,'cnblogsnews',con=conn,if_exists='replace')


# 数据分析开始

def getNewsText():
    f = open('news.txt', 'r',encoding='utf-8')
    text = f.read()
    f.close()
    return text

jieba.add_word('区块链')
jieba.add_word('阿里巴巴')
# 不要的标点符号
punctuation =  ''',。‘’“”:;()!?、)( '''
# 获取所有的文本信息
text = getNewsText()
# 对文本信息进行去标点符号
for i in punctuation:
    text = text.replace(i, '')
# 用jieba对文本进行切割
tempwords = list(jieba.cut(text))
# 定义了一个获取所有切割完毕的一个字的列表
oneWord = []
for i in tempwords:
    if len(i) == 1:
        oneWord.append(i)

not_number = []
for i in range(1,101):
    not_number.append(str(i))

def makeNotWords():
    notWords = ['00','01','没有','if','比如','使用','因为','还有','包括','同时','虽然','但是','其他','作为'
        , '认为','一个','不是','达到','来说','on','oo','018','000','re','016','017','er','cb','le','al','be','可以','200','所以'
        ,'对于','为了','部分','ac','an','一些','方面','en','ro','es','表示','已经','他们','如果','时候','自己','这些','目前'
        , '这样','']
    return notWords


notWords = makeNotWords()


count = {}
# 确定关键词的集合
words = list(set(tempwords) - set(oneWord)-set(not_number) - set(notWords))


# 存放统计结果的字典的列表,主要用来存放进数据库
dictList = []
for i in range(0, len(words)):
    tempDict = {}
    count[words[i]] = text.count(str(words[i]))
    tempDict['word'] = words[i]
    tempDict['count'] = count[words[i]]
    dictList.append(tempDict)

# 对结果进行排序
countList = list(count.items())
countList.sort(key=lambda x: x[1], reverse=True)
print(countList)

# 写到文件中
f = open('zzzCount.txt', 'a',encoding='utf-8')
for i in range(20):
    f.write(countList[i][0] + '' + str(countList[i][1]) + '\n')
f.close()


import matplotlib.pyplot as plt
from wordcloud import WordCloud, STOPWORDS, ImageColorGenerator
d = path.dirname(__file__)
football = np.array(Image.open(path.join(d, "timg.jpg")))
wc = WordCloud(font_path="C:\\Windows\\Fonts\\STFANGSO.ttf",width=1000,height=600,min_font_size=20,
max_words=250,
max_font_size=80,mask=football,background_color='white')
wc.generate_from_frequencies(count)

plt.imshow(wc)
plt.axis("off")
plt.show()

 浙公网安备 33010602011771号