hexo使用pure主题
概要
关于hexo的介绍在上一篇文章 hexo博客搭建-NexT主题 中已经简单介绍过了,此处不再赘述。这篇博客主要讲的是如何使用pure主题。
1 关于pure主题
这是pure主题的github主页hexo-theme-pure,详细介绍了pure的使用,pure同时也提供了中文文档hexo-theme-pure中文文档
Hexo theme pure. It's a pure theme for Hexo. --pure主页
这是pure主题的作者主页 Cofess - Web Developer & Designer
2 安装pure
2.1 下载pure
在博客根目录下使用如下命令:
git clone https://github.com/cofess/hexo-theme-pure.git themes/pure
2.2 修改站点配置文件
打开站点配置文件_config.yml,修改theme:landscape 为 theme:pure
到这里就可以通过命令 hexo s启动hexo查看效果了。
3 修改pure的设置
3.1 修改pure设置之前先安装几个插件
hexo-wordcount
npm install hexo-wordcount --save
hexo-generator-json-content
npm install hexo-generator-json-content --save
hexo-generator-feed
npm install hexo-generator-feed --save
hexo-generator-sitemap
npm install hexo-generator-sitemap --save
hexo-generator-baidu-sitemap
npm install hexo-generator-baidu-sitemap --save
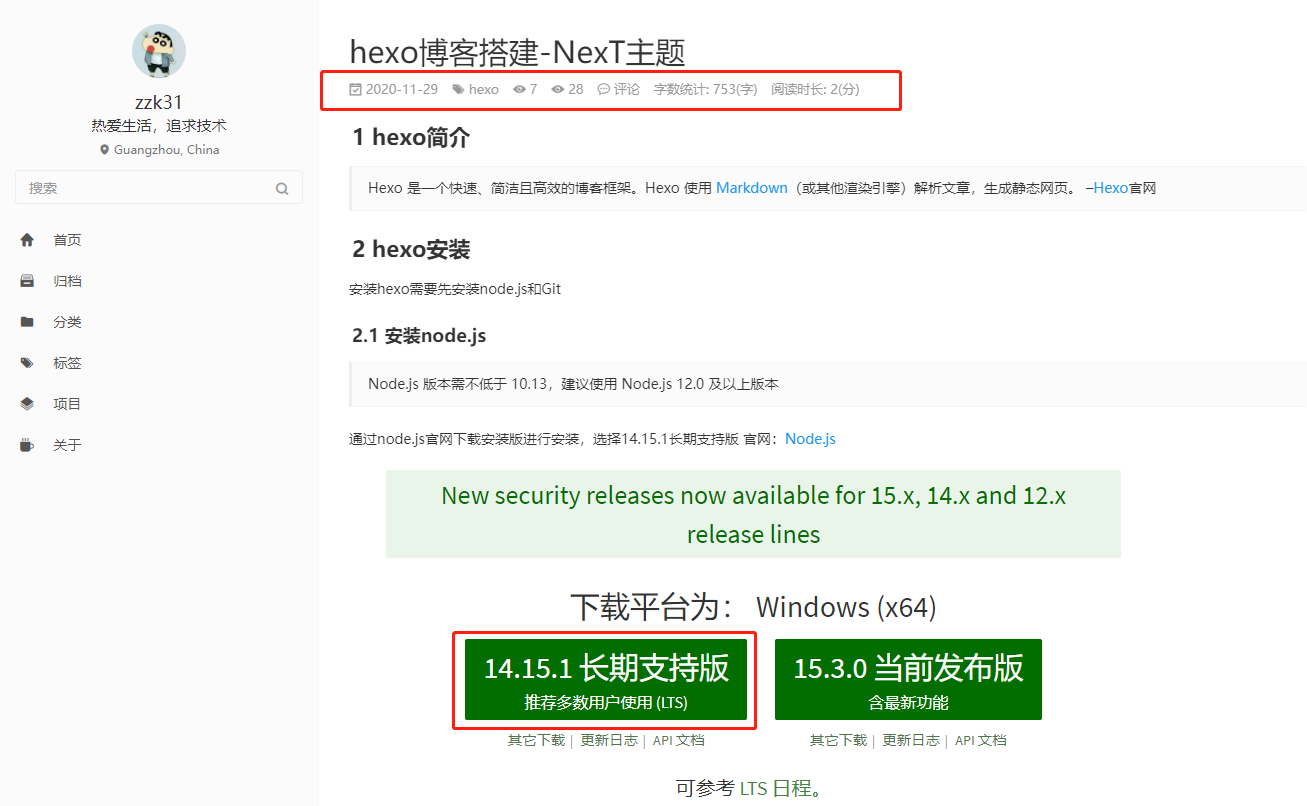
3.2 启用文章浏览量统计,文章字数统计和阅读时长
启用不蒜子来统计文章浏览量,在主题配置文件中把busuanzi设置为true
pv:
  busuanzi:
    enable: true  # 不蒜子统计
启用文章字数统计和阅读时长(wordcount插件),主题配置文件中设置如下:
postCount:
  enable: true
  wordcount: true  # 文章字数统计
  min2read: true  # 阅读时长预计
最终效果如下:
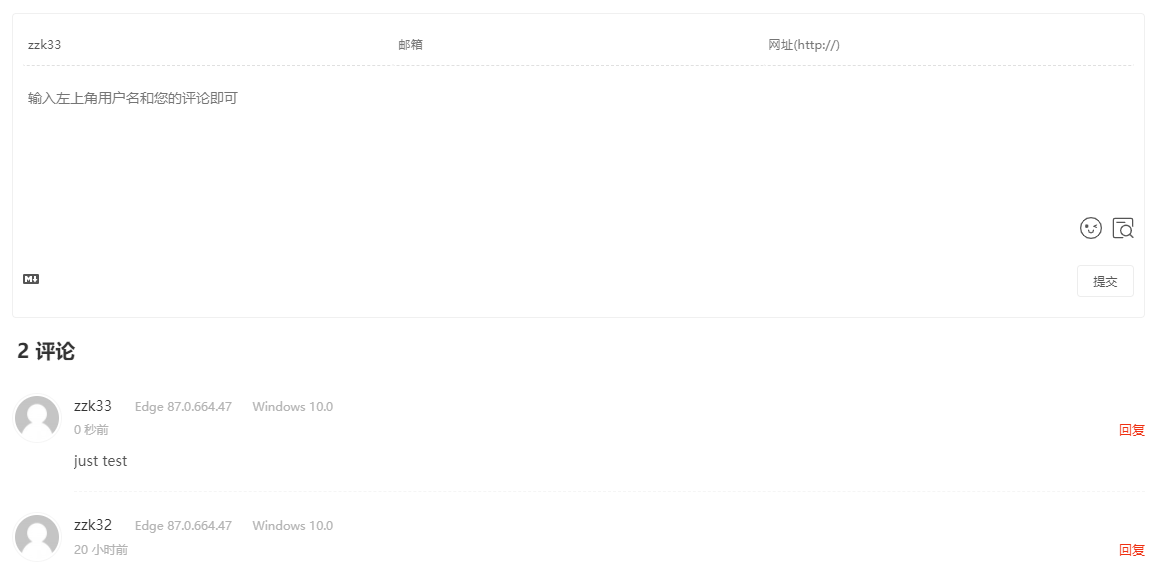
3.3 启用文章评论 - valine
在主题配置文件中设置如下,我启用的是valine评论系统,valine评论系统是通过LeanCloud平台来完成数据记录的。
主要修改comment.type ,comment.valine.appid 和 comment.valine.appkey ,具体设置如下
comment:
  type: valine  # 启用哪种评论系统
  ...
  valine: # Valine. https://valine.js.org
    appid: <你的leancloud appid> # your leancloud application appid
    appkey: <你的leancloud appkey># your leancloud application appkey
    notify: false # mail notifier , https://github.com/xCss/Valine/wiki
    verify: false # Verification code
其中的appid和appkey需要通过LeanCloud平台获取,具体文章网上有许多教程,就不再赘述,主要就是在leancloud中创建一个类,命名为Comments拿到appid和appkey就可以。
效果如下:
3.4 配置个人信息
profile:
  enabled: true # Whether to show profile bar
  avatar: images/avatar.jpg
  gravatar: # Gravatar email address, if you enable Gravatar, your avatar config will be overriden
  author: zzk31
  author_title: 热爱生活,追求技术
  author_description: 热爱生活,追求技术。
  location: Guangzhou, China
  follow: https://github.com/shzyjbr
  # Social Links
  social:
    links:
      github: https://github.com/shzyjbr
    link_tooltip: true # enable the social link tooltip, options: true, false
头像的存放路径是在yourBlogRootPath\themes\pure\source\images文件夹下
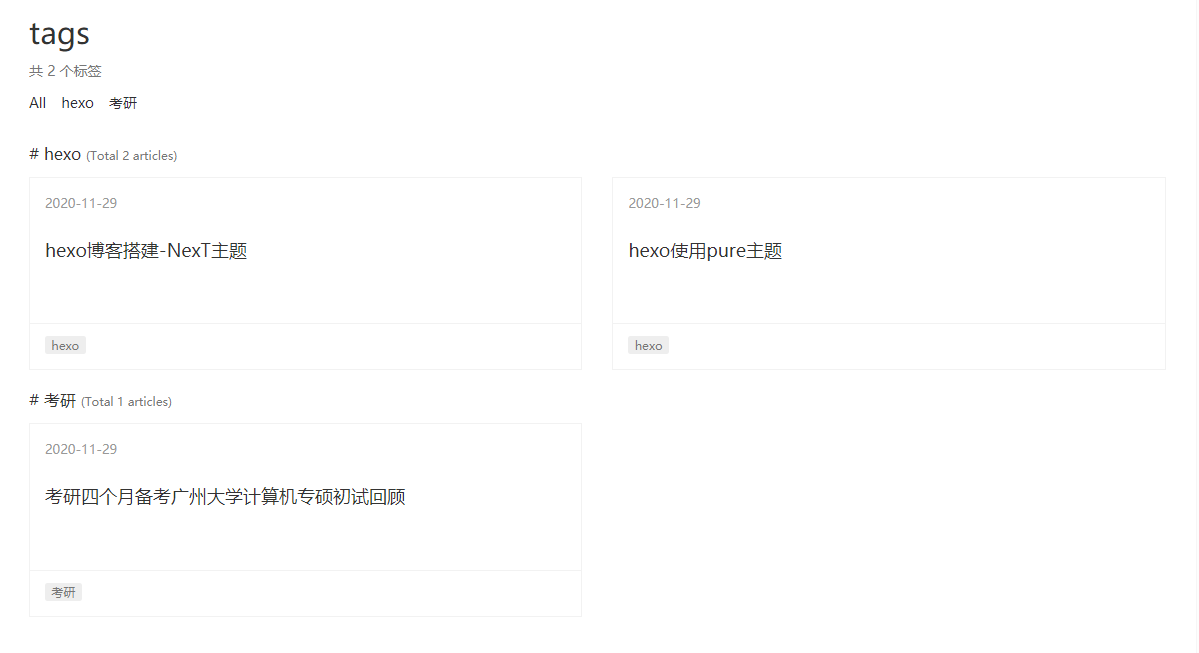
4 pure主题下的分类,标签设置
此处是我的踩坑指南
使用hexo new page tags 会生成tag/index.md 按照hexo官方的设置如下,tags首页是不会显示tags的
title: tags
date: 2020-11-29 17:18:06
type: tags
需要设置如下
title: tags
date: 2020-11-29 17:18:06
layout: tags
之后其他文章就跟hexo给文章标记tag一样,例如
title: 考研四个月备考广州大学计算机专硕初试回顾
date: 2020-11-29 15:55:49
tags: [考研]
效果如下:
标签的设置同理,改成categories即可
5 404页面的设置
使用hexo new page 404 会生成404/index.md, 在index.md里编写你的404页面即可。
提示:编写的404页面只有在部署到github pages之后才会生效,在本地localhost测试不起作用
6 结束
这篇文章的内容就到这里结束了,感谢阅读。有错误或者建议的,欢迎评论指正,或者发邮件给我。关于我 | zzk31的博客小站 (zzk31.top)

 浙公网安备 33010602011771号