接口测试——接口自动化框架设计(python+requests)
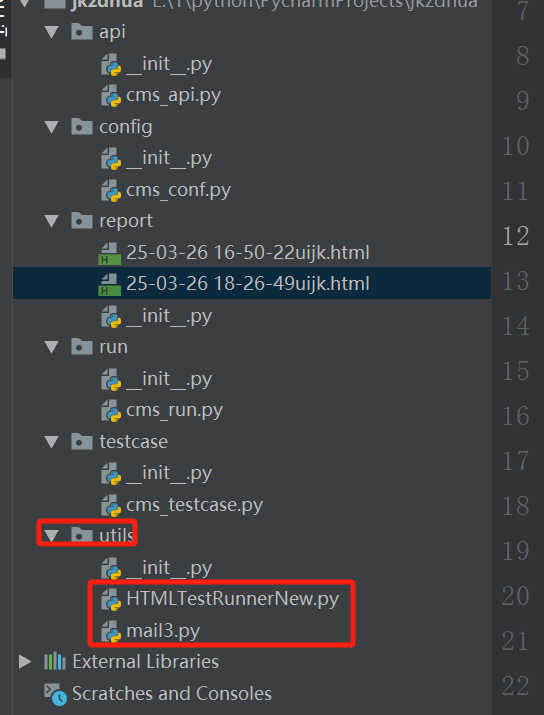
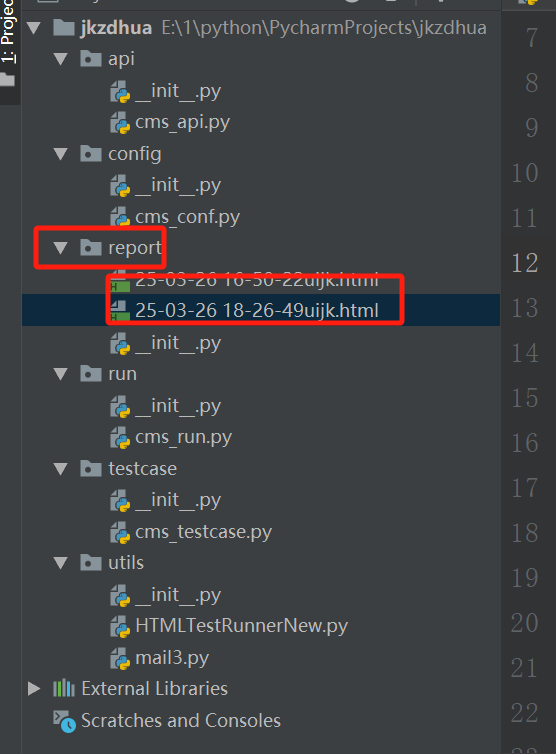
一、自动化设计框架结构

二、接口自动化讲解
首先在pycharm里新建一个项目,然后构建6个包,分别是api构建包、conf配置包、report报告包、run运行包、testcase用例包以及utils工具包。 其中api包用来组建并发送接口请求,conf包用来存放所有接口的入参信息,report包用来放置运行所有测试用例生成的报告,run包用来自动加载所有的测试用例、并且运行,testcase包用来继承unittest单元测试框架、组建接口测试用例,utils包用来存放发送邮件和生成报告模块。 然后,在conf包中把参数值都写好,比如url、data和header;在api包中组建接口和发送接口请求,导入request和conf,参数名引用conf里面的,创建一个全局的session对象用来保持会话的状态和管理上下文,把各个接口的请求方式编写出来,同时用rep.json()来转换,全部封装在一个类里;在testcase包中组建测试用例导入unittest模块、api里面的Cms类,定义一个类,且继承unittest中的TestCase,用匿名对象来调用实例方法,然后进行断言,需要注意的是断言内容要与结果完全一致;最后,在run包里导入unittest、time、mail3、HTMLTestRunner,定义项目的路径、用例的路径、测试报告的名称、定义自动搜索用例,执行测试用例并生成报告,其中的时间戳也需要注意一下;此时,测试用例报告就会在report包里,最后用谷歌浏览器打开就可以查看了。
三、用例包testcast管理用例
1、config配置包

#登录接口
url1 = "http://49.233.201.254:8080/cms/manage/loginJump.do"
data1 = {'userAccount': 'admin', 'loginPwd': '123456'}
heard1 = {"Content-Type": "application/x-www-form-urlencoded"}
#用户接口
url2 = "http://49.233.201.254:8080/cms/manage/queryUserList.do"
data2={
    'startCreateDate':'',
    'endCreateDate':'',
    'searchValue':'',
    'page':'2'
}
heard2={"Content-Type":"application/x-www-form-urlencoded"}
#栏目接口
url3 = "http://49.233.201.254:8080/cms/manage/findCategoryByPage.do"
data3 = {
    'parentId': '',
    'categoryName': '',
    'page': 1
}
haerd3 = {"Content-Type": "application/x-www-form-urlencoded"}
2、api包

import requests
from config.cms_conf import *
s=requests.Session()
class Cms(object):
    def __init__(self):
        pass
    def dl(self):
        jk1=s.post(url=url1,data=data1,headers=heard1)
        print(jk1.text)
    def yh(self):
        jk2 = s.post(url=url2, data=data2, headers=heard2)
        print(jk2.text)
    def lm(self):
        jk3 = s.post(url=url3, data=data3, headers=haerd3)
        print(jk3.text)
if __name__ == '__main__':
    dx=Cms()
    dx.dl()
    dx.yh()
    dx.lm()
3、testcase包

import unittest
from api.cms_api import *
class Cms_TestCase(unittest.TestCase):
    @classmethod
    def setUpClass(cls) -> None:
        pass
    @classmethod
    def tearDownClass(cls) -> None:
        pass
    def setUp(self) -> None:
        pass
    def tearDown(self) -> None:
        pass
    def test1_login(self):
        Cms().dl()       #通过类名 调方法
    def test2_yh(self):
        Cms().yh()
    def test3_lm(self):
        Cms().lm()
if __name__ == '__main__':
    unittest.main()
4、run运行包

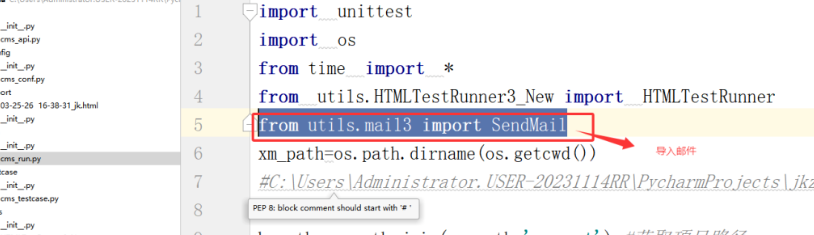
import unittest
import os
from time import *
from utils.HTMLTestRunnerNew import HTMLTestRunner
from utils.mail3 import SendMail
xm_path=os.path.dirname(os.getcwd())
print(xm_path)
bgpath=os.path.join(xm_path,'report')
print(bgpath)
test_path=os.path.join(xm_path,'testcase')
print(test_path)
new=strftime("%y-%m-%d %H-%M-%S")
file=bgpath+"/"+str(new)+"uijk.html"
def bg():
    d=unittest.TestLoader().discover(start_dir=test_path,pattern="cms_testcase*.py")
    f=open(file,"bw")
    HTMLTestRunner(
        stream=f,title="接口自动化框架测试",description="用例执行情况",tester="dcs"
    ).run(d)
def yj():
    fs=SendMail(send_msg=file,attachment=file)
    fs.send_mail()
if __name__ == '__main__':
    bg()
    yj()
5、utils 工具类包
存放报告模板,邮件模板
6、report 报告包
一、下载一个邮件模板(属于封装号的模板)

二、将邮件模板存放在utlis中

三、修改邮件模板

案例:
1、注册一个邮箱(案例163邮箱)
2.、网址:https://mail.163.com/js6/main.jsp?sid=aLdwHUuYwOueisERUbYYwPJQIJpXbsny&df=mail163_letter#module=read.ReadModule%7C%7B%22area%22%3A%22normal%22%2C%22isThread%22%3Afalse%2C%22viewType%22%3A%22%22%2C%22id%22%3A%22417%3AxtbBoRvU2meF1pqmGgAAsm%22%2C%22fid%22%3A1%7D
3、点解设置

4、协议
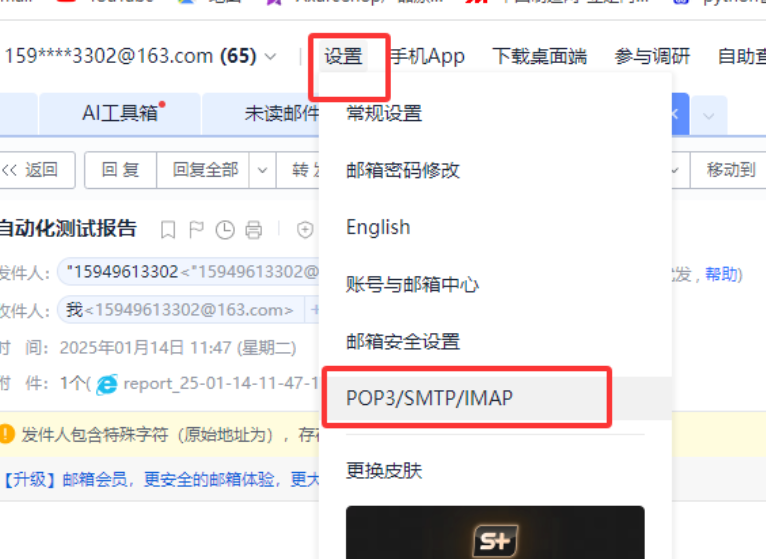
5、开启协议

扫码界面


获取授权码


四、运行报告模板
(1)导入邮件模板
from utils.mail3 import SendMail
(2)接受到邮箱

import unittest
import os
from time import *
from utils.HTMLTestRunnerNew import HTMLTestRunner
from utils.mail3 import SendMail
xm_path=os.path.dirname(os.getcwd())
print(xm_path)
bgpath=os.path.join(xm_path,'report')
print(bgpath)
test_path=os.path.join(xm_path,'testcase')
print(test_path)
new=strftime("%y-%m-%d %H-%M-%S")
file=bgpath+"/"+str(new)+"uijk.html"
def bg():
    d=unittest.TestLoader().discover(start_dir=test_path,pattern="cms_testcase*.py")
    f=open(file,"bw")
    HTMLTestRunner(
        stream=f,title="接口自动化框架测试",description="用例执行情况",tester="dcs"
    ).run(d)
def yj():
    fs=SendMail(send_msg=file,attachment=file)
    fs.send_mail()
if __name__ == '__main__':
    bg()
    yj()

 浙公网安备 33010602011771号