haproxy
1、HAProxy简介
HAProxy 是一款基于 TCP(第四层)和 HTTP(第七层)应用的代理软件,它也可作为负载均衡器,而且完全免费。 借助 HAProxy,可以快速并且可靠地提供基于 TCP 和 HTTP 应用的代理解决方案。 HAProxy 最主要的优点是性能突出,它特别适合那些负载特大的 Web 站点,这些站点通常需要具备会话保持或七层处理功能。 HAProxy 完全可以支持数以万计的并发连接,而且它的运行模式可以让你简单而安全地将它整合到当前的架构中,同时可以保护你的 Web 服务器不暴露到网络上(通过防火墙 80 端口映射的方法)。 作为一款优秀的负载均衡软件,HAProxy 优点如下所示:
1>免费且开源,稳定性也非常好,其稳定性可以与硬件级的 F5 Big-IP 相媲美。
2>根据官方文档可知,HAProxy 可以跑满 10Gbps,对于软件级负载均衡器而言,这个数字是相当惊人的。
3>支持连接拒绝,因为维护一个连接保持打开状态的开销是很低的,有时我们需要防止蠕虫攻击,也就是通过限制它们的连接打开来防止它们的危害。 这个功能已经拯救了很多被 DDoS 攻击的小型站点,这也是其他负载均衡器所不具备的。
4>支持全透明代理(已具备硬件防火墙的典型特点),可以用客户端 IP 地址或任何其他地址来连接后端服务器,这个特性仅在 Linux 2.4/2.6 内核打了 cttproxy 补丁后才可以使用。 这个特性使得为某特殊服务器处理部分流量的同时又不修改服务器的地址成为可能。
5>HAProxy 现在多用于线上的 MySQL 集群环境,常用它作为 MySQL(读)负载均衡。
6>自带强大的监控服务器状态的页面,在实际环境中我们可以结合 Nagios 来实现邮件或短信报警,这也是很多人非常喜欢它的原因之一。
7>支持虚拟主机。
2、四种常用算法:
1>roundrobin:轮询,轮流分配到后端服务器;
2>static-rr:根据后端服务器性能分配;
3>leastconn:最小连接者优先处理;
4>source:根据请求源 IP,与 Nginx 的 IP_Hash 类似。
3、HAProxy L4 负载均衡应用架构拓扑
HAProxy 软件的四层 tcp 代理应用非常优秀,配置非常简单方便,比 LVS 和 Nginx 要方便很多,因为不需要在 RS 端执行脚本即可实现应用代理。和商业版的 NS(Netscaler)、F5 等负载均衡硬件的使用方法和在架构中的位置几乎一样。
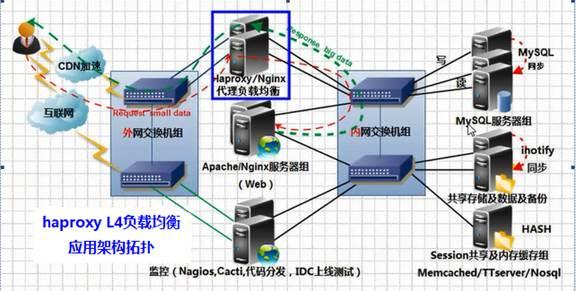
说明:由于 haproxy 采用的 NAT 模式,数据包来去都会经过 haproxy,因此,在流量特别大的情况下,其性能不如 LVS。
4、HAProxy L7 负载均衡应用架构拓扑
Haproxy 的最大优点在于其 7 层的根据 URL 请求头应用过滤的功能,在门户网站的高并发生产架构中,haproxy 软件一般用在 LVS 软件的下一层,或者像官方推荐的可以挂在硬件负载均衡 althon、NS、F5 下使用,其表现非常好。2009 年起 taobao 网的 cdn 业务就大面积使用了 haproxy作为 7 层 CACHE 应用代理。
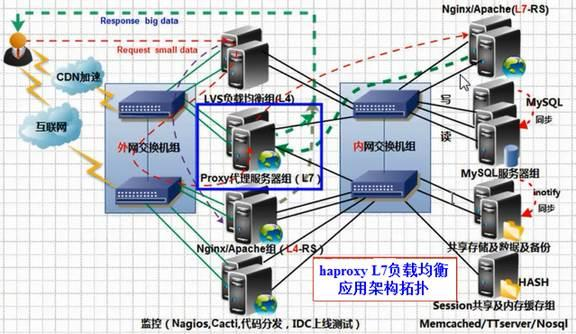
通过修改 HAProxy 的配置文件,指定哪一台 Heartbeat 服务器作为主服务器,则另一台将自动成为备份服务器。然后在备份服务器上配置 Heartbeat 守护程序来监听来自主服务器的心跳。如果备份服务器在指定时间内未监听来自主服务器的心跳,就会启动故障转移程序,并取得主服务器上的相关资源服务的所有权,接替主服务器继续不间断的提供服务,从而达到资源服务高可用性的目的。
5、HAProxy负载均衡搭建
1>环境规划:centos7
client:192.168.100.111/24
haproxy:192.168.100.101/24
web1:192.168.100.10/24
web2:192.168.100.20/24
2>前期配置:部署各节点ip,各个节点关闭防火墙,禁用selinux,时间同步,保证机器干净
3>web-server节点配置:
web-server1节点:
[root@web-server1 ~]# yum install httpd -y
[root@web-server1 ~]# echo web-server1 > /var/www/html/index.html
[root@web-server1 ~]# systemctl start httpd

web-server2节点:
[root@web-server2 ~]# yum install httpd -y
[root@web-server2 ~]# echo web-server2 > /var/www/html/index.html
[root@web-server2 ~]# systemctl start httpd
4>haproxy节点配置:
[root@haproxy ~]# yum install haproxy -y
[root@haproxy ~]# cp /etc/haproxy/haproxy.cfg /etc/haproxy/haproxy.cfg.bak
[root@haproxy ~]# vim /etc/haproxy/haproxy.cfg
# 全局设置
global
    log         127.0.0.1 local2 info   # log日志类型,级别
    maxconn     4000    # 最大连接数
    pidfile     /var/run/haproxy.pid
    user        haproxy
    group       haproxy
    daemon              # 守护进程,常驻内存不退出
    nbproc      1       # 一个进程,常于CPU核数相同

##################################################################################

# 默认配置,针对后端服务器
defaults
    mode                    http    # 模式(七层代理)
    log                     global  # 日志定义于全局
    option                  redispatch    # 选项:重新调度
    retries                 3   # 健康检查:3次连接失败就认为服务不可用
    contimeout              5000    # 跟前端用户
    clitimeout              50000   # 跟后端连接
    srvtimeout              50000   # 跟后端连接
    maxconn                 3000    # 最大连接数
    #timeout connect 5000  #新形式,和以上定义作用相同
    #timeout client 50000
    #timeout server 50000
    stats   uri             /haproxy    # 状态:web页面状态模块功能开启
    stats   auth            admin:123   # 定义web状态页面验证的用户名密码

##################################################################################

# 前端:用户(haproxy的前端)
frontend  http-in      # 定义前端监听套接字
    bind 0.0.0.0:80    # 绑定该机器上的所有ip,只要有人访问80端口,给予服务
    mode http          # 用户发起的url地址
    log global         # 日志记录于全局
    option httplog     # 选项:使日志格式变得丰富
    option httpclose   # 每次请求后关闭连接
    acl html url_reg -i  \.html$    # 访问控制列表:html 靠正则表达式的地址区分 -i忽略大小写
    use_backend html-server if html # 如果访问html,就使用后端服务器html-server
    default_backend html-server

##################################################################################

# 后端:服务器(haproxy的后端)
backend html-server
    mode        http          # 模式:http(七层)
    balance     roundrobin    # 算法:轮询
    option      httpchk GET /index.html             # 选项:结合健康检查(3次)GETh html页面
    cookie      SERVERID insert indirect nocache    # 记录服务器id给用户,插入到头部信息
    server      http-A 192.168.100.10:80 weight 1 cookie 3 check inter 2000 rise 2 fall 5
    server      http-B 192.168.100.20:80 weight 1 cookie 4 check inter 2000 rise 2 fall 5
    #192.168.100.XX:80(也可以配置域名解析)  weight权重  cookie id  check检查一次2000毫秒  rise get2次页面算有效  fall 5次失败
[root@haproxy ~]# systemctl start haproxy //启动haproxy
5>client访问测试
[root@client ~]# elinks -dump http://192.168.100.101
   web-server1
[root@client ~]# elinks -dump http://192.168.100.101
   web-server2
[root@client ~]# elinks -dump http://192.168.100.101
   web-server1
[root@client ~]# elinks -dump http://192.168.100.101
   web-server2
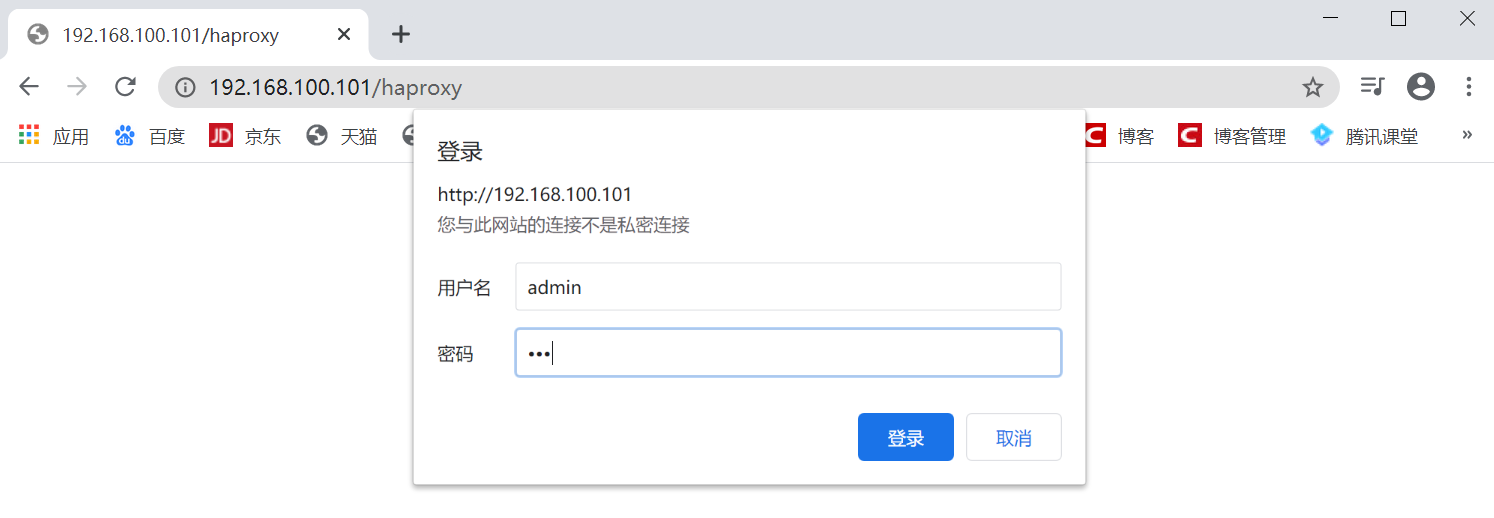
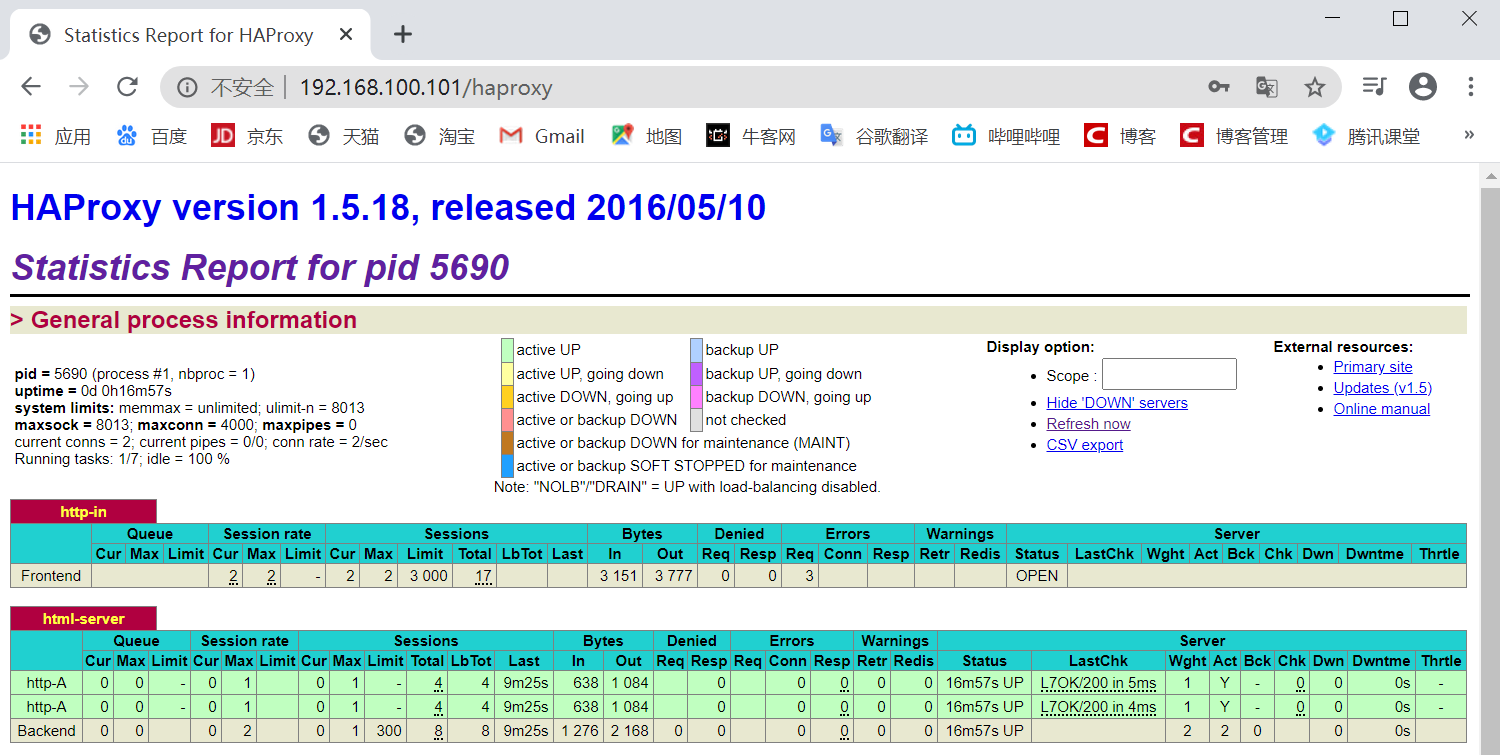
6>浏览器访问haproxy web状态页面
6、实现HAProxy动静分离
1>环境规划:centos7
192.168.100.111 client
192.168.100.101 haproxy
192.168.100.10 web-server1
192.168.100.20 web-server2
192.168.100.30 php-server1
192.168.100.40 php-server2
2>前期配置:部署各节点ip,各个节点关闭防火墙,禁用selinux,时间同步,保证机器干净
3>web-server节点配置:
web-server1节点:
[root@web-server1 ~]# yum install httpd -y
[root@web-server1 ~]# echo web-server1 > /var/www/html/index.html
[root@web-server1 ~]# systemctl start httpd

web-server2节点:
[root@web-server2 ~]# yum install httpd -y
[root@web-server2 ~]# echo web-server2 > /var/www/html/index.html
[root@web-server2 ~]# systemctl start httpd
4>php-server节点配置:
php-server1节点:
[root@php-server1 ~]# yum install httpd php -y
[root@php-server1 ~]# vim /var/www/html/test.php
<?php
echo "Here is php-server1";
?>
[root@php-server1 ~]# systemctl start httpd

php-server2节点:
[root@php-server2 ~]# yum install httpd php -y
[root@php-server2 ~]# vim /var/www/html/test.php
<?php
echo "Here is php-server2";
?>
[root@php-server1 ~]# systemctl start httpd
5>haproxy节点配置:
# 本次编译安装haproxy:注意要确保机器干净,以防上个实验有文件残留(最好恢复快照)
# 源码包获取:https://src.fedoraproject.org/repo/pkgs/haproxy/
# 获取源码包并上传至haproxy服务器/root/目录下

[root@haproxy ~]# yum install -y pcre-devel bzip2-devel gcc gcc-c++ make    //安装依赖包
[root@haproxy ~]# groupadd -r -g 111 haproxy
[root@haproxy ~]# useradd -r -s /sbin/nologin -g haproxy haproxy
[root@haproxy ~]# tar xf haproxy-2.1.3.tar.gz -C /usr/local/src/
[root@haproxy ~]# cd /usr/local/src/haproxy-2.1.3/
[root@haproxy haproxy-2.1.3]# make TARGET=linux-glibc PREFIX=/usr/local/haproxy
[root@haproxy haproxy-2.1.3]# make install PREFIX=/usr/local/haproxy
[root@haproxy haproxy-2.1.3]# cd
[root@haproxy ~]# cp /usr/local/src/haproxy-2.1.3/examples/haproxy.init /etc/init.d/haproxy
[root@haproxy ~]# chmod +x /etc/init.d/haproxy
[root@haproxy ~]# ln -s /usr/local/haproxy/sbin/haproxy /usr/sbin/haproxy
[root@haproxy ~]# mkdir /etc/haproxy
[root@haproxy ~]# vim /etc/haproxy/haproxy.cfg
# 全局设置
global
    log         127.0.0.1 local2 info   # log日志类型,级别
    maxconn     4000    # 最大连接数
    pidfile     /var/run/haproxy.pid
    user        haproxy
    group       haproxy
    daemon              # 守护进程,常驻内存不退出
    nbproc      1       # 一个进程,常于CPU核数相同

##################################################################################

# 默认配置,针对后端服务器
defaults
    mode                    http    # 模式(七层代理)
    log                     global  # 日志定义于全局
    option                  redispatch    # 选项:重新调度
    retries                 3   # 健康检查:3次连接失败就认为服务不可用
    maxconn                 3000    # 最大连接数
    timeout connect 5000
    timeout client 50000
    timeout server 50000
    stats   uri             /haproxy    # 状态:web页面状态模块功能开启
    stats   auth            admin:123   # 定义web状态页面验证的用户名密码

##################################################################################

# 前端:用户(haproxy的前端)
frontend  http-in      # 定义前端监听套接字
    bind 0.0.0.0:80    # 绑定该机器上的所有ip,只要有人访问80端口,给予服务
    mode http          # 用户发起的url地址
    log global         # 日志记录于全局
    option httplog     # 选项:使日志格式变得丰富
    option httpclose   # 每次请求后关闭连接
    acl html url_reg -i  \.html$    # 访问控制列表:html 靠正则表达式的地址区分 -i忽略大小写
    acl php url_reg -i \.php$
    use_backend html-server if html # 如果访问html,就使用后端服务器html-server
    use_backend php-server if php
    default_backend html-server

##################################################################################

# 后端:服务器(haproxy的后端)
backend html-server
    mode        http          # 模式:http(七层)
    balance     roundrobin    # 算法:轮询
    option      httpchk GET /index.html             # 选项:结合健康检查(3次)GETh html页面
    cookie      SERVERID insert indirect nocache    # 记录服务器id给用户,插入到头部信息
    server      http-A 192.168.100.10:80 weight 1 cookie 3 check inter 2000 rise 2 fall 5
    server      http-B 192.168.100.20:80 weight 1 cookie 4 check inter 2000 rise 2 fall 5
    #192.168.100.XX:80(也可以配置域名解析)  weight权重  cookie id  check检查一次2000毫秒  rise get2次页面算有效  fall 5次失败

backend php-server
    mode        http          # 模式:http(七层)
    balance     roundrobin    # 算法:轮询
    option      httpchk GET /test.php               # 选项:结合健康检查(3次)GETh html页面
    cookie      SERVERID insert indirect nocache    # 记录服务器id给用户,插入到头部信息
    server      http-C 192.168.100.30:80 weight 1 cookie 5 check inter 2000 rise 2 fall 5
    server      http-D 192.168.100.40:80 weight 1 cookie 6 check inter 2000 rise 2 fall 5

[root@haproxy ~]# /usr/local/haproxy/sbin/haproxy -f /etc/haproxy/haproxy.cfg    //启动haproxy服务,-f指定配置文件路径
6>client访问测试
[root@client ~]# elinks --dump http://192.168.100.101
   web-server1
[root@client ~]# elinks --dump http://192.168.100.101
   web-server2
[root@client ~]# elinks --dump http://192.168.100.101/test.php
   Here is php-server1
[root@client ~]# elinks --dump http://192.168.100.101/test.php
   Here is php-server2
7>浏览器访问haproxy web状态页面

8>模仿后端服务器挂掉,再进行访问测试
使php-server1挂掉:
[root@php-server1 ~]# systemctl stop httpd

client访问测试:
[root@client ~]# elinks --dump http://192.168.100.101/test.php
   Here is php-server2
[root@client ~]# elinks --dump http://192.168.100.101/test.php
   Here is php-server2
浏览器刷新haproxy web状态页面:

haproxy状态页明显发现php-server1挂掉,重新启动php-server1,又发现恢复正常

 浙公网安备 33010602011771号