nginx 原理及安装
第一节:基本原理
1.1 httpd 工作模型
(1)perfock:进程模型,两级结构,主进程 master 负责生成子进程,每个子进程负责响应一个请求。
(2)worker:线程模型,三级结构,主进程 master 负责生成子进程,每个子进程负责生成多个线程,每个线程响应一个请求。
(3)event:线程模型,三级结构,主进程 master 负责生成子进程,每个子进程响应多个请求。
1.2 I/O 介绍
(1)I/O:磁盘I/O;网络I/O(本质是 socket 读取)
(2)每次IO,都要经过两个阶段:
第一步:将数据从磁盘文件先加载至内核内存空间(缓冲区),等待数据准备完成,时间较长
第二步:将数据从内核缓冲区复制到用户空间的进程的内存中,时间较短
1.3 I/O 模型
(1)同步/异步:关注的是消息的通信机制
同步:synchronous,调用者等待被调用者返回消息,才能继续执行
异步:asynchronous,被调用者通过状态、通知或回调机制主动通知调用者被调用者的运行状态
(2)阻塞/非阻塞:关注调用者在等待结果返回之前所处的状态
阻塞:blocking,指IO操作需要彻底完成后才返回到用户空间,调用结果返回之前,调用者被挂起
非阻塞:nonblocking,指IO操作被调用后立即返回给用户一个状态值,无需等到IO操作彻底完成,最终的调用结果返回之前,调用者不会被挂起
(3)I/O 模型:
阻塞型、非阻塞型、复用型、信号驱动型、异步
(4)I/O 模型的具体实现
select:linux 实现,对应 I/O 多路复用模型
poll:linux 实现,对应 I/O 多路复用模型
epoll:linux 实现,对应 I/O 多路复用模型,具有信号驱动 I/O 模型的某些特性
(5)差别比较
select:同步 I/O、1024 句柄限制、水平触发、跨平台使用
poll:同步 I/O、无句柄限制、水平触发、仅限 linux
epoll:异步 I/O、无句柄限制、水平/边缘触发、仅限 linux、mmap(内存映射)

1.4 nginx 特性
(1)模块化设计(非DSO),扩展性较好
(2)高可用性
(3)支持热部署:不停机更新版本(平滑升级)
1.5 nginx 基本功能
(1)解决 c10k 问题
(2)静态资源的 web 服务器、反向代理服务器
(3)FastCGI(LAMP)、uWSGI(python)协议
1.6 对于 web 服务相关功能
(1)虚拟主机(server)
(2)支持 keep-alive 和管道连接
(3)访问日志(支持基于日志缓冲提高其性能)
(4)url rewirte
(5)路径别名
(6)基于 IP 及用户的访问限制
(7)重新配置和在线升级而无需中断客户的工作进程
(8)Memcached 的 GET 接口
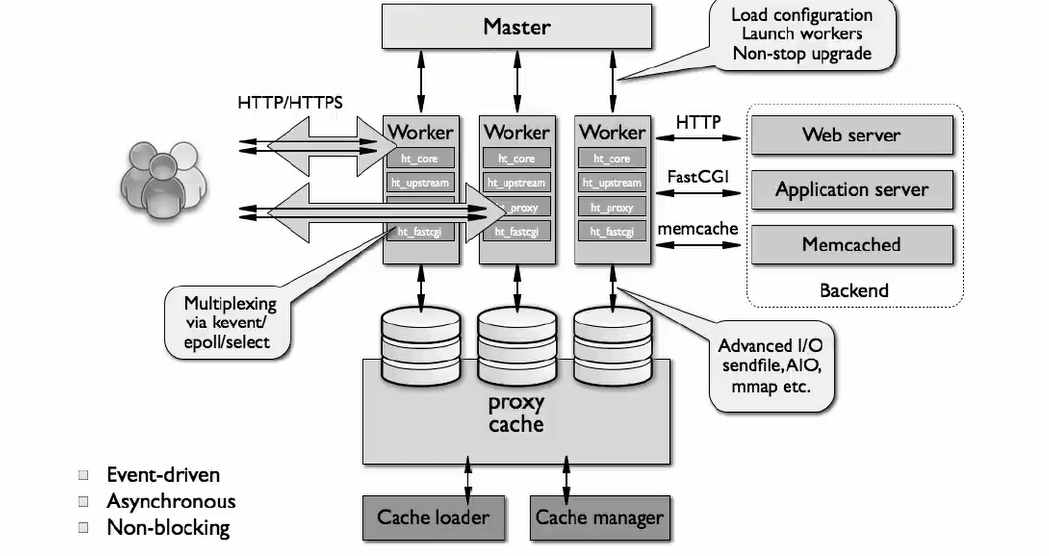
1.7 nginx 架构
1.8 nginx 模块分类
核心模块:core module
标准模块(http 模块、mail 模块、stream 模块)
第三方模块
第二节:nginx 安装
2.1 rpm 包安装
rpm 包获取:https://nginx.org/packages/
2.2 epel 源安装
需要配置 epel 源,epel 源里有 nginx 的 rpm 包
[root@centos7 ~]#vim /etc/yum.repos.d/epel.repo
[epel]
name=aliyun epel
baseurl=https://mirrors.aliyun.com/epel/$releasever/$basearch/
gpgcheck=0
enabled=1
[root@centos7 ~]#yum repolist    #列出所有的repo仓库信息
2.3 配置官方 yum 仓库安装
地址:https://nginx.org/en/linux_packages.html
  配置文件 /etc/nginx/nginx.conf
  主目录 /usr/share/nginx/html/
  查看版本 /usr/sbin/nginx -v
  配置文件语法检查 /usr/sbin/nginx -t
  服务启动停止 /etc/init.d/nginx {start | stop | restart | reload | status}
2.4 源码安装
(1)源码包获取:https://nginx.org/download/
上传至 linux 服务器
(2)源码安装环境说明:
系统:centos7.4
软件:nginx-1.14.0.tar.gz
安装方式:源码编译安装
安装位置:/apps/nginx
(3)安装配置:
创建 nginx 用户和组:
[root@centos7 ~]#groupadd -r -g 108 nginx
[root@centos7 ~]#useradd -r -u 108 -g nginx -s /sbin/nologin nginx
解压软件:
[root@centos7 ~]#tar xvf nginx-1.14.0.tar.gz -C /usr/local/src/
安装依赖包:
[root@centos7 ~]#yum install gcc gcc-c++ make recp pcre-devel openssl openssl-devel -y
编译安装:
[root@centos7 ~]#cd /usr/local/src/nginx-1.14.0/
[root@centos7 nginx-1.14.0]#./configure --prefix=/apps/nginx --conf-path=/etc/nginx/nginx.conf --error-log-path=/var/log/nginx/error.log --http-log-path=/var/log/nginx/access.log --pid-path=/var/run/nginx.pid --lock-path=/var/run/nginx.lock --user=nginx --group=nginx --with-http_ssl_module --with-http_v2_module --with-http_stub_status_module --with-http_gunzip_module --with-http_gzip_static_module --with-http_dav_module --with-http_stub_status_module --with-http_auth_request_module --with-threads --with-file-aio
[root@centos7 nginx-1.14.0]#make && make install
[root@centos7 nginx-1.14.0]#cd /apps/nginx/
[root@centos7 nginx]#ls
client_body_temp  fastcgi_temp  html  proxy_temp  sbin  scgi_temp  uwsgi_temp
参数详解:
    --prefix=          指向安装目录
    --sbin-path=       指向(执行)程序文件(nginx)
    --conf-path=       指向配置文件(nginx.conf)
    --error-log-path=  指向错误日志目录
    --http-log-path=   指向访问日志
    --pid-path=        指向pid 文件(nginx.pid)
    --lock-path=       指向 lock 文件(nginx.lock)(安装文件锁定,防止安装文件被别人利用,或自己误操作。)
    --user=            指定程序运行时的非特权用户
    --group=           指定程序运行时的非特权用户组
    --with-http_ssl_module          启用 ngx_http_ssl_module 支持(使支持 https 请求,需已安装 openssl)
    --with-http_flv_module          启用 ngx_http_flv_module 支持(提供寻求内存使用基于时间的偏移量文件)
    --with-http_sub_module          启用 ngx_http_sub_module 支持(允许用一些其他文本替换nginx 响应中的一些文本)
    --with-http_gzip_static_module  启用 ngx_http_gzip_static_module 支持(在线实时压缩输出数据流)
    --http-client-body-temp-path=   设定 http 客户端请求临时文件路径
    --http-proxy-temp-path=         设定 http 代理临时文件路径
    --http-fastcgi-temp-path=       设定 http fastcgi 临时文件路径
    --http-uwsgi-temp-path=         设定 http uwsgi 临时文件路径
    --http-scgi-temp-path=          设定 http scgi 临时文件路径
    --with-pcre                     启用 pcre 库
2.5 配置启动
[root@centos7 ~]#nginx     #默认启动
[root@centos7 ~]#nginx -h  #nginx -h查看帮助选项
nginx version: nginx/1.16.1
Usage: nginx [-?hvVtTq] [-s signal] [-c filename] [-p prefix] [-g directives]
Options:
  -?,-h         : 帮助
  -v            : 显示版本
  -V            : 显示版本和配置选项
  -t            : 测试nginx语法错误
  -T            : 测试配置,将其转储并退出
  -q            : 在配置测试期间抑制非错误消息
  -s signal     : signal发送信号给master进程: stop, quit, reopen, reload
  -p prefix     : set prefix path (default: /usr/share/nginx/)
  -c filename   : set configuration file (default: /etc/nginx/nginx.conf)
  -g directives : 在命令行中指明全局指令

nginx默认使用nginx命令启动,也可以为nginx提供SysV init 脚本,使其开机自启(生产中使用)如下:
(1)配置环境变量:
[root@centos7 nginx]#echo "export PATH=/apps/nginx/sbin:$PATH" >> /etc/profile.d/env.sh
[root@centos7 nginx]#source /etc/profile.d/env.sh
(2)nginx 配置:
[root@centos7 nginx]#mkdir /apps/nginx/conf
[root@centos7 nginx]#ln -s /apps/nginx/conf /etc/nginx
[root@centos7 nginx]#cd /etc/nginx/
[root@centos7 nginx]#ls
conf                  fastcgi_params.default  mime.types.default  scgi_params.default
fastcgi.conf          koi-utf                 nginx.conf          uwsgi_params
fastcgi.conf.default  koi-win                 nginx.conf.default  uwsgi_params.default
fastcgi_params        mime.types              scgi_params         win-utf
[root@centos7 nginx]#vim /etc/nginx/nginx.conf
http {
  ...
  include /etc/nginx/conf/*.conf    #在http模块下include引用/etc/nginx/conf/*.conf
  ...
}
#实现/etc/nginx/nginx.conf调用/etc/nginx/conf/*.conf,而/etc/nginx/conf又是/apps/nginx/conf的软链接,进而实现调用/apps/nginx/conf/*.conf
#也可以直接在/etc/nginx/nginx.conf中的http模块中include引用/apps/nginx/conf/*.conf
#之后对nginx http模块做相关设置,可以设置在安装目录/apps/nginx/conf/下,以.conf结尾
(3)为 nginx 提供 SysV init 脚本:
[root@centos7 nginx]#vim /usr/lib/systemd/system/nginx.service
[Unit]
Description=nginx - high performance web server
Documentation=http://nginx.org/en/docs/
After=network.target remote-fs.target nss-lookup.target

[Service]
Type=forking
PIDFile=/run/nginx.pid
ExecStartPre=/apps/nginx/sbin/nginx -t -c /etc/nginx/nginx.conf
ExecStart=/apps/nginx/sbin/nginx -c /etc/nginx/nginx.conf
ExecReload=/bin/kill -s HUP $MAINPID
ExecStop=/bin/kill -s QUIT $MAINPID
PrivateTmp=true

[Install]
WantedBy=multi-user.target
[root@centos7 nginx]#systemctl enable nginx
[root@centos7 nginx]#systemctl list-unit-files | grep nginx
nginx.service                                               enabled
(4)启动 nginx:
[root@centos7 nginx]#systemctl start nginx
[root@centos7 nginx]#ss -ntlp
State      Recv-Q Send-Q Local Address:Port                Peer Address:Port
LISTEN     0      128                *:80                             *:*                   users:(("nginx",pid=10087,fd=6),("nginx",pid=10086,fd=6))
LISTEN     0      128                *:22                             *:*                   users:(("sshd",pid=1066,fd=3))
LISTEN     0      128               :::22                            :::*                   users:(("sshd",pid=1066,fd=4))
(5)访问测试:

第三节:nginx 应用
3.1 nginx 虚拟主机概念
(1)虚拟主机概念:
所谓的虚拟主机,在 web 服务器里就是一个独立的网络站点,这个站点对应独立的域名(也可能是 IP 或端口),具有独立的程序及资源目录,可以独立地对外服务供用户访问。
这个独立的站点在配置里是有一定格式的标签段标记的,对于 Apache 软件来说,一个虚拟主机的标签通常被包含在 <VirtualHost></VirtualHost> 内,而 Nginx 软件则使用一个 serve{} 标签来表示一个虚拟主机。一个 Web 服务里可以有多个虚拟主机标签对,即可以同时支持多个虚拟主机站点。
(2)虚拟主机类型:
基于域名的虚拟主机:通过不同的域名区分不同的虚拟主机。企业应用最广,几乎所有对外提供服务的网站使用的都是基于域名的虚拟主机。
基于端口的虚拟主机:通过不同的端口来区分不同的虚拟主机。多用于企业内部的网站。
基于 IP 的虚拟主机:通过不同的 IP 区分同的虚拟主机,此类虚拟主机的应用场景都会在负载均衡器上进行 VIP 绑定,而不是在 web 上绑定 IP 来区分不同的虚拟机。
3.2 nginx 基于域名的虚拟主机配置
(1)域名支持准备:使用 dns 或本地 host 文件,这里采用host文件实现
windows:C:\Windows\System32\drivers\etc\hosts
linux:/etc/hosts
在windows、linux(test)主机上hosts文件中添加:192.168.129.128 www.a.com www.b.com
例(linux):
[root@test ~]#vim /etc/hosts
127.0.0.1   localhost localhost.localdomain localhost4 localhost4.localdomain4
::1         localhost localhost.localdomain localhost6 localhost6.localdomain6
192.168.129.128 www.a.com www.b.com
(2)centos7(nginx)上准备虚拟主机网页文件及存放目录
[root@centos7 ~]#mkdir -p /www/site{a,b}
(3)准备网页测试数据
[root@centos7 ~]#echo /www/sitea/html > /www/sitea/index.html
[root@centos7 ~]#echo /www/siteb/html > /www/siteb/index.html
(4)编辑配置文件,搭建虚拟主机
[root@centos7 ~]#vim /apps/nginx/conf/www.a.com.conf
server {
    listen 80;
    server_name www.a.com;
    root /www/sitea;
}
[root@centos7 ~]#vim /apps/nginx/conf/www.b.com.conf
server {
    listen 80;
    server_name www.b.com;
    root /www/siteb;
}
(5)重启服务
[root@centos7 ~]#systemctl restart nginx
(6)windows、linux(test)机上进行访问测试
windows:


linux(test):
[root@test ~]# curl www.a.com
/www/sitea/html
[root@test ~]# curl www.b.com
/www/siteb/html
3.3 nginx 基于端口的虚拟主机配置
(1)环境准备同上(基于域名的虚拟主机)
(2)编辑配置文件
[root@centos7 ~]#vim /apps/nginx/conf/www.a.com.conf
server {
    listen 7070;    #设置7070端口
    server_name www.a.com;
    root /www/sitea;
}
[root@centos7 ~]#vim /apps/nginx/conf/www.b.com.conf
server {
    listen 8080;    #设置8080端口
    server_name www.b.com;
    root /www/siteb;
}
(3)重启服务
[root@centos7 ~]#systemctl restart nginx
(4)linux(test)机测试,windows相同在这不作过多测试
[root@test ~]# curl www.a.com
<!DOCTYPE html>
<html>
<head>
<title>Welcome to nginx!</title>
......
</html>
[root@test ~]# curl www.b.com
<!DOCTYPE html>
<html>
<head>
<title>Welcome to nginx!</title>
......
</html>
[root@test ~]# curl www.a.com:7070
/www/sitea/html
[root@test ~]# curl www.a.com:8080
/www/siteb/html
3.4 nginx 基于 IP 的虚拟主机配置
测试环境可以通过给 ens32 子接口添加地址
(1)在服务器网卡上增加多个 IP
配置基于 IP 的虚拟主机,就需要让每一个虚拟主机有不同的 IP 地址,因此以增加辅助 IP 的形式临时在 eth0 网卡上增加 2 个不同的 IP。
[root@centos7 ~]#ip addr add 10.0.0.9/24 dev ens32
[root@centos7 ~]#ip addr add 10.0.0.10/24 dev ens32
[root@centos7 ~]#ip a

2: ens32: <BROADCAST,MULTICAST,UP,LOWER_UP> mtu 1500 qdisc pfifo_fast state UP qlen 1000
    link/ether 00:0c:29:63:c6:95 brd ff:ff:ff:ff:ff:ff
    inet 192.168.129.128/24 brd 192.168.129.255 scope global dynamic ens32
       valid_lft 1088sec preferred_lft 1088sec
    inet 10.0.0.9/24 scope global ens32
       valid_lft forever preferred_lft forever
    inet 10.0.0.10/24 scope global secondary ens32
       valid_lft forever preferred_lft forever
    inet6 fe80::ba4c:e696:2245:9c3b/64 scope link
       valid_lft forever preferred_lft forever

[root@centos7 ~]#ping 10.0.0.9
PING 10.0.0.9 (10.0.0.9) 56(84) bytes of data.
64 bytes from 10.0.0.9: icmp_seq=1 ttl=64 time=0.039 ms
64 bytes from 10.0.0.9: icmp_seq=2 ttl=64 time=0.060 ms

[root@centos7 ~]#ping 10.0.0.10
PING 10.0.0.10 (10.0.0.10) 56(84) bytes of data.
64 bytes from 10.0.0.10: icmp_seq=1 ttl=64 time=0.048 ms
64 bytes from 10.0.0.10: icmp_seq=2 ttl=64 time=0.061 ms
(2)编辑配置文件
[root@centos7 ~]#vim /apps/nginx/conf/www.a.com.conf
server {
    listen 10.0.0.9:80;
    server_name www.a.com;
    root /www/sitea;
}
[root@centos7 ~]#vim /apps/nginx/conf/www.b.com.conf
server {
    listen 10.0.0.10:80;
    server_name www.a.com;
    root /www/sitea;
}
(3)访问测试(因为以增加辅助 IP 的形式临时在 eth0 网卡上增加 2 个不同的 IP,与外网不通,所以在本机测试。如有如要请增加两张桥接网卡,获取和外网通讯,再进行测试)
[root@centos7 ~]#curl http://10.0.0.9
/www/sitea/html
[root@centos7 ~]#curl http://10.0.0.10
/www/siteb/html

 浙公网安备 33010602011771号