RabbitMQ基本入门
1.简介
RabbitMQ是一套开源的消息队列服务软件,也叫做面向消息的中间件。RabbitMQ服务器是用Erlang语言编写的。主要特性是可伸缩性、消息持久化。
2.下载
RabbitMQ的使用需要依赖Erlang,因此要先下载并安装Erlang。
Erlang:https://www.erlang.org/downloads,选择对应的版本下载。网盘下载:https://pan.baidu.com/s/1y9vYMz7b14XreAjPhCHFiw 提取码:eqzr
RabbitMQ:https://www.rabbitmq.com/install-windows.html。网盘下载:https://pan.baidu.com/s/1l-Qf61wYnVPXnGENJLpYTw 提取码:wn6u
3.在Windows上安装
3.1安装Erlang
第一步,双击exe文件进行安装
第二步,配置环境变量
1)新建变量ERLANG_HOME
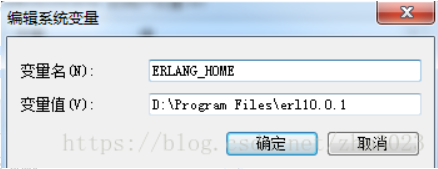
2)在path中添加新建的变量,内容为%ERLANG_HOME%\bin
第三步,测试
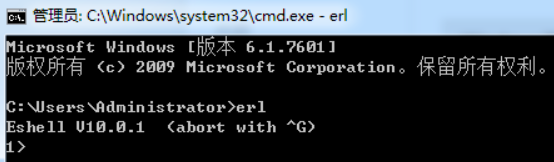
打开cmd命令框,输入erl,如下图所示,说明已经安装成功。
3.2安装RabbitMQ
第一步,双击exe文件进行安装
第二步,配置环境变量
1)新建变量RABBITMQ_SERVER
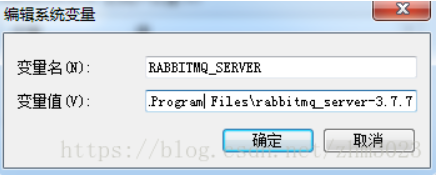
2)在path中添加新建的变量,内容为%RABBITMQ_SERVER%\sbin
3)查看rabbmitmq的状态
打开cmd,输入rabbitmqctl status
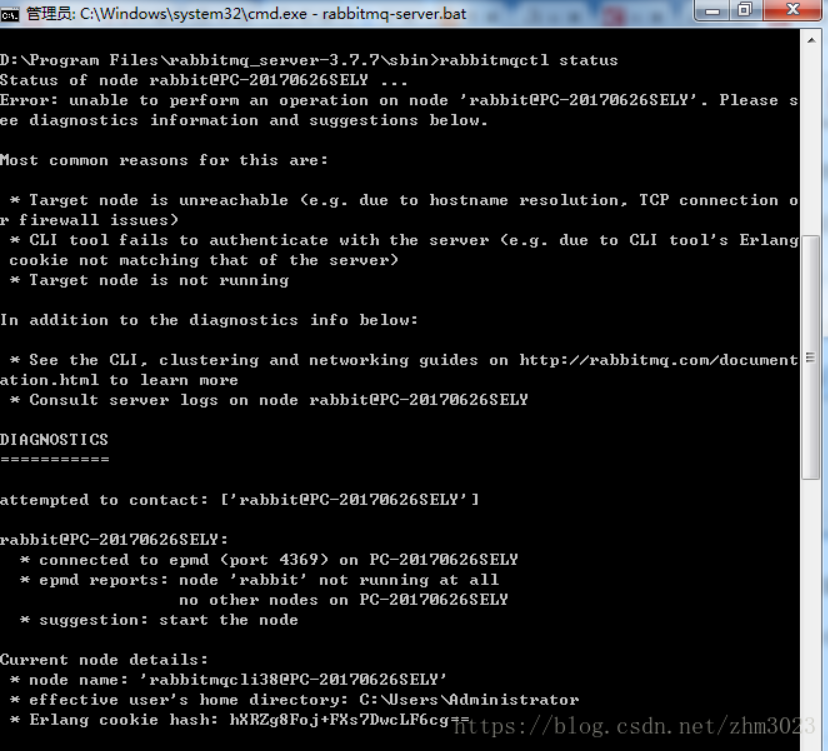
看到上面的内容说明rabbmitmq并没有启动。
4)安装插件并启动
执行命令:rabbitmq-plugins.bat enable rabbitmq_management。出现下图结果说明插件安装成功

5)测试
在浏览器访问http://localhost:15672,看到下图说明服务已经启动。此时这个服务被添加到系统服务列表了,不用每次启动即可使用。
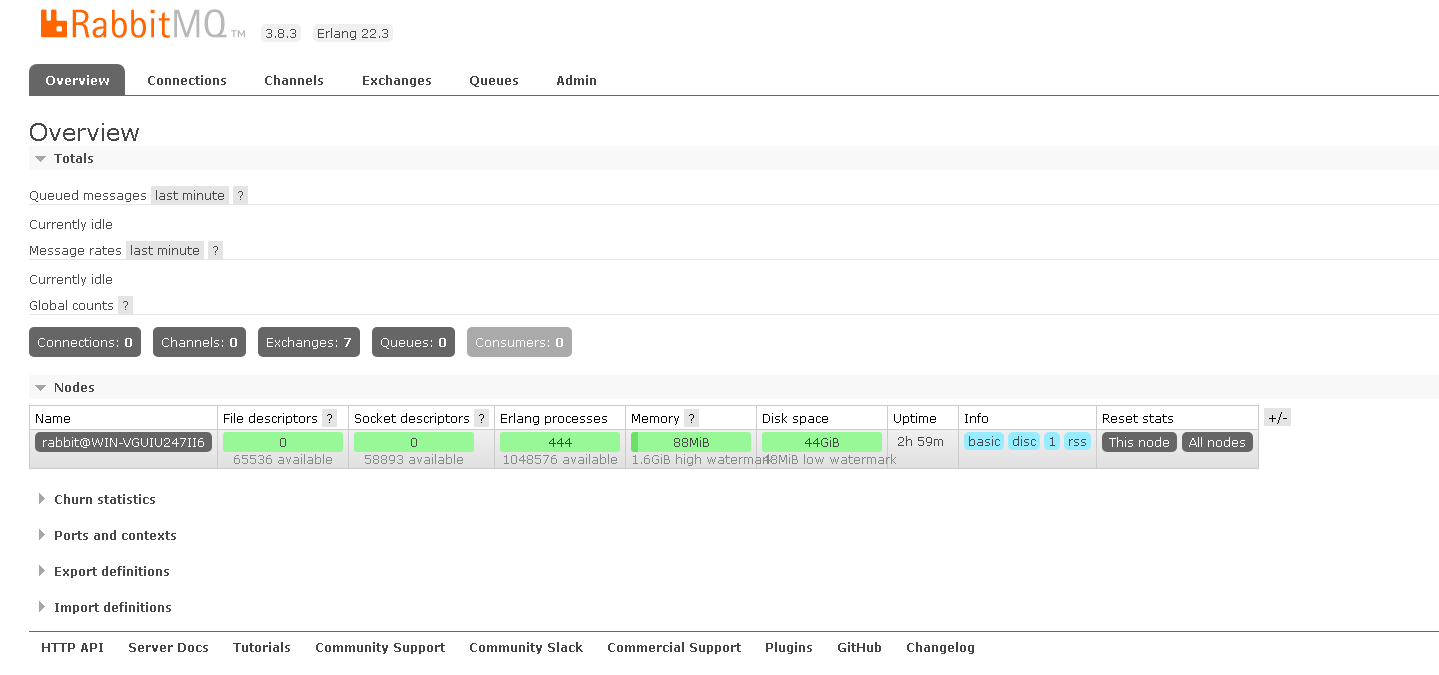
用户名和密码都是guest。登录成功后会看到下面的页面
需要注意的是,这里使用的是默认的游客用户,只能在本地用localhost访问,要需要开启远程访问,则需要新建管理员账号。下面通过界面方式说明账号的创建:

添加后如下图
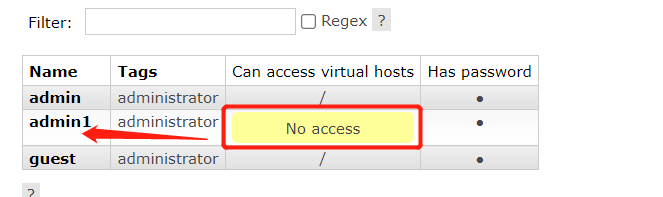
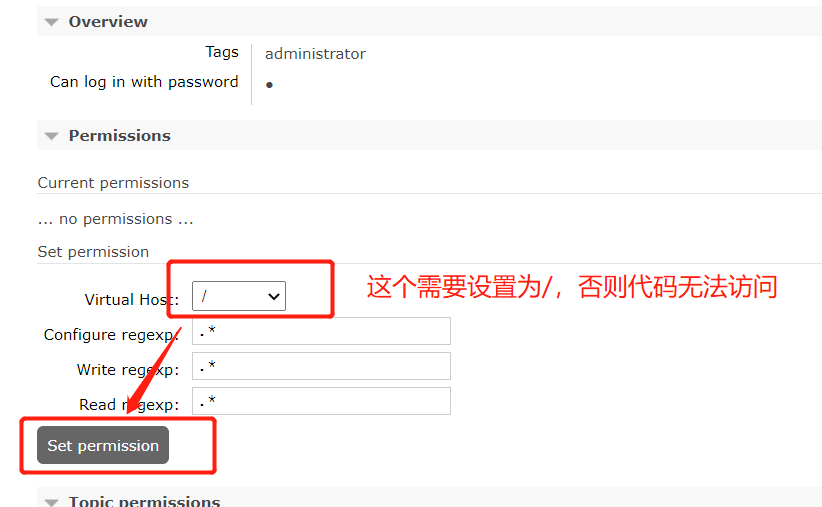
此时这个用户没有访问的权限,需要点击用户名,进入详细页面,设置一下所有权限,然后保存即可
4.基本入门
注:本文发送请求均使用curl发送。以下内容版本说明:Rabbit版本是3.10.5,Erang版本是25.0.1,SpringBoot版本是2.7.0
4.1RabbitMQ工作流程
RabbitMQ的组成如下:
- Broker:消息队列服务进程。包括两个部分:Exchange和Queue。
- Exchange:消息队列交换机。按照一定的规则将消息路由转发到某个队列。
- Queue:消息队列,用来存储消息。
- Producer:消息生产者。生产方客户端将消息同交换机路由发送到队列中。
- Consumer:消息消费者。消费队列中存储的消息。
主要的工作流程如下图

- 生产者创建connection,连接到RabbitMQ Broker。
- 生产者发送消息,并指定消息是否持久化等属性和routing key。
- exchange收到消息之后,根据routing key路由把消息放到跟当前交换机绑定的相匹配的队列里面。
- 消费者监听接收到消息,处理相关业务。
从工作流程来看,关键的组件是Exchange,原因是消息发送到RabbitMQ后首先要经过Exchange路由才能找到对应的Queue。而Exchange类型有四种,根据不同的类型工作的方式也有所不同,分别是:Direct Exchange、Fanout exchange、Topic exchange、Headers exchange。
4.2Direct Exchange
直连交换机。此交换机需要绑定一个队列,并且该消息需要与一个特定的路由键完全匹配。换句话说就是一对一的,点对点的发送。
这里以3个项目为例进行说明,后续不再叙述。common-api公共类(jar),producter-demo服务提供者(springboot),consumer-demo服务消费者(springboot):
common-api
将公共配置放到common-api中
package com.zxh.config;

import java.text.SimpleDateFormat;

/**
 * RabbitMq公共配置
 */
public class RabbitMqConfig {
    //日期格式化
    public static SimpleDateFormat SDF = new SimpleDateFormat("yyyy-MM-dd HH:mm:ss");
    //队列主题
    public static final String RABBITMQ_TOPIC = "rabbitmqTopic";
    //交换机
    public static final String RABBITMQ_DIRECT_EXCHANGE = "rabbitmqDirectExchange";
    //交换机和队列绑定的匹配键
    public static final String RABBITMQ_DIRECT_ROUTING = "rabbitmqDirectRouting";


}
producter-demo
1)导入依赖
<dependency>
    <groupId>org.springframework.boot</groupId>
    <artifactId>spring-boot-starter-amqp</artifactId>
</dependency>
2)配置yml
spring:
  rabbitmq:
    host: 127.0.0.1
    port: 5672
    username: guest
    password: guest

server:
  port: 9898
3)配置rabbitmq队列和交换机
package com.zxh.producterdemo.config;

import org.springframework.amqp.core.Binding;
import org.springframework.amqp.core.BindingBuilder;
import org.springframework.amqp.core.DirectExchange;
import org.springframework.amqp.core.Queue;
import org.springframework.amqp.rabbit.connection.ConnectionFactory;
import org.springframework.amqp.rabbit.core.RabbitAdmin;
import org.springframework.beans.BeansException;
import org.springframework.beans.factory.config.BeanPostProcessor;
import org.springframework.context.annotation.Bean;
import org.springframework.context.annotation.Configuration;

import javax.annotation.Resource;

/**
 * RabbitMQ配置类
 */
@Configuration
public class DirectRabbitConfig implements BeanPostProcessor {

    @Resource
    private RabbitAdmin rabbitAdmin;

    @Bean
    public Queue rabbitmqDirectQueue() {
        /**
         * 1、name:    队列名称
         * 2、durable: 是否持久化
         * 3、exclusive: 是否独享、排外的。如果设置为true,定义为排他队列。则只有创建者可以使用此队列。也就是private私有的。
         * 4、autoDelete: 是否自动删除。也就是临时队列。当最后一个消费者断开连接后,会自动删除。
         * */
        return new Queue(RabbitMqConfig.RABBITMQ_TOPIC, true, false, false);
    }

    @Bean
    public DirectExchange rabbitmqDirectExchange() {
        //Direct交换机
        return new DirectExchange(RabbitMqConfig.RABBITMQ_DIRECT_EXCHANGE, true, false);
    }

    /**
     * /绑定交换机和队列,并设置匹配键
     *
     * @return
     */
    @Bean
    public Binding bindDirect() {
        return BindingBuilder
                //绑定队列
                .bind(rabbitmqDirectQueue())
                //到交换机
                .to(rabbitmqDirectExchange())
                //设置匹配键
                .with(RabbitMqConfig.RABBITMQ_DIRECT_ROUTING);
    }


    //初始化rabbitAdmin对象
    @Bean
    public RabbitAdmin rabbitAdmin(ConnectionFactory connectionFactory) {
        RabbitAdmin rabbitAdmin = new RabbitAdmin(connectionFactory);
        // 只有设置为 true,spring 才会加载 RabbitAdmin 这个类
        rabbitAdmin.setAutoStartup(true);
        return rabbitAdmin;
    }

    //实例化bean后,在启动生产者时会自动创建交换机和队列,不用等到发送消息才创建
    @Override
    public Object postProcessAfterInitialization(Object bean, String beanName) throws BeansException {
        //创建交换机
        rabbitAdmin.declareExchange(rabbitmqDirectExchange());
        //创建队列
        rabbitAdmin.declareQueue(rabbitmqDirectQueue());
        return null;
    }

}
4)创建service类下订单
在分布式服务的实际场景中,下单和减库存一般是两个服务,但不能因为减库存失败就不让用户下单。故这里模拟在下单时,不仅记录订单信息,还调用服务去减库存。
package com.zxh.producterdemo.service;

import com.zxh.producterdemo.config.RabbitMqConfig;
import lombok.extern.slf4j.Slf4j;
import org.springframework.amqp.rabbit.core.RabbitTemplate;
import org.springframework.stereotype.Service;

import javax.annotation.Resource;
import java.text.SimpleDateFormat;
import java.util.Date;
import java.util.HashMap;
import java.util.Map;
import java.util.UUID;

@Service
@Slf4j
public class OrderService {

    @Resource
    private RabbitTemplate rabbitTemplate;

    /**
     * 模拟下订单
     *
     * @param productId
     * @return
     * @throws Exception
     */
    public String addOrder(String productId) {
        //记录订单信息
        log.info("订单保存成功");
        String msgId = UUID.randomUUID().toString().replaceAll("-", "");
        String sendTime = RabbitConfig.SDF.format(new Date());
        Map<String, Object> map = new HashMap<>();
        map.put("msgId", msgId);
        map.put("sendTime", sendTime);
        map.put("productId", productId);
        //减库存
        String s = sendMsg(map);
        log.info("减库存成功");
        return s;
    }

    /**
     * 发送消息,模拟减库存
     *
     * @return
     */
    private String sendMsg(Map map) {
        try {
            rabbitTemplate.convertAndSend(RabbitMqConfig.RABBITMQ_DIRECT_EXCHANGE, RabbitMqConfig.RABBITMQ_DIRECT_ROUTING, map);
            return "ok";
        } catch (Exception e) {
            e.printStackTrace();
            return "error";
        }
    }
}
5)创建controller类
package com.zxh.producterdemo.controller;

import com.zxh.producterdemo.service.OrderService;
import org.springframework.beans.factory.annotation.Autowired;
import org.springframework.web.bind.annotation.GetMapping;
import org.springframework.web.bind.annotation.RestController;

@RestController
public class OrderController {

    @Autowired
    private OrderService orderService;

    @GetMapping("/addOrder")
    public String addOrder(String productId){
        return orderService.addOrder(productId);
    }

}
即可启动项目。
consumer-demo
1)导入依赖
<dependency>
    <groupId>org.springframework.boot</groupId>
    <artifactId>spring-boot-starter-amqp</artifactId>
</dependency>
2)配置yml
spring:
  rabbitmq:
    host: 127.0.0.1
    port: 5672
    username: guest
    password: guest

server:
  port: 9897
3)配置rabbitmq监听器
使用注解@RabbitListener来指定要监听的队列,既可用在类上,也可用在方法上。用在类上时,需要配合注解@RabbitHandler一起使用,会监听注解@RabbitHandler修饰的方法。用在方法上时,会监听注解@RabbitListener修饰的方法,无需加注解@RabbitHandler。
package com.zxh.consumerdemo.listener;

import com.zxh.producterdemo.config.RabbitMqConfig;
import lombok.extern.slf4j.Slf4j;
import org.springframework.amqp.rabbit.annotation.Queue;
import org.springframework.amqp.rabbit.annotation.RabbitHandler;
import org.springframework.amqp.rabbit.annotation.RabbitListener;
import org.springframework.stereotype.Component;

import java.util.Map;

/**
 * RabbitMQ监听器
 * RabbitListener 指定多个队列名称
 * 使用queuesToDeclare属性,如果不存在则会创建队列
 */
@Component
@RabbitListener(queuesToDeclare = @Queue(RabbitMqConfig.RABBITMQ_TOPIC))
@Slf4j
public class RabbitMQConsumerListener {

    @RabbitHandler
    public void process(Map map) {
        log.info("收到客户端消息:" + map.toString());
        //模拟减库存操作(实际中会根据消息类型进行判断,执行什么操作)
        log.info("减库存成功");
    }
}
这里在监听到消息后,模拟减库存操作,但在实际场景中会更深入的处理。
启动项目,发送请求
curl "http://localhost:9898/addOrder?productId=10093"
即可在生产者控制台看到日志

于此同时,也可在消费者控制台看到日志

自此,一个消息从生产到消息已经完成。
分析:公共类中配置的主题topic、交换机exchange、匹配键Routing的作用是什么?
在生产者端,在配置类中将队列通过匹配键绑定到交换机,然后对指定的交换机和匹配键发送消息;在消费者端,通过监听主题来消费消息。
4.3Fanout exchange
一个发送到交换机的消息都会被转发到与该交换机绑定的所有队列上。相当于广播。下面在上述基础上,通过一个消息生产者,2个消息消费者进行说明
1)首先在RabbitMqConfig中定义交换机和队列的名称
public class RabbitMqConfig {
    ...

    //FANOUT_EXCHANGE交换机类型的队列 A 的名称
    public static final String FANOUT_EXCHANGE_QUEUE_TOPIC_A = "fanoutA";
    //FANOUT_EXCHANGE交换机类型的队列 B 的名称
    public static final String FANOUT_EXCHANGE_QUEUE_TOPIC_B = "fanoutB";
    //FANOUT_EXCHANGE交换机类型的名称
    public static final String FANOUT_EXCHANGE_DEMO_NAME = "fanoutExchangeDemo";

}
2)配置rabbitmq队列和交换机
package com.zxh.producterdemo.config;

import org.springframework.amqp.core.*;
import org.springframework.amqp.rabbit.connection.ConnectionFactory;
import org.springframework.amqp.rabbit.core.RabbitAdmin;
import org.springframework.beans.BeansException;
import org.springframework.beans.factory.config.BeanPostProcessor;
import org.springframework.context.annotation.Bean;
import org.springframework.context.annotation.Configuration;

import javax.annotation.Resource;

/**
 * RabbitMQ配置类
 */
@Configuration
public class FanoutRabbitConfig implements BeanPostProcessor {

    @Resource
    private RabbitAdmin rabbitAdmin;

    @Bean
    public Queue rabbitmqFanoutQueueA() {
        return new Queue(RabbitMqConfig.FANOUT_EXCHANGE_QUEUE_TOPIC_A, true, false, false);
    }

    @Bean
    public Queue rabbitmqFanoutQueueB() {
        return new Queue(RabbitMqConfig.FANOUT_EXCHANGE_QUEUE_TOPIC_B, true, false, false);
    }

    @Bean
    public FanoutExchange rabbitmqFanoutExchange() {
        return new FanoutExchange(RabbitMqConfig.FANOUT_EXCHANGE_DEMO_NAME, true, false);
    }

    @Bean
    public Binding bindFanoutA() {
        return BindingBuilder.bind(rabbitmqFanoutQueueA()).to(rabbitmqFanoutExchange());
    }

    @Bean
    public Binding bindFanoutB() {
        return BindingBuilder.bind(rabbitmqFanoutQueueB()).to(rabbitmqFanoutExchange());
    }

    //初始化rabbitAdmin对象,若已存在则无需配置
    @Bean
    public RabbitAdmin rabbitAdmin(ConnectionFactory connectionFactory) {
        RabbitAdmin rabbitAdmin = new RabbitAdmin(connectionFactory);
        rabbitAdmin.setAutoStartup(true);
        return rabbitAdmin;
    }

    //启动项目即创建交换机和队列
    @Override
    public Object postProcessAfterInitialization(Object bean, String beanName) throws BeansException {
        rabbitAdmin.declareExchange(rabbitmqFanoutExchange());
        rabbitAdmin.declareQueue(rabbitmqFanoutQueueA());
        rabbitAdmin.declareQueue(rabbitmqFanoutQueueB());
        return null;
    }

}
若在启动时显示RabbitAdmin在注入Bean时重复,则删除即可。原因是在同一个项目中,同一个Bean只能在Spring注入一次。为了显示最完整的代码,在启动项目前我把DirectRabbitConfig中配置注解注释了。
3)编写发布消息的类
package com.zxh.producterdemo.service;

import com.zxh.producterdemo.config.RabbitMqConfig;
import lombok.extern.slf4j.Slf4j;
import org.springframework.amqp.rabbit.core.RabbitTemplate;
import org.springframework.stereotype.Service;

import javax.annotation.Resource;
import java.util.Date;
import java.util.HashMap;
import java.util.Map;
import java.util.UUID;

@Service
@Slf4j
public class MessageService {


    @Resource
    private RabbitTemplate rabbitTemplate;

    /**
     * 模拟发送信息
     *
     * @param msg
     * @return
     */
    public String sendMessage1(String msg) {
        log.info("开始发送信息");
        String msgId = UUID.randomUUID().toString().replaceAll("-", "");
        String sendTime = RabbitMqConfig.SDF.format(new Date());
        Map<String, Object> map = new HashMap<>();
        map.put("msgId", msgId);
        map.put("sendTime", sendTime);
        map.put("msg", msg);
        //发送信息
        String s = sendFanoutMsg(map);
        log.info("结束发送信息");
        return s;
    }

    /**
     * 发送消息,广播消息routingKey为空即可
     *
     * @return
     */
    private String sendFanoutMsg(Map map) {
        try {
            rabbitTemplate.convertAndSend(RabbitMqConfig.FANOUT_EXCHANGE_DEMO_NAME, "", map);
            return "ok";
        } catch (Exception e) {
            e.printStackTrace();
            return "error";
        }
    }
}
无需配置routing key,设置为空即可。
4)编写controller接口
package com.zxh.producterdemo.controller;

import com.zxh.producterdemo.service.MessageService;
import org.springframework.beans.factory.annotation.Autowired;
import org.springframework.web.bind.annotation.GetMapping;
import org.springframework.web.bind.annotation.RestController;

@RestController
public class MessageController {

    @Autowired
    private MessageService messageService;

    @GetMapping("/sendMessage1")
    public String sendMessage1(String msg) {
        return messageService.sendMessage1(msg);
    }
5)在消费者中指定交换机A进行监听
package com.zxh.consumerdemo.listener;

import com.zxh.producterdemo.config.RabbitMqConfig;
import lombok.extern.slf4j.Slf4j;
import org.springframework.amqp.rabbit.annotation.Queue;
import org.springframework.amqp.rabbit.annotation.RabbitHandler;
import org.springframework.amqp.rabbit.annotation.RabbitListener;
import org.springframework.stereotype.Component;

import java.util.Map;

/**
 * RabbitMQ监听器1
 */
@Component
@RabbitListener(queuesToDeclare = @Queue(RabbitMqConfig.FANOUT_EXCHANGE_QUEUE_TOPIC_A))
@Slf4j
public class FanoutConsumerListener {

    @RabbitHandler
    public void process(Map map) {
        log.info("队列A收到客户端消息:" + map.toString());
    }
}
6)同consumer-demo,再新建一个SpringBoot项目consumer-demo2,指定交换机B进行监听,配置文件需修改端口号。当然为了演示方便,也可直接在consumer-demo中再添加一个监听器而来模拟另一个项目而不用新建项目,后续就按这样方式进行说明,实际上这两个方式没什么差别。
package com.zxh.consumerdemo2.listener;

import com.zxh.producterdemo.config.RabbitMqConfig;
import lombok.extern.slf4j.Slf4j;
import org.springframework.amqp.rabbit.annotation.Queue;
import org.springframework.amqp.rabbit.annotation.RabbitHandler;
import org.springframework.amqp.rabbit.annotation.RabbitListener;
import org.springframework.stereotype.Component;

import java.util.Map;

/**
 * RabbitMQ监听器
 */
@Component
@RabbitListener(queuesToDeclare = @Queue(RabbitMqConfig.FANOUT_EXCHANGE_QUEUE_TOPIC_B))
@Slf4j
public class FanoutConsumerListener {

    @RabbitHandler
    public void process(Map map) {
        log.info("队列B收到客户端消息:" + map.toString());
    }
}
项目启动后,发送信息
curl "http://localhost:9898/sendMessage1?msg=hhhh123"
可在consumer-demo和consumer-demo2的控制台看到日志


自此,消息广播模式已基本完成。
4.4Topic exchange
通配符交换机,也叫主题交换机。它使用以xxx开头的通配符来匹配路由到对应的队列。而通配符有两种:"*" 和"#",需要在通配符前加上"."符号及开头字符进行匹配。其中"*" 表示有且只匹配一个词(如 a.*可匹配到"a.b"、"a.c",但是匹配不了"a.b.c")。"#"表示匹配一个或多个词(如"rabbit.#"既可以匹配到"rabbit.a.b"、"rabbit.a",也可以匹配到"rabbit.a.b.c")。
看到这里是不是一脸懵逼,那来看看代码吧
1)首先在RabbitMqConfig中定义交换机和队列的名称
public class RabbitMqConfig {
   ...

    //TOPIC_EXCHANGE交换机类型的队列 A 的名称
    public static final String TOPIC_EXCHANGE_QUEUE_TOPIC_A = "topicQueueA";
    //TOPIC_EXCHANGE交换机类型的队列 B 的名称
    public static final String TOPIC_EXCHANGE_QUEUE_TOPIC_B = "topicQueueB";
    //TOPIC_EXCHANGE交换机类型的队列 C 的名称
    public static final String TOPIC_EXCHANGE_QUEUE_TOPIC_C = "topicQueueC";
    //TOPIC_EXCHANGE交换机类型的名称
    public static final String TOPIC_EXCHANGE_DEMO_NAME = "topicExchangeDemo";

}
2)配置rabbitmq队列和交换机
package com.zxh.producterdemo.config;

import org.springframework.amqp.core.Binding;
import org.springframework.amqp.core.BindingBuilder;
import org.springframework.amqp.core.TopicExchange;
import org.springframework.amqp.core.Queue;
import org.springframework.amqp.rabbit.connection.ConnectionFactory;
import org.springframework.amqp.rabbit.core.RabbitAdmin;
import org.springframework.beans.BeansException;
import org.springframework.beans.factory.config.BeanPostProcessor;
import org.springframework.context.annotation.Bean;
import org.springframework.context.annotation.Configuration;

import javax.annotation.Resource;

/**
 * RabbitMQ配置类
 */
@Configuration
public class TopicRabbitConfig implements BeanPostProcessor {

    @Resource
    private RabbitAdmin rabbitAdmin;

    @Bean
    public Queue rabbitmqTopicQueueA() {
        return new Queue(RabbitMqConfig.TOPIC_EXCHANGE_QUEUE_TOPIC_A, true, false, false);
    }

    @Bean
    public Queue rabbitmqTopicQueueB() {
        return new Queue(RabbitMqConfig.TOPIC_EXCHANGE_QUEUE_TOPIC_B, true, false, false);
    }

    @Bean
    public Queue rabbitmqTopicQueueC() {
        return new Queue(RabbitMqConfig.TOPIC_EXCHANGE_QUEUE_TOPIC_C, true, false, false);
    }

    @Bean
    public TopicExchange rabbitmqTopicExchange() {
        return new TopicExchange(RabbitMqConfig.TOPIC_EXCHANGE_DEMO_NAME, true, false);
    }

    @Bean
    public Binding bindTopicA() {
        return BindingBuilder.bind(rabbitmqTopicQueueA()).to(rabbitmqTopicExchange()).with("a.*");
    }

    @Bean
    public Binding bindTopicB() {
        return BindingBuilder.bind(rabbitmqTopicQueueB()).to(rabbitmqTopicExchange()).with("a.*");
    }

    @Bean
    public Binding bindTopicC() {
        return BindingBuilder.bind(rabbitmqTopicQueueC()).to(rabbitmqTopicExchange()).with("rabbit.#");
    }

    //初始化rabbitAdmin对象,若已存在则无需配置
    @Bean
    public RabbitAdmin rabbitAdmin(ConnectionFactory connectionFactory) {
        RabbitAdmin rabbitAdmin = new RabbitAdmin(connectionFactory);
        rabbitAdmin.setAutoStartup(true);
        return rabbitAdmin;
    }

    //启动项目即创建交换机和队列
    @Override
    public Object postProcessAfterInitialization(Object bean, String beanName) throws BeansException {
        rabbitAdmin.declareExchange(rabbitmqTopicExchange());
        rabbitAdmin.declareQueue(rabbitmqTopicQueueA());
        rabbitAdmin.declareQueue(rabbitmqTopicQueueB());
        rabbitAdmin.declareQueue(rabbitmqTopicQueueC());
        return null;
    }

}
3)编写消息发布的方法
    public String sendMessage2(String msg, String routingKey) {
        log.info("发送信息{}", routingKey);
        String msgId = UUID.randomUUID().toString().replaceAll("-", "");
        String sendTime = RabbitMqConfig.SDF.format(new Date());
        Map<String, Object> map = new HashMap<>();
        map.put("msgId", msgId);
        map.put("sendTime", sendTime);
        map.put("msg", msg);
        //发送信息
        try {
            rabbitTemplate.convertAndSend(RabbitMqConfig.TOPIC_EXCHANGE_DEMO_NAME, routingKey, map);
            return "ok";
        } catch (Exception e) {
            e.printStackTrace();
            return "error";
        }
    }
4)编写controller接口
public class MessageController {
    ...

    @GetMapping("/sendMessage2")
    public String sendMessage2(String msg, String rk) {
        return messageService.sendMessage2(msg, rk);
    }
}
5)在消费者中对交换机进行监听
这里就在consumer-demo中创建3个监听器来实现消息的接收
@Component
@RabbitListener(queuesToDeclare = @Queue(RabbitMqConfig.TOPIC_EXCHANGE_QUEUE_TOPIC_A))
@Slf4j
public class TopicConsumerListener1 {

    @RabbitHandler
    public void process(Map map) {
        log.info("队列{}收到客户端消息:{}", RabbitMqConfig.TOPIC_EXCHANGE_QUEUE_TOPIC_A, map.toString());
    }
}

-------------------------------------------------------
@Component
@RabbitListener(queuesToDeclare = @Queue(RabbitMqConfig.TOPIC_EXCHANGE_QUEUE_TOPIC_B))
@Slf4j
public class TopicConsumerListener2 {

    @RabbitHandler
    public void process(Map map) {
        log.info("队列{}收到客户端消息:{}", RabbitMqConfig.TOPIC_EXCHANGE_QUEUE_TOPIC_B, map.toString());
    }
}
-------------------------------------------------------
@Component
@RabbitListener(queuesToDeclare = @Queue(RabbitMqConfig.TOPIC_EXCHANGE_QUEUE_TOPIC_C))
@Slf4j
public class TopicConsumerListener3 {

    @RabbitHandler
    public void process(Map map) {
        log.info("队列{}收到客户端消息:{}", RabbitMqConfig.TOPIC_EXCHANGE_QUEUE_TOPIC_C, map.toString());
    }
}
项目启动后发送信息
curl "http://localhost:9898/sendMessage2?msg=99999&rk=a.456dsfhsn"
可在consumer-demo控制台看到队列a和b打印的日志。但当rk=a.656.jnfjs时就没有日志,这是因为在配置中指定了队列a和b使用通配符a.*,也就只能匹配一个词。

同理
curl "http://localhost:9898/sendMessage2?msg=99999&rk=rabbit.456dsfhsn"
可在consumer-demo控制台看到队列c打印的日志。当rk=rabbit.656.jnfjs时仍然有日志,当rk=rabbit.656.jnfjs.52888时还是有日志,这是因为配置中指定了队列c使用通配符rabbit.#,可匹配多个词。

4.5Headers exchange
它的路由不是用routingKey进行路由匹配,而是在匹配请求头中所带的键值进行路由。由于这种方式使用较少,在此不演示代码。
在创建队列时需要设置绑定的头部信息,交换机会根据生产者发送过来的头部信息携带的键值去匹配队列绑定的键值,路由到对应的队列。匹配有两种模式:全部匹配(WhereAll)和部分匹配(WhereAny)。
5.RabbitMQ防数据丢失策略
5.1概述
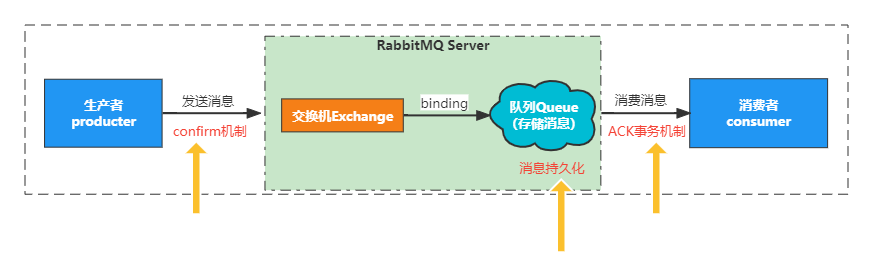
RabbitMQ作为消息队列,对于消息是如何传递的呢?一条消息从生产到消费的过程如下:

从图中可以看出,一条消息需要先由生产者发送给RabbitMQ Server,RabbitMQ Server存储在队列中(默认存储),消费者从RabbitMQ Server中消费消息(消费后从队列中移除)。
因此,在上述的三个阶段中,都会发生数据丢失:
1)生产者发送消息给RabbitMQ Server时,若RabbitMQ Server宕机
2)若RabbitMQ Server不进行消息持久化,其服务重启
3)消费者从RabbitMQ Server中消费消息时,消费者服务宕机
RabbitMQ也提供了对应的解决方式,分别为confirm机制、消息持久化、ACK事务机制,其对应关系如下:
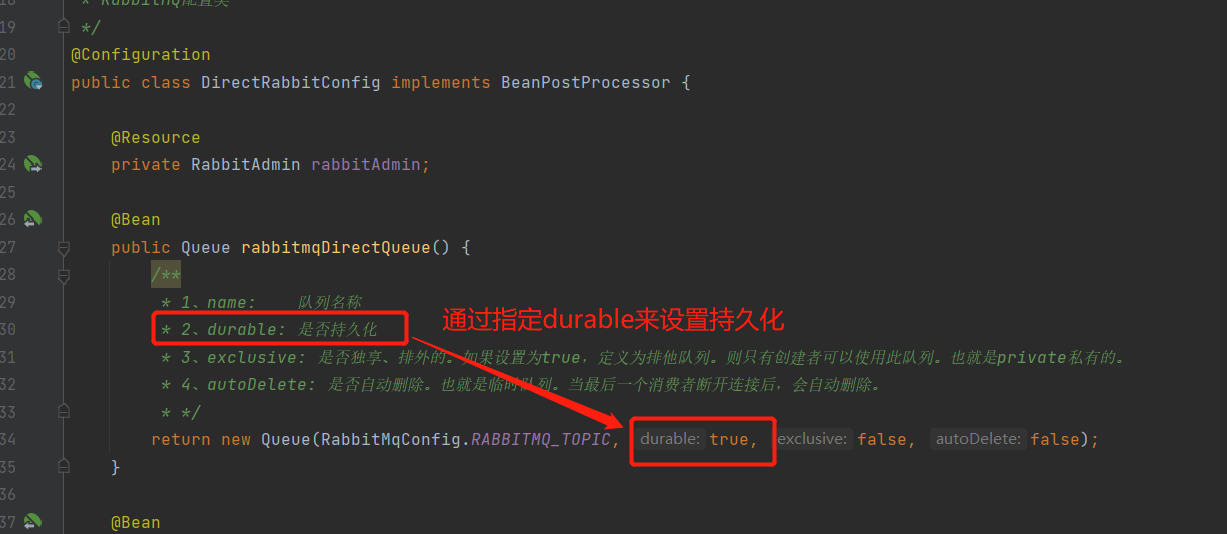
5.2消息持久化机制
是RabbitMQ默认的机制,即会把接收的消息存储下来,防止因服务重启而丢失。以DirectExchange模式进行说明,在上述的代码中,注释中已进行说明:
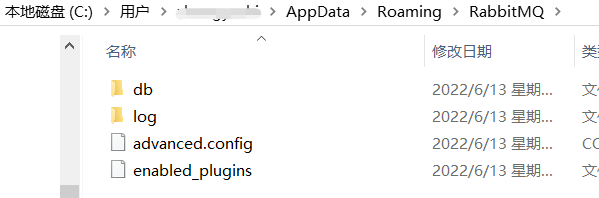
持久化的消息存在的磁盘中
5.3confirm机制
1)工作流程
confirm机制在生产者发送消息给RabbitMQ Server的过程中进行确认,其工作流程如下
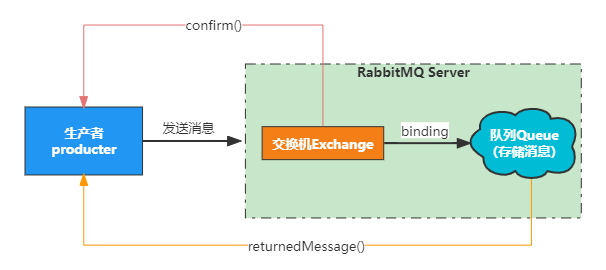
confirm:若消息能顺利到达RabbitMQ Server的交换机,则回调confirm()来通知生产者
returnedMessage:若交换机不能路由到队列,则回调returnedMessage()。这种情况很少发生,不再过多说明。
2)代码实现
默认是没有开启确认机制的,使用时需要开启并进行配置。
以TopicExchange模式进行说明。首先在配置文件中开启配置
spring:
  rabbitmq:
    ...
    # 为CORRELATED当消息投递到Exchange后,会回调confirm()方法进行通知生产者。默认为NONE
    publisher-confirm-type: correlated
    # 为true时指定消息在没有被队列接收时会通过回调returnedMessage()方法退回
    template:
      mandatory: true
定义回调方法,在回调方法中可进行日志打印或日志记录,方便问题的排查
package com.zxh.producterdemo.config;

import lombok.extern.slf4j.Slf4j;
import org.springframework.amqp.core.Message;
import org.springframework.amqp.rabbit.connection.CorrelationData;
import org.springframework.amqp.rabbit.core.RabbitTemplate;
import org.springframework.stereotype.Component;

import java.io.ByteArrayInputStream;
import java.io.ObjectInputStream;
import java.util.Map;

@Component
@Slf4j
public class RabbitmqConfirmCallback implements RabbitTemplate.ConfirmCallback, RabbitTemplate.ReturnCallback {

    /**
     * 监听消息是否到达Exchange
     *
     * @param correlationData 包含消息的唯一标识的对象
     * @param ack             true 标识 ack,false 标识 nack
     * @param cause           nack 投递失败的原因
     */
    @Override
    public void confirm(CorrelationData correlationData, boolean ack, String cause) {
        if (ack) {
            log.info("消息投递成功~消息Id:{}", correlationData.getId());
        } else {
            log.error("消息投递失败,Id:{},错误提示:{}", correlationData.getId(), cause);
        }
    }

    @Override
    public void returnedMessage(Message message, int replyCode, String replyText, String exchange, String routingKey) {
        log.warn("消息没有路由到队列,返回消息如下:");
        Map map = byteToObject(message.getBody(), Map.class);
        log.info("message body: {}", map == null ? "" : map.toString());
        log.info("replyCode: {}", replyCode);
        log.info("replyText: {}", replyText);
        log.info("exchange: {}", exchange);
        log.info("routingKey: {}", exchange);
        log.info("------------> end <------------");
    }

    //字节数组转对象
    @SuppressWarnings("unchecked")
    private <T> T byteToObject(byte[] bytes, Class<T> clazz) {
        T t;
        try (ByteArrayInputStream bis = new ByteArrayInputStream(bytes);
             ObjectInputStream ois = new ObjectInputStream(bis)) {
            t = (T) ois.readObject();
        } catch (Exception e) {
            e.printStackTrace();
            return null;
        }
        return t;
    }
}
配置回调方法
public class TopicRabbitConfig implements BeanPostProcessor {

    ....

    /**
     * 设置返回回调和确认回调
     *
     * @param connectionFactory
     * @return
     */
    @Bean
    public RabbitTemplate rabbitTemplate(ConnectionFactory connectionFactory, RabbitmqConfirmCallback rabbitmqConfirmCallback) {
        RabbitTemplate rabbitTemplate = new RabbitTemplate();
        rabbitTemplate.setConnectionFactory(connectionFactory);
        rabbitTemplate.setConfirmCallback(rabbitmqConfirmCallback);
        rabbitTemplate.setReturnCallback(rabbitmqConfirmCallback);
        rabbitTemplate.setMandatory(true);
        return rabbitTemplate;
    }

}
修改发送信息的方法,添加一个参数。若不添加此参数,则在上述confirm方法中国日志打印出会抛出空指针异常
    public String sendMessage2(String msg, String routingKey) {
        log.info("发送信息{}", routingKey);
        String msgId = UUID.randomUUID().toString().replaceAll("-", "");
        String sendTime = RabbitMqConfig.SDF.format(new Date());
        Map<String, Object> map = new HashMap<>();
        map.put("msgId", msgId);
        map.put("sendTime", sendTime);
        map.put("msg", msg);
        //发送信息
        try {
            rabbitTemplate.convertAndSend(RabbitMqConfig.TOPIC_EXCHANGE_DEMO_NAME, routingKey, map, new CorrelationData(msgId));
            return "ok";
        } catch (Exception e) {
            e.printStackTrace();
            return "error";
        }
发送信息正确的路由匹配,可看到控制台消息发送成功,没有匹配失败的日志
curl "http://localhost:9898/sendMessage2?msg=99999&rk=a.456dsfhsn"

发送信息,不正确的路由匹配,可看到控制台消息虽然发送成功,但匹配失败
curl "http://localhost:9898/sendMessage2?msg=99999&rk=a.456dsfhsn.2"

5.4ACK事务机制
ack事务机制即在消费者服务中,将自动接收消息改为手动接收。正常消费则返回确认签收,如果出现异常,则返回拒绝签收重回队列。
6.死信队列
6.1概述
为了保证消息数据不丢失,一般采用RabbitMQ的死信队列机制,当消息消费发生异常时,将消息投入死信队列中进行后续处理。那么死信队列是什么呢?其英文是“Dead Letter”,是RabbitMQ中的一种消息机制,在消费消息时若队列里的消息出现以下情况时,那么该消息将成为“死信”:
- 消息被否定确认,使用
channel.basicNack或channel.basicReject,并且此时requeue属性被设置为false - 消息在队列的存活时间超过设置的TTL时间(生存时间)
- 消息队列的消息数量已经超过最大队列长度
“死信”消息会被RabbitMQ进行特殊处理,如果配置了死信队列,那么该消息将会被丢进死信队列中,如果没有配置,则该消息将会被丢弃。死信队列也是一种普通的队列,只是绑定在死信交换机上而已。死信交换机也不是什么特殊的交换机,只不过是用来接受死信的交换机而已。根据标准,每个业务队列都会配置一个死信队列。也就是说,应为每个需要死信队列的业务队列配置一个单独的死信交换机,但同一个项目可共用一个死信交换机,只要每个业务队列分配单独的路由key即可。
6.2前期准备
若是首次使用RabbitMQ,则默认不会安装delayed_message_exchange插件,此插件就是死信队列所需要的插件,通过在界面看是否已安装此插件:
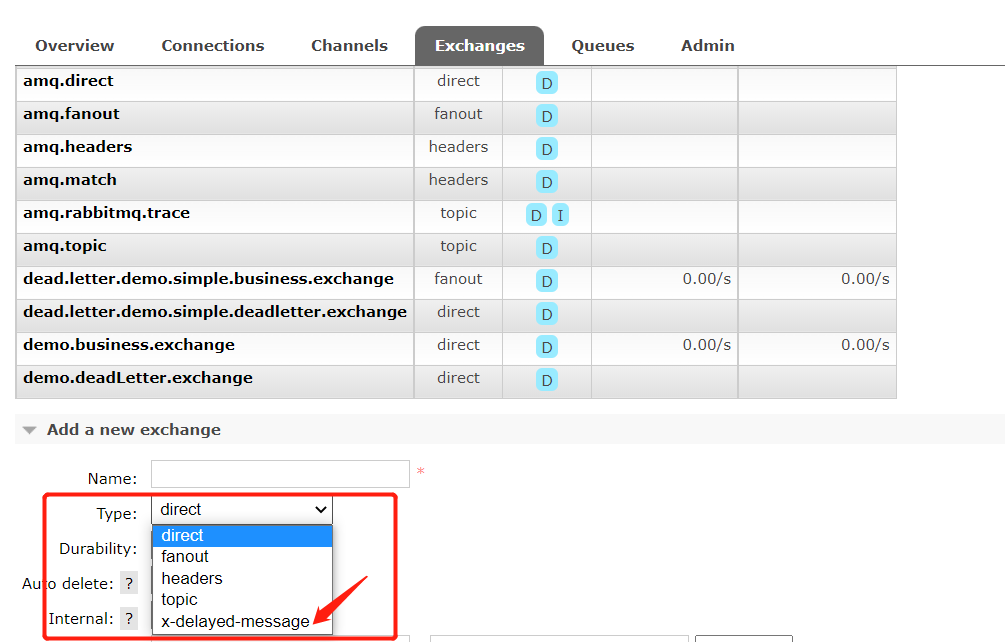
在type的下拉列表中查看,若无x-delayed-message就表示未安装,若已有则表示已安装。
安装方式如下:
1)下载最新版插件,地址:https://github.com/rabbitmq/rabbitmq-delayed-message-exchange/releases

官网提供的地址是https://www.rabbitmq.com/community-plugins.html,通过此地址也可跳转到上述下载页面。
2)将其复制到RabbitMQ的安装目录的plugins目录下
3)在RabbitMQ的安装目录的sbin目录下执行命令
rabbitmq-plugins enable rabbitmq_delayed_message_exchange
4)重启RabbitMQ服务
先关闭:rabbitmqctl stop
再重启:rabbitmq-server
即可安装完成。
6.3配置死信队列
配置死信队列很简单,将死信交换机和路由key与业务队列进行绑定,然后把死信队列与死信交换机进行绑定即可。这里将使用direct模式在上述基础上进行说明(在使用前,其他配置类需注释掉)
1)首先在RabbitMqConfig中定义交换机和队列等信息
    //业务队列
    public static final String BUSINESS_QUEUE_TOPIC = "demo.queue.topic";
    public static final String BUSINESS_EXCHANGE_NAME = "demo.business.exchange";
    public static final String BUSINESS_ROUTING_KEY = "demo.business.routingKey";
    //死信队列
    public static final String DEAD_LETTER_QUEUE_TOPIC = "demo.deadLetter.topic";
    public static final String DEAD_LETTER_EXCHANGE_NAME = "demo.deadLetter.exchange";
    public static final String DEAD_LETTER_ROUTING_KEY = "demo.deadLetter.routingKey";
2)配置业务队列和业务交换机以及死信队列和死信交换机
package com.zxh.producterdemo.config;

import com.zxh.config.RabbitMqConfig;
import org.springframework.amqp.core.*;
import org.springframework.amqp.rabbit.connection.ConnectionFactory;
import org.springframework.amqp.rabbit.core.RabbitAdmin;
import org.springframework.beans.BeansException;
import org.springframework.beans.factory.annotation.Qualifier;
import org.springframework.beans.factory.config.BeanPostProcessor;
import org.springframework.context.annotation.Bean;
import org.springframework.context.annotation.Configuration;

import javax.annotation.Resource;
import java.util.HashMap;
import java.util.Map;

@Configuration
public class RabbitConfigure implements BeanPostProcessor {

    @Resource
    private RabbitAdmin rabbitAdmin;

    // 声明业务队列
    @Bean("businessQueue")
    public Queue businessQueue() {
        Map<String, Object> args = new HashMap<>(2);
        //声明当前队列绑定的死信交换机
        args.put("x-dead-letter-exchange", RabbitMqConfig.DEAD_LETTER_EXCHANGE_NAME);
        //声明当前队列的死信路由key
        args.put("x-dead-letter-routing-key", RabbitMqConfig.DEAD_LETTER_ROUTING_KEY);
        return QueueBuilder.durable(RabbitMqConfig.BUSINESS_QUEUE_TOPIC).withArguments(args).build();
    }

    // 声明业务交换机
    @Bean("businessExchange")
    public DirectExchange businessExchange() {
        return new DirectExchange(RabbitMqConfig.BUSINESS_EXCHANGE_NAME);
    }

    // 声明业务队列绑定关系
    @Bean
    public Binding businessBindingA(@Qualifier("businessQueue") Queue queue,
                                    @Qualifier("businessExchange") DirectExchange exchange) {
        return BindingBuilder.bind(queue).to(exchange).with(RabbitMqConfig.BUSINESS_ROUTING_KEY);
    }


    // 声明死信队列
    @Bean("deadLetterQueue")
    public Queue deadLetterQueue() {
        return new Queue(RabbitMqConfig.DEAD_LETTER_QUEUE_TOPIC, true, false, false);
    }

    // 声明死信交换机
    @Bean("deadLetterExchange")
    public DirectExchange deadLetterExchange() {
        return new DirectExchange(RabbitMqConfig.DEAD_LETTER_EXCHANGE_NAME);
    }

    // 声明死信队列绑定关系
    @Bean
    public Binding deadLetterBindingA(@Qualifier("deadLetterQueue") Queue queue,
                                      @Qualifier("deadLetterExchange") DirectExchange exchange) {
        return BindingBuilder.bind(queue).to(exchange).with(RabbitMqConfig.DEAD_LETTER_ROUTING_KEY);
    }


    //初始化rabbitAdmin对象
    @Bean
    public RabbitAdmin rabbitAdmin(ConnectionFactory connectionFactory) {
        RabbitAdmin rabbitAdmin = new RabbitAdmin(connectionFactory);
        // 只有设置为 true,spring 才会加载 RabbitAdmin 这个类
        rabbitAdmin.setAutoStartup(true);
        return rabbitAdmin;
    }

    //实例化bean后,在启动生产者时会自动创建交换机和队列,不用等到发送消息才创建
    @Override
    public Object postProcessAfterInitialization(Object bean, String beanName) throws BeansException {
        //创建交换机
        rabbitAdmin.declareExchange(businessExchange());
        rabbitAdmin.declareExchange(deadLetterExchange());
        //创建队列
        rabbitAdmin.declareQueue(businessQueue());
        rabbitAdmin.declareQueue(deadLetterQueue());
        return null;
    }
}
同时配置了业务队列和死信队列,并给业务队列绑定了死信交换机和路由key。需要注意的是,这里配置了在启动时就创建队列和交换机,那么在消费者端服务可正常启动。若不配置,则需先发送一条消息,才能启动消费者端服务,否则会报错

3)编写消息发布的方法
    public void sendMessage0(String msg) {
        rabbitTemplate.convertSendAndReceive(RabbitMqConfig.BUSINESS_EXCHANGE_NAME, RabbitMqConfig.BUSINESS_ROUTING_KEY, msg);
    }
4)编写controller接口
public class MessageController {

    ...

    @GetMapping("/sendMessage0")
    public void sendMessage0(String msg) {
        messageService.sendMessage0(msg);
    }
}
5)在消费者端配置手动确认消息
spring:
  rabbitmq:
    ...

    listener:
      #容器类型,simple或direct
      type: simple
      simple:
        #被拒绝的消息是否重新入队 默认是true
        default-requeue-rejected: false
        #消息确认方式 手动
        acknowledge-mode: manual
采用手动方式确认消息,被拒绝的消息不再重新入队,而是进入死信队列
6)在消费者中对队列进行监听
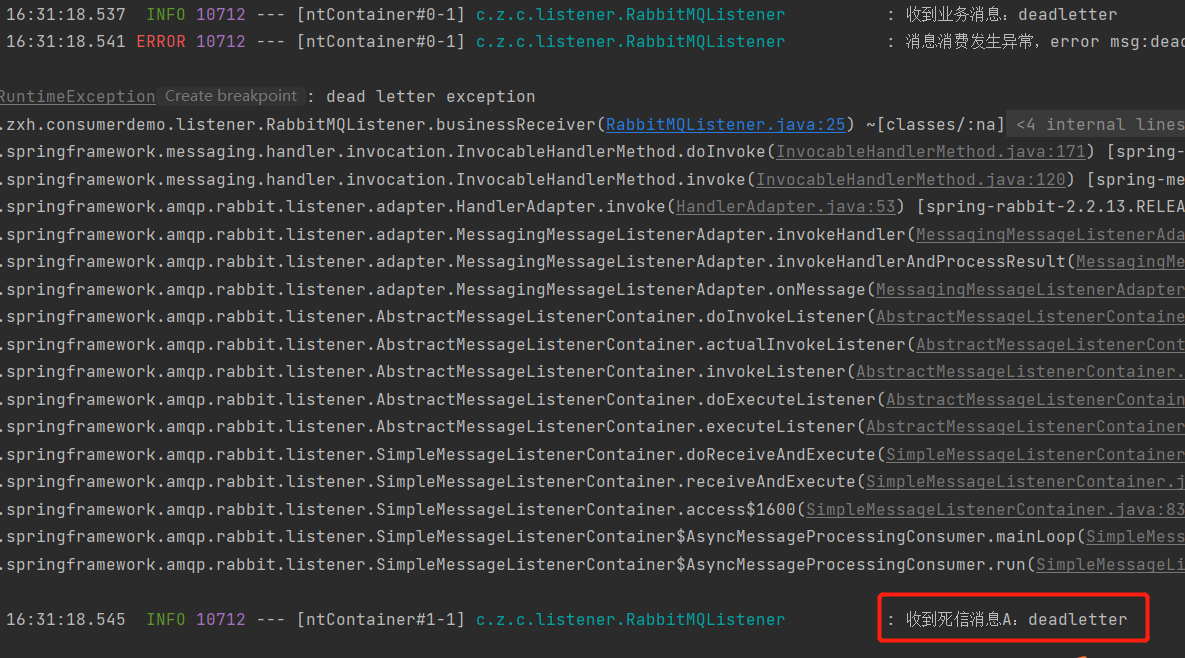
package com.zxh.consumerdemo.listener;

import com.rabbitmq.client.Channel;
import com.zxh.config.RabbitMqConfig;
import lombok.extern.slf4j.Slf4j;
import org.springframework.amqp.core.Message;
import org.springframework.amqp.rabbit.annotation.Queue;
import org.springframework.amqp.rabbit.annotation.RabbitListener;
import org.springframework.stereotype.Component;

import java.io.IOException;

@Component
@Slf4j
public class RabbitMQListener {

    @RabbitListener(queuesToDeclare = @Queue(RabbitMqConfig.BUSINESS_QUEUE_TOPIC))
    public void businessReceiver(Message message, Channel channel) throws IOException {
        String msg = new String(message.getBody());
        log.info("收到业务消息:{}", msg);
        boolean ack = true;
        Exception exception = null;
        try {
            //根据消息内容模拟发生异常
            if (msg.contains("deadletter")) {
                throw new RuntimeException("dead letter exception");
            }
        } catch (Exception e) {
            ack = false;
            exception = e;
        }
        if (!ack) {
            log.error("消息消费发生异常,error msg:{}", exception.getMessage(), exception);
            //拒绝消息,会自动将发生异常的消息放入死信队列
            channel.basicNack(message.getMessageProperties().getDeliveryTag(), false, false);
        } else {
            //正常消息则直接消费
            channel.basicAck(message.getMessageProperties().getDeliveryTag(), false);
        }
    }

    @RabbitListener(queuesToDeclare = @Queue(RabbitMqConfig.DEAD_LETTER_QUEUE_TOPIC))
    public void deadLetterReceiver(Message message, Channel channel) throws IOException {
        log.info("收到死信消息:" + new String(message.getBody()));
        channel.basicAck(message.getMessageProperties().getDeliveryTag(), false);
    }

}
这里模拟了异常,当出现异常时就拒绝消息再入队,同时监听业务队列和死信队列,当被手动拒绝时,消息就进入死信队列。
7)测试
项目启动后先发送正常信息
curl "http://localhost:9898/sendMessage0?msg=msg3232"
可在consumer-demo控制台看到业务队列打印的日志

然后发送模拟异常的信息
curl "http://localhost:9898/sendMessage0?msg=deadletter"
可在consumer-demo控制台看到业务队列和死信队列打印的日志
上述只简单模拟异常说明两年死信队列的用法,但在实际使用过程中并非如此简单,后续会进一步优化处理。
7.延时队列
7.1概述
延时队列也是一种普通的队列,但消息是按照先进先出,后进后出的顺序进入和出去的。另外延时队列包含延时属性,时间属性可以在队列上,也可以在消息上,主要用来存放需要在指定时间内被消费的消息。与普通队列不同的是,普通队列总中的消息是按照越快被消息为主,而延时队列是根据时间属性,在某一特定的时间去处理消息。
其应用场景有很多,举例如下:
1)订单在30分钟内未支付则自动取消
2)花呗在还款日的前一天进行消息提醒
3)预定的会议,提前10分钟通知参会人员
7.2RabbitMQ之TTL
TTL(Time To Live),是RabbitMQ中一个消息或者队列的属性,表示这一个消息或队列中国所有消息的最大存活时间(单位毫秒)。
7.3使用TTL+DLX配置延时队列
DLX即为Dead Letter Exchange。
7.3.1给队列设置TTL
这里定义了两个业务队列(a和b)、两个死信队列(a和b) ,业务队列共用一个交换机,死信队列共用一个交换机;业务队列a和死信队列a绑定,业务队列b和死信队列b绑定。消费者端只监听死信队列,为了模拟消息不被按时消费,故无需监听业务队列,具体流程如下图:

1)首先在RabbitMqConfig中定义交换机和队列等信息
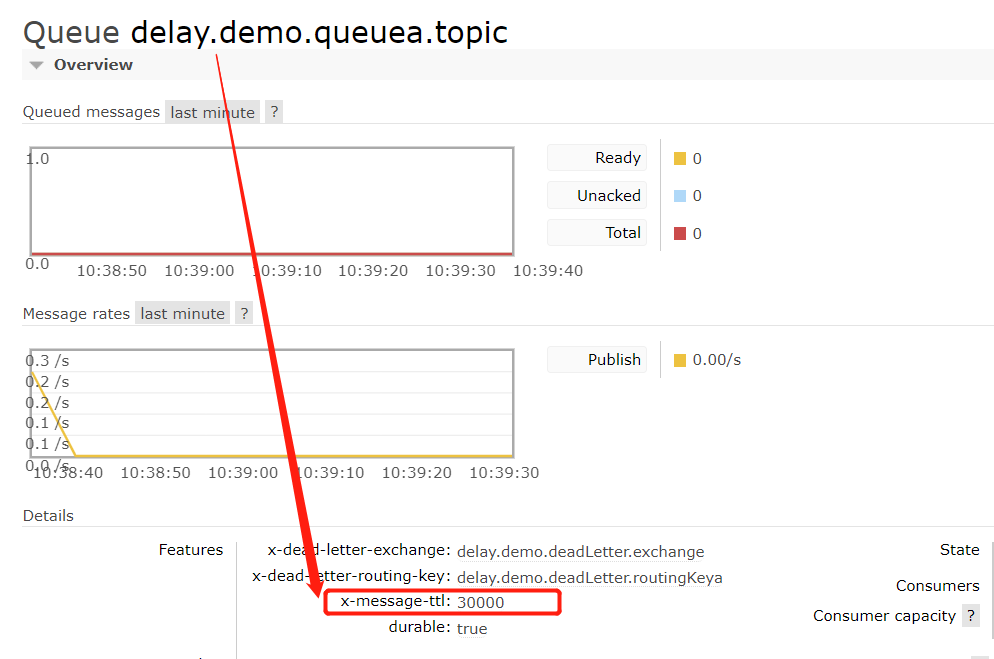
 //业务队列(延时)
    public static final String DELAY_BUSINESS_EXCHANGE_NAME = "delay.demo.business.exchange";
    public static final String DELAY_BUSINESS_QUEUEA_TOPIC = "delay.demo.queuea.topic";
    public static final String DELAY_BUSINESS_QUEUEB_TOPIC = "delay.demo.queueb.topic";
    public static final String DELAY_BUSINESSA_ROUTING_KEY = "delay.demo.businessa.routingKey";
    public static final String DELAY_BUSINESSB_ROUTING_KEY = "delay.demo.businessb.routingKey";
    //死信队列(延时)
    public static final String DELAY_DEAD_LETTER_EXCHANGE_NAME = "delay.demo.deadLetter.exchange";
    public static final String DELAY_DEAD_LETTER_QUEUEA_TOPIC = "delay.demo.deadLettera.topic";
    public static final String DELAY_DEAD_LETTER_QUEUEB_TOPIC = "delay.demo.deadLetterb.topic";
    public static final String DELAY_DEAD_LETTER_ROUTING_KEYA = "delay.demo.deadLetter.routingKeya";
    public static final String DELAY_DEAD_LETTER_ROUTING_KEYB = "delay.demo.deadLetter.routingKeyb";
2)配置业务队列和业务交换机以及死信队列和死信交换机
package com.zxh.producterdemo.config;

import com.zxh.config.RabbitMqConfig;
import org.springframework.amqp.core.*;
import org.springframework.amqp.rabbit.connection.ConnectionFactory;
import org.springframework.amqp.rabbit.core.RabbitAdmin;
import org.springframework.beans.BeansException;
import org.springframework.beans.factory.config.BeanPostProcessor;
import org.springframework.context.annotation.Bean;
import org.springframework.context.annotation.Configuration;

import javax.annotation.Resource;
import java.util.HashMap;
import java.util.Map;

@Configuration
public class RabbitMQDelayConfig implements BeanPostProcessor {

    @Resource
    private RabbitAdmin rabbitAdmin;

    // 声明业务交换机
    @Bean
    public DirectExchange delayBusinessExchange() {
        return new DirectExchange(RabbitMqConfig.DELAY_BUSINESS_EXCHANGE_NAME);
    }

    // 声明死信交换机
    @Beanpublic DirectExchange delayDeadLetterExchange() {
        return new DirectExchange(RabbitMqConfig.DELAY_DEAD_LETTER_EXCHANGE_NAME);
    }

    // 声明业务队列A 进行延时并绑定到死信交换机
    @Bean
    public Queue delayBusinessQueueA() {
        Map<String, Object> args = new HashMap<>(3);
        //声明当前队列绑定的死信交换机
        args.put("x-dead-letter-exchange", RabbitMqConfig.DELAY_DEAD_LETTER_EXCHANGE_NAME);
        //声明当前队列的死信路由key
        args.put("x-dead-letter-routing-key", RabbitMqConfig.DELAY_DEAD_LETTER_ROUTING_KEYA);
        // 声明队列的TTL 单位ms
        args.put("x-message-ttl", 30000);
        return QueueBuilder.durable(RabbitMqConfig.DELAY_BUSINESS_QUEUEA_TOPIC).withArguments(args).build();
    }

    // 声明业务队列B 进行延时并绑定到死信交换机
    @Bean
    public Queue delayBusinessQueueB() {
        Map<String, Object> args = new HashMap<>(3);
        //声明当前队列绑定的死信交换机
        args.put("x-dead-letter-exchange", RabbitMqConfig.DELAY_DEAD_LETTER_EXCHANGE_NAME);
        //声明当前队列的死信路由key
        args.put("x-dead-letter-routing-key", RabbitMqConfig.DELAY_DEAD_LETTER_ROUTING_KEYB);
        // 声明队列的TTL 单位ms
        args.put("x-message-ttl", 70000);
        return QueueBuilder.durable(RabbitMqConfig.DELAY_BUSINESS_QUEUEB_TOPIC).withArguments(args).build();
    }

    // 声明死信队列A 接收业务队列A处理的消息
    @Bean
    public Queue delayDeadLetterQueueA() {
        return new Queue(RabbitMqConfig.DELAY_DEAD_LETTER_QUEUEA_TOPIC, true, false, false);
    }

    // 声明死信队列B 接收业务队列B处理的消息
    @Bean
    public Queue delayDeadLetterQueueB() {
        return new Queue(RabbitMqConfig.DELAY_DEAD_LETTER_QUEUEB_TOPIC, true, false, false);
    }

    @Bean
    public Binding delayBusinessBindingA() {
        return BindingBuilder.bind(delayBusinessQueueA()).to(delayBusinessExchange()).with(RabbitMqConfig.DELAY_BUSINESSA_ROUTING_KEY);
    }

    @Bean
    public Binding delayBusinessBindingB() {
        return BindingBuilder.bind(delayBusinessQueueB()).to(delayBusinessExchange()).with(RabbitMqConfig.DELAY_BUSINESSB_ROUTING_KEY);
    }


    @Bean
    public Binding delayDeadLetterBindingA() {
        return BindingBuilder.bind(delayDeadLetterQueueA()).to(delayDeadLetterExchange()).with(RabbitMqConfig.DELAY_DEAD_LETTER_ROUTING_KEYA);
    }

    @Bean
    public Binding delayDeadLetterBindingB() {
        return BindingBuilder.bind(delayDeadLetterQueueB()).to(delayDeadLetterExchange()).with(RabbitMqConfig.DELAY_DEAD_LETTER_ROUTING_KEYB);
    }


    //初始化rabbitAdmin对象
    @Bean
    public RabbitAdmin rabbitAdmin(ConnectionFactory connectionFactory) {
        RabbitAdmin rabbitAdmin = new RabbitAdmin(connectionFactory);
        // 只有设置为 true,spring 才会加载 RabbitAdmin 这个类
        rabbitAdmin.setAutoStartup(true);
        return rabbitAdmin;
    }

    //实例化bean后,在启动生产者时会自动创建交换机和队列,不用等到发送消息才创建
    @Override
    public Object postProcessAfterInitialization(Object bean, String beanName) throws BeansException {
        //创建交换机
        rabbitAdmin.declareExchange(delayBusinessExchange());
        rabbitAdmin.declareExchange(delayDeadLetterExchange());
        //创建队列
        rabbitAdmin.declareQueue(delayBusinessQueueA());
        rabbitAdmin.declareQueue(delayBusinessQueueB());
        rabbitAdmin.declareQueue(delayDeadLetterQueueA());
        rabbitAdmin.declareQueue(delayDeadLetterQueueB());
        return null;
    }
}
通过参数 "x-message-ttl" 给每个需要延时的队列设置了生存时间.
3)编写消息发布的方法
分别对两个不同TTL的队列发送消息
    public void sendMessage3(Integer type, String msg) {
        log.info("发送消息:type {},msg:{}", type, msg);
        switch (type) {
            case 1:
                rabbitTemplate.convertSendAndReceive(RabbitMqConfig.DELAY_BUSINESS_EXCHANGE_NAME, RabbitMqConfig.DELAY_BUSINESSA_ROUTING_KEY, msg);
                break;
            case 2:
                rabbitTemplate.convertSendAndReceive(RabbitMqConfig.DELAY_BUSINESS_EXCHANGE_NAME, RabbitMqConfig.DELAY_BUSINESSB_ROUTING_KEY, msg);
                break;
        }
    }
4)编写controller接口
    @GetMapping("/sendMessage3")
    public void sendMessage3(Integer type, String msg) {
        messageService.sendMessage3(type, msg);
    }
5)在消费者中对死信队列进行监听
当队列中的消息未在指定时间内被消费则会进行死信队列,在实际场景中可对死信队列中的消息进行处理。
package com.zxh.consumerdemo.listener;

import com.rabbitmq.client.Channel;
import com.zxh.config.RabbitMqConfig;
import lombok.extern.slf4j.Slf4j;
import org.springframework.amqp.core.Message;
import org.springframework.amqp.rabbit.annotation.Queue;
import org.springframework.amqp.rabbit.annotation.RabbitListener;
import org.springframework.stereotype.Component;

import java.io.IOException;

@Component
@Slf4j
public class DelayMessageReceiver {

    @RabbitListener(queuesToDeclare = @Queue(RabbitMqConfig.DELAY_DEAD_LETTER_QUEUEA_TOPIC))
    public void DeadLetterReceiverA(Message message, Channel channel) throws IOException {
        log.info("收到死信队列A消息:{}", new String(message.getBody()));
        channel.basicAck(message.getMessageProperties().getDeliveryTag(), false);
    }

    @RabbitListener(queuesToDeclare = @Queue(RabbitMqConfig.DELAY_DEAD_LETTER_QUEUEB_TOPIC))
    public void DeadLetterReceiverB(Message message, Channel channel) throws IOException {
        log.info("收到死信队列B消息:{}", new String(message.getBody()));
        channel.basicAck(message.getMessageProperties().getDeliveryTag(), false);
    }
}
6)启动项目后,可在界面看到业务队列有ttl属性
7)发送两条消息
curl "http://localhost:9898/sendMessage3?type=1&msg=123"
curl "http://localhost:9898/sendMessage3?type=2&msg=12388"
发送消息的日志如下

观察consumer-demo控制台,消息发送后分别在30S后和70S后看到死信队列打印的日志

从上述内容可看出,TTL不同的时候,都需定义不同的队列,显然是非常麻烦的。那如果给消息设置TTL效果会如何呢?
7.3.2给消息设置TTL
1)首先在RabbitMqConfig中队列等信息
交换机仍然使用上述延时定义的交换机
    public static final String DELAY_BUSINESS_QUEUEC_TOPIC = "delay.demo.queuec.topic";
    public static final String DELAY_BUSINESSC_ROUTING_KEY = "delay.demo.businessc.routingKey";
    public static final String DELAY_DEAD_LETTER_QUEUEC_TOPIC = "delay.demo.deadLetterc.topic";
    public static final String DELAY_DEAD_LETTER_ROUTING_KEYC = "delay.demo.deadLetter.routingKeyc";
2)配置业务队列和业务交换机以及死信队列和死信交换机
package com.zxh.producterdemo.config;

import com.zxh.config.RabbitMqConfig;
import org.springframework.amqp.core.*;
import org.springframework.amqp.rabbit.connection.ConnectionFactory;
import org.springframework.amqp.rabbit.core.RabbitAdmin;
import org.springframework.beans.BeansException;
import org.springframework.beans.factory.config.BeanPostProcessor;
import org.springframework.context.annotation.Bean;
import org.springframework.context.annotation.Configuration;

import javax.annotation.Resource;
import java.util.HashMap;
import java.util.Map;

@Configuration
public class RabbitMQDelayConfig2 implements BeanPostProcessor {

    @Resource
    private RabbitAdmin rabbitAdmin;

    // 声明业务交换机
    @Bean
    public DirectExchange delayBusinessExchange() {
        return new DirectExchange(RabbitMqConfig.DELAY_BUSINESS_EXCHANGE_NAME);
    }

    // 声明死信交换机
    @Bean
    public DirectExchange delayDeadLetterExchange() {
        return new DirectExchange(RabbitMqConfig.DELAY_DEAD_LETTER_EXCHANGE_NAME);
    }

    // 声明业务队列C
    @Bean
    public Queue delayBusinessQueueC() {
        Map<String, Object> args = new HashMap<>(2);
        args.put("x-dead-letter-exchange", RabbitMqConfig.DELAY_DEAD_LETTER_EXCHANGE_NAME);
        args.put("x-dead-letter-routing-key", RabbitMqConfig.DELAY_DEAD_LETTER_ROUTING_KEYC);
        return QueueBuilder.durable(RabbitMqConfig.DELAY_BUSINESS_QUEUEC_TOPIC).withArguments(args).build();
    }

    // 声明死信队列C 接收业务队列C处理的消息
    @Bean
    public Queue delayDeadLetterQueueC() {
        return new Queue(RabbitMqConfig.DELAY_DEAD_LETTER_QUEUEC_TOPIC, true, false, false);
    }

    @Bean
    public Binding delayBusinessBindingC() {
        return BindingBuilder.bind(delayBusinessQueueC()).to(delayBusinessExchange()).with(RabbitMqConfig.DELAY_BUSINESSC_ROUTING_KEY);
    }

    @Bean
    public Binding delayDeadLetterBindingC() {
        return BindingBuilder.bind(delayDeadLetterQueueC()).to(delayDeadLetterExchange()).with(RabbitMqConfig.DELAY_DEAD_LETTER_ROUTING_KEYC);
    }

    @Bean
    public RabbitAdmin rabbitAdmin(ConnectionFactory connectionFactory) {
        RabbitAdmin rabbitAdmin = new RabbitAdmin(connectionFactory);
        rabbitAdmin.setAutoStartup(true);
        return rabbitAdmin;
    }

    @Override
    public Object postProcessAfterInitialization(Object bean, String beanName) throws BeansException {
        rabbitAdmin.declareExchange(delayBusinessExchange());
        rabbitAdmin.declareExchange(delayDeadLetterExchange());
        rabbitAdmin.declareQueue(delayBusinessQueueC());
        rabbitAdmin.declareQueue(delayDeadLetterQueueC());
        return null;
    }
}
3)编写消息发布的方法
这里设置了消息的过期时间
    public void sendMessage4(Integer time, String msg) {
        log.info("发送消息:time {},msg:{}", time, msg);
        //通过Lambda表达式设置消息的过期时间,单位是ms
        rabbitTemplate.convertAndSend(RabbitMqConfig.DELAY_BUSINESS_EXCHANGE_NAME, RabbitMqConfig.DELAY_BUSINESSC_ROUTING_KEY, msg,
                (messagePostProcessor) -> {
                    messagePostProcessor.getMessageProperties().setExpiration(time.toString());
                    return messagePostProcessor;
                }
        );
    }
为每条消息指定存活时间,单位是毫秒。
4)编写controller接口
    @GetMapping("/sendMessage4")
    public void sendMessage4(Integer time, String msg) {
        messageService.sendMessage4(time, msg);
    }
5)在消费者中对死信队列进行监听
    @RabbitListener(queuesToDeclare = @Queue(RabbitMqConfig.DELAY_DEAD_LETTER_QUEUEC_TOPIC))
    public void DeadLetterReceiverC(Message message, Channel channel) throws IOException {
        log.info("收到死信队列C消息:{}", new String(message.getBody()));
        channel.basicAck(message.getMessageProperties().getDeliveryTag(), false);
    }
6)发送两条消息
curl "http://localhost:9898/sendMessage4?time=30000&msg=12388545"
curl "http://localhost:9898/sendMessage4?time=3000&msg=123999"
发送消息的日志如下

观察consumer-demo控制台,消息发送后在30S后看到死信队列打印的日志

先发了一个延时30s的消息,然后发了一个延时3s的消息,但据日志结果显示,第二个消息会在等第一个消息成为死信后才会“死亡“。也就是说给消息设置TTL属性后,即使当前消息已过期,也需等待前面过期的消息消费后才能消费此消息。也就意味着即使消息已经过期也不一定立即被消费。既然通过这种方式给消息设置TTL不太实用,那么是否有其他方式呢?
7.4使用插件配置延时队列
对于消息设置TTL属性,使用官方提供的延时插件可很好的处理上述过期消息不能立即消费问题。此方法无需使用死信队列,更为简单。
7.4.1下载插件
需要使用的插件是 rabbitmq_delayed_message_exchange,若未安装则参考上述死队列章节中插件的安装步骤。
7.4.2给消息设置TTL
1)首先在RabbitMqConfig中队列和交换机等信息
    public static final String DELAY_BUSINESSD_EXCHANGE_NAME = "delay.demo.businessd.exchange";
    public static final String DELAY_BUSINESS_QUEUED_TOPIC = "delay.demo.queued.topic";
    public static final String DELAY_BUSINESSD_ROUTING_KEY = "delay.demo.businessd.routingKey";
2)配置业务队列和业务交换机
package com.zxh.producterdemo.config;

import com.zxh.config.RabbitMqConfig;
import org.springframework.amqp.core.*;
import org.springframework.amqp.rabbit.connection.ConnectionFactory;
import org.springframework.amqp.rabbit.core.RabbitAdmin;
import org.springframework.beans.BeansException;
import org.springframework.beans.factory.config.BeanPostProcessor;
import org.springframework.context.annotation.Bean;
import org.springframework.context.annotation.Configuration;

import javax.annotation.Resource;
import java.util.HashMap;
import java.util.Map;

@Configuration
public class RabbitMQDelayConfig3 implements BeanPostProcessor {

    @Resource
    private RabbitAdmin rabbitAdmin;

    // 声明业务交换机
    @Bean
    public CustomExchange delayBusinessExchangeD() {
        Map<String, Object> args = new HashMap<>(1);
        args.put("x-delayed-type", "direct");//声明延时队列类型
        //x-delayed-message 指定类型,是延时消息
        return new CustomExchange(RabbitMqConfig.DELAY_BUSINESSD_EXCHANGE_NAME,"x-delayed-message", true, false, args);
    }

    // 声明业务队列D
    @Bean
    public Queue delayBusinessQueueD() {
        return new Queue(RabbitMqConfig.DELAY_BUSINESS_QUEUED_TOPIC);
    }

    @Bean
    public Binding delayBusinessBindingD() {
        return BindingBuilder.bind(delayBusinessQueueD()).to(delayBusinessExchangeD()).with(RabbitMqConfig.DELAY_BUSINESSD_ROUTING_KEY).noargs();
    }

    @Bean
    public RabbitAdmin rabbitAdmin(ConnectionFactory connectionFactory) {
        RabbitAdmin rabbitAdmin = new RabbitAdmin(connectionFactory);
        rabbitAdmin.setAutoStartup(true);
        return rabbitAdmin;
    }

    @Override
    public Object postProcessAfterInitialization(Object bean, String beanName) throws BeansException {
        rabbitAdmin.declareExchange(delayBusinessExchangeD());
        rabbitAdmin.declareQueue(delayBusinessQueueD());
        return null;
    }
}
这里使用的交换机是CustomExchange,它不是一种固定的类型,主要用来配合插件一起使用。
3)编写消息发布的方法
这里设置了消息的延时时间
    public void sendMessage5(Integer time, String msg) {
        log.info("发送消息:time {},msg:{}", time, msg);
        //通过Lambda表达式设置消息的延时时间,单位是ms
        rabbitTemplate.convertAndSend(RabbitMqConfig.DELAY_BUSINESSD_EXCHANGE_NAME, RabbitMqConfig.DELAY_BUSINESSD_ROUTING_KEY, msg,
                (messagePostProcessor) -> {
                    messagePostProcessor.getMessageProperties().setDelay(time);
                    return messagePostProcessor;
                }
        );
    }
controller接口都是大同小异的,在此略。
4)在消费者中对死信队列进行监听
5)发送两条消息
curl "http://localhost:9898/sendMessage5?time=30000&msg=12388545"
curl "http://localhost:9898/sendMessage5?time=3000&msg=123999"
发送消息的日志如下

观察consumer-demo控制台,消息发送后在30S后看到死信队列打印的日志
![]()
先发了一个延时30s的消息,然后发了一个延时3s的消息,但据日志结果显示,第二个消息先消费,然后第一个消息再消费。也就是说,先过期的消息不能等前面还未过期的消息消费后再消费,而是过期后立即消息,无需等待。至此,也就达到了过期立即被消费的效果。
7.5使用场景简述
1)订单30分钟未支付则自动取消
在下单时,不仅需要订单信息存入数据库,而且需要将订单关键信息(如主键ID)和过期时间(30分钟)发送到RabbitMQ,采用延时插件的方式控制消息的过期时间。在消费者端,监听订单消息,过期的订单根据其ID和订单状态(未支付)更新数据库即可。注意,必须加订单状态条件进行更新,不能直接根据ID更新,原因是订单可能已支付或已手动取消。

 浙公网安备 33010602011771号