

TabLayout的高级使用
前言
前面介绍了TabLayout的基本属性和基本的使用方法。我是传送门。
真实的业务场景中,很多的效果,原生的TabLayout,并不支持。例如下滑线短于文字的效果,底部导航栏效果,标签文字选中是需要加粗效果等等。
所以我们需要使用TabLayout的自定义tab标签。
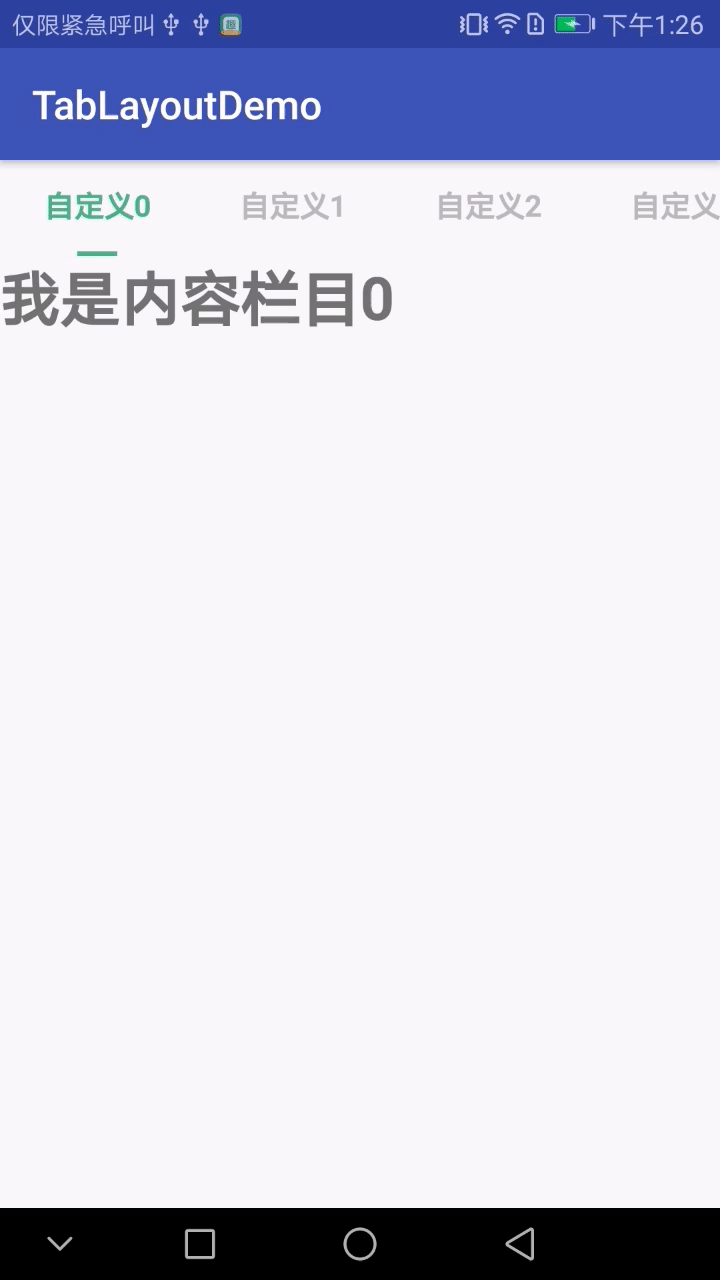
先上图。
先为急用的朋友上代码,后面做讲解
java类
import android.content.Context;
import android.os.Bundle;
import android.support.design.widget.TabLayout;
import android.support.v4.app.Fragment;
import android.support.v4.app.FragmentManager;
import android.support.v4.app.FragmentPagerAdapter;
import android.support.v4.view.ViewPager;
import android.support.v7.app.AppCompatActivity;
import android.view.LayoutInflater;
import android.view.View;
import android.widget.CheckBox;

import java.util.ArrayList;
import java.util.List;

import butterknife.BindView;
import butterknife.ButterKnife;

public class MainActivity extends AppCompatActivity {
    @BindView(R.id.vp_all)
    ViewPager vpAll;
    @BindView(R.id.tab_custom)
    TabLayout tabCustom;

    //存放自定义tab标签的列表
    List<View> customTabList = new ArrayList<>();
    //存放对应tab标签的fragment页面
    List<PageFragment> fgList = new ArrayList<>();
    //选中的自定义标签,标记器。默认选中第一个。标记位是0;
    int indicator = 0;

    ViewPagerAdapter pagerAdapter;

    @Override
    protected void onCreate(Bundle savedInstanceState) {
        super.onCreate(savedInstanceState);
        setContentView(R.layout.activity_main);
        ButterKnife.bind(this);//此处是用的是butterKnife框架,等同于findviewbyid获取各个控件。
        initTabCustomAndViewPager();
        initListener();
    }

    /**
     * 初始化tab标签和viewpager内容。
     */
    private void initTabCustomAndViewPager() {
        //初始化10个自定义tab标签
        for (int i = 0; i < 10; i++) {
            final View tabView = getCustomTabView(this, "自定义" + i);
            customTabList.add(tabView);
            if (i==0){
                //设置默认第一个选中效果
                ((CheckBox) tabView.findViewById(R.id.cb_name)).setChecked(true);
                tabView.findViewById(R.id.cb_slide).setVisibility(View.VISIBLE);
            }
            tabCustom.addTab(tabCustom.newTab().setCustomView(tabView));
        }
        //初始化10个fragment页面
        for (int i = 0; i < 10; i++) {
            fgList.add(PageFragment.newInstance("我是内容栏目" + i));
        }
        pagerAdapter = new ViewPagerAdapter(getSupportFragmentManager(), fgList);
        vpAll.setAdapter(pagerAdapter);
    }

    /**
     * 将viewpager和tabLayout之间的滑动事件和点击事件关联起来。
     * 此处不能使用tabLayout的setupWithViewPager()方法,否则会造成自定义view失效
     */
    private void initListener() {
        //添加关联接口,此处不能用自带的绑定方法,否则自定义view会失效
        vpAll.addOnPageChangeListener(new ViewPager.OnPageChangeListener() {
            @Override
            public void onPageScrolled(int i, float v, int i1) {
            }

            @Override
            public void onPageSelected(int i) {
                tabCustom.getTabAt(i).select();
            }

            @Override
            public void onPageScrollStateChanged(int i) {
            }
        });
        tabCustom.addOnTabSelectedListener(new TabLayout.OnTabSelectedListener() {
            @Override
            public void onTabSelected(TabLayout.Tab tab) {
                //viewpager联动
                vpAll.setCurrentItem(tab.getPosition());
                //将之前选中的tab标签,设置为未选中状态
                View oldView = customTabList.get(indicator);
                CheckBox oldCbName = (CheckBox) oldView.findViewById(R.id.cb_name);
                View oldCbSlide = oldView.findViewById(R.id.cb_slide);
                oldCbName.setChecked(false);
                oldCbSlide.setVisibility(View.INVISIBLE);
                //当前选中的tab标签,设置为选中状态。
                indicator = tab.getPosition();
                View newView = customTabList.get(indicator);
                CheckBox newCbName = (CheckBox) newView.findViewById(R.id.cb_name);
                View newCbSlide = newView.findViewById(R.id.cb_slide);
                newCbName.setChecked(true);
                newCbSlide.setVisibility(View.VISIBLE);
            }

            @Override
            public void onTabUnselected(TabLayout.Tab tab) {
            }

            @Override
            public void onTabReselected(TabLayout.Tab tab) {
            }
        });

    }

    /**
     * ViewPager的适配器。
     */
    class ViewPagerAdapter extends FragmentPagerAdapter {

        List<PageFragment> fragmentList;

        public ViewPagerAdapter(FragmentManager fm, List<PageFragment> fragmentList) {
            super(fm);
            this.fragmentList = fragmentList;
        }

        @Override
        public Fragment getItem(int position) {
            return fragmentList.get(position);
        }

        @Override
        public int getCount() {
            return fragmentList.size();
        }
    }

    /**
     * 获取自定义Tab标签的显示的内容
     *
     * @param context
     * @param
     * @return
     */
    public static View getCustomTabView(Context context, String text) {
        View view = LayoutInflater.from(context).inflate(R.layout.item_custom_tab, null);
        CheckBox tabText = (CheckBox) view.findViewById(R.id.cb_name);
        tabText.setText(text);
        return view;
    }
}
pageFragment的代码和布局就不贴了。不想写的朋友可以看上一篇:我是传送门
布局文件
activity_main的布局文件
<?xml version="1.0" encoding="utf-8"?>
<LinearLayout xmlns:android="http://schemas.android.com/apk/res/android"
    xmlns:app="http://schemas.android.com/apk/res-auto"
    xmlns:tools="http://schemas.android.com/tools"
    android:layout_width="match_parent"
    android:layout_height="match_parent"
    android:orientation="vertical"
    tools:context="com.example.administrator.tablayoutdemo.MainActivity">
    <android.support.design.widget.TabLayout
        android:id="@+id/tab_custom"
        android:layout_width="match_parent"
        android:layout_height="wrap_content"
        app:tabIndicatorHeight="0dp"
        app:tabMode="scrollable"
        />

    <android.support.v4.view.ViewPager
        android:id="@+id/vp_all"
        android:layout_width="match_parent"
        android:layout_height="match_parent" />

</LinearLayout>
自定义tab标签的布局文件:
<?xml version="1.0" encoding="utf-8"?>
<LinearLayout xmlns:android="http://schemas.android.com/apk/res/android"
    android:layout_width="wrap_content"
    android:layout_height="wrap_content"
    android:paddingLeft="10dp"
    android:paddingRight="10dp"
    android:orientation="vertical"
    android:gravity="center"
    android:descendantFocusability="blocksDescendants">
    <CheckBox
        android:id="@+id/cb_name"
        android:layout_width="wrap_content"
        android:layout_height="wrap_content"
        android:button="@null"
        android:text=""
        android:textColor="@drawable/select_text_color"
        android:textSize="15sp"
        android:paddingTop="13dp"
        android:ellipsize="end"
        android:singleLine="true"
        android:maxEms="5"
        android:textStyle="bold"
        android:paddingBottom="13dp"
        android:clickable="false"
        />
    <View
        android:id="@+id/cb_slide"
        android:layout_width="20dp"
        android:layout_height="3dp"
        android:visibility="invisible"
        android:background="#ff4fbf86"/>

</LinearLayout>
色值文件select_text_color,放在drawable目录下
<?xml version="1.0" encoding="utf-8"?>
<selector xmlns:android="http://schemas.android.com/apk/res/android">
    <item android:color="#ff4fbf86" android:state_checked="true"/>
    <item android:color="#BBBBBB" android:state_checked="false" />
</selector>
讲解:
OK上完代码,针对关键点在做一次说明
1、标签在初始化的过程中,需要对第一个tab标签提前进行选中状态的初始化,否则可能会造成第一次启动的时候,第一个标签没有出现选中状态。
2、viewpager和TabLayout标签进行联动的时候,不可以使用TabLayout的setupWithViewPager()方法,而是要通过ViewPager的addOnPageChangeListener()和Tablayout的addOnTabSelectedListener()方法进行两个控件之间的联动效果。否则会造成自定义的CustomeTab被TabLayout默认生成的标签覆盖掉。
3、在布局文件中,需要将TabLayout的tabIndicatorHeight设为0。用来屏蔽掉控件自动生成的下滑线。
通过自定义的Tab标签可以完全实现自己控制tab标签的内容,这里就不展示tab标签做为底部导航栏的效果了。原理都是一样的。
